
11 Proven Solutions to Fix Google Play Store Not Working Issue on Infinix Smart 8 Plus | Dr.fone
11 Proven Solutions to Fix Google Play Store Not Working Issue on Infinix Smart 8 Plus
Google Play Store is a necessary and bundled service of any Android device. This app is required to download or even run any apps. So, getting an error like Play store not working or Play Store crashing is very unfortunate and a matter of a headache. Here we tried to put the best solution to overcome this issue. Keep reading this article for all the 11 best solutions.
Part 1. The recommended method to fix Google Play Store issues
If you search on the internet, you may find various tricks dealing with Google Play Store not working issue. However, either to try each of them or choose several to follow would certainly cost a lot of time. What’s more, we are not sure whether they will really work. Therefore, we would recommend you with a more effective and fast way, that is to use Dr.Fone - System Repair (Android) , a dedicated Android repair tool to fix Google Play Store, not working issues just in one click.
Dr.Fone - System Repair (Android)
A most effective method to fix Google Play Store not working
- Fix all Android system issues like the black screen of death, won’t turn on, system UI not working, etc.
- Industry’s 1st tool for one-click Android repair.
- Supports all the new Infinix Smart 8 Plus devices like Galaxy S8, S9, etc.
- Step-by-step instructions provided. No technicals skills required.
3981454 people have downloaded it
Brief steps to guide you through the process of fixing Google Play Store not working (followed by video tutorial):
- Get this tool downloaded on your computer. Install and launch it, and you can find the following welcome screen displayed.

- Select the option “System Repair”. In the new interface, click on the “Android Repair” tab.

- Start fixing Google Play Store not working by clicking “Start”. Select and confirm the correct model details as instructed.

- Activate the Download mode from your Infinix Smart 8 Plus.

- After entering the Download mode, the Dr.Fone tool starts to download the correct firmware to your Android.

- The downloaded firmware will be loaded and flashed to your Infinix Smart 8 Plus to fix the Google Play Store not working issue.

- Wait until the Android repair process is complete. Start your Android and Google Play Store, you can then find that the Google Play Store not working issue no longer exists.

Video tutorial to fix Google Play Store not working
Part 2: Other 10 common methods to fix Google Play Store issues
1. Fix Date and Time settings
Sometimes Google creates a problem connecting with the Play Store or Play store crashing due to the wrong date and time. The first and most common thing is you have to check if the date and time are updated or not. If not, update it first by following the below step by step guide.
Step 1 – First, go to the “Settings” of your device. Find ‘Date and time’ and tap on it.

Step 2 – Now you can see several options. Select “Automatic date and time”. This should override the wrong date and time your device have. Else, deselect the tick beside that option and select the date and time manually.
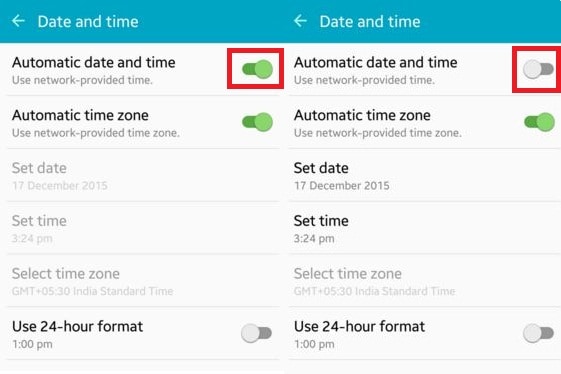
Step 3 – Now, go to the Play store and try to connect again. This should be working without any problem now.
2. Cleaning of Cache data of Play Store
This may happen that sometimes Google Play Store stopped working due to excessive unnecessary data stored in the cache of the Infinix Smart 8 Plus device. So, clearing unnecessary data is very important to keep the application run smoothly. To do this, you need to follow the below steps.
Step 1 – Firstly, go to “Settings” on your device.
Step 2 – Now, navigate to the “Apps” option available at the settings menu.
Step 3 – Here you can find the “Google Play Store” app listed. Open it by tapping.
Step 4 – Now, you can find a screen like below. Tap on “Clear cache” to remove all the cache from the application.
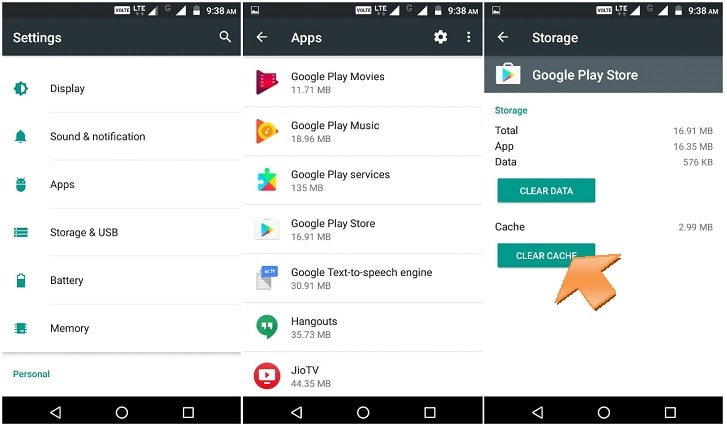
Now, again try to open Google Play Store and you may successfully overcome the Play Store not working issue. If not, check the next solution.
3. Reset Play store by Clear data
If the above solution is not working for you, you might try this option instead. This step will erase all the app data, settings, etc so that it can be set up a fresh one. This will also fix the Google Play store not working issue. For this solution, use the following method step by step.
Step 1 – Like the previous method, head towards the settings and then find “Apps”
Step 2 – Now find “Google Play Store” and open it.
Step 3 – Now, instead of tapping “Clear cache”, tap on “Clear data”. This will erase all the data and settings from the Google Play store.
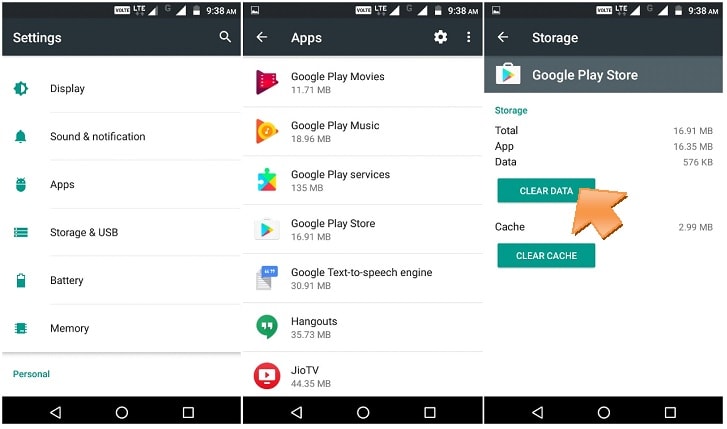
After this, open “Google Play Store” and now your problem might be solved now.
4. Reconnecting the Google account
Sometimes it may happen that removing and reconnecting your Google account may solve the Play Store not working issue. To do this, you need to follow the instructions below.
Step 1 – Go to the “Settings” and then find “Accounts”.
Step 2 – Upon opening the option, select “Google”. Now you can see your Gmail ID listed there. Tap on it.

Step 3 – Now click on the top right side three dots or “more” option. Here you can find the “Remove account” option. Select it to remove the Google Account from your Mobile.
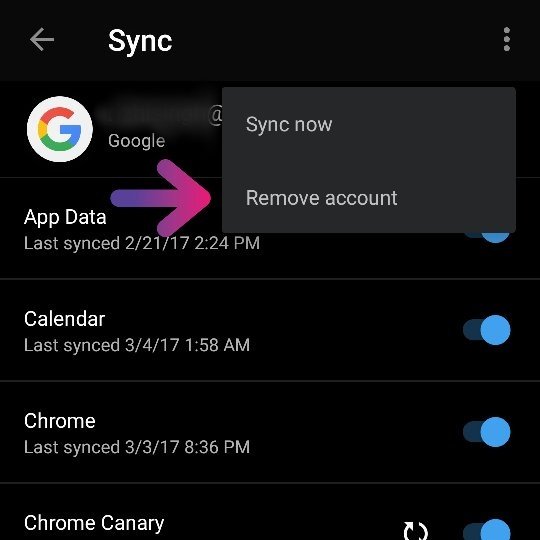
Now, go back and try to open Google Play Store again. This should work now and enter your Google ID and password again to continue. If it’s still not working, move to the next solution.
5. Reinstall the latest version of Google Play Store
Google Play store can’t be uninstalled completed completely from your Infinix Smart 8 Plus. But disabling and reinstalling its latest version can resolve the Play Store crashing issue. For doing this, just follow the below guide.
Step 1 – First of all, go to “Settings” and then move on to “Security”. Then find “Device administration” here.
Step 2 – Upon clicking on this option, you can find “Android device manager”. Uncheck this and disable.

Step 3 – Now you can be able to uninstall Google play service by going into application manager.

Step 4 – After that, try to open any app that requires Google Play store to open, and that will automatically guide you to install the Google Play service. Now install the updated version of the Google Play service.
After installing, your problem might be solved by now. If not, try the next solution.
6. Clear Google Service Framework Cache
Besides the Google Play store, this is important to keep healthy the Google Service Framework as well. The cache and unnecessary data should be removed from there also. Follow the steps below.
Step 1 – Go to settings and then tap on “Application Manager”
Step 2 – Here you can find “Google Service Framework”. Open it.
Step 3 – Now, tap on “Clear cache”. And you are done.

Now go back and try to open Google Play store again. This might solve the Google Play Store has stopped the problem by now. If not, check the next solution.
7. Disable the VPN
The VPN is a service to get all the media outside your geographic location. This is also used to install a country-specific app in another country. But sometimes it can create a problem with Play Store crashing. So, this is recommended to try disabling the VPN.
Step 1 – Go to the settings of your device.
Step 2 – Under the “networks”, click on “More”.
Step 3 – Here you can find “VPN”. Tap on it and turn it off.
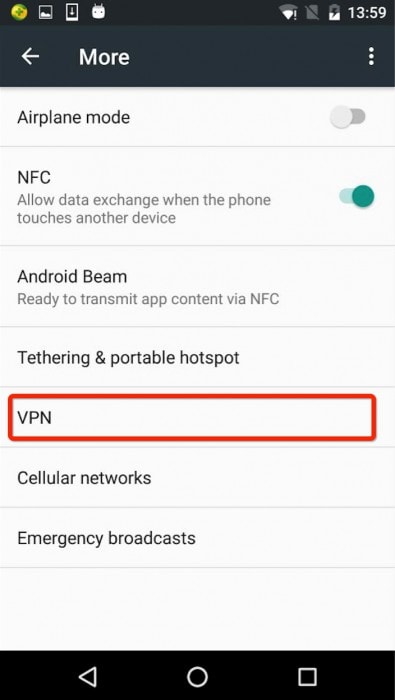
Now, again go back and try to open the Google Play Store. This may solve your problem now. If not, check the next solution.
8. Force stop Google Play Service
Google Play Store needs to be restart just like your PC. This is a really helpful and common trick to overcome the Play Store crashing issue on your Infinix Smart 8 Plus. To do this, follow the below steps.
Step 1- Go to settings and then go to the “Application Manager”.
Step 2 – Now find “Google Play Store” and click on it.
Step 3 – Here click on “Force Stop”. This allows the Google Play Store to stop.

Now, try to open Google Play store again and this time the service is being restarted and might work properly. If not, try the next solution.
9. Try a Soft Reset of your device
This easy to use solution will remove all the unnecessary temporary files of your device, close all recent apps, and make it clean. This is just rebooting your device. It won’t delete any data from your device.
Step 1 – Long press the “Power” button on your device.
Step 2 – Now, click on ‘Reboot’ or ‘Restart’ option. Your device will restart in some time.

After restarting, try to open the Google Play Store again and this time you should succeed. If any case, it’s not opening, try the last (but not the least) method by hard reset your Android.
10. Hard reset your device
If you have done with all of the above solutions and still Play Store crashing, and you are aggressive to get it, then only try this method. Using this method will delete all the data of your device. So take a backup of the whole. Follow the step by step instruction below.
Step 1 – Go to setting and find “backup and reset” there.
Step 2 – Click on it. And then Click on the “Factory data reset” option.
Step 3 – Now confirm your action and tap on the “Reset device”.

This will take a while to reset your device completely. After completion, start the Google Play Store and set up as a new device.
The above methods are the best 11 among all the solutions you can get for your Play Store not working on wifi or Play Store crashing error. Try one by one and you might get rid of this problem.
Spotify Keeps Crashing: A Complete List of Fixes You Can Use on Infinix Smart 8 Plus

Does your Spotify keep crashing? You’re not alone. This problem is widespread and can happen to anyone. Fortunately, there are ways to rectify it quickly and easily. We’ve prepared a guide to fixing your Spotify crashing problem.
In our guide, you’ll find out why your Spotify keeps crashing. Moreover, you’ll get a list of fixes for your Spotify closing problem and detailed instructions. Once you’ve read our guide, you’ll successfully solve the problem of Spotify crashing on Android.
Part 1. Why Spotify Keeps Crashing

Some people have encountered a problem with their Spotify accounts. Spotify can sometimes keep crashing and closing due to several reasons. For example, it can happen due to your phone not being compatible with the app. This can happen if your operating system isn’t updated to the newest version.
Another reason the Spotify app keeps crashing could be an antivirus or a VPN blocking Spotify from working. Moreover, your device might be out of storage space, causing your phone to slow down and crash apps.
Several other reasons for this problem include network issues, a weak Wi-Fi signal, or the battery saving mode. Furthermore, your apps and files might be corrupted, or an app on your phone might block Spotify from working correctly.
Part 2. Spotify Keeps Crashing: Best Fixes
As you can see, there are numerous reasons for your Spotify crashing. Fortunately, all of them are easy fixes, and there’s no need to worry. We’ve prepared a list of 11 ways to fix your Spotify. With these fixes and detailed instructions, you’ll be able to eliminate your Spotify problem with ease.
1. Fix the Spotify Closing Issue by Repairing Your System
The reason for your Spotify crashing may be more significant than just a bug. Your device system might be behind it. If that’s the case, you might need to repair your system before trying to fix Spotify.
If you want to repair your mobile device’s system quickly and efficiently, try Wondershare Dr.Fone.
Wondershare Dr.Fone is an app that gives you complete control over your phone. You can manage it, back it up, recover files, and repair your system. The system repair option will fix your Android in just a few clicks and allow you to use Spotify freely. The steps go as follows:
- Step 1: Install and open Wondershare Dr.Fone on your computer and connect your Android.
- Step 2: Go to the Toolbox section and select System Repair.
- Step 3: Choose the Android

- Step 4: See which Android errors Wondershare Dr.Fone can fix and click Start.
- Step 5: Select the **Brand,**Name, Model, Country, and Carrier In the Carrier section, choose OPEN if your device is unlocked.
- Step 6: Tick the “I agree with the warning, and I am ready to proceed”checkbox and click Next.
- Step 7: Put your Android in Download Mode. You can find the steps below these instructions.
- Step 8: The program will automatically download once you put the phone in Download Mode.
- Step 9: Once the firmware downloads, click Fix Nowto install it on your Android.

- Step 10: Type “000000” in the dialog box and click Confirm.

- Step 11: That will start the system reparation, which you can follow on the screen.
- Step 12: Once it finishes, click Doneto complete the system repair.
There are two ways to enter Download Mode: one for Android devices with the Home button and another for those without it.
The steps for entering Download Mode on an Android phone with the Home button are as follows:
- Step 1: Turn off your phone.
- Step 2: Press and hold the Volume Down,Home, and Power buttons simultaneously.
- Step 3: Press the Volume Upbutton to enter Download Mode.
The steps for entering Download Mode on Android devices without the Home button are as follows:

- Step 1: Turn off your phone.
- Step 2: Press and hold the Volume Down, Bixby, andPower buttons simultaneously.
- Step 3: Press the Volume Upbutton to enter Download Mode.
2. Force-Close the App
You can force-close Spotify and open it again to make it work properly. That is an easy fix if your Spotify has developed a bug. If that is the case, follow the next steps:
- Step 1: Try opening Spotify.
- Step 2: If it’s not working, open App Switcher or Recent Apps. Different Android devices open it differently. Thus, you can swipe up from your Home screen, or if you have three buttons at the bottom, press Recent Apps.

- Step 3: Find Spotify in Recent Appsand click X or swipe up over it to force-close it.
- Step 4: Try opening Spotify again.
3. Re-Login to Your Spotify
The Spotify app may be working fine. Maybe you’re having problems with your Spotify account. If so, you can try logging out and logging in again to see if that works. That isn’t a big problem; sometimes Spotify accounts start bugging. You can re-login to your Spotify account by following these steps:
- Step 1: Open Spotify.
- Step 2: Tap Settingsin the upper right corner.

- Step 3: Scroll to the bottom of the settings and tap Log Out.

- Step 4: Tap Log In.

- Step 5: Enter your login credentials.
- Step 6: Tap Loginagain, and you’re in.

4. Restart Your Device
Another way to stop Spotify from crashing can be restarting your Android. The steps may vary slightly depending on the Infinix Smart 8 Plus device, but they’re mostly the same. Follow these steps to restart your device:
- Step 1: Press and hold the Power button(you must press and hold both the Power and Volume Up buttons on a newer Android device).
- Step 2: Tap Restart. That will restart your Android, and you can try opening Spotify again.

5. Set Up Your Time and Date
Another possible reason for your Spotify closing problem could be the incorrect time and date on your Android. That is also an easy fix; you must set it correctly and try opening the app again. Set up your time and date with these steps:
- Step 1: Open Settingson your Android.
- Step 2: Go to Systemor General Management (depending on your Android model).
- Step 3: Go to Date and Time.
- Step 4: Tap Set Dateand set the correct date.

- Step 5: Go to Set Timeand set the right time.

6. Update Your System Software
Your Spotify app might keep crashing because your system is outdated. Try updating it to the latest version to try and fix the crashing problem. The steps for the Android system update are as follows:
- Step 1: Open Settings.

- Step 2: Go to System or About Phone.

- Step 3: Select System Update.
- Step 4: If there’s an available update, tap

7. Update Your App
If your system is updated, then Spotify might need an update. The app might malfunction if you’re using an older version. Thus, updating the app might solve the Spotify crashing problem. You can update Spotify by following these steps:
- Step 1: Go to the Play Store.

- Step 2: Search and open Spotify in the Play Store.
- Step 3: Tap Update

8. Free up Storage
Spotify can start crashing if your Android’s storage space is at capacity. That can also cause other apps to crash, not only Spotify. Therefore, check the storage space and free up as much as possible. Follow these steps:
- Step 1: Open
- Step 2: Go to Device Maintenance > Storageor go directly to Storage.

- Step 3: Here, you can see how much of your storage space is available and what’s taking up the most space.

- Step 4: Then, you can go ahead and clear as much space as you can.
9. Reinstall Spotify
There’s another solution if the Spotify app keeps crashing. You can try uninstalling and reinstalling it again on your Android. That will reset the app and might solve your problem. Follow the next steps to reinstall Spotify:
- Step 1: Find the Spotify app on your Android.
- Step 2: Hold the app icon.
- Step 3: Then, press Uninstall.

- Step 4: Press OK.
- Step 5: Then, open the PlayStore and find Spotify.
- Step 6: Tap Installto reinstall the app again.

- Step 7: Once it installs, log in to test if it’s working.
10. Check if Spotify Is Down
If your Spotify keeps crashing and closing, it might not be your device’s problem. Sometimes, Spotify’s server can be down, and many people face the same issue. If that’s the case, you can check with your friends if their Spotify is working or check online if Spotify is down. To do that, follow these steps:
- Step 1: Open your web browser.
- Step 2: Type “Is Spotify down” in the search bar.

- Step 3: You’ll see several websites that check real-time app servers and if they’re down.

- Step 4: Go to one or two and see what they say. If Spotify is down, you’ll need to wait for them to fix the problem.
11. Clear the Cache
When using different apps and websites, your device caches data from those sources. Since there’s no need to pile up your Spotify cache, you can clear it. Follow these steps:
- Step 1: Open Settings.

- Step 2: Go to Apps.
- Step 3: Find Spotify and tap it.

- Step 4: Tap Storageor Storage usage.

- Step 5: Tap Clear Cache.

 safe & secure
Conclusion
If your Spotify app keeps crashing, several reasons might be behind it. For instance, your storage space might be at capacity, your system might need an update, your phone might have a software bug, or the Spotify server might be down.
We’ve given you 11 solutions to fix the Spotify crashing problem. However, if your system needs repairing, you can try Wondershare Dr.Fone for quick and easy repair. This solution and all others will surely help you fix the crashing problem.
Why Is My Infinix Smart 8 Plus Offline? Troubleshooting Guide
Ever had your Infinix Smart 8 Plus claim it’s offline, leaving you scratching your head about where it went wrong? We get it; it’s confusing. That’s why this article is here to untangle the mystery.
In the following sections, we’re diving into the “why is My Infinix Smart 8 Plus offline” dilemma that many Android users face. We’ll break down the possible reasons behind this common issue and guide you through simple steps on how to fix it. By the end of the article, you’ll be able to get back to smooth internet surfing on your Infinix Smart 8 Plus. Let’s get started.
Part 1: Why Does My Infinix Smart 8 Plus Say Offline?
When you encounter the “offline” error message, it can disrupt your usual smartphone activities. Suddenly, you find yourself unable to browse the internet, send or receive emails, or stay connected through instant messages.
It’s a frustrating scenario, but let’s break down the potential reasons why your phone might be displaying this offline status:
- Enabling Airplane mode
Why is My Infinix Smart 8 Plus showing offline? Well, one common culprit behind the “offline” message is the accidental activation of Airplane Mode on your Infinix Smart 8 Plus. When Airplane Mode is enabled, it disconnects your phone from all wireless networks, rendering it unable to connect to the internet or cellular networks.
- Internet connection issues
Fluctuations in your signal strength or unexpected data loss can also be the culprit behind the “Why is My Infinix Smart 8 Plus offline?” problem. Android devices rely on stable internet connections, and disruptions, whether temporary or prolonged, can lead to this error.
- Glitches or bugs
Sometimes, glitches or bugs in Google apps installed on your Infinix Smart 8 Plus can mislead it into thinking it’s offline. Google Play Services or other related applications may encounter issues, causing the phone to display an “offline” message.
- Firewall restrictions
In some cases, a firewall on your Infinix Smart 8 Plus might be overly restrictive, preventing the Infinix Smart 8 Plus device from establishing a connection to the internet. This security measure, intended to protect your device, can sometimes go overboard and disrupt normal online functionality.
Now, you have understood the potential causes as the first step toward resolving the issue. Next, we’ll guide you through the process of troubleshooting and getting your Infinix Smart 8 Plus back online.

Part 2: How To Fix “Phone Offline” With Internet Connection Problem
Now that we’ve figured out why your phone says it’s offline, let’s tackle the issue head-on. If you’re facing problems like downloads that won’t start, Google Play stuck on “Loading…,” or web pages refusing to load, chances are it’s an internet connection issue causing the problem.
Here are some easy solutions to get your connection back.
Solution 1: Change connection to mobile data
Switching to mobile data can be a quick fix if your Wi-Fi is acting up. It ensures a change in your connection source and might resolve the “Phone offline” issue. Follow these easy steps to change your connection to mobile data:
- Step 1: Swipe down from the top of your screen to access the Quick Settings menu.
- Step 2: Tap the Wi-Fi icon to turn off the Wi-Fi connection.
- Step 3: Tap Mobile Data to turn it on.

Solution 2: On and off Airplane mode
Airplane Mode can sometimes cause connectivity confusion. Turning it off and on essentially resets your phone’s wireless connections, which might resolve the offline issue.
How to on and off Airplane mode on Android:
- Step 1: Swipe down from the top of your screen to access the Quick Settings menu.
- Step 2: Look for the Airplane Mode icon and tap the icon to turn on Airplane Mode.
- Step 3: Wait a few seconds, then tap it again to turn off the Airplane Mode. Now, check if your phone is now online.

Solution 3: Reset network settings
Resetting network settings can help eliminate any configuration glitches that might be causing the phone offline problem. It’s like giving your phone’s connection settings a fresh start.
To reset your network settings, the steps may differ depending on the phone model you are using. However, you can generally do so by looking for the “Network” settings.
- Step 1: Open your phone’s Settings > Connection & sharing.
- Step 2: Find and select “Reset Wi-Fi, mobile networks, and Bluetooth.”
- Step 3: Tap “Reset Settings” and confirm the action and allow your phone to reset.
- Step 4: Reconnect to your Wi-Fi and check if the issue persists.

Solution 4: Restart your Wi-Fi router
Sometimes, the problem might not be with your phone but rather with the Wi-Fi router. Restarting it can refresh the connection and potentially resolve the connectivity problem.
How to restart your Wi-Fi router:
- Step 1: Locate your Wi-Fi router.
- Step 2: Turn off the router using the power button or unplug it.
- Step 3: Wait for about 10–15 seconds before plugging the router back in or turning it on.
- Step 4: Allow the router to restart and establish a connection. Then, check if your phone still shows the “Phone Offline” message.
These solutions should cover the most common connectivity issues. If the problem persists, we’ll explore further steps in the following sections.
Part 3: How To Fix “Phone Offline” Despite Having an Internet Connection
Ever found it odd to receive the frustrating offline error message when you’re sure your internet connection is up and running? If you’ve double-checked your internet connection and your phone still says it’s offline, the issue may lie within your browser, apps, or device settings.
In this part, we’ll answer the question “**Why does My Infinix Smart 8 Plus say offline android?**” despite a seemingly functional internet connection. Then, let’s see other solutions on how to get your device back to its online, fully functional self.
Solution 1: Clear Google Chrome’s cache and data
Sometimes, the answer to “Why is my Android phone offline” can be attributed to a buildup of corrupted or outdated data in your browser’s cache. Clearing the cache and data for Google Chrome can resolve this issue, allowing for a fresh start and potentially eliminating the offline status.
How to clear your browser’s cache and data on Android:
- Step 1: Open the Settings > Apps > Manage Apps.
- Step 2: Locate and tap “Google Chrome” or your preferred browser in the list of installed apps.
- Step 3: Tap “Storage” and select “Clear Cache” to remove temporary files.
- Step 4: Choose “Clear Data” to delete app data. Confirm the action if prompted.
Now, restart Google Chrome and check if the offline error persists.

Solution 2: Re-install Google Chrome
If clearing the cache and data didn’t solve the offline issue, reinstalling Google Chrome can be the next step. A fresh installation can eliminate any underlying glitches or corrupted files that might be causing the persistent offline status.
How to re-install Google Chrome:
- Step 1: Visit the Google Play Store and search for Google Chrome.
- Step 2: Tap “Uninstall” to remove the app from your device.
- Step 3: Wait until it has finished uninstalling your app. Then, tap “Install” to start reinstalling the app.
- Step 4: Once the installation is complete, open Google Chrome and check if the offline error persists while browsing.

Solution 3: Repair the system to fix the phone showing offline
When persistent offline issues seem deeply rooted in your device’s system, a comprehensive system repair may be the solution. Wondershare Dr. Fone’s system repair tool is designed to address a range of system problems, providing a reliable way to fix any problem you have with your phone.
With Dr. Fone’s system repair tool, you can diagnose and resolve “Why is My Infinix Smart 8 Plus offline on Android,” ensuring a smooth and functional Android experience.
Key Features:
- Comprehensive system repair for any devices
- User-friendly interface
- Efficient problem diagnosis
How to use Dr. Fone’s system repair tool:
- Step 1: Open Dr.Fone’s system repair tool
Start by launching Wondershare Dr.Fone on your computer. Go to the Toolbox section and connect your Infinix Smart 8 Plus. Choose System Repair and pick Android as your device type.
safe & secure
3,189,324 people have downloaded it
- Step 2: Start the repair
Click Start on the new screen to kick off the repair. Since you’re dealing with an offline connection issue on Android, select System Damage.
- Step 3: Confirm your device details
The platform will detect your Infinix Smart 8 Plus’s brand. Confirm the Name, Model, Country, and Carrier. If your device is unlocked, choose OPEN in the Carrier section. Agree to the warning, click Next, and proceed with the repair.
- Step 4: Download firmware.
Follow the instructions to put your Infinix Smart 8 Plus into Download Mode. Once in Download Mode, you will start downloading the firmware.
- Step 5: Confirm Installation
Remember, the repair may erase data. It’s advisable to back up your data first before starting the repair. Enter “000000” to confirm the repair process, shown by a progress bar. Click Done once it is completed and see if your Android is back online.
Conclusion
Dealing with the “Phone Offline” hiccup on your Infinix Smart 8 Plus can be a real headache. But fear not – we’ve covered a range of solutions to get you back online smoothly. From troubleshooting internet connection problems to addressing browser and app-related glitches, the solutions provided in this guide are designed to cater to a variety of scenarios. If you find it troublesome to try solutions one by one, then we recommend using Dr.Fone directly which is a full toolkit for your phone and can help resolve most device glitches one-off.
Remember, technology can sometimes be tricky. But with patience and the right guidance, you can overcome these challenges.
Also read:
- [New] In 2024, Clear-Cut Strategies Transferring Your iMovie Work to Vimeo
- [Updated] The Clear-Cut Guide to High Definition Twitter Videos
- 「セガートの外付けHDDに問題がある場合、データ消失後の再利用手順」
- 4 Solutions to Fix Unfortunately Your App Has Stopped Error on Samsung Galaxy S24 Ultra | Dr.fone
- 5 Techniques to Transfer Data from Oppo A78 to iPhone 15/14/13/12 | Dr.fone
- Fixing Persistent Pandora Crashes on Honor X8b | Dr.fone
- HP ZBook 15 G3의 웹 드라이버 다운로드 및 설치 : 편안한 지침
- In 2024, Auditory Ambitions Scouting the Ultimate 10 Songs for Podcasts
- In 2024, How to Fix when Apple Account Locked On iPhone 13 Pro?
- Troubleshooting Guide How to Fix an Unresponsive Google Pixel 8 Screen | Dr.fone
- Updating the Software on Your Apple Studio Display: A Step-by-Step Guide - Insights From ZDNet
- Why Your Vivo Y100i Screen Might be Unresponsive and How to Fix It | Dr.fone
- Title: 11 Proven Solutions to Fix Google Play Store Not Working Issue on Infinix Smart 8 Plus | Dr.fone
- Author: Ariadne
- Created at : 2024-11-16 00:40:13
- Updated at : 2024-11-22 01:50:37
- Link: https://howto.techidaily.com/11-proven-solutions-to-fix-google-play-store-not-working-issue-on-infinix-smart-8-plus-drfone-by-drfone-fix-android-problems-fix-android-problems/
- License: This work is licensed under CC BY-NC-SA 4.0.