
11 Ways to Fix it When My Poco C50 Wont Charge | Dr.fone
11 Ways to Fix it When My Poco C50 Won’t Charge
What would you do if your phone or other device’s battery is draining? You will plug it into a power source. Right? What if you realize that your phone won’t charge? My phone won’t charge, and the Poco C50 tablet won’t charge is a common problem.
Android devices are very prone to this problem, and hence Android device owners complain frequently that My Poco C50 won’t charge even when it is plugged into a power source properly. The reason behind the phone won’t charge, or Poco C50 tablet won’t charge are not very complicated and, therefore, can be dealt with by you sitting at home.
A charging problem can occur due to a temporary software crash. It is also possible that a corrupted device cache may be causing such a glitch. Another reason for phones not to charge normally or charge slowly is an inappropriate power source or defective charging cable and adapter. All these and many more problems will be cured in the 10 solutions to fix My Poco C50 won’t charge error.
So if you’re still thinking about why won’t My Poco C50 charge, read on to find out solutions to fix My Poco C50 won’t charge problem.
Part 1. One-click solution to fix Android phone won’t charge
While you are upset over ‘why My Poco C50 won’t charge?’, would you mind us helping you around?
Well, we have got Dr.Fone - System Repair (Android) at your fingertips to get rid of this annoying phone won’t charge issues (caused by system corruption). Whether the Poco C50 device froze or became unresponsive, bricked, or got stuck on the Poco C50 logo/blue screen of death or apps started crashing. It can fix every Android system problem.
Dr.Fone - System Repair (Android)
Easy-to-operate program to fix Android phone won’t charge
- As it supports all the latest Poco C50 devices, it can even easily fix the Poco C50 tablet won’t charge issue.
- With a single click, you can fix your entire Android system issues.
- The very first tool is available in the market for Android system repair.
- Without any technical knowledge, one can use this software.
- This tool is intuitive with a high success rate.
3981454 people have downloaded it
Note: When you are stressed over ‘why won’t My Poco C50 charge’, we are ready to eliminate the tension and make things easier for you. But, before you start fixing the phone won’t charge the problem, make sure to back up the Android device . This fixing process might wipe out all the Poco C50 device data.
Phase 1: Preparing and connecting the Android device
Step 1: Install and then run Dr.Fone - System Repair (Android), the ultimate Android repair software on your PC. Hit the ‘System Repair’ tab, followed by connecting your Poco C50.


Step 2: Tap on the ‘Android Repair’ option and then click ‘Start’ for moving ahead.

Step 3: Mention the detailed information about your Poco C50 under the Poco C50 device information section. Press ‘Next’ then on.

Phase 2: Get to ‘Download’ mode for repairing the Poco C50 device
Step 1: It’s essential that you put the Android device under ‘Download’ mode to resolve the phone won’t charge the issue. Here comes how to do –
- With a ‘Home’ button device, switch off it before holding down the set of keys, including ‘Power’, ‘Volume Down’, and ‘Home’ key for 5-10 seconds. Let them go and hit the ‘Volume Up’ key for entering the ‘Download’ mode.

- If the ‘Home’ button is not there, you got to turn down the Poco C50 device and altogether hold down the ‘Volume Down’, ‘Bixby’, and ‘Power’ keys between 5-10 seconds. Soon after you release the keys, tap the ‘Volume Up’ button for entering the ‘Download’ mode.


Step 2: Click ‘Next’ to start downloading the Android firmware.
 Video Converter Factory Pro
Step 3: Now, Dr.Fone - System Repair (Android) would verify the firmware and then start repairing the Android system on its own. It will ultimately fix your ‘why won’t My Poco C50 charge’ trouble.

Part 2. 10 common ways to fix Android won’t charge
1. Check/replace charging cable
Charging cables fray or become defunct after prolonged usage. Therefore, it is advised to always use the Poco C50 device’s original charging cable or purchase a good quality charging cord, which doesn’t damage your device or your adapter.
It is also very commonly observed that the charging end of the cable which gets connected to the charging port of the Poco C50 device gets damaged and prevents the current from flowing to the phone/tablet.


2. Check/clean charging port
The charging port in your device is a small opening where the charging end of the cabbie is inserted for the current to flow to the phone/tablet. Very often, we notice that the charging port gets blocked with tiny particles of dirt. The charging port might also get clogged if dirt and dust get accumulated in it, preventing the sensors from receiving and forwarding the current to the Poco C50 device.

The best way to take this problem is to clean the port with a blunt pin or a soft bristle unused toothbrush. Make sure you clean the port gently and do not damage it or its sensors.

3. Check/replace charging adapter
This method is fairly simple, and all you need to do is check whether or not the charging adapter is working properly as sometimes, the adapter itself is to be blamed for the charge. To make sure that you are not using a defective adapter, connect your charging cable/USB to another adapter. If your device charges normally, it means there is a problem is with your adapter, and you must replace it at the earliest to solve My Poco C50 won’t charge the issue.
 WinUtilities Pro
4. Try another power source
This technique is more like a quick trick. It means to switch from one power source to another or use a more efficient and suitable power source. Laptops and PCs charge slower than a direct power source, i.e., a wall socket. Sometimes, the charging speed is slower, and the battery is draining. In such a scenario, choose to charge your device by directly plugging it into a socket on the wall to never experience My Poco C50 won’t charge problem.
5. Clear device Cache
Clearing Cache is a great technique as it cleans your device and all its partitions. By clearing the cache, all the unwanted data and files stored in your device get deleted, which may be causing glitches in the Poco C50 device’s software, preventing it from recognizing the current.
Follow the steps given below to clear your device’s cache:
• Visit “Settings” and find “Storage”


• Now tap on “Cached Data”.

• Click “OK” to clear all unwanted cache from your device as shown above.
Try charging your phone after clearing the cache. If your phone doesn’t charge even now, do not worry. There are more ways to help you combat My Poco C50 won’t charge problem.

6. Re-start/reboot your phone/tablet
Restarting your device to fix why won’t My Poco C50 charge error is a very effective remedy. This method of rebooting your device not only fixes software glitches but other but also tackles other factors/operations that might be running in the background preventing your device from charging.
Restarting a device is simple and can be done by following the steps given below:
• Long press the power button of your device.
• From the options that appear, click on “Restart”/ “Reboot” as shown in the image below.

To restart your device, you may also press the power button for about 20-25 seconds for the phone/tablet to automatically reboot.
7. Download and install the Ampere App
The Ampere app can be downloaded from the Google Play Store. It is very helpful to fix the why won’t my charge error as it gives you real-time information about your device’s battery consumption, charging status, and other essential data.
If the App gives information in green color, it means all is wetland your device is charging normally, however, if the information before you is in orange, you need to take steps to fix the charging problem.


8. Install software updates
Installing your Android version updates is a good idea as the software is the interface that receives charge from the charging port sensors and gives a command for the phone/tablet to charge. People often continue to use older OS versions, which cause trouble and prevent the Poco C50 device from charging.
To check for and install updates on your device, you must be connected to WiFi or a cellular network. Next, visit “Settings” and select “About device”. Now click on “Software Update”.
 Lyric Video Creator Professional Version

If there is an update available, you will be prompted to download it. Just follow the instructions given before you install a brand new Android OS version on your device.
9. Factory reset your device
Factory Reset is must be done after due deliberation. Remember to take a back-up of all your data and contents on the cloud or an external memory device, such as a pen drive before adopting this method because once you perform a factory reset on your device, all media, contents, data and other files are wiped out, including your device settings.
Follow the steps given below to factory reset your device:
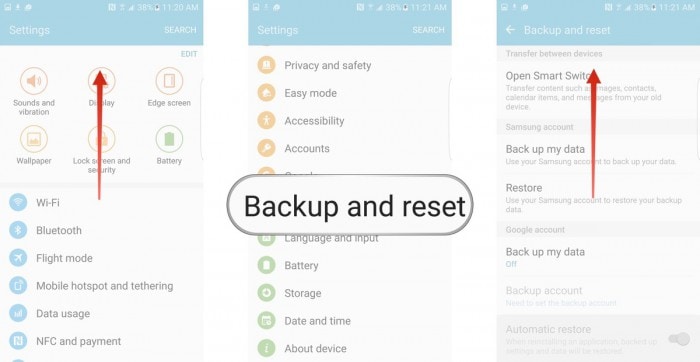
• Visit “Settings” by clicking the settings icon as shown below.

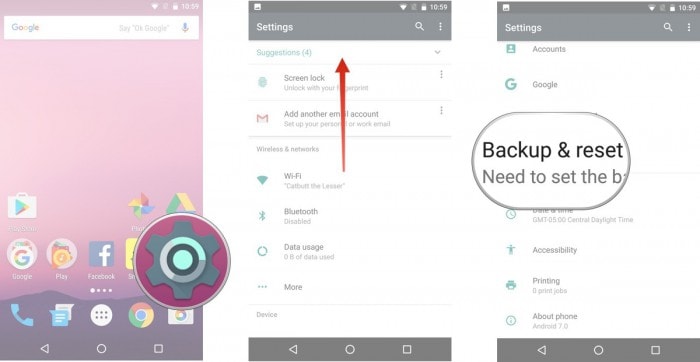
• Now select “Backup and Reset” and move on.
• In this step, select “Factory data reset” and then “Reset Device”.
• Finally, tap on “ERASE EVERYTHING” as shown below to Factory Reset your device.

Note: Once the factory reset process is complete, your device will automatically restart and you will have to set it up once again.
10. Replace your battery
This should be your last resort to fix My Poco C50 won’t charge problem, and you should only attempt to replace your battery if none of the other techniques work. Also, please consult a technician before purchasing and installing a new battery in your device as different phones and tablets have a different type of battery requirements.

Finally, fixing the phone won’t charge the problem is simple, and therefore there is no need for you to worry as you are not the only one experiencing such an issue. Other Android users have tried, tested, and recommended the methods given above to solve why won’t My Poco C50 charge or Poco C50 tablet won’t charge error. So go ahead and try them out now.
Full Guide: How To Fix Connection Is Not Private on Poco C50
Are you encountering the “your connection is not private” issue on your phone? We found many Android users have increasingly expressed their frustrations with this recurring problem while browsing on the internet.
Usually, you can just reload the page to fix the error. But in case it doesn’t help, you may need to look for more advanced solutions. In the following discussion, we will delve into why this “your connection is not private” on Android happens and explore solutions that work for you.
Part 1: Addressing Your Connection Is Not Private on Android
First of all, what does “your connection is not private” on Android mean? To answer this question, it’s essential to understand that this error is often associated with Secure Socket Layer (SSL) protocol issues.
SSL is a cryptographic protocol created to establish a secure communication channel over the internet. Its primary purpose is to ensure the confidentiality and integrity of data exchanged between a user’s device and a website’s server.
The error message appears when there’s a problem with the SSL/TLS (Transport Layer Security) certificate of the website you are trying to access. This certificate is a digital document that authenticates the website and encrypts the data transmitted between the user’s device and the server.

Some common factors that could trigger the “your connection is not private” on Chrome Android error:
- Expired or invalid SSL certificate of the website;
Certificates are issued for a specific period, and if the website owner fails to renew it in time, your browser will detect it as not secure.
- There is a mismatch between the domain on the certificate and the actual domain you are trying to visit;
This discrepancy might occur due to a misconfiguration on the website or, in some cases, due to a man-in-the-middle attack where a third party intercepts the communication between your device and the server.
- No HTTPS enforcement;
Another reason for the issue is if the installed SSL certificate doesn’t turn on the “force HTTPS” option. This means visitors might be using the non-secure HTTP version of the site instead of the safe URL.
So, the error serves as a warning to users, indicating that the connection may not be secure and sensitive information could be at risk.
Browsers, including those on Android devices, prioritize user safety and privacy. They will block access to potentially compromised websites to prevent data theft or unauthorized access. That’s why when you get the “your connection is not private” message on Android, you can’t access the website.
Part 2: What The Error Codes in “Your Connection Is Not Private” Mean
When “your connection is not private” on Chrome Android error shows up, it often comes along with specific error codes that can indicate the root cause of the issue. Understanding these error codes is crucial for troubleshooting and resolving the problem effectively.
- ERR_CERT_SYMANTEC_LEGACY: Unsupported Symantec-issued certificate
This error code indicates that the website you are attempting to access is equipped with an unsupported Symantec-issued certificate. Symantec, a prominent Certificate Authority, had faced concerns about the security of its certificate issuance processes.
As a result, major browsers, including Google Chrome, no longer support certificates issued by Symantec. If you encounter this error, it implies that the website’s SSL certificate is outdated and needs to be updated with a certificate from a trusted Certificate Authority.
- NET::ERR_CERT_AUTHORITY_INVALID: Unauthenticated SSL certificate
The presence of this error code suggests that the SSL certificate of the website cannot be authenticated by your browser. This could occur if the certificate is self-signed or issued by an unrecognized Certificate Authority.
- NET::ERR_CERT_DATE_INVALID: Date and time mismatch
This error code points to a discrepancy between your Poco C50’s date and time settings and the information on the website’s SSL certificate, as they have expiration dates. If the date and time settings on your device are incorrect, it may prevent the certificate from being validated. Correcting your device’s date and time settings should resolve this issue.
- SSL certificate error: Generic or unspecified problem
This is a more generic error message that indicates a problem with the website’s SSL certificate without specifying the exact nature of the issue. It could indicate various issues, such as an expired certificate, a misconfiguration in the certificate chain, or other SSL-related problems.
Part 3: How To Fix Your Connection Is Not Private on Android
Encountering the “your connection is not private” error on Android can be a frustrating experience. Fortunately, there are various methods to address and fix this issue, depending on its underlying cause.
In this section, we will explore some effective solutions to help you regain a secure and private connection.
Method 1: Clear your cache
When you use the internet, web browsers store information about your online activities in cached data and cookies to speed things up. However, having too much of this data can cause problems instead. It might even stop your browser from connecting securely.
So, clearing your browser cache and data can be a quick and simple “your connection is not private” Android fix. Follow the steps here:
- Step 1: Open and launch Chrome.
- Step 2: Access the Menu (the three dots button) to open the Settings. Select Privacy and Security > Clear Browsing Data.
- Step 3: Opt for the “All Time” option and click “Clear Data” to erase your cache.

After successfully clearing your browser cache and data, revisit the website to check if the problem persists.

Method 2: Repair the Android system
Addressing the “your connection is not private” to fix on Android involves examining both the Poco C50 device and the website. If clearing browser data doesn’t help, there might be an issue with your Android system. One solution is to use the Wondershare Dr.Fone system repair tool to fix the issues safely.
How to perform system repair with Dr.Fone:
- Step 1. Open the Repair Tool
Start by launching Wondershare Dr.Fone on your computer. Go to the Toolbox section and connect your Poco C50. Choose System Repair and pick Android as your device type.
 safe & secure
4,322,863 people have downloaded it
- Step 2. Begin Repair
Click Start on the new screen to kick off the repair. Since you’re dealing with a connection private issue on Android, select System Damage.
 Epubor Audible Converter for Mac: Download and convert Audible AAXC/AA/AAX to MP3 with 100% original quality preserved.
- Step 3. Fill in the Poco C50 device Details
The platform will detect your Poco C50’s brand. Confirm the Name, Model, Country, and Carrier. If your device is unlocked, choose OPEN in the Carrier section. Agree to the warning, click Next, and proceed with the repair.
- Step 4. Activate Download Mode
Follow the instructions to put your Poco C50 into Download Mode. Once in Download Mode, you will start downloading the firmware.
- Step 5. Confirm Installation
Remember, the repair may erase data. It’s advisable to back up your data first before starting the repair. Enter “000000” to confirm the repair process, shown by a progress bar.

When done, click Done if your Android starts properly. If not, click Try Again to repeat the process.
### Method 3: Check and fix the date and time on your AndroidSince the error code “NET::ERR_CERT_DATE_INVALID” indicates a mismatch between the date and time on your device and your browser, you need to adjust the date and time settings on your Android to fix it.
The specific steps can vary based on your Android model, but the general approach involves locating the “date and time” settings on your phone. How to fix the date and time on Android to bypass “your connection is not private” on Chrome Android:
- Step 1: Go to your Poco C50’s Settings > Date & Time.
- Step 2: Switch on the “Automatic Date & Time” to sync with the network-provided time.

Method 4: Perform factory reset
If nothing else works, there might be malware on your phone causing trouble. It’s crucial to eliminate this threat before further damage occurs. The recommended action is to perform a factory reset on your phone.
However, keep in mind that this process can result in data loss, so it’s essential to back up your data beforehand. Follow the steps to perform a factory reset on Android:
- Step 1: Go to your Android Settings.
- Step 2: Select Backup and Reset > Factory data reset. Then, opt to erase all data.

Most of the time, you won’t need to go to the extreme of a factory reset. The simpler solutions mentioned earlier should take care of the Security Certificate Error on your Android.
Conclusion
By now, you should have a good grasp of the “Your Connection Is Not Private” problem on Android. This issue typically arises from complications with the SSL certificate of the website, designed to ensure a secure connection.
When you see the error message, it often comes with specific codes that indicate the underlying problem. Several methods can be employed to fix the “Your Connection Is Not Private” on Android. Clearing the browser cache, repairing the Android system using tools like Dr.Fone, checking and fixing date and time settings, and performing a factory reset as a last resort are among the solutions.
By prioritizing user safety and following the step-by-step approach in this guide, you can navigate and resolve this common internet browsing challenge on your Poco C50s.
How To Fix Part of the Touch Screen Not Working on Poco C50
You probably touch the screen of your phone hundreds of times per day. It’s no surprise that smartphone touchscreens are one of the most common components to fail, given their delicate glass construction. However, a part of the touch screen not working on your Poco C50 does not necessarily mean it is a hardware issue. There could be other reasons why your Android’s touch screen stopped responding.
If your phone’s touchscreen frequently fails to respond, there are several things you can try before calling a professional. This article will reveal those proven fixes you can easily perform independently.
Part 1. Why Is Part of My Screen Not Working
There are two possible causes as to why your phone’s touch screen is not working. One is the touch screen may have been damaged, and the other is the Poco C50 device may be experiencing technical difficulties.
If you drop your phone and it becomes stuck against something, the touch screen’s connectivity may fail. Only a part of the touch screen may sometimes become damaged and unresponsive. That may also occur when there is a technical failure, such as the phone hanging. A part of the touch screen not working can occur when malware is downloaded or when phone settings are changed.
Now, the problem can affect any Android phone, and users may encounter the following error messages on their respective phone models:
- Poco C50 P40 lite half touch screen not working
- Nexus touch screen not working
- LG screen is unresponsive to touch
- Poco C50 left side of the screen is not working
- Redmi’s whole screen is unresponsive to touch

Part 2. Different Types of Touch Screen Issues and What You Should Check Before Fixing
You may experience a variety of touch screens not working on Android issues:
- A certain part of the touch screen is not working.
- Your touches do not register on the touch screen.
- The touch screen incorrectly responds to your touch.
- Half touch screen is not working.
- The touch screen becomes frozen or hangs.
- The screen flashes, flickers, or remains blank.
- Theleft side of the phone screen is not working.
Before proceeding to how to fix an unresponsive touch screen on an Android device, you should complete the following steps:
- Examine the screen of your device. Check to see if it is cracked or chipped.
- If the screen is damaged, it must be replaced.
- Remove the Poco C50 device cover and screen protector if they are not damaged.
- If there is a sticker on the Poco C50 device screen, you must remove it.
- Before continuing, make sure your screen is spotless.
Part 3. How To Fix Part of the Touch Screen Not Working (No Physical Damage)
If you have already tried running the Poco C50 device in diagnostic mode and verified that it is not physically damaged, then the problem is most likely technical. If your Poco C50’s screen is not responding to touches for technical reasons, follow the methods below to resolve the issue.
Restart Your Device
When your touch screen stops working, the first thing you should do is restart your device. The operation is known as soft resetting. You cannot turn your device off from the option on the screen because the touch screen is not responding. Here are the steps to take.
Step 1: Hold the “Power” button until the Poco C50 device turns off.
Tip: If you hold down the power button for a few seconds, you will see the “Power Off” and “Restart” options on the screen. You can’t use it because the entire screen isn’t responding. Hence, you should press and hold the “Power” button for as long as necessary.

Step 2: When the Poco C50 device turns off, wait a few seconds.
Step 3: Press and hold the “Power” button to restart the Poco C50 device.
Check to see if the Android auto touch screen is not working problem has been resolved. Otherwise, proceed with the following methods.
Turn On Safe Mode
You should switch to Safe mode whenever an application or piece of software causes a problem on your device. Only the most fundamental system components are loaded and used when operating in Safe mode.
If your touch screen is functional in safe mode, the issue is most likely internal. You can quickly fix the Android touchscreen issue by following the prompts given below to activate the safe mode:
Step 1: To force a restart, press and hold the Poco C50 device’s “Power” button for an extended period.
Step 2: Maintain pressure on the “Power” button. Take your finger off it once you see the manufacturer’s logo.
Step 3: When you let go of the “Power” button, press and hold the “Volume Down” button. After that, a “Safe Mode” label will appear in your screen’s lower-left corner.
 CollageIt Pro
Turn Off Developer Options
Every smartphone is bound to have limitations. However, smartphone makers include a “Developer Options” menu for advanced users. Here, restrictions are removed, and user preferences can be customized.
If you enable Developer Options on some Android devices, they may stop working properly. If you have recently activated Developer Options and your touchscreen is no longer responding as expected, you should disable it. To do so, follow the instructions below:
Step 1: Launch the Settings app on your device.
Step 2: Select the System menu item, which usually locates at the bottom of the screen.
Step 3: Tap the Advanced options menu, then select Developer Options.
Step 4: You will then find the switch to turn it on or off. Disable itby toggling the button off.

Step 5: Restart your device to check if the part of the touch screen not working issue has been resolved.

Reset Device to Factory Settings
Resetting your device to its factory settings will return it to its state when you first unboxed it. All your phone’s data and installed apps will be erased, including any malware on your device that may be causing the issue to occur. Here’s how to restore your device to factory settings:
Step 1: Since your touch screen is not working, you can factory reset it using Google’s Find My Device web service.
Step 2: Go to Find My Device from any device and sign in to the Google account associated with the damaged screen device.
Step 3: After successfully logging in, you will see your device’s name. Select the Erase Device option.

Step 4: Confirm by pressing the Erase Device button.
Tip: Since all your data will be removed, it’s recommended to back up your data first before resetting your device to factory settings.

Part 4. Fix Using a Third-Party App – Wondershare Dr.Fone
If you’ve exhausted all other options and still can’t fix your Android’s part of the touch screen not working issue, it’s time to resort to Dr.Fone – System Repair! It allows you to repair Android system issues with a single click.
Many users have reported exceptions on their Android devices, such as touch screen failure, black screen of death, system UI failure, app crashing, etc. And in this case, people should seek an Android repair tool.
Dr.Fone – System Repair has made it easier than ever for Android users experiencing technical issues with their device, including an unresponsive touch screen, among other system issues. The best part is that no data will be lost while repairing Android system issues.
Follow the steps given below on how to use Wondershare Dr.Fone System Repair for Android:
Step 1: Select the System Repair option from the main window after starting Dr. Fone.
Step 2: Connect your Poco C50 or tablet to the computer using the appropriate cable. Choose Android Repair from the three options shown on the left side of the screen.
Step 3: The device information screen will appear in the next window. There, input your device’s unified brand, name, model, country/region, and carrier information. Then click Next after you confirm the warning.
The Android repair procedure may wipe out all data on your device. To confirm and proceed, enter “000000”.
Note: It is strongly advised that you back up your Android data before attempting Android repair.
Step 4: Before repairing your Poco C50, you must boot it into Download mode. To boot your Poco C50 or tablet into DFU mode, follow the steps below:
For a device that has a Home button:
- Turn off your phone or tablet.
- Hold the Volume Down, Home, and Power buttons for 5 to 10 seconds.
- To enter Download mode, release all the buttons and press the Volume Up button.
For a device that lacks a Home button:
- Turn off the Poco C50 device.
- Hold the Volume Down, Bixby, and Power buttons for 5 to 10 seconds.
- To enter Download mode, release all the buttons and press the Volume Up button.
 PCDJ Karaoki is the complete professional karaoke software designed for KJs and karaoke venues. Karaoki includes an advanced automatic singer rotation list with singer history, key control, news ticker, next singers screen, a song book exporter and printer, a jukebox background music player and many other features designed so you can host karaoke shows faster and easier!
Step 5: Then press the Next button. The program will then download the firmware. After downloading and verifying the firmware, the program will automatically repair your Poco C50. And in a while, your Poco C50’s system issues will be resolved.
Supported OS
Check Dr.Fone’s supported operating systems below before using the application to fix your mobile technical issues.
| Platform | Supported OS |
|---|---|
| Windows | Windows 11/10/8.1/8/7/Vista/XP |
| Mac | Mac 14/13/12/11/10.15/10.14/X/10.13/10.12/10.11/10.10/10.9/10.8 |
Key Features
Dr.Fone – System Repair is a data management and recovery tool that contains several toolkits in one program, each designed to repair a specific phone problem. Check out its key features below:
- One-click Android Repair Tool
- Troubleshoots and repairs a wide range of Android system problems, including black screen of death, Play Store not working, apps crashing, phone stuck in a boot loop, and bricked Android issues
- A high success rate for fixing Android system issues
- Fixes Android system back to normal
Pros
Here are the advantages of using Dr.Fone – System Repair:
- Highly intuitive UI/UX/. No need for any skill to operate it
- Provides a comprehensive set of toolkits, including advanced data recovery and system repair
- Data management is simple and seamless for both Android and iOS devices
- Data backup with Dr. Fone is simple and quick.
Cons
Check below to know Dr.Fone – System Repair’s limitations:
- Depending on the toolkit required, the program can be costly.

safe & secure
Conclusion
Fixing an Android part of the touch screen not working issue can be quickly done with just a few fixes you can do on your own. However, there may be times when the solutions provided above may not work, and the worst part is factory resetting your phone erases all your data.
That’s why Dr.Fone – System Repair might be your best solution. It has all the tools you need to keep your Poco C50 100%. Not only that, but with Dr.Fone, you can repair your Android system issues without dealing with any data loss.
- Title: 11 Ways to Fix it When My Poco C50 Wont Charge | Dr.fone
- Author: Ariadne
- Created at : 2024-07-30 07:17:28
- Updated at : 2024-07-31 07:17:28
- Link: https://howto.techidaily.com/11-ways-to-fix-it-when-my-poco-c50-wont-charge-drfone-by-drfone-fix-android-problems-fix-android-problems/
- License: This work is licensed under CC BY-NC-SA 4.0.