
11 Ways to Fix it When My Vivo Y36 Wont Charge | Dr.fone
11 Ways to Fix it When My Vivo Y36 Won’t Charge
What would you do if your phone or other device’s battery is draining? You will plug it into a power source. Right? What if you realize that your phone won’t charge? My phone won’t charge, and the Vivo Y36 tablet won’t charge is a common problem.
Android devices are very prone to this problem, and hence Android device owners complain frequently that My Vivo Y36 won’t charge even when it is plugged into a power source properly. The reason behind the phone won’t charge, or Vivo Y36 tablet won’t charge are not very complicated and, therefore, can be dealt with by you sitting at home.
A charging problem can occur due to a temporary software crash. It is also possible that a corrupted device cache may be causing such a glitch. Another reason for phones not to charge normally or charge slowly is an inappropriate power source or defective charging cable and adapter. All these and many more problems will be cured in the 10 solutions to fix My Vivo Y36 won’t charge error.
So if you’re still thinking about why won’t My Vivo Y36 charge, read on to find out solutions to fix My Vivo Y36 won’t charge problem.
Part 1. One-click solution to fix Android phone won’t charge
While you are upset over ‘why My Vivo Y36 won’t charge?’, would you mind us helping you around?
Well, we have got Dr.Fone - System Repair (Android) at your fingertips to get rid of this annoying phone won’t charge issues (caused by system corruption). Whether the Vivo Y36 device froze or became unresponsive, bricked, or got stuck on the Vivo Y36 logo/blue screen of death or apps started crashing. It can fix every Android system problem.
Dr.Fone - System Repair (Android)
Easy-to-operate program to fix Android phone won’t charge
- As it supports all the latest Vivo Y36 devices, it can even easily fix the Vivo Y36 tablet won’t charge issue.
- With a single click, you can fix your entire Android system issues.
- The very first tool is available in the market for Android system repair.
- Without any technical knowledge, one can use this software.
- This tool is intuitive with a high success rate.
3981454 people have downloaded it
Note: When you are stressed over ‘why won’t My Vivo Y36 charge’, we are ready to eliminate the tension and make things easier for you. But, before you start fixing the phone won’t charge the problem, make sure to back up the Android device . This fixing process might wipe out all the Vivo Y36 device data.
Phase 1: Preparing and connecting the Android device
Step 1: Install and then run Dr.Fone - System Repair (Android), the ultimate Android repair software on your PC. Hit the ‘System Repair’ tab, followed by connecting your Vivo Y36.


Step 2: Tap on the ‘Android Repair’ option and then click ‘Start’ for moving ahead.

Step 3: Mention the detailed information about your Vivo Y36 under the Vivo Y36 device information section. Press ‘Next’ then on.

Phase 2: Get to ‘Download’ mode for repairing the Vivo Y36 device
Step 1: It’s essential that you put the Android device under ‘Download’ mode to resolve the phone won’t charge the issue. Here comes how to do –
- With a ‘Home’ button device, switch off it before holding down the set of keys, including ‘Power’, ‘Volume Down’, and ‘Home’ key for 5-10 seconds. Let them go and hit the ‘Volume Up’ key for entering the ‘Download’ mode.


- If the ‘Home’ button is not there, you got to turn down the Vivo Y36 device and altogether hold down the ‘Volume Down’, ‘Bixby’, and ‘Power’ keys between 5-10 seconds. Soon after you release the keys, tap the ‘Volume Up’ button for entering the ‘Download’ mode.

Step 2: Click ‘Next’ to start downloading the Android firmware.

Step 3: Now, Dr.Fone - System Repair (Android) would verify the firmware and then start repairing the Android system on its own. It will ultimately fix your ‘why won’t My Vivo Y36 charge’ trouble.

Part 2. 10 common ways to fix Android won’t charge
1. Check/replace charging cable
Charging cables fray or become defunct after prolonged usage. Therefore, it is advised to always use the Vivo Y36 device’s original charging cable or purchase a good quality charging cord, which doesn’t damage your device or your adapter.
It is also very commonly observed that the charging end of the cable which gets connected to the charging port of the Vivo Y36 device gets damaged and prevents the current from flowing to the phone/tablet.

2. Check/clean charging port
The charging port in your device is a small opening where the charging end of the cabbie is inserted for the current to flow to the phone/tablet. Very often, we notice that the charging port gets blocked with tiny particles of dirt. The charging port might also get clogged if dirt and dust get accumulated in it, preventing the sensors from receiving and forwarding the current to the Vivo Y36 device.

The best way to take this problem is to clean the port with a blunt pin or a soft bristle unused toothbrush. Make sure you clean the port gently and do not damage it or its sensors.

3. Check/replace charging adapter
This method is fairly simple, and all you need to do is check whether or not the charging adapter is working properly as sometimes, the adapter itself is to be blamed for the charge. To make sure that you are not using a defective adapter, connect your charging cable/USB to another adapter. If your device charges normally, it means there is a problem is with your adapter, and you must replace it at the earliest to solve My Vivo Y36 won’t charge the issue.

4. Try another power source
This technique is more like a quick trick. It means to switch from one power source to another or use a more efficient and suitable power source. Laptops and PCs charge slower than a direct power source, i.e., a wall socket. Sometimes, the charging speed is slower, and the battery is draining. In such a scenario, choose to charge your device by directly plugging it into a socket on the wall to never experience My Vivo Y36 won’t charge problem.
5. Clear device Cache
Clearing Cache is a great technique as it cleans your device and all its partitions. By clearing the cache, all the unwanted data and files stored in your device get deleted, which may be causing glitches in the Vivo Y36 device’s software, preventing it from recognizing the current.
Follow the steps given below to clear your device’s cache:
• Visit “Settings” and find “Storage”

• Now tap on “Cached Data”.

• Click “OK” to clear all unwanted cache from your device as shown above.
Try charging your phone after clearing the cache. If your phone doesn’t charge even now, do not worry. There are more ways to help you combat My Vivo Y36 won’t charge problem.
 DLNow Video Downloader
6. Re-start/reboot your phone/tablet
Restarting your device to fix why won’t My Vivo Y36 charge error is a very effective remedy. This method of rebooting your device not only fixes software glitches but other but also tackles other factors/operations that might be running in the background preventing your device from charging.
Restarting a device is simple and can be done by following the steps given below:
• Long press the power button of your device.
• From the options that appear, click on “Restart”/ “Reboot” as shown in the image below.

To restart your device, you may also press the power button for about 20-25 seconds for the phone/tablet to automatically reboot.
7. Download and install the Ampere App
The Ampere app can be downloaded from the Google Play Store. It is very helpful to fix the why won’t my charge error as it gives you real-time information about your device’s battery consumption, charging status, and other essential data.
If the App gives information in green color, it means all is wetland your device is charging normally, however, if the information before you is in orange, you need to take steps to fix the charging problem.


8. Install software updates
Installing your Android version updates is a good idea as the software is the interface that receives charge from the charging port sensors and gives a command for the phone/tablet to charge. People often continue to use older OS versions, which cause trouble and prevent the Vivo Y36 device from charging.
To check for and install updates on your device, you must be connected to WiFi or a cellular network. Next, visit “Settings” and select “About device”. Now click on “Software Update”.

If there is an update available, you will be prompted to download it. Just follow the instructions given before you install a brand new Android OS version on your device.
9. Factory reset your device
Factory Reset is must be done after due deliberation. Remember to take a back-up of all your data and contents on the cloud or an external memory device, such as a pen drive before adopting this method because once you perform a factory reset on your device, all media, contents, data and other files are wiped out, including your device settings.
Follow the steps given below to factory reset your device:
• Visit “Settings” by clicking the settings icon as shown below.
 Greeting Card Builder
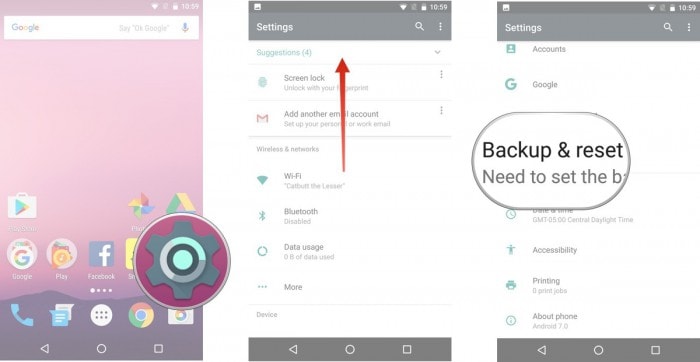
• Now select “Backup and Reset” and move on.
• In this step, select “Factory data reset” and then “Reset Device”.
• Finally, tap on “ERASE EVERYTHING” as shown below to Factory Reset your device.

Note: Once the factory reset process is complete, your device will automatically restart and you will have to set it up once again.
10. Replace your battery
This should be your last resort to fix My Vivo Y36 won’t charge problem, and you should only attempt to replace your battery if none of the other techniques work. Also, please consult a technician before purchasing and installing a new battery in your device as different phones and tablets have a different type of battery requirements.

Finally, fixing the phone won’t charge the problem is simple, and therefore there is no need for you to worry as you are not the only one experiencing such an issue. Other Android users have tried, tested, and recommended the methods given above to solve why won’t My Vivo Y36 charge or Vivo Y36 tablet won’t charge error. So go ahead and try them out now.

Top 10 Fixes for Phone Keep Disconnecting from Wi-Fi On Vivo Y36
The revolutionized world is about the internet, online life, and social media. You can get all the information you need from the internet. You are a click away from booking tickets, buying groceries, calling your loved ones, or even you can handle office meetings with the internet.

Since everything revolves around the internet, it’s annoying if your WI-FI disconnects. You might question yourself why does my Wi-Fi keep disconnecting from the phone? To know the answer, read the article below.
Part 1: Why Does Your Phone Keep Disconnecting from WiFi?
Is your phone frequently getting disconnected from Wi-Fi? Or the internet service is lagging? We have a few options from which you can inspect your problem. Not all internet issues arise from the service provider, as some issues are because of the Vivo Y36 devices that are using the internet. Some of these issues are discussed below for your assistance:
- Router Problems
If the internet provider is doing their job right, the router might not deliver you the right thing. Like other electronic devices, they can also misbehave. This can happen because the router is faulty, or it can happen because the firmware is outdated.
- Out of Wi-Fi Range
Why does My Vivo Y36 keep disconnecting from Wi-Fi? It is because you might be out of range! The router’s placement is very important. The router transmits frequencies that have a limited range. If you are moving out of the range, the internet automatically disconnects.
- Wi-Fi Signals Getting Blocked
The signals from the router can dissipate from any other electronic device nearby. Signals like radio and microwaves can interfere with signal strength.
- Devices Connected with Router
Commonly, a house has around a dozen devices connected to the internet router. People do not think that the router has limited connection slots. It is unable to entertain a specific number of requests for service facilitation. The router has limitations; the service quality will drop if the limitations are exceeded. This drop in quality can also cause internet disconnection from devices.
- Unstable Internet
If your Vivo Y36 gets disconnected frequently, then this disconnection is due to unstable internet, but apart from the above-mentioned problems, there is another reason for internet disconnection.
Sometimes, the internet is stable, but it still disconnects. This is because the internet service provider might not send the best quality internet you have acquired it for. If your internet is stable and the phone still keeps disconnecting, then head onto the next part that will share the top 10 fixes to sort out this issue.
Part 2: 10 Ways to Fix Wi-Fi Keep Disconnecting on Phone
As we have mentioned earlier if your Wi-Fi is stable, but it keeps disconnecting from Vivo Y36 S22 or other Android phones, the coming section of this article is for you. We will provide you with 10 solutions with complete assistance to fix the “Wi-fi keeps disconnecting Android“ issue.

Fix 1: Restart Your Phone
If the Wi-Fi keeps disconnecting from your Vivo Y36, but the internet is stable, then you should try to fix the issue by restarting your phone. Sometimes, it’s the phone that’s causing a problem, so to resolve it, you can follow the steps given below:
Step 1: Firstly, unlock your phone. Now, press the Power button and hold it for a few seconds.
Step 2: Now, select the ‘Reboot’ option to resolve the issue from the options on the screen.

Fix 2: Check Router Settings
If your Android keeps disconnecting from Wi-Fi, you can also fix the problem by checking the router settings. This is because your phone might be blocked from connecting to the network, and if this is the scenario, your phone will never maintain the connection. You should check the Router’s admin panel or app to remove your phone from the blocklist.
 vMix HD - Software based live production. vMix HD includes everything in vMix Basic HD plus 1000 inputs, Video List, 4 Overlay Channels, and 1 vMix Call
Fix 3: Reconnect to Network
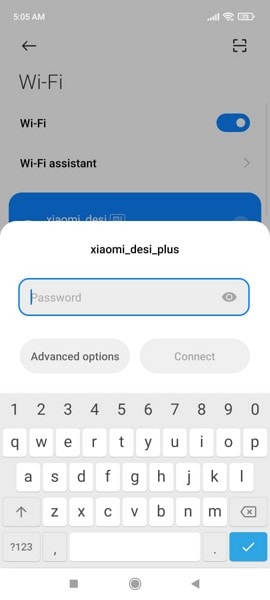
To fix the annoying problem that your Wi-Fi keeps disconnecting, you should try forgetting the network and then reconnecting to it. This could be done easily by following the steps below:
Step 1: First, you need to open the Wi-Fi settings menu. This could be done by pressing and holding the Wi-Fi option from the drop-down menu of your phone until the settings open up.

Step 2: A list of all the Wi-Fi networks will appear on the screen. Select the network that is causing trouble from that list and hit the ‘Forget Network’ option.
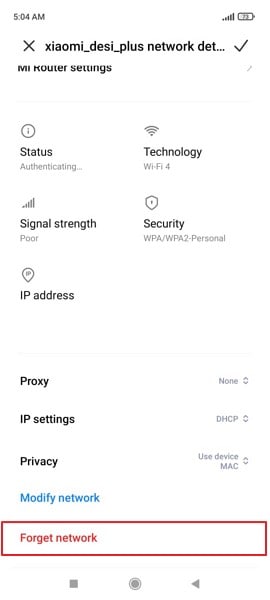
Step 3: After that, you should reconnect to this Wi-Fi network by selecting it from the Wi-Fi list and entering its password.
Fix 4: Restart Your Router
As we discussed, to restart your phone, you can also restart the router to get rid of the problem. For this, hit the restart button on the router to get a fresh start. If the Vivo Y36 device has no button, disconnect the power supply and plug it back in to connect again. Most internet issues are resolved by restarting the router.
Fix 5: Forget Old Networks
The problem that your Wi-Fi keeps disconnecting can also occur because of the list of networks you have connected to. Having yourselves connected to different set of networks could turn out to be quite problematic in the process. In the process of finding and switching to the best network, your device’s Wi-Fi will continually disconnect and reconnect with the nearby networks. To finish this irritating issue, you should remove and forget all the extra networks that you connected previously.
Step 1: You should start by pressing and holding the Wi-Fi option from the drop-down menu on your phone until the Wi-Fi settings screen appears.

Step 2: You will see a list of all the Wi-Fi networks you have connected to previously. One by one, select each network and hit the ‘Forget Network’ button to remove it.
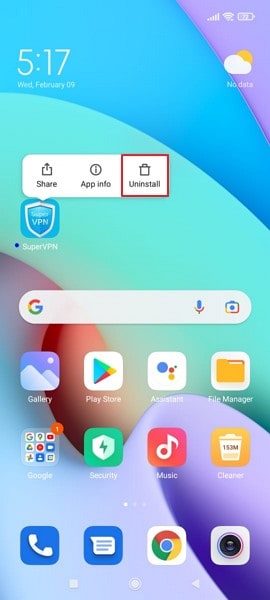
Fix 6. Check Recently Installed Applications
Sometimes, different installed applications can also cause trouble. If your Wi-Fi was fine, but suddenly it started disconnecting, then don’t forget to check the recently installed apps. This is because with not knowing the damage it can cause, you might have installed some VPNs, connections boosters, or firewalls. You can try and disable them but if that doesn’t resolve the problem, then uninstall the app.
Step 1: For uninstalling the problematic application, you have to select it and hold it. You will see a pop-up menu of multiple options; choose the option of ‘Uninstall’ to remove the app from the phone.
 vMix Basic HD - Software based live production. vMix Basic HD includes 4 inputs, 3 cameras, streaming, recording, playlist.
Fix 7: Reset Network Settings on your Phone
It’s annoying that your Wi-Fi keeps disconnecting while you are working or studying. Android users can easily get over this problem by resetting the network settings. The steps for this fix are as follows:
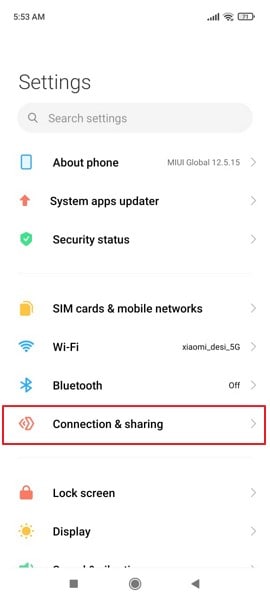
Step 1: For resetting the network, start by opening the ‘Settings’ menu on your phone. Then, scroll down, look for the ‘Connection & Sharing’ option, and select it.
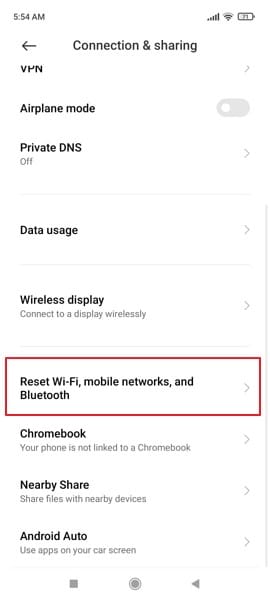
Step 2: As you progress onto a new screen, you will find the option of “Reset Wi-Fi, Mobile Networks, and Bluetooth” in the menu. Select the option to lead to the next window.
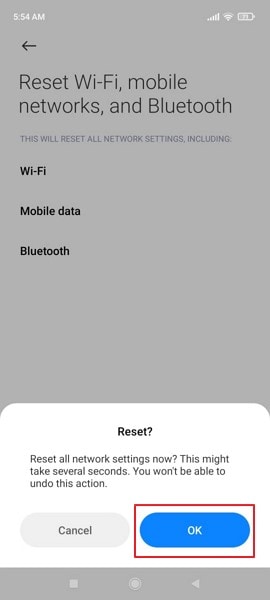
Step 3: Click on the option of “Reset Settings” present on the bottom of the next screen that shows up. Provide confirmation of resetting these settings by inserting your device’s PIN, if any.

Step 4: After providing the appropriate clearances, you will be asked for another confirmation of resetting the Vivo Y36 device’s networks to default. Click “OK” to execute.

Fix 8: Check Routers Range
If your Wi-Fi automatically disconnects and connects again while you are roaming in the house, then it is because of the router’s range; you should check it. For this, you can consider changing and modifying your AP (Access Point) band on your router.
Although the 5GHz frequency band is recognized for providing better network speeds, this band has a shorter range as compared to the 2.4GHz band, which has a better coverage of area. You can easily shift your router’s range through its configuration page. It is considered optimal to utilize the 2.4GHz frequency band for better ranges.

 Software Update Pro - Check and update software installed on your computer.
Fix 9: Stay Connected while Asleep
Most Android phones have a battery-saving feature. This feature disables the network connections to save the battery of the phone. If this is why the Wi-Fi keeps disconnecting, follow the steps shared below to fix it:
Step 1: Start by opening the ‘Settings’ menu on your phone. Then scroll down until you find the ‘Battery’ option and open it.

Step 2: Then, from the battery screen, hit the ‘More Battery Settings’ options. Then, you will see the ‘Stay Connected while Asleep’ option; turn it on.
 Jet Profiler for MySQL, Enterprise Version: Jet Profiler for MySQL is real-time query performance and diagnostics tool for the MySQL database server. Its detailed query information, graphical interface and ease of use makes this a great tool for finding performance bottlenecks in your MySQL databases.
Fix 10: Upgrade Router Firmware
If none of the above-shared fixes work, the last fix to resolve the problem is upgrading your router firmware. For this, you should contact any professional who knows network operations as upgrading router firmware takes time and requires knowledge.
Wi-Fi Stay Connected
The article above has discussed 10 solutions that offer a comprehensive toolkit to tackle the persistent issue of Wi-Fi keeps turning off Android. By toggling Airplane Mode, restarting your device, adjusting settings, and updating firmware, among other steps, you can effectively address and resolve this connectivity problem. With these solutions at your disposal, you can regain a stable and uninterrupted Wi-Fi experience on your Vivo Y36.
[Solved] Warning: Camera Failed on Vivo Y36
In this article, you will learn why camera fails on Vivo Y36 devices, how to make camera work again, as well as a system repair tool to fix this issue in few clicks.

Vivo Y36 devices are one of the best Android devices available in the market and their users are always satisfied with their features. However, it is a recent observation that many Vivo Y36 users complain about Vivo Y36 camera failed error while using the camera App on the Vivo Y36 device. It is a strange error and pops up suddenly with only one option to tap on, i.e., “OK”
The error message reads as follows: “Warning: Camera Failed”.
Once you click on “OK” the app shuts down abruptly and your Vivo Y36 camera is failed. We understand this is not a very pleasing situation, thus, here are ways to tackle the camera failed Vivo Y36 issue. Let us now move ahead and find out why exactly you experience Warning: Camera Failed error and how to fix it.
## Part 1: Why Vivo Y36 phone has Warning: Camera Failed error?We are all aware that no device runs smoothly, without any glitches. We also know that there is a cause behind every problem. Listed below are a few reasons behind camera failed error, especially on Vivo Y36 devices:
 Allavsoft Batch Download Online Videos, Music Offline to MP4, MP3, MOV, etc format

- If you have recently updated your OS version, there are chances that certain bugs are preventing the camera App from functioning normally. Also, if the update is interrupted and not downloaded completely, certain apps may suffer.
- There are chances of your internal storage being cluttered with unwanted Apps and files leaving no space for the camera App to save its data and work smoothly.
- If you haven’t cleared camera Cache and Data, the chances of the App to get clogged up increase tremendously which disrupt its working.
- Warning: Camera Failed error can also be a direct outcome of a change in the system settings or the Vivo Y36 device’s internal settings.
- Finally, if you tamper a lot with the camera settings and do not update the App whenever it is available, Vivo Y36 Camera App will not be efficient.
There might be much more reasons for the camera failed error, but these are the most obvious ones. Now let us now move on to troubleshooting the problem.
 PCDJ DEX 3 for Windows & MAC is the total entertainment DJ software solution, offering audio, video, and karaoke mixing ability. Automatic beat-sync, smart looping, 4 decks, DJ MIDI controller support, Karaoke Streaming and much more.
Part 2: How to fix Vivo Y36 Camera Failed in One Click?
If you are experiencing some kind of issues in your Vivo Y36s such as Vivo Y36 camera failed, the Vivo Y36 device stopped working, black screen, play store not working, etc. There is a special software is designed for such kind of issues in Android devices, i.e. dr. fone. The tool enables the users to fix various kinds of issues in the Vivo Y36 devices and perform a complete system repair so the Vivo Y36 device starts working normally.
Dr.Fone - System Repair (Android)
One-click solution to fix camera failed on Vivo Y36 devices
- The tool has a one-click operation which makes it super easy to use.
- You don’t need any technical skills expertise to operate the software.
- The software supports all the Vivo Y36 devices including the latest and older ones.
- The software can fix the “warning camera failed”, the app is crashing, failed update, etc.
4,616,396 people have downloaded it
Note: You have to remember that the system repair may erase all the Vivo Y36 device data. So, create a backup of your Vivo Y36 data first and then try fixing the Vivo Y36 phone.
Follow the steps given below and fix the camera failed error:
Step 1. Download the software on your computer and launch it. Connect your device and select the System Repair option from the main interface. In the next screen, select Android Repair module.
 Forex Robotron Basic Package
Step 2. You will have to provide the Vivo Y36 device details accurately to ensure that the software provides a precise firmware package to be downloaded. Enter brand, name, model, country, and carrier of your device and agree to the terms and condition.
Step 3. Now put your device in the download mode. The software will provide you with a guide to put the phone in download mode to begin the downloading process.

Step 4. As soon as the firmware is downloaded, the software will automatically initiate the repair process. You will be able to see the ongoing repair.
 Easy GIF Animator is a powerful animated GIF editor and the top tool for creating animated pictures, banners, buttons and GIF videos. You get extensive animation editing features, animation effects, unmatched image quality and optimization for the web. No other GIF animation software matches our features and ease of use, that’s why Easy GIF Animator is so popular.
When the software is done repairing the system, you will be notified. Thus, the Camera failed Vivo Y36 error in your phone will be fixed.
Part 3: How to fix Camera Failed error by clearing camera data?
Has anyone ever informed you that it is absolutely necessary to keep clearing camera data every once in a while? Yes, since it deletes all unnecessary data stored in respect of the App and no, it does not mean that all your photos and videos will get deleted. Just follow the steps given below to clear camera data:
1. First, visit “Settings’” on your Vivo Y36 device and select “Apps” or Application Manager”.

2. Now a list of all Apps will appear before you. Keep scrolling down until your find “Camera”.

Tap on “Camera” to open the “Camera Info” screen and once you are there, hit “Clear Data” option as shown below.

That’s all, now return to the Home Screen and access the camera again. Hopefully, it will work now.
Part 4: How to fix Camera Failed error by removing third-party Apps?
Another tip to fix Vivo Y36 camera failed error is by deleting a few unwanted third-party Apps (recently installed) to free some space in the Vivo Y36 device’s internal storage. It is essential to create and keep storage space for the camera App to function smoothly and allow it to store its data as well. Also, if this issue only happens recently, it might be some newly installed Apps causing some glitches with the camera.
Simply, follow the instructions given below to remove Apps from Vivo Y36 Devices:
1. Click on the “Settings” icon on the Home Screen and from the options before you, select “Apps”/ “Application Manager”.
2. You will see that a list of downloaded and built-in Apps will open up before you as follows.

3. Now, once you select the App you want to uninstall, the App Info screen will appear. Tap on “Uninstall” option and then tap on “Uninstall” again on the pop-up message.


The App will be removed immediately and its icon will disappear from the Home Screen and you will notice an increase in the storage capacity of your device.
Part 5: How to fix Camera Failed error by wiping Cache Partition?
This method might seem tedious and time-consuming and you may also lose your data and essential settings. However, wiping the Cache Partition only cleans your device system internally and gets rid off any unwanted and trouble making elements causing Warning: Camera Failed error. Follow the step-by-step guide given below to clean Cache Partition smoothly:
1. Firstly, switch off the Vivo Y36 device by pressing the power button and tapping on “Power Off” as shown in the screenshot below. Then wait for the lit screen to turn off completely before proceeding further.

2. Now, press and hold the power on/off, home and volume up button simultaneously. Your device will now vibrate. This a signal to let go of the power button (only).

3. Once the Recovery Screen appears, leave all buttons and use the volume down key till you reach “Wipe Cache Partition”.

4. Now, to select the option to use the power on/off button and wait for the process to get over. Once this done, tap on “Reboot system now” and see that your device restarts normally.

You may try to use the camera app once the process completes.
Part 6: How to fix Camera Failed error by Reset Settings?
Resetting the camera settings solves the problem 9 out of 10 times and thus is worth a try.
1. To reset, first, launch the Camera App by tapping on its icon.

2. Then go to Camera “Settings” by tapping on the circular gear like icon.

3. Now look for “Reset Settings” options and click on it.

Once done, go back to the Home Screen and start the camera App again to use it.
Part 7: How to fix Camera Failed error by Factory Reset?
Lastly, if the above-mentioned techniques do not help you in fixing the camera failed error, you can consider performing a Factory Reset. Note: This method will delete all your saved data so it is advised to backup before you start the process.
Here are the steps to factory reset your device to fix “Warning: Camera Failed” Error:
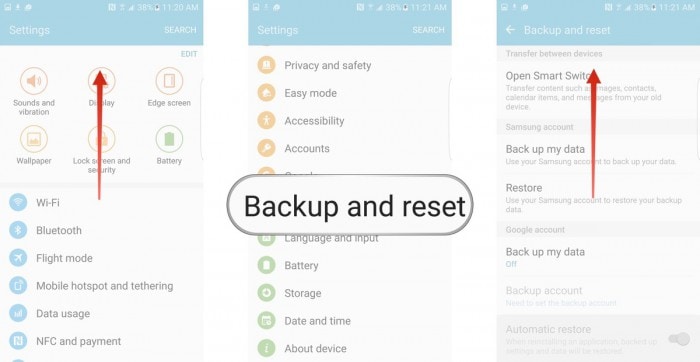
1. Start by visiting “Settings” on your Vivo Y36 device on which the camera has failed.

2. Now from the list of options before you, select “Backup and reset” and move ahead.
 Glarysoft File Recovery Pro Annually - Helps to recover your lost file/data, even permanently deleted data.
3. Now you must first select “Factory data reset” and then tap on “Reset Device” as shown in the screenshot below.


4. Finally, you have to click on “Erase Everything” and wait for the Vivo Y36 device to reboot itself.

Note: You will have to set up your Vivo Y36 device from scratch once it is reset, however, that is a small price to pay to fix your Camera App.
Warning: Camera Failed error is not a rare phenomenon and many users experience it on daily basis. So, there is no need to panic, All you need to do is carefully follow the instructions given above and repair your Camera App yourself. You do not need to seek any technical assistance for the same as the camera failed issue is not difficult to deal with. So go ahead and try these tricks to enjoy using the Camera App on your Vivo Y36 devices.
- Title: 11 Ways to Fix it When My Vivo Y36 Wont Charge | Dr.fone
- Author: Ariadne
- Created at : 2024-07-30 07:19:55
- Updated at : 2024-07-31 07:19:55
- Link: https://howto.techidaily.com/11-ways-to-fix-it-when-my-vivo-y36-wont-charge-drfone-by-drfone-fix-android-problems-fix-android-problems/
- License: This work is licensed under CC BY-NC-SA 4.0.