
11 Ways to Fix it When My Vivo Y78+ Wont Charge | Dr.fone
11 Ways to Fix it When My Vivo Y78+ Won’t Charge
What would you do if your phone or other device’s battery is draining? You will plug it into a power source. Right? What if you realize that your phone won’t charge? My phone won’t charge, and the Vivo Y78+ tablet won’t charge is a common problem.
Android devices are very prone to this problem, and hence Android device owners complain frequently that My Vivo Y78+ won’t charge even when it is plugged into a power source properly. The reason behind the phone won’t charge, or Vivo Y78+ tablet won’t charge are not very complicated and, therefore, can be dealt with by you sitting at home.
A charging problem can occur due to a temporary software crash. It is also possible that a corrupted device cache may be causing such a glitch. Another reason for phones not to charge normally or charge slowly is an inappropriate power source or defective charging cable and adapter. All these and many more problems will be cured in the 10 solutions to fix My Vivo Y78+ won’t charge error.
So if you’re still thinking about why won’t My Vivo Y78+ charge, read on to find out solutions to fix My Vivo Y78+ won’t charge problem.

Part 1. One-click solution to fix Android phone won’t charge
While you are upset over ‘why My Vivo Y78+ won’t charge?’, would you mind us helping you around?
Well, we have got Dr.Fone - System Repair (Android) at your fingertips to get rid of this annoying phone won’t charge issues (caused by system corruption). Whether the Vivo Y78+ device froze or became unresponsive, bricked, or got stuck on the Vivo Y78+ logo/blue screen of death or apps started crashing. It can fix every Android system problem.
Dr.Fone - System Repair (Android)
Easy-to-operate program to fix Android phone won’t charge
- As it supports all the latest Vivo Y78+ devices, it can even easily fix the Vivo Y78+ tablet won’t charge issue.
- With a single click, you can fix your entire Android system issues.
- The very first tool is available in the market for Android system repair.
- Without any technical knowledge, one can use this software.
- This tool is intuitive with a high success rate.
3981454 people have downloaded it
Note: When you are stressed over ‘why won’t My Vivo Y78+ charge’, we are ready to eliminate the tension and make things easier for you. But, before you start fixing the phone won’t charge the problem, make sure to back up the Android device . This fixing process might wipe out all the Vivo Y78+ device data.
Phase 1: Preparing and connecting the Android device
Step 1: Install and then run Dr.Fone - System Repair (Android), the ultimate Android repair software on your PC. Hit the ‘System Repair’ tab, followed by connecting your Vivo Y78+.

Step 2: Tap on the ‘Android Repair’ option and then click ‘Start’ for moving ahead.

Step 3: Mention the detailed information about your Vivo Y78+ under the Vivo Y78+ device information section. Press ‘Next’ then on.

Phase 2: Get to ‘Download’ mode for repairing the Vivo Y78+ device
Step 1: It’s essential that you put the Android device under ‘Download’ mode to resolve the phone won’t charge the issue. Here comes how to do –
- With a ‘Home’ button device, switch off it before holding down the set of keys, including ‘Power’, ‘Volume Down’, and ‘Home’ key for 5-10 seconds. Let them go and hit the ‘Volume Up’ key for entering the ‘Download’ mode.

- If the ‘Home’ button is not there, you got to turn down the Vivo Y78+ device and altogether hold down the ‘Volume Down’, ‘Bixby’, and ‘Power’ keys between 5-10 seconds. Soon after you release the keys, tap the ‘Volume Up’ button for entering the ‘Download’ mode.

Step 2: Click ‘Next’ to start downloading the Android firmware.

Step 3: Now, Dr.Fone - System Repair (Android) would verify the firmware and then start repairing the Android system on its own. It will ultimately fix your ‘why won’t My Vivo Y78+ charge’ trouble.


Part 2. 10 common ways to fix Android won’t charge
1. Check/replace charging cable
Charging cables fray or become defunct after prolonged usage. Therefore, it is advised to always use the Vivo Y78+ device’s original charging cable or purchase a good quality charging cord, which doesn’t damage your device or your adapter.
It is also very commonly observed that the charging end of the cable which gets connected to the charging port of the Vivo Y78+ device gets damaged and prevents the current from flowing to the phone/tablet.

2. Check/clean charging port
The charging port in your device is a small opening where the charging end of the cabbie is inserted for the current to flow to the phone/tablet. Very often, we notice that the charging port gets blocked with tiny particles of dirt. The charging port might also get clogged if dirt and dust get accumulated in it, preventing the sensors from receiving and forwarding the current to the Vivo Y78+ device.

The best way to take this problem is to clean the port with a blunt pin or a soft bristle unused toothbrush. Make sure you clean the port gently and do not damage it or its sensors.


3. Check/replace charging adapter
This method is fairly simple, and all you need to do is check whether or not the charging adapter is working properly as sometimes, the adapter itself is to be blamed for the charge. To make sure that you are not using a defective adapter, connect your charging cable/USB to another adapter. If your device charges normally, it means there is a problem is with your adapter, and you must replace it at the earliest to solve My Vivo Y78+ won’t charge the issue.


4. Try another power source
This technique is more like a quick trick. It means to switch from one power source to another or use a more efficient and suitable power source. Laptops and PCs charge slower than a direct power source, i.e., a wall socket. Sometimes, the charging speed is slower, and the battery is draining. In such a scenario, choose to charge your device by directly plugging it into a socket on the wall to never experience My Vivo Y78+ won’t charge problem.
 NeoDownloader - Fast and fully automatic image/video/music downloader.
5. Clear device Cache
Clearing Cache is a great technique as it cleans your device and all its partitions. By clearing the cache, all the unwanted data and files stored in your device get deleted, which may be causing glitches in the Vivo Y78+ device’s software, preventing it from recognizing the current.
Follow the steps given below to clear your device’s cache:
• Visit “Settings” and find “Storage”

• Now tap on “Cached Data”.

• Click “OK” to clear all unwanted cache from your device as shown above.
Try charging your phone after clearing the cache. If your phone doesn’t charge even now, do not worry. There are more ways to help you combat My Vivo Y78+ won’t charge problem.
6. Re-start/reboot your phone/tablet
Restarting your device to fix why won’t My Vivo Y78+ charge error is a very effective remedy. This method of rebooting your device not only fixes software glitches but other but also tackles other factors/operations that might be running in the background preventing your device from charging.
Restarting a device is simple and can be done by following the steps given below:
• Long press the power button of your device.
• From the options that appear, click on “Restart”/ “Reboot” as shown in the image below.

To restart your device, you may also press the power button for about 20-25 seconds for the phone/tablet to automatically reboot.
7. Download and install the Ampere App
The Ampere app can be downloaded from the Google Play Store. It is very helpful to fix the why won’t my charge error as it gives you real-time information about your device’s battery consumption, charging status, and other essential data.
If the App gives information in green color, it means all is wetland your device is charging normally, however, if the information before you is in orange, you need to take steps to fix the charging problem.


 Any DRM Removal for Mac: Remove DRM from Adobe, Kindle, Sony eReader, Kobo, etc, read your ebooks anywhere.
8. Install software updates
Installing your Android version updates is a good idea as the software is the interface that receives charge from the charging port sensors and gives a command for the phone/tablet to charge. People often continue to use older OS versions, which cause trouble and prevent the Vivo Y78+ device from charging.
To check for and install updates on your device, you must be connected to WiFi or a cellular network. Next, visit “Settings” and select “About device”. Now click on “Software Update”.

If there is an update available, you will be prompted to download it. Just follow the instructions given before you install a brand new Android OS version on your device.
9. Factory reset your device
Factory Reset is must be done after due deliberation. Remember to take a back-up of all your data and contents on the cloud or an external memory device, such as a pen drive before adopting this method because once you perform a factory reset on your device, all media, contents, data and other files are wiped out, including your device settings.
Follow the steps given below to factory reset your device:
• Visit “Settings” by clicking the settings icon as shown below.
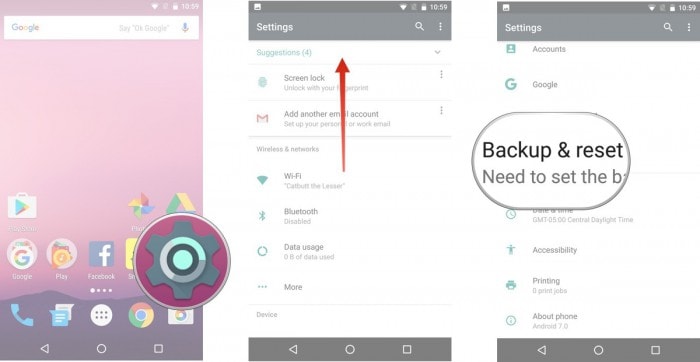
• Now select “Backup and Reset” and move on.
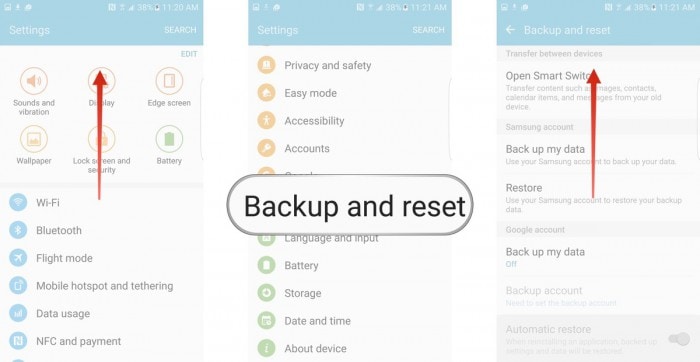
• In this step, select “Factory data reset” and then “Reset Device”.
• Finally, tap on “ERASE EVERYTHING” as shown below to Factory Reset your device.


Note: Once the factory reset process is complete, your device will automatically restart and you will have to set it up once again.
10. Replace your battery
This should be your last resort to fix My Vivo Y78+ won’t charge problem, and you should only attempt to replace your battery if none of the other techniques work. Also, please consult a technician before purchasing and installing a new battery in your device as different phones and tablets have a different type of battery requirements.

Finally, fixing the phone won’t charge the problem is simple, and therefore there is no need for you to worry as you are not the only one experiencing such an issue. Other Android users have tried, tested, and recommended the methods given above to solve why won’t My Vivo Y78+ charge or Vivo Y78+ tablet won’t charge error. So go ahead and try them out now.
Fix Vivo Y78+ Android System Webview Crash 2024 Issue
In recent months, the term “Android WebView crash 2023“ has become a common search term among Android users seeking solutions to these app crashes . The issue has been particularly prevalent on Vivo Y78+ devices, but it has also affected users of other Android models.
Android WebView for Android apps allows you to see and interact with web pages without leaving your app. But lately, it’s been causing more headaches than it’s worth.
So, what’s going on with Vivo Y78+ Android System WebView, and what can you do to fix its issues? Let’s take a look. This article will shed light on Vivo Y78+ Android System WebView crashing apps, helping you understand what triggers them, how to identify them, and what you can do to prevent them from happening again.
Part 1: What Should We Know About Vivo Y78+ Android System WebView Crashes?
This year, the term “Android WebView crash 2023“ has become a familiar and dreaded phrase. This issue has plagued Android users, causing app crashes, freezing , and frustration. But what exactly is Android WebView, and what triggers these apps to crash?
Android WebView is an integral component of Android apps, acting as the invisible engine that renders web content within these apps. It allows users to seamlessly browse websites, watch videos, and interact with web pages without switching to a separate browser. However, when WebView crashes, it disrupts this integrated experience, causing apps to malfunction.
Several signs can indicate an impending or ongoing Android WebView crash. These include:
- App Freezing
One of the earliest signs of an Vivo Y78+ Android System WebView crash is the app freezing. The app may become unresponsive, refusing to respond to your taps or gestures.
- Unexpected App Closures
Another common sign is unexpected app closing. The app may shut down without warning, abruptly ending your activity. Vivo Y78+ Android System WebView crashing apps can be disruptive if you are in the middle of a conversation, shopping online, or filling out an important form.
- Error Messages
Error messages can also provide valuable clues about the impending crash. These messages may appear as pop-ups or be displayed within the app itself.
 Power Tools add-on for Google Sheets, 12-month subscription

- Slow Loading Times
Slow loading times can also be a sign of an impending crash. If webpages within the app take unusually long to load or images and other content appear pixelated or distorted, it could be a sign that Vivo Y78+ Android System WebView is struggling to handle the workload.
But why does WebView crash Android smartphones? The answer involves several factors:
- Updates and Compatibility Issues
Updates are often intended to improve software stability and compatibility, but in some cases, they can introduce new bugs or compatibility issues that lead to crashes. It is particularly evident when app developers and WebView developers release updates that don’t fully align, causing conflicts.
- Insufficient Memory
Vivo Y78+ Android System WebView requires a certain amount of memory to operate properly. If your device is running low on memory, it can cause Vivo Y78+ Android System WebView to crash. It is more likely to happen on older devices with less RAM.
 CollageIt Pro
- Outdated Vivo Y78+ Android System WebView
The WebView app is responsible for rendering web content within Android apps. Using an outdated version of WebView can introduce known bugs and security vulnerabilities that can cause crashes.
- Conflicts With Other Apps
WebView might crash if it conflicts with other resources or processes running on the Vivo Y78+ device. It can happen if the Vivo Y78+ device runs low on memory or other resource-intensive apps compete for system resources.
In the next section, you’ll explore potential solutions to keep your apps running smoothly.
Part 2: Android WebView Crashes? Here Are Quick and Proven Solutions
Now you’ve identified the signs and causes of Vivo Y78+ Android System WebView crashing apps on your phone. While these issues can be frustrating, there are several quick and proven solutions to fix them.
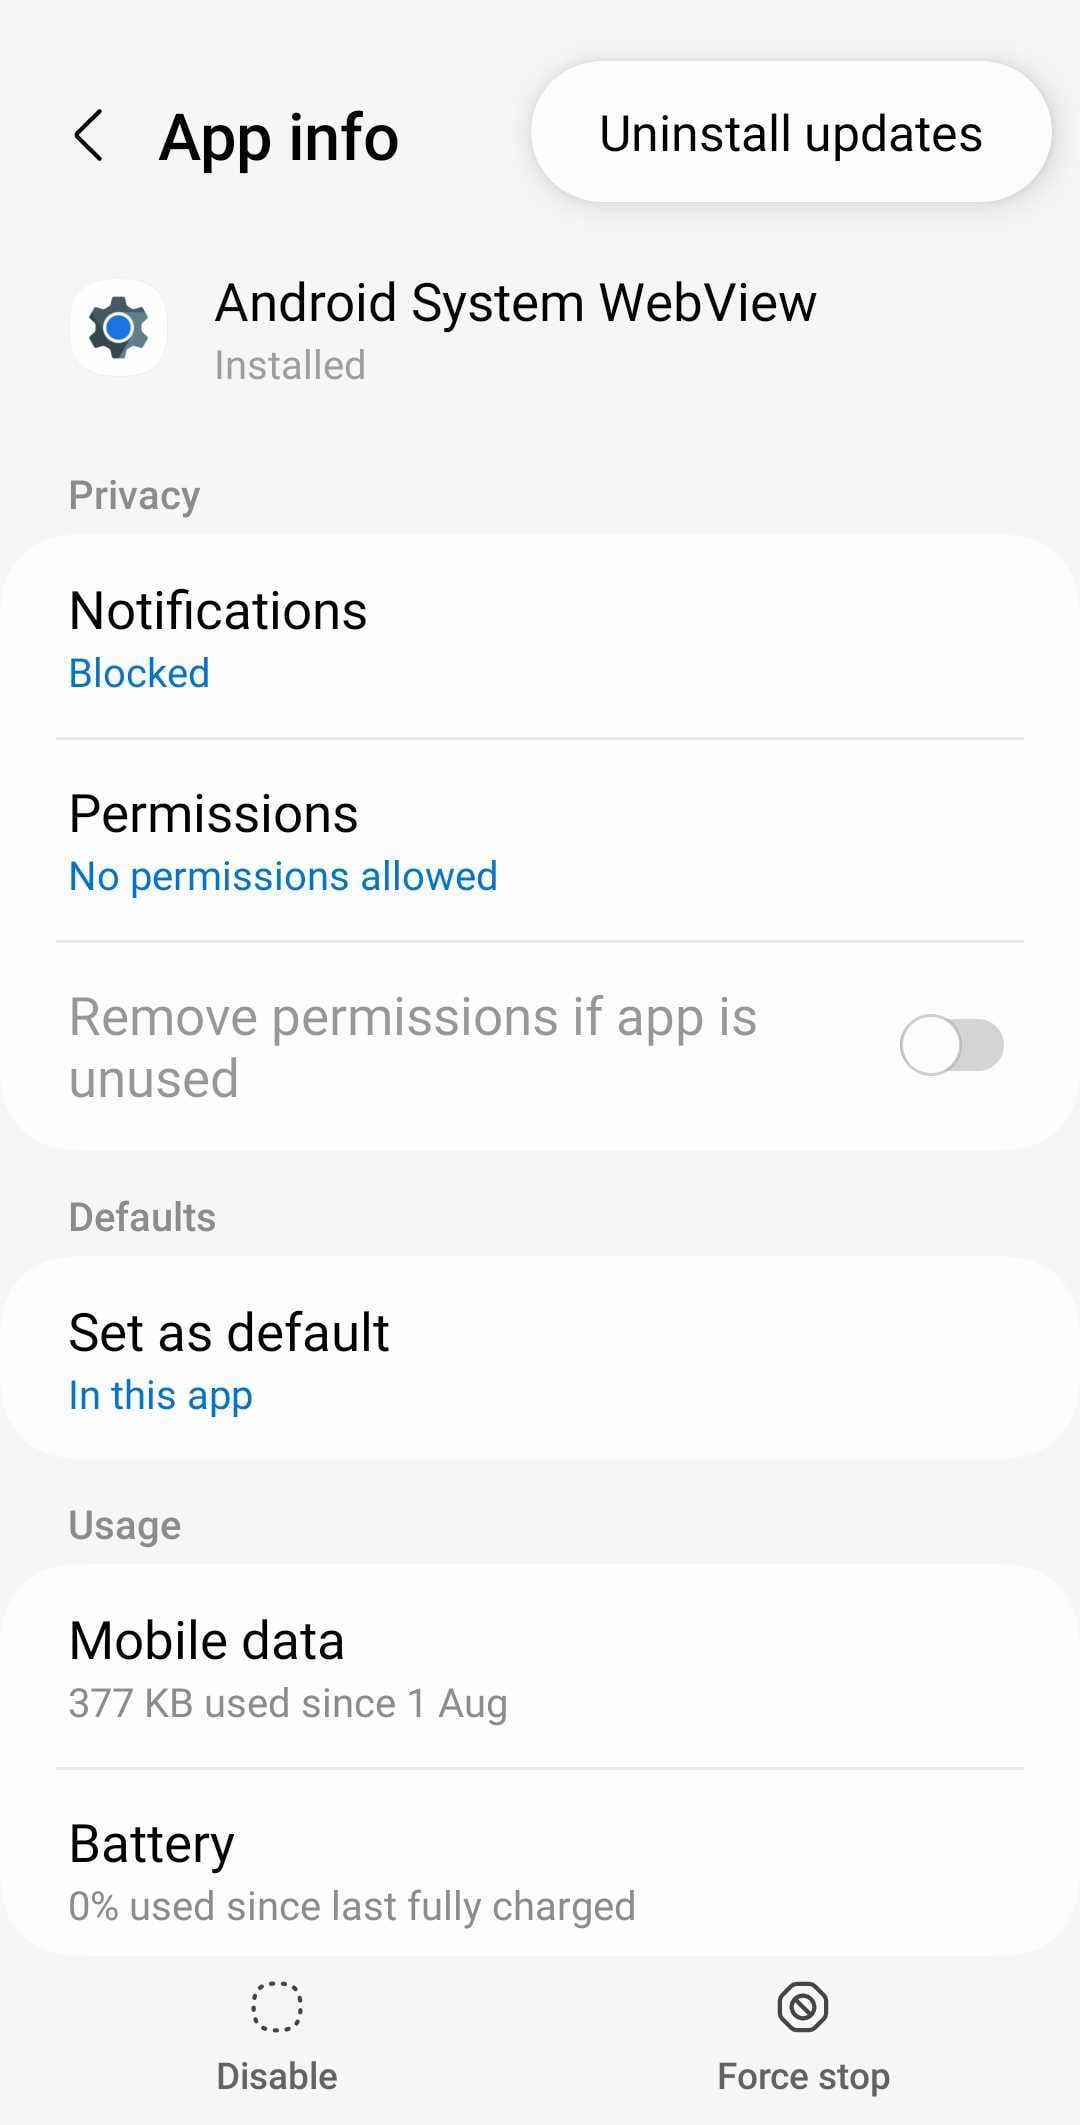
Uninstall WebView Updates
If you’re experiencing apps crashing after a recent update, consider uninstalling those updates. This action can potentially revert to a more stable version of Vivo Y78+ Android System WebView.
To do this on your Vivo Y78+, navigate to Settings > Apps, then select Vivo Y78+ Android System WebView. Tap the menu icon in the top right corner and tap Uninstall updates.

Update Android WebView
Regularly updating Vivo Y78+ Android System WebView to the latest version is crucial for maintaining compatibility and addressing known bugs. Google releases updates to address these concerns, ensuring optimal performance and stability.
Check for available updates on Vivo Y78+ devices by navigating to Settings > Apps. Then, select Vivo Y78+ Android System WebView and tap App details in-store. If an update is available, tap Update to install it and restart your phone.


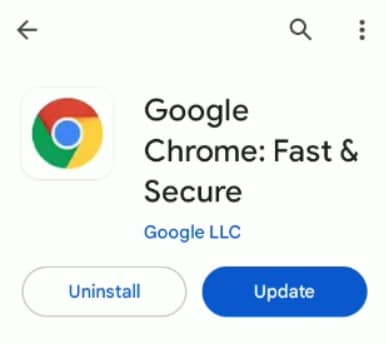
Update Google Chrome
Android WebView is closely tied to Google Chrome, and issues with Chrome can sometimes affect WebView functionality. As such, updating Chrome to the latest version can help address Android System and WebView forcibly closing your phone’s apps.
Open the Google Play Store and search for Google Chrome. If an update is available, tap Update to install it, then restart your device.
Clearing Cache and Data for Android WebView
Clearing the cache frees up phone storage and helps the app run more efficiently. To clear Vivo Y78+ Android System WebView’s cache and data, go to Settings > Apps and select Vivo Y78+ Android System WebView. Tap on Storage and tap Clear cache on the lower right corner of your screen.

Restart Device
A simple restart can often resolve temporary glitches or conflicts that might be causing Android WebView crashes. The specific steps to restart your phone will vary depending on your device type.
Check Internet Connection
A stable internet connection is essential for Vivo Y78+ Android System WebView to render web content properly. If the internet connection is unstable or down, it can lead to crashes. Ensure you have a stable internet connection before using WebView-based apps.
Update Device Software
OS updates may introduce changes to the Vivo Y78+ Android System WebView that make it more compatible with newer web standards and technologies. It can enhance the performance and stability of apps that rely on WebView for web content.
Check for available software updates by going to Settings > Software Update. If an update is required, tap on Download and install.
 OtsAV DJ Pro
While problems like when the Android System WebView crashes Android phones are common, they don’t have to be a persistent problem for Vivo Y78+ users. It’s also equally important to have effective solutions when app crashes occur. This is where Wondershare Dr.Fone steps in as a reliable and comprehensive solution for restoring app stability and overall phone performance.
Part 3: Restoring Apps and Phone Stability: A Step-by-Step Guide
Dr. Fone’s System Repair tool can help you resolve common Android scenarios, including Google Play Store malfunctions and persistent app crashes.
How To Use Dr.Fone for Vivo Y78+ Android System WebView Crashing Apps?
Before attempting any repairs, it is crucial to back up your Vivo Y78+ to prevent data loss. Once you have a secure backup, follow these steps to fix WebView app crashes and restore your Vivo Y78+ to its optimal performance.
- Step 1: Download the Dr.Fone toolkit. Next, install the software on your desktop and launch it.
3,090,920 people have downloaded it
- Step 2: Connect your Vivo Y78+ to your computer using a USB cable. Dr.Fone will automatically detect and establish a connection.
- Step 3: Select the System Repair function from the Toolbox homepage and choose Android to confirm your device type.

- Step 4: Click Start to begin the process of fixing Vivo Y78+ Android System WebView crashes. Next, choose your device details and follow the in-app instructions to put your device in Download mode.
- Step 5: Dr.Fone will analyze your device’s system and download the firmware to solve the root cause of the issue.
- Step 6: Confirm your device information in the dialogue box. Dr.Fone will proceed to repair the detected WebView-related problems.

- Step 7: Once the repair is complete, your device will restart, and Vivo Y78+ Android System WebView crashing apps should no longer occur.
More Articles About Android System:
5 Ways to Do With & Access Android Phone with Broken Screen
Google Play Services Won’t Update? 12 Fixes are Here!
Easy Ways to Bypass Google Account Verification (FRP) On Android Phones
 Easy GIF Animator is a powerful animated GIF editor and the top tool for creating animated pictures, banners, buttons and GIF videos. You get extensive animation editing features, animation effects, unmatched image quality and optimization for the web. No other GIF animation software matches our features and ease of use, that’s why Easy GIF Animator is so popular.
Conclusion
The “Android WebView crash 2023“ issue was widespread for many Android users. The common issues encountered were app crashes, slow loading times, and error messages. Fortunately, these problems are manageable with the right approach.
By understanding the signs and causes of Vivo Y78+ Android System WebView crashes, you can take proactive measures to prevent them. Quick fixes such as clearing cache and data or updates can often resolve the issue promptly.
For more comprehensive troubleshooting, Dr. Fone’s mobile solution offers a reliable and user-friendly approach. Its advanced capabilities effectively tackle app crashing issues, providing you peace of mind that your phone is functioning optimally.
 safe & secure
4,684,259 people have downloaded it
Proven Ways to Fix There Was A Problem Parsing the Package on Vivo Y78+
Unable to install your favorite Apps from Google Play Store because there was a problem parsing the package?
The Parse Error or there was a problem parsing the package error is very common with Android devices. Android is a versatile platform and, therefore, a very popular OS. It is an open software and allows users to download and use various types of apps from the Play store. Android is also a cheaper alternative as compared to other Operating Software.
Since many of us are well versed with most of the Android devices, parse error, or there is a problem parsing the package is an error is not something new and uncommon.
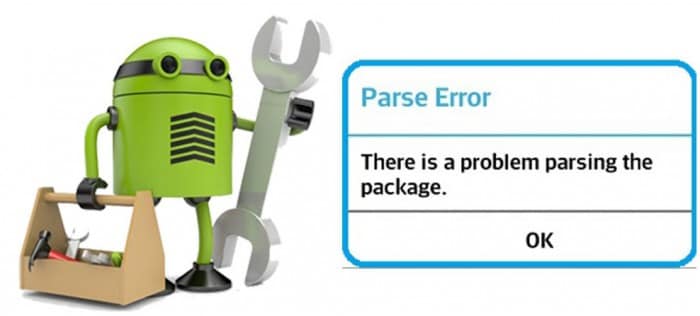
The error message usually pops up on the Vivo Y78+ device screen when we try to download and install an App, for example, “There is a problem parsing the package Pokémon Go ”.
The error message which appears reads as follows:
“Parse error: There is a problem parsing the package”.
Android users who have experienced this would know that the parse error leaves us with only one option, i.e., “OK” as shown in the image below.
There was a problem parsing the package may occur due to several reasons, most of which are listed and explained below. Furthermore, there is a list of solutions to choose from to eliminate the “there is a problem parsing the package” error.
Read on to find out more.
Part 1: Reasons for the parsing error
Parse Error, better known as “there was a problem parsing the package” error is very common and normally surfaces when we try to download and install new Apps onto our Android devices from Google Play Store.

The reason for the error message to pop-up are many but none of them can be blamed singularly for the “there is a problem parsing the package” error. Given below is a list of the most probable reasons for Parse Error to stop an App from installing. Examine them carefully before moving on to the solutions to fix the “there was a problem parsing the package” error.
• Updating the OS may cause some disturbances in the manifest files of different Apps leading to Parse Error.
• Sometimes, the APK File, i.e., Android Application Package, gets infected due to improper or incomplete App installation causing “there is a problem parking the package” error.
• When Apps are downloaded and installed from unknown sources, due permission is needed. In the absence of such permission, the chances of the Parse Error to occur increase.
• Certain Apps are not compatible or supported by the latest and updated Android versions.
• Anti-virus and other cleaning Apps are also a major reason for the “there was a problem parsing the package” error.
The causes listed above are not App specific. The Parse Error may occur due to any one or more of these reasons, but what is more important is to try to get rid of the problem.
Let us move on to learn ways to fix the there was a problem parsing the package error.
Part 2: 8 Solutions to fix the parsing error
“There is problem parking the package” error can be dealt with easily if only we do not panic and deliberately follows the steps explained in this segment. Here are 7 of the most reliable and trustworthy methods to fix the Parse Error.
They are easy, user-friendly, and do not take much of your time. So don not waste any more of your time and try them now.
2.1 One Click to Fix ‘There is a Problem Parsing the Package
If you’re still encountering the Parsing error, there may be a problem with the Vivo Y78+ device data on your device, which means you’ll need to repair it. Luckily, there’s a simple, one-click solution you can follow called Dr.Fone - System Repair .
Dr.Fone - System Repair (Android)
Android repair tool to fix all android system issues in one click
- Simple, clean, and user-friendly interface
- No technical knowledge required
- Easy one-click repair to fix ‘there is a problem parsing the package’ error
- Should repair most parsing problems with apps, like ‘there is a problem parsing the package Pokemon Go’ error
- Supports most Vivo Y78+ devices and all the latest models like Galaxy S9/S8/Note 8
3981454 people have downloaded it
If this sounds like the solution you’re looking for, here’s a step by guide on how to use it yourself;
Note: Please note that this repair process can erase all data on your phone, including your personal information. This is why it’s so important to back up your Vivo Y78+ before proceeding.
Step #1 Head over to the Dr.Fone website and download the software. Install the downloaded software and open it. From the main menu, select the System Repair option.
Input your device and firmware information to confirm you’re installing the right version of the operating system.
Step #2 Follow the onscreen instructions on how to get into Download Mode to start the Repair process.
Once complete, the firmware will start downloading.

Step #3 Once the firmware has downloaded, it will automatically install it to your device.
When this is completed, you’ll be free to disconnect your Vivo Y78+ and use it how you please without the ‘there is a problem with the parsing package’ error.
2.2 Allow installation from unknown sources
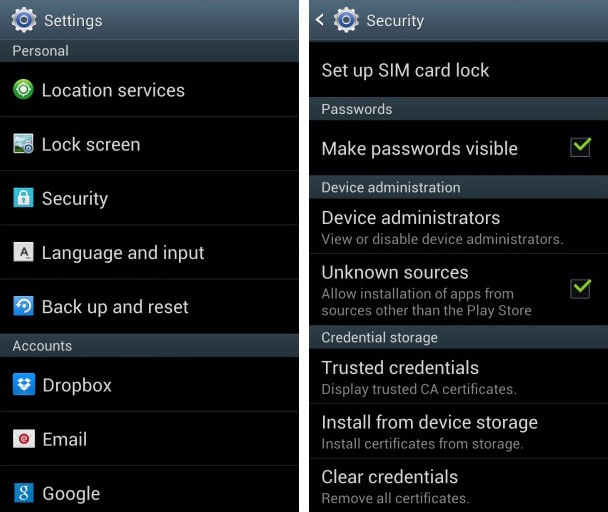
When we install Apps from other sources and not Google Play Store, there might be a glitch in using such Apps. To overcome this problem, turn on “Allow App installation from other sources”. Follow the steps given below for better understanding:
• Visit “Settings” and select “Applications”.
• Now tick mark on the option saying allow App installation from unknown sources.
2.3 Enable USB debugging
USB debugging is not considered necessary by many users but these methods give you an edge over others while using an Android device as it lets you access things on your phone, etc which you could not earlier.
To enable USB Debugging to fix “There is a problem parsing the package” error, follow these steps:
• Visit “Settings” and select “About Device”.
• Now click on “Build Number” not once but continuously for seven times.


• Once you see a pop-up saying “You are now a developer”, go back to “Settings”.

• In this step, select “Developer Options” and turn on “USB Debugging”.

This should solve the problem. If not, move on to the other techniques.
2.4 Check APK File
An incomplete and irregular App installation may cause the .apk file to get corrupted. Make sure you download the file completely. If need be, delete the existing App or its .apk file and reinstall it from Google Play Store for it to be compatible with your device’s software and to use the App smoothly.
2.5 Check App Manifest File
Manifested App files are nothing but .apk files which are improvised by you. Such changes may cause the Parse Error to occur more frequently. Modifications in the App file can be made by changing its name, App settings, or more advanced customizations. Make sure you roll back all changes and restore the App file to its original state to prevent it from getting corrupted.
2.6 Disable Antivirus and other cleaner Apps
Antivirus software and other cleaning Apps are very helpful in blocking unwanted and harmful Apps from damaging your device. However, sometimes such Apps also prevent you from using other safe Apps.
We do not suggest that you delete the Antivirus App permanently. Temporary uninstallation will be useful here. To do so:
• Visit “Settings” and then select “Apps”.
• Select the antivirus App to click on “Uninstall” and then tap “OK”.
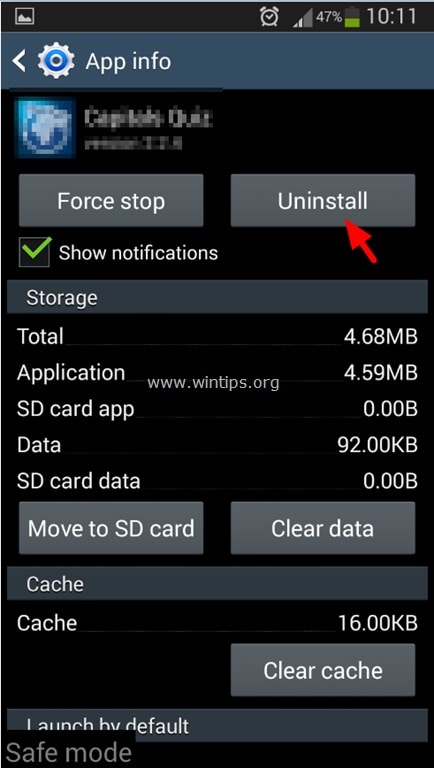
Now download and install the desired App again. Once this is done, do not forget to install the Antivirus App again.
2.7 Clear Cache cookies of Play Store
Clearing Play Store Cache cleans the Android Market platform by deleting all clogged up unwanted data. Follow the steps given below to delete Play Store cache:
• Tap on Google Play Store App.
• Now visit Play Store’s “Settings”.

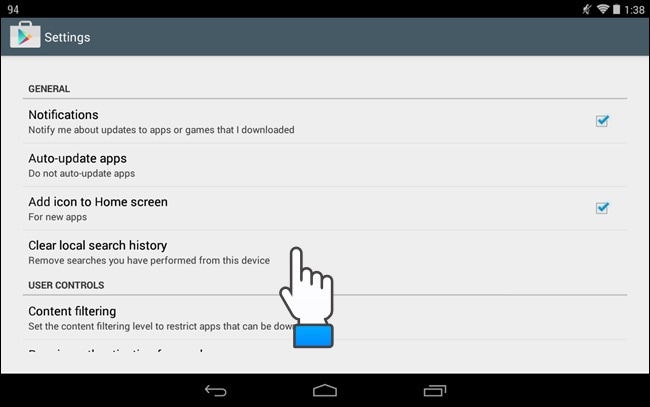
• Select “General Settings” to “Clear local search history”.
2.8 Factory Reset Android
Factory Resetting your device to fix the Parse Error should be the last thing you try. Make sure you take a back-up of all your data on your Google Account or a Pen Drive because this technique erases all media, contents, data, and other files, including your device settings.
Follow the steps given below to factory reset your device:
• Visit “Settings”.
• Now select “Backup and Reset”.

• In this step, select “Factory data reset” and then “Reset Device” to confirm Factory Reset.
The whole process of factory resetting your Vivo Y78+ might sound tedious, risky, and cumbersome but it helps to fix the Android SystemUI has stopped error 9 out of 10 times. So, think carefully before using this remedy.
Parse Error: There was a problem parsing the package is an error message that has troubled many Android users. The good part is that the above-stated fixes not only solve the problem but also prevent it from occurring in the future. So, keep them in mind the next time you or anyone you know faces such an issue.
- Title: 11 Ways to Fix it When My Vivo Y78+ Wont Charge | Dr.fone
- Author: Ariadne
- Created at : 2024-07-30 07:20:01
- Updated at : 2024-07-31 07:20:01
- Link: https://howto.techidaily.com/11-ways-to-fix-it-when-my-vivo-y78plus-wont-charge-drfone-by-drfone-fix-android-problems-fix-android-problems/
- License: This work is licensed under CC BY-NC-SA 4.0.