
11 Ways to Fix it When My Vivo Y78t Wont Charge | Dr.fone
11 Ways to Fix it When My Vivo Y78t Won’t Charge
What would you do if your phone or other device’s battery is draining? You will plug it into a power source. Right? What if you realize that your phone won’t charge? My phone won’t charge, and the Vivo Y78t tablet won’t charge is a common problem.
Android devices are very prone to this problem, and hence Android device owners complain frequently that My Vivo Y78t won’t charge even when it is plugged into a power source properly. The reason behind the phone won’t charge, or Vivo Y78t tablet won’t charge are not very complicated and, therefore, can be dealt with by you sitting at home.
A charging problem can occur due to a temporary software crash. It is also possible that a corrupted device cache may be causing such a glitch. Another reason for phones not to charge normally or charge slowly is an inappropriate power source or defective charging cable and adapter. All these and many more problems will be cured in the 10 solutions to fix My Vivo Y78t won’t charge error.
So if you’re still thinking about why won’t My Vivo Y78t charge, read on to find out solutions to fix My Vivo Y78t won’t charge problem.
 PDF application, powered by AI-based OCR, for unified workflows with both digital and scanned documents.
 Part 1. One-click solution to fix Android phone won’t charge
While you are upset over ‘why My Vivo Y78t won’t charge?’, would you mind us helping you around?
Well, we have got Dr.Fone - System Repair (Android) at your fingertips to get rid of this annoying phone won’t charge issues (caused by system corruption). Whether the Vivo Y78t device froze or became unresponsive, bricked, or got stuck on the Vivo Y78t logo/blue screen of death or apps started crashing. It can fix every Android system problem.
Dr.Fone - System Repair (Android)
Easy-to-operate program to fix Android phone won’t charge
- As it supports all the latest Vivo Y78t devices, it can even easily fix the Vivo Y78t tablet won’t charge issue.
- With a single click, you can fix your entire Android system issues.
- The very first tool is available in the market for Android system repair.
- Without any technical knowledge, one can use this software.
- This tool is intuitive with a high success rate.
3981454 people have downloaded it
Note: When you are stressed over ‘why won’t My Vivo Y78t charge’, we are ready to eliminate the tension and make things easier for you. But, before you start fixing the phone won’t charge the problem, make sure to back up the Android device . This fixing process might wipe out all the Vivo Y78t device data.
Phase 1: Preparing and connecting the Android device
Step 1: Install and then run Dr.Fone - System Repair (Android), the ultimate Android repair software on your PC. Hit the ‘System Repair’ tab, followed by connecting your Vivo Y78t.

Step 2: Tap on the ‘Android Repair’ option and then click ‘Start’ for moving ahead.

Step 3: Mention the detailed information about your Vivo Y78t under the Vivo Y78t device information section. Press ‘Next’ then on.


Phase 2: Get to ‘Download’ mode for repairing the Vivo Y78t device
Step 1: It’s essential that you put the Android device under ‘Download’ mode to resolve the phone won’t charge the issue. Here comes how to do –
- With a ‘Home’ button device, switch off it before holding down the set of keys, including ‘Power’, ‘Volume Down’, and ‘Home’ key for 5-10 seconds. Let them go and hit the ‘Volume Up’ key for entering the ‘Download’ mode.
 Any DRM Removal for Mac: Remove DRM from Adobe, Kindle, Sony eReader, Kobo, etc, read your ebooks anywhere.
- If the ‘Home’ button is not there, you got to turn down the Vivo Y78t device and altogether hold down the ‘Volume Down’, ‘Bixby’, and ‘Power’ keys between 5-10 seconds. Soon after you release the keys, tap the ‘Volume Up’ button for entering the ‘Download’ mode.
 Easy and Safe Partition Software & Hard Disk Manager

Step 2: Click ‘Next’ to start downloading the Android firmware.

Step 3: Now, Dr.Fone - System Repair (Android) would verify the firmware and then start repairing the Android system on its own. It will ultimately fix your ‘why won’t My Vivo Y78t charge’ trouble.


Part 2. 10 common ways to fix Android won’t charge
1. Check/replace charging cable
Charging cables fray or become defunct after prolonged usage. Therefore, it is advised to always use the Vivo Y78t device’s original charging cable or purchase a good quality charging cord, which doesn’t damage your device or your adapter.
It is also very commonly observed that the charging end of the cable which gets connected to the charging port of the Vivo Y78t device gets damaged and prevents the current from flowing to the phone/tablet.


2. Check/clean charging port
The charging port in your device is a small opening where the charging end of the cabbie is inserted for the current to flow to the phone/tablet. Very often, we notice that the charging port gets blocked with tiny particles of dirt. The charging port might also get clogged if dirt and dust get accumulated in it, preventing the sensors from receiving and forwarding the current to the Vivo Y78t device.
 PCDJ Karaoki is the complete professional karaoke software designed for KJs and karaoke venues. Karaoki includes an advanced automatic singer rotation list with singer history, key control, news ticker, next singers screen, a song book exporter and printer, a jukebox background music player and many other features designed so you can host karaoke shows faster and easier!
The best way to take this problem is to clean the port with a blunt pin or a soft bristle unused toothbrush. Make sure you clean the port gently and do not damage it or its sensors.

3. Check/replace charging adapter
This method is fairly simple, and all you need to do is check whether or not the charging adapter is working properly as sometimes, the adapter itself is to be blamed for the charge. To make sure that you are not using a defective adapter, connect your charging cable/USB to another adapter. If your device charges normally, it means there is a problem is with your adapter, and you must replace it at the earliest to solve My Vivo Y78t won’t charge the issue.

4. Try another power source
This technique is more like a quick trick. It means to switch from one power source to another or use a more efficient and suitable power source. Laptops and PCs charge slower than a direct power source, i.e., a wall socket. Sometimes, the charging speed is slower, and the battery is draining. In such a scenario, choose to charge your device by directly plugging it into a socket on the wall to never experience My Vivo Y78t won’t charge problem.
5. Clear device Cache
Clearing Cache is a great technique as it cleans your device and all its partitions. By clearing the cache, all the unwanted data and files stored in your device get deleted, which may be causing glitches in the Vivo Y78t device’s software, preventing it from recognizing the current.
Follow the steps given below to clear your device’s cache:
• Visit “Settings” and find “Storage”

• Now tap on “Cached Data”.

• Click “OK” to clear all unwanted cache from your device as shown above.
Try charging your phone after clearing the cache. If your phone doesn’t charge even now, do not worry. There are more ways to help you combat My Vivo Y78t won’t charge problem.
6. Re-start/reboot your phone/tablet
Restarting your device to fix why won’t My Vivo Y78t charge error is a very effective remedy. This method of rebooting your device not only fixes software glitches but other but also tackles other factors/operations that might be running in the background preventing your device from charging.
Restarting a device is simple and can be done by following the steps given below:
• Long press the power button of your device.
• From the options that appear, click on “Restart”/ “Reboot” as shown in the image below.

To restart your device, you may also press the power button for about 20-25 seconds for the phone/tablet to automatically reboot.

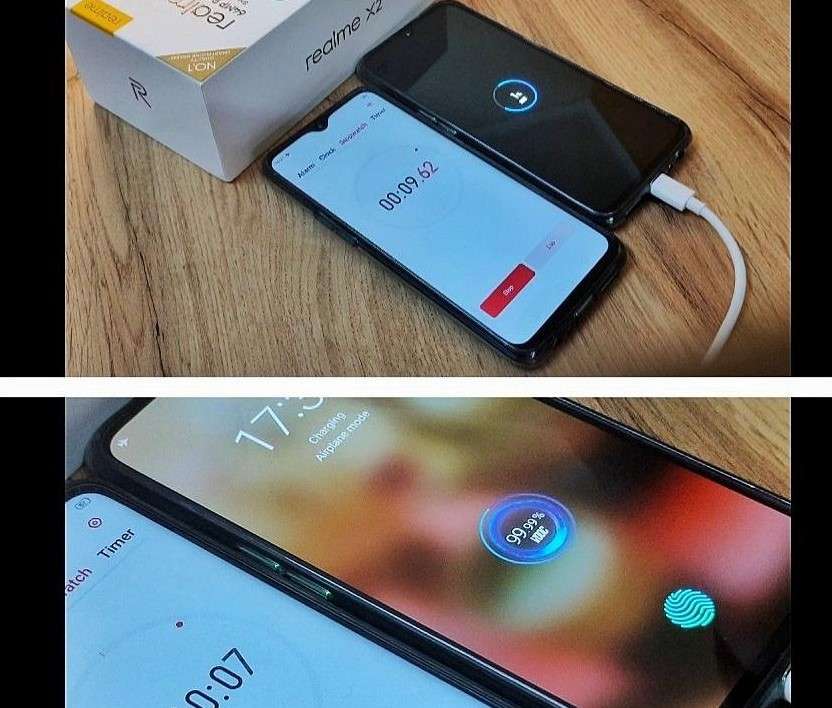
7. Download and install the Ampere App
The Ampere app can be downloaded from the Google Play Store. It is very helpful to fix the why won’t my charge error as it gives you real-time information about your device’s battery consumption, charging status, and other essential data.
If the App gives information in green color, it means all is wetland your device is charging normally, however, if the information before you is in orange, you need to take steps to fix the charging problem.


 Greeting Card Builder
8. Install software updates
Installing your Android version updates is a good idea as the software is the interface that receives charge from the charging port sensors and gives a command for the phone/tablet to charge. People often continue to use older OS versions, which cause trouble and prevent the Vivo Y78t device from charging.
To check for and install updates on your device, you must be connected to WiFi or a cellular network. Next, visit “Settings” and select “About device”. Now click on “Software Update”.
 PaperScan Professional: PaperScan Scanner Software is a powerful TWAIN & WIA scanning application centered on one idea: making document acquisition an unparalleled easy task for anyone.
If there is an update available, you will be prompted to download it. Just follow the instructions given before you install a brand new Android OS version on your device.
9. Factory reset your device
Factory Reset is must be done after due deliberation. Remember to take a back-up of all your data and contents on the cloud or an external memory device, such as a pen drive before adopting this method because once you perform a factory reset on your device, all media, contents, data and other files are wiped out, including your device settings.
Follow the steps given below to factory reset your device:
• Visit “Settings” by clicking the settings icon as shown below.
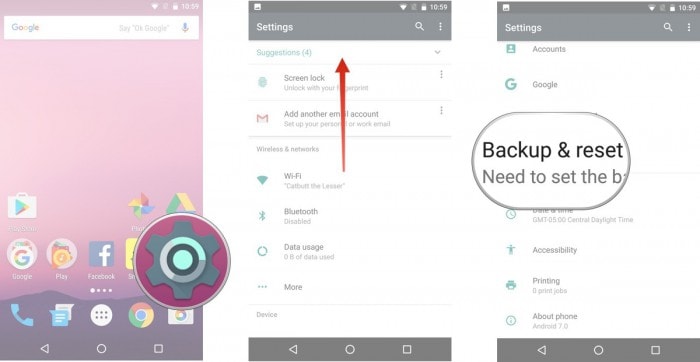
• Now select “Backup and Reset” and move on.

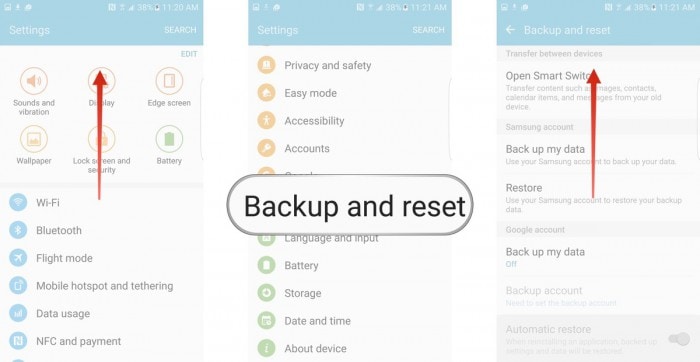
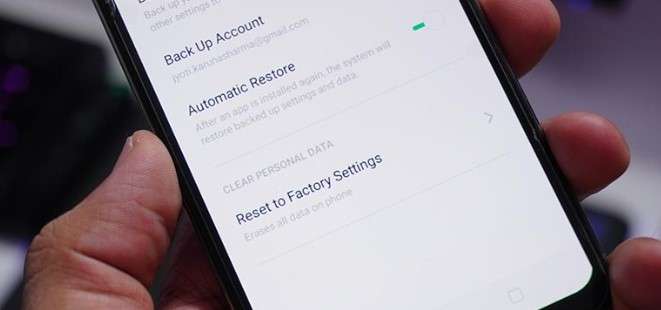
• In this step, select “Factory data reset” and then “Reset Device”.
• Finally, tap on “ERASE EVERYTHING” as shown below to Factory Reset your device.
 Project Manager - Asset Browser for 3Ds Max

Note: Once the factory reset process is complete, your device will automatically restart and you will have to set it up once again.
10. Replace your battery
This should be your last resort to fix My Vivo Y78t won’t charge problem, and you should only attempt to replace your battery if none of the other techniques work. Also, please consult a technician before purchasing and installing a new battery in your device as different phones and tablets have a different type of battery requirements.
 OtsAV TV Webcaster
Finally, fixing the phone won’t charge the problem is simple, and therefore there is no need for you to worry as you are not the only one experiencing such an issue. Other Android users have tried, tested, and recommended the methods given above to solve why won’t My Vivo Y78t charge or Vivo Y78t tablet won’t charge error. So go ahead and try them out now.
Troubleshooting Guide: How to Fix an Unresponsive Vivo Y78t Screen

Smart devices have become an integral part of our lives, and Vivo Y78t phones are increasingly popular due to their advanced features and affordable prices. These phones offer numerous benefits, including high-quality cameras, fast processors, long-lasting batteries, and sleek designs.
However, like any other electronic device, Vivo Y78t phones can sometimes encounter issues that may impede their functionality. One common problem that users face is an unresponsive screen, which can be frustrating and disruptive to daily activities.
This article will discuss some valuable solutions for dealing with Vivo Y78t phone screen unresponsiveness. We will provide step-by-step instructions for troubleshooting and getting your phone back in working order. Whether you’re a novice or an experienced user, these tips and tricks will help you navigate this problem and get back to using your phone without any issues. So, let’s dive in and explore how to fix a Vivo Y78t phone with an unresponsive screen.
What causes the Vivo Y78t Screen unresponsive?
The Vivo Y78t screen may become unresponsive due to various reasons. Here are some common situations and their possible causes:
During Use/Gaming: The screen may become unresponsive due to overheating when using or gaming on a Vivo Y78t phone. This can be caused by running too many apps simultaneously or playing games for an extended period, especially on models such as the Vivo Y78t 9 Pro, which generates much heat during gaming.
**No Response When Touching the Screen:**Sometimes, the Vivo Y78t screen may not respond when touched due to a faulty touch screen or display. This can happen due to physical damage or a manufacturing defect. Some Vivo Y78t Nord 2 users have reported this issue.
After Dropping the Phone: If a Vivo Y78t phone has been dropped, the screen may become unresponsive due to physical damage or a loose connection. This can happen to any model, including the Vivo Y78t.
Overheating, physical damage, and manufacturing defects are some common causes of Vivo Y78t screen unresponsiveness, which may occur during use/gaming, no response when touching the screen, or after dropping the phone.
The common solutions to solve a Vivo Y78t Screen unresponsive
Here are the three most common solutions to deal with phone screens being unresponsive, regardless of the brand:
Restart the Vivo Y78t device

Restarting the Vivo Y78t device is a simple and quick solution to an unresponsive phone screen. To restart the phone, press and hold the power button until the screen turns off, then press and hold the power button again to turn the phone back on.
Check the Charging Port and Battery
Sometimes, an unresponsive screen can be caused by a dead battery or a faulty charging port. To check for these issues:
Step 1: Plug the phone into a charger and wait for at least 30 minutes to see if the battery charges.
Step 2: Try a different charger or cable to see if the issue is with the charging accessories.

Contact the Pros

If the above solutions don’t work, contacting a professional is best. A trained technician can diagnose and fix the problem. Contact the phone manufacturer or an authorized repair center to get help with your phone.
For different Vivo Y78t models, there may be additional solutions to consider:
Check the Phone’s Temperature

Sometimes, a Vivo Y78t phone’s screen, specifically Vivo Y78t 8 Pro, may become unresponsive due to overheating. To check the phone’s temperature:
Step 1: Go to Settings > Battery > Battery Temperature.
Step 2: If the phone is overheating, let it cool down before using it again.
Reset to Factory Settings
A factory reset may help fix the problem if none of the above solutions work. Note that this will erase all data and settings on the phone, so be sure to back up your data before resetting. To reset the phone:
Step 1: Go to Settings > Additional Settings > Backup and Reset > Erase All Data.
Step 2: Follow the on-screen instructions to reset the phone.
Replace a New Screen

If the phone’s screen is physically damaged or cracked, it may need to be replaced. To replace the screen:
- Contact a professional repair center or the manufacturer for replacement parts and installation.
How to avoid Vivo Y78t Screen being unresponsive?
To avoid Vivo Y78t screen being unresponsive, here are some suggestions based on the possible causes:
Check Software Updates on Time
Make sure to regularly check for and install software updates on your Vivo Y78t phone. These updates often include bug fixes and security patches that can help prevent issues like overheating and screen unresponsiveness.
Check Hardware from Time to Time
Regularly inspect your phone’s hardware components such as charging ports, battery, and screen for any signs of damage or wear and tear. If you notice any issues, get them fixed promptly to prevent them from causing further damage.
Avoid extreme temperatures
Keep your Vivo Y78t device in a temperature-controlled environment. High temperatures can cause the screen to become unresponsive, and low temperatures can cause it to freeze.

Keep the screen clean
Dirt and debris on the screen can cause it to become unresponsive. Use a microfiber cloth to clean the screen regularly.
Reduce the number of running apps
Running too many apps at once can overload the system and cause the screen to become unresponsive. Close any apps you’re not using to free up system resources.
![]() FX PRO (Gold Robot + Silver Robot(Basic Package))
FX PRO (Gold Robot + Silver Robot(Basic Package))
Use Wondershare Dr.Fone to Repair or Manage Your Data
Wondershare Dr.Fone is a helpful tool that can help manage and repair your phone’s data. It can be used to back up your data, transfer files between devices, and even fix issues like an unresponsive screen. Dr.Fone has the DF13 version to be launched, which includes more features to help manage your phone’s data effectively.
By following these suggestions, you can help prevent screen unresponsiveness on your Vivo Y78t phone. Download Dr.Fone at https://drfone.wondershare.com/ to manage your phone’s data effectively and fix any issues that may arise.
 ZoneAlarm Extreme Security NextGen
 safe & secure
Conclusion
Vivo Y78t phones offer numerous benefits, including high-quality cameras, fast processors, long-lasting batteries, and sleek designs. However, like any other electronic device, Vivo Y78t phones can sometimes encounter issues, such as an unresponsive screen. The causes of an unresponsive screen may include overheating, physical damage, and manufacturing defects.
To deal with an unresponsive screen, users can try restarting the Vivo Y78t device, checking the charging port and battery, or contacting a professional. Additional solutions for specific Vivo Y78t models include checking the phone’s temperature, resetting to factory settings, or replacing a new screen. To avoid an unresponsive screen, users can check software updates on time, inspect the phone’s hardware, avoid extreme temperatures, keep the screen clean, and reduce the number of running apps. Dr.Fone is a helpful tool that can help manage and repair your phone’s data.
6 Solutions to Fix Error 505 in Google Play Store on Vivo Y78t
In case you are receiving the error code 505 while downloading an application from Google play store and have no clue what is it, then this is the right article for you. In this article we are covering the reasons behind the occurrence of Google play error 505. Not only that, we are also providing 6 solutions to fix the error code 505. Usually, this error is seen with Android 5.0 Lollipop version and occurs at the time when you try to install the already downloaded application making it hard to run the app.
Such an error is a kind of permission error. That is, in case you have two similar kinds of applications such as banking apps and both looking for similar kind of permission, causes conflict error named as error 505.
The occurrence chance is more in the old operating systems, 4 KitKat, Android version 4. Let us then proceed to know more about this error 505.
Part 1: Reasons for Google Play error 505

As per the report by some users, error 505 occurs in certain apps such as Weather App, SBI, ITV, Adobe Air 15, We Chat etc.
To have the right idea about the problem, we have listed all the reasons of it occurrence below:
- Google play store is not updated or refreshed (Causes the error during the downloading process)
- Due to installation of an outdated version (In case your Android version is outdated may result in error in the installation process)
- Cache memory(Is the redundant data occurs due to search history)
- Application is not compatible with the Android OS (If the app you are downloading is not the updated may cause error)
- Adobe air app
- Data crash (Many time app or Google play store crashed crashes after downloading it, reason may be some bugs, so many apps are open, less memory etc.)
Now that we know the reasons, let us also learn about the solutions that will guide you to resolve the error code 505.
Part 2: 6 Solutions to fix error code 505
Any error that occurs during downloading or installation process not only hinders with the new app but also takes a large amount of our time to solve the issue. To check that, let us go through the 6 solutions one by one.
Solution 1: One click to make error code 505 disappear
The most common cause for error code 505 pop-up is that Android system files that underpin the Google Play module are corrupted. To make error code 505 disappear in this condition, you should have your Android system repaired.
Dr.Fone - System Repair (Android)
One click to repair Android system and make error code 505 disappear
- Fix all Android system issues like error code 505, error code 495, error code 963, etc.
- One click to fix error code 505. No technical skills required.
- Supports all the new Vivo Y78t devices like Galaxy S8, S9, etc.
- Easy-to-understand instructions provided on each screen.
4,999,459 people have downloaded it
Now, you just need to follow these Android repair steps to fix error code 505:
Note: Android repair needs to flash the system firmware, which may erase existing Android data. To prevent data loss, back up all the important data from Android to PC .
Step1: Download the Dr.Fone - System Repair (Android) program , install and launch it. The following interface will pop up.
Step2: Select the “Android Repair” among the 3 tabs, connect your Android to PC, and click “Start”.
Step3: Choose the correct device details from each field, confirm them and continue.
 Simple and intuitive video editing
Step4: Boot your Android in download mode, then start downloading the firmware of your device.
Step5: After the Vivo Y78t device firmware is downloaded, the tool will start repairing your Android.

Step6: When your Android is repaired, the error code 505 will disappear.
Solution 2: Check whether Download Manger is ON or not
Many times download manager is set to disable due to which you are not able to download or install the app. So, it is required to make a check whether the download manager is set on or off. So that your installation process will work properly. The process to enable the download manager is as follows.
>Go to Settings
>Select the Application Manger or App (Option depends upon the Vivo Y78t device)
At the top, an option will appear
>Swipe right till you locate Download manager at top of the screen of the Vivo Y78t device
>Then Select Enable

Enabling download manager to give permission to the Vivo Y78t device to start the download or installation process.
Solution 3: Updating to the latest version of OS of your Vivo Y78t
Working with an old operating system is ok, but many times old version also creates some problem and is the main reason behind the occurrence of any bug or error. So, updating the older version act like a rescue to get rid of any such issue or bug. The Process of updation is quite simple; you just need to follow the below steps and your device is ready to get updated to the latest version. Steps are:
- >Go to Settings
- >Select about Phone
- >Click on System Update
- >Check for updates
- >Click on Update
- >Need to click on Install (if any update is available)

Solution 4: Clearing the cache memory from Google services Framework and Google play store
While browsing data online or through Google play store some cache memory get stored for the fast access to the pages. Below mentioned simple steps will help you in clearing out the cache memory from Google services framework and Google play store.
Process to clear the Cache memory for Google Services Framework
- >Go to Settings
- >Select Applications
- >Click on Manage Applications
- >Click to select ‘ALL’
- >Click on Google services framework
- >Select ‘Clear data and clear cache’
That will remove the cache memory of your Google services framework
Steps to Cache memory of Google Play Store
- >Go to Settings
- >Applications
- >Manage Applications
- >Click to select ‘ALL’
- >Select Google Play store
- >Clear data and clear cache
It will clear the cache of Google play store

Clearing the cache memory remove the extra temporary memory, thus free up space for the further installation process.
Solution 5: Reinstalling play store Updates
The reason behind the installation error code 505 might be Google play store updates.
Due to continuous updation of new apps and services Google Play store used to be flooded with so many updates or sometimes does not updated properly. That sometimes caused the problem in dealing with app installation. Resolving the issue is important to make your play store ready for future updation and installation.

- >Go to Settings
- >Visit Application Manager or Apps
- >Select Google Play Store
- >Click on Uninstalling Updates
- >A Message will appear ‘Change play store app to factory version’- Accept it
- >Now Open Google play store>It will refresh the updates within 5 to 10 minutes(So you need to keep your internet connection on while Google play store is updating its store for new updates.)

Solution 6: Third party App
In the case, error 505 occur due to the installation of two or more apps with duplicate permission of data, as many times we use to install two similar kind of app that creates the situation where both seeking out for somewhat similar permissions for the installation. The manual finding is a long and tiring process. Then you can take the assistance of ‘Lucky Patcher App’ to find out which app is creating the conflict. This app will assist you in finding out the duplicity if any and then modifying it. Through this app, once you will find out which particular app is causing the conflict, then you can delete that conflicting app from your phone so that problem of error code 505 gets sort out.
Download link: https://www.luckypatchers.com/download/

Note: If still, you are in the state of trouble to solve the issue of error code 505 then Google Play help center is here to look out all troubles related to app store and its service. You can check out the details by visiting the following link:
https://support.google.com/googleplay/?hl=en-IN#topic=3364260
Or call them at their call center number regarding the issue.

Bonus FAQ about Google Play error
Q1: What is a 505 error code?
The HyperText Transfer Protocol (HTTP) error 505: HTTP Version Not Supported response status code means that the HTTP version used in the request is not supported by the server.
Q2: What is a 506 error?
The 506 error code is a frequent error when operating the Google Play Store. You will sometimes see this error code when you are downloading an app. The app may seem to be downloading just fine when suddenly, near the end of the installation, an error occurs, and a message pops up saying, “App could not be downloaded due to an error 506.”
Q3: How to fix the 506?
Solution 1: Restart your device which can help solve most problems.
Solution 2: Remove the SD card safely.
Solution 3: Correct date and time if it is wrong.
Solution 4: Add your Google Account again.
Solution 5: Clear Google Play Store data and cache.
However, sometimes the five simple couldn’t work anymore. A system repair software can be helpful quickly. We really recommend the Dr.Fone - System Repair (Android) , only a few minutes, the error will be fixed.
Conclusion
Not being able to download or install the app is very frustrating and time-consuming also. Therefore, in this article, we went through the reasons behind the occurrence error code 505 as well as resolving the issue by following five effective methods. I hope that you would be able to sort out the error 505 by following above methods thus would be able to install the application without further delay.
- Title: 11 Ways to Fix it When My Vivo Y78t Wont Charge | Dr.fone
- Author: Ariadne
- Created at : 2024-07-30 07:20:02
- Updated at : 2024-07-31 07:20:02
- Link: https://howto.techidaily.com/11-ways-to-fix-it-when-my-vivo-y78t-wont-charge-drfone-by-drfone-fix-android-problems-fix-android-problems/
- License: This work is licensed under CC BY-NC-SA 4.0.