
4 Solutions to Fix Unfortunately Your App Has Stopped Error on Vivo V29 | Dr.fone
4 Solutions to Fix Unfortunately Your App Has Stopped Error on Vivo V29
We often find people complaining, “Unfortunately Youtube has stopped”, “Unfortunately the internet has stopped” or “Unfortunately Netalpha has stopped”. An error that causes Apps to randomly stop working is experienced by users daily. This is a strange error as it occurs while you are using an App, and it suddenly stops working or crashes. You are brought back from the App screen to the Home Screen of your device with an error message saying: “Unfortunately, it has stopped working.”
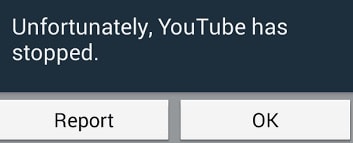
Apps not working or stopped while working, such as unfortunately Netalpha has stopped or unfortunately the internet has stopped, is a very confusing error because one moment your App is running smoothly and the next moment it shuts down automatically with an error message. Unfortunately, Youtube has stopped working, Netalpha has stopped. Unfortunately, the internet has stopped, and many more such examples of Apps stopping while working normally are witnessed by users all over the world, and they are constantly on a lookout for solutions to fix such an error.
Read on to find out why exactly your App stops working suddenly and 3 of the best and most effective ways to tackle the problem.
 PDF application, powered by AI-based OCR, for unified workflows with both digital and scanned documents.
 Part 1: Why your App stops working suddenly?
Unfortunately, Youtube has stopped; unfortunately, Netalpha has stopped working, etc. are error messages that pop-up now and then while using Apps on Android mobile devices. It is important to understand that such errors are not App/Apps specific and may occur to any App/Apps. There is no one specific App or genre of Apps that face this problem.
The reason behind unfortunately internet has stopped or any other App which experiences such a glitch in data crash. A data crash is not a serious problem and only means a situation wherein an App, OS, or software stops working normally and exits abruptly. This may happen due to various reasons such as unstable internet connection, both cellular and WiFi. Another reason for Apps to stop working could be corrupted Cache files, which have not been cleared in a long time.
Many users also feel that incomplete or improper installation may cause the App to crash and stop working suddenly.
There may be many more reasons for them; unfortunately, App has stopped error to show up, but no one reason can be blamed for it.
Therefore it is important for us to carefully examine the problem and choose from the solutions given below to fix Unfortunately, Youtube has stopped; unfortunately, Netalpha has stopped; unfortunately, the internet has stopped and many other similar unfortunately App has stopped working errors.

Part 2: A One-Click Fix to ‘Unfortunately App has Stopped’
Fortunately, while this is an annoying problem that stops you from doing what you’re doing, the best way to eliminate this error is simply to repair the data glitch, thus preventing it from happening.
The easiest solution is to use a software application known as Dr.Fone - System Repair , a specialist piece of programming designed to help you fix your devices as quickly as possible.
If this sounds like the option you need to alleviate your, unfortunately, YouTube has stopped errors; this is how to use it.
 PCDJ DEX 3 for Windows & MAC is the total entertainment DJ software solution, offering audio, video, and karaoke mixing ability. Automatic beat-sync, smart looping, 4 decks, DJ MIDI controller support, Karaoke Streaming and much more.
How to Use Dr.Fone -Repair to Fix Unfortunately App has Stopped Error
Note: Please note that using this solution may rewrite and repair all data on your phone, meaning there is the potential to lose data during the process. Make sure you back up your device before continuing.
Step #1 - Acquire the Software
Head over to the Dr.Fone - System Repair website and download the software to your Mac or Windows computer.
Step #2 - Connect Your Android Device
Launch Dr.Fone and click the System Repair option from the main menu. Now connect your Vivo V29 using the official cable.


From the next menu, select the ‘Android Repair’ option and press ‘Start’.

Step #3 - Input Information & Repair
Tap in your phone information. This is to make sure your device is repaired correctly while minimizing the risk of bricking your device.

Follow the on-screen instructions on how to then boot your Vivo V29 in Download mode.
 Easy GIF Animator is a powerful animated GIF editor and the top tool for creating animated pictures, banners, buttons and GIF videos. You get extensive animation editing features, animation effects, unmatched image quality and optimization for the web. No other GIF animation software matches our features and ease of use, that’s why Easy GIF Animator is so popular.
Once booted, the software will verify your firmware and start repairing your device. Make sure your phone stays connected throughout the process, and you’ll be ready to go and your ‘unfortunately the internet [or another app] has stopped’ error should be erased!

This could take some time, depending on your internet connection and speeds, so be mindful that everything stays connected.
Part 3: Fix your App has unfortunately stopped by clearing App Cache
Herein we bring to you 3 of the most effective remedies to combat the; unfortunately, App has stopped error, which has helped many users facing similar problems.
First among these is to clear the App’s cache. Clearing App Cache to fix Unfortunately Youtube has stopped, and such errors are very popular as it cleans your App/Apps by wiping off data that has been stored due to constant App usage, and it makes the App/Apps as good as new. It is advised to all users to clear the App cache regularly for Apps to function better.
Follow the steps given below to learn how to clear App cache:
• Visit “Settings” to find an option named “Apps”.

• Tap on “Apps” and look for the App which has suddenly stopped.
• Click the App name, say, for example, “Youtube” by scrolling down in “All” Apps.
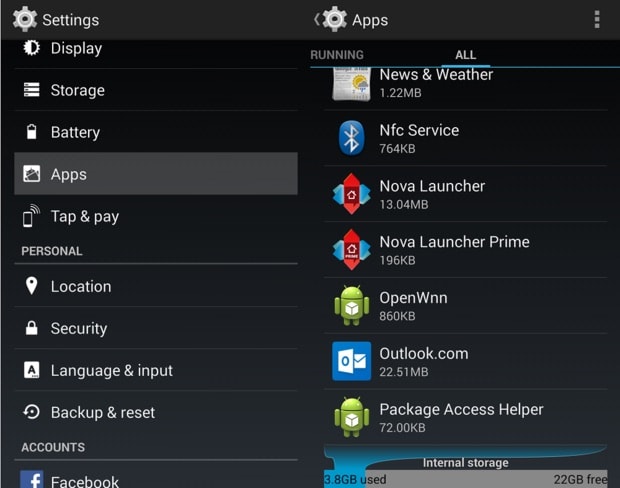
• From the options that appear, tap on “Storage” and then on “Clear cache” as shown below.

Clearing App cache is always a good idea as it prevents any errors which may be caused due to the cache being corrupt or too full. This method is likely to help you, but if the problem persists, read on to find out about 2 more solutions.

Part 4: Fix your App has unfortunately stopped by the fresh installation
Sometimes, unfortunately, Youtube has stopped; unfortunately, the internet has stopped, and such errors are caused due to improper or inappropriate App installation. It is mandatory to completely download the App from the Google Play Store and use it after it is successfully installed on your device.
Firstly, to uninstall all an existing App from your device, follow the instructions given hereunder:
• Visit “Settings” and search for “Application Manager” or “Apps”.
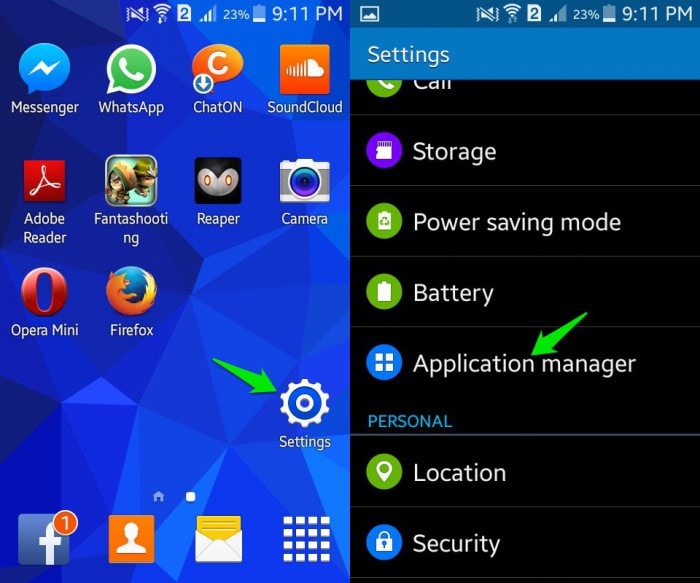
• Select the App you wish to uninstall, say, for example, “Messenger”.
• From the options that appear before you, click on “Uninstall” to delete the App from your device.

You may also uninstall an app directly from the Home Screen (only possible in certain devices) or the Play Store.
To re-install the App, visit Google Play Store, search for the App name and click on “Install”. You will also find the deleted App in “My Apps and games” on your Play store.
This method has helped many and will be useful to you too. So don’t hesitate to try it. It may sound tedious and time-consuming, but it hardly takes 5 minutes of your time.
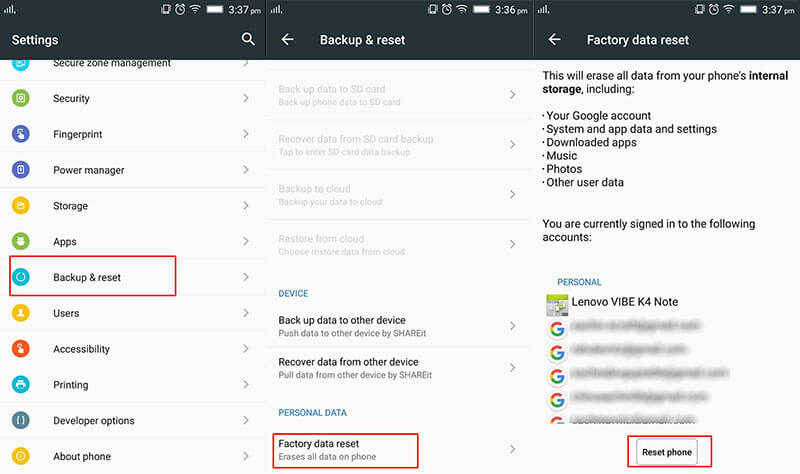
Part 5: Fix your App has unfortunately stopped by factory reset
Factory Reset must be used only when nothing else works. Please remember to take a back-up of all your data and contents on the cloud or an external memory device, such as a pen drive before adopting this method because the one you perform a factory reset on your device, all media, contents, data and other files are wiped out, including device settings. Do remember to back up the data on an Android device before performing a factory reset.
Follow the step-by-step explanation given below to factory reset your device to fix Unfortunately Youtube has stopped; unfortunately, the internet has stopped working and similar errors:
• Visit “Settings” by clicking the settings icon, as shown below.
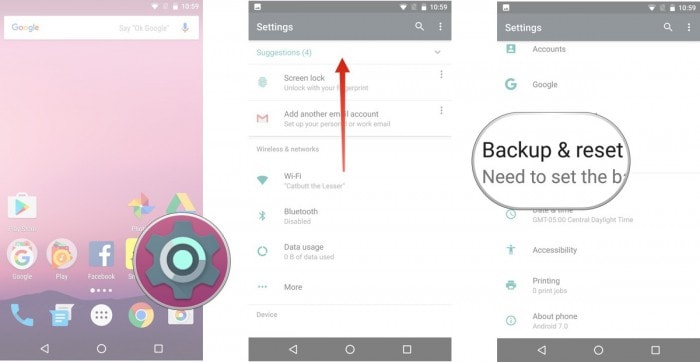
• Now select “Backup and Reset” and move on.
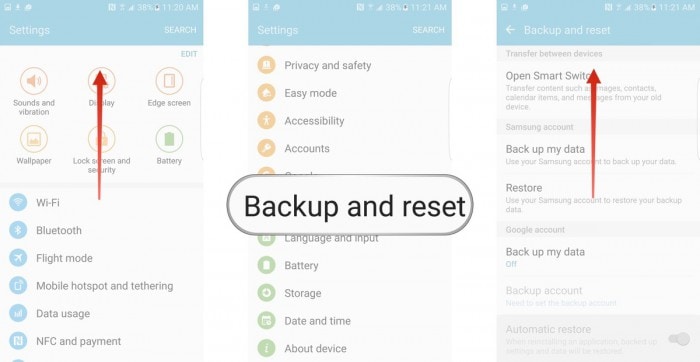
• In this step, select “Factory data reset” and then “Reset Device”.
• Finally, tap on “ERASE EVERYTHING” as shown below to Factory Reset your device.
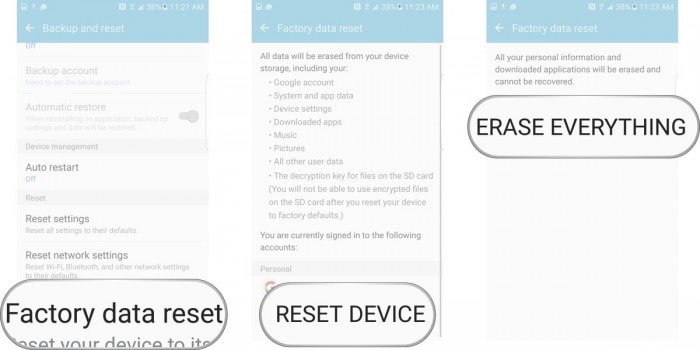
Note: Once the factory reset process is complete, your device will automatically restart and you will have to set it up once again.
Errors such as unfortunately, Youtube has stopped, unfortunately, Netalpha has stopped, unfortunately, the internet has stopped working and so on are very common these days. They disrupt the normal functioning of an App/Apps and prevent you from using the App/Apps smoothly. Unfortunately, App has stopped error is not a serious problem and does not mean there is a problem with the App, your Android OS version, or your handset. It is a random error which occurs due to various reasons in a given situation. If you experience such an error while sign in your favorite App/Apps, DO NOT panic as unfortunately, App has stopped error can be fixed easily. All you need to do is be patient with the App’s software and not try to launch it again and again once it crashes, and an error message pops-up. Just follow the methods listed and explained in detail in the previous segments to solve the problem of unfortunately App has stopped.
Effective Methods on How To Take Viruses Off Your Phone
Cell phones have become a part of a person’s daily life. It offers convenience and connectivity at your fingertips. Yet, these handy devices are prone to viruses when used carelessly. Viruses can infiltrate your phone through unverified downloads, unsecured networks, or malicious links. This can compromise your data and device performance.
In this article, you’ll explore practical methods on h ow to take a virus off your phone. From simple preventive measures to specific solutions, this guide aims to equip you with practical strategies, ensuring a safer and smoother mobile experience by safeguarding your phone against the perils of viruses.

Part 1: Why You Get Mobile Viruses in the First Place
Mobile viruses are tiny bugs that sneak into your phone and mess things up. They’re sneaky software programs designed to cause trouble, like stealing your info or making your phone act strange. Pesky viruses are usually acquired by accessing unverified links and downloading sketchy files. This is why it’s essential to be careful about what you access on the internet. It’s also a great habit to beware of the computers you’re connecting your phone to.
You might notice weird things happening on your phone when infected with a virus. It may suddenly slow down, show pop-ups you didn’t click, or run out of battery super-fast . These could be signs that your phone has a virus. Take note of these.

Here are some common ways viruses get into your phone:
- **Accessing sketchy links.**Clicking on strange or suspicious links in messages or emails is the number one virus source.
- **Downloading apps from unauthorized developers.**Getting apps from places other than the official app stores like Google Play or Apple Store can also be a gateway for trojan viruses. This is mainly because apps install files directly to your system when downloaded.
- Connecting to compromised computers. Watching out for viruses or malware when plugging your phone into a computer would be best.
- **Transferring malware files to your phone:**Moving files with viruses from a computer or another device to your phone.
Remember, these bugs can cause a lot of trouble, but staying careful while using your phone can help you avoid them!
Part 2: Different Methods To Take Viruses Off Your Phone
If your phone’s caught a virus, it’s time to remove those bugs. You might wonder about how you get a virus off your phone. Well, this section has you covered with 4 different methods you can use.
 TubeDigger - online video downloader from mostly any site
Method 1: Wondershare Dr. Fone’s System Repair
If you need a quick, professional, and safe solution, Wondershare Dr.Fone is here to save the day. Its System Repair feature is like a superhero—it swoops in and fixes the problem in a snap. This magic tool does the heavy lifting to remove viruses from your phone.
Here’s how you can use Dr. Fone’s System Repair feature:
- Step 1: Launch Dr.Fone. Choose System Repair in the Toolbox section. Ensure that your phone is connected.
 safe & secure
3,391,426 people have downloaded it
- Step 2: Choose either Android or iPhone. In this example, iPhone shall be selected. For Android devices, simply follow and mirror the prompts that will follow.

- Step 3: Select iOS Repair to proceed.

- Step 4: Choose either Standard Mode or Standard Repair. Standard Repair will not remove data from your device. However, for a sure fix, choose Standard Mode.

- Step 5: Put your device to Recovery Mode . Dr. Fone will provide on-screen instructions.

- Step 6: Click Download next to the iOS firmware you want to install.
 ZoneAlarm Pro Antivirus + Firewall NextGen

- Step 7: After the firmware is downloaded, click Repair Now.


- Step 8: Once the process is completed, choose Done. Your phone should be virus-free by now.

Method 2: Using Safe Mode
Safe Mode is like a secret agent—it helps but with a downside. It turns off third-party apps, making your phone useful only for basic calls or texts. Use this method if any solutions in this section do not work. It’s especially handy if you use your phone before sending it to a technician. This way, you’ll learn how you can get a virus off your phone before actually letting a technician do it.
Generally, here’s how you can enter Safe Mode on Android Phones. Do check with your phone manufacturer’s official manual/guides on how to enter them:
- Step 1: Press and hold the power button. Wait for the power options to appear.
- Step 2: Tap and hold the Power Off button.
- Step 3: Tap on the prompt when you see the Reboot to safe mode option.
 Easy and Safe Partition Software & Hard Disk Manager

For iPhones, here’s how you can do it:
- Step 1: Power off your iPhone.
- Step 2: Hold the power button.
- Step 3: Hold the volume down button until you see the Apple logo.
- Step 4: Your phone should now be in safe mode.

Method 3: Downloading Anti-Virus Software
Anti-virus software works like a shield, protecting your phone from sneaky viruses and malware. Here are three recommended anti-virus apps that you should try out. They’re available on both the Google Play Store and App Store. So, regardless of what device you’re using, you’re sure to be safe with these:
- Avast Anti-virus – Mobile Security
- Norton 360: Online Security
- Bitdefender Mobile Security & Anti-virus
Method 4: Performing a Factory Reset
A Factory Reset is like a phone makeover—it wipes everything and starts fresh. But be cautious, as it erases all data!
Generally, the Factory Reset option should be in Settings > General & Backup and reset or under Settings > About phone for Android devices.

IOS devices should be under Settings > General > Transfer or Reset iPhone.

Remember, each method has its strengths and weaknesses. Dr.Fone is quick and effective, Safe Mode is limited but useful, anti-virus apps can protect, and a Factory Reset gives a clean slate. Try these methods to zap those viruses away!
Part 3: Handy Prevention Tips To Avoid Future Infections
To keep your phone safe from viruses, follow these easy tips that act as a shield against potential threats.
- **Regular software updates:**Keep your phone updated with the latest software. Updates often include security patches that protect your phone from new threats.
- **Cautious downloads:**Be careful when downloading apps or files. Stick to trusted sources like Google Play Store or Apple Store. Avoid clicking on suspicious links from unknown sources.
- **Secure networks:**Use secure Wi-Fi networks and limit public Wi-Fi use for sensitive activities. Public networks can expose your device to potential risks.
- **Anti-virus software:**Install a reliable anti-virus app and keep it updated. These apps constantly scan for and detect viruses, safeguarding your device against threats.
These simple yet crucial tips will fortify your phone’s defenses, reducing the likelihood of virus infections and ensuring a safer digital experience.
Conclusion
Viruses can make your phones act weird, but you have the tools to fight back. Keep your phone healthy by updating software, being cautious with downloads and links, using secure networks, and having an anti-virus app.
And, if you’re thinking, “**How do I get a virus off My Vivo V29?**” then Wondershare Dr.Fone is a reliable hero. It’s quick and effective in clearing out those bugs. By staying aware and taking preventive steps, you can keep your phone safe and ensure a trouble-free experience. And if viruses strike, Dr. Fone’s got your back for an instant fix!

Google Play Services Won’t Update? 12 Fixes are Here on Vivo V29
Google Play Services is a crucial component of any Android device, responsible for supporting various Google apps and services. However, at times, users may encounter issues with updating Google Play Services, preventing them from accessing the latest features and security updates.
It’s pretty much annoying when you try to launch Google Play Services but it isn’t able to operate correctly. You get some of the notifications like Google Play Services won’t run unless you update Google Play Services. On the other hand, when you start to update Google Play Services, you stuck again with the error pop-ups, and Google Play Services won’t update. This can create a lot of chaos in one’s life. So, what action should one need to take in such a situation? Well! You needn’t rankle more as we will explore some of the causes and tips to fix the issue. Keep reading!

company, user or members of the same household. Action! - screen and game recorder</a>
Part 1: Causes for Google Play Services Won’t Update Issue
Before diving into the solutions, it’s essential to understand the potential causes of the Google Play Services update problem. Let’s talk about the causes without further ado.
- 1. Incompatibility with Custom ROMs: Using a custom ROM on your Vivo V29 can cause compatibility issues and prevent the installation of Google Play Services updates.
- 2. Network connectivity issues: Poor or unstable internet connection can prevent the download and installation of updates.
- 3. Insufficient storage space: When your device doesn’t have enough free space, it can hinder the installation of updates for Google Play Services.
- 4. Excessive Installed Apps: a large number of installed apps on your device can exacerbate the update problem with Google Play Services.
- 5. Cache Conflicts: Accumulated cache can lead to conflicts and cause issues with the updating process of “Google Play Services”.
- 6. Outdated version of Google Play Store: If your device has an outdated version of the Google Play Store app, it may interfere with the update process for Google Play Services.
- 7. Google Play Components: If certain components of Google Play Services are corrupted, it can contribute to update issues.
Part 2: One-Click Fix When Google Play Services Won’t Update
For those seeking a quick and effortless solution, several third-party tools offer one-click fixes for the Google Play Services update problem. These tools automate the update process, ensuring that you have the latest version of Google Play Services installed. However, it is crucial to use reputable and trusted tools to avoid potential security risks.
If you cannot update Google play services by the reason of custom ROM incompatibility or Google Play component corruption, there is a serious need of repairing firmware then. And to repair Android firmware, one of the expert ways is Dr.Fone - System Repair (Android) . This professional tool vows to bring your Vivo V29s back to normal by fixing the issues with ease. Here are the advantages of this tool.
Dr.Fone - System Repair (Android)
Android repair tool to fix Google Play Services not updating
- A completely user-friendly tool where no technical skills are needed.
- All Android models are easily supported.
- Any kind of Android issue like black screen , stuck in boot loop , Google play services won’t update, or app crashing can easily be resolved with these.
- Full security is promised with the tool so there’s no need to worry about harmful activities like viruses or malware.
- Trusted by a lot of users and carries a high success rate.
3,485,019 people have downloaded it
How to Fix Google Play Services can’t be installed using Dr.Fone - System Repair (Android)
- Step 1: Install the Software
Initiate the process of downloading the software on your computer. Now, click on “Install” button and go along with the installation procedure. Click on “System Repair” option from the Toolbox window.
- Step 2: Device Connection
Now, taking the assistance of an original USB cable, connect your Vivo V29 to the PC. Then hit on “Start”.
- Step 3: Check the Information
You will notice the next screen which asks for some information. Please ensure to choose the correct device brand, name, model, career, and other needed details. Click on “Next” after this.
 Epubor Audible Converter for Win: Download and convert Audible AAXC/AA/AAX to MP3 with 100% original quality preserved.
- Step 4: Download Mode
You will now see some instructions on your PC screen. Just follow those according to your device. And then your device will boot in Download mode. Once done, hit on “Next”. The program will now download the firmware.

- Step 5: Repair the Problem
When the firmware is downloaded completely, the program will automatically start getting fixed the issue. Wait for a while until you get the notification of the process completion.
 dotConnect for Oracle is an ADO.NET data provider for Oracle with Entity Framework Support.

safe & secure
Part 3: 10 Common Fixes When Google Play Services Won’t Update
Method 1. Restart your Android and try to update again
In most cases, restarting the Vivo V29 device can simply do the trick. When you restart the Vivo V29 device, most of the issues get eliminated making the Vivo V29 device perform better than before. Also, it is all about RAM. While you restart your device, the RAM gets cleared. As a result, the apps work properly. So, in the first place, we would like you to restart your Vivo V29 when you cannot update Google Play Services. Once restarted, try to update again and see if the results are positive.
Method 2. Uninstall Google Play Services Updates and Reattempt the Update
Uninstalling previous Google Play Services updates resolves conflicts and errors, often addressing the issue of updates. This process clears potential obstacles, enabling a successful update of Google Play Services. Here’s how you can do it:
- Open your device’s “Settings.”
- Scroll down and select “Apps” or “App Manager.”
- Locate and tap on “Google Play Services.”
- Depending on your device and Android version, you might need to tap on “App info” or “Storage.”
- Look for the option to “Uninstall updates.” This will revert Google Play Services to its original version.
- Confirm the action when prompted.
- Once the updates are uninstalled, go back to the Google Play Store.
- Search for “Google Play Services” using the search bar at the top.
- If an update is available, you’ll see the option to “Update.” Tap on it to start the update process.
- After the update is complete, restart your device to ensure the changes take effect.
Method 3. Update Google Play Store
Ensure that you have the latest version of the Google Play Store app installed on your device. Open the Play Store, go to Settings, and check for updates. Updating the Play Store can often resolve compatibility issues with Google Play Services updates.
Method 4. Google account and re-add it
Go to your device’s Settings, select Accounts or Users, and remove your Google account. Restart your device and add the account again. This process can refresh the connection and resolve update issues.
Method 5. Uninstall unnecessary apps
As we mentioned above, due to a lot of apps being installed at the same time, the issue can crop up. And hence, if the above solution didn’t help, you can try to uninstall the apps that you don’t need currently. We hope this works. But if not, you can go to the next fix.
Method 6. Clear Google Play Services cache
If still you cannot update Google Play Services, clearing cache can solve your problem. We also stated this in the beginning as the reason. If you don’t know, cache holds the app’s data temporarily so that it can remember the information when you next open the app. Many times, old cache files get corrupted. And clearing cache can also help in saving storage space on your device. For these reasons, you need to clear cache of Google Play Services to get rid of the problem.
Here is how to clear Google Play Services cache:
 Any DRM Removal for Mac: Remove DRM from Adobe, Kindle, Sony eReader, Kobo, etc, read your ebooks anywhere.
- Launch “Settings” on your phone and go to “Apps & Notifications” or “Application” or “Application Manager”.
- Now, from all the apps’ list, choose “Google Play Services”.
- On opening it, tap “Storage” followed by “Clear Cache”.
Method 7. Boot into download mode to clear cache of whole phone
If unfortunately, things are still the same, we would like to recommend you wipe the cache of the whole device to fix the issue. This is an advanced method to solve issues and is helpful when the Vivo V29 device is facing any flaws or malfunctions. For this, you need to go to the download mode or recovery mode of your device. Every device has its own steps for this. Like in some, you need to simultaneously press the “Power” and “Volume Down” keys. While in some, the “Power” and both “Volume” keys work.
This is how it works when Google Play Services can’t be installed on your device:
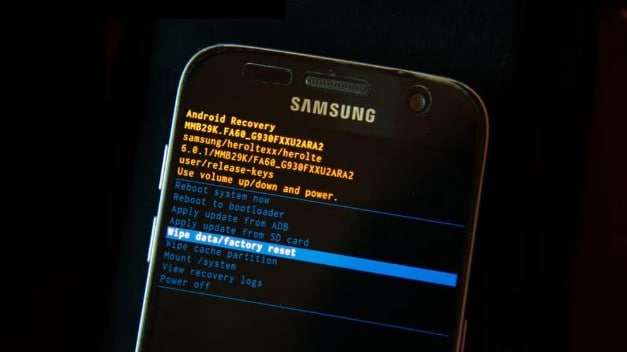
- Turn off the Vivo V29 device to begin with and then follow the steps for recovery mode.
- On the recovery screen, use the “Volume” buttons for scrolling up and down and go to “Wipe cache partition”.
- To confirm, press the “Power” button. Now, the Vivo V29 device will begin to wipe the cache.
- Hit reboot when asked and the Vivo V29 device will now be rebooted finishing the issue.
Method 8. Check your Android storage
Generally speaking, Google Play Services can update automatically in the background. But if there is not enough storage on your Android, the automatic update may fail, so check your android space.
Method 9. battery optimization
Some devices aggressively optimize battery usage, which can interfere with the background processes required for updating Google Play Services. Disable battery optimization for Google Play Services in the Vivo V29 device’s Settings to ensure uninterrupted updates.

Method 10. Check date and time settings
Sometimes, incorrect date and time settings on your device can cause conflicts with Google Play Services updates. Ensure that your device’s date and time are set correctly and set to automatic. Follow the steps below to set the date and time on your android correctly.

- Open “Settings” and go to “General Management”.
- Click “Date & time” and then enable “Automatic date & time”. Or you can disable and re-enable it.
Method 11. Factory Reset your Android
As a final measure, if everything went in vain, you can perform a factory reset on your device. This method will wipe away all your data while performing and make the Vivo V29 device go to factory state. Please ensure to keep backing up your important data if you are going to take the help of this method.
The steps are:
- Open “Settings” and go to “Backup & Reset”.
- Choose “Factory Reset” followed by “Reset Phone”.
FAQs about Google Play Services
To provide further clarity, here are some frequently asked questions about Google Play Services:
1. What is Google Play Services?
Google Play Services is a background service on Android devices that provides essential functionality and support for various Google apps and services. It includes features like authentication, push notifications, location services, and more, enabling seamless integration and enhanced performance for Google apps.

2. Why is it important to keep Google Play Services updated?
Keeping Google Play Services updated is crucial for several reasons. It ensures compatibility with the latest versions of Google apps, improves app performance, and enhances security. Updates often introduce new features, bug fixes, and optimizations, providing a better user experience and access to the latest advancements offered by Google.
3. Can I uninstall Google Play Services?
No, Google Play Services cannot be uninstalled as it is a core system component required for the proper functioning of Google apps and services. Removing or disabling it can lead to malfunctions and render many Google apps non-functional. However, you can disable specific permissions or clear its cache and data if troubleshooting issues related to Google Play Services.
4. How can I check the version of Google Play Services on my device?
To check the version of Google Play Services on your Vivo V29, follow these steps:
- Step 1. Open the Google Play Store app.
- Step 2. Tap on the menu icon (three horizontal lines) in the upper-left corner.
- Step 3. Scroll down and select “Settings.”
- Step 4. Scroll to the bottom and find the “Play Store version” or “Play Services version”. The number displayed indicates the version of Google Play Services installed on your device.
 PearlMountain Image Converter
5. Why is my device not compatible with the latest version of Google Play Services?
There can be several reasons why a device is not compatible with the latest version of Google Play Services. It could be due to hardware limitations, an outdated Android operating system version, or the Vivo V29 device no longer receiving official software updates. Compatibility requirements can change with newer versions of Google Play Services, and older devices may not meet the necessary criteria to support the latest updates.
Conclusion
Encountering difficulties when updating Google Play Services can be frustrating, but with the right approach, these issues can be resolved. By understanding the causes and implementing the suggested fixes outlined in this guide, you can overcome the Google Play Services update problem. Remember to prioritize storage space, ensure a stable internet connection, and keep your apps and system components up to date. By doing so, you can enjoy the full functionality of Google Play Services and benefit from the latest features and security enhancements.
- Title: 4 Solutions to Fix Unfortunately Your App Has Stopped Error on Vivo V29 | Dr.fone
- Author: Ariadne
- Created at : 2024-07-30 07:26:44
- Updated at : 2024-07-31 07:26:44
- Link: https://howto.techidaily.com/4-solutions-to-fix-unfortunately-your-app-has-stopped-error-on-vivo-v29-drfone-by-drfone-fix-android-problems-fix-android-problems/
- License: This work is licensed under CC BY-NC-SA 4.0.