
4 Ways to Fix Android Blue Screen of Death On Infinix Smart 7 HD | Dr.fone
4 Ways to Fix Android Blue Screen of Death On Infinix Smart 7 HD
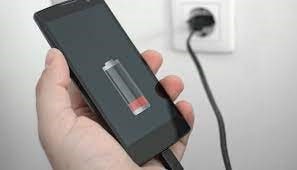
Android is undoubtedly amongst the best smartphone platforms but comes with its own share of glitches. The Android screen of death is observed by many users all over the world who complain of their device screen turning blue rendering their phone/tablet unresponsive. This is called the Android blue screen of death and it usually occurs when you turn on your device by pressing the Power On button but your device does not boot up normally and remains stuck at a plain blue screen without any error message.
Such an Android screen of death is caused by a temporary software crash but can also occur due to certain hardware issues. We understand the inconvenience caused to you when you see the Android blue screen of death. Here are ways to fix the error and great software to extract all your data to keep it unaltered and safe.
Read on to learn more about the Android screen of death and ways to combat it.
Part 1: How to rescue data on Infinix Smart 7 HD with blue screen of death?
The Android blue screen of death issue is not a difficult problem to deal with and can be fixed by you by following the easy steps given in this article. We suggest that all readers rescue the data stored on their Android devices to prevent data loss and keep it stored in your PC from where it can be accessed and recovered by you anytime, anywhere. This task might sound tedious, but, we have for you Dr.Fone - Data Recovery (Android) , a software specially designed to retrieve data from broken and damaged Infinix Smart 7 HD phones and tabs, especially Infinix Smart 7 HD devices, and keep it safe in your PC without tampering with it or altering its format. It efficiently extracts data from broken or unresponsive Infinix Smart 7 HD devices, phones/tabs stuck at black/blue screen, or whose system crashed due to a virus attack.
 DEX 3 RE is Easy-To-Use DJ Mixing Software for MAC and Windows Designed for Today’s Versatile DJ.
Mix from your own library of music, iTunes or use the Pulselocker subsciprtion service for in-app access to over 44 million songs. Use with over 85 supported DJ controllers or mix with a keyboard and mouse.
DEX 3 RE is everything you need without the clutter - the perfect 2-deck mixing software solution for mobile DJs or hard-core hobbiests.
PCDJ DEX 3 RE (DJ Software for Win & MAC - Product Activation For 3 Machines)
Dr.Fone - Data Recovery (Android)
World’s 1st data retrieval software for broken Android devices.
- It can also be used to recover data from broken devices or devices that are damaged in any other way such as those stuck in a reboot loop.
- Highest retrieval rate in the industry.
- Recover photos, videos, contacts, messages, call logs, and more.
- Compatible with Infinix Smart 7 HD devices.
3,145,271 people have downloaded it
Follow the steps given below to extract data when you experience an Android screen of death:
1. Download, install, and run the Dr.Fone - Data Recovery (Android) tool on your PC. Connect your device using a USB cable and move on to the main screen of the software.
2. Once you launch the software, you will see many tabs before you. Click on “Data Recovery” > “Android”.

3. And then choose “Recover from Broken Phone” from the program’s screen.


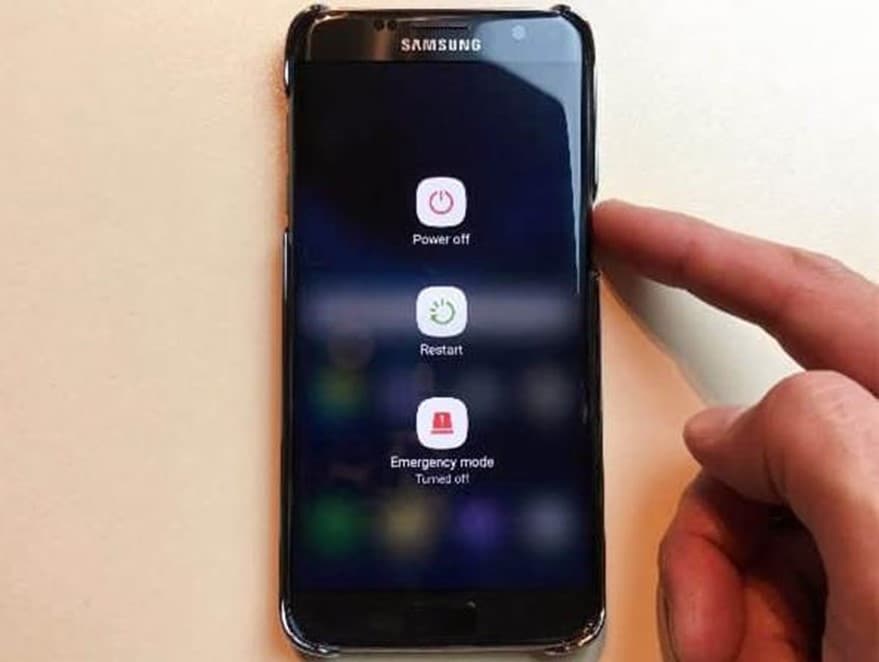
4. In this step, choose from the two options before you the true nature of your device as shown in the screenshot below.

5. You will now be asked to feed in your phone’s model type and name as shown in the screenshot below. Give correct details for the software to identify your device smoothly and hit “Next”.
 Simple and intuitive video editing
6. In this step, refer to the instructions in your device manual to enter into Download Mode on your Infinix Smart 7 HD and hit “Next”. An example of what to do to reach Download Mode is shown below.


7. Finally, let the software recognize your Infinix Smart 7 HD, and start to download the recovery package for your device.

8. Once it does, you will be able to preview all the files on the screen in front of you before you hit “Recover to Computer”.

The process may take up to a few minutes and once it’s done all your files will be extracted and stored on your PC. You can now move on to troubleshooting the problem without the fear of losing all your important data.
 safe & secure
Part 2: One click to fix the Android blue screen of death
We understand how annoying it is to see the Android blue screen of death and fail to access your device data. But, with Dr.Fone - System Repair (Android) , your troubles would burst away.
This software effectively fixes Android screen of death issue along with app crashing, bricked or unresponsive device, stuck on Infinix Smart 7 HD logo, etc. All Android issues are well taken care of by Dr.Fone - System Repair (Android) with one click.
Dr.Fone - System Repair (Android)
Easy and effective solution to fix the Android blue screen of death!
- Every kind of Android system error and problem is resolved.
- It is the premier Android repair software in the market.
- All the latest Infinix Smart 7 HD devices are supported by this program.
- Android blue screen of death can be fixed with a single click.
- Easy to use and no technical skills are needed to operate it.
4,750,154 people have downloaded it
Note: Backing up your device is significant before you carry out the Android repair process. The process of fixing the Android blue screen of death issue may erase data from your Infinix Smart 7 HD. So backing up your Android seems a viable option.
Phase 1: Connecting your Android after preparing it
Step 1: Installation and running Dr.Fone - System Repair (Android) on your system takes you to the main screen. Choose the ‘System Repair’ option followed by connecting the Android device.

Step 2: Press the ‘Android Repair’ option before tapping the ‘Start’ button.

Step 3: Over the Infinix Smart 7 HD device information window, select all relevant data about your device followed by the ‘Next’ button.

Phase 2: Initiate repairing after entering ‘Download’ mode
Step 1: Get the Infinix Smart 7 HD device in ‘Download’ mode to fix the Android blue screen of death issue. Here is how –
- On a ‘Home’ button-less device – you need to switch off the Infinix Smart 7 HD device. Now, hold the ‘Volume Down’, ‘Power’, and ‘Bixby’ keys together for about 10 seconds and release. Hit the ‘Volume Up’ key to get into ‘Download’ mode.

- On a ‘Home’ button device – shut down the Android phone/tablet, and then push the ‘Power’, ‘Volume Down’, and ‘Home’ keys for 10 seconds. Let go of the keys and press the ‘Volume Up’ key to enter ‘Download’ mode.
 Forex Robotron Gold Package
Step 2: Tap the ‘Next’ button to download firmware.

Step 3: Dr.Fone - System Repair (Android) would verify the firmware post-download. It will start repairing the Android system automatically.

safe & secure
 Epubor Audible Converter for Win: Download and convert Audible AAXC/AA/AAX to MP3 with 100% original quality preserved.
Part 3: Force Restart Your Infinix Smart 7 HD
A force restart is a basic step that can clear minor software glitches. It has the potential to resolve the Android blue screen of death issue. Force restarting your device can clear temporary bugs and reset all processes. It is a simple yet often overlooked way to fix the Android blue screen of death issue. Use the following steps to force restart your Infinix Smart 7 HD:
Step: On your Infinix Smart 7 HD, press and hold the “Power” and “Volume Down” keys for around 10 seconds. Release the keys when your device reboots and wait for it to complete rebooting.
 Glarysoft File Recovery Pro - Helps to recover your lost file/data, even permanently deleted data.

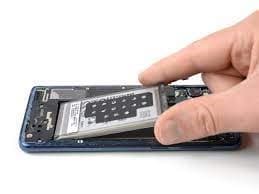
Part 4: Remove phone battery to fix blue screen of death
The best home remedy to fix any kind of Android screen of death remove the Infinix Smart 7 HD device’s battery. This technique might sound too simple, but it has solved the Android blue screen of death issue for many users whose devices started normally after reinserting the battery. Here is what you should do.
1. Open the back cover of your Infinix Smart 7 HD and carefully remove its battery.

2. Let the battery be out for 5-7 minutes. Meanwhile, long press the power button to drain out any residual charge from your device.
3. Now reinsert the battery and attach the back cover.
4. Turn on your device and see that it boots normally all the way to the Home/Locked Screen without getting stuck at Android blue screen of death.
Note: Not all Android devices allow you to remove their battery. If you own such a device, try the next step as it is your only option to fix the Android blue screen of death problem.
Part 5: Put out your SIM Card/SD card and reinsert
In some cases, issues related to the Android blue screen of death can be caused by problems with the SIM card or SD card. Removing and reinserting these cards can help resolve potential conflicts or glitches. Remember that this method can help resolve issues related to SIM card or SD card conflicts. However, it may not address more complex software or hardware problems causing the blue screen issue.
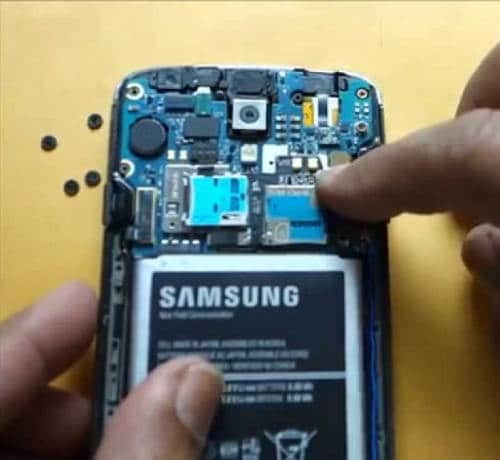
## Part 6: Clean or change the LCD connectorIf you’re facing the Android blue screen of death issue, the issue might be related to a hardware problem. The problem can be a loose or damaged LCD connector. In this scenario, you can try cleaning or changing the connector. This method is more advanced and involves disassembling your device. That’s why you need to proceed with caution and only if you’re comfortable with hardware tasks.
Part 7: Update to the latest Android version
Software problems can manifest the Android equivalent of a blue screen of death. It is usually triggered by errors or anomalies within the operating system. To address these concerns, upgrading to the most recent version of the Android OS proves effective. However, updating your device’s software could introduce fresh glitches or compatibility conflicts. These steps outline the process of updating your device to the latest OS:
Step: Open the Settings app on your Infinix Smart 7 HD by locating and launching it. Proceed by scrolling through the options and selecting “Software Update.” In the ensuing screen, choose “Download and Install” to start a search for any available updates.

 PaperScan Professional: PaperScan Scanner Software is a powerful TWAIN & WIA scanning application centered on one idea: making document acquisition an unparalleled easy task for anyone.
Part 8: How to fix the Android blue screen of death by factory reset?
The Android screen of death is a very confusing issue as it freezes your device at a blue screen with no options to navigate further. In such a situation you may consider performing a Factory Reset, better known as Hard Reset as you will need to enter Recovery Mode to implement this technique. Although resting your device will wipe off all its data but you don’t need to worry as Dr.Fone toolkit Android Data Extraction software can retrieve all your files and keep them safe.
Accessing Recovery Mode differs for different Android devices. Thus, we suggest that you consult your device manual to understand how to boot into Recovery Mode on your particular Android device and then follow the steps given below:
Once you are on the Recovery Screen, you will see a list of options before you, similar to the screenshot below.

Key features:
• Import from any devices and cams, including GoPro and drones. All formats supported. Сurrently the only free video editor that allows users to export in a new H265/HEVC codec, something essential for those working with 4K and HD.
• Everything for hassle-free basic editing: cut, crop and merge files, add titles and favorite music
• Visual effects, advanced color correction and trendy Instagram-like filters
• All multimedia processing done from one app: video editing capabilities reinforced by a video converter, a screen capture, a video capture, a disc burner and a YouTube uploader
• Non-linear editing: edit several files with simultaneously
• Easy export to social networks: special profiles for YouTube, Facebook, Vimeo, Twitter and Instagram
• High quality export – no conversion quality loss, double export speed even of HD files due to hardware acceleration
• Stabilization tool will turn shaky or jittery footage into a more stable video automatically.
• Essential toolset for professional video editing: blending modes, Mask tool, advanced multiple-color Chroma Key

Use the Volume Down button to scroll downwards and reach the “Wipe data/Factory reset” option.


Now use the power button to select it and wait for the Infinix Smart 7 HD device to reboot automatically.
You will notice that the Android device will turn back on without getting stuck at the Android blue screen of death. Now you can set up your device from scratch.
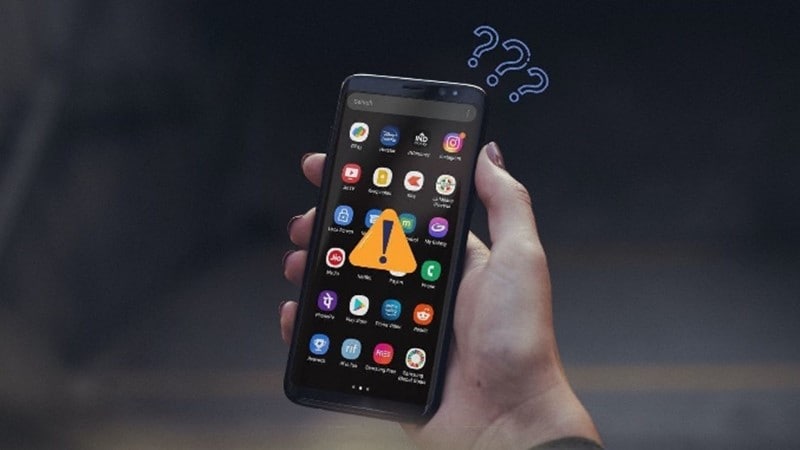
Part 9: What Should You Do if Android Still Stuck on Blue Screen?
Have you tried all the methods, and your Infinix Smart 7 HD is still stuck on the blue screen of death? In this case, it’s important to consider the possibility of a hardware issue. Remember that hardware issues can be complex. Trying to fix things without the right expertise can result in additional harm. If you’re uncertain about the next steps, it’s wisest to ask for assistance from a trained professional.
The Android screen of death, especially the Android blue screen of death, is not a very pleasant sight and could worry you. The good news is that this problem can be fixed by you sitting at home without any technical assistance. Follow the simple and easy tips given above to reboot your device and use the Dr.Fone - Data Recovery (Damaged Device) tool to rescue your data in the most efficient and effective way, then use Dr.Fone - System Repair (Android) to repair your Infinix Smart 7 HD.
 Software Update Pro - Check and update software installed on your computer.
safe & secure
Infinix Smart 7 HD Camera Not Working Unexpected Error? Fix It Now
For all its glory and goodness, the Android OS often has its users pulling their hair in frustration at just how buggy the OS can be at times. So, if you’re having one of those days today, we are here to help. Camera app is one of the most used apps on smartphones today. People only launch the app when they want to take a photo, for everything else there’s a dedicated photo gallery app. What happens when you launch the camera app only to realize it threw an error and you missed your photo moment? Don’t throw the phone, not yet. Let us help you out.

Part I: Why Is Android Camera Not Working?
There are a few reasons why the camera app is not working on your Infinix Smart 7 HD.
Low Memory
Camera app does rely heavily on system resources, so in case you have too many apps open and for some reason the OS is not able to manage the resources appropriately for the camera app to function as it should, you will get a camera error.
Low Storage
The camera app needs storage space to save the photos it takes. So, in case your phone is running low on storage space, the camera app would likely malfunction as it would have no way to store the photos it would be taking.
General Bugs And Glitches
OS bugs and general glitches within the OS and the camera app can cause camera not working issue anytime during everyday operation. This is part and parcel of any technology.
Hardware Issues
In the rarest cases, there might have developed an actual hardware issue with the camera system on your Infinix Smart 7 HD. The likely culprit is misuse and abuse, such as a dropped phone or maybe the phone was too hot for extended periods of time, causing hardware issues.
Part II: How To Fix Android Camera Not Working Issue?
So, how to get the Android camera not working problem solved? There are a few ways you can try fixing the camera not working issue on your Infinix Smart 7 HD right where you are, without needing to take the Infinix Smart 7 HD device to the manufacturer’s service center.
II.I: Restart The Handset
One of the first things to do any time an app or your phone or tablet does not work like it should, restarting the Infinix Smart 7 HD device refreshes everything just enough to resolve most commonly occurring issues.

Use the power button on your smartphone to restart your Android handset and see if this resolves the issue.
Parental Control Software
### II.II: Close And Relaunch The Camera AppIf the camera app (or any app for that matter) has been in the background for a while and then it is brought to the foreground, there are always chances of it crashing for any reason, or not working as expected. So, closing the app completely and relaunching it is recommended.
Step 1: Launch the app switcher on your specific Android device the way your device manufacturer suggests you to. Usually, it is a swipe up and hold gesture to get into the app switcher.

Step 2: Next, you can choose to close just the camera app or, better yet, close all apps by tapping the Close All button. Flicking any app upwards (quick upward swipe) is how you close an app. If there is no Close All button anywhere, repeat the gesture for all open apps.
II.III: Check App Permissions
These days, thanks to strides in the privacy initiatives, apps need permissions before they can function the way they do. Most of the times, apps such as camera do have the necessary permissions, but sometimes it is possible that the permissions are set incorrectly. To check if the camera app has the requisite permissions, do the following:
Step 1: Go to Settings > Apps > Camera > Permissions.

Step 2: Tap Camera.
 /a>
/a>
Step 3: See if the selected option is Allow Only While Using This App. If not, select it.
II.IV: Clear The Camera App Cache
Clearing the camera app cache is sometimes helpful. To do that:
Step 1: Go to Settings > Apps > Camera and tap Storage Usage.

Step 2: Tap Clear Cache.


II.V: Clear The Photo Gallery App Cache
The camera app is closely tied to the photo gallery app that comes baked in into Android OS. That is because photos that the camera app takes are stored in the photo gallery app. Consequently, if there were any issues in the photo gallery app, that could lead to the camera app not working on Android problem. Here’s how to clear the photo gallery app cache:
Step 1: Go to Settings > Apps > Photos > Storage Usage.

Step 2: Tap Clear Cache.
II.VI: Check For App Updates
This does not happen always, but sometimes, with known bugs and issues, there may be an update released that fixes those bugs and issues that prevent some users from using a given app reliably. Checking for updates is a good step to make sure that your camera app is updated to the latest version possible.
Step 1: Go to Play Store and tap your profile picture on the right.

Step 2: Tap Manage Apps and Device.
 The BootIt Collection covers multi-booting, partitioning, and disk imaging on traditional PC’s using the standard BIOS and newer PC’s using UEFI. The collection includes BootIt Bare Metal (BIBM) for standard BIOS systems and BootIt UEFI (BIU) for UEFI system.
Step 3: If there are updates available, Tap Update All to update all apps.
II.VII: Cool The Phone Down
We do not realize the immense power that is packed into the thin smartphone form factor these days. If you have been using the phone to video chat for a while now, you might not realize that the phone has become hot, especially if you are using a desk stand. Same for shooting high-resolution videos; the phone does get quite hot shooting high-resolution videos.
If this is the case, close all apps and let the phone cool down. You might even want to shut the phone off to help cool it faster.
II.VIII: Nudge The Camera System
You may want to tap your camera system (the lenses and surrounding area) gently to see if that gets the camera working. In case it did, this is indicative of a hardware issue, and you should get it checked at the service center at your earliest convenience.

II.IX: Fix Android Camera Not Working Issue In One Click (With Dr.Fone)
Now, if the above fixes have not worked, you might want to repair your Android OS once before you make that appointment with the service centre. And, we have just the app to help you fix your camera not working on Android problem quickly.
Wondershare Dr.Fone is a multi-module app that works on both Windows and macOS and is the only app you will ever need to resolve nearly all of your smartphone and tablet issues that you are likely to encounter. Need to take backups? Dr.Fone Phone Backup has you covered with the ability to take and restore even selective backups, and to any location such as your computer or an external disk as well. Want to transfer WhatsApp chats to a new phone? Use WhatsApp Transfer to do just that! Bought a new phone? Use Phone Transfer to transfer contents from old phone to new, and then use Dr.Fone Data Eraser to securely wipe your old phone before giving it away!
Today, we will use Dr.Fone’s System Repair (Android) module to fix Android camera not working issue quickly.
Download Dr.Fone here.
safe & secure
Step 1: Launch Dr.Fone app on your PC or Mac.
Step 2: Click System Repair module and then Android.

Step 3: For now, don’t bother with the scenarios given and click Start to go to the next screen.
Step 4: Your Android device will be detected by Dr.Fone. If anything seems incorrect, use the dropdown options to change it, and click Next.
Step 5: Your phone needs to be put into Download mode before it can be repaired. Follow the instructions shown onscreen and click Next.
Step 6: Dr.Fone automatically downloads the most recent firmware for your device and when it is ready, waits for your input. Click Fix Now to start the repair process.

Step 7: You will need to enter a 6-digit code (digit zero, six times – 000000) to confirm and begin the repair process.

When the repair is complete, Dr.Fone shows the final screen as below:

safe & secure
Conclusion
The camera app on your smartphone is one of the most important apps you use. This is not a game; this is an app that makes previous memories possible for you. So, when you get any of those incorrigible errors that are impossible to make sense of, what do you do? This guide gives you 9 fixes to fix Android camera not working error quickly and easily.
Reasons for Infinix Smart 7 HD Stuck on Boot Screen and Ways To Fix Them
One of the main reasons why people own a phone is for convenience. It will be ironic if that device, supposed to grant convenience, provides problems instead. Some people face this when their Android phone is stuck on the logo page and unable to do anything. As expected, this is common in Android phones and is why people are unhappy with Android phones.
This article will share the possible reasons why your Android phone is stuck on the boot screen. This article will share three possible reasons for this problem and five valuable tips to help fix this issue. If all else fails, we have an application to share and recommend that is guaranteed to solve your problem in no time. Keep on reading to find out more!
Part 1. Why Is Your Infinix Smart 7 HD Stuck on the Boot Screen?
There are countless reasons why a problem happens, just like why your Android phone is stuck on the logo page. This section sieved out the top 3 reasons why your Android boot screen happens and some tips to overcome it.
 With Screensaver Wonder you can easily make a screensaver from your own pictures and video files. Create screensavers for your own computer or create standalone, self-installing screensavers for easy sharing with your friends. Together with its sister product Screensaver Factory, Screensaver Wonder is one of the most popular screensaver software products in the world, helping thousands of users decorate their computer screens quickly and easily.
1. Changes to the Software
Android is a flexible operating system. It allows users to customize it in any way they desire, which is Android’s beauty. The customizable nature of the operating system allows users to unlock, root, flash, and tinker. However, this flexibility in customization might be a double edge sword. Accidental tampering with the Android system might result in software problems, such as being stuck on the Android boot screen.
Fortunately, this is not a complicated fix. Android accepts different fixes and allows the system to return to how it once was. Even with software issues, the system does not get completely inoperable. The best way to fix changes to the software is to start from the beginning of the process. This might offer the best chance for you to restore your phone to normal.
Although it is fun to customize and change the software, following trusted sources ensures you do not damage your phone. Having an Android phone stuck on the logo page is one of the many examples of the problems that might happen if changes to the software go out of hand.
2. Android Software Updates
Updates are a common cause of Android phones stuck on the logo. It happened when the update did not complete as it should have been. Several reasons for incomplete updates, such as poor internet connection, the connection between computer and phone being lost, a power cut, the phone freezing, and the list go on. When an update is uncompleted, issues such as being stuck at the Android boot screen and many others might occur.
Before an update starts, your mobile device will notify you of the duration of the update. As a tip, set aside an additional 10-15 minutes on top of the update duration to ensure your update is completed successfully. It will be ideal for activating the software update only when there is sufficient power in your phone or keep it charging during the update.
When an update is disrupted or stopped before it completes, the existing Android version will become corrupted while the new software to be updated is incomplete. This means that your Infinix Smart 7 HD has no system to run on. Always complete your software updates, and you will not have the problem of your Android phone getting stuck on the logo.


3. Malfunctioning Applications
If you noticed that your Android phone is stuck on the logo page only after installing certain apps, there is a high chance that the app is not compatible with the existing apps in your phone or with the Android version. When an app conflicts with the Android system or other apps, this will run into problems with your phone.
This problem typically happens when an app is downloaded from a third-party source, not the official Google Play Store. This app from a third-party source might be malicious or contain a virus. This can cause problems such as being stuck at the Android boot screen.
To overcome this, locate the app that has been giving you issues and remove the app from your phone. Restart your device, and you should be able to have your Infinix Smart 7 HD functioning properly.

Part 2. 5 Helpful Ways To Fix Android Phones Stuck on Boot Screen
After understanding the common problems on why your Android phone is stuck on the logo page, here are five easy solutions you can try solving at home.
1. Force Reboot
When encountering problems with your Infinix Smart 7 HD, such as being stuck at the Android boot screen, you should first try a forced reboot. This simple yet effective solution could be what you need to solve all your Android problems. It is essential to leave your device turned off for at least a minute or two before turning it back on.
2. Pull Out Battery
Another way to restart your Infinix Smart 7 HD when it is frozen is to try taking the battery out. Android devices are designed with a removable battery, and sometimes you can resolve the issue easily by removing the battery and replacing it after a couple of seconds. Then, turn on your device again and test to see if your Android phone is stuck on the logo page.
If it works, then the problem is solved. However, some Android devices come with a built-in battery. For these kinds of devices, a stimulated battery pull should be attempted. A simulated battery pull is a set of instructions telling your Infinix Smart 7 HD to switch off and on again. If your device does not offer the simulated battery pull option, omit this troubleshooting option.
3. Charge Your Device
If your Android phone is stuck on the logo page and not getting past it, no matter how many times you have tried, it may be due to a low battery! As simple as it sounds, plug your device into a power outlet and try restarting your phone. You might be surprised that this simple fix is all it takes to solve your Android problem.
Cache refers to a software or hardware component of an Android device that stores your program and data for reference. This data might result from the daily usage of your device or duplicate data from a different source on the Infinix Smart 7 HD device. Similar to a computer, if the cache occupies too much space on your device, it might cause your Infinix Smart 7 HD to become slower and eventually get stuck at the Android boot screen.
Wiping out the cache data from your Infinix Smart 7 HD could free up more space, allow your device to function faster, and avoid problems such as being stuck at the Android boot screen. Do not worry; wiping the cache data is entirely safe and will not lead to any loss of important data or programs on your phone.

5. Factory Reset
If all the methods above fail, performing a factory rest might be your last option. However, it is important to note that performing a factory reset will erase everything on your phone, including apps, contacts, photos, etc. As a tip, back up all your data from your device before performing a factory reset. That way, you can still retrieve all your precious information after the reset.
Follow the steps below to perform a factory rest on your Infinix Smart 7 HD:
Step 1: Turn off your phone and press the Power button and Volume Down button at the same time
Step 2: Use the Volume button to scroll the options and highlight Wipe data/factory reset. Press the Power button to begin the factory reset.
 Any DRM Removal for Mac: Remove DRM from Adobe, Kindle, Sony eReader, Kobo, etc, read your ebooks anywhere.
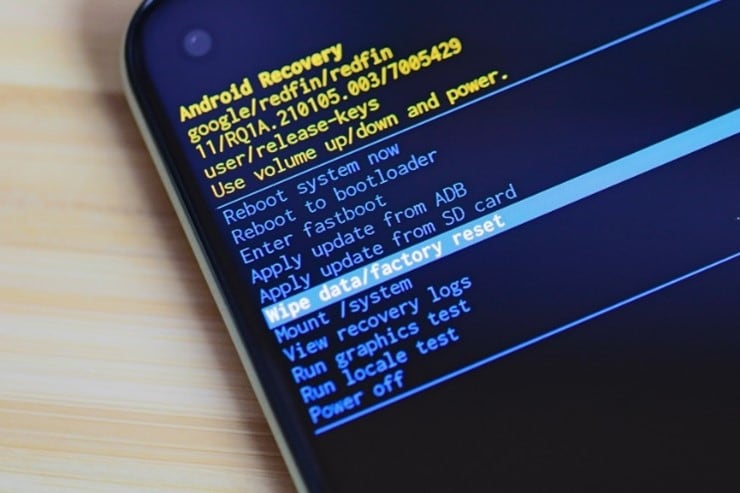
Part 3. Bonus Tip: Best App To Solve Android Phone Stuck On Boot Screen
If all the solutions above do not work and you do not want to perform a factory reset on your phone, one option is to use an app called Dr.Fone. It is one of the most effective phone recovery solutions and can help to bring your Infinix Smart 7 HD back to a state like it was brand new. Being stuck on the Android boot screen will be a problem of the past.
Refer to the tutorial below to solve your Android phone is stuck on the logo page issue.
Step 1: Download and install Dr.Fone – System Repair (Android) on your computer. Open the application and connect your Infinix Smart 7 HD to the computer.
Step 2: Select the issue you face on the next page. If you use a Infinix Smart 7 HD phone, select Stuck at Infinix Smart 7 HD Logo. Alternatively, you can click on Black Screen or Stuck in Boot Loop.
Step 3: Input the Brand, Name, Model, Country, and Carrier of your phone and click on Next.
Step 4: Follow the instructions provided on the page and wait for the system repair to finish. After which, click on Done to complete the process.
safe & secure
Conclusion
This article summarizes some possible reasons your Android phone is stuck on the logo page. Five useful strategies were shared to easily overcome your Infinix Smart 7 HD being stuck in the boot. However, if all the above methods do not work, we recommend trying the Dr.Fone-System Repair.
Dr.Fone-System Repair repairs the operating system issues and fixes the problem with your Infinix Smart 7 HD. Once you power on your Infinix Smart 7 HD again, you can rest assured that it will be like new.
- Title: 4 Ways to Fix Android Blue Screen of Death On Infinix Smart 7 HD | Dr.fone
- Author: Ariadne
- Created at : 2024-07-30 07:29:18
- Updated at : 2024-07-31 07:29:18
- Link: https://howto.techidaily.com/4-ways-to-fix-android-blue-screen-of-death-on-infinix-smart-7-hd-drfone-by-drfone-fix-android-problems-fix-android-problems/
- License: This work is licensed under CC BY-NC-SA 4.0.