
6 Fixes to Unfortunately WhatsApp has stopped Error Popups On Honor Play 7T | Dr.fone
6 Fixes to Unfortunately WhatsApp has stopped Error Popups On Honor Play 7T
Ever seen a wheel going on without cog? Similarly, WhatsApp has become the cog of our lives. Be it in the professional era or personal (gossips, oomph) stuffs, it is a crucial engaging kind of application. WhatsApp is the slow poison yet a useful tool used worldwide after call logs or messages. Imagining a day without is enough to put someone off. And if one has recently faced a problem in WhatsApp crashing or not opening, then it is enough to give a heart break. It can be due to Cache memory piled up, storage running out of space, WhatsApp components getting corrupted. In such a case, resolving the problem by using an effective solution is very important! Don’t worry and wander as we will provide impeccable range of fixes to bid bye to WhatsApp stopping problem.

Cause 1: WhatsApp-related Firmware Components went wrong
You should start fixing the WhatsApp crashing issue with fixing the Android firmware. This is because the Android firmware components are many times the hidden culprit behind the problem of why a particular app stops working. And to fix these components in one click, you need Dr.Fone - System Repair (Android). It is one of the safest tools around in the market and works efficiently with Android system issues. It promises to bring your device back to normal and healthy state. Here are the benefits you get with this amazing tool.

Dr.Fone - System Repair (Android)
Android repair tool to fix firmware component issues
- Fixes all kinds of Android system issues with ease
- Supports 1000+ Android device in a hassle-free way
- Really easy to use and free from any virus infection
- One needn’t to be a tech pro to use this tool
- Can be downloaded for free and repairs the Honor Play 7T device in few easy steps
4,388,871 people have downloaded it
Step 1: Download Dr.Fone Tool
To start repairing, go to the official website of Dr.Fone - System Repair (Android) and download it. Install it and then open the tool on your PC. To proceed, look for the “System Repair” tab and click on it.

Step 2: Choose the Right Tab
As the next step, you need to take the help of USB cable and then plug your device to the computer. Once connected appropriately, make sure to click on the “Android Repair” tab from the left panel.
 With Screensaver Wonder you can easily make a screensaver from your own pictures and video files. Create screensavers for your own computer or create standalone, self-installing screensavers for easy sharing with your friends. Together with its sister product Screensaver Factory, Screensaver Wonder is one of the most popular screensaver software products in the world, helping thousands of users decorate their computer screens quickly and easily.
Step 3: Enter Details
Next will be the information screen. Simply enter the model, brand and other details. Check everything once and click on “Next”.

Step 4: Enter Download Mode
Subsequently, you need to go along with the onscreen instructions. This will boot your device in the download mode. The step is necessary to download the firmware. When you follow the steps, you need to click “Next”. The program will then start downloading the firmware.

Step 5: Repair Android
Now, you just have to sit back and relax. The program will begin to repair your device. Wait until you get the notification for completion.

Cause 2: Cache conflict
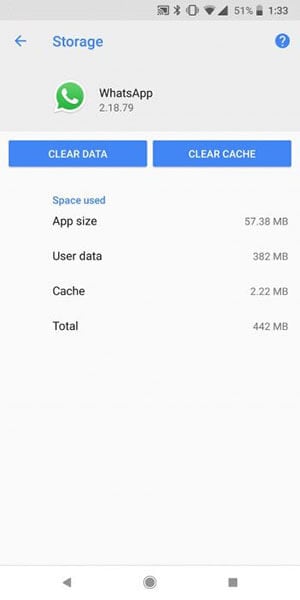
The purpose of Cache in a device is to keep the track of frequently used data and information of an application. And when there are the files or data that are corrupted in the cache, this might raise the “Unfortunately WhatsApp has stopped” error. Therefore, you need to clear the WhatsApp data if the above method went futile. Here are the steps.
- Open “Settings” and go to “App Manager” or “Apps & Notifications” or “Applications”.
- Now, from the list of all applications, choose “WhatsApp”.
- Click on “Storage” and tap “Clear Data”.

Cause 3: WhatsApp components corruption
A lot of times, the WhatsApp crashes due to the corrupted components of WhatsApp. In such case, all you need to do is uninstall and install the WhatsApp again. This is how you do it.
- Uninstall the app right away from your Homescreen or from the “Settings” > “Applications” > “All” > “WhatsApp” > “Uninstall” (for some phones).
- Go to “Play Store” and search “WhatsApp” on the search bar.
- Tap on it and start downloading followed by installing it.

 Glarysoft File Recovery Pro Annually - Helps to recover your lost file/data, even permanently deleted data.
Cause 4: Not Enough Storage on your Phone
Insufficient storage could be the other reason why for your WhatsApp has stopped. When your device starts running out of space, some apps may not be able to operate properly for their functions take up space in the Honor Play 7T device. And probably WhatsApp is one of them. If the space is the case with you, we suggest you the following two things to go with.
- Firstly, go to Settings and check the storage. Make sure it is enough i.e. at least 100 to 200MB.
- Secondly, start eliminating the apps that are no longer needed. This will indeed create more space in your device and will let your WhatsApp wok properly.
 dotConnect for Oracle is an ADO.NET data provider for Oracle with Entity Framework Support.
Cause 5: Gmail Account no longer valid or hacked
It is a well-known fact that Android device and Gmail account go hand in hand. To run the Honor Play 7T device smoothly, it is always asked to enter your Gmail address for further configurations. And when WhatsApp stops on your device, the reason might be your Gmail account. Most probably it is not valid now or maybe hacked. If this is the case, we suggest you to log out and log in with some another Gmail account.
- Log out by opening “Settings” and tap on “Accounts”.
- Choose your Google account and tap on “REMOVE ACCOUNT”.
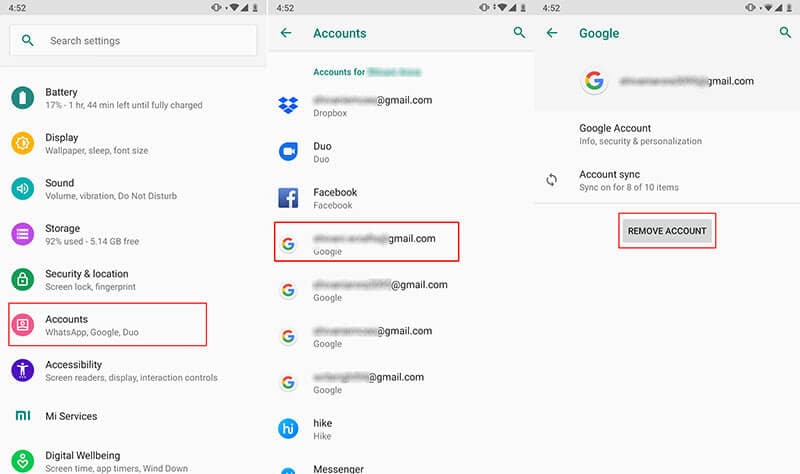
Now, you can login again and check if WhatsApp works or not.
Cause 6: WhatsApp Incompatible with your Android Phone
If still nothing works and your WhatsApp keeps stopping, most likely the reason is the incompatibility of your WhatsApp with your device. In such case, the thing that comes to your rescue is mod WhatsApp version like GBWhatsApp. It is a mod app which is similar to WhatsApp but in a more modified way. With this, a user gets more functionalities and customizable settings when compared to WhatsApp.
If you’re wondering how you can find this app and install, you should keep reading.
To find GBWhatsApp:
Since you can look for this mod app on the Play Store, here are some of the other secure places from where you can download apk file for this GBWhatsApp. Note down these websites to get GBWhatsApp downloaded if WhatsApp has stopped.
- Latest Mod APKs
- UptoDown
- Android APKs Free
- Soft Alien
- OpenTechInfo
To Install GBWhatsApp:
Now that you have decided where to download the apk file, these are the following steps that you should follow to install it on your phone. Please have a look:
- Firstly, open “Settings” on your device and go to “Security”. Turn the “Unknown Sources” option. Doing this will let you install the apps from other locations than Play Store.

- Using the browser on your phone, download the app from any of the aforementioned website.
- Launch the GBWhatsApp apk and follow the onscreen instruction in order to install. You need to go in a similar way as you do in mormal WhatsApp app.
- Simply proceed with entering your name, country and contact number. The app will verify your account. You are now ready to use this app.


Authentication Error Occurred on Honor Play 7T? Here Are 10 Proven Fixes
There are times when users get an authentication error while they connect to a Wifi network. The problem is mostly found in Android whenever a device tries to establish a connection to Wifi. If your device is also experiencing an authentication problem Wifi, then don’t worry. It can easily be resolved. In this post, we will make you familiar with the root cause for the Honor Play 7T Wifi problem and how you can resolve whenever authentication error occurred on your device.
Part 1: Any idea about the Wi-Fi authentication problem?
Wi-Fi authentication has to be done every time you wish to connect to a Wi-Fi network over your smartphone or laptop. To authenticate yourself and connect to the protected Wi-Fi network, you need to have the password of it. But if after you’re putting in the correct password and still experiencing the wifi authentication problem. Here’s what you need to know.
Authentication error occurs when the “deal” between the Wi-Fi router and device fails due to certain reasons. First, the Honor Play 7T device sends the password of the network and the “connect” request in an encrypted format to the Wi-Fi router. Then, the router decrypts the password and compares the password saved on it. Now, if the password matches, it sends affirmation for the “connect” request, and then the Honor Play 7T device is allowed to connect to the network.
Part 2: Why Authentication Error Occurred when Connecting to Wifi?
There could be plenty of reasons for facing an authentication error on your device. Most of the time, it occurs whenever a Wifi router seems to malfunction. Furthermore, if your phone has been recently updated, then chances are that there could be an issue with its drivers. A security attack can also make your device malfunction as well. An unstable connection or a router blockage can also be a reason for this issue.
In this scenario, whenever you try to connect to a Wifi network (even after supplying the correct password and username), it doesn’t connect to it. Instead, it displays an authentication error occurred promptly. Thankfully, there are plenty of ways to overcome the authentication problem Wifi. In the next section, we have provided three different solutions to fix the Honor Play 7T Wifi problem (as it mostly happens on Android devices).
Part 3: 10 Solutions to Fix Wifi Authentication Error
Before we make you familiar with different fixes for the Wifi authentication error, it is important to check your router beforehand. Chances are that you could be getting the authentication error because your router is not functioning properly. You can restart it and try to connect any other device to it as well to check it. After making sure that there is no problem with your network or router, follow these suggestions to overcome the authentication error occurred issue.
Check if extra characters added in Wi-Fi password
Ensure that no other extra characters are being added in the Wi-Fi password while you’re entering it. Key in the password carefully while viewing the characters, and then check if the authentication error occurs or not.
One-Click to Fix Wifi Authentication Error by Android System Repair
Android system repair is considered the most effective way to fix Wifi Authentication Error. As the bottom-layer Android system files may be corrupted unconsciously with days of phone use, the Wifi Authentication Error may be one of the symptoms.
So Android repair requires programming knowledge to do it?
No! With Dr.Fone - System Repair (Android), you can do Android repair in just a few steps and get all issues like Wifi Authentication error fixed easily.
Dr.Fone - System Repair (Android)
An easy-to-operate tool to fix Android system issues like a Wifi authentication error
- Fixes all Android system issues like a black screen of death, Wifi authentication error, etc.
- One-click to fix the Wifi authentication error. No technical skills required.
- Supports all the new Honor Play 7T devices like Galaxy S8, S9, etc.
- Easy-to-follow instructions provided on each of the screens.
3981454 people have downloaded it
Here are the steps to fix Wifi Authentication Error by Android system repair:
Note: Android repair is effective to permanently fix Wifi Authentication Error, but may wipe out the existing phone data. Backup all the important Android data to PC before you go on.
- After the Dr.Fone tool is downloaded, install, and launch it. You can see the following screen.
- Connect your Honor Play 7T to the computer, and select “Android Repair” in the middle.

- Select all the details that match your device, and click “Next”.
- Next up, you should boot your Honor Play 7T in download mode by following the on-screen instructions.

- Allow the program to download the corresponding firmware. After that, the Android repair will start and get the Wifi Authentication Error fixed in minutes.

Use static IP address instead of DHCP
DHCP, or Dynamic Host Configuration Protocol is the default IP address assignment for the Wi-Fi settings on many devices. Whereas DHCP can cause IP address conflict during the dynamic IP address assignment. So, you’d better change “DHCP” to “Static” to see if the authentication error persists.
Step 1: Head to the “Settings” of your Honor Play 7T and then opt for “Wireless and Networks” followed by “WLAN/WiFi”.
Step 2: Now, hit on the WiFi network that is showing “authentication error occurred”.
Step 3: Depending on your Honor Play 7T model, look for “IP Settings” and tap on it. Now, switch the “DHCP” to “Static”.
Step 4: Note down the static IP address fields and wipe off all the fields. Punch it in again and then save it.


Check carefully for duplicate Wi-Fi names before you connect
Perhaps, you might connect to a WiFi with a similar name. There are good chances that some users do not modify their WiFi network name and possibly, your neighbor may have the same WiFi network, service provider. Therefore, ensure you connect to the correct WiFi network.

Reset the Wifi network
One of the easiest ways to fix the authentication problem of Wifi is to reset the network. To do this, you would be required to forget the respective network first and then connect to it again. This can be done by simply following these steps.
1. Firstly, you need to forget a Wifi network. To do it, go to your phone’s Settings > WiFi and network. From here, you can see a list of all the Wifi hotspots that your phone connects to. Select the network you wish to forget.
 vMix Basic HD - Software based live production. vMix Basic HD includes 4 inputs, 3 cameras, streaming, recording, playlist.
2. When you would select a network, it will provide the basic information related to it. Just tap on the “Forget” button and agree to the pop-up message. This will erase the network’s information from your device.

3. Afterward, turn on your Wifi again and tap to the network you wish to connect to. Simply provide the credentials and tap on the “Connect” button to reestablish the connection. This way, you can reset the network successfully.

Modify network connection
If the above solution won’t work, then you would be required to walk the extra mile to fix the Honor Play 7T Wifi problem. After you reset a network connection, if still getting issues regarding the authentication of the network, you need to modify the connection. In this technique, you will be changing the IP settings on your phone to alter the way it establishes a secure connection. You can do it by following these steps.
1. To start with, visit your phone’s Settings and open the Wifi page.

2. This will display a list of all the Wifi networks that are associated with your device. Just long-tap on the Wifi network that you wish to modify. It will open another pop-up window. From here, tap on the option of “Manage network settings”. Sometimes, users also get an option of “Modify network settings” here as well. Simply select it to proceed.


3. It will display basic information related to your Wifi network. Just tap on the “Show advanced options” button to access more options related to the network setting.

4. From the IP Settings menu, change the field from DHCP to Static. This will let you establish a static connection between your device and the router.
 ZoneAlarm Pro Antivirus + Firewall NextGen

5. As soon as you will change it to static, you will get different fields related to your network’s IP address, gateway, DNS, and more. Simply fill these fields and tap on the “Save” button once you are done.

Now, try to connect to the Wifi hotspot again. You would be able to overcome the authentication problem of Wifi.
Change Network Security Type
It has been observed that, when we connect to Wifi, our device chooses a wrong security type. This clashes with the default security protocol of the router and authentication error occurred due to this. If your device is facing the same issue, then it can be fixed by simply changing its security type. To do this, follow these instructions:
1. To change the security type of a network, you need to “Add the network”. If you already have the Wifi network saved, then simply forget the network by following the above-mentioned tutorial.
2. Now, turn on your device’s Wifi and tap on the option of “Add network”. Here, you would be asked to give a network name and select the security type. To manually select it, tap on the “Security” option.

3. From here, you will get a list of various security protocols that you can pick. Select “WPA/WPA2-PSK” and save your selection.

Now, try to connect to the network again. Most likely, it will let you fix the authentication error on your device.
Update Android firmware to the latest
There are instances where an outdated OS version of your Honor Play 7T may create a hindrance in establishing a connection between your device and the WiFi network. You need to update your Android firmware to the latest version and then check if the problem persists or not.
Step 1: Launch “Settings” of your Honor Play 7T and then get into the “About Phone” option.
Step 2: Now, opt for the “System Update” option. If the update is available, get your device updated to the latest OS version.
Restart the router and reset Android network settings
Sometimes, the WiFi router may hang up while establishing a connection and therefore, the wifi authentication problem occurs. Try restarting your Wi-Fi router and then check if your device connects successfully. If this doesn’t work, try to reset your Android Network Settings .
Bonus tip: Turn Airplane mode on/off
By simply turning on the Airplane mode (and later turning it off), you can easily fix the authentication problem Wifi most of the time. You can find a toggle button for Airplane mode on the notification bar of your phone. If you can’t find it there, then go to your phone’s Settings > Connection > More Networks and turn on the feature of “Airplane Mode”.

Let it do for a while. Afterward, turn it off and try to connect to the Wifi network again.
After following these quick and easy suggestions, you would be able to fix the Honor Play 7T Wifi problem for sure. Even if you use any other Android device, then its authentication error can easily be resolved after these effective solutions. Go ahead and give these expert solutions a try and let us know about your experience as well. If you have any other solution to fix the authentication problem Wifi, then share it with us as well in the comments.
Full Guide: How To Fix Connection Is Not Private on Honor Play 7T
Are you encountering the “your connection is not private” issue on your phone? We found many Android users have increasingly expressed their frustrations with this recurring problem while browsing on the internet.
Usually, you can just reload the page to fix the error. But in case it doesn’t help, you may need to look for more advanced solutions. In the following discussion, we will delve into why this “your connection is not private” on Android happens and explore solutions that work for you.
Part 1: Addressing Your Connection Is Not Private on Android
First of all, what does “your connection is not private” on Android mean? To answer this question, it’s essential to understand that this error is often associated with Secure Socket Layer (SSL) protocol issues.
SSL is a cryptographic protocol created to establish a secure communication channel over the internet. Its primary purpose is to ensure the confidentiality and integrity of data exchanged between a user’s device and a website’s server.
The error message appears when there’s a problem with the SSL/TLS (Transport Layer Security) certificate of the website you are trying to access. This certificate is a digital document that authenticates the website and encrypts the data transmitted between the user’s device and the server.

Some common factors that could trigger the “your connection is not private” on Chrome Android error:
- Expired or invalid SSL certificate of the website;
Certificates are issued for a specific period, and if the website owner fails to renew it in time, your browser will detect it as not secure.
- There is a mismatch between the domain on the certificate and the actual domain you are trying to visit;
This discrepancy might occur due to a misconfiguration on the website or, in some cases, due to a man-in-the-middle attack where a third party intercepts the communication between your device and the server.
- No HTTPS enforcement;
Another reason for the issue is if the installed SSL certificate doesn’t turn on the “force HTTPS” option. This means visitors might be using the non-secure HTTP version of the site instead of the safe URL.
So, the error serves as a warning to users, indicating that the connection may not be secure and sensitive information could be at risk.
Browsers, including those on Android devices, prioritize user safety and privacy. They will block access to potentially compromised websites to prevent data theft or unauthorized access. That’s why when you get the “your connection is not private” message on Android, you can’t access the website.

Part 2: What The Error Codes in “Your Connection Is Not Private” Mean
When “your connection is not private” on Chrome Android error shows up, it often comes along with specific error codes that can indicate the root cause of the issue. Understanding these error codes is crucial for troubleshooting and resolving the problem effectively.
- ERR_CERT_SYMANTEC_LEGACY: Unsupported Symantec-issued certificate
This error code indicates that the website you are attempting to access is equipped with an unsupported Symantec-issued certificate. Symantec, a prominent Certificate Authority, had faced concerns about the security of its certificate issuance processes.
As a result, major browsers, including Google Chrome, no longer support certificates issued by Symantec. If you encounter this error, it implies that the website’s SSL certificate is outdated and needs to be updated with a certificate from a trusted Certificate Authority.
- NET::ERR_CERT_AUTHORITY_INVALID: Unauthenticated SSL certificate
The presence of this error code suggests that the SSL certificate of the website cannot be authenticated by your browser. This could occur if the certificate is self-signed or issued by an unrecognized Certificate Authority.
- NET::ERR_CERT_DATE_INVALID: Date and time mismatch
This error code points to a discrepancy between your Honor Play 7T’s date and time settings and the information on the website’s SSL certificate, as they have expiration dates. If the date and time settings on your device are incorrect, it may prevent the certificate from being validated. Correcting your device’s date and time settings should resolve this issue.
- SSL certificate error: Generic or unspecified problem
This is a more generic error message that indicates a problem with the website’s SSL certificate without specifying the exact nature of the issue. It could indicate various issues, such as an expired certificate, a misconfiguration in the certificate chain, or other SSL-related problems.
Part 3: How To Fix Your Connection Is Not Private on Android
Encountering the “your connection is not private” error on Android can be a frustrating experience. Fortunately, there are various methods to address and fix this issue, depending on its underlying cause.
In this section, we will explore some effective solutions to help you regain a secure and private connection.
Method 1: Clear your cache
When you use the internet, web browsers store information about your online activities in cached data and cookies to speed things up. However, having too much of this data can cause problems instead. It might even stop your browser from connecting securely.
So, clearing your browser cache and data can be a quick and simple “your connection is not private” Android fix. Follow the steps here:
- Step 1: Open and launch Chrome.
- Step 2: Access the Menu (the three dots button) to open the Settings. Select Privacy and Security > Clear Browsing Data.
- Step 3: Opt for the “All Time” option and click “Clear Data” to erase your cache.

After successfully clearing your browser cache and data, revisit the website to check if the problem persists.
 Video Converter Factory Pro
Method 2: Repair the Android system
Addressing the “your connection is not private” to fix on Android involves examining both the Honor Play 7T device and the website. If clearing browser data doesn’t help, there might be an issue with your Android system. One solution is to use the Wondershare Dr.Fone system repair tool to fix the issues safely.
How to perform system repair with Dr.Fone:
- Step 1. Open the Repair Tool
Start by launching Wondershare Dr.Fone on your computer. Go to the Toolbox section and connect your Honor Play 7T. Choose System Repair and pick Android as your device type.

 safe & secure
4,322,863 people have downloaded it
- Step 2. Begin Repair
Click Start on the new screen to kick off the repair. Since you’re dealing with a connection private issue on Android, select System Damage.
- Step 3. Fill in the Honor Play 7T device Details
The platform will detect your Honor Play 7T’s brand. Confirm the Name, Model, Country, and Carrier. If your device is unlocked, choose OPEN in the Carrier section. Agree to the warning, click Next, and proceed with the repair.
- Step 4. Activate Download Mode
Follow the instructions to put your Honor Play 7T into Download Mode. Once in Download Mode, you will start downloading the firmware.
- Step 5. Confirm Installation
Remember, the repair may erase data. It’s advisable to back up your data first before starting the repair. Enter “000000” to confirm the repair process, shown by a progress bar.

When done, click Done if your Android starts properly. If not, click Try Again to repeat the process.
 Epubor Audible Converter for Win: Download and convert Audible AAXC/AA/AAX to MP3 with 100% original quality preserved.
Method 3: Check and fix the date and time on your Android
Since the error code “NET::ERR_CERT_DATE_INVALID” indicates a mismatch between the date and time on your device and your browser, you need to adjust the date and time settings on your Android to fix it.
The specific steps can vary based on your Android model, but the general approach involves locating the “date and time” settings on your phone. How to fix the date and time on Android to bypass “your connection is not private” on Chrome Android:
- Step 1: Go to your Honor Play 7T’s Settings > Date & Time.
- Step 2: Switch on the “Automatic Date & Time” to sync with the network-provided time.

 NeoDownloader - Fast and fully automatic image/video/music downloader.
Method 4: Perform factory reset
If nothing else works, there might be malware on your phone causing trouble. It’s crucial to eliminate this threat before further damage occurs. The recommended action is to perform a factory reset on your phone.
However, keep in mind that this process can result in data loss, so it’s essential to back up your data beforehand. Follow the steps to perform a factory reset on Android:
- Step 1: Go to your Android Settings.
- Step 2: Select Backup and Reset > Factory data reset. Then, opt to erase all data.

Most of the time, you won’t need to go to the extreme of a factory reset. The simpler solutions mentioned earlier should take care of the Security Certificate Error on your Android.
Conclusion
By now, you should have a good grasp of the “Your Connection Is Not Private” problem on Android. This issue typically arises from complications with the SSL certificate of the website, designed to ensure a secure connection.
When you see the error message, it often comes with specific codes that indicate the underlying problem. Several methods can be employed to fix the “Your Connection Is Not Private” on Android. Clearing the browser cache, repairing the Android system using tools like Dr.Fone, checking and fixing date and time settings, and performing a factory reset as a last resort are among the solutions.
By prioritizing user safety and following the step-by-step approach in this guide, you can navigate and resolve this common internet browsing challenge on your Honor Play 7Ts.
- Title: 6 Fixes to Unfortunately WhatsApp has stopped Error Popups On Honor Play 7T | Dr.fone
- Author: Ariadne
- Created at : 2024-07-30 07:36:08
- Updated at : 2024-07-31 07:36:08
- Link: https://howto.techidaily.com/6-fixes-to-unfortunately-whatsapp-has-stopped-error-popups-on-honor-play-7t-drfone-by-drfone-fix-android-problems-fix-android-problems/
- License: This work is licensed under CC BY-NC-SA 4.0.