
6 Fixes to Unfortunately WhatsApp has stopped Error Popups On Vivo Y17s | Dr.fone
6 Fixes to Unfortunately WhatsApp has stopped Error Popups On Vivo Y17s
Ever seen a wheel going on without cog? Similarly, WhatsApp has become the cog of our lives. Be it in the professional era or personal (gossips, oomph) stuffs, it is a crucial engaging kind of application. WhatsApp is the slow poison yet a useful tool used worldwide after call logs or messages. Imagining a day without is enough to put someone off. And if one has recently faced a problem in WhatsApp crashing or not opening, then it is enough to give a heart break. It can be due to Cache memory piled up, storage running out of space, WhatsApp components getting corrupted. In such a case, resolving the problem by using an effective solution is very important! Don’t worry and wander as we will provide impeccable range of fixes to bid bye to WhatsApp stopping problem.

Cause 1: WhatsApp-related Firmware Components went wrong
You should start fixing the WhatsApp crashing issue with fixing the Android firmware. This is because the Android firmware components are many times the hidden culprit behind the problem of why a particular app stops working. And to fix these components in one click, you need Dr.Fone - System Repair (Android). It is one of the safest tools around in the market and works efficiently with Android system issues. It promises to bring your device back to normal and healthy state. Here are the benefits you get with this amazing tool.

Dr.Fone - System Repair (Android)
Android repair tool to fix firmware component issues
- Fixes all kinds of Android system issues with ease
- Supports 1000+ Android device in a hassle-free way
- Really easy to use and free from any virus infection
- One needn’t to be a tech pro to use this tool
- Can be downloaded for free and repairs the Vivo Y17s device in few easy steps
4,388,871 people have downloaded it
Step 1: Download Dr.Fone Tool
To start repairing, go to the official website of Dr.Fone - System Repair (Android) and download it. Install it and then open the tool on your PC. To proceed, look for the “System Repair” tab and click on it.

Step 2: Choose the Right Tab
As the next step, you need to take the help of USB cable and then plug your device to the computer. Once connected appropriately, make sure to click on the “Android Repair” tab from the left panel.

Step 3: Enter Details
Next will be the information screen. Simply enter the model, brand and other details. Check everything once and click on “Next”.

Step 4: Enter Download Mode
Subsequently, you need to go along with the onscreen instructions. This will boot your device in the download mode. The step is necessary to download the firmware. When you follow the steps, you need to click “Next”. The program will then start downloading the firmware.

Step 5: Repair Android
Now, you just have to sit back and relax. The program will begin to repair your device. Wait until you get the notification for completion.

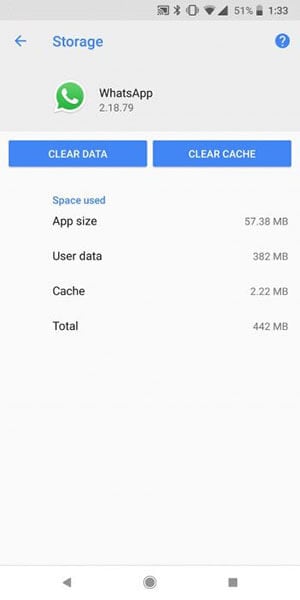
Cause 2: Cache conflict
The purpose of Cache in a device is to keep the track of frequently used data and information of an application. And when there are the files or data that are corrupted in the cache, this might raise the “Unfortunately WhatsApp has stopped” error. Therefore, you need to clear the WhatsApp data if the above method went futile. Here are the steps.
- Open “Settings” and go to “App Manager” or “Apps & Notifications” or “Applications”.
- Now, from the list of all applications, choose “WhatsApp”.
- Click on “Storage” and tap “Clear Data”.
Cause 3: WhatsApp components corruption
A lot of times, the WhatsApp crashes due to the corrupted components of WhatsApp. In such case, all you need to do is uninstall and install the WhatsApp again. This is how you do it.
- Uninstall the app right away from your Homescreen or from the “Settings” > “Applications” > “All” > “WhatsApp” > “Uninstall” (for some phones).
- Go to “Play Store” and search “WhatsApp” on the search bar.
- Tap on it and start downloading followed by installing it.


Cause 4: Not Enough Storage on your Phone
Insufficient storage could be the other reason why for your WhatsApp has stopped. When your device starts running out of space, some apps may not be able to operate properly for their functions take up space in the Vivo Y17s device. And probably WhatsApp is one of them. If the space is the case with you, we suggest you the following two things to go with.
- Firstly, go to Settings and check the storage. Make sure it is enough i.e. at least 100 to 200MB.
- Secondly, start eliminating the apps that are no longer needed. This will indeed create more space in your device and will let your WhatsApp wok properly.
Cause 5: Gmail Account no longer valid or hacked
It is a well-known fact that Android device and Gmail account go hand in hand. To run the Vivo Y17s device smoothly, it is always asked to enter your Gmail address for further configurations. And when WhatsApp stops on your device, the reason might be your Gmail account. Most probably it is not valid now or maybe hacked. If this is the case, we suggest you to log out and log in with some another Gmail account.
- Log out by opening “Settings” and tap on “Accounts”.
- Choose your Google account and tap on “REMOVE ACCOUNT”.
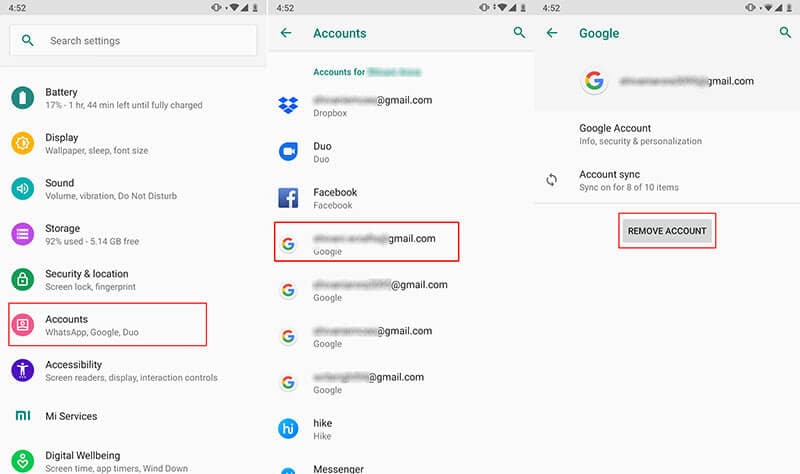
Now, you can login again and check if WhatsApp works or not.
Cause 6: WhatsApp Incompatible with your Android Phone
If still nothing works and your WhatsApp keeps stopping, most likely the reason is the incompatibility of your WhatsApp with your device. In such case, the thing that comes to your rescue is mod WhatsApp version like GBWhatsApp. It is a mod app which is similar to WhatsApp but in a more modified way. With this, a user gets more functionalities and customizable settings when compared to WhatsApp.
If you’re wondering how you can find this app and install, you should keep reading.
To find GBWhatsApp:
Since you can look for this mod app on the Play Store, here are some of the other secure places from where you can download apk file for this GBWhatsApp. Note down these websites to get GBWhatsApp downloaded if WhatsApp has stopped.
- Latest Mod APKs
- UptoDown
- Android APKs Free
- Soft Alien
- OpenTechInfo
To Install GBWhatsApp:
Now that you have decided where to download the apk file, these are the following steps that you should follow to install it on your phone. Please have a look:
- Firstly, open “Settings” on your device and go to “Security”. Turn the “Unknown Sources” option. Doing this will let you install the apps from other locations than Play Store.
 vMix Basic HD - Software based live production. vMix Basic HD includes 4 inputs, 3 cameras, streaming, recording, playlist.
- Using the browser on your phone, download the app from any of the aforementioned website.
- Launch the GBWhatsApp apk and follow the onscreen instruction in order to install. You need to go in a similar way as you do in mormal WhatsApp app.

- Simply proceed with entering your name, country and contact number. The app will verify your account. You are now ready to use this app.


Guide: How To Unbrick a Bricked Vivo Y17s Phone
Vivo Y17s phones are super popular thanks to their excellent features and affordable prices. But being so popular means people try to customize them with custom software. If you’re not careful, you might have a “bricked” Vivo Y17s phone. It won’t work at all. It will be more like a brick than a smartphone.
Don’t worry, though. This guide is here to help. It will show you how to unbrick your phone step by step. You’ll learn to bring your phone back to life and make it work again. So, get started on fixing your bricked Vivo Y17s phone by reading this article.

Part 1. Common Reasons Why Vivo Y17s Phones Get Bricked
A bricked phone might sound like a techy term, but it’s pretty simple – when your Vivo Y17s phone turns into a lifeless block that won’t do anything. In this section, you’ll learn all about why this happens, so you can avoid these issues and keep your phone alive as long as possible.

- Trying to flash incompatible ROMs. Sometimes, people want their Vivo Y17s phones to run different software like a custom version of Android called a ROM. But if you use the correct ROM for your specific phone, it can mess things up nicely. Also, inexperience with ROM flashing can hard brickyour Vivo Y17s Be sure to follow guides and ask for community help online.
- Rooting mishaps/failures.“Rooting” means giving your phone superpowers, but if you mess up, it can go wrong. Your phone might not boot up, leaving you with a brick. Like the previous bullet, follow guides carefully, especially if inexperienced.
- Failed Firmware Updates. When your phone asks you to update its software, following the instructions carefully is essential. If you interrupt the process or something goes wrong, your phone could be bricked.
Now, you must know about soft and hard-bricking to learn how to diagnose your phone. Soft bricking is like a phone’s bad day – it might not start up. However, with the right help, you can fix it. Hard bricking is worse. It’s when your phone is a paperweight – it won’t turn on, respond, or do anything useful.
Part 2. Method 1: Use the Vivo Y17s Flash Tool To Recover Bricked Vivo Y17s Phones
Say you’ve accidentally bricked your Vivo Y17s phone due to rooting or ROM flashing. You might feel scared, but imagine having a magic wand that can fix your bricked phone. That’s what the Vivo Y17s Flash Tool is –a dedicated Vivo Y17s unbricking tool. It lets you install or flash different software onto your phone, giving it a fresh start. Most of the time, a simple firmware flash will unbrick your Vivo Y17s.
The Vivo Y17s Flash Tool is a superhero for various situations. Here are some scenarios where it can save the day:
- **Device Recovery.**If your phone is bricked or acting strange, the Flash Tool can help bring it back to life.
- Firmware Updates. You can use it to install official updates released by Vivo Y17s, ensuring your phone runs smoothly.
- **Device Customization.**Want a different look for your phone? The Flash Tool can help you install custom ROMs or themes.
- **Bug Fixes.**Got pesky bugs or glitches? The Flash Tool can replace corrupted software to make your phone behave.
- Performance Enhancement. If your phone feels sluggish, the Flash Tool can boost its speed by flashing a new OS.
How To Use the Vivo Y17s Flash Tool To Unbrick a Vivo Y17s Phone
Now that you know what the Vivo Y17s Flash Tool is all about, it’s time to learn how to use it. If you’ve bricked your Vivo Y17s phone, follow the steps below:
- Step 1. Download the Vivo Y17s Flash Tool and the stock firmware of your device on your computer.
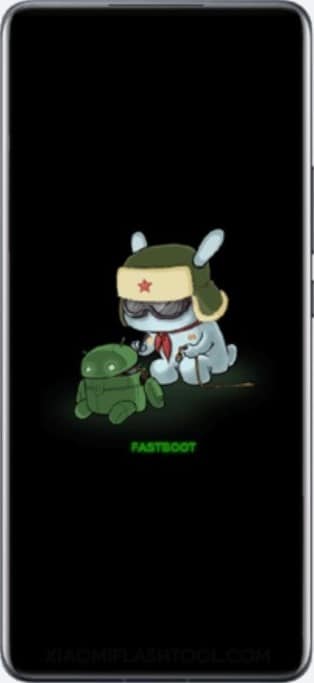
- Step 2. Turn off your phone. Then, press and hold the Volume Down + Power Key simultaneously for 6-8 seconds. This will force your phone to enter the Fastboot mode.


- Step 3. Connect your phone to your computer using a cable when you see this screen flash.
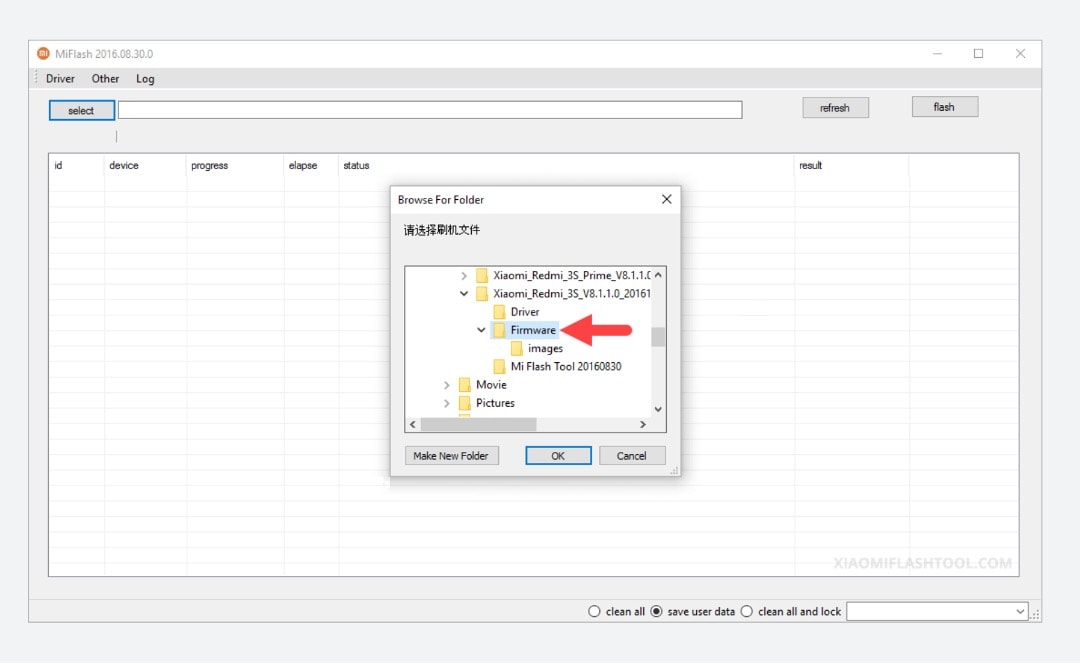
- Step 4. Using the Vivo Y17s Flash Tool, click Select. Then, locate the firmware files you downloaded earlier.
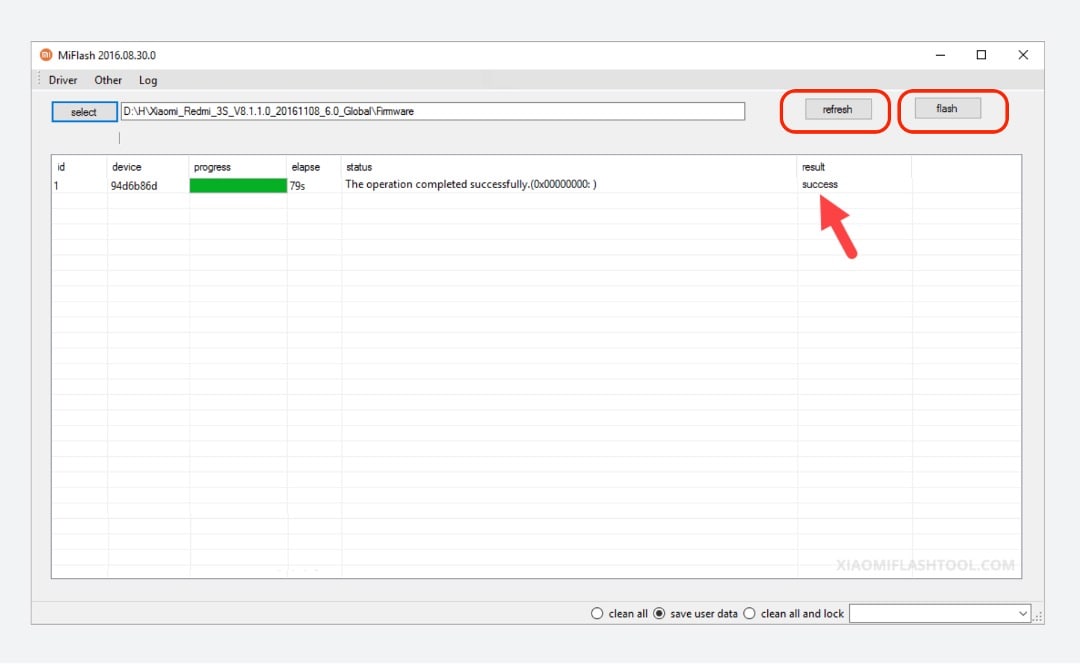
- Step 5. Click the refresh button until the flash tool recognizes your device. Then, click flash to replace the firmware. A text saying “success” should appear under the result column.

Congratulations! Your phone should be up and working after following these steps.
Part 3. Method 2: Wondershare Dr.Fone System Repair – Your One-Stop Shop for Unbricking Your Vivo Y17s Phone
If you gave the Vivo Y17s Flash Tool a shot and your phone is still not cooperating, don’t lose hope. Sometimes, the magic touch needs a slight variation. That’s where Dr.Fone comes into play. This dedicated software can work wonders when fixing various phone problems. It can even help in cases of bricked Vivo Y17s phones involving software or firmware issues.
![]()
Dr.Fone - System Repair (Android)
Repair Android System Errors without Any Trouble.
- Fix your Android to normal, no skills required.
- Fix various Android system issues, stuck in boot loop , black screen , or won’t turn on , looping on start, etc.
- The high success rate in resolving Android system issues.
- Compatible with a wide range of Android devices and OS versions
- User-friendly interface with easy-to-follow steps.
3981454 people have downloaded it

One of Dr.Fone’s most astonishing powers is its “System Repair” feature. This is where the real magic happens. If your Vivo Y17s phone is bricked, it can help repair the underlying software glitches that caused the issue. Moreover, Dr.Fone brings a toolbox of features to the table, making it more than just a one-trick pony. Here are its key features:
- **Data Recovery:**If you’ve lost precious data, Dr.Fone can help recover it, even from a bricked phone.
- **Data Transfer:**You can quickly move data between devices, even if one is unresponsive.
- **System Backup & Restore:**Fone can help you create a backup of your phone’s system and restore it when needed.
- **Unlocking Tools:**If you’re locked out of your phone, Dr.Fone can help you regain access.
How To Use Dr.Fone System Recovery Feature To Unbrick a Vivo Y17s Phone
Now that you know about Dr.Fone, it’s time to understand how to use it. Hopefully, it can save your bricked Vivo Y17s phone from its problems. Follow the steps below:
- Step 1. DownloadDr.Fone from its official website , and launch it on your computer. After entering the Toolbox menu from the left panel, click System Repair. Make sure that your Vivo Y17s phone is connected.
- Step 2. Select Android on the next screen.

- Step 3. Initiate the Android System Repair by clicking Start.
- Step 4. Confirm your device details. You can edit any details that might be wrong.
- Step 5. Put your phone into Download mode. Follow the guidelines for phones with or without home buttons. Your phone will begin downloading the dedicated firmware.
 Greeting Card Builder
- Step 6. After downloading the firmware, verify and proceed with the installation by clicking Fix Now. Confirm firmware installation by typing “000000” into the text box in the appearing window. Click Confirm afterward.
 Project Manager - Asset Browser for 3Ds Max

- Step 7. After the process is finished, your phone should now be okay. Click Done.

Part 4. Best Practices/Tips Before Unbricking Your Phone
Before diving into the unbricking process, you must arm yourself with some tips and precautions to ensure your recovery journey is as smooth as possible. Here’s what you need to know:
- Backing Up Data: An Ounce of Prevention. Remember the golden rule: always back up your data before attempting any phone recovery. Unbricking might save your phone, but being safe is better than sorry.
- **Authentic Tools and Software: Stay on the Safe Side.**Using genuine and trustworthy tools is crucial when unbricking your Vivo Y17s This applies especially to Dr.Fone, which you should only download from the official website. Additionally, when recovering your phone’s software, use authentic Vivo Y17s ROMs (the operating system’s files).
- **Learning from Online Guides and Communities: Seek Guidance.**Navigating the unbricking process might seem daunting, but you’re not alone. There are many online guides, tutorials, and communities where people share their experiences and solutions.

Conclusion
So, there you have it – your guide to fixing a bricked Vivo Y17s phone. Remember, bricking happens when your phone stops working. You won’t be afraid when that happens, as you learned about the Vivo Y17s Flash Tool and Dr.Fone. They are your phone-saving superheroes that can unbrick even a hard-bricked Vivo Y17s phone.
As a parting reminder, always keep a tool ready for emergencies. For this, choose Dr.Fone. It’s a super tool for all your phone problems. Give it a shot and be confident with your phone wherever you go and whatever you do with it.
 safe & secure
3,052,835 people have downloaded it
Cellular Network Not Available for Voice Calls On Vivo Y17s
The “Cellular Network Not Available for Voice Calls“ error is a common experience for many Android users. In our contemporary world, communication stands as the fundamental pillar of our existence. Yet, the malfunctioning of our devices hinders this connectivity. It often gives rise to numerous complications. Fortunately, your concerns are now a thing of the past.
This article serves as your guide for troubleshooting and overcoming this frustrating dilemma. It has compiled expert perspectives, valuable tips, and detailed, systematic solutions. The article will go through the underlying causes behind this issue and explore potential fixes. By the conclusion of this article, you’ll be armed with the necessary knowledge to tackle this problem.

Part 1. Preliminary Reasons For Cellular Network Not Available For Voice Calls
Facing the “Cellular Network Not Available for Voice Calls Android“ error can be overwhelming. Thus, it becomes evident that specific reasons underlie this issue. Solutions indeed exist to tackle this problem. Yet, comprehending the underlying reasons is equally crucial to resolve the issue:
1. Internet Access
One primary reason behind cellular network unavailability glitches lies in unstable internet access. Voice calls over cellular networks often require a stable internet connection. When this connection fluctuates or drops, it can result in the dreaded error message.
2. Terrain Coverage
Another contributing factor is the geographical terrain. In remote or sparsely populated areas, cellular tower coverage might be limited. It causes a signal disturbance or complete loss of the network.
3. Network Congestion
During peak usage hours or in densely populated areas, network congestion can also be a cause. It leads to temporary unavailability of the cellular network for voice calls. When the network is overloaded with traffic, it might struggle to accommodate more voice calls. That results in connectivity issues.
4. Technical Glitches
Furthermore, technical glitches within the Vivo Y17s device or network infrastructure can cause this issue. These glitches could range from software bugs to hardware malfunctions.
5. Battery or Power Issues
In some instances, insufficient battery power or power-saving modes on devices can cause this issue. They affect the Vivo Y17s device’s capacity to sustain a consistent connection with the cellular network. This consequently causes voice call unavailability.
Part 2. Prominent Solutions For Cellular Network Not Available For Voice Calls Android
A myriad of purposeful solutions exists to resolve the TracFone cellular network not available for voice calls issue. These solutions are specifically designed to address various underlying causes. The aim of these solutions is to restore smooth connectivity for voice calls. Described below are the top 8 solutions to fix the “Cellular Network Not Available” error:
| Method | Efficiency | Difficulty | Duration (Minutes) |
|---|---|---|---|
| Check Network Availability | Moderate | Easy | 5-10 |
| Check Airplane Mode | Low | Easy | 2-5 |
| Select Network Operator | Moderate | Moderate | 5-10 |
| Restart Device | Low to Moderate | Easy | 3-5 |
| Enable Roaming Settings | Moderate | Easy | 3-7 |
| Update Android Smartphone | Moderate | Moderate | 15-30 |
| Performing Factory Reset | High (Last Resort) | Difficult | 30-60+ |
| Contact Carrier Provider | High (Specialized Help) | Moderate | Varies (Depends on Carrier Provider) |
| Wondershare Dr.Fone - System Repair | Highest (Complex Issues) | Easiest | 5-10 |
Solution 1. Check the Availability of Cellular Networks
Before diving into complex fixes, the first thing to do is to check if nearby cell networks are available and how strong their signals are. It is an essential step when trying to fix the “Cellular Network Not Available“ error. This basic check ensures your phone is close enough to a working network tower, which matters for staying connected. It allows you to find out the availability of nearby cellular networks.
Moreover, with it, you can ensure your device is connected to a reliable network. This preliminary check sets the foundation for further troubleshooting.
 CalendarBudget - Monthly subscription membership to CalendarBudget via web browser or mobile app. Support included.
 Solution 2. Check the Airplane Mode of the Smartphone
Another crucial step in resolving this error involves ensuring that the Airplane Mode is disabled. This mode, when activated, disables all wireless connections. It also includes cellular networks, which could lead to connectivity issues. Follow these simple steps to check and disable Airplane Mode on your device:
Instructions: Swipe down on your phone’s screen from the top to access the Notification Panel, unveiling the Quick Settings tiles. Search for the airplane-shaped icon; if Airplane Mode is active, the icon will be highlighted or shown in a distinct color. Tap the Airplane Mode to turn off the Airplane Mode on your Android.

Solution 3. Selecting the Network Operator of the Vivo Y17s device
In certain instances, manually selecting your network operator can help. It effectively resolves the “Cellular Network Not Available for Voice Calls Android“ error on your Vivo Y17s. By choosing the network operator manually, you ensure a deliberate connection to a specific carrier. This potentially bypasses issues related to automatic network selection. Follow these steps to select your network operator manually:
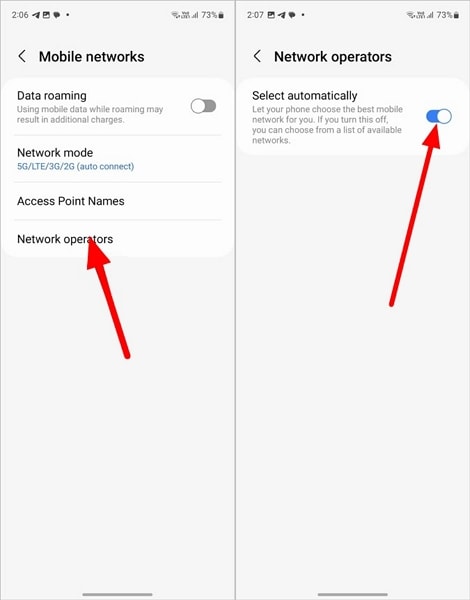
- Step 1. Access “Settings” on your Vivo Y17s, then tap on “Connections.” From there, navigate to “Mobile Networks” and proceed by selecting “Network Operators.”

- Step 2. Look for the “Automatically Select” toggle, which will be turned on. Toggle it off to see available networks and choose the one best suited to your device.

Key features:
• Import from any devices and cams, including GoPro and drones. All formats supported. Сurrently the only free video editor that allows users to export in a new H265/HEVC codec, something essential for those working with 4K and HD.
• Everything for hassle-free basic editing: cut, crop and merge files, add titles and favorite music
• Visual effects, advanced color correction and trendy Instagram-like filters
• All multimedia processing done from one app: video editing capabilities reinforced by a video converter, a screen capture, a video capture, a disc burner and a YouTube uploader
• Non-linear editing: edit several files with simultaneously
• Easy export to social networks: special profiles for YouTube, Facebook, Vimeo, Twitter and Instagram
• High quality export – no conversion quality loss, double export speed even of HD files due to hardware acceleration
• Stabilization tool will turn shaky or jittery footage into a more stable video automatically.
• Essential toolset for professional video editing: blending modes, Mask tool, advanced multiple-color Chroma Key
Solution 4. Restart Your Device
Sometimes, resolving the “Cellular Network Not Available for Voice Calls“ error on your Vivo Y17s can be as simple as performing a restart. This basic troubleshooting step helps refresh the Vivo Y17s device’s software. It clears temporary glitches and reestablishes essential connections, potentially resolving network-related issues. Follow these straightforward steps to restart your Vivo Y17s:
Instructions: Hold down the “Power” button until the Power menu emerges on the display. From there, select “Restart” to initiate the Vivo Y17s device’s reboot process.

Solution 5. Enable Roaming Settings
There are situations where you’re in an area with weak or no coverage from your primary network provider. In such a case, enabling roaming settings on your Vivo Y17s can sometimes resolve the issue at hand. Enabling roaming allows your device to connect to partner networks. This extends your coverage beyond your home network’s reach. Follow these steps to enable roaming settings on your Vivo Y17s:
- Step 1. Start by accessing your device’s Settings and tapping the “Connections” option. Here, scroll downward to press “Mobile Networks.”
 Any DRM Removal for Win:Remove DRM from Adobe, Kindle, Sony eReader, Kobo, etc, read your ebooks anywhere.
- Step 2. Presently, you will encounter the “Data Roaming” option. Toggle this option on to enable data roaming on your device and resolve the issue.

Solution 6. Update Android Smartphone
Updating your Vivo Y17s’s OS to the latest version can often resolve performance issues. It can also fix network connectivity issues, including the “Cellular Network Not Available” error. Manufacturers regularly release system updates containing bug fixes and security patches. It also includes enhancements that can address underlying software-related problems. Follow these steps to update your Android smartphone:
- Step 1. In your device’s Settings, scroll through to find the “Software Update” option. Select it, and on the subsequent screen, verify the availability of any updates.

- Step 2. If an update is accessible, select the ‘Download and Install’ choice. Then, proceed by following the prompts displayed on the screen to finalize the process.

Solution 7. Performing Factory Reset
Performing a factory reset is a drastic but effective measure. It can resolve persistent software-related issues, including the “Cellular Network Not Available” error. Be aware that initiating a factory reset results in the deletion of all data and settings stored on your device. Hence, it is crucial to back up any vital information before proceeding with this action. Here is how to fix the Verizon cellular network not available for voice calls:
- Step 1. To access your device’s “General Management” section, navigate through Settings. There, tap on “Reset,” and select “Factory Data Reset” from the subsequent screen.
 DEX 3 RE is Easy-To-Use DJ Mixing Software for MAC and Windows Designed for Today’s Versatile DJ.
Mix from your own library of music, iTunes or use the Pulselocker subsciprtion service for in-app access to over 44 million songs. Use with over 85 supported DJ controllers or mix with a keyboard and mouse.
DEX 3 RE is everything you need without the clutter - the perfect 2-deck mixing software solution for mobile DJs or hard-core hobbiests.
PCDJ DEX 3 RE (DJ Software for Win & MAC - Product Activation For 3 Machines)

- Step 2. You will need to tap “Reset” to confirm your choice. Then, follow the on-screen guidelines carefully to complete the reset process.

Solution 8. Contact Carrier Provider
If you’ve exhausted all options and the issue persists, reaching out to your carrier provider for assistance is a viable solution. Carrier providers can offer specific insights and guidance regarding network-related issues. When connected to customer service, explain the issue you’re experiencing in detail. Contacting your carrier provider enables you to tap into their expertise and resources.

You May Also Like:
Top 5 DFU Tools for iPhone to Enter DFU Mode
9 Ways to Fix iPhone Error 4013 or iTunes Error 4013
Vivo Y17s ROM Download & Install: The Definitive Guide
 vMix Pro - Software based live production. vMix Pro includes everything in vMix 4K plus 8 channels of Replay and 8 vMix Call
Part 3. [100% Resolvable] Resolve Cellular Network Not Available For Calls Issues
Despite all your attempts, the cellular network not available for voice calls remains unresolved. It might state a more complex software-related issue or glitch within the Vivo Y17s device. However, there’s a solution designed explicitly for addressing such complex issues. That software is Wondershare Dr.Fone, a comprehensive toolkit for Android devices. It stands out as the world’s first one-click Android repair tool.
Dr.Fone specializes in resolving a wide array of Android system issues, including the notorious black screen of death. With this tool, users can effortlessly restore their Android system to normal functionality.
Key Features of Wondershare Dr.Fone
- Fone’s advanced repairing mechanism has the ability to repair even the bricked Android devices.
- This tool supports more than 1000 models of Android devices across different brands for system repair.
- It boasts the highest success rate when it comes to fixing Android devices.
![]()
Dr.Fone - System Repair (Android)
Repair Android System Errors without Any Trouble.
- Fix your Android to normal, no skills required.
- Fix various Android system issues, stuck in boot loop , black screen , or won’t turn on , looping on start, etc.
- The high success rate in resolving Android system issues.
- Compatible with a wide range of Android devices and OS versions
- User-friendly interface with easy-to-follow steps.
3981454 people have downloaded it
Steps Needed To Fix the Cellular Network Not Available for Calls Issue via Wondershare Dr.Fone
The following are the steps to resolve the Tracfone cellular network not available for voice calls using Wondershare Dr.Fone:
- Step 1. Open Wondershare Dr.Fone and Opt for System Repair
Launch the software. Then, navigate to the “Toolbox” section located in the left panel. Connect your Vivo Y17s and proceed by choosing “System Repair.” Then, opt for “Android” to specify the Vivo Y17s device type. On the subsequent screen, click “Start” to commence the repair procedure.
- Step 2. Provide Details of Your Android Device
The system automatically identifies the brand of the Android device undergoing repair. Afterward, choose the “Name,” “Model,” “Country,” and “Carrier” from the provided list options. If the Vivo Y17s device is already unlocked, you can choose OPEN in the Carrier section. Then, confirm by checking the warning box indicating agreement and readiness to proceed. Click on “Next” to initiate the repair process for your Vivo Y17s.
 With Screensaver Wonder you can easily make a screensaver from your own pictures and video files. Create screensavers for your own computer or create standalone, self-installing screensavers for easy sharing with your friends. Together with its sister product Screensaver Factory, Screensaver Wonder is one of the most popular screensaver software products in the world, helping thousands of users decorate their computer screens quickly and easily.
- Step 3. Complete the Android Repair Process Successfully
Follow the guidance displayed on your device’s screen to access Download Mode. Once in, the firmware download begins automatically. During this process, the platform verifies and presents the firmware details. Select “Fix Now” to proceed with the installation of the firmware onto your Vivo Y17s. Since Android repair will result in the deletion of all data, input “000000” to confirm. This action initiates the system repair process.
safe & secure
3,336,459 people have downloaded it
 Screensaver Factory, Create stunning professional screensavers within minutes. Create screensavers for yourself, for marketing or unlimited royalty-free commercial distribution. Make screensavers from images, video and swf flash, add background music and smooth sprite and transition effects. Screensaver Factory is very easy to use, and it enables you to make self-installing screensaver files and CDs for easy setup and distribution. Screensaver Factory is the most advanced software of its kind.
Conclusion
In conclusion, facing the “Cellular Network Not Available for Voice Calls“ problem on your Vivo Y17s can be frustrating. This article has explored many ways to fix this issue. These include simple checks like turning off Airplane Mode to solutions like contacting your carrier. However, when facing persistent network problems, a tool like Wondershare Dr.Fone becomes the only hope.
Among the various methods discussed, Dr.Fone stands out as a top choice. Its thorough system repair function targets and removes complex software glitches. The tool’s easy interface, broad compatibility, and secure repair process make it perfect. It is ideal for users looking for a reliable solution beyond regular troubleshooting.
![]() Why isn’t My Vivo Y17s establishing a connection with the cellular network?
Why isn’t My Vivo Y17s establishing a connection with the cellular network?
 Forex Robotron Gold Package
![]() What steps can I take when the mobile network isn’t available?
What steps can I take when the mobile network isn’t available?
 SwifDoo PDF 2-Year Plan
![]() What might be causing my SIM card to not display a network?
What might be causing my SIM card to not display a network?
- Title: 6 Fixes to Unfortunately WhatsApp has stopped Error Popups On Vivo Y17s | Dr.fone
- Author: Ariadne
- Created at : 2024-07-30 07:42:01
- Updated at : 2024-07-31 07:42:01
- Link: https://howto.techidaily.com/6-fixes-to-unfortunately-whatsapp-has-stopped-error-popups-on-vivo-y17s-drfone-by-drfone-fix-android-problems-fix-android-problems/
- License: This work is licensed under CC BY-NC-SA 4.0.