
6 Solutions to Fix Error 505 in Google Play Store on Motorola Moto G13 | Dr.fone
6 Solutions to Fix Error 505 in Google Play Store on Motorola Moto G13
In case you are receiving the error code 505 while downloading an application from Google play store and have no clue what is it, then this is the right article for you. In this article we are covering the reasons behind the occurrence of Google play error 505. Not only that, we are also providing 6 solutions to fix the error code 505. Usually, this error is seen with Android 5.0 Lollipop version and occurs at the time when you try to install the already downloaded application making it hard to run the app.
Such an error is a kind of permission error. That is, in case you have two similar kinds of applications such as banking apps and both looking for similar kind of permission, causes conflict error named as error 505.
The occurrence chance is more in the old operating systems, 4 KitKat, Android version 4. Let us then proceed to know more about this error 505.
Part 1: Reasons for Google Play error 505

As per the report by some users, error 505 occurs in certain apps such as Weather App, SBI, ITV, Adobe Air 15, We Chat etc.
To have the right idea about the problem, we have listed all the reasons of it occurrence below:
- Google play store is not updated or refreshed (Causes the error during the downloading process)
- Due to installation of an outdated version (In case your Android version is outdated may result in error in the installation process)
- Cache memory(Is the redundant data occurs due to search history)
- Application is not compatible with the Android OS (If the app you are downloading is not the updated may cause error)
- Adobe air app
- Data crash (Many time app or Google play store crashed crashes after downloading it, reason may be some bugs, so many apps are open, less memory etc.)
Now that we know the reasons, let us also learn about the solutions that will guide you to resolve the error code 505.
Part 2: 6 Solutions to fix error code 505
Any error that occurs during downloading or installation process not only hinders with the new app but also takes a large amount of our time to solve the issue. To check that, let us go through the 6 solutions one by one.
Solution 1: One click to make error code 505 disappear
The most common cause for error code 505 pop-up is that Android system files that underpin the Google Play module are corrupted. To make error code 505 disappear in this condition, you should have your Android system repaired.
 Any DRM Removal for Mac: Remove DRM from Adobe, Kindle, Sony eReader, Kobo, etc, read your ebooks anywhere.
Dr.Fone - System Repair (Android)
One click to repair Android system and make error code 505 disappear
- Fix all Android system issues like error code 505, error code 495, error code 963, etc.
- One click to fix error code 505. No technical skills required.
- Supports all the new Motorola Moto G13 devices like Galaxy S8, S9, etc.
- Easy-to-understand instructions provided on each screen.
4,999,459 people have downloaded it
Now, you just need to follow these Android repair steps to fix error code 505:
Note: Android repair needs to flash the system firmware, which may erase existing Android data. To prevent data loss, back up all the important data from Android to PC .
Step1: Download the Dr.Fone - System Repair (Android) program , install and launch it. The following interface will pop up.

Step2: Select the “Android Repair” among the 3 tabs, connect your Android to PC, and click “Start”.

Step3: Choose the correct device details from each field, confirm them and continue.

Step4: Boot your Android in download mode, then start downloading the firmware of your device.


Step5: After the Motorola Moto G13 device firmware is downloaded, the tool will start repairing your Android.

Step6: When your Android is repaired, the error code 505 will disappear.
 ZoneAlarm Pro Antivirus + Firewall NextGen

Solution 2: Check whether Download Manger is ON or not
Many times download manager is set to disable due to which you are not able to download or install the app. So, it is required to make a check whether the download manager is set on or off. So that your installation process will work properly. The process to enable the download manager is as follows.
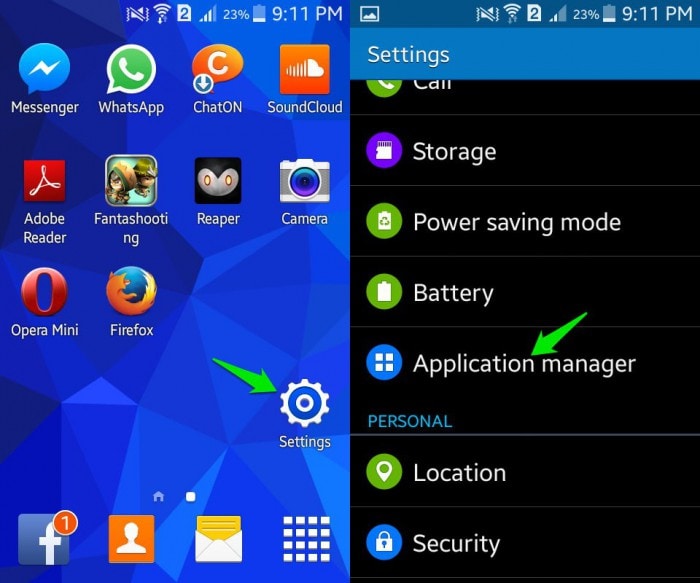
>Go to Settings
>Select the Application Manger or App (Option depends upon the Motorola Moto G13 device)
At the top, an option will appear
>Swipe right till you locate Download manager at top of the screen of the Motorola Moto G13 device
>Then Select Enable

Enabling download manager to give permission to the Motorola Moto G13 device to start the download or installation process.
Solution 3: Updating to the latest version of OS of your Motorola Moto G13
Working with an old operating system is ok, but many times old version also creates some problem and is the main reason behind the occurrence of any bug or error. So, updating the older version act like a rescue to get rid of any such issue or bug. The Process of updation is quite simple; you just need to follow the below steps and your device is ready to get updated to the latest version. Steps are:
- >Go to Settings
- >Select about Phone
- >Click on System Update
- >Check for updates
- >Click on Update
- >Need to click on Install (if any update is available)


Solution 4: Clearing the cache memory from Google services Framework and Google play store
While browsing data online or through Google play store some cache memory get stored for the fast access to the pages. Below mentioned simple steps will help you in clearing out the cache memory from Google services framework and Google play store.
Process to clear the Cache memory for Google Services Framework
- >Go to Settings
- >Select Applications
- >Click on Manage Applications
- >Click to select ‘ALL’
- >Click on Google services framework
- >Select ‘Clear data and clear cache’
That will remove the cache memory of your Google services framework
Steps to Cache memory of Google Play Store
- >Go to Settings
- >Applications
- >Manage Applications
- >Click to select ‘ALL’
- >Select Google Play store
- >Clear data and clear cache
It will clear the cache of Google play store
 DLNow Video Downloader
Clearing the cache memory remove the extra temporary memory, thus free up space for the further installation process.
Solution 5: Reinstalling play store Updates
The reason behind the installation error code 505 might be Google play store updates.
Due to continuous updation of new apps and services Google Play store used to be flooded with so many updates or sometimes does not updated properly. That sometimes caused the problem in dealing with app installation. Resolving the issue is important to make your play store ready for future updation and installation.

- >Go to Settings
- >Visit Application Manager or Apps
- >Select Google Play Store
- >Click on Uninstalling Updates
- >A Message will appear ‘Change play store app to factory version’- Accept it
- >Now Open Google play store>It will refresh the updates within 5 to 10 minutes(So you need to keep your internet connection on while Google play store is updating its store for new updates.)

Solution 6: Third party App
In the case, error 505 occur due to the installation of two or more apps with duplicate permission of data, as many times we use to install two similar kind of app that creates the situation where both seeking out for somewhat similar permissions for the installation. The manual finding is a long and tiring process. Then you can take the assistance of ‘Lucky Patcher App’ to find out which app is creating the conflict. This app will assist you in finding out the duplicity if any and then modifying it. Through this app, once you will find out which particular app is causing the conflict, then you can delete that conflicting app from your phone so that problem of error code 505 gets sort out.
Download link: https://www.luckypatchers.com/download/

Note: If still, you are in the state of trouble to solve the issue of error code 505 then Google Play help center is here to look out all troubles related to app store and its service. You can check out the details by visiting the following link:
https://support.google.com/googleplay/?hl=en-IN#topic=3364260
Or call them at their call center number regarding the issue.


Bonus FAQ about Google Play error
Q1: What is a 505 error code?
The HyperText Transfer Protocol (HTTP) error 505: HTTP Version Not Supported response status code means that the HTTP version used in the request is not supported by the server.
Q2: What is a 506 error?
The 506 error code is a frequent error when operating the Google Play Store. You will sometimes see this error code when you are downloading an app. The app may seem to be downloading just fine when suddenly, near the end of the installation, an error occurs, and a message pops up saying, “App could not be downloaded due to an error 506.”
Q3: How to fix the 506?
Solution 1: Restart your device which can help solve most problems.
Solution 2: Remove the SD card safely.
Solution 3: Correct date and time if it is wrong.
Solution 4: Add your Google Account again.
Solution 5: Clear Google Play Store data and cache.
However, sometimes the five simple couldn’t work anymore. A system repair software can be helpful quickly. We really recommend the Dr.Fone - System Repair (Android) , only a few minutes, the error will be fixed.
Conclusion
Not being able to download or install the app is very frustrating and time-consuming also. Therefore, in this article, we went through the reasons behind the occurrence error code 505 as well as resolving the issue by following five effective methods. I hope that you would be able to sort out the error 505 by following above methods thus would be able to install the application without further delay.
Fix Can’t Take Screenshot Due to Security Policy on Motorola Moto G13
“Can’t take screenshots due to security policy” is a screenshot restriction on your Android smartphone. You’ve probably seen this error message before, especially when taking screenshots of banking or video streaming apps. But why do apps and websites block screenshots? It’s actually for your good.
Screenshots can be misused to steal money or pirate copyrighted content. By prohibiting screenshots, apps and websites can help to protect your data and privacy. If you want to learn more, keep reading. This article will explain why apps and websites prevent screenshot capture and why it’s important for security. We’ll also give you tips on how to take photos of apps and websites that don’t let you take screenshots.
Part 1. Can’t Take Screenshots Due to Security Policy on Android? Here’s Why
Why can’t you take a screenshot of something on your phone and get the error message that says, “Can’t take screenshot due to security policy”? Apps and websites turn off or remove the screenshot feature for a variety of reasons, including:
Device Restrictions
Lots of workplaces and schools have rules against taking screenshots on devices used for work or school. Organizations do this to protect sensitive information and prevent data breaches.
Protect Sensitive Information
Say you’re trying to take a screenshot on your Motorola Moto G13 device, and you get the notification “Can’t take screenshot due to security policy.” Motorola Moto G13 smartphones are not necessarily the problem.
Some apps and websites, such as banking apps, store private data like financial and credit card details. Blocking capturing screenshots is a way to prevent unauthorized access to confidential information.
 OtsAV TV Webcaster
Follow Regulations
Some industries and organizations have regulations that need them to protect sensitive data. Financial institutions must protect their customers’ financial information, for example. Disabling screenshots is one way to follow these regulations.
DRM-Protected Content
Android can’t take screenshots due to security policy, especially to prevent piracy. Piracy is the distribution of copyrighted material without permission. It can harm businesses that depend on copyright protection.
To prevent this, you can use DRM (digital rights management) to protect copyrighted content. DRM-protected content cannot be screenshotted or copied.
Prevent Fraud
Scammers and other criminals often use screenshots to commit fraud. For instance, people might send fake screenshots to trick others into sharing personal details or money. Disabling screenshots can help to prevent this type of fraud.
Protect Intellectual Property
Many businesses and organizations have valuable information they want to keep safe, such as trade secrets. Disabling screenshots can be helpful to prevent the theft of this intellectual property.
Protect User Privacy
Some apps and websites allow users to share private information. Some apps, like messaging apps, let users share private info. But there are limits.
You can’t take screenshots due to security policy Whatsapp features, View Once media option. This method stops people from taking pictures of private media chats, protecting users’ privacy.

You Are Using a Secure Folder
Companies design secure folders to protect your most sensitive data from unauthorized access, so screenshots are not allowed within them.
Part 2. 8 Ways To Take Screenshots When You Can’t Due to Security Policy
If you’re trying to take a screenshot of an app or website with a security policy in place, there’s usually no way to circumvent it. However, there are a few things you can do to take pictures of these apps and website content.
Enable Screen Capture on Android
Sudden “can’t take screenshot due to security policy” notifications, failing to take a screenshot, and a Motorola Moto G13 user?
If you are using this Android device, you can enable the screen capture feature in the Settings app.
- Step 1: Go to Settings > Apps, then tap the More options icon in the upper right corner.

- Step 2: Choose Special access > All files access.


- Step 3: Enable Motorola Moto G13 capture.


Once you have enabled screen capture, you can check if you can take screenshots of any app or website.
Enable Screenshots in Incognito Mode
Apps and websites may prohibit screenshots in incognito mode to protect your privacy. However, you can enable the Incognito Screenshot experimental flag in Chrome to bypass this restriction.
- Step 1: Open Chrome on your Motorola Moto G13 and type “chrome://flags” in the address bar.

- Step 2: Search for Incognito Screenshot and choose Enabled from the drop-down menu.

- Step 3: Tap Relaunch on the lower right corner of the screen.
Once Chrome has relaunched, you should be able to take screenshots in incognito mode by pressing the power and volume-down buttons at the same time.
Use Google Assistant
With Google Assistant, taking screenshots on your Motorola Moto G13 is now easier than ever. Just say, “Hey, Google, take a screenshot,” Google Assistant will capture the screen and save it to your gallery.

Use a Third-Party App To Take Screenshots
You can download several applications on Google Play Store if you still can’t take a screenshot due to security policy. Some popular third-party screenshot apps include:
- Screenshot Easy
- Screenshot Tile
- Screen Master: Screenshot Markup
Third-party screenshot apps often use different methods to capture the screen. These might bypass the security measures that prevent you from taking screenshots with the built-in screenshot function.
Capture Your Phone Display With Another Device
If you own another smartphone, you can use it to take a photo of the screen of the Motorola Moto G13 device you’re trying to take a screenshot of. This is a simple workaround for any security policies that may be in place. To do this, open the camera app on your other smartphone and point it at the screen of the first device.
Check the Banking App Settings for Screenshot Permissions
Some banking apps may turn off screenshots by default, but some may allow them in the settings. To check this, open the banking app and select the settings menu. Look for a setting that allows taking in-app photos. If you find it, enable it to allow screenshots to be taken in the app.
Screen Mirroring
Smart View allows you to display your Motorola Moto G13 device’s screen on your smart TV, where you can then take a screenshot of the TV to capture the app or website you need.
- Step 1: Swipe down the top of the screen to access the Quick Settings panel.
- Step 2: Tap the Smart View icon.
- Step 3: Select your TV from the list of available devices and tap Start Now.

Alternatively, if you don’t have a smart TV, you can still mirror your phone screen display to your desktop or tablet using the Motorola Moto G13 Flow app and take a screenshot of your phone’s screen instead.
Use Disable Flag Secure Magisk Module
Still experiencing the error message, “Can’t take screenshot due to security policy?” Bypass Android phone error like this using a module.
The module patches the Android framework to remove the FLAG_SECURE flag from apps. It is a relatively simple process but requires root access and Magisk. This module will turn off the security flag to take screenshots in Incognito mode and other apps.

Authors Verdict
There are a few ways to bypass screenshot restrictions on Android apps and websites, but some methods are more complicated than others. All methods should work, but if you think your device has been compromised, it is important to check if it is a system issue.
You can use a third-party tool like Wondershare Dr.Fone without rooting your device. It is easy to use and supports many Android smartphones. You can try Dr.Fone for free to test if it supports your device and can fix the underlying system issues.
Part 3. Dr.Fone: A Comprehensive Solution for Fixing Android System Issues
Dr.Fone’s System Repair tool for Android cannot bypass the security apps of banking apps and video streaming apps like Netflix. This is because these apps use sophisticated security measures to protect their users’ data.
However, Dr.Fone System Repair tool for Android can fix a wide range of other Android system issues that might happen from installing third-party apps on your smartphone, such as:
Follow this step-by-step guide and learn how to use Dr.Fone to scan your Android smartphone for system issues and repair them.
- Step 1: Once you have downloaded Dr.Fone, install it and launch it on your desktop. Then, connect your Motorola Moto G13 to your desktop using a USB cable.
 safe & secure
3,567,199 people have downloaded it
- Step 2: From the Toolbox homepage, select System Repair > Android.

- Step 3: Click Start on the new window.
- Step 4: Select an option from the Name, Model, Country, and Carrier in the drop-down lists. Next, select the checkbox to agree with the warning, then click Next in the bottom right corner.
- Step 5: Follow the in-app instructions to put your Motorola Moto G13 on Download mode, then click Next.
![]() FX PRO (Gold Robot + Silver Robot(Basic Package))
FX PRO (Gold Robot + Silver Robot(Basic Package))

- Step 6: Wait while the firmware automatically downloads.

- Step 7: Review the details on the screen and click Fix Now to install the firmware on your smartphone.

- Step 8: Read the dialogue box note, enter the code in the input box, and click Confirm.
 NeoDownloader - Fast and fully automatic image/video/music downloader.

- Step 9: Keep your smartphone connected and avoid using it while Dr.Fone is repairing it.
- Step 10: If your device has started properly, click Done to close this app. Otherwise, click Try again.
Conclusion
You can fix the “Can’t take screenshot due to security policy” error on Android in different ways. But it depends on the cause of the error. If an app is causing the error, you can try two things. First, remove the app’s screenshot restriction. Second, download a different screenshot app or a different device to take screenshots.
Although there are ways to bypass the “Can’t take screenshot due to security policy” error message, it’s crucial to know why screenshots are not allowed. Many apps and websites do not permit it to protect sensitive information, prevent piracy, and follow regulations. They also do it to prevent fraud, protect user privacy, and safeguard intellectual property.
If you think the issue is with your Android system, or your device becomes bricked after trying other methods, experiencing app crashes, or otherwise malfunctioning, try using the Dr.Fone System Repair tool. It is worth trying and can fix most Android system issues in a few minutes.
7 Solutions to Fix Error Code 963 on Google Play Of Motorola Moto G13
People are increasingly complaining about Google Play Error Codes which pop-up during downloading, installing or updating an App via Google Play Store. Amongst these, the most recent and common one being Error Code 963.
Google Play Error 963 is a typical error which shows up not only when you try to download and install an App but also during App update.
Error 963 cannot be attributed to a particular App or its update. It is a Google Play Store error and is experienced by Android users across the world.
Error Code 963, just like any other Google Play Store errors, is not something difficult to deal with. It’s a minor glitch which can be fixed easily. There is no need to worry or panic if you see Error 963 on Google Play Store preventing your favorite App from downloading or updating.
Read on to find out more about the Google Play Error 963 and best ways to fix it.
Part 1: What is Error Code 963?
Error 963 is a common Google Play Store error which basically hinders Apps from downloading and updating. Many people get worried when Error Code 963 does not let them install new Apps or update existing ones. However, please understand that Google Play Error is not such a big deal as it may sound and can be overcome easily.
Error 963 pop-up message reads as follows: “cannot be downloaded due to an error (963)” as shown in the image below.


A similar message shows up even while you are trying to update an App, as shown in the screenshot below.

Error Code 963 is basically an outcome of data crash which mostly is seen in cheaper smartphones. There might another reason for Error 963 preventing Apps from downloading and updating, which is Google Play Store Cache being corrupted. People also speculate SD Card related issues as many-a-times external memory enhancer chips do not support large Apps and their updates. Also, Error 963 is very common with HTC M8 and HTC M9 smartphones.
All these reasons and more can handle with ease and you can continue to use Google play services smoothly. In the following segment, we will discuss various fixes to cure the problem to enable to you download, install and update Apps on your device normally.
Part 2: Easiest solution to fix Error Code 963 on Android
When it comes to the most convenient solution to fix error 963, Dr.Fone - System Repair (Android) cannot be missed. It is the most productive program that covers a wide range of Android issues. It ensures full safety while performing and one can fix the Android issues in a hassle-free way.
Dr.Fone - System Repair (Android)
One click to fix Google Play error 963
- The tool is recommended for its higher success rate.
- Not just Google Play error 963, it can fix a large number of system issues including app crashing, black/white screen etc.
- It’s considered as the first tool that offers one-click operation for Android repairing.
- There’s no technical expertise needed to use this tool.
4,997,014 people have downloaded it
This section will provide you the tutorial guide for how to fix error code 963.
Note: Before moving to solve the error 963, we would like to inform you that the process may result in wiping away your data. And therefore, we suggest you to make backup of your Motorola Moto G13 prior to fixing this Google Play error 963.
Phase 1: Connecting and preparing the Motorola Moto G13 device
Step 1 – To begin fixing error 963, run Dr.Fone after downloading and installing it on your PC. Now, pick out the ‘System Repair’ tab from the main screen. Thereupon, with the help of a USB cable, make connection between your Motorola Moto G13 and PC
Step 2 – On the left panel, you’re supposed to choose ‘Android Repair’ and then click the ‘Start’ button.
Step 3 – On the following screen, you need to choose the appropriate details for your device like the name, brand, model, country/region etc. Later, go for warning confirmation and hit ‘Next’.
 KoolReport Pro is an advanced solution for creating data reports and dashboards in PHP. Equipped with all extended packages , KoolReport Pro is able to connect to various datasources, perform advanced data analysis, construct stunning charts and graphs and export your beautiful work to PDF, Excel, JPG or other formats. Plus, it includes powerful built-in reports such as pivot report and drill-down report which will save your time in building ones.
 It will help you to write dynamic data reports easily, to construct intuitive dashboards or to build a whole business intelligence cockpit.
KoolReport Pro package goes with Full Source Code, Royal Free, ONE (1) Year Priority Support, ONE (1) Year Free Upgrade and 30-Days Money Back Guarantee.
Developer License allows Single Developer to create Unlimited Reports, deploy on Unlimited Servers and able deliver the work to Unlimited Clients.
Phase 2: Taking Android device in Download mode for repairing
Step 1 – It is essential to get your Motorola Moto G13 or tablet entered in Download mode. For this, following are the steps to be taken:
If the Motorola Moto G13 device contains Home button:
- Turn the Motorola Moto G13 device off and then keep holding the ‘Power’, ‘Volume Down’ and ‘Home’ buttons altogether for about 10 seconds. Next, release them all and push the ‘Volume Up’ key. This way, your device will enter the Download mode.
If the Motorola Moto G13 device contains no Home button:
- Switch off your phone/tablet and press the ‘Volume Down’, ‘Bixby’ and ‘Power’ buttons for 10 seconds. Leave the buttons and then press the ‘Volume Up’ button for entering download mode.
Step 2 – Press the ‘Next’ button and then the program will commence the firmware downloading.

Step 3 – Upon successful downloading and verification of the firmware, the process of Android device repairing will begin automatically.
Step 4 – Within a while, the Google play error 963 will be vanished.
Part 3: 6 Common Solutions to fix Error Code 963
 Jet Profiler for MySQL, Enterprise Version: Jet Profiler for MySQL is real-time query performance and diagnostics tool for the MySQL database server. Its detailed query information, graphical interface and ease of use makes this a great tool for finding performance bottlenecks in your MySQL databases.
Since there is no specific reason for Error Code 963 to occur, similarly there is no one solution to the problem. You may use any one of them below or try them all to never see Error Code 963 on your device.
1. Clear Play Store Cache and Play Store Data
Clearing Google Play Store Cache and Data basically means keeping Google Play Store clean and free from trouble-making data stored in respect of it. It is advisable to carry out this process regularly to prevent Errors like Error Code 963 from occurring.
Follow the steps given below to fix Error Code 963:
Visit “Settings” and select “Application Manager”.

Now select “All” to see all downloaded and built-in Apps on your device.
Select “Google Play Store” and from the options that appear, tap on “Clear Cache” and “Clear Data”.

Once you are done clearing Google Play Store Cache and Data, try to download, install or update the App facing Google Play Error 963 again.
2. Uninstall updates for Play Store
Uninstalling Google Play Store updates is an easy and quick task. This method is known to have helped many as it brings back the Play Store to its original state, free from all updates.
Visit “Settings” and select “Application Manager”.
 dotConnect for Oracle is an ADO.NET data provider for Oracle with Entity Framework Support.
Now select “Google Play Store” from “All” Apps.
 Glary Utilities PRO - Premium all-in-one utility to clean, speed up, maintain and protect your PC

In this step, click on “Uninstall Updates” as shown below.

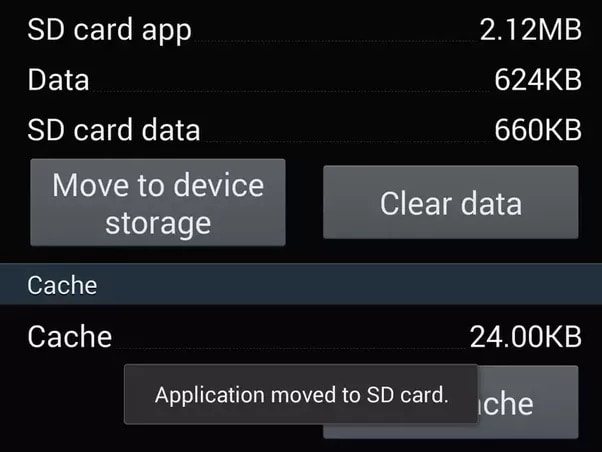
3. Shift the App from SD Card to device’s memory
This method is strictly for certain Apps which cannot be updated because they are stored on an external memory card, i.e., SD Card. Such memory enhancing chips do not support large Apps and due to a shortage of space prevents them from updating. It advisable to move such Apps from the SD Card to the Motorola Moto G13 device’s internal memory and then try to update it.
Visit “Settings” and select “Apps”.

From “All” Apps click on the App which is unable to update.
Now click on “Move to Phone” or “Move to internal storage” and try to download its update again from the Google Play Store.
Try updating the App now. If the Apps’s update does not download even now, DO NOT worry. There are three more ways to help you.
4. Unmount your external Memory Card
Error Code963 may also occur due to an external memory chip used in your device to enhance its storage capacity. This is very common and can be dealt with by unmounting the SD Card temporarily.
To unmount your SD Card:
Visit “Settings” and keep scrolling downwards.
Now select “Storage”.
From the options that appear, select “Unmount SD Card” as explained in the screenshot below.

Note: If the App or its update downloads successfully now, do not forget to mount the SD Card back.
5. Remove and Re-add your Google account
Deleting and re-adding your Google account in might sound a little tedious but it does not take much of your precious time. Moreover, this technique is very effective when it comes to fixing Error Code 963.
Carefully follow the steps given below to remove and then re-add your Google account:
Visit “Settings”, under “Accounts” select “Google”.
Select your account and from the “Menu” select “Remove account” as shown below.

Once your account is removed, follow the steps given hereunder to add it back again after a few minutes:
Go back to “Accounts” and select “Add Account”.


Select “Google” as shown above.
In this step feed in your account details and your Google account will be configured once again.
6. Special technique for HTC users
This technique is specially crafted fro HTC smartphone users who frequently face Google Play Error 963.
Follow the step-by-step instructions given below to uninstall all updates for your HTC One M8 Lock Screen App:
Visit “Settings” and find “HTC Lock Screen” under “Apps”.
Now click on “Force Stop”.
In this step, Click on “Uninstall Updates”.
This remedy is as simple as it sounds and has helped many HTC users to get rid of Error 963.
Google Play Errors are a very common phenomenon these days, especially Error Code 963 which usually occurs in the Google Play Store when we try to download, install or update an App. There is no need to worry if you see Error Code 963 pop-up on your screen as your device and its software are not to be blamed for Error 963 to suddenly surface. It is a random error and can be fixed easily by you. You do not need any technical assistance to deal with the issue. All you need to do is follow the steps introduced in this article to use Google Play Store and its services smoothly.
- Title: 6 Solutions to Fix Error 505 in Google Play Store on Motorola Moto G13 | Dr.fone
- Author: Ariadne
- Created at : 2024-07-30 07:45:08
- Updated at : 2024-07-31 07:45:08
- Link: https://howto.techidaily.com/6-solutions-to-fix-error-505-in-google-play-store-on-motorola-moto-g13-drfone-by-drfone-fix-android-problems-fix-android-problems/
- License: This work is licensed under CC BY-NC-SA 4.0.