
6 Solutions to Fix Error 505 in Google Play Store on OnePlus Nord CE 3 5G | Dr.fone
6 Solutions to Fix Error 505 in Google Play Store on OnePlus Nord CE 3 5G
In case you are receiving the error code 505 while downloading an application from Google play store and have no clue what is it, then this is the right article for you. In this article we are covering the reasons behind the occurrence of Google play error 505. Not only that, we are also providing 6 solutions to fix the error code 505. Usually, this error is seen with Android 5.0 Lollipop version and occurs at the time when you try to install the already downloaded application making it hard to run the app.
Such an error is a kind of permission error. That is, in case you have two similar kinds of applications such as banking apps and both looking for similar kind of permission, causes conflict error named as error 505.
The occurrence chance is more in the old operating systems, 4 KitKat, Android version 4. Let us then proceed to know more about this error 505.

Part 1: Reasons for Google Play error 505
 Video Converter Factory Pro
As per the report by some users, error 505 occurs in certain apps such as Weather App, SBI, ITV, Adobe Air 15, We Chat etc.
To have the right idea about the problem, we have listed all the reasons of it occurrence below:
- Google play store is not updated or refreshed (Causes the error during the downloading process)
- Due to installation of an outdated version (In case your Android version is outdated may result in error in the installation process)
- Cache memory(Is the redundant data occurs due to search history)
- Application is not compatible with the Android OS (If the app you are downloading is not the updated may cause error)
- Adobe air app
- Data crash (Many time app or Google play store crashed crashes after downloading it, reason may be some bugs, so many apps are open, less memory etc.)
Now that we know the reasons, let us also learn about the solutions that will guide you to resolve the error code 505.
Part 2: 6 Solutions to fix error code 505
Any error that occurs during downloading or installation process not only hinders with the new app but also takes a large amount of our time to solve the issue. To check that, let us go through the 6 solutions one by one.
Solution 1: One click to make error code 505 disappear
The most common cause for error code 505 pop-up is that Android system files that underpin the Google Play module are corrupted. To make error code 505 disappear in this condition, you should have your Android system repaired.
Dr.Fone - System Repair (Android)
One click to repair Android system and make error code 505 disappear
- Fix all Android system issues like error code 505, error code 495, error code 963, etc.
- One click to fix error code 505. No technical skills required.
- Supports all the new OnePlus Nord CE 3 5G devices like Galaxy S8, S9, etc.
- Easy-to-understand instructions provided on each screen.
4,999,459 people have downloaded it
Now, you just need to follow these Android repair steps to fix error code 505:
Note: Android repair needs to flash the system firmware, which may erase existing Android data. To prevent data loss, back up all the important data from Android to PC .
Step1: Download the Dr.Fone - System Repair (Android) program , install and launch it. The following interface will pop up.

Step2: Select the “Android Repair” among the 3 tabs, connect your Android to PC, and click “Start”.

Step3: Choose the correct device details from each field, confirm them and continue.

Step4: Boot your Android in download mode, then start downloading the firmware of your device.

Step5: After the OnePlus Nord CE 3 5G device firmware is downloaded, the tool will start repairing your Android.

Step6: When your Android is repaired, the error code 505 will disappear.

Solution 2: Check whether Download Manger is ON or not
Many times download manager is set to disable due to which you are not able to download or install the app. So, it is required to make a check whether the download manager is set on or off. So that your installation process will work properly. The process to enable the download manager is as follows.
>Go to Settings
>Select the Application Manger or App (Option depends upon the OnePlus Nord CE 3 5G device)
At the top, an option will appear
>Swipe right till you locate Download manager at top of the screen of the OnePlus Nord CE 3 5G device
>Then Select Enable
 Easy and Safe Partition Software & Hard Disk Manager

Enabling download manager to give permission to the OnePlus Nord CE 3 5G device to start the download or installation process.
Solution 3: Updating to the latest version of OS of your OnePlus Nord CE 3 5G
Working with an old operating system is ok, but many times old version also creates some problem and is the main reason behind the occurrence of any bug or error. So, updating the older version act like a rescue to get rid of any such issue or bug. The Process of updation is quite simple; you just need to follow the below steps and your device is ready to get updated to the latest version. Steps are:
- >Go to Settings
- >Select about Phone
- >Click on System Update
- >Check for updates
- >Click on Update
- >Need to click on Install (if any update is available)

Solution 4: Clearing the cache memory from Google services Framework and Google play store
While browsing data online or through Google play store some cache memory get stored for the fast access to the pages. Below mentioned simple steps will help you in clearing out the cache memory from Google services framework and Google play store.
Process to clear the Cache memory for Google Services Framework
- >Go to Settings
- >Select Applications
- >Click on Manage Applications
- >Click to select ‘ALL’
- >Click on Google services framework
- >Select ‘Clear data and clear cache’
That will remove the cache memory of your Google services framework
Steps to Cache memory of Google Play Store
- >Go to Settings
- >Applications
- >Manage Applications
- >Click to select ‘ALL’
- >Select Google Play store
- >Clear data and clear cache
It will clear the cache of Google play store

Clearing the cache memory remove the extra temporary memory, thus free up space for the further installation process.
Solution 5: Reinstalling play store Updates
The reason behind the installation error code 505 might be Google play store updates.
Due to continuous updation of new apps and services Google Play store used to be flooded with so many updates or sometimes does not updated properly. That sometimes caused the problem in dealing with app installation. Resolving the issue is important to make your play store ready for future updation and installation.

- >Go to Settings
- >Visit Application Manager or Apps
- >Select Google Play Store
- >Click on Uninstalling Updates
- >A Message will appear ‘Change play store app to factory version’- Accept it
- >Now Open Google play store>It will refresh the updates within 5 to 10 minutes(So you need to keep your internet connection on while Google play store is updating its store for new updates.)

Solution 6: Third party App
In the case, error 505 occur due to the installation of two or more apps with duplicate permission of data, as many times we use to install two similar kind of app that creates the situation where both seeking out for somewhat similar permissions for the installation. The manual finding is a long and tiring process. Then you can take the assistance of ‘Lucky Patcher App’ to find out which app is creating the conflict. This app will assist you in finding out the duplicity if any and then modifying it. Through this app, once you will find out which particular app is causing the conflict, then you can delete that conflicting app from your phone so that problem of error code 505 gets sort out.
Download link: https://www.luckypatchers.com/download/

Note: If still, you are in the state of trouble to solve the issue of error code 505 then Google Play help center is here to look out all troubles related to app store and its service. You can check out the details by visiting the following link:
https://support.google.com/googleplay/?hl=en-IN#topic=3364260
Or call them at their call center number regarding the issue.
 Glary Utilities PRO - Premium all-in-one utility to clean, speed up, maintain and protect your PC


Bonus FAQ about Google Play error
Q1: What is a 505 error code?
The HyperText Transfer Protocol (HTTP) error 505: HTTP Version Not Supported response status code means that the HTTP version used in the request is not supported by the server.
Q2: What is a 506 error?
The 506 error code is a frequent error when operating the Google Play Store. You will sometimes see this error code when you are downloading an app. The app may seem to be downloading just fine when suddenly, near the end of the installation, an error occurs, and a message pops up saying, “App could not be downloaded due to an error 506.”
Q3: How to fix the 506?
Solution 1: Restart your device which can help solve most problems.
Solution 2: Remove the SD card safely.
Solution 3: Correct date and time if it is wrong.
Solution 4: Add your Google Account again.
Solution 5: Clear Google Play Store data and cache.
However, sometimes the five simple couldn’t work anymore. A system repair software can be helpful quickly. We really recommend the Dr.Fone - System Repair (Android) , only a few minutes, the error will be fixed.
Conclusion
Not being able to download or install the app is very frustrating and time-consuming also. Therefore, in this article, we went through the reasons behind the occurrence error code 505 as well as resolving the issue by following five effective methods. I hope that you would be able to sort out the error 505 by following above methods thus would be able to install the application without further delay.
Why Does My OnePlus Nord CE 3 5G Keep Turning Off By Itself? 6 Fixes Are Here
Android users are usually very happy with their smartphones; however, sometimes they do complain about their phones switching off abruptly. This is a weird situation to be in because one moment you are using your phone, and the next moment it suddenly turns itself off, and when you happen to turn it back on, it functions smoothly, but only for a while.
Phones shutting off problem not only disrupts your work but also tests your patience if you are in the middle of executing an important task, playing your favorite game, typing an e-mail/message, or attending a business call, etc.
We often hear Android users ask for solutions for this problem at different forums. If you are one of them and clueless about why My OnePlus Nord CE 3 5G keeps shutting off, here are ways that can help you.
So the next time you ask, “Why does My OnePlus Nord CE 3 5G keep shutting off?”, refer to this article and follow the techniques given hereunder.
Part 1: Possible reasons for phone turning off by itself
We understand your trouble when you ask, “Why does My OnePlus Nord CE 3 5G keep turning off?” thus, here we have four of the possible reasons that might be causing the glitch and help you understand the problem better.
The first one is related to updating the phone’s software or any of the Apps if the download process is interrupted and not duly completed, the phone can act abnormally causing it to switch off at frequent intervals.
Then there are certain Applications that are not supported by the Android software. While using such Apps, the phone may turn off abruptly. This usually happens when you install Apps from unknown sources which are not compatible with Android.
Also, if your battery is low or has become too old, your phone may shut off and not work as smoothly.
Lastly, you can also check if you use a protective cover for your phone. Sometimes, the cover is so tight that it presses the power button continuously turning the phone off.
Now, once you have analyzed the problem, it is easier to move on to the solutions.
Part 2: Check the battery status on Android
If your phone turns off now and then while you are using it and even refuses to start when you press the power button, we suspect that there is a problem with your phone’s battery. Well, Luckily for Android users, there is a test that can be run on the phone to check the battery’s operations and health. Not many users are aware of it, and thus, we have compiled what you need to do the next time you wonder why does My OnePlus Nord CE 3 5G keeps shutting off itself.
First, open the dialer on your OnePlus Nord CE 3 5G shown in the screenshot below.
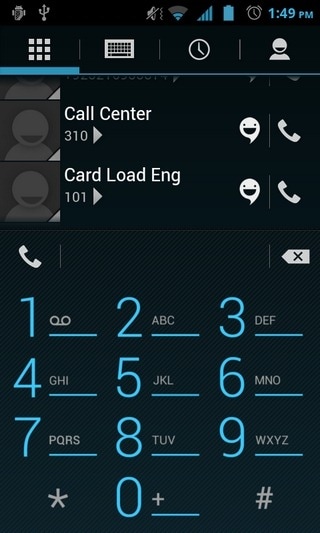
Now dial *#*#4636#*#* just like dialing a usual phone number and wait for the “Battery Info” screen to pop up.
Note: Sometimes, the above-mentioned code may not work. In such cases, try dialing *#*#INFO#*#*. The following screen will appear now.

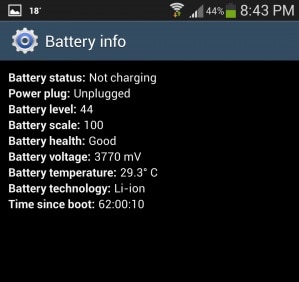
If the battery looks good as you can see in the screenshot above and everything else seems normal, it means that your battery is healthy and need not be replaced. You may now move on to the next step to cure your device.

Part 3: One-click to fix Android phone keeps turning off
We understand how annoying it is to find your OnePlus Nord CE 3 5G turning off randomly on its own. So, when the age-old remedies to fix the phone keeps turning off turns futile, you need to go for a reliable tool like Dr.Fone - System Repair (Android) .
Apart from tackling the Android phone keeps turning off the issue, it can also resolve all Android problems. The issues include system update fail, device stuck on logo, unresponsive, or bricked device with a blue screen of death.
Your trouble with ‘why does My OnePlus Nord CE 3 5G keep shutting off?’ can be resolved easily using Dr.Fone - System Repair (Android). But, before that, you need to ensure that the Android device has been backed up properly to eliminate the risk of data erasing.
![]()
Dr.Fone - System Repair (Android)
Repair Android System Errors without Any Trouble.
- Fix your Android to normal, no skills required.
- Fix various Android system issues, stuck in boot loop , black screen , or won’t turn on , looping on start, etc.
- The high success rate in resolving Android system issues.
- Compatible with a wide range of Android devices and OS versions
- User-friendly interface with easy-to-follow steps.
3981454 people have downloaded it
Below are the steps that help easily fix Android device keeps turning off on its own:
Phase 1: Preparing your OnePlus Nord CE 3 5G and connecting it
Step 1: On your computer, install and launch Dr.Fone. Now, click the ‘System Repair’ button over Dr.Fone window and connect the Android device to your computer.
Step 2: Here, you need to press the ‘Start’ button right after hitting the ‘Android’.
Step 3: Pick your OnePlus Nord CE 3 5G details over the OnePlus Nord CE 3 5G device information interface. Click the ‘Next’ button afterward.
Phase 2: Enter ‘Download’ mode to repair and resolve ‘why does My OnePlus Nord CE 3 5G keep turning off’
Step 1: On your OnePlus Nord CE 3 5G, go to ‘Download’ mode following the instructions.
For a device with the ‘Home’ button – Turn off the mobile and then hold down the ‘Home’, ’Volume Down’, and ’Power’ buttons together nearly for 10 seconds. Leave them all and then click the ‘Volume Up’ button to get into the ‘Download’ mode.
For a device lacking ‘Home’ button – After switching off the Android mobile, hold down ‘Bixby’, ‘Power’, ‘Volume Down’ key still 10 seconds. Now, un-hold them and tap the ‘Volume Up’ button to enter the ‘Download’ mode.

Step 2: Hitting the ‘Next’ button will start the Android firmware download.


Step 3: Now, Dr.Fone - System Repair (Android) will verify the firmware once downloaded. Within some time the Android system gets repaired.

![]() FX PRO (Gold Robot + Silver Robot(Basic Package))
FX PRO (Gold Robot + Silver Robot(Basic Package))
 safe & secure
Part 4: Update software to the latest version to fix Android phone keeps turning off
Software glitches or outdated operating systems can trigger automatic shutdowns on Android phones. Updating your OnePlus Nord CE 3 5G’s software version can be an effective solution to fix the issue of the phone repeatedly turning off. Regular software updates provided by the phone manufacturer often include bug fixes, performance improvements, and security patches. These updates can address underlying problems that may be causing the random shutdowns, ensuring a more stable and reliable phone performance.
To update the software on your OnePlus Nord CE 3 5G, follow these steps:
Go to “Settings” on your OnePlus Nord CE 3 5G and navigate to the “System” or “Software Update” section (the exact wording may vary depending on your device model and Android version). Look for the option to “Check for updates” to see if any new software updates are available.
 PCDJ Karaoki is the complete professional karaoke software designed for KJs and karaoke venues. Karaoki includes an advanced automatic singer rotation list with singer history, key control, news ticker, next singers screen, a song book exporter and printer, a jukebox background music player and many other features designed so you can host karaoke shows faster and easier!
When a phone overheats, it can trigger an automatic shutdown as a protective mechanism to prevent damage to the OnePlus Nord CE 3 5G device’s internal components. Overheating occurs when the phone’s internal temperature rises significantly, typically due to excessive heat generated by the processor and other hardware components during intensive tasks or prolonged usage.
To prevent the phone from turning off due to overheating, you can take various measures, such as limiting intensive usage, avoiding direct sunlight and hot environments, and using the phone on hard surfaces to aid heat dissipation.

Part 6: Narrow down the randomly turning off issue in Safe Mode
Starting your phone in Safe Mode is a good way to narrow down whether or not the problem is occurring because of some heavy and incompatible Apps as Safe Mode allows only built-in Apps to function. If you can use your phone in Safe Mode, consider deleting the unnecessary Apps which may be burdening the phone’s processor.
To boot into Safe Mode:
Long press the power button to see the following options on the screen.
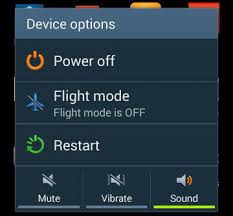
Now tap on “Power Off” for about 10 seconds and click “OK” on the message that pops-up as shown below.
 OtsAV Radio Webcaster
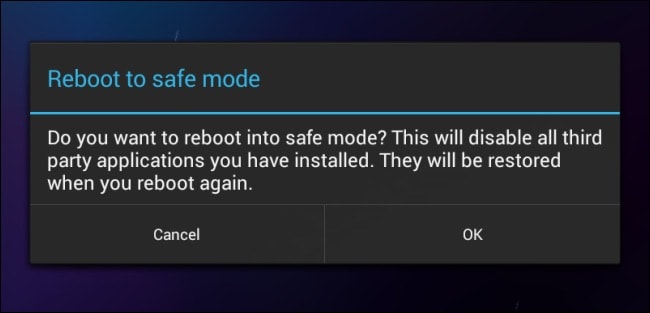
Once done, the phone will reboot and you will see “Safe Mode” on the main screen.
 With Screensaver Wonder you can easily make a screensaver from your own pictures and video files. Create screensavers for your own computer or create standalone, self-installing screensavers for easy sharing with your friends. Together with its sister product Screensaver Factory, Screensaver Wonder is one of the most popular screensaver software products in the world, helping thousands of users decorate their computer screens quickly and easily.
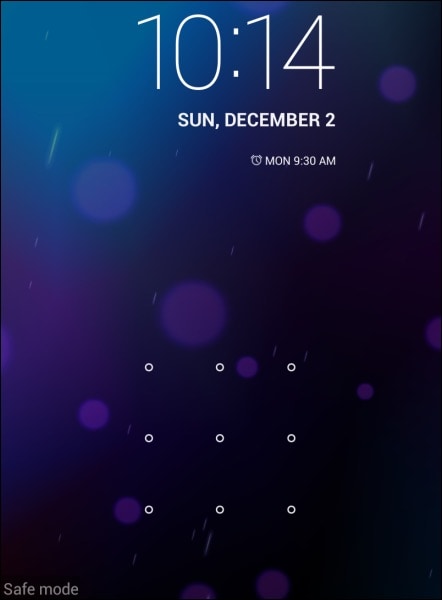
That’s all. Well, booting to Safe Mode is easy and it also helps you to identify the real problem.

Part 7: Back up your data and perform a factory reset
Note: You must take a back-up of all your data because once you perform a factory reset on your device, all media, contents, data, and other files are wiped out, including your device settings.
Wondershare Dr.Fone is a great way to back up all your data to prevent it from getting lost after resetting the phone. It works brilliantly as it backs up all data and allows users to retrieve it fully or selectively. You can backup all files from your Android to PC in just a click and restore them later. Try this software for free before purchasing it to understand it’s working better. It does not tamper with your data and only requires you to follow the simple steps given below to backup your Android data:
Wondershare Dr.Fone
Flexibly Back up and Restore Android Data
- Back up Android data to the computer with one click.
- Preview and selectively restore the backup to any Android device.
- Supports 8000+ Android devices.
- There is no data lost during backup, export, or restoration.
3,981,454 people have downloaded it
To start with, download and run the backup software on the PC.
Once you have the main screen of the software with multiple options that will appear before you, choose the “My Backup” option.
Now connect the Android phone to the PC and make sure that USB debugging is turned on. Then hit “Back Up Now” and wait for the next screen to open.

You will see the file types that will be backed up. Wait for the backup process to complete.

There you go, you have successfully backed up data.

safe & secure
Now moving on to factory reset your phone:
Simply visit “Settings” on your OnePlus Nord CE 3 5G by clicking the settings icon as shown below.
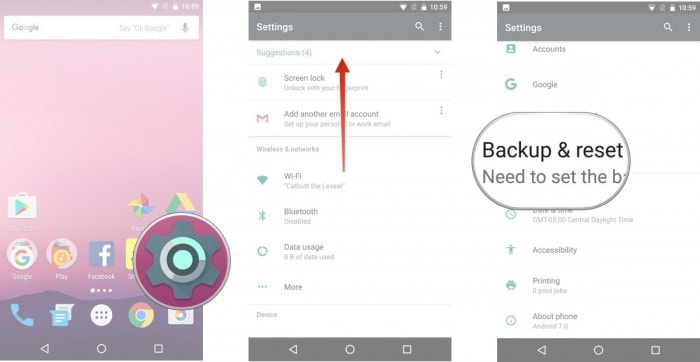
And then select the “Backup and Reset” option.
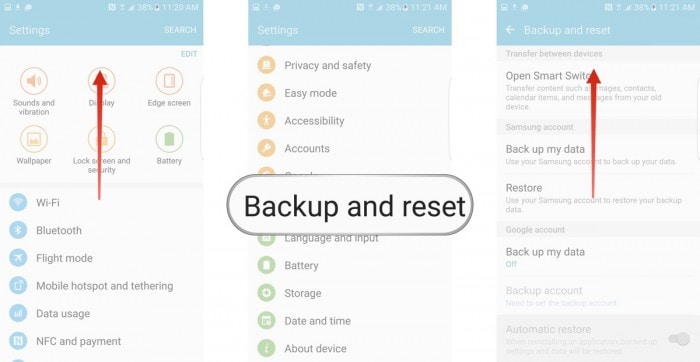
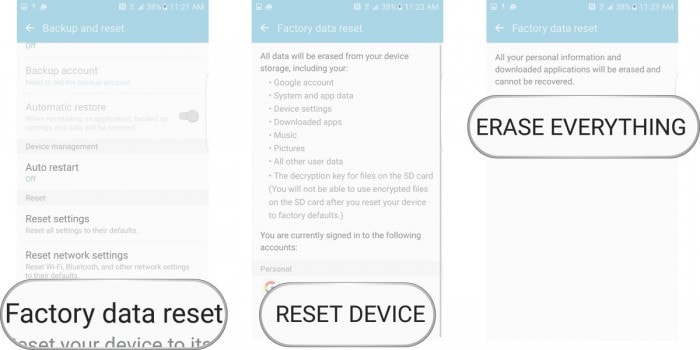
Once selected, tap on “Factory data reset” and then “reset device” as shown in the picture below.
Finally, tap on “ERASE EVERYTHING” as shown below to Factory Reset your device.
Note: Once the factory reset process is complete, your device will automatically restart and you will have to set it up once again. You can restore the backup data on your OnePlus Nord CE 3 5G once you factory reset it, again using the Dr.Fone toolkit.
Now for all those of you who are wondering why does My OnePlus Nord CE 3 5G keeps turning off by itself, please understand that the reasons behind the problem are simple, and so are its fixes. All you need to do is examine the problem carefully and move on to the fixes given in this article. Dr.Fone toolkit Android Data Backup & Restore feature provides an excellent platform for you to store all your data safely on your PC and retrieve it whenever you like so that you can go ahead to solve the error yourself without stressing about data loss.“Why does My OnePlus Nord CE 3 5G keep shutting off?” might be common questions but can be dealt with ease if you follow the methods explained above.
So, do not hold back, go ahead, and try these tricks. They have helped many and will be useful for you too.
safe & secure

[8 Quick Fixes] Unfortunately, Snapchat has Stopped on OnePlus Nord CE 3 5G
Have you ever been deep in conversation with a loved one or friend, taking advantage of all the funny filters and games Snapchat has to offer when you’ve suddenly been presented with the ‘Unfortunately, Snapchat has Stopped’ error code? This is usually followed by the app crashing back to the main menu.
If so, don’t worry; you’re not alone. Snapchat crashing in this way is nothing new, but it can be incredibly annoying when it keeps happening and stops you from enjoying the conversations you care about.
Fortunately, there are plenty of solutions out there to help you out and get the app working again as it should do. Today, we’re going to explore them all to help you get back to what you were doing before and as though there was never a problem.
Part 1. Install Snapchat again from Google Play Store

One of the best ways to resolve the Snapchat crashing problem or Snap Map not working issue is to delete the app and reinstall it again. When you’re using your phone, there is data continually flowing around and data being sent here, there, and everywhere.
During these processes, bugs can occur, and if they can’t sort themselves out, the best thing to do is to reset your app and start from a fresh installation. Here’s how to do it.
Step 1: Hold down the Snapchat app from your main menu and press the ‘x’ button to uninstall the app.
Step 2: Open the Google App Store from your device and search ‘Snapchat’ in the search bar. Find the official app page and download the app onto your device.
Step 3: The app will automatically install itself once downloaded. Open the app, sign in to your account using your log-in details, and you should be able to use the app like normal.
Part 2. Check for new Snapchat Updates
 Any DRM Removal for Mac: Remove DRM from Adobe, Kindle, Sony eReader, Kobo, etc, read your ebooks anywhere.
Hand in hand with the problem above, sometimes a bug can restrict Snapchat from working, or perhaps your personal update settings. If you receive a Snapchat from someone with an upgraded version, this can crash your app.
Here’s how to make sure you’re running the latest version of Snapchat is Snapchat isn’t responding.
- Launch the Play Store and navigate to the My Apps and Games page
- Tap the Update button
- The app will now automatically update to the latest version
 Lyric Video Creator Professional Version
Part 3. Wipe the cache of Snapchat
If you have a lot of data in your Snapchat cache, this can cause the app to become overloaded in which you’ll need to clear it to start again and refresh the app. This is a common problem that can cause Snapchat has stopped working error.
Here’s how to fix it.
Open the Snapchat app and tap the Profile icon on the top left-hand side of your screen
Tap the Settings gear icon on the top right

 OtsAV DJ Pro
Scroll down the Settings menu and tap the Clear Cache option
Here, you can choose to Clear All, but you can select individual areas if you prefer
Tap the Confirm option to clear your cache preference completely


Part 4. Fix the system issues that caused Snapchat stopping
If you’re experiencing the Snapchat crashing on Android often, or you’re experiencing similar errors with other apps, this can be an indication that there’s something wrong with your Android operating system.
The best way to fix this is to repair your device using the software known as Dr.Fone - System Repair (Android). This is a powerful repair system that can completely recover your device from any errors, including the Snapchat keeps crashing error.
Dr.Fone - System Repair (Android)
Dedicated repair tool to fix Snapchat crashing on Android.
- Recover your device from any problem, including black screen or unresponsive screen.
- Supports over 1000+ unique Android devices, models, and brands.
- Trusted by over 50+ million customers around the world.
- Can fully repair faults with your OnePlus Nord CE 3 5G’s firmware in a few simple steps.
- One of the most user-friendly applications in the world.
3,889,035 people have downloaded it
To help you make the most of this Android repair software and to fix your Snapchat not responding error, here’s a step-by-step guide on how to use it.
Step 1: Download the Dr.Fone - System Repair (Android) software to your computer. Install the software to your Mac or Windows computer by following the onscreen instructions.
Once completed, open the software, so you’re on the main menu.

Step 2: From the main menu, click the System Repair option, followed by the Android option. Of course, if you have an iOS device you want to repair in the future, the option is there if you want it. Also, connect your OnePlus Nord CE 3 5G to your computer using the USB cable.
Step 3: Confirm details.
On the next screen, use the drop-down menus to confirm the model, brand, operating system, and carrier of your device. Click Next to confirm the details are correct.
Step 4: You’ll now need to put your phone into Download Mode, sometimes referred to as Recovery Mode. For this, you can follow the onscreen instructions. Make sure your device stays connected to your computer throughout this process.
The method will slightly differ depending on whether your device has a home button, so make sure you follow the right instructions for your individual device.
Step 5: Once in Download Mode, the software will now download and install a fresh version of your OnePlus Nord CE 3 5G’s operating system. This can take some time, so make sure your device stays connected, and your computer stays on and doesn’t shut down.
Step 6: That’s it! Once you see the screen saying your device has been repaired, you’ll be able to close the Dr.Fone - System Repair (Android) software, disconnect your phone, and can start using Snapchat as normal without the Snapchat not responding error coming up!
safe & secure
Part 5. Check for the Android update

Similar to some of the other solutions we’ve listed above, if you’re using an outdated version of the Android operating system, but the latest version of Snapchat is coded to the most recent, this can be a cause for the Snapchat crashing on Android problem to occur.
Fortunately, it’s easy to check to make sure you’re running the latest version of Android and to download and install the update if you need it. Here’s how, which will help to sort out your Snapchat keeps crashing Android problems.
Step 1: Open the Settings menu on your OnePlus Nord CE 3 5G and select the About Phone option.
Step 2: Tap the ‘Check for Updates’ option. If an update is available, you’ll then have the option to Install Now or Install Overnight. If no update is available, you’ll see a notification stating your device is up to date and no action is needed.
Part 6. Connect to another Wi-Fi
In some cases, you may be trying to connect to a Wi-Fi network that’s not very stable. This may keep cutting the connection to your device, which in turn is causing Snapchat to crash on Android.
To resolve this, you can simply try connecting to another Wi-Fi network or a data plan to see whether this is the problem. If so, changing network and then using the Snapchat app should stop any error messages from occurring.
Step 1: Open the Settings menu on your OnePlus Nord CE 3 5G, followed by the Wi-Fi option.

Step 2: Tap the new Wi-Fi network you’re currently connected to, and then tap the ‘Forget’ option, to stop your phone connecting to it.

Step 3: Now tap the new Wi-Fi network you want to connect to. Insert the Wi-Fi security code and connect. Now try reopening and using the Snapchat to see if you can use it.

Part 7. Stop using the custom ROM

If you’re running a custom Android ROM on your device, with some versions of the ROM and some apps, you’re going to experience errors simply because of the way the apps and the ROMs are coded and designed.
Unfortunately, there’s no easy fix to this, and if you want to continue using the app, you’ll need to reflash your OnePlus Nord CE 3 5G back to its original firmware, and then wait until the ROM developers update the ROM to be compatible with social apps like Snapchat.
However, this reflashing process is simple thanks to the Dr.Fone - System Repair (Android) software that we listed above. To follow the detailed step-by-step guide, follow the steps on Part 4 of this article, or follow the quick guide instructions below.
- Download and install the Dr.Fone - System Repair (Android) software to your computer
- Connect your OnePlus Nord CE 3 5G to your Windows computer using the USB cable
- Open the software and click the Repair option.
- Select the Android device repair option
- Make sure your carrier and device information are correct
- Put your device into Download Mode by following the onscreen instructions
- Allow the software to repair your OnePlus Nord CE 3 5G automatically
Part 8. Reset the factory settings of your Android

One of the last resorts you can take is factory resetting your OnePlus Nord CE 3 5G back to its original settings. From the day you first started using your device, you’ve been using the system and downloading files and apps, and over time this increases the chances of creating a bug.
However, by resetting your device to factory settings, you can reset these bugs and get your apps and device working again free from the Unfortunately, Snapchat has stopped error message. Here’s how to factory reset your device.
Make sure you back up your personal files from your device first like your photos and music files because factory resetting your device will clear your device’s memory.
Step 1: Tap the Settings menu on your device and click the Backup and Reset option.
Step 2: Click the Reset Phone option. That’s it! The phone will take several minutes to complete the process, after which your phone will be reset to its original state.
- Title: 6 Solutions to Fix Error 505 in Google Play Store on OnePlus Nord CE 3 5G | Dr.fone
- Author: Ariadne
- Created at : 2024-07-30 07:45:58
- Updated at : 2024-07-31 07:45:58
- Link: https://howto.techidaily.com/6-solutions-to-fix-error-505-in-google-play-store-on-oneplus-nord-ce-3-5g-drfone-by-drfone-fix-android-problems-fix-android-problems/
- License: This work is licensed under CC BY-NC-SA 4.0.