
6 Solutions to Fix Error 505 in Google Play Store on Poco F5 5G | Dr.fone
6 Solutions to Fix Error 505 in Google Play Store on Poco F5 5G
In case you are receiving the error code 505 while downloading an application from Google play store and have no clue what is it, then this is the right article for you. In this article we are covering the reasons behind the occurrence of Google play error 505. Not only that, we are also providing 6 solutions to fix the error code 505. Usually, this error is seen with Android 5.0 Lollipop version and occurs at the time when you try to install the already downloaded application making it hard to run the app.
Such an error is a kind of permission error. That is, in case you have two similar kinds of applications such as banking apps and both looking for similar kind of permission, causes conflict error named as error 505.
The occurrence chance is more in the old operating systems, 4 KitKat, Android version 4. Let us then proceed to know more about this error 505.
Part 1: Reasons for Google Play error 505


As per the report by some users, error 505 occurs in certain apps such as Weather App, SBI, ITV, Adobe Air 15, We Chat etc.
To have the right idea about the problem, we have listed all the reasons of it occurrence below:
- Google play store is not updated or refreshed (Causes the error during the downloading process)
- Due to installation of an outdated version (In case your Android version is outdated may result in error in the installation process)
- Cache memory(Is the redundant data occurs due to search history)
- Application is not compatible with the Android OS (If the app you are downloading is not the updated may cause error)
- Adobe air app
- Data crash (Many time app or Google play store crashed crashes after downloading it, reason may be some bugs, so many apps are open, less memory etc.)
Now that we know the reasons, let us also learn about the solutions that will guide you to resolve the error code 505.
Part 2: 6 Solutions to fix error code 505
Any error that occurs during downloading or installation process not only hinders with the new app but also takes a large amount of our time to solve the issue. To check that, let us go through the 6 solutions one by one.
Solution 1: One click to make error code 505 disappear
The most common cause for error code 505 pop-up is that Android system files that underpin the Google Play module are corrupted. To make error code 505 disappear in this condition, you should have your Android system repaired.
Dr.Fone - System Repair (Android)
One click to repair Android system and make error code 505 disappear
- Fix all Android system issues like error code 505, error code 495, error code 963, etc.
- One click to fix error code 505. No technical skills required.
- Supports all the new Poco F5 5G devices like Galaxy S8, S9, etc.
- Easy-to-understand instructions provided on each screen.
4,999,459 people have downloaded it
Now, you just need to follow these Android repair steps to fix error code 505:
Note: Android repair needs to flash the system firmware, which may erase existing Android data. To prevent data loss, back up all the important data from Android to PC .
Step1: Download the Dr.Fone - System Repair (Android) program , install and launch it. The following interface will pop up.

Step2: Select the “Android Repair” among the 3 tabs, connect your Android to PC, and click “Start”.

Step3: Choose the correct device details from each field, confirm them and continue.

Step4: Boot your Android in download mode, then start downloading the firmware of your device.

Step5: After the Poco F5 5G device firmware is downloaded, the tool will start repairing your Android.
 Nero Burning ROM:
The ultimate burning program for all your needs!

Step6: When your Android is repaired, the error code 505 will disappear.
 dotConnect for Oracle is an ADO.NET data provider for Oracle with Entity Framework Support.

Solution 2: Check whether Download Manger is ON or not
Many times download manager is set to disable due to which you are not able to download or install the app. So, it is required to make a check whether the download manager is set on or off. So that your installation process will work properly. The process to enable the download manager is as follows.
>Go to Settings
>Select the Application Manger or App (Option depends upon the Poco F5 5G device)
At the top, an option will appear
>Swipe right till you locate Download manager at top of the screen of the Poco F5 5G device
>Then Select Enable

Enabling download manager to give permission to the Poco F5 5G device to start the download or installation process.
Solution 3: Updating to the latest version of OS of your Poco F5 5G
Working with an old operating system is ok, but many times old version also creates some problem and is the main reason behind the occurrence of any bug or error. So, updating the older version act like a rescue to get rid of any such issue or bug. The Process of updation is quite simple; you just need to follow the below steps and your device is ready to get updated to the latest version. Steps are:
- >Go to Settings
- >Select about Phone
- >Click on System Update
- >Check for updates
- >Click on Update
- >Need to click on Install (if any update is available)


Solution 4: Clearing the cache memory from Google services Framework and Google play store
While browsing data online or through Google play store some cache memory get stored for the fast access to the pages. Below mentioned simple steps will help you in clearing out the cache memory from Google services framework and Google play store.
Process to clear the Cache memory for Google Services Framework
- >Go to Settings
- >Select Applications
- >Click on Manage Applications
- >Click to select ‘ALL’
- >Click on Google services framework
- >Select ‘Clear data and clear cache’
That will remove the cache memory of your Google services framework
Steps to Cache memory of Google Play Store
- >Go to Settings
- >Applications
- >Manage Applications
- >Click to select ‘ALL’
- >Select Google Play store
- >Clear data and clear cache
It will clear the cache of Google play store

Clearing the cache memory remove the extra temporary memory, thus free up space for the further installation process.
Solution 5: Reinstalling play store Updates
The reason behind the installation error code 505 might be Google play store updates.
Due to continuous updation of new apps and services Google Play store used to be flooded with so many updates or sometimes does not updated properly. That sometimes caused the problem in dealing with app installation. Resolving the issue is important to make your play store ready for future updation and installation.

- >Go to Settings
- >Visit Application Manager or Apps
- >Select Google Play Store
- >Click on Uninstalling Updates
- >A Message will appear ‘Change play store app to factory version’- Accept it
- >Now Open Google play store>It will refresh the updates within 5 to 10 minutes(So you need to keep your internet connection on while Google play store is updating its store for new updates.)
 LYRX is an easy-to-use karaoke software with the professional features karaoke hosts need to perform with precision. LYRX is karaoke show hosting software that supports all standard karaoke file types as well as HD video formats, and it’s truly fun to use.
Solution 6: Third party App
In the case, error 505 occur due to the installation of two or more apps with duplicate permission of data, as many times we use to install two similar kind of app that creates the situation where both seeking out for somewhat similar permissions for the installation. The manual finding is a long and tiring process. Then you can take the assistance of ‘Lucky Patcher App’ to find out which app is creating the conflict. This app will assist you in finding out the duplicity if any and then modifying it. Through this app, once you will find out which particular app is causing the conflict, then you can delete that conflicting app from your phone so that problem of error code 505 gets sort out.
Download link: https://www.luckypatchers.com/download/

Note: If still, you are in the state of trouble to solve the issue of error code 505 then Google Play help center is here to look out all troubles related to app store and its service. You can check out the details by visiting the following link:
https://support.google.com/googleplay/?hl=en-IN#topic=3364260
Or call them at their call center number regarding the issue.
 Any DRM Removal for Mac: Remove DRM from Adobe, Kindle, Sony eReader, Kobo, etc, read your ebooks anywhere.
Bonus FAQ about Google Play error
Q1: What is a 505 error code?
The HyperText Transfer Protocol (HTTP) error 505: HTTP Version Not Supported response status code means that the HTTP version used in the request is not supported by the server.
Q2: What is a 506 error?
The 506 error code is a frequent error when operating the Google Play Store. You will sometimes see this error code when you are downloading an app. The app may seem to be downloading just fine when suddenly, near the end of the installation, an error occurs, and a message pops up saying, “App could not be downloaded due to an error 506.”
Q3: How to fix the 506?
Solution 1: Restart your device which can help solve most problems.
Solution 2: Remove the SD card safely.
Solution 3: Correct date and time if it is wrong.
Solution 4: Add your Google Account again.
Solution 5: Clear Google Play Store data and cache.
However, sometimes the five simple couldn’t work anymore. A system repair software can be helpful quickly. We really recommend the Dr.Fone - System Repair (Android) , only a few minutes, the error will be fixed.
Conclusion
Not being able to download or install the app is very frustrating and time-consuming also. Therefore, in this article, we went through the reasons behind the occurrence error code 505 as well as resolving the issue by following five effective methods. I hope that you would be able to sort out the error 505 by following above methods thus would be able to install the application without further delay.

Proven Ways to Fix There Was A Problem Parsing the Package on Poco F5 5G
Unable to install your favorite Apps from Google Play Store because there was a problem parsing the package?
The Parse Error or there was a problem parsing the package error is very common with Android devices. Android is a versatile platform and, therefore, a very popular OS. It is an open software and allows users to download and use various types of apps from the Play store. Android is also a cheaper alternative as compared to other Operating Software.
Since many of us are well versed with most of the Android devices, parse error, or there is a problem parsing the package is an error is not something new and uncommon.
The error message usually pops up on the Poco F5 5G device screen when we try to download and install an App, for example, “There is a problem parsing the package Pokémon Go ”.
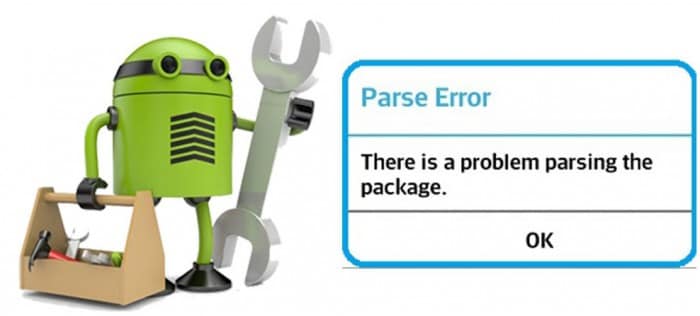
The error message which appears reads as follows:
“Parse error: There is a problem parsing the package”.
Android users who have experienced this would know that the parse error leaves us with only one option, i.e., “OK” as shown in the image below.
There was a problem parsing the package may occur due to several reasons, most of which are listed and explained below. Furthermore, there is a list of solutions to choose from to eliminate the “there is a problem parsing the package” error.
Read on to find out more.
Part 1: Reasons for the parsing error
Parse Error, better known as “there was a problem parsing the package” error is very common and normally surfaces when we try to download and install new Apps onto our Android devices from Google Play Store.
The reason for the error message to pop-up are many but none of them can be blamed singularly for the “there is a problem parsing the package” error. Given below is a list of the most probable reasons for Parse Error to stop an App from installing. Examine them carefully before moving on to the solutions to fix the “there was a problem parsing the package” error.
• Updating the OS may cause some disturbances in the manifest files of different Apps leading to Parse Error.
• Sometimes, the APK File, i.e., Android Application Package, gets infected due to improper or incomplete App installation causing “there is a problem parking the package” error.
• When Apps are downloaded and installed from unknown sources, due permission is needed. In the absence of such permission, the chances of the Parse Error to occur increase.
• Certain Apps are not compatible or supported by the latest and updated Android versions.
• Anti-virus and other cleaning Apps are also a major reason for the “there was a problem parsing the package” error.
The causes listed above are not App specific. The Parse Error may occur due to any one or more of these reasons, but what is more important is to try to get rid of the problem.
Let us move on to learn ways to fix the there was a problem parsing the package error.
 OtsAV TV Webcaster
Part 2: 8 Solutions to fix the parsing error
“There is problem parking the package” error can be dealt with easily if only we do not panic and deliberately follows the steps explained in this segment. Here are 7 of the most reliable and trustworthy methods to fix the Parse Error.
They are easy, user-friendly, and do not take much of your time. So don not waste any more of your time and try them now.
2.1 One Click to Fix ‘There is a Problem Parsing the Package
If you’re still encountering the Parsing error, there may be a problem with the Poco F5 5G device data on your device, which means you’ll need to repair it. Luckily, there’s a simple, one-click solution you can follow called Dr.Fone - System Repair .
Parental Control Software
### [Dr.Fone - System Repair (Android)](https://tools.techidaily.com/wondershare/drfone/android-repair/)Android repair tool to fix all android system issues in one click
- Simple, clean, and user-friendly interface
- No technical knowledge required
- Easy one-click repair to fix ‘there is a problem parsing the package’ error
- Should repair most parsing problems with apps, like ‘there is a problem parsing the package Pokemon Go’ error
- Supports most Poco F5 5G devices and all the latest models like Galaxy S9/S8/Note 8
3981454 people have downloaded it
If this sounds like the solution you’re looking for, here’s a step by guide on how to use it yourself;
Note: Please note that this repair process can erase all data on your phone, including your personal information. This is why it’s so important to back up your Poco F5 5G before proceeding.
Step #1 Head over to the Dr.Fone website and download the software. Install the downloaded software and open it. From the main menu, select the System Repair option.

Input your device and firmware information to confirm you’re installing the right version of the operating system.
 vMix HD - Software based live production. vMix HD includes everything in vMix Basic HD plus 1000 inputs, Video List, 4 Overlay Channels, and 1 vMix Call
Step #2 Follow the onscreen instructions on how to get into Download Mode to start the Repair process.
Once complete, the firmware will start downloading.

Step #3 Once the firmware has downloaded, it will automatically install it to your device.
When this is completed, you’ll be free to disconnect your Poco F5 5G and use it how you please without the ‘there is a problem with the parsing package’ error.
 With Screensaver Wonder you can easily make a screensaver from your own pictures and video files. Create screensavers for your own computer or create standalone, self-installing screensavers for easy sharing with your friends. Together with its sister product Screensaver Factory, Screensaver Wonder is one of the most popular screensaver software products in the world, helping thousands of users decorate their computer screens quickly and easily.
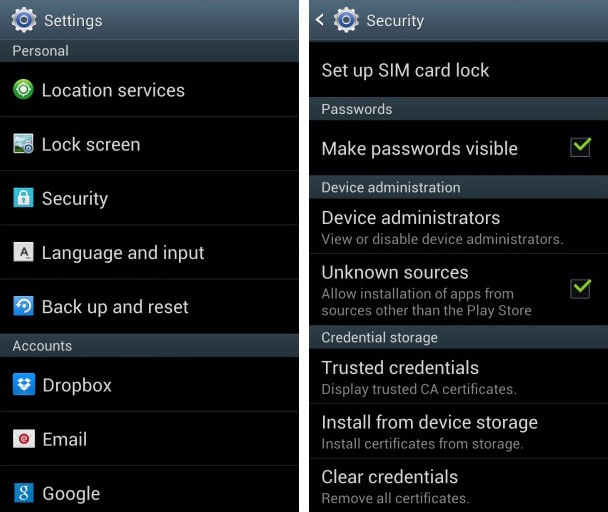
2.2 Allow installation from unknown sources
When we install Apps from other sources and not Google Play Store, there might be a glitch in using such Apps. To overcome this problem, turn on “Allow App installation from other sources”. Follow the steps given below for better understanding:
• Visit “Settings” and select “Applications”.
• Now tick mark on the option saying allow App installation from unknown sources.
2.3 Enable USB debugging
USB debugging is not considered necessary by many users but these methods give you an edge over others while using an Android device as it lets you access things on your phone, etc which you could not earlier.
To enable USB Debugging to fix “There is a problem parsing the package” error, follow these steps:
• Visit “Settings” and select “About Device”.
• Now click on “Build Number” not once but continuously for seven times.


• Once you see a pop-up saying “You are now a developer”, go back to “Settings”.

• In this step, select “Developer Options” and turn on “USB Debugging”.

This should solve the problem. If not, move on to the other techniques.
2.4 Check APK File
An incomplete and irregular App installation may cause the .apk file to get corrupted. Make sure you download the file completely. If need be, delete the existing App or its .apk file and reinstall it from Google Play Store for it to be compatible with your device’s software and to use the App smoothly.
2.5 Check App Manifest File
Manifested App files are nothing but .apk files which are improvised by you. Such changes may cause the Parse Error to occur more frequently. Modifications in the App file can be made by changing its name, App settings, or more advanced customizations. Make sure you roll back all changes and restore the App file to its original state to prevent it from getting corrupted.
2.6 Disable Antivirus and other cleaner Apps
Antivirus software and other cleaning Apps are very helpful in blocking unwanted and harmful Apps from damaging your device. However, sometimes such Apps also prevent you from using other safe Apps.
We do not suggest that you delete the Antivirus App permanently. Temporary uninstallation will be useful here. To do so:
• Visit “Settings” and then select “Apps”.
• Select the antivirus App to click on “Uninstall” and then tap “OK”.
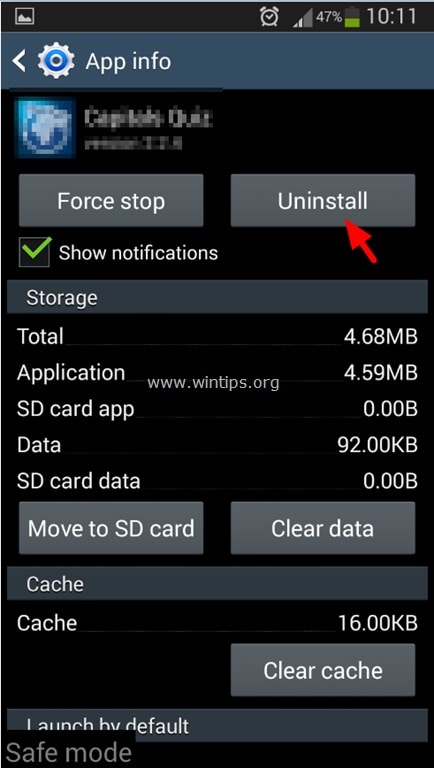
Now download and install the desired App again. Once this is done, do not forget to install the Antivirus App again.
2.7 Clear Cache cookies of Play Store
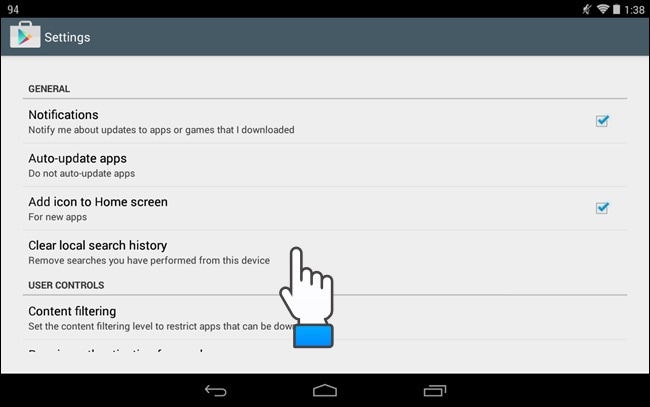
Clearing Play Store Cache cleans the Android Market platform by deleting all clogged up unwanted data. Follow the steps given below to delete Play Store cache:
• Tap on Google Play Store App.
• Now visit Play Store’s “Settings”.

• Select “General Settings” to “Clear local search history”.
2.8 Factory Reset Android
Factory Resetting your device to fix the Parse Error should be the last thing you try. Make sure you take a back-up of all your data on your Google Account or a Pen Drive because this technique erases all media, contents, data, and other files, including your device settings.
Follow the steps given below to factory reset your device:
• Visit “Settings”.
• Now select “Backup and Reset”.

• In this step, select “Factory data reset” and then “Reset Device” to confirm Factory Reset.
The whole process of factory resetting your Poco F5 5G might sound tedious, risky, and cumbersome but it helps to fix the Android SystemUI has stopped error 9 out of 10 times. So, think carefully before using this remedy.
Parse Error: There was a problem parsing the package is an error message that has troubled many Android users. The good part is that the above-stated fixes not only solve the problem but also prevent it from occurring in the future. So, keep them in mind the next time you or anyone you know faces such an issue.
8 Workable Fixes to the SIM not provisioned MM#2 Error on Poco F5 5G
SIM cards are small chips that act as a connecting medium between your cell phone and your carrier. It is programmed to help your carrier identify your cell phone account with certain information. And eventually, you are enabled to make calls and to make use of mobile internet. Now, if your device is showing “SIM not provisioned” on Android then it signifies that the connection to carrier network cannot be established or perhaps, your carrier isn’t able to identify your cell phone account.
Part 1. Why does the error “SIM not provisioned MM#2” pop up?
There can be numerous reasons behind the pop up that reads “SIM not provisioned” on Android. But basically, it most probably affects the users who have registered a new SIM card. If you get to experience this issue in other situations or if the SIM is not working in Android, then the problem is with the SIM card and needs to be replaced. Anyways, here is a list of situations when the “SIM not provisioned” error may bother you.
- You got a new SIM card for your new phone.
- You are transferring your contacts into the new SIM card.
- In case, the carrier network provider’s authorization server is unavailable.
- Perhaps, you’re out of the reach of the carrier coverage area and that too, without active roaming agreement.
- Though new SIM cards work flawlessly. But it is often necessary to get your SIM card activated due to security reasons.
Just in case, you haven’t bought any new SIM card and the one you were using was working fine until now, then the most probable reasons behind it could be listed below:
- If your SIM card is too old, possibly it might have gone dead, try replacing it.
- Perhaps, the SIM card was not properly inserted into the slot or there might be some dirt between the SIM and smartphone pins.
A yet another reason could be that your SIM card got deactivated by your carrier provider as it could have been locked to a particular phone. Now, if you insert such a SIM card to another device or a new device even, you may get to witness a message that reads “SIM not valid”.
2.1 One click to fix the “SIM not provisioned MM#2” error on Android
Without talking any further, let’s straightly get to the first and the easiest way to repair SIM not provisioned issue on Android. For this purpose, we’re glad to introduce Dr.Fone - System Repair (Android) , one of its kind of tool that is capable of repairing almost all sort of Android OS issues in just a matter of few clicks. Whether it is SIM not provisioned on Android or SIM not working in Android or your device stuck in a boot loop or black/white screen of death. The most probable reason for these errors is Android OS corruption. And with Dr.Fone – Repair (Android) you can efficiently and effectively repair your Android OS in a hassle freeway.
Dr.Fone - System Repair (Android)
Android repair tool to fix “SIM not provisioned MM#2” error
- Fix any type of Android system issue with ease.
- Even novice users can use it without any hassle.
- Compatible with all major Poco F5 5G smartphone models.
- Highest success rate in the market for fixing Android issues.
- Supports all Android OS versions.
3981454 people have downloaded it
Step by step Tutorial to fix “SIM not provisioned MM#2” error
Step 1. Connect your Poco F5 5G
Download and launch the Dr.Fone toolkit on your computer and then opt for the “System Repair” option from the main interface. Meanwhile, get your Poco F5 5G connected with the computer using a genuine cable.
Step 2. Opt for Android Repair and key in important information
Now, hit on the “Android Repair” from the 3 options on the left, followed by hitting the “Start” button. From the upcoming screen, you’ll be asked to key in important device-related information, like brand, model, country, and carrier details. Hit “Next” afterward.
Step 3. Boot your device in Download mode
You must put your device in Download mode for better repairing of your Android OS. Simply follow the onscreen guide to boot your Android in DFU mode and hit “Next” thereafter. Once done, the software will automatically start downloading the most compatible and recent firmware for your device.
Step 4. Initiate Repairing
As soon as the download completes, the software verifies the firmware and automatically initiates repairing your Poco F5 5G. Within a short period, you’ll notice that your Poco F5 5G has been successfully repaired.
 safe & secure
2.2 Ensure the SIM card is not dirty or wet
At times, the issue can be as simple as cleaning your SIM card and SIM slot properly. Ensuring that SIM is not wet either and then putting it back into its place. If this works, then the SIM not working in Android was due to the dirt or moisture that was preventing proper contact between SIM card pins and smartphone circuit.

2.3 Insert the SIM card correctly
If your SIM card was working properly until yet, there is a good possibility that the SIM card may have moved a bit from its actual location. Eventually, there is poor contact between the SIM card pins and the circuit. Try inserting your SIM card properly with the following steps.
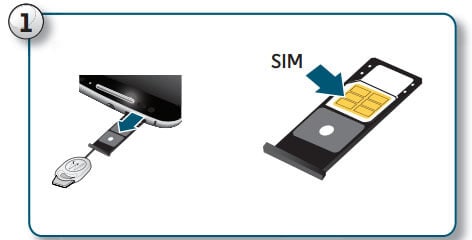
- Power off your Poco F5 5G and with the help of Q pin, eject the SIM card holder from the SIM slot of your device.
- Now, grab a soft rubber pencil eraser and gently rub it in on the gold pins of SIM card to clean them properly. Then, with the help of a soft cloth wipe away the rubber residue from the SIM card.
- Next, push the SIM back into the SIM card holder properly and push it back into the SIM slot now.
- Turn your device back on and look if your SIM not provisioned on the Android issue is resolved or not.
2.4 Activate the SIM card
Usually, when you buy a new SIM card, it gets automatically activated within 24 hours of being plugged into a new device. But if that’s not happening in your case and you’re wondering how to activate SIM card, make use of the three options below to enable activation:
- Call your carrier service provider
- Send an SMS
- Log on to your carrier’s website and look for the activation page over it.
Note: The aforementioned options are straightforward and are quick ways to enable activation. It depends on your carrier network whether they support them.
2.5 Contact your carrier
Even if your SIM isn’t activated, grab another working device to make a phone call to your carrier or network. Ensure, to explain the entire situation and the error message to them. Be patient while they investigate the issue. It may eat up a heck load of time or may get resolved in a few minutes that completely depend upon the complexity of the issue.
 /a>
/a>
2.6 Try the other SIM card slot
A yet another reason why SIM not working in Android can be because of the SIM card slot might have gone corrupted. Thanks to the dual SIM technology, you do not have to rush immediately to get it to check or repair. You can simply rule out this possibility by ejecting the SIM card from its original SIM slot and then replacing it into the other SIM card slot. If this solution did work out for you then it is obvious that the problem was with the SIM card slot that got corrupted. And hence, it was triggering SIM not responding issue.
2.7 Try the SIM card in other phones
Or just in case, you’ve still no joy and the SIM not provisioned on Android message is bothering you. Try making use of another Android device. Eject the SIM card from the Poco F5 5G device which is creating problems and try plugging it into other Poco F5 5G] and other smartphones. Perhaps, this will let you know whether the issue is with your device only or with the SIM card itself.
2.8 Try a new SIM card
Still, wondering how to fix SIM not provisioned? Perhaps, nothing worked for you, right? Well, on that note, you must head to your carrier store and request a new SIM card. Also, inform them about the “SIM not provisioned MM2” error, they will be able to execute proper diagnostics over your old SIM card and hopefully get it resolved. Or else, they’ll equip you with a brand new SIM card and swap the new SIM card into your device and get it activated in the meantime. Eventually, restoring the normal functioning of your device.
Conclusion
In wrapping up, SIM not provisioned errors on Android can be troubling, but they’re certainly fixable. There are several methods, from a simple device restart to reaching out to your network provider. But if these don’t work, we suggest trying Dr.Fone - System Repair (Android) . This tool is known for its ability to handle an array of Android issues and could be just what your device needs. Navigate your tech challenges with ease using Dr.Fone.
safe & secure
- Title: 6 Solutions to Fix Error 505 in Google Play Store on Poco F5 5G | Dr.fone
- Author: Ariadne
- Created at : 2024-07-30 07:46:49
- Updated at : 2024-07-31 07:46:49
- Link: https://howto.techidaily.com/6-solutions-to-fix-error-505-in-google-play-store-on-poco-f5-5g-drfone-by-drfone-fix-android-problems-fix-android-problems/
- License: This work is licensed under CC BY-NC-SA 4.0.