
6 Solutions to Fix Error 505 in Google Play Store on Vivo T2 Pro 5G | Dr.fone
6 Solutions to Fix Error 505 in Google Play Store on Vivo T2 Pro 5G
In case you are receiving the error code 505 while downloading an application from Google play store and have no clue what is it, then this is the right article for you. In this article we are covering the reasons behind the occurrence of Google play error 505. Not only that, we are also providing 6 solutions to fix the error code 505. Usually, this error is seen with Android 5.0 Lollipop version and occurs at the time when you try to install the already downloaded application making it hard to run the app.
Such an error is a kind of permission error. That is, in case you have two similar kinds of applications such as banking apps and both looking for similar kind of permission, causes conflict error named as error 505.
The occurrence chance is more in the old operating systems, 4 KitKat, Android version 4. Let us then proceed to know more about this error 505.
Part 1: Reasons for Google Play error 505


As per the report by some users, error 505 occurs in certain apps such as Weather App, SBI, ITV, Adobe Air 15, We Chat etc.
To have the right idea about the problem, we have listed all the reasons of it occurrence below:
- Google play store is not updated or refreshed (Causes the error during the downloading process)
- Due to installation of an outdated version (In case your Android version is outdated may result in error in the installation process)
- Cache memory(Is the redundant data occurs due to search history)
- Application is not compatible with the Android OS (If the app you are downloading is not the updated may cause error)
- Adobe air app
- Data crash (Many time app or Google play store crashed crashes after downloading it, reason may be some bugs, so many apps are open, less memory etc.)
Now that we know the reasons, let us also learn about the solutions that will guide you to resolve the error code 505.
Part 2: 6 Solutions to fix error code 505
Any error that occurs during downloading or installation process not only hinders with the new app but also takes a large amount of our time to solve the issue. To check that, let us go through the 6 solutions one by one.
Solution 1: One click to make error code 505 disappear
The most common cause for error code 505 pop-up is that Android system files that underpin the Google Play module are corrupted. To make error code 505 disappear in this condition, you should have your Android system repaired.
Dr.Fone - System Repair (Android)
One click to repair Android system and make error code 505 disappear
- Fix all Android system issues like error code 505, error code 495, error code 963, etc.
- One click to fix error code 505. No technical skills required.
- Supports all the new Vivo T2 Pro 5G devices like Galaxy S8, S9, etc.
- Easy-to-understand instructions provided on each screen.
4,999,459 people have downloaded it
Now, you just need to follow these Android repair steps to fix error code 505:
Note: Android repair needs to flash the system firmware, which may erase existing Android data. To prevent data loss, back up all the important data from Android to PC .
Step1: Download the Dr.Fone - System Repair (Android) program , install and launch it. The following interface will pop up.
 DLNow Video Downloader
Step2: Select the “Android Repair” among the 3 tabs, connect your Android to PC, and click “Start”.


Step3: Choose the correct device details from each field, confirm them and continue.

Step4: Boot your Android in download mode, then start downloading the firmware of your device.

Step5: After the Vivo T2 Pro 5G device firmware is downloaded, the tool will start repairing your Android.

Step6: When your Android is repaired, the error code 505 will disappear.

Solution 2: Check whether Download Manger is ON or not
Many times download manager is set to disable due to which you are not able to download or install the app. So, it is required to make a check whether the download manager is set on or off. So that your installation process will work properly. The process to enable the download manager is as follows.
>Go to Settings
>Select the Application Manger or App (Option depends upon the Vivo T2 Pro 5G device)
At the top, an option will appear
>Swipe right till you locate Download manager at top of the screen of the Vivo T2 Pro 5G device
>Then Select Enable

Enabling download manager to give permission to the Vivo T2 Pro 5G device to start the download or installation process.
Solution 3: Updating to the latest version of OS of your Vivo T2 Pro 5G
Working with an old operating system is ok, but many times old version also creates some problem and is the main reason behind the occurrence of any bug or error. So, updating the older version act like a rescue to get rid of any such issue or bug. The Process of updation is quite simple; you just need to follow the below steps and your device is ready to get updated to the latest version. Steps are:
- >Go to Settings
- >Select about Phone
- >Click on System Update
- >Check for updates
- >Click on Update
- >Need to click on Install (if any update is available)

Solution 4: Clearing the cache memory from Google services Framework and Google play store
While browsing data online or through Google play store some cache memory get stored for the fast access to the pages. Below mentioned simple steps will help you in clearing out the cache memory from Google services framework and Google play store.
Process to clear the Cache memory for Google Services Framework
- >Go to Settings
- >Select Applications
- >Click on Manage Applications
- >Click to select ‘ALL’
- >Click on Google services framework
- >Select ‘Clear data and clear cache’
That will remove the cache memory of your Google services framework
Steps to Cache memory of Google Play Store
- >Go to Settings
- >Applications
- >Manage Applications
- >Click to select ‘ALL’
- >Select Google Play store
- >Clear data and clear cache
It will clear the cache of Google play store
 Software Update Pro - Check and update software installed on your computer.

Clearing the cache memory remove the extra temporary memory, thus free up space for the further installation process.
Solution 5: Reinstalling play store Updates
The reason behind the installation error code 505 might be Google play store updates.
Due to continuous updation of new apps and services Google Play store used to be flooded with so many updates or sometimes does not updated properly. That sometimes caused the problem in dealing with app installation. Resolving the issue is important to make your play store ready for future updation and installation.

- >Go to Settings
- >Visit Application Manager or Apps
- >Select Google Play Store
- >Click on Uninstalling Updates
- >A Message will appear ‘Change play store app to factory version’- Accept it
- >Now Open Google play store>It will refresh the updates within 5 to 10 minutes(So you need to keep your internet connection on while Google play store is updating its store for new updates.)

Solution 6: Third party App
In the case, error 505 occur due to the installation of two or more apps with duplicate permission of data, as many times we use to install two similar kind of app that creates the situation where both seeking out for somewhat similar permissions for the installation. The manual finding is a long and tiring process. Then you can take the assistance of ‘Lucky Patcher App’ to find out which app is creating the conflict. This app will assist you in finding out the duplicity if any and then modifying it. Through this app, once you will find out which particular app is causing the conflict, then you can delete that conflicting app from your phone so that problem of error code 505 gets sort out.
Download link: https://www.luckypatchers.com/download/

Note: If still, you are in the state of trouble to solve the issue of error code 505 then Google Play help center is here to look out all troubles related to app store and its service. You can check out the details by visiting the following link:
https://support.google.com/googleplay/?hl=en-IN#topic=3364260
Or call them at their call center number regarding the issue.


Bonus FAQ about Google Play error
Q1: What is a 505 error code?
The HyperText Transfer Protocol (HTTP) error 505: HTTP Version Not Supported response status code means that the HTTP version used in the request is not supported by the server.
Q2: What is a 506 error?
The 506 error code is a frequent error when operating the Google Play Store. You will sometimes see this error code when you are downloading an app. The app may seem to be downloading just fine when suddenly, near the end of the installation, an error occurs, and a message pops up saying, “App could not be downloaded due to an error 506.”
Q3: How to fix the 506?
Solution 1: Restart your device which can help solve most problems.
Solution 2: Remove the SD card safely.
Solution 3: Correct date and time if it is wrong.
Solution 4: Add your Google Account again.
Solution 5: Clear Google Play Store data and cache.
However, sometimes the five simple couldn’t work anymore. A system repair software can be helpful quickly. We really recommend the Dr.Fone - System Repair (Android) , only a few minutes, the error will be fixed.
Conclusion
Not being able to download or install the app is very frustrating and time-consuming also. Therefore, in this article, we went through the reasons behind the occurrence error code 505 as well as resolving the issue by following five effective methods. I hope that you would be able to sort out the error 505 by following above methods thus would be able to install the application without further delay.
How to Fix Android App Not Installed Error on Vivo T2 Pro 5G Quickly?
App not installed on Android is no more an unknown Error Code during Application installation as many people experience it on a day-to-day basis. An “Application not installed” error message usually pops up when you are trying to download and install an App with a .apk file extension from somewhere other than the Google Play Store. The error is very confusing at first but makes sense when you realize that this unknown Error Code during Application installation is neither a software issue nor a hardware problem. It is a direct outcome of what you do with your device. Yes, you heard that right. Your faulty actions can cause Android App not installed error.
What to do when trying to install the Android APK it says “app not installed”? It is terrible that you can’t install App on your device. But in this article, you will know more about the causes behind this error and the best ways to fix it, read on, here is all you need to know.
Part 1: Common reasons for the “Android App not installed” error
You may ask: Why can’t I download apps on my Vivo T2 Pro 5G? Understanding the underlying causes of the “Android App Not Installed” error is crucial for resolving the issue effectively. So, what are the reasons for Android App not installed error? Given below are a few reasons:
1. Insufficient storage
Android software and if data such as photos, videos, music, messages, apps, contacts, emails, etc are stored in the internal memory there is not adequate storage left for another App, leading to Android App not installed error.
2. Corrupted/Contaminated App file
When you do not download Apps from the Play Store and choose another platform to do so, App files are usually corrupted and hence cannot be installed on your device smoothly. You should be doubly sure of the source from where you download an App, check its extension name, and make an effort not to install contained files.
3. SD Card not mounted in the Vivo T2 Pro 5G device
At times your phone could be connected to your PC or another electronic device that can access the SD Card from your device. In such situations when you install an App and choose to save it to your SD Card, you will see Android App not installed error because the App cannot find the SD card as it is not mounted in your device.
4. Storage location
You must be aware that certain Apps work their best when stored in the Vivo T2 Pro 5G device’s internal memory, whereas others need to be located on an SD Card. If you do not save the App in an appropriate location, you will find that the App isn’t installed because of an unknown Error Code.
5. Corrupt storage
Corrupted storage, especially a corrupted SD Card, is known to cause the Android App isn’t installed error. Even the internal storage can get clogged due to unnecessary and unwanted data, some of which might contain an element that disturbs the storage location. Take this issue seriously as a corrupted SD Card and even clogged up internal memory can put your device in danger.
6. Application Permission
Software operations running in the background and App Permission are not new concepts. Such errors can also cause the Unknown Error Code during App installation.
7. Incorrect file
If you already have an App installed but download another variant of it having a distinct signed or unsigned certificate can also make the Android App not installed error pop-up. This sounds technical, but this and all the other reasons listed above can be tackled by you.
The Unknown Error Code during Application installation can occur due to any one or more of the reasons stated above. So read them carefully and understand them well to avoid such glitches in the future.

Part 2: One-click to fix App not installed on Android error
So App not installed on your Vivo T2 Pro 5G or tablet? The most horrible part is that this issue may come out of the corruption in the system files. In this situation, Android apps won’t be installed no matter what measures you take. Android system repair is the only effective solution to deal with this issue.
Android system repair used to require high technical skills. But most of the users know little about technical things. Well, worry not! Dr.Fone - System Repair (Android) allows you to repair Android easily, that is, complete the fix with just one click.
 Any DRM Removal for Win:Remove DRM from Adobe, Kindle, Sony eReader, Kobo, etc, read your ebooks anywhere.
Dr.Fone - System Repair (Android)
A powerful tool to fix the “Android App not installed” error in one click
- Fix all Android system issues like Android App not being installed, the system UI not working, etc.
- One-click to fix Android App not installed. No technical skills are required.
- Support all the new Vivo T2 Pro 5G devices, etc.
- On-screen instructions are provided to prevent any misoperation.
3981454 people have downloaded it
Note: Getting your Android system repaired may erase the existing device data. It is recommended that you should back up your Android data before starting the Android repair.
The following steps illustrate how to fix the “Android App not installed” error in one click:
- Install Dr.Fone on your Windows. After that, launch it, and click “System Repair”. Connect your Android to the computer.
- Select the “Android” option and click “Start”.
- Select device information, such as brand, name, model, country, etc., from each field, and type “Next”.
- Follow the on-screen instructions to boot your Android in download mode, and allow the tool to download the firmware to your device.
- After the firmware is downloaded, the tool will start to repair your Android, hereby fixing the “Android App not installed” error.
 Greeting Card Builder
 safe & secure
Part 3: How to fix App not installed error on Android
We understand that it can be a tricky situation to be in when Android App not installed error pops up, but what if we tell you can get rid of it in easy and simple steps? Yes, there is!
#1. Delete unnecessary files/Apps
Insufficient storage can prevent the app from being installed. Make some storage space on your device by cleaning unwanted data and deleting extra media and other files. You can also get rid of heavy Apps by:
Visiting “Settings” on your device. Then select “Manage apps”, “Application Manager” or “Apps” (varies based on device model or version) from the list of options before you.


Now select the App you wish to uninstall and wait for the App Info screen to open, then click on “Uninstall” as shown in the screenshot.
You can also uninstall the unnecessary application on the home screen, just long-press the app you want to uninstall until you see the “uninstall” icon. Click “Uninstall”, then, you need to click “OK” to confirm the uninstall process.


#2. Use only Google Play Store
As you are all aware, the Play Store is specially designed for Android software and contains only trusted and safe Apps. It is often known as the “Android Market” because it is loaded with different types of Apps to stiffly all your needs so that you don’t have to rely on other third-party sources to purchase/install Apps.

#3. Mount your SD Card
Another remedy for Android App not installed error is to make sure that the SD card inserted in your device is not inaccessible.
 Power Tools add-on for Google Sheets, Lifetime subscription

To check the same:
First, disconnect your Vivo T2 Pro 5G from your PC and then visit “Settings” on your Android and select “Storage” from the options that appear. Finally, click on “Mount SD Card” at the Storage Info screen.
You can now restart your device and try to install the app now, it should work!
#4. Choose App location wisely
It is advisable to not tamper with the App’s location and let the software decide where it needs to be placed. As far as possible, let the Apps be in your device’s internal memory.
#5. Format SD Card
The chances of your SD Card being corrupted are very high. You can format it either while it is in your device or externally.
Now to Clean up your SD Card, simply visit “Settings” and select “Storage” and tap on “Format SD Card” and mount it once again to use it smoothly.

#6. App Permissions
You can reset App permissions to combat the Android App not installed error by Visiting “Settings” and then selecting “Apps”. Now access the Apps menu and hit “Reset App Preferences” or “Reset application permissions”. This will allow third-party apps to get installed on your device.
#7. Choose the correct App file
Make sure to always download an App file only from a trusted and safe source to avoid any errors during installation.
#8. Reboot your device
Finally, if nothing else works, restart your device to end all operations which could be causing the said error. To reboot, just press the power button till you see a pop-up. Select “Restart” and wait for your device to reboot.

 Power Tools add-on for Google Sheets, 12-month subscription
Conclusion
Encountering the “App Not Installed” error on Android can be frustrating, but by understanding the causes and implementing the appropriate solutions, you can overcome this issue. We saw that Android App not installed error can be fixed quickly if you keep in mind the tips given in this article. However, please ensure that you follow each instruction carefully to avoid any further goof up.
 TubeDigger - online video downloader from mostly any site
safe & secure
Fixes for Apps Keep Crashing on Vivo T2 Pro 5G
The rapid evolution of technology has transformed our smartphones into powerful devices. Presently, with just a few taps, they possess the ability to accomplish a diverse array of tasks. It has been possible due to the extensive availability of mobile applications. However, it can be incredibly frustrating when your favorite apps keep crashing repeatedly.
You’re not alone if you’re an Android user who encounters app crashes. This article will explore ten practical ways to fix apps that keep crashing on Android devices. We will also discuss the causes behind app crashes and how to prevent them.
Part 1: What Are the Causes Behind Apps Keep Crashing on Android?
There are many reasons for the app crashing on Android devices. These reasons range from insufficient storage space to bugs and glitches in the apps. Finding out the root cause of an app crashing is important so that you can find the appropriate solution. Discussed below are some of the reasons why your Android apps keep crashing:
Insufficient Memory
When a device is low on memory, it may struggle to run multiple apps simultaneously. Each app requires memory to store its data and execute its processes. If the available memory is limited, it can cause apps to crash. That happens because they don’t have enough resources to operate properly.
Software Compatibility
Android devices come in various models and run different operating system versions. That’s why it is essential to use apps compatible with your device. Since there are a lot of Android variants, it is hard to optimize apps for all devices. An app not optimized for an Android version or device leads to crashes or malfunctions.
Outdated Apps
Apps are regularly updated to introduce new features, fix bugs, and enhance performance. Using an outdated version of an app may cause instability or compatibility problems. Since the app is not optimized for the current version of Android, it can keep crashing.
Network Problems
Some apps rely heavily on network connectivity to function properly. They need a stable and strong internet connection to perform all the functions. These apps can crash if there are network connectivity issues, such as a weak Wi-Fi or network outage. Unstable connections can disrupt data transmission, making the app’s function challenging.
App Bugs
Despite rigorous testing, apps can still have bugs or coding errors that lead to crashes. Bugs in apps can occur due to various reasons. It mostly relates to incorrect implementation of features or unexpected user interactions. App developers work to identify and fix these bugs, often releasing updates.
Part 2: How to Fix the Apps Keep Crashing on Android?
Once you discover why your Android apps keep crashing, fixing them becomes a lot easier. However, there is no need to worry even if you cannot locate the problem source. Below we have listed 10 general and specialized solutions to fix app crashing:
### Fix 1: Check the Internet ConnectionAs mentioned before, some apps rely on the internet to function. If you don’t have an active internet connection, they will not work. To avoid the app crashing, you need to ensure that the internet connection on your device is working. If you use Wi-Fi, check the router and turn Wi-Fi off and on again. In the case of mobile data, try enabling Airplane mode and then disabling it.
Fix 2: Force Stop the Apps Keep Crashing
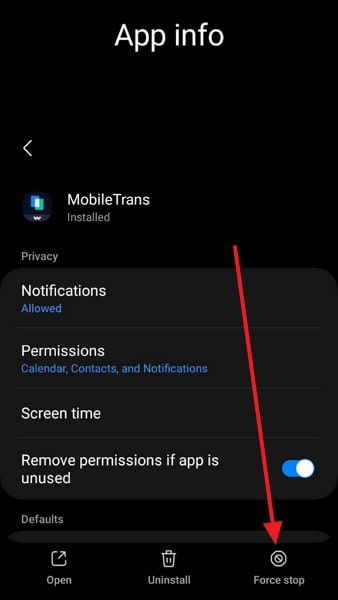
If your apps keep crashing, you should try force-closing the targeted app and re-opening it. Doing this will flush out minor bugs and glitches from the app. These temporary bugs and glitches can occur due to various reasons and hamper the app’s working. Use the following steps to force stop the app that keeps crashing and re-open it:
- Step 1: On your Vivo T2 Pro 5G, move the app icon and press it to select “App Info.” On the App Info screen, tap the “Force Stop” button to force close the app. The button can be either on the down left or down right corner.

WPS Office Premium ( File Recovery, Photo Scanning, Convert PDF)–Yearly
- Step 2: After force closing the app, relaunch it and see if the app crashing issue is resolved.

Fix 3: Restart your Android Device
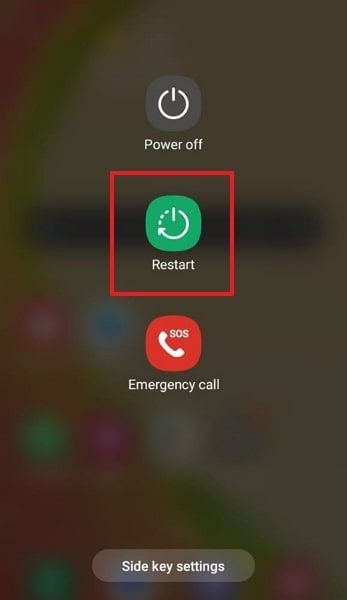
In case restarting the app hasn’t worked, you should try restarting your Vivo T2 Pro 5G. Rebooting your device reset all the processes and apps in the Vivo T2 Pro 5G device. It helps remove conflicts between different apps, which can be the cause of your apps keep crashing on Android. To reboot your Vivo T2 Pro 5G, adhere to the following guidelines:
- Step: Press and hold the “Power” key until you see the power menu on the screen. Here, tap the “Restart/Reboot” button to restart your Vivo T2 Pro 5G.
Fix 4: Update the Android OS
Not updating your Android OS for a long while can cause many performance issues in your device. One of these issues is the incompatibility with the latest apps. That’s why make sure that your Vivo T2 Pro 5G is running the latest available version of the operating system. You can check and update the Android OS of your device using these steps:
- Step 1: Launch the Settings app on your Vivo T2 Pro 5G and scroll down to select “Software Update.” On the next screen, tap “Download and Install” to look for new updates.
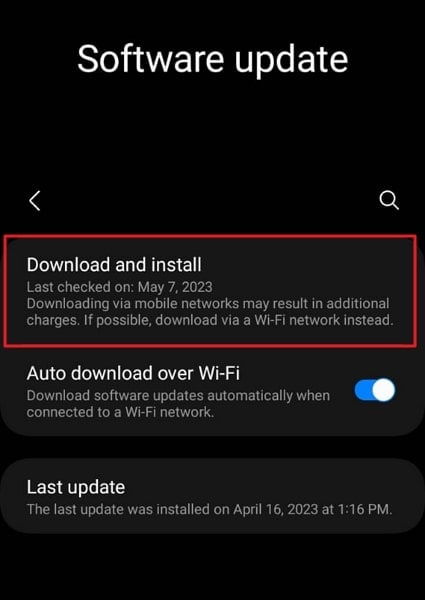
- Step 2: During the update process, ensure you have a stable internet connection. Moreover, your device should be fully charged to avoid any complications.

Fix 5: Clear the App Cache
Have you tried clearing the cache of the app that keeps crashing? The app cache consists of temporary files and data that are stored to enhance app performance. However, if the app cache becomes corrupted, it can cause crashes. In such a situation, clearing the app cache can help resolve the app crashing issue. To clear the app cache on your Vivo T2 Pro 5G, follow these steps:
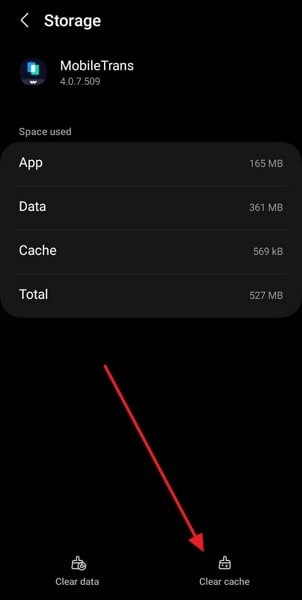
- Step 1: Navigate to your targeted app icon and long-press it. Now, tap “App Info” from the pop-up menu to access app information.
- Step 2: Following this, press “Storage,” and on the following screen, hit “Clear Cache.” It will clean the cache for the targeted app.
Fix 6: Reinstall the Buggy App
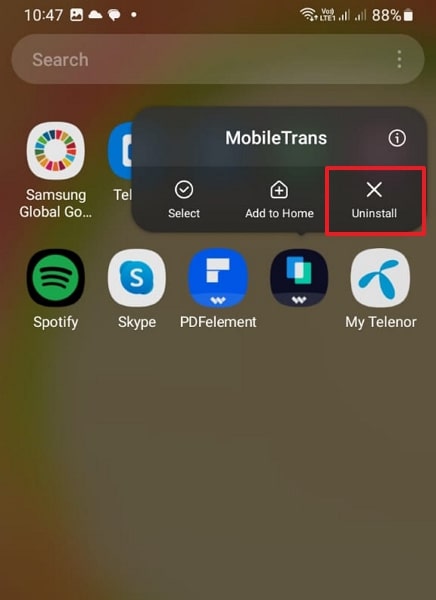
Bugs in the app can prove a nightmare and hard to remove from the app. If your apps keep crashing due to bugs, it is best to uninstall and then reinstall the app. It will help you eliminate any corrupted files or settings that might be causing the crashes. Given below are the steps needed to uninstall and reinstall the apps on Android device:
- Step 1: Go to the problematic app on your device and press the app icon for a while. Select “Uninstall” and remove the app by pressing “OK.”
- Step 2: After removing the app, go to Google Play Store and find the targeted app. Here, tap “Install” to reinstall the app on your device.

Fix 7: Check the App Permissions
Sometimes, app crashes can occur due to improper or conflicting permissions. Whenever you install an app on your device, it needs related permission to function. If you have not granted the required permissions, the apps will not function, leading to apps keep crashing on Android. You can check the app permissions using the following procedure:
- Step 1: You will need to launch Settings on your Vivo T2 Pro 5G and tap “Apps.” Here find and select the targeted app to open App Info.
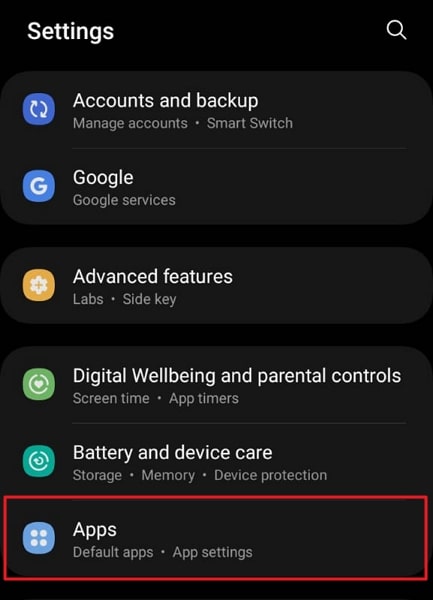
- Step 2: On the App Info screen, press “Permissions” to access all permission settings. Here, ensure that your app has the required permissions.

Fix 8: Check and Clear the Phone Storage
Insufficient storage space on your device can also lead to app crashes. Check the available storage space on your Vivo T2 Pro 5G and ensure it has enough free space. If the storage is full, consider deleting unnecessary files or apps to create more space. Explained below is the process to check and free up storage on Android devices:
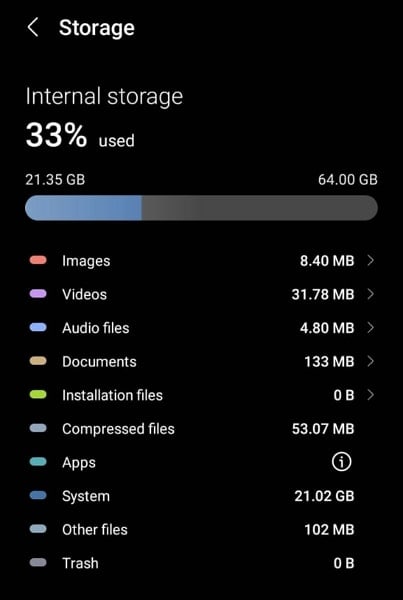
- Step 1: Open Settings on your Vivo T2 Pro 5G and scroll down to find and select “Battery and Device Care.” Here, tap “Storage” to view the Vivo T2 Pro 5G device storage.
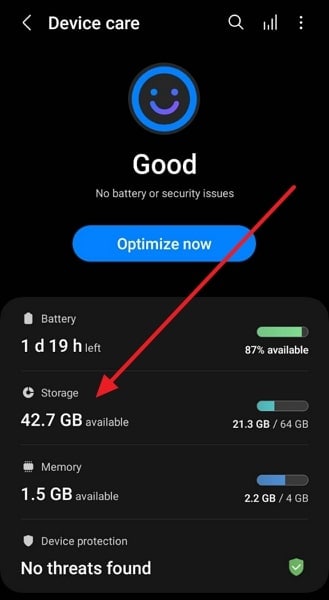
- Step 2: Here, you will see detailed information about everything stored on your device. If the storage space is full, remove the unnecessary data.

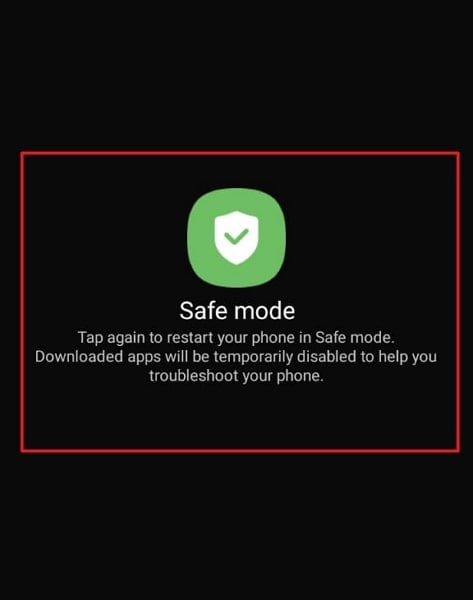
Fix 9: Reboot Into Safe Mode
It can be hard to find the app crashing root cause if it happens due to conflicts between different apps. In such scenarios, the best way to find the problematic apps is to use Safe Mode on your device. Safe Mode disables all third-party apps, allowing you to determine if the crashes are caused by a specific app. Follow the process given below to reboot your device into Safe Mode:
- Step 1: Press and hold the “Volume Down” and “Power” buttons together for 3 seconds to access the power menu. Here, long-press the “Power Off” option.
![]() FX PRO (Gold Robot + Silver Robot(Basic Package))
FX PRO (Gold Robot + Silver Robot(Basic Package))
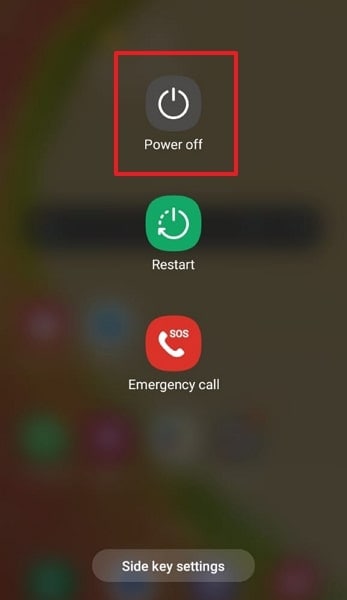
- Step 2: Press the “Power Off” button until “Restart in Safe Mode” appears on the screen. Now reboot the Vivo T2 Pro 5G device into Safe Mode. To exit Safe Mode, you will need to restart the phone.

Fix 10: 100% Working Solution to Fix the Android Apps Keep Crashing – Wondershare Dr.Fone
Trying to fix an app crashing with multiple methods can be a tiring and frustrating experience. That’s why the best option is always to find and use a specialized Android system repair tool. The best Android repair tool currently available is Wondershare Dr.Fone. It is a comprehensive system repairing tool that can fix almost all system issues in Android devices.
Using Wondershare Dr.Fone, you can fix issues like apps crashing, black screen of death, Play Store not working, and many more. Furthermore, you do not need any technical skills to use Wondershare Dr.Fone to repair your Android system issues.
Main Features of Wondershare Dr.Fone
- Wondershare Dr.Fone is a specialized tool for fixing problems with Vivo T2 Pro 5G devices, including the latest Vivo T2 Pro 5G phones.
- It supports the Android system repair feature for over 1000 Android phones across the spectrum.
- With this tool, you can also fix bricked Android devices with ease.
Step to Fix the Android Apps Keep Crashing via Wondershare Dr.Fone
The process of fixing apps that keeps crashing on Android devices is straightforward when using Wondershare Dr.Fone. Here are the simple steps you need to follow to fix the app crashing:
- Step 1: Access System Repair from Toolbox
Open Wondershare Dr.Fone on your system after installation and select “System Repair” from the “Toolbox.” Now connect your Vivo T2 Pro 5G using a USB cable and select “Android” in Wondershare Dr.Fone.
- Step 2: Provide Your Android Device Information
Click “Start” to initiate the repair process and provide your device information. You will need to provide device details like Brand, Name, Model, Country, and Carrier. Now, check the “I agree with the warning, and I am ready to proceed” box and tap “Next.”

- Step 3: Repair the Apps Keeps Crashing on Android
Follow the on-screen instruction to activate Download Mode on your device. Wondershare Dr.Fone will download the related firmware once you have enabled Download Mode. Afterward, click “Fix Now” and confirm your action by inserting the “000000” code. Now, wait for the repair process to finish.

 safe & secure
Conclusion
To sum up, if your apps keep crashing on Android, you can resolve it in many ways. Using the fixes given in this article, you can improve apps’ performance and reduce crashes. However, if you’re looking for a reliable and convenient solution, we highly recommend Wondershare Dr.Fone.
With its clean interface and powerful features, Wondershare Dr.Fone stands out as the best choice to fix app crashes. It provides a comprehensive toolkit to diagnose and resolve various software issues.
- Title: 6 Solutions to Fix Error 505 in Google Play Store on Vivo T2 Pro 5G | Dr.fone
- Author: Ariadne
- Created at : 2024-07-30 07:49:00
- Updated at : 2024-07-31 07:49:00
- Link: https://howto.techidaily.com/6-solutions-to-fix-error-505-in-google-play-store-on-vivo-t2-pro-5g-drfone-by-drfone-fix-android-problems-fix-android-problems/
- License: This work is licensed under CC BY-NC-SA 4.0.