
6 Solutions to Fix Error 505 in Google Play Store on Vivo V29 Pro | Dr.fone
6 Solutions to Fix Error 505 in Google Play Store on Vivo V29 Pro
In case you are receiving the error code 505 while downloading an application from Google play store and have no clue what is it, then this is the right article for you. In this article we are covering the reasons behind the occurrence of Google play error 505. Not only that, we are also providing 6 solutions to fix the error code 505. Usually, this error is seen with Android 5.0 Lollipop version and occurs at the time when you try to install the already downloaded application making it hard to run the app.
Such an error is a kind of permission error. That is, in case you have two similar kinds of applications such as banking apps and both looking for similar kind of permission, causes conflict error named as error 505.
The occurrence chance is more in the old operating systems, 4 KitKat, Android version 4. Let us then proceed to know more about this error 505.
Part 1: Reasons for Google Play error 505
 The BootIt Collection covers multi-booting, partitioning, and disk imaging on traditional PC’s using the standard BIOS and newer PC’s using UEFI. The collection includes BootIt Bare Metal (BIBM) for standard BIOS systems and BootIt UEFI (BIU) for UEFI system.
As per the report by some users, error 505 occurs in certain apps such as Weather App, SBI, ITV, Adobe Air 15, We Chat etc.
To have the right idea about the problem, we have listed all the reasons of it occurrence below:
- Google play store is not updated or refreshed (Causes the error during the downloading process)
- Due to installation of an outdated version (In case your Android version is outdated may result in error in the installation process)
- Cache memory(Is the redundant data occurs due to search history)
- Application is not compatible with the Android OS (If the app you are downloading is not the updated may cause error)
- Adobe air app
- Data crash (Many time app or Google play store crashed crashes after downloading it, reason may be some bugs, so many apps are open, less memory etc.)
Now that we know the reasons, let us also learn about the solutions that will guide you to resolve the error code 505.
Part 2: 6 Solutions to fix error code 505
Any error that occurs during downloading or installation process not only hinders with the new app but also takes a large amount of our time to solve the issue. To check that, let us go through the 6 solutions one by one.
Solution 1: One click to make error code 505 disappear
The most common cause for error code 505 pop-up is that Android system files that underpin the Google Play module are corrupted. To make error code 505 disappear in this condition, you should have your Android system repaired.
Dr.Fone - System Repair (Android)
One click to repair Android system and make error code 505 disappear
- Fix all Android system issues like error code 505, error code 495, error code 963, etc.
- One click to fix error code 505. No technical skills required.
- Supports all the new Vivo V29 Pro devices like Galaxy S8, S9, etc.
- Easy-to-understand instructions provided on each screen.
4,999,459 people have downloaded it
Now, you just need to follow these Android repair steps to fix error code 505:
Note: Android repair needs to flash the system firmware, which may erase existing Android data. To prevent data loss, back up all the important data from Android to PC .
Step1: Download the Dr.Fone - System Repair (Android) program , install and launch it. The following interface will pop up.

Step2: Select the “Android Repair” among the 3 tabs, connect your Android to PC, and click “Start”.

Step3: Choose the correct device details from each field, confirm them and continue.

Step4: Boot your Android in download mode, then start downloading the firmware of your device.


Step5: After the Vivo V29 Pro device firmware is downloaded, the tool will start repairing your Android.


Step6: When your Android is repaired, the error code 505 will disappear.

Solution 2: Check whether Download Manger is ON or not
Many times download manager is set to disable due to which you are not able to download or install the app. So, it is required to make a check whether the download manager is set on or off. So that your installation process will work properly. The process to enable the download manager is as follows.
>Go to Settings
>Select the Application Manger or App (Option depends upon the Vivo V29 Pro device)
At the top, an option will appear
>Swipe right till you locate Download manager at top of the screen of the Vivo V29 Pro device
>Then Select Enable

Enabling download manager to give permission to the Vivo V29 Pro device to start the download or installation process.
Solution 3: Updating to the latest version of OS of your Vivo V29 Pro
Working with an old operating system is ok, but many times old version also creates some problem and is the main reason behind the occurrence of any bug or error. So, updating the older version act like a rescue to get rid of any such issue or bug. The Process of updation is quite simple; you just need to follow the below steps and your device is ready to get updated to the latest version. Steps are:
- >Go to Settings
- >Select about Phone
- >Click on System Update
- >Check for updates
- >Click on Update
- >Need to click on Install (if any update is available)


Solution 4: Clearing the cache memory from Google services Framework and Google play store
While browsing data online or through Google play store some cache memory get stored for the fast access to the pages. Below mentioned simple steps will help you in clearing out the cache memory from Google services framework and Google play store.
Process to clear the Cache memory for Google Services Framework
- >Go to Settings
- >Select Applications
- >Click on Manage Applications
- >Click to select ‘ALL’
- >Click on Google services framework
- >Select ‘Clear data and clear cache’
That will remove the cache memory of your Google services framework
Steps to Cache memory of Google Play Store
- >Go to Settings
- >Applications
- >Manage Applications
- >Click to select ‘ALL’
- >Select Google Play store
- >Clear data and clear cache
It will clear the cache of Google play store

Clearing the cache memory remove the extra temporary memory, thus free up space for the further installation process.
Solution 5: Reinstalling play store Updates
The reason behind the installation error code 505 might be Google play store updates.
Due to continuous updation of new apps and services Google Play store used to be flooded with so many updates or sometimes does not updated properly. That sometimes caused the problem in dealing with app installation. Resolving the issue is important to make your play store ready for future updation and installation.
 Nero Burning ROM:
The ultimate burning program for all your needs!

- >Go to Settings
- >Visit Application Manager or Apps
- >Select Google Play Store
- >Click on Uninstalling Updates
- >A Message will appear ‘Change play store app to factory version’- Accept it
- >Now Open Google play store>It will refresh the updates within 5 to 10 minutes(So you need to keep your internet connection on while Google play store is updating its store for new updates.)

Solution 6: Third party App
In the case, error 505 occur due to the installation of two or more apps with duplicate permission of data, as many times we use to install two similar kind of app that creates the situation where both seeking out for somewhat similar permissions for the installation. The manual finding is a long and tiring process. Then you can take the assistance of ‘Lucky Patcher App’ to find out which app is creating the conflict. This app will assist you in finding out the duplicity if any and then modifying it. Through this app, once you will find out which particular app is causing the conflict, then you can delete that conflicting app from your phone so that problem of error code 505 gets sort out.
Download link: https://www.luckypatchers.com/download/

Note: If still, you are in the state of trouble to solve the issue of error code 505 then Google Play help center is here to look out all troubles related to app store and its service. You can check out the details by visiting the following link:
https://support.google.com/googleplay/?hl=en-IN#topic=3364260
Or call them at their call center number regarding the issue.
 Power Tools add-on for Google Sheets, Lifetime subscription

 Easy GIF Animator is a powerful animated GIF editor and the top tool for creating animated pictures, banners, buttons and GIF videos. You get extensive animation editing features, animation effects, unmatched image quality and optimization for the web. No other GIF animation software matches our features and ease of use, that’s why Easy GIF Animator is so popular.
Bonus FAQ about Google Play error
Q1: What is a 505 error code?
The HyperText Transfer Protocol (HTTP) error 505: HTTP Version Not Supported response status code means that the HTTP version used in the request is not supported by the server.
Q2: What is a 506 error?
The 506 error code is a frequent error when operating the Google Play Store. You will sometimes see this error code when you are downloading an app. The app may seem to be downloading just fine when suddenly, near the end of the installation, an error occurs, and a message pops up saying, “App could not be downloaded due to an error 506.”
Q3: How to fix the 506?
Solution 1: Restart your device which can help solve most problems.
Solution 2: Remove the SD card safely.
Solution 3: Correct date and time if it is wrong.
Solution 4: Add your Google Account again.
Solution 5: Clear Google Play Store data and cache.
However, sometimes the five simple couldn’t work anymore. A system repair software can be helpful quickly. We really recommend the Dr.Fone - System Repair (Android) , only a few minutes, the error will be fixed.
Conclusion
Not being able to download or install the app is very frustrating and time-consuming also. Therefore, in this article, we went through the reasons behind the occurrence error code 505 as well as resolving the issue by following five effective methods. I hope that you would be able to sort out the error 505 by following above methods thus would be able to install the application without further delay.
Restore Missing App Icon on Vivo V29 Pro: Step-by-Step Solutions
The growing conversation around the missing app icons on Android issue has caught our attention. While it seems confusing, it’s a problem that some Android users have encountered.
After all, the presence of app icons on our Android device’s home screen is important for convenient access to our frequently used applications. When your Vivo V29 Pro’s icons suddenly disappear, it can leave you feeling lost about how to use and access your apps.
No worries, though. We’ve got you covered with a simple guide in this article. Just follow the steps, and you’ll get those missing app icons back on your Vivo V29 Pro.
Part 1: Make Sure if the Missing App Is Installed
Before proceeding with troubleshooting the missing app icon on your Android device, it’s essential to confirm whether the app is still installed or if it has been accidentally deleted. To do it, you can have a quick check on Google Play:
- Step 1: Go to the Play Store.
- Step 2: Tap your Google profile at the top right and find Manage apps and devices.
- Step 3: Open Manage and select the “Installed” tab.
![]()
Now, see whether you can find the app icon that disappeared on your Android. If you can’t find it, it means the app has been accidentally deleted, and you can install it back on your device. However, if it’s confirmed to be installed on your Android but remains missing from your home screen, you can continue the following practice.
Part 2: How To Find the Missing App Icon on Android
“All my apps disappeared from my home Android screen. What should I do?”
If you’ve confirmed that the missing app is installed, but its icon is nowhere to be found on your home screen, don’t fret—there are several solutions you can take to locate and restore the missing app icon on Android.
 Jet Profiler for MySQL, Enterprise Version: Jet Profiler for MySQL is real-time query performance and diagnostics tool for the MySQL database server. Its detailed query information, graphical interface and ease of use makes this a great tool for finding performance bottlenecks in your MySQL databases.
 1. Check hidden apps
How could the Android phone icon be missing? Well, app icons can disappear from your home screen for different reasons. One of the common reasons is you might have accidentally hidden it in your phone. To find and check whether the app is hidden, the steps can be different depending on the phone model you are using.
However, as a general guide, you can follow these steps:
- Step 1. Go to your phone’s Settings.
- Step 2. Use the search bar to look for “Hidden app.”
- Step 3. Once you find the “Hidden app” settings, watch the list to see if the missing app is there. If it is, you can toggle off the switch to unhide it.

![]()
2. Move the app to the home screen from the App Drawer
If your app icon disappeared on your Android, you can also easily restore it by adding the app to the home screen from the app drawer. Follow the step-by-step guide below:
- Step 1. Open the App Drawer on your Android. To do this, swipe from the bottom to the top, starting from your home screen. The App Drawer is where all your installed apps are neatly listed.
- Step 2. Once you open the App drawer, locate the app icon that has disappeared from your home screen. For example, you lost the phone icon on Android. Then, look for the phone icon from the App Drawer.
- Step 3. Long-press the Icon of the missing app and move it to the desired location on your home screen. You can drag it to an empty space or a specific folder.
- Step 4. Release to drop the app icon onto the home screen.
 EmEditor Professional (Lifetime License, non-store app)
![]()
3. Re-enable disabled app
App icons can also disappear on the Android home screen if you unintentionally or intentionally disable them. Certain phone models even offer a functionality known as ‘Freezer,’ allowing users to temporarily halt the apps. While in a frozen state, the app remains inactive and doesn’t appear on the home screen until you unfrozen it.
To re-enable the disabled app, you can follow the steps here:
- Step 1. Open the Apps & Notifications on the Settings.
- Step 2. Select the app which icon is missing on your home screen. For example, tap the phone app if the phone icon disappears on your Android.
- Step 3: In the App Info, tap Enable.
4. Reset Android to factory settings
If the previous methods don’t work, you might need to do a factory reset on your Vivo V29 Pro. But before doing that, it’s important to back up your data first because a factory reset will clear all your data and cache when you press the reset button.
How to reset Android to factory setting:
- Step 1: Go to your Android Settings.
- Step 2: Select Backup and Reset > Factory data reset. Then, choose to erase all data.
Please be mindful that performing a factory reset on Android will reset your Android completely to its initial state.
![]()
Part 3: How to Fix System Error on Android Easily with Reliable Software
Missing app icons on Android can sometimes be a result of errors in your Android system launcher, causing inconvenience and potential disruptions to your device’s operation. To address this issue effectively, you can turn to Dr.Fone’s advanced system repair tool. This tool is designed to handle various system issues, providing an easy and reliable solution.
How to fix the Android system using Dr.Fone’s system repair tool:
- Step 1. Open the Repair Tool
Start by launching Wondershare Dr.Fone on your computer. Go to the Toolbox section and connect your Vivo V29 Pro. Choose System Repair and pick Android as your device type.
 safe & secure
4,136,839 people have downloaded it
- Step 2. Begin Repair
Click Start on the new screen to kick off the repair. Since you’re dealing with the Android system, select System Damage.

- Step 3. Fill in the Vivo V29 Pro device Details
The platform will detect your Vivo V29 Pro’s brand. Confirm the Name, Model, Country, and Carrier. If your device is unlocked, choose OPEN in the Carrier section. Agree to the warning, click Next, and proceed with the repair.

- Step 4. Activate Download de
Follow the instructions to put your Vivo V29 Pro into Download Mode. Once you are in Download Mode, the firmware will be downloaded automatically.

- Step 5. Confirm Installation
Remember, the repair may erase data. It’s advisable to back up your data first before starting the repair. Enter “000000” to confirm the repair process, shown by a progress bar. Once finished, click Done and see if your phone has returned to normal.

More Articles About Android System:
9 Solutions for Android Process System isn’t Responding Error
How to Fix Android App Not Installed Error Quickly?
Authentication Error Occurred? Here Are 10 Proven Fixes
Conclusion
When the app disappears from the home screen of your Android, it can hinder your ability to access and use the app efficiently. There are several reasons why an app might disappear from your Android home screen, and addressing the issue depends on the specific circumstances.
Whether it’s due to accidental deletion or a system glitch, we have discussed various methods to recover the missing app and ensure smooth functionality in this article. In cases of system-related issues on your Vivo V29 Pro, it’s advisable to rely on trustworthy software such as Dr. Fone’s system repair tool for a comprehensive resolution.
11 Proven Solutions to Fix Google Play Store Not Working Issue on Vivo V29 Pro
Google Play Store is a necessary and bundled service of any Android device. This app is required to download or even run any apps. So, getting an error like Play store not working or Play Store crashing is very unfortunate and a matter of a headache. Here we tried to put the best solution to overcome this issue. Keep reading this article for all the 11 best solutions.
Part 1. The recommended method to fix Google Play Store issues
If you search on the internet, you may find various tricks dealing with Google Play Store not working issue. However, either to try each of them or choose several to follow would certainly cost a lot of time. What’s more, we are not sure whether they will really work. Therefore, we would recommend you with a more effective and fast way, that is to use Dr.Fone - System Repair (Android) , a dedicated Android repair tool to fix Google Play Store, not working issues just in one click.
Dr.Fone - System Repair (Android)
A most effective method to fix Google Play Store not working
- Fix all Android system issues like the black screen of death, won’t turn on, system UI not working, etc.
- Industry’s 1st tool for one-click Android repair.
- Supports all the new Vivo V29 Pro devices like Galaxy S8, S9, etc.
- Step-by-step instructions provided. No technicals skills required.
3981454 people have downloaded it
Brief steps to guide you through the process of fixing Google Play Store not working (followed by video tutorial):
- Get this tool downloaded on your computer. Install and launch it, and you can find the following welcome screen displayed.
 ZoneAlarm Pro Antivirus + Firewall NextGen
- Select the option “System Repair”. In the new interface, click on the “Android Repair” tab.

- Start fixing Google Play Store not working by clicking “Start”. Select and confirm the correct model details as instructed.
- Activate the Download mode from your Vivo V29 Pro.
- After entering the Download mode, the Dr.Fone tool starts to download the correct firmware to your Android.

- The downloaded firmware will be loaded and flashed to your Vivo V29 Pro to fix the Google Play Store not working issue.
- Wait until the Android repair process is complete. Start your Android and Google Play Store, you can then find that the Google Play Store not working issue no longer exists.
Video tutorial to fix Google Play Store not working
 Glarysoft File Recovery Pro Annually - Helps to recover your lost file/data, even permanently deleted data.
Part 2: Other 10 common methods to fix Google Play Store issues
### 1\. Fix Date and Time settingsSometimes Google creates a problem connecting with the Play Store or Play store crashing due to the wrong date and time. The first and most common thing is you have to check if the date and time are updated or not. If not, update it first by following the below step by step guide.
Step 1 – First, go to the “Settings” of your device. Find ‘Date and time’ and tap on it.

Step 2 – Now you can see several options. Select “Automatic date and time”. This should override the wrong date and time your device have. Else, deselect the tick beside that option and select the date and time manually.
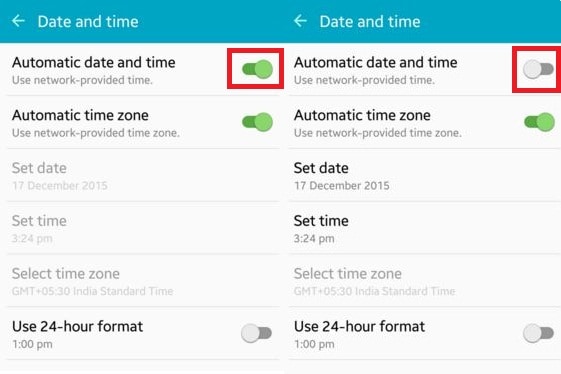
Step 3 – Now, go to the Play store and try to connect again. This should be working without any problem now.
2. Cleaning of Cache data of Play Store
This may happen that sometimes Google Play Store stopped working due to excessive unnecessary data stored in the cache of the Vivo V29 Pro device. So, clearing unnecessary data is very important to keep the application run smoothly. To do this, you need to follow the below steps.
Step 1 – Firstly, go to “Settings” on your device.
Step 2 – Now, navigate to the “Apps” option available at the settings menu.
Step 3 – Here you can find the “Google Play Store” app listed. Open it by tapping.
Step 4 – Now, you can find a screen like below. Tap on “Clear cache” to remove all the cache from the application.
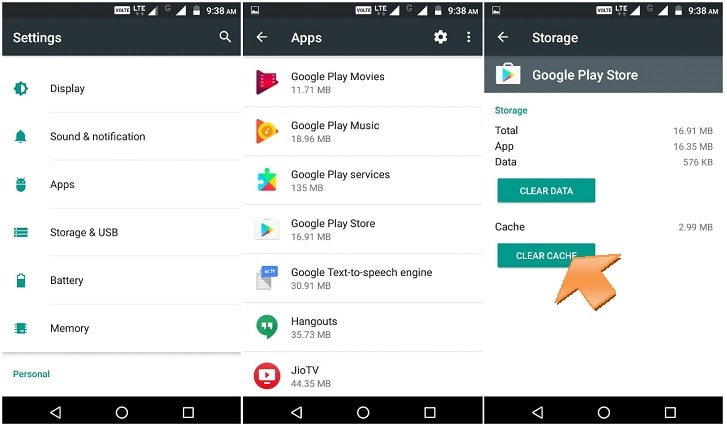
Now, again try to open Google Play Store and you may successfully overcome the Play Store not working issue. If not, check the next solution.
3. Reset Play store by Clear data
If the above solution is not working for you, you might try this option instead. This step will erase all the app data, settings, etc so that it can be set up a fresh one. This will also fix the Google Play store not working issue. For this solution, use the following method step by step.
Step 1 – Like the previous method, head towards the settings and then find “Apps”
Step 2 – Now find “Google Play Store” and open it.
Step 3 – Now, instead of tapping “Clear cache”, tap on “Clear data”. This will erase all the data and settings from the Google Play store.
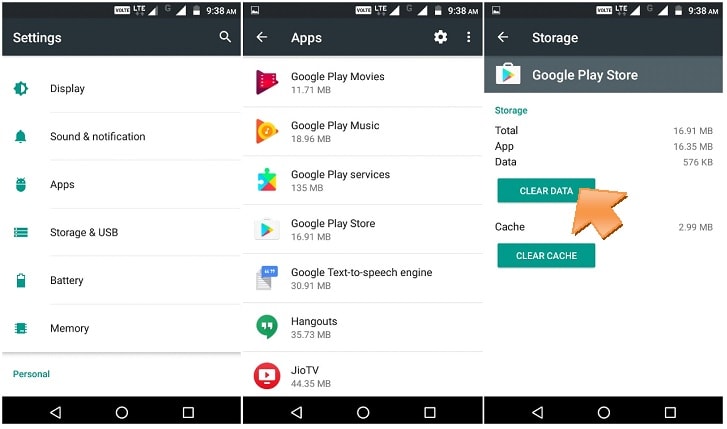
After this, open “Google Play Store” and now your problem might be solved now.
 CalendarBudget - Monthly subscription membership to CalendarBudget via web browser or mobile app. Support included.
 4. Reconnecting the Google account
Sometimes it may happen that removing and reconnecting your Google account may solve the Play Store not working issue. To do this, you need to follow the instructions below.
Step 1 – Go to the “Settings” and then find “Accounts”.
Step 2 – Upon opening the option, select “Google”. Now you can see your Gmail ID listed there. Tap on it.

Step 3 – Now click on the top right side three dots or “more” option. Here you can find the “Remove account” option. Select it to remove the Google Account from your Mobile.
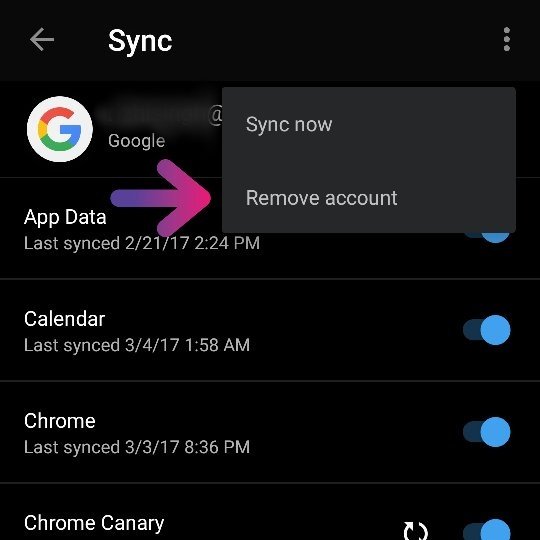
Now, go back and try to open Google Play Store again. This should work now and enter your Google ID and password again to continue. If it’s still not working, move to the next solution.

5. Reinstall the latest version of Google Play Store
Google Play store can’t be uninstalled completed completely from your Vivo V29 Pro. But disabling and reinstalling its latest version can resolve the Play Store crashing issue. For doing this, just follow the below guide.
Step 1 – First of all, go to “Settings” and then move on to “Security”. Then find “Device administration” here.
Step 2 – Upon clicking on this option, you can find “Android device manager”. Uncheck this and disable.
 DLNow Video Downloader
Step 3 – Now you can be able to uninstall Google play service by going into application manager.

Step 4 – After that, try to open any app that requires Google Play store to open, and that will automatically guide you to install the Google Play service. Now install the updated version of the Google Play service.
After installing, your problem might be solved by now. If not, try the next solution.
6. Clear Google Service Framework Cache
Besides the Google Play store, this is important to keep healthy the Google Service Framework as well. The cache and unnecessary data should be removed from there also. Follow the steps below.
Step 1 – Go to settings and then tap on “Application Manager”
Step 2 – Here you can find “Google Service Framework”. Open it.
Step 3 – Now, tap on “Clear cache”. And you are done.

Now go back and try to open Google Play store again. This might solve the Google Play Store has stopped the problem by now. If not, check the next solution.
7. Disable the VPN
The VPN is a service to get all the media outside your geographic location. This is also used to install a country-specific app in another country. But sometimes it can create a problem with Play Store crashing. So, this is recommended to try disabling the VPN.
Step 1 – Go to the settings of your device.
Step 2 – Under the “networks”, click on “More”.
Step 3 – Here you can find “VPN”. Tap on it and turn it off.
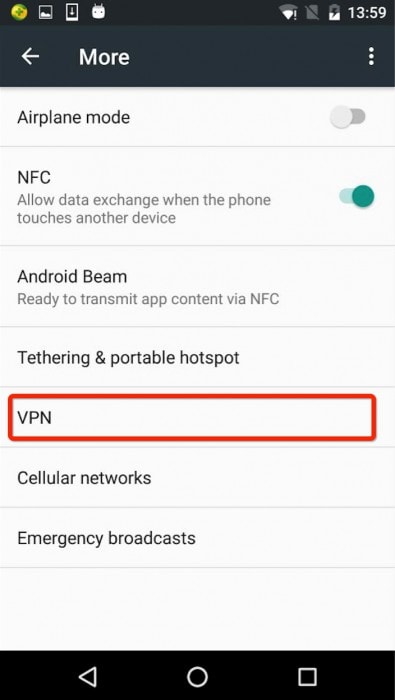
Now, again go back and try to open the Google Play Store. This may solve your problem now. If not, check the next solution.
8. Force stop Google Play Service
Google Play Store needs to be restart just like your PC. This is a really helpful and common trick to overcome the Play Store crashing issue on your Vivo V29 Pro. To do this, follow the below steps.
Step 1- Go to settings and then go to the “Application Manager”.
Step 2 – Now find “Google Play Store” and click on it.
Step 3 – Here click on “Force Stop”. This allows the Google Play Store to stop.

Now, try to open Google Play store again and this time the service is being restarted and might work properly. If not, try the next solution.

9. Try a Soft Reset of your device
This easy to use solution will remove all the unnecessary temporary files of your device, close all recent apps, and make it clean. This is just rebooting your device. It won’t delete any data from your device.
Step 1 – Long press the “Power” button on your device.
Step 2 – Now, click on ‘Reboot’ or ‘Restart’ option. Your device will restart in some time.

After restarting, try to open the Google Play Store again and this time you should succeed. If any case, it’s not opening, try the last (but not the least) method by hard reset your Android.
10. Hard reset your device
If you have done with all of the above solutions and still Play Store crashing, and you are aggressive to get it, then only try this method. Using this method will delete all the data of your device. So take a backup of the whole. Follow the step by step instruction below.
Step 1 – Go to setting and find “backup and reset” there.
Step 2 – Click on it. And then Click on the “Factory data reset” option.
Step 3 – Now confirm your action and tap on the “Reset device”.

This will take a while to reset your device completely. After completion, start the Google Play Store and set up as a new device.
The above methods are the best 11 among all the solutions you can get for your Play Store not working on wifi or Play Store crashing error. Try one by one and you might get rid of this problem.
- Title: 6 Solutions to Fix Error 505 in Google Play Store on Vivo V29 Pro | Dr.fone
- Author: Ariadne
- Created at : 2024-07-30 07:49:08
- Updated at : 2024-07-31 07:49:08
- Link: https://howto.techidaily.com/6-solutions-to-fix-error-505-in-google-play-store-on-vivo-v29-pro-drfone-by-drfone-fix-android-problems-fix-android-problems/
- License: This work is licensed under CC BY-NC-SA 4.0.