
:max_bytes(150000):strip_icc():format(webp)/how-to-add-tiktok-filters-and-effects-f3c195b2fe1449cb8b2906eea3305b22.jpg)
6 Solutions to Fix Error 505 in Google Play Store on Vivo X90S | Dr.fone
6 Solutions to Fix Error 505 in Google Play Store on Vivo X90S
In case you are receiving the error code 505 while downloading an application from Google play store and have no clue what is it, then this is the right article for you. In this article we are covering the reasons behind the occurrence of Google play error 505. Not only that, we are also providing 6 solutions to fix the error code 505. Usually, this error is seen with Android 5.0 Lollipop version and occurs at the time when you try to install the already downloaded application making it hard to run the app.
Such an error is a kind of permission error. That is, in case you have two similar kinds of applications such as banking apps and both looking for similar kind of permission, causes conflict error named as error 505.
The occurrence chance is more in the old operating systems, 4 KitKat, Android version 4. Let us then proceed to know more about this error 505.
Part 1: Reasons for Google Play error 505

As per the report by some users, error 505 occurs in certain apps such as Weather App, SBI, ITV, Adobe Air 15, We Chat etc.
To have the right idea about the problem, we have listed all the reasons of it occurrence below:
- Google play store is not updated or refreshed (Causes the error during the downloading process)
- Due to installation of an outdated version (In case your Android version is outdated may result in error in the installation process)
- Cache memory(Is the redundant data occurs due to search history)
- Application is not compatible with the Android OS (If the app you are downloading is not the updated may cause error)
- Adobe air app
- Data crash (Many time app or Google play store crashed crashes after downloading it, reason may be some bugs, so many apps are open, less memory etc.)
Now that we know the reasons, let us also learn about the solutions that will guide you to resolve the error code 505.
Part 2: 6 Solutions to fix error code 505
Any error that occurs during downloading or installation process not only hinders with the new app but also takes a large amount of our time to solve the issue. To check that, let us go through the 6 solutions one by one.
Solution 1: One click to make error code 505 disappear
The most common cause for error code 505 pop-up is that Android system files that underpin the Google Play module are corrupted. To make error code 505 disappear in this condition, you should have your Android system repaired.
Dr.Fone - System Repair (Android)
One click to repair Android system and make error code 505 disappear
- Fix all Android system issues like error code 505, error code 495, error code 963, etc.
- One click to fix error code 505. No technical skills required.
- Supports all the new Vivo X90S devices like Galaxy S8, S9, etc.
- Easy-to-understand instructions provided on each screen.
4,999,459 people have downloaded it
Now, you just need to follow these Android repair steps to fix error code 505:
Note: Android repair needs to flash the system firmware, which may erase existing Android data. To prevent data loss, back up all the important data from Android to PC .
Step1: Download the Dr.Fone - System Repair (Android) program , install and launch it. The following interface will pop up.

Step2: Select the “Android Repair” among the 3 tabs, connect your Android to PC, and click “Start”.

Step3: Choose the correct device details from each field, confirm them and continue.

Step4: Boot your Android in download mode, then start downloading the firmware of your device.

Step5: After the Vivo X90S device firmware is downloaded, the tool will start repairing your Android.

Step6: When your Android is repaired, the error code 505 will disappear.

Solution 2: Check whether Download Manger is ON or not
Many times download manager is set to disable due to which you are not able to download or install the app. So, it is required to make a check whether the download manager is set on or off. So that your installation process will work properly. The process to enable the download manager is as follows.
>Go to Settings
>Select the Application Manger or App (Option depends upon the Vivo X90S device)
At the top, an option will appear
>Swipe right till you locate Download manager at top of the screen of the Vivo X90S device
>Then Select Enable

Enabling download manager to give permission to the Vivo X90S device to start the download or installation process.
Solution 3: Updating to the latest version of OS of your Vivo X90S
Working with an old operating system is ok, but many times old version also creates some problem and is the main reason behind the occurrence of any bug or error. So, updating the older version act like a rescue to get rid of any such issue or bug. The Process of updation is quite simple; you just need to follow the below steps and your device is ready to get updated to the latest version. Steps are:
- >Go to Settings
- >Select about Phone
- >Click on System Update
- >Check for updates
- >Click on Update
- >Need to click on Install (if any update is available)

Solution 4: Clearing the cache memory from Google services Framework and Google play store
While browsing data online or through Google play store some cache memory get stored for the fast access to the pages. Below mentioned simple steps will help you in clearing out the cache memory from Google services framework and Google play store.
Process to clear the Cache memory for Google Services Framework
- >Go to Settings
- >Select Applications
- >Click on Manage Applications
- >Click to select ‘ALL’
- >Click on Google services framework
- >Select ‘Clear data and clear cache’
That will remove the cache memory of your Google services framework
Steps to Cache memory of Google Play Store
- >Go to Settings
- >Applications
- >Manage Applications
- >Click to select ‘ALL’
- >Select Google Play store
- >Clear data and clear cache
It will clear the cache of Google play store

Clearing the cache memory remove the extra temporary memory, thus free up space for the further installation process.
Solution 5: Reinstalling play store Updates
The reason behind the installation error code 505 might be Google play store updates.
Due to continuous updation of new apps and services Google Play store used to be flooded with so many updates or sometimes does not updated properly. That sometimes caused the problem in dealing with app installation. Resolving the issue is important to make your play store ready for future updation and installation.

- >Go to Settings
- >Visit Application Manager or Apps
- >Select Google Play Store
- >Click on Uninstalling Updates
- >A Message will appear ‘Change play store app to factory version’- Accept it
- >Now Open Google play store>It will refresh the updates within 5 to 10 minutes(So you need to keep your internet connection on while Google play store is updating its store for new updates.)

Solution 6: Third party App
In the case, error 505 occur due to the installation of two or more apps with duplicate permission of data, as many times we use to install two similar kind of app that creates the situation where both seeking out for somewhat similar permissions for the installation. The manual finding is a long and tiring process. Then you can take the assistance of ‘Lucky Patcher App’ to find out which app is creating the conflict. This app will assist you in finding out the duplicity if any and then modifying it. Through this app, once you will find out which particular app is causing the conflict, then you can delete that conflicting app from your phone so that problem of error code 505 gets sort out.
Download link: https://www.luckypatchers.com/download/

Note: If still, you are in the state of trouble to solve the issue of error code 505 then Google Play help center is here to look out all troubles related to app store and its service. You can check out the details by visiting the following link:
https://support.google.com/googleplay/?hl=en-IN#topic=3364260
Or call them at their call center number regarding the issue.

Bonus FAQ about Google Play error
Q1: What is a 505 error code?
The HyperText Transfer Protocol (HTTP) error 505: HTTP Version Not Supported response status code means that the HTTP version used in the request is not supported by the server.
Q2: What is a 506 error?
The 506 error code is a frequent error when operating the Google Play Store. You will sometimes see this error code when you are downloading an app. The app may seem to be downloading just fine when suddenly, near the end of the installation, an error occurs, and a message pops up saying, “App could not be downloaded due to an error 506.”
Q3: How to fix the 506?
Solution 1: Restart your device which can help solve most problems.
Solution 2: Remove the SD card safely.
Solution 3: Correct date and time if it is wrong.
Solution 4: Add your Google Account again.
Solution 5: Clear Google Play Store data and cache.
However, sometimes the five simple couldn’t work anymore. A system repair software can be helpful quickly. We really recommend the Dr.Fone - System Repair (Android) , only a few minutes, the error will be fixed.
Conclusion
Not being able to download or install the app is very frustrating and time-consuming also. Therefore, in this article, we went through the reasons behind the occurrence error code 505 as well as resolving the issue by following five effective methods. I hope that you would be able to sort out the error 505 by following above methods thus would be able to install the application without further delay.
Vivo X90S Bootloop Problem, How to Fix it Without Data Loss
Have you, like many other users, faced the bootloop Android problem and wondered what exactly is Android boot loop. Well, Android boot loop is nothing but an error that makes your phone switch on itself every time you manually turn it off. To be precise, when your Vivo X90S does not remain switched off or powered off and starts to boot up automatically after a few seconds, it might be stuck in the boot loop Android.
An Android boot loop is a very common problem and is one of the first symptoms of a soft-bricked device. Also, when your device is experiencing Android boot loop issue, it does not start normally to reach the Home or Locked Screen and remains frozen at the Vivo X90S device’s logo, Recovery Mode or a lit-up screen. Many people fear losing their data and other files due to this error and thus, it is a very confusing situation to be in.
We understand the inconvenience caused, therefore, here are ways to tell you how to fix the bootloop problem in Android devices without losing any important data.
However, before moving on, let us learn a little about the causes for the Android boot loop error.
Part 1: What might cause the bootloop issue on Android?
Android boot loop error might seem weird and unexplainable but it occurs because of some specific reasons.
Firstly, please understand that it is a misnomer that boot loop error occurs only in a rooted device. Boot loop Android error can also occur in a stock device with the original software, ROM, and firmware.
In a rooted device, changes made, such as flashing a new ROM or customized firmware which are not compatible with the Vivo X90S device’s hardware or existing software, can be blamed for the boot loop problem.
Moving on, when your device’s software is unable to communicate with the system files during the start-up process, Android boot loop problem may arise. Such a glitch is caused if you have recently updated the Android version.
Also, corrupt App update files may also cause the bootloop Android issue. Apps and programs downloaded from unknown sources bring in a particular type of virus that prevents you from using your device smoothly.
All-in-all, Android boot loop error is a direct outcome of when you try to tamper with your device’s internal settings.
Hence, if you are looking for ways to guide you about how to fix boot loop issue, you will have to revamp the Vivo X90S device internally by either resetting it or adopting a recovery method.
Read on to know more about how to fix the bootloop error without any data loss when your device suffers from the bootloop Android problem.
Part 2: One click to Fix Android Bootloop without factory reset
If you are trying to figure out how to fix boot loop, the first option you have is the one-click fix to Android Bootloop which involves using the Dr.Fone - System Repair software.
This is designed to repair any data corruption on your device and restores your firmware to its usual working condition.
Dr.Fone - System Repair (Android)
One click to fix boot loop of Android
- #1 Android repair solution from your PC, can fix a wide range of Android system issues, such as boot loop, black screen, etc.
- The software requires no technical expertise, and anybody can use it
- A one-click solution when learning how to fix Android boot loop
- Not require root Android phones.
- Works with most Vivo X90S devices, including the latest Vivo X90S phones like S22
- Simple and easy-to-use user interface
4,689,059 people have downloaded it
To help you get started, here’s a step-by-step guide on how to use Dr.Fone - System Repair.
Note: This method can erase data on your device, including your personal files, so make sure you’ve backed up your device before proceeding.
Step #1 Download the Dr.Fone - System Repair software from the website and install it onto your computer.
Open the software and select the System Repair option from the main menu to fix the Android bootloop error.
Step #2 Connect your Vivo X90S to your computer using the official cable and select the “Android” option from the three menu items. Click “Start” to confirm.
You’ll then need to input the Vivo X90S device information, such as your carrier info, device name, model, and country/region in order to ensure you’re downloading and repairing the correct firmware to your phone.
Step #3 Now you’ll need to put your phone into Download Mode to remove the Android bootloop.
For this, you can simply follow the onscreen instructions for both phones with and without home buttons.
Click “Next”, and the software will begin downloading the firmware repair files.

Step #4 Now you can sit back and watch the magic happen!
Make sure your computer stays connected to the internet, and your device stays connected to your computer throughout the entire process. Once the firmware has been downloaded, it will be automatically installed onto your mobile device, removing the boot loop Android error.
You’ll be notified when the process is done and when you can remove your device and start using free from the boot loop Android error!
 safe & secure
Part 3: Soft reset to fix Android bootloop issue
When your device is stuck in Android boot loop, it does not necessarily mean that it is bricked. Boot loop might be occurring due to a simpler problem which can be fixed by turning off your device. This sounds like a home remedy for a serious problem but it works and resolves the problem most of the time.
Follow the steps given below to soft reset your device:
Turn the Vivo X90S device off and take out its battery.

If you cannot take the battery out, let the phone be off for about 3 to 5 minutes, and then turn it back on.
Simply performing a soft reset on your device can help you if you are looking for solutions for how to fix the bootloop issue. This a very useful method as it does not result in any kind of loss in data and protects all your media files, documents, settings, etc.
In case the Vivo X90S device does not turn on normally and is still stuck in the bootloop Android problem, be prepared to use the troubleshooting techniques given and explained below.
Part 4: Boot into Safe Mode to fix Android boot loop

Booting your Vivo X90S into Safe Mode is a useful troubleshooting step to fix boot loop issues caused by third-party apps. When in Safe Mode, the Vivo X90S device will start up with only essential system apps, and any downloaded apps that might be causing conflicts won’t run. Here’s how you can boot your Vivo X90S into Safe Mode to address the boot loop problem:
Step 1: Power Off Your Device
Hold down the power button until it turns off completely.
Step 2: Access Safe Mode
To enter Safe Mode, follow these steps based on your device model:
- For most Android devices: Press and hold the power button to turn on your device. As soon as the manufacturer’s logo appears, press and hold the Volume Down button until the Vivo X90S device finishes booting. You should see “Safe Mode” displayed in the bottom left or right corner of the screen.
- Some devices might require slightly different key combinations. Refer to your device’s user manual or perform an online search for the specific method to enter Safe Mode for your model.
Step 3: Observe the Vivo X90S device
Once your device has booted into Safe Mode, use it for a while to see if the boot loop issue persists. If the boot loop doesn’t occur in Safe Mode, it indicates that the problem is likely caused by a third-party app.
Step 4: Identify and Uninstall Problematic Apps
Now that you’re in Safe Mode, it’s time to identify the troublesome app. Start by uninstalling recently installed apps one by one until the boot loop problem is resolved. After each uninstallation, restart your device normally to check if the boot loop still occurs. Continue this process until you find the problematic app.
Step 5: Restart Normally
Once you’ve identified and uninstalled the problematic app, restart your device normally to exit Safe Mode. Your Android device should now start up without getting stuck in a boot loop.
By following these steps and using Safe Mode to isolate problematic apps, you can effectively troubleshoot and resolve boot loop issues on your Vivo X90S.
Part 4: Factory reset to fix Android bootloop issue
Factory reset, also known as Hard Reset, is a one-stop solution for all your software resulting in issues. Android boot loop being such problem, can be easily overcome by performing a factory reset.
Please note that all your device’s data and settings will be deleted by adopting this method. However, if you have a Google account signed in on your Vivo X90S, you will be able to retrieve most of your data once the Vivo X90S device turns on.
To factory reset your Android boot loop device, you must first boot into the Recovery Mode screen.
To do this:
Press the volume down button and power button together until you see a screen with multiple options before you.

When you are at the Recovery Mode screen, scroll down using the volume down key, and from the options given, select “Factory Reset” using the power key.

Wait for your device to perform the task and then:
Reboot the phone in Recovery Mode by selecting the first option.

This solution is known to fix the boot loop error 9 out of 10 times, but if you still can’t start your Vivo X90S normally, consider using a CWM Recovery to resolve the Android boot loop issue.
Part 5: Use CWM Recovery to fix bootloop on rooted Android
CWM stands for ClockworkMod and it is a very popular custom recovery system. To use this system to solve the boot loop Android error, your Vivo X90S must be rooted with CWM Recovery System which basically means CWM must be downloaded and installed on your device.
Furthermore, to use CWM Recovery to fix boot loop on rooted Android devices, follow the steps given below:
Press the home, power, and volume up buttons to launch the CWM Recovery screen.
Note: you might have to use a different combination of keys to enter into Recovery Mode, depending on your device’s model.

Scroll down using” the volume key to select “Advanced”.

Now select “Wipe” and choose to wipe “Dalvik Cache”.

In this step, select “Mounts and Storage” to click on “Wipe” or “Cache”.
Once this is done, make sure to reboot your Vivo X90S.
This process with successfully fix the Android boot loop error and not cause any loss of data stored on your device stuck in boot loop.
So the bottom line is that boot loop Android issue may seem like an irreparable error but it can be resolved by carefully following the techniques explained above. These methods not only tell you how to fix the bootloop problem but also prevent it from occurring in the future.
An Android boot loop is a common phenomenon with all Android devices because we tend to tamper with our device’s internal settings. Once the ROM, firmware, kernel, etc are damaged or rendered incompatible with the Vivo X90S device’s software, you cannot expect it to function smoothly, hence, the boot loop error occurs. Since you are not the only one suffering from the Android boot loop problem, be rest assured that the ways, given above, to combat it are recommended by users facing similar troubles. So, don’t hesitate and go ahead to try them on.
safe & secure
11 Ways to Fix it When My Vivo X90S Won’t Charge
What would you do if your phone or other device’s battery is draining? You will plug it into a power source. Right? What if you realize that your phone won’t charge? My phone won’t charge, and the Vivo X90S tablet won’t charge is a common problem.
Android devices are very prone to this problem, and hence Android device owners complain frequently that My Vivo X90S won’t charge even when it is plugged into a power source properly. The reason behind the phone won’t charge, or Vivo X90S tablet won’t charge are not very complicated and, therefore, can be dealt with by you sitting at home.
A charging problem can occur due to a temporary software crash. It is also possible that a corrupted device cache may be causing such a glitch. Another reason for phones not to charge normally or charge slowly is an inappropriate power source or defective charging cable and adapter. All these and many more problems will be cured in the 10 solutions to fix My Vivo X90S won’t charge error.
So if you’re still thinking about why won’t My Vivo X90S charge, read on to find out solutions to fix My Vivo X90S won’t charge problem.
Part 1. One-click solution to fix Android phone won’t charge
While you are upset over ‘why My Vivo X90S won’t charge?’, would you mind us helping you around?
Well, we have got Dr.Fone - System Repair (Android) at your fingertips to get rid of this annoying phone won’t charge issues (caused by system corruption). Whether the Vivo X90S device froze or became unresponsive, bricked, or got stuck on the Vivo X90S logo/blue screen of death or apps started crashing. It can fix every Android system problem.
Dr.Fone - System Repair (Android)
Easy-to-operate program to fix Android phone won’t charge
- As it supports all the latest Vivo X90S devices, it can even easily fix the Vivo X90S tablet won’t charge issue.
- With a single click, you can fix your entire Android system issues.
- The very first tool is available in the market for Android system repair.
- Without any technical knowledge, one can use this software.
- This tool is intuitive with a high success rate.
3981454 people have downloaded it
Note: When you are stressed over ‘why won’t My Vivo X90S charge’, we are ready to eliminate the tension and make things easier for you. But, before you start fixing the phone won’t charge the problem, make sure to back up the Android device . This fixing process might wipe out all the Vivo X90S device data.
Phase 1: Preparing and connecting the Android device
Step 1: Install and then run Dr.Fone - System Repair (Android), the ultimate Android repair software on your PC. Hit the ‘System Repair’ tab, followed by connecting your Vivo X90S.
Step 2: Tap on the ‘Android Repair’ option and then click ‘Start’ for moving ahead.
Step 3: Mention the detailed information about your Vivo X90S under the Vivo X90S device information section. Press ‘Next’ then on.
Phase 2: Get to ‘Download’ mode for repairing the Vivo X90S device
Step 1: It’s essential that you put the Android device under ‘Download’ mode to resolve the phone won’t charge the issue. Here comes how to do –
- With a ‘Home’ button device, switch off it before holding down the set of keys, including ‘Power’, ‘Volume Down’, and ‘Home’ key for 5-10 seconds. Let them go and hit the ‘Volume Up’ key for entering the ‘Download’ mode.
- If the ‘Home’ button is not there, you got to turn down the Vivo X90S device and altogether hold down the ‘Volume Down’, ‘Bixby’, and ‘Power’ keys between 5-10 seconds. Soon after you release the keys, tap the ‘Volume Up’ button for entering the ‘Download’ mode.

Step 2: Click ‘Next’ to start downloading the Android firmware.
Step 3: Now, Dr.Fone - System Repair (Android) would verify the firmware and then start repairing the Android system on its own. It will ultimately fix your ‘why won’t My Vivo X90S charge’ trouble.
Part 2. 10 common ways to fix Android won’t charge
1. Check/replace charging cable
Charging cables fray or become defunct after prolonged usage. Therefore, it is advised to always use the Vivo X90S device’s original charging cable or purchase a good quality charging cord, which doesn’t damage your device or your adapter.
It is also very commonly observed that the charging end of the cable which gets connected to the charging port of the Vivo X90S device gets damaged and prevents the current from flowing to the phone/tablet.

2. Check/clean charging port
The charging port in your device is a small opening where the charging end of the cabbie is inserted for the current to flow to the phone/tablet. Very often, we notice that the charging port gets blocked with tiny particles of dirt. The charging port might also get clogged if dirt and dust get accumulated in it, preventing the sensors from receiving and forwarding the current to the Vivo X90S device.

The best way to take this problem is to clean the port with a blunt pin or a soft bristle unused toothbrush. Make sure you clean the port gently and do not damage it or its sensors.

3. Check/replace charging adapter
This method is fairly simple, and all you need to do is check whether or not the charging adapter is working properly as sometimes, the adapter itself is to be blamed for the charge. To make sure that you are not using a defective adapter, connect your charging cable/USB to another adapter. If your device charges normally, it means there is a problem is with your adapter, and you must replace it at the earliest to solve My Vivo X90S won’t charge the issue.

4. Try another power source
This technique is more like a quick trick. It means to switch from one power source to another or use a more efficient and suitable power source. Laptops and PCs charge slower than a direct power source, i.e., a wall socket. Sometimes, the charging speed is slower, and the battery is draining. In such a scenario, choose to charge your device by directly plugging it into a socket on the wall to never experience My Vivo X90S won’t charge problem.
5. Clear device Cache
Clearing Cache is a great technique as it cleans your device and all its partitions. By clearing the cache, all the unwanted data and files stored in your device get deleted, which may be causing glitches in the Vivo X90S device’s software, preventing it from recognizing the current.
Follow the steps given below to clear your device’s cache:
• Visit “Settings” and find “Storage”

• Now tap on “Cached Data”.

• Click “OK” to clear all unwanted cache from your device as shown above.
Try charging your phone after clearing the cache. If your phone doesn’t charge even now, do not worry. There are more ways to help you combat My Vivo X90S won’t charge problem.
6. Re-start/reboot your phone/tablet
Restarting your device to fix why won’t My Vivo X90S charge error is a very effective remedy. This method of rebooting your device not only fixes software glitches but other but also tackles other factors/operations that might be running in the background preventing your device from charging.
Restarting a device is simple and can be done by following the steps given below:
• Long press the power button of your device.
• From the options that appear, click on “Restart”/ “Reboot” as shown in the image below.

To restart your device, you may also press the power button for about 20-25 seconds for the phone/tablet to automatically reboot.
7. Download and install the Ampere App
The Ampere app can be downloaded from the Google Play Store. It is very helpful to fix the why won’t my charge error as it gives you real-time information about your device’s battery consumption, charging status, and other essential data.
If the App gives information in green color, it means all is wetland your device is charging normally, however, if the information before you is in orange, you need to take steps to fix the charging problem.


8. Install software updates
Installing your Android version updates is a good idea as the software is the interface that receives charge from the charging port sensors and gives a command for the phone/tablet to charge. People often continue to use older OS versions, which cause trouble and prevent the Vivo X90S device from charging.
To check for and install updates on your device, you must be connected to WiFi or a cellular network. Next, visit “Settings” and select “About device”. Now click on “Software Update”.

If there is an update available, you will be prompted to download it. Just follow the instructions given before you install a brand new Android OS version on your device.
9. Factory reset your device
Factory Reset is must be done after due deliberation. Remember to take a back-up of all your data and contents on the cloud or an external memory device, such as a pen drive before adopting this method because once you perform a factory reset on your device, all media, contents, data and other files are wiped out, including your device settings.
Follow the steps given below to factory reset your device:
• Visit “Settings” by clicking the settings icon as shown below.
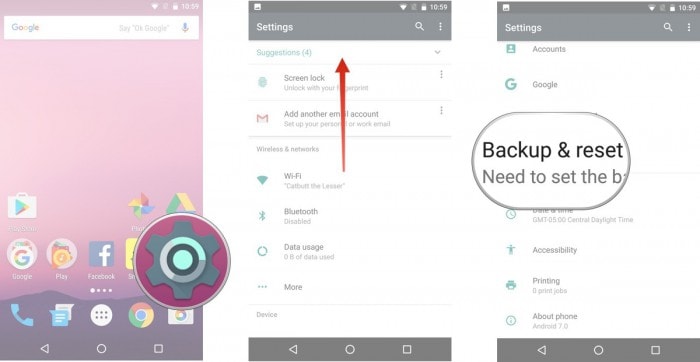
• Now select “Backup and Reset” and move on.
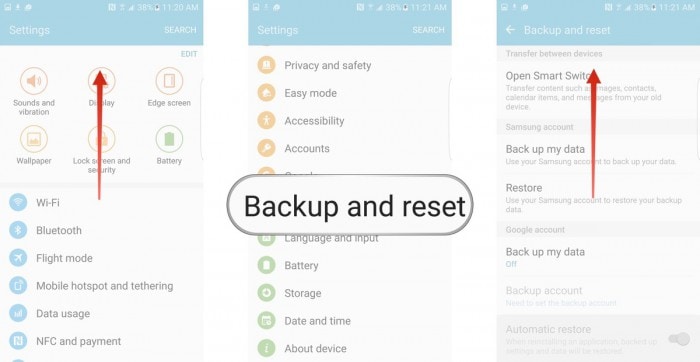
• In this step, select “Factory data reset” and then “Reset Device”.
• Finally, tap on “ERASE EVERYTHING” as shown below to Factory Reset your device.

Note: Once the factory reset process is complete, your device will automatically restart and you will have to set it up once again.
10. Replace your battery
This should be your last resort to fix My Vivo X90S won’t charge problem, and you should only attempt to replace your battery if none of the other techniques work. Also, please consult a technician before purchasing and installing a new battery in your device as different phones and tablets have a different type of battery requirements.

Finally, fixing the phone won’t charge the problem is simple, and therefore there is no need for you to worry as you are not the only one experiencing such an issue. Other Android users have tried, tested, and recommended the methods given above to solve why won’t My Vivo X90S charge or Vivo X90S tablet won’t charge error. So go ahead and try them out now.
Also read:
- Gionee F3 Pro Screen Unresponsive? Heres How to Fix It | Dr.fone
- Vivo Y28 5G Not Receiving Texts? 10 Hassle-Free Solutions Here | Dr.fone
- 7 Solutions to Fix Error Code 963 on Google Play Of Xiaomi 13 Ultra | Dr.fone
- 7 Solutions to Fix Chrome Crashes or Wont Open on OnePlus 12 | Dr.fone
- Full Solutions to Fix Error Code 920 In Google Play on Nokia G42 5G | Dr.fone
- Gmail Not Working on Lava Yuva 3 Pro 7 Common Problems & Fixes | Dr.fone
- 11 Ways to Fix it When My Tecno Spark 20 Pro Wont Charge | Dr.fone
- Android Safe Mode - How to Turn off Safe Mode on Google Pixel Fold? | Dr.fone
- 4 Solutions to Fix Unfortunately Your App Has Stopped Error on OnePlus Ace 2V | Dr.fone
- How To Unbrick a Dead Nokia 130 Music | Dr.fone
- 8 Quick Fixes Unfortunately, Snapchat has Stopped on Oppo Reno 10 Pro 5G | Dr.fone
- Stuck at Android System Recovery Of Realme Narzo 60 5G ? Fix It Easily | Dr.fone
- How to Resolve Lava Blaze 2 Pro Screen Not Working | Dr.fone
- 8 Ultimate Fixes for Google Play Your Nokia C12 Pro Isnt Compatible | Dr.fone
- Why Your Vivo Y78 5G Screen Might be Unresponsive and How to Fix It | Dr.fone
- Top 10 Fixes for Phone Keep Disconnecting from Wi-Fi On Nokia C210 | Dr.fone
- App Wont Open on Your Motorola Razr 40 Ultra? Here Are All Fixes | Dr.fone
- Fixes for Apps Keep Crashing on Oppo A18 | Dr.fone
- 4 Ways to Fix Android Blue Screen of Death On Poco M6 Pro 4G | Dr.fone
- Top 4 Android System Repair Software for Vivo Y100i Bricked Devices | Dr.fone
- 4 Solutions to Fix Unfortunately Your App Has Stopped Error on Honor Magic Vs 2 | Dr.fone
- How to Resolve Nokia C110 Screen Not Working | Dr.fone
- How To Revive Your Bricked Vivo V29 in Minutes | Dr.fone
- 8 Workable Fixes to the SIM not provisioned MM#2 Error on Lava Blaze Curve 5G | Dr.fone
- 9 Solutions to Fix Process System Isnt Responding Error on Honor Magic 5 Lite | Dr.fone
- How to Fix the Soft Bricked Infinix Smart 8 Plus? | Dr.fone
- 9 Solutions to Fix Samsung Galaxy A54 5G System Crash Issue | Dr.fone
- App Wont Open on Your Motorola Moto E13? Here Are All Fixes | Dr.fone
- Fixes for Apps Keep Crashing on Sony Xperia 10 V | Dr.fone
- 9 Quick Fixes to Unfortunately TouchWiz has stopped Of Samsung Galaxy F54 5G | Dr.fone
- Calls on Samsung Galaxy F34 5G Go Straight to Voicemail? 12 Fixes | Dr.fone
- Vivo T2 5G Camera Not Working Unexpected Error? Fix It Now | Dr.fone
- Android Safe Mode - How to Turn off Safe Mode on Vivo V27? | Dr.fone
- 11 Ways to Fix it When My Honor Play 7T Wont Charge | Dr.fone
- Fix Unfortunately Settings Has Stopped on Samsung Galaxy S23 Tactical Edition Quickly | Dr.fone
- Authentication Error Occurred on Lava Yuva 3 Pro? Here Are 10 Proven Fixes | Dr.fone
- Fix Cant Take Screenshot Due to Security Policy on Realme GT Neo 5 SE | Dr.fone
- Gmail Not Working on Oppo Find X6 7 Common Problems & Fixes | Dr.fone
- 8 Workable Fixes to the SIM not provisioned MM#2 Error on Motorola Edge 2023 | Dr.fone
- Fixing Persistent Pandora Crashes on Realme Narzo 60 Pro 5G | Dr.fone
- 6 Solutions to Fix Error 505 in Google Play Store on Xiaomi Redmi K70 Pro | Dr.fone
- Fixing Persistent Pandora Crashes on Meizu 21 | Dr.fone
- Fix Cant Take Screenshot Due to Security Policy on Realme Note 50 | Dr.fone
- What To Do if Your Samsung Galaxy F54 5G Auto Does Not Work | Dr.fone
- Calls on OnePlus Nord N30 5G Go Straight to Voicemail? 12 Fixes | Dr.fone
- 4 Solutions to Fix Unfortunately Your App Has Stopped Error on Honor 90 GT | Dr.fone
- 8 Ultimate Fixes for Google Play Your Motorola G54 5G Isnt Compatible | Dr.fone
- What to Do if Google Play Services Keeps Stopping on Vivo Y200 | Dr.fone
- New Top 10 Text-to-Video AI Generators to Create Engaging and Captivating Videos
- In 2024, How Can I Catch the Regional Pokémon without Traveling On Samsung Galaxy A15 4G | Dr.fone
- Guide to Mirror Your Honor Magic 6 to Other Android devices | Dr.fone
- A Comprehensive Guide to Apple iPhone 15 Pro Max Blacklist Removal Tips and Tools
- Add Emojis to Videos on YouTube/Facebook/Snapchat Step by Step Guide for 2024
- In 2024, How To Unlock iPhone 6s Plus Without Passcode? 4 Easy Methods | Dr.fone
- New 2024 Approved Working Through the Details of iMovie Slow Motion Video Making 100 Effective
- In 2024, How to Unlock Apple ID On your Apple iPhone 8 without Security Questions?
- 2 Ways to Monitor Apple iPhone 11 Pro Max Activity | Dr.fone
- 4 Methods to Turn off Life 360 On Tecno Camon 30 Pro 5G without Anyone Knowing | Dr.fone
- New In 2024, Kapwing Online Editor Trim and Refine Your Videos in Minutes
- Pokémon Go Cooldown Chart On Apple iPhone 13 mini | Dr.fone
- In 2024, Top 9 Motorola Razr 40 Monitoring Apps for Parental Controls | Dr.fone
- A Step-by-Step Guide on Using ADB and Fastboot to Remove FRP Lock on your Infinix Note 30 VIP Racing Edition
- 2024 Approved Unleash Your Childs Creativity 10 Best Video Editing Apps
- In 2024, Android Unlock Code Sim Unlock Your Xiaomi Redmi Note 12 4G Phone and Remove Locked Screen
- 5 Most Accurate Aspect Ratio Calculators You Can Trust for 2024
- In 2024, Various Methods to Transfer Pictures from Apple iPhone 12 mini to PC | Dr.fone
- In 2024, How To Change Country on App Store for Apple iPhone 11 Pro Max With 7 Methods | Dr.fone
- In 2024, How to Fake Snapchat Location on Apple iPhone X | Dr.fone
- The Updated Method to Bypass Oppo A2 FRP
- Updated 2024 Approved Tutorial Guide to Animate Pictures in Canva
- In 2024, How to Stream Apple iPhone 14 Video to Computer? | Dr.fone
- Remove FRP Lock on GT 5 (240W)
- In 2024, 3 Easy Ways to Factory Reset a Locked Apple iPhone 15 Pro Without iTunes
- A Detailed VPNa Fake GPS Location Free Review On Apple iPhone 6s Plus | Dr.fone
- Online Vertical Video Editing Made Easy Top Tools
- 5 Solutions For Honor X8b Unlock Without Password
- In 2024, What Legendaries Are In Pokemon Platinum On Nokia C110? | Dr.fone
- Updated Ever-Changing Era of AI Video Translation A Reality to Be Fulfilled
- In 2024, 5 Easy Ways to Copy Contacts from Tecno Camon 20 to iPhone 14 and 15 | Dr.fone
- 3 Best Tools to Hard Reset Samsung Galaxy S23 Tactical Edition | Dr.fone
- In 2024, How and Where to Find a Shiny Stone Pokémon For Vivo Y200e 5G? | Dr.fone
- New The Ultimate List of Stop Motion Animation Programs for Mac and PC for 2024
- Updated In 2024, Live Selling A Comprehensive Starters Guide
- How To Repair System Issues of iPhone 15? | Dr.fone
- In 2024, 3D LUT Mobile App Review - A Composite Application for Editing Media
- Ultimate Guide on Apple iPhone 15 Plus iCloud Activation Lock Bypass
- How to Access Your Apple iPhone 13 Pro When You Forget the Passcode? | Dr.fone
- The way to get back lost data from Gionee F3 Pro
- In 2024, How to Change/Add Location Filters on Snapchat For your Nubia Red Magic 8S Pro+ | Dr.fone
- In 2024, The 6 Best SIM Unlock Services That Actually Work On Your Motorola Moto G34 5G Device
- In 2024, Pattern Locks Are Unsafe Secure Your Samsung Galaxy Z Fold 5 Phone Now with These Tips
- In 2024, Two Ways to Track My Boyfriends Lava Yuva 3 Pro without Him Knowing | Dr.fone
- A Complete Guide To OEM Unlocking on Honor Play 7T
- In 2024, How Do I Stop Someone From Tracking My Meizu 21? | Dr.fone
- Title: 6 Solutions to Fix Error 505 in Google Play Store on Vivo X90S | Dr.fone
- Author: Ariadne
- Created at : 2024-04-30 09:42:14
- Updated at : 2024-05-01 09:42:14
- Link: https://howto.techidaily.com/6-solutions-to-fix-error-505-in-google-play-store-on-vivo-x90s-drfone-by-drfone-fix-android-problems-fix-android-problems/
- License: This work is licensed under CC BY-NC-SA 4.0.
