
6 Solutions to Fix Error 505 in Google Play Store on Xiaomi Redmi 13C | Dr.fone
6 Solutions to Fix Error 505 in Google Play Store on Xiaomi Redmi 13C
In case you are receiving the error code 505 while downloading an application from Google play store and have no clue what is it, then this is the right article for you. In this article we are covering the reasons behind the occurrence of Google play error 505. Not only that, we are also providing 6 solutions to fix the error code 505. Usually, this error is seen with Android 5.0 Lollipop version and occurs at the time when you try to install the already downloaded application making it hard to run the app.
Such an error is a kind of permission error. That is, in case you have two similar kinds of applications such as banking apps and both looking for similar kind of permission, causes conflict error named as error 505.
The occurrence chance is more in the old operating systems, 4 KitKat, Android version 4. Let us then proceed to know more about this error 505.
Part 1: Reasons for Google Play error 505

As per the report by some users, error 505 occurs in certain apps such as Weather App, SBI, ITV, Adobe Air 15, We Chat etc.
To have the right idea about the problem, we have listed all the reasons of it occurrence below:
- Google play store is not updated or refreshed (Causes the error during the downloading process)
- Due to installation of an outdated version (In case your Android version is outdated may result in error in the installation process)
- Cache memory(Is the redundant data occurs due to search history)
- Application is not compatible with the Android OS (If the app you are downloading is not the updated may cause error)
- Adobe air app
- Data crash (Many time app or Google play store crashed crashes after downloading it, reason may be some bugs, so many apps are open, less memory etc.)
Now that we know the reasons, let us also learn about the solutions that will guide you to resolve the error code 505.
Part 2: 6 Solutions to fix error code 505
Any error that occurs during downloading or installation process not only hinders with the new app but also takes a large amount of our time to solve the issue. To check that, let us go through the 6 solutions one by one.
Solution 1: One click to make error code 505 disappear
The most common cause for error code 505 pop-up is that Android system files that underpin the Google Play module are corrupted. To make error code 505 disappear in this condition, you should have your Android system repaired.

Dr.Fone - System Repair (Android)
One click to repair Android system and make error code 505 disappear
- Fix all Android system issues like error code 505, error code 495, error code 963, etc.
- One click to fix error code 505. No technical skills required.
- Supports all the new Xiaomi Redmi 13C devices like Galaxy S8, S9, etc.
- Easy-to-understand instructions provided on each screen.
4,999,459 people have downloaded it
Now, you just need to follow these Android repair steps to fix error code 505:
Note: Android repair needs to flash the system firmware, which may erase existing Android data. To prevent data loss, back up all the important data from Android to PC .
Step1: Download the Dr.Fone - System Repair (Android) program , install and launch it. The following interface will pop up.

Step2: Select the “Android Repair” among the 3 tabs, connect your Android to PC, and click “Start”.

Step3: Choose the correct device details from each field, confirm them and continue.

WPS Office Premium ( File Recovery, Photo Scanning, Convert PDF)–Yearly

Step4: Boot your Android in download mode, then start downloading the firmware of your device.

Step5: After the Xiaomi Redmi 13C device firmware is downloaded, the tool will start repairing your Android.


Step6: When your Android is repaired, the error code 505 will disappear.

Solution 2: Check whether Download Manger is ON or not
Many times download manager is set to disable due to which you are not able to download or install the app. So, it is required to make a check whether the download manager is set on or off. So that your installation process will work properly. The process to enable the download manager is as follows.
>Go to Settings
>Select the Application Manger or App (Option depends upon the Xiaomi Redmi 13C device)
At the top, an option will appear
>Swipe right till you locate Download manager at top of the screen of the Xiaomi Redmi 13C device
>Then Select Enable

Enabling download manager to give permission to the Xiaomi Redmi 13C device to start the download or installation process.
Solution 3: Updating to the latest version of OS of your Xiaomi Redmi 13C
Working with an old operating system is ok, but many times old version also creates some problem and is the main reason behind the occurrence of any bug or error. So, updating the older version act like a rescue to get rid of any such issue or bug. The Process of updation is quite simple; you just need to follow the below steps and your device is ready to get updated to the latest version. Steps are:
- >Go to Settings
- >Select about Phone
- >Click on System Update
- >Check for updates
- >Click on Update
- >Need to click on Install (if any update is available)

Solution 4: Clearing the cache memory from Google services Framework and Google play store
While browsing data online or through Google play store some cache memory get stored for the fast access to the pages. Below mentioned simple steps will help you in clearing out the cache memory from Google services framework and Google play store.
Process to clear the Cache memory for Google Services Framework
- >Go to Settings
- >Select Applications
- >Click on Manage Applications
- >Click to select ‘ALL’
- >Click on Google services framework
- >Select ‘Clear data and clear cache’
That will remove the cache memory of your Google services framework
Steps to Cache memory of Google Play Store
- >Go to Settings
- >Applications
- >Manage Applications
- >Click to select ‘ALL’
- >Select Google Play store
- >Clear data and clear cache
It will clear the cache of Google play store

Clearing the cache memory remove the extra temporary memory, thus free up space for the further installation process.
Solution 5: Reinstalling play store Updates
The reason behind the installation error code 505 might be Google play store updates.
Due to continuous updation of new apps and services Google Play store used to be flooded with so many updates or sometimes does not updated properly. That sometimes caused the problem in dealing with app installation. Resolving the issue is important to make your play store ready for future updation and installation.


- >Go to Settings
- >Visit Application Manager or Apps
- >Select Google Play Store
- >Click on Uninstalling Updates
- >A Message will appear ‘Change play store app to factory version’- Accept it
- >Now Open Google play store>It will refresh the updates within 5 to 10 minutes(So you need to keep your internet connection on while Google play store is updating its store for new updates.)

Solution 6: Third party App
In the case, error 505 occur due to the installation of two or more apps with duplicate permission of data, as many times we use to install two similar kind of app that creates the situation where both seeking out for somewhat similar permissions for the installation. The manual finding is a long and tiring process. Then you can take the assistance of ‘Lucky Patcher App’ to find out which app is creating the conflict. This app will assist you in finding out the duplicity if any and then modifying it. Through this app, once you will find out which particular app is causing the conflict, then you can delete that conflicting app from your phone so that problem of error code 505 gets sort out.
Download link: https://www.luckypatchers.com/download/
 The Tube Sites Submitter is a fast and efficient tool for anyone who needs to upload videos quickly, easily and automatically to hundreds of tube sites in mere minutes .
Note: If still, you are in the state of trouble to solve the issue of error code 505 then Google Play help center is here to look out all troubles related to app store and its service. You can check out the details by visiting the following link:
https://support.google.com/googleplay/?hl=en-IN#topic=3364260
Or call them at their call center number regarding the issue.

Bonus FAQ about Google Play error
Q1: What is a 505 error code?
The HyperText Transfer Protocol (HTTP) error 505: HTTP Version Not Supported response status code means that the HTTP version used in the request is not supported by the server.
Q2: What is a 506 error?
The 506 error code is a frequent error when operating the Google Play Store. You will sometimes see this error code when you are downloading an app. The app may seem to be downloading just fine when suddenly, near the end of the installation, an error occurs, and a message pops up saying, “App could not be downloaded due to an error 506.”
Q3: How to fix the 506?
Solution 1: Restart your device which can help solve most problems.
Solution 2: Remove the SD card safely.
Solution 3: Correct date and time if it is wrong.
Solution 4: Add your Google Account again.
Solution 5: Clear Google Play Store data and cache.
However, sometimes the five simple couldn’t work anymore. A system repair software can be helpful quickly. We really recommend the Dr.Fone - System Repair (Android) , only a few minutes, the error will be fixed.
Conclusion
Not being able to download or install the app is very frustrating and time-consuming also. Therefore, in this article, we went through the reasons behind the occurrence error code 505 as well as resolving the issue by following five effective methods. I hope that you would be able to sort out the error 505 by following above methods thus would be able to install the application without further delay.
 Allavsoft Batch Download Online Videos, Music Offline to MP4, MP3, MOV, etc format
Xiaomi Redmi 13C Camera Not Working Unexpected Error? Fix It Now
For all its glory and goodness, the Android OS often has its users pulling their hair in frustration at just how buggy the OS can be at times. So, if you’re having one of those days today, we are here to help. Camera app is one of the most used apps on smartphones today. People only launch the app when they want to take a photo, for everything else there’s a dedicated photo gallery app. What happens when you launch the camera app only to realize it threw an error and you missed your photo moment? Don’t throw the phone, not yet. Let us help you out.

Part I: Why Is Android Camera Not Working?
There are a few reasons why the camera app is not working on your Xiaomi Redmi 13C.
Low Memory
Camera app does rely heavily on system resources, so in case you have too many apps open and for some reason the OS is not able to manage the resources appropriately for the camera app to function as it should, you will get a camera error.
Low Storage
The camera app needs storage space to save the photos it takes. So, in case your phone is running low on storage space, the camera app would likely malfunction as it would have no way to store the photos it would be taking.
General Bugs And Glitches
OS bugs and general glitches within the OS and the camera app can cause camera not working issue anytime during everyday operation. This is part and parcel of any technology.
Hardware Issues
In the rarest cases, there might have developed an actual hardware issue with the camera system on your Xiaomi Redmi 13C. The likely culprit is misuse and abuse, such as a dropped phone or maybe the phone was too hot for extended periods of time, causing hardware issues.
 Greeting Card Builder
Part II: How To Fix Android Camera Not Working Issue?
So, how to get the Android camera not working problem solved? There are a few ways you can try fixing the camera not working issue on your Xiaomi Redmi 13C right where you are, without needing to take the Xiaomi Redmi 13C device to the manufacturer’s service center.
 DEX 3 RE is Easy-To-Use DJ Mixing Software for MAC and Windows Designed for Today’s Versatile DJ.
Mix from your own library of music, iTunes or use the Pulselocker subsciprtion service for in-app access to over 44 million songs. Use with over 85 supported DJ controllers or mix with a keyboard and mouse.
DEX 3 RE is everything you need without the clutter - the perfect 2-deck mixing software solution for mobile DJs or hard-core hobbiests.
PCDJ DEX 3 RE (DJ Software for Win & MAC - Product Activation For 3 Machines)
II.I: Restart The Handset
One of the first things to do any time an app or your phone or tablet does not work like it should, restarting the Xiaomi Redmi 13C device refreshes everything just enough to resolve most commonly occurring issues.

Use the power button on your smartphone to restart your Android handset and see if this resolves the issue.
II.II: Close And Relaunch The Camera App
If the camera app (or any app for that matter) has been in the background for a while and then it is brought to the foreground, there are always chances of it crashing for any reason, or not working as expected. So, closing the app completely and relaunching it is recommended.
Step 1: Launch the app switcher on your specific Android device the way your device manufacturer suggests you to. Usually, it is a swipe up and hold gesture to get into the app switcher.
 With Screensaver Wonder you can easily make a screensaver from your own pictures and video files. Create screensavers for your own computer or create standalone, self-installing screensavers for easy sharing with your friends. Together with its sister product Screensaver Factory, Screensaver Wonder is one of the most popular screensaver software products in the world, helping thousands of users decorate their computer screens quickly and easily.
Step 2: Next, you can choose to close just the camera app or, better yet, close all apps by tapping the Close All button. Flicking any app upwards (quick upward swipe) is how you close an app. If there is no Close All button anywhere, repeat the gesture for all open apps.
II.III: Check App Permissions
These days, thanks to strides in the privacy initiatives, apps need permissions before they can function the way they do. Most of the times, apps such as camera do have the necessary permissions, but sometimes it is possible that the permissions are set incorrectly. To check if the camera app has the requisite permissions, do the following:
Step 1: Go to Settings > Apps > Camera > Permissions.


Step 2: Tap Camera.

Step 3: See if the selected option is Allow Only While Using This App. If not, select it.
II.IV: Clear The Camera App Cache
Clearing the camera app cache is sometimes helpful. To do that:
Step 1: Go to Settings > Apps > Camera and tap Storage Usage.


Step 2: Tap Clear Cache.

II.V: Clear The Photo Gallery App Cache
The camera app is closely tied to the photo gallery app that comes baked in into Android OS. That is because photos that the camera app takes are stored in the photo gallery app. Consequently, if there were any issues in the photo gallery app, that could lead to the camera app not working on Android problem. Here’s how to clear the photo gallery app cache:
Step 1: Go to Settings > Apps > Photos > Storage Usage.

Step 2: Tap Clear Cache.
II.VI: Check For App Updates
This does not happen always, but sometimes, with known bugs and issues, there may be an update released that fixes those bugs and issues that prevent some users from using a given app reliably. Checking for updates is a good step to make sure that your camera app is updated to the latest version possible.
Step 1: Go to Play Store and tap your profile picture on the right.
 NeoDownloader - Fast and fully automatic image/video/music downloader.

Step 2: Tap Manage Apps and Device.
 Easy GIF Animator is a powerful animated GIF editor and the top tool for creating animated pictures, banners, buttons and GIF videos. You get extensive animation editing features, animation effects, unmatched image quality and optimization for the web. No other GIF animation software matches our features and ease of use, that’s why Easy GIF Animator is so popular.
Step 3: If there are updates available, Tap Update All to update all apps.
II.VII: Cool The Phone Down
We do not realize the immense power that is packed into the thin smartphone form factor these days. If you have been using the phone to video chat for a while now, you might not realize that the phone has become hot, especially if you are using a desk stand. Same for shooting high-resolution videos; the phone does get quite hot shooting high-resolution videos.
If this is the case, close all apps and let the phone cool down. You might even want to shut the phone off to help cool it faster.
II.VIII: Nudge The Camera System
You may want to tap your camera system (the lenses and surrounding area) gently to see if that gets the camera working. In case it did, this is indicative of a hardware issue, and you should get it checked at the service center at your earliest convenience.
II.IX: Fix Android Camera Not Working Issue In One Click (With Dr.Fone)
Now, if the above fixes have not worked, you might want to repair your Android OS once before you make that appointment with the service centre. And, we have just the app to help you fix your camera not working on Android problem quickly.
Wondershare Dr.Fone is a multi-module app that works on both Windows and macOS and is the only app you will ever need to resolve nearly all of your smartphone and tablet issues that you are likely to encounter. Need to take backups? Dr.Fone Phone Backup has you covered with the ability to take and restore even selective backups, and to any location such as your computer or an external disk as well. Want to transfer WhatsApp chats to a new phone? Use WhatsApp Transfer to do just that! Bought a new phone? Use Phone Transfer to transfer contents from old phone to new, and then use Dr.Fone Data Eraser to securely wipe your old phone before giving it away!
Today, we will use Dr.Fone’s System Repair (Android) module to fix Android camera not working issue quickly.
Download Dr.Fone here.
 safe & secure
Step 1: Launch Dr.Fone app on your PC or Mac.
Step 2: Click System Repair module and then Android.

Step 3: For now, don’t bother with the scenarios given and click Start to go to the next screen.
Step 4: Your Android device will be detected by Dr.Fone. If anything seems incorrect, use the dropdown options to change it, and click Next.
 Lyric Video Creator Professional Version
Step 5: Your phone needs to be put into Download mode before it can be repaired. Follow the instructions shown onscreen and click Next.

Step 6: Dr.Fone automatically downloads the most recent firmware for your device and when it is ready, waits for your input. Click Fix Now to start the repair process.

Step 7: You will need to enter a 6-digit code (digit zero, six times – 000000) to confirm and begin the repair process.

When the repair is complete, Dr.Fone shows the final screen as below:

safe & secure
 vMix 4K - Software based live production. vMix 4K includes everything in vMix HD plus 4K support, PTZ control, External/Fullscreen output, 4 Virtual Outputs, 1 Replay, 4 vMix Call, and 2 Recorders.
Conclusion
The camera app on your smartphone is one of the most important apps you use. This is not a game; this is an app that makes previous memories possible for you. So, when you get any of those incorrigible errors that are impossible to make sense of, what do you do? This guide gives you 9 fixes to fix Android camera not working error quickly and easily.
Top 10 Fixes for Phone Keep Disconnecting from Wi-Fi On Xiaomi Redmi 13C
The revolutionized world is about the internet, online life, and social media. You can get all the information you need from the internet. You are a click away from booking tickets, buying groceries, calling your loved ones, or even you can handle office meetings with the internet.

Since everything revolves around the internet, it’s annoying if your WI-FI disconnects. You might question yourself why does my Wi-Fi keep disconnecting from the phone? To know the answer, read the article below.
Part 1: Why Does Your Phone Keep Disconnecting from WiFi?
Is your phone frequently getting disconnected from Wi-Fi? Or the internet service is lagging? We have a few options from which you can inspect your problem. Not all internet issues arise from the service provider, as some issues are because of the Xiaomi Redmi 13C devices that are using the internet. Some of these issues are discussed below for your assistance:
- Router Problems
If the internet provider is doing their job right, the router might not deliver you the right thing. Like other electronic devices, they can also misbehave. This can happen because the router is faulty, or it can happen because the firmware is outdated.
- Out of Wi-Fi Range
Why does My Xiaomi Redmi 13C keep disconnecting from Wi-Fi? It is because you might be out of range! The router’s placement is very important. The router transmits frequencies that have a limited range. If you are moving out of the range, the internet automatically disconnects.
- Wi-Fi Signals Getting Blocked
The signals from the router can dissipate from any other electronic device nearby. Signals like radio and microwaves can interfere with signal strength.
- Devices Connected with Router
Commonly, a house has around a dozen devices connected to the internet router. People do not think that the router has limited connection slots. It is unable to entertain a specific number of requests for service facilitation. The router has limitations; the service quality will drop if the limitations are exceeded. This drop in quality can also cause internet disconnection from devices.
- Unstable Internet
If your Xiaomi Redmi 13C gets disconnected frequently, then this disconnection is due to unstable internet, but apart from the above-mentioned problems, there is another reason for internet disconnection.
Sometimes, the internet is stable, but it still disconnects. This is because the internet service provider might not send the best quality internet you have acquired it for. If your internet is stable and the phone still keeps disconnecting, then head onto the next part that will share the top 10 fixes to sort out this issue.
Part 2: 10 Ways to Fix Wi-Fi Keep Disconnecting on Phone
As we have mentioned earlier if your Wi-Fi is stable, but it keeps disconnecting from Xiaomi Redmi 13C S22 or other Android phones, the coming section of this article is for you. We will provide you with 10 solutions with complete assistance to fix the “Wi-fi keeps disconnecting Android“ issue.
Fix 1: Restart Your Phone
If the Wi-Fi keeps disconnecting from your Xiaomi Redmi 13C, but the internet is stable, then you should try to fix the issue by restarting your phone. Sometimes, it’s the phone that’s causing a problem, so to resolve it, you can follow the steps given below:
Step 1: Firstly, unlock your phone. Now, press the Power button and hold it for a few seconds.
Step 2: Now, select the ‘Reboot’ option to resolve the issue from the options on the screen.

 PDF application, powered by AI-based OCR, for unified workflows with both digital and scanned documents.
 Fix 2: Check Router Settings
If your Android keeps disconnecting from Wi-Fi, you can also fix the problem by checking the router settings. This is because your phone might be blocked from connecting to the network, and if this is the scenario, your phone will never maintain the connection. You should check the Router’s admin panel or app to remove your phone from the blocklist.
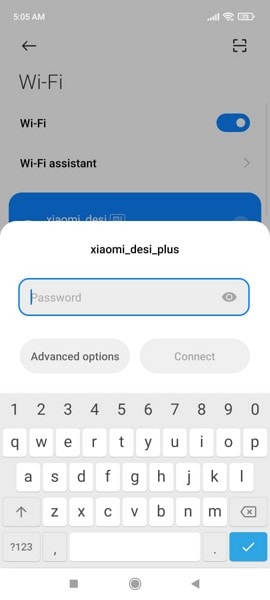
Fix 3: Reconnect to Network
To fix the annoying problem that your Wi-Fi keeps disconnecting, you should try forgetting the network and then reconnecting to it. This could be done easily by following the steps below:
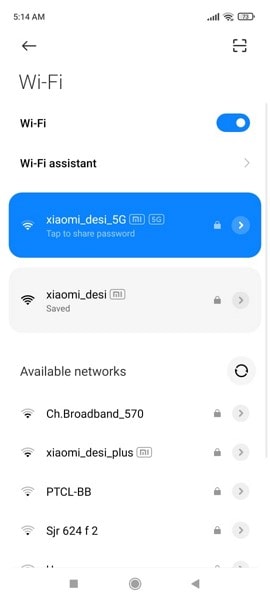
Step 1: First, you need to open the Wi-Fi settings menu. This could be done by pressing and holding the Wi-Fi option from the drop-down menu of your phone until the settings open up.

Step 2: A list of all the Wi-Fi networks will appear on the screen. Select the network that is causing trouble from that list and hit the ‘Forget Network’ option.
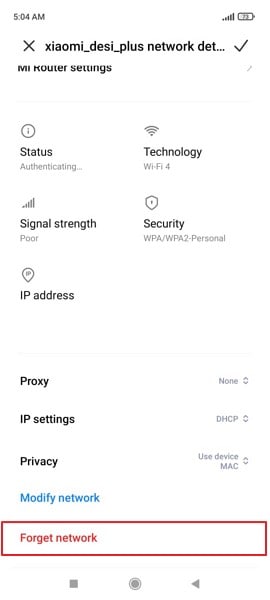
Step 3: After that, you should reconnect to this Wi-Fi network by selecting it from the Wi-Fi list and entering its password.

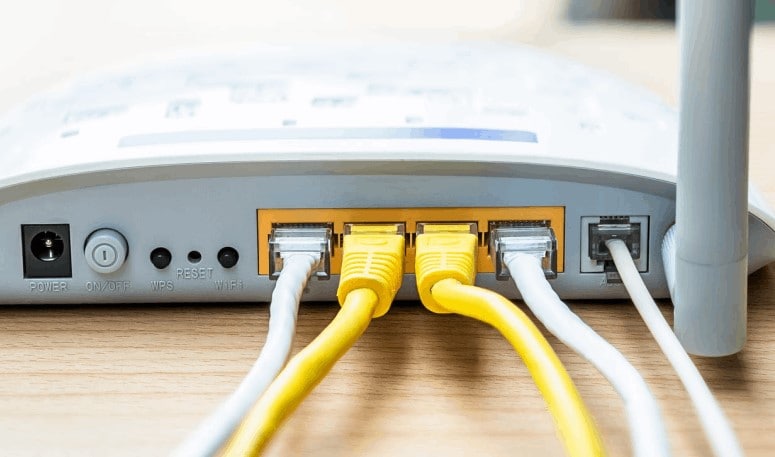
Fix 4: Restart Your Router
As we discussed, to restart your phone, you can also restart the router to get rid of the problem. For this, hit the restart button on the router to get a fresh start. If the Xiaomi Redmi 13C device has no button, disconnect the power supply and plug it back in to connect again. Most internet issues are resolved by restarting the router.
Fix 5: Forget Old Networks
The problem that your Wi-Fi keeps disconnecting can also occur because of the list of networks you have connected to. Having yourselves connected to different set of networks could turn out to be quite problematic in the process. In the process of finding and switching to the best network, your device’s Wi-Fi will continually disconnect and reconnect with the nearby networks. To finish this irritating issue, you should remove and forget all the extra networks that you connected previously.
Step 1: You should start by pressing and holding the Wi-Fi option from the drop-down menu on your phone until the Wi-Fi settings screen appears.

Step 2: You will see a list of all the Wi-Fi networks you have connected to previously. One by one, select each network and hit the ‘Forget Network’ button to remove it.
Fix 6. Check Recently Installed Applications
Sometimes, different installed applications can also cause trouble. If your Wi-Fi was fine, but suddenly it started disconnecting, then don’t forget to check the recently installed apps. This is because with not knowing the damage it can cause, you might have installed some VPNs, connections boosters, or firewalls. You can try and disable them but if that doesn’t resolve the problem, then uninstall the app.
Step 1: For uninstalling the problematic application, you have to select it and hold it. You will see a pop-up menu of multiple options; choose the option of ‘Uninstall’ to remove the app from the phone.
 Screensaver Factory, Create stunning professional screensavers within minutes. Create screensavers for yourself, for marketing or unlimited royalty-free commercial distribution. Make screensavers from images, video and swf flash, add background music and smooth sprite and transition effects. Screensaver Factory is very easy to use, and it enables you to make self-installing screensaver files and CDs for easy setup and distribution. Screensaver Factory is the most advanced software of its kind.
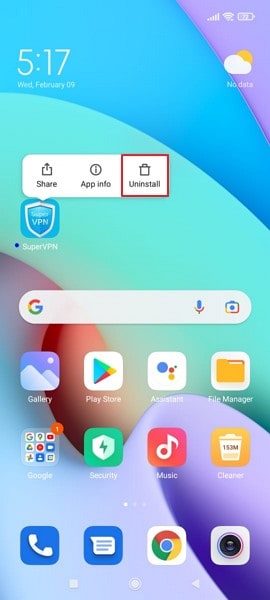
Fix 7: Reset Network Settings on your Phone
It’s annoying that your Wi-Fi keeps disconnecting while you are working or studying. Android users can easily get over this problem by resetting the network settings. The steps for this fix are as follows:
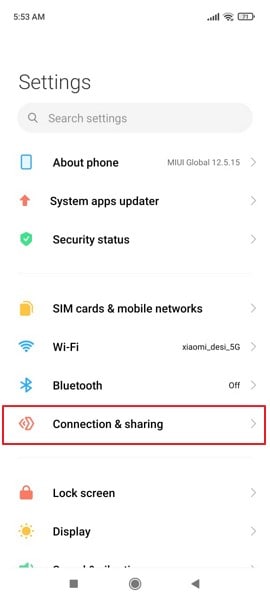
Step 1: For resetting the network, start by opening the ‘Settings’ menu on your phone. Then, scroll down, look for the ‘Connection & Sharing’ option, and select it.
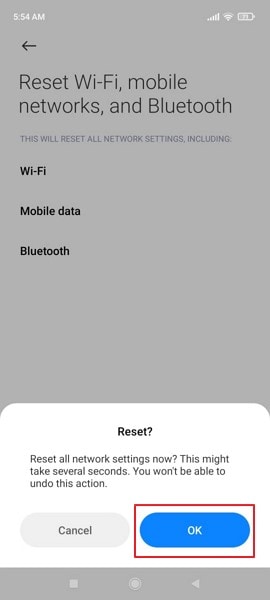
Step 2: As you progress onto a new screen, you will find the option of “Reset Wi-Fi, Mobile Networks, and Bluetooth” in the menu. Select the option to lead to the next window.
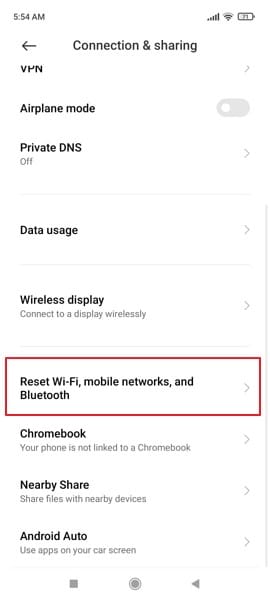
Step 3: Click on the option of “Reset Settings” present on the bottom of the next screen that shows up. Provide confirmation of resetting these settings by inserting your device’s PIN, if any.
 vMix HD - Software based live production. vMix HD includes everything in vMix Basic HD plus 1000 inputs, Video List, 4 Overlay Channels, and 1 vMix Call
Step 4: After providing the appropriate clearances, you will be asked for another confirmation of resetting the Xiaomi Redmi 13C device’s networks to default. Click “OK” to execute.
Fix 8: Check Routers Range
If your Wi-Fi automatically disconnects and connects again while you are roaming in the house, then it is because of the router’s range; you should check it. For this, you can consider changing and modifying your AP (Access Point) band on your router.
Although the 5GHz frequency band is recognized for providing better network speeds, this band has a shorter range as compared to the 2.4GHz band, which has a better coverage of area. You can easily shift your router’s range through its configuration page. It is considered optimal to utilize the 2.4GHz frequency band for better ranges.

Fix 9: Stay Connected while Asleep
Most Android phones have a battery-saving feature. This feature disables the network connections to save the battery of the phone. If this is why the Wi-Fi keeps disconnecting, follow the steps shared below to fix it:
Step 1: Start by opening the ‘Settings’ menu on your phone. Then scroll down until you find the ‘Battery’ option and open it.

Step 2: Then, from the battery screen, hit the ‘More Battery Settings’ options. Then, you will see the ‘Stay Connected while Asleep’ option; turn it on.


Fix 10: Upgrade Router Firmware
If none of the above-shared fixes work, the last fix to resolve the problem is upgrading your router firmware. For this, you should contact any professional who knows network operations as upgrading router firmware takes time and requires knowledge.
Wi-Fi Stay Connected
The article above has discussed 10 solutions that offer a comprehensive toolkit to tackle the persistent issue of Wi-Fi keeps turning off Android. By toggling Airplane Mode, restarting your device, adjusting settings, and updating firmware, among other steps, you can effectively address and resolve this connectivity problem. With these solutions at your disposal, you can regain a stable and uninterrupted Wi-Fi experience on your Xiaomi Redmi 13C.
- Title: 6 Solutions to Fix Error 505 in Google Play Store on Xiaomi Redmi 13C | Dr.fone
- Author: Ariadne
- Created at : 2024-07-30 07:50:04
- Updated at : 2024-07-31 07:50:04
- Link: https://howto.techidaily.com/6-solutions-to-fix-error-505-in-google-play-store-on-xiaomi-redmi-13c-drfone-by-drfone-fix-android-problems-fix-android-problems/
- License: This work is licensed under CC BY-NC-SA 4.0.