
7 Fixes for Unfortunately, Phone Has Stopped on Nokia G310 | Dr.fone
7 Fixes for “Unfortunately, Phone Has Stopped” on Nokia G310
Encountering issues with the Phone app is never welcoming. Being one of the useful apps, seeing it crashing and unresponsive gives sheer despondency. If talked about the triggering points, they are numerous. But the central point is what to do when the Phone app keeps crashing. In this article, we have discussed this issue in detail. To know this and more about why the “Unfortunately, Phone has stopped” error crops up, read this article and get the problem sorted on your own.

Part 1: When can the “Unfortunately, Phone has stopped” error come?
First things first! You need to stay updated on why the Phone app keeps stopping or crashing before jumping to any solution. Following are the points when this error comes up to annoy you.
- When you install a custom ROM, the issue might occur.
- The upgrading of the software or incomplete updates can lead to crashing the Phone app.
- Data crashes can be another reason why this error shows up.
- Infection through malware and virus on your phone is also included when the Phone app might crash.
Part 2: 7 Fixes for the “Unfortunately, Phone Has Stopped” error
 Project Manager - Asset Browser for 3Ds Max
2.1 Open the Phone app in Safe Mode
First and foremost, the thing that can let you get rid of this trouble is Safe Mode. It is a feature that will end any excessive background functioning of the Nokia G310 device. For instance, your device will be able to run sans any third-party apps when in Safe mode. Since the important functions and the naïve apps will be running on the Nokia G310 device, you will get to know if it’s really a software glitch or not by running the Phone app in Safe mode. And this is the first solution we would recommend you make use of when the Phone app has stopped. Here is how to enable Safe Mode.
- Switch off the Nokia G310 phone first.
- Now keep pressing the “Power” button until you see the Nokia G310 logo on the screen.
- Release the button and immediately press and hold the “Volume Down” key.
- Leave the key once the Nokia G310 device is in Safe mode. Now, the third-party apps will be disabled and you can check if the Phone app is still not responding or everything is fine.
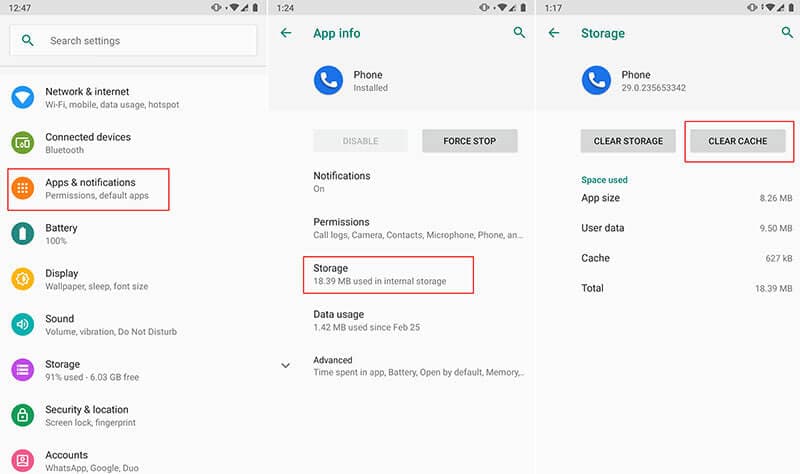
2.2 Clear the cache of the Phone app
The cache should be cleaned timely if you want any app to work properly. Due to the constant usage, the temporary files get collected and may corrupt if not cleared. Hence, the next solution you should try when the Phone app keeps stopping is to clear the cache. Here are the steps to be performed.
- Open “Settings” on your device and go to “Application” or “Apps”.
- Now from the list of all applications, go to “Phone” and tap on it.
- Now, click on “Storage” and choose “Clear Cache”.

2.3 Update Google Play services
Since Android is created by Google, there must be some Google Play services that are crucial to run several system functions. And if attempting the previous methods isn’t of any use, try updating Google Play services when you find the Phone app stopped. For doing this, you need to make sure that automatic updates are turned on in Google settings. If not, enable it and get the apps including Google Play services updated for smoother functions.
2.4 Update the Nokia G310 firmware
When the firmware is not updated, it may conflict with some apps and maybe that’s why your Phone app falls prey. Therefore, updating Nokia G310 firmware will be a sane step that should be taken when the Phone app has stopped. Follow the below-mentioned steps and then check if the Phone app is opening or not.
- Open “Settings” and go to “About Device”.
- Now tap on “Software Updates” and check for the availability of the new update.

- Download and install it and then try to use the Phone app.

2.5 Clear partition cache
Here is another resolution for the “Unfortunately Phone has stopped” error. Clearing the partition cache will remove the whole cache of the Nokia G310 device and make it work like before.
- Switch off your device to begin with and enter the recovery mode by pressing the “Home”, “Power” and “Volume Up” buttons.
- The recovery mode screen will appear now.
- From the menu, you need to choose “Wipe Cache Partition”. For this, you can use the Volume keys to scroll up and down.
- To select, press the “Power” button.
- The process will begin and the Nokia G310 device will restart post it. Check if the problem still persists or it is finished. If unfortunately not, get to the next and the most productive solution.

2.6 Get the Nokia G310 system repaired in one click
If still, the Phone app keeps stopping after trying everything, here is the most effective method that can surely help you. Dr.Fone - System Repair (Android) is a one-click tool that promises to repair Android devices hassle-free. Be it apps crashing, the black screen, or any other issue, the tool has no problem fixing any sort of issue. Here are the benefits of Dr.Fone - System Repair (Android).
 vMix 4K - Software based live production. vMix 4K includes everything in vMix HD plus 4K support, PTZ control, External/Fullscreen output, 4 Virtual Outputs, 1 Replay, 4 vMix Call, and 2 Recorders.
 EmEditor Professional (Lifetime License, non-store app)
Dr.Fone - System Repair (Android)
Android repair tool to fix “Unfortunately, Phone Has Stopped” on Nokia G310 devices.
- It takes no special skills to operate it and fairly works to bring the Android system to normalcy.
- It shows great compatibility with all Nokia G310 devices and other Android phones supporting over 1000 Android brands.
- Fixes any kind of Android issue without any complication.
- Easy to use and trusted by millions of users and therefore has a higher success rate.
- Can be downloaded freely and friendly user interface.
3,106,444 people have downloaded it
How to fix crashing Phone app using Dr.Fone - System Repair (Android)
Step 1: Get the Software Installed
Click the “Start Download” button to download the tool on your computer, and then open the program to begin the repair, click on “System Repair”.


Step 2: Plug the Phone with PC
Take your original USB cord and then connect your Nokia G310 to the computer. When the Nokia G310 device is connected, click on “Android” from the two tabs > click “Start”

Step 3: Enter the Details
As the next step, enter some important details on the next screen. Be sure to enter the right name, brand, and model of the Nokia G310 device. When done everything, verify once and click on “Next”.

Step 4: Downloading Firmware
Downloading firmware will be the next step. Prior to this, you have to go through the instructions given onscreen to enter the DFU mode. Please click on “Next” and the program will bring the suitable firmware version and start downloading it.

Step 5: Get the Nokia G310 device Repaired
When you see the firmware has been downloaded, the issue will begin to get resolved. Hang on and wait until you get notified for the repair of the Nokia G310 device.

 safe & secure
2.7 Factory reset
If none of the above methods worked for you, the last resort you are left with is a factory reset. This method will wipe everything from your device and make it function like normal. We also suggest you make a backup of your data if it is important so as to prevent the loss. Here is how to do this to fix the crashing Phone app.
- Open “Settings” and go to the “Backup and Reset” option.
- Look for “Factory data reset” and then tap on “Reset phone”.
- Within a while, your device will go through resetting and boot up to normalcy.

safe & secure
 CollageIt Pro
What to Do if Google Play Services Keeps Stopping on Nokia G310

Is the annoying Google Play Services error constantly popping up on your phone? Is it happening while reading, gaming, or browsing social media?
The error constantly plagues thousands of Android users, and it can be incredibly frustrating when you’re using the phone for something important or doing something entirely unrelated to the Google Play app.
Oddly enough, the “Unfortunately, Google Play Services has stopped.” error isn’t severe – you can fix it with a few general and easy-to-do fixes, a factory reset, or a system repair. Below, you’ll find info about why it’s happening and a list of ten possible solutions.
Why Am I Getting the Message “Google Play Services Keeps Stopping?”
Computers and phones often speak in error codes and apps that stop working. Even minor connectivity issues can cause these problems, leaving you wondering what’s wrong with your device or displaying the “Unfortunately, Google Play Services has stopped working.” error message.
Software errors are another set of problems that can also cause this issue. Namely, an average phone user has at least 40 installed apps, and sometimes these apps don’t play well together. They generate problems or steal resources from each other, such as RAM, causing crashes and errors.
There’s also the issue of wrong app versions. Although each Android phone uses the Android operating system, these systems can be vastly different, and the apps built for them can be made to be phone-specific and only run on a specific phone model.
That’s also the case with Google Play Store and Google Play Services.
Why Google Play Services Keeps Stopping
The Google Play Services keeps stopping error is an infamous one, and it can appear for various reasons and even on brand new phones. However, these causes can be categorized into three groups, which are:
- Network Issues
- Software Errors
- Wrong Play Services Version
Regardless of what’s causing the issue on your phone, we’ve compiled a list of ten possible solutions, and you can find those below.
Solutions to Try When Google Play Services Keeps Stopping
There are many solutions for the issue of Google Play Services that keeps stopping. We’ve listed the most famous and effective ones, and you’ll find them below in no particular order. Try them out and see whether they fix the issue.

1. Do a Factory Reset
A factory reset on any smartphone removes all your data on the phone’s internal storage and can even wipe your SD card clean if you select the option. Before you reset your phone to factory settings, ensure you’ve backed up all your essential apps and files. When you’re ready, you can do a factory reset by following these steps:
- Step 1: Go into Settingsand search for “reset.”
- Step 2: Choose Factory reset.
- Step 3: Tap the Erase all dataor Reset device at the bottom, whichever button is there.


- Step 4: Input your password and confirm the action.
Your phone will now restart and start the reset process. Once the factory reset completes, your phone will look brand new, and you’ll need to install all your apps again. Moreover, your Google Play Services app will likely get fixed by this, too.
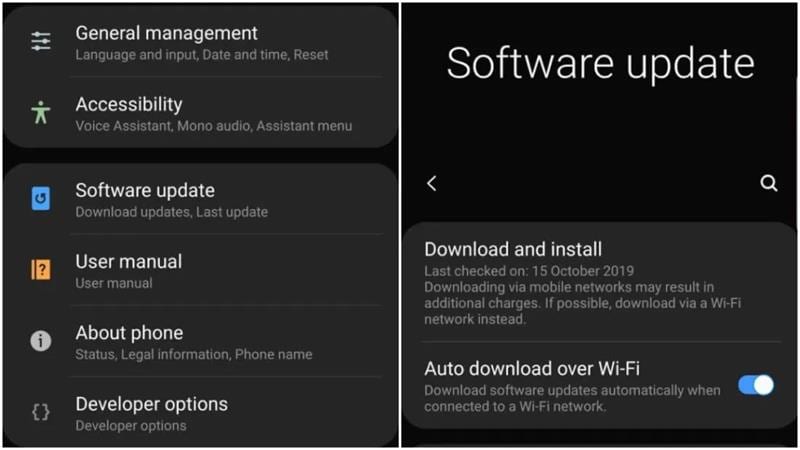
2. Update Your System
As keeping your phone’s system and apps updated to the latest possible version is essential and recommended for the best performance and highest efficiency, you can try updating it to see whether it fixes your Google Play Services error. Here’s how:
- Step 1: Open the Settings
- Step 2: Head into System> System update.
- Step 3: If there’s an update available, click it and go through the process of updating your phone’s system.
Restarting your phone after an update, even if it doesn’t restart itself, is highly advisable, ensuring that the new updates apply without issues.
3. Revert to the Previous Version
As we’ve discussed the wrong Play Services versions above, it’s worth noting that sometimes even the developers can make mistakes and roll out the wrong version for your phone. So, if you notice that the phone is getting the error after you’ve updated Google Services or the Play Store, you can quickly revert to the previous version, and here’s how:
- Step 1: Head into Settings> Apps > Google Play Services.
- Step 2: Press the Disablebutton at the bottom of the screen.
- Step 3: Restart the phone, repeat the process by clicking Enablethis time, and restart the phone again.
As these are system apps, you can’t remove them from the phone, and disabling them will only remove the updates, leaving you with a base version that came with your phone out of the box.
4. Uninstall the App’s Updates and Reinstall
Like reverting to the previous version, you can also try reinstalling updates to fix the Google Play Services has stopped working error. The process is similar to the one above, but we’ve still included the steps. Here’s how you can do that:
Step 1: Go into Settings> Apps and find Google Play Services.
Step 2: Tap it and press Uninstall Updatesat the bottom.
Step 3: Exit the Settingsapp and restart the phone.
Step 4: Open the Play Storeapp and head into the app’s settings by clicking your profile icon. Then scroll to the bottom, and tap Settings.
Step 5: Find and tap the Play Store versionto update your Google Play Services.

As you’re already there, you might as well update all other apps after you tap Manage apps & device. That will ensure that older and not-up-to-date apps aren’t causing the issue.
5. Check Storage
Believe it or not, one of the leading causes of the Google Play Services issue is a phone overfilled with apps. Namely, if you have insufficient storage, the Google Play Store app will likely crash and display errors such as “Unfortunately, Google Play Services has stopped working.”
Head into your phone’s Settings and select Storage to see how your phone’s doing storage-wise. Deleting a few apps you don’t use and transferring your photo and video library to a PC is highly advisable if your phone’s storage space lacks gigabytes.
6. Do a System Repair
Although the other solutions here are general fixes that might help, a system repair might take a bit longer but will undoubtedly fix your issue. You can use the Wondershare Dr.Fone app to repair the system and eliminate the annoying “Unfortunately, Google Play Services has stopped working” error.
Moreover, Dr. Fone works on Android and iOS devices and can fix various phone issues, including boot loops, a white screen of death, a stuck phone, etc. That’s why we’ve included a guide on using it for an Android phone issue. Here’s how:
- Step 1: Launch the Wondershare Dr.Fone app on your PC and head into Toolkit> System Repair > Android.
 Allavsoft Batch Download Online Videos, Music Offline to MP4, MP3, MOV, etc format

Step 2: Select the type of issue you want to fix > Start.
Step 3: Select the make and model of your phone so that Dr.Fone can find the appropriate Android software.
Step 4: Connect the phone to the PC via a USB cable and follow the on-screen instructions to put the phone into Download Mode. The instructions are available for both phones with and without the home button.
Step 5: Select the appropriate Android firmware, download it, and hit Fix Nowafter it downloads.


Step 6: Enter the code and hit Confirmto continue the system repair process. When it’s done, click the Done

That’s all it takes to do a system repair with Wondershare Dr.Fone. Give the software a few minutes to complete, during which your phone might restart a few times. Once it’s done, your Google Play Services app will undoubtedly work.
 Any DRM Removal for Win:Remove DRM from Adobe, Kindle, Sony eReader, Kobo, etc, read your ebooks anywhere.
7. Clear Cache
The easiest and the most obvious fix for many Android apps is clearing the app’s cache. Here’s how you can do that for Google Play Services and Google Play Store:
Step 1: Go into Settings> Apps and find the Google Play Store
Step 2: Tap Storageand hit the Clear cache
Step 3: Repeat the process for the Google Play Services

If this doesn’t work, move on to another possible fix.
8. Check Date and Time Settings
Oddly enough, the Google Play Services app is prone to failure because of an incorrectly set time or date. That’s because Google’s servers constantly check these settings before issuing updates to the Nokia G310 devices, so you’ll need to ensure they’re correct beforehand. Here’s how:
Step 1: Head into Settings> System > Date & Time.
Step 2: Ensure that both “**Use network–provided time” and “Use network-provided time zone**” are toggled on.
Step 3: If this doesn’t work, you can try repeating the process and manually setting the time and the time zone.

Once you check or change these settings, try using the Google Play Store app and check whether the issue is fixed. Restarting the phone after changing the settings is also highly advisable.
 Forex Robotron Basic Package
9. Troubleshoot Your Internet Connection
Another regularly overlooked troublemaker is a poor internet connection. That’s because most apps nowadays are meant to work in online mode only, and losing connection or using a bad one interferes with the app’s functionality.
To test the internet connection on your Nokia G310, you should open a browser and head to a random internet page to see if it’s opening and whether there are any delays. If it’s working fine, your internet connection isn’t the problem.
10. Adjust Google Play Services Permissions
Although permissions rarely change, they can cause issues if you change them accidentally. These settings can be found in the same place where you would uninstall updates or clear the app’s cache, so you can use some of the steps mentioned above to check them.
Once inside Permission Settings, check whether the Google Play Services and Play Store apps have sufficient permission to do their jobs and whether any required permissions were recently removed. If so, grant these two apps their permissions back.
safe & secure
4,953,228 people have downloaded it
Conclusion
Although it’s an incredibly frustrating error, the “Unfortunately, Google Play Services has stopped” message is more annoying than serious. We’ve explained why it happens, but we’ve also given you a list of solutions to fix it.
Our list includes various fixes, from simple ones, like deleting the app’s cache and ensuring your network works fine, to more serious ones, like doing a factory reset. Alternatively, you can do a system repair with the help of Wondershare Dr.Fone, which will certainly fix the problem, but it might be a bit more complicated than cache deletion.
How to Fix the Soft Bricked Nokia G310?
Bricked phone is a serious problem, as your brick smartphone could be suffering from a soft brick or hard brick problem, and must be dealt with carefully. It is very common to see a brick smartphone these days. If you are wondering what exactly is a bricked phone, here is your answer.
A bricked phone, hard brick or soft brick, is a smartphone which refuses to start or boot all the way up the home/main screen of the Nokia G310 device. This issue is observed within most Android phones because users have a tendency to tamper with the Nokia G310 device settings, flashing new and customized ROMs and tweaking with the essential files. Playing around with the phone’s internal set-up leads to such errors, worst of them being a brick smartphone. Usually, a bricked phone does not switch on and stays frozen at the Nokia G310 device logo, a blank screen or even worse, doesn’t respond to any command, even the power on command.
If you are confused about the soft brick and hard brick problems and looking for solutions to fix your priced phone, then here is all you need to know.
Read on to find out more.
Part 1: What is the difference between soft brick and hard brick?
To begin with, let us understand the basic difference between a soft brick and hard brick issue. Both versions of a bricked phone prevent it from booting but differ in their causes and gravity of the problem.
A soft-brick problem is caused merely by a software error/crash and makes your device switch on automatically every time you manually turn it off. This phenomenon is referred to as Boot Loop. Soft bricked Android phones are not as difficult to fix as the hard bricked Android phones. It is convenient to say that a soft bricked phone only boots up half-way and not fully, whereas a hard bricked device does not switch on at all. A hard brick error is thus caused when the kernel, which is nothing but an interface for the software to communicate with the hardware, is tampered with. A hard bricked phone is not recognized by your PC when plugged in and is a serious problem. It requires troubleshooting techniques and cannot be easily fixed as the soft brick problem.


Hard bricked phones are a rare sight, but the soft brick is very common. Given below are ways to fix a soft brick Android phone. The techniques listed here are the best and the most efficient ways to get your phone back to its normal working conditions without losing your important data or damaging your device or its software.
Part 2: Stuck at the Boot Loop
This is the first sign of a soft bricked Android phone. Boot Loop is nothing but when your phone does not remain switched off and turns itself on automatically, and freezes at the logo screen or blank screen, every time you manually try to power it off.
Stuck at boot loop problem can be fixed by clearing your Cache partitions. These partitions are nothing but storage locations for your modem, kernels, system files, drivers and built-in Apps data.
It is advisable to clear Cache partitions regularly to keep your phone free from such glitches.
Since the phone refuses to boot, Cache can be cleared from entering into the Recovery Mode. Different Android devices have different ways to put it in recovery mode. Normally pressing the power key and volume down key helps, but you may refer to your phone’s guide for better understanding and then follow the steps given below to clear the cache partition:
Once you are the recovery mode screen, you will see a number of options as shown in the screenshot.

Use the volume down key to scroll down and select ”Wipe cache partition” as shown below.
 WinUtilities Pro
 >
>
After the process is completed, select “Reboot System” which is the first option in the recovery mode screen.
This method will help you erase all the clogged up and unwanted files. You may loose some App related data, but that is a small price to pay to fix your bricked phone.
If this method does not boot up your brick smartphone and the problem still persists, there are two more things you can try. Read ahead to find out about them.
Part 3: Booting straight into recovery mode
If your bricked phone does not boot up to your Home Screen or Lock screen and instead boots directly into Recovery Mode, there is not much left to do. Booting straight into recovery mode is undoubtedly a soft brick error but it also indicates a possible problem with your current ROM. The only option you have to flash a new ROM to reboot your bricked phone back to its normal functioning.
To flash a new ROM:
Firstly, you must root your phone and unlock the Bootloader. Every phone’s mechanism to unlock the bootloader is different, thus, we suggest to refer to your user manual.
Once the Bootloader is unlocked, take a backup of all your data by selecting “Backup” or “Android” back in recovery mode. The process should not take long and all you need to do is tap “OK” to config backup.
 Power Tools add-on for Google Sheets, Lifetime subscription

In this step, download a ROM of your choice and store it in your SD Card. Insert the SD Card in your phone to begin the flashing process.
Once at the recovery mode, select “Install Zip from SD Card” from the options.

Scroll down using the volume key and use the power key to select the downloaded ROM.
 SwifDoo PDF Perpetual (1 PC) Free upgrade. No monthly fees ever.


This might take a few minutes of your time, but once the process is complete, reboot your phone.
Hopefully, your bricked phone will not boot normally and work smoothly.
Part 4: Booting straight into Bootloader
If your bricked phone boots straight into Bootloader, then this a serious issue and must not be taken lightly. Flashing a new ROM or clearing cache partitions are of little help in such a brick smartphone situation. Booting straight into Bootloader is a peculiar soft bricked Android phone feature and can be tackled only by downloading and flashing your original ROM from the manufacturer. In order to do so, a detailed study about your manufacturer’s ROM, ways to download and flash must be carried out. Since different Android phones come with different types of ROMs, it difficult to cover all the aspects about the different types of ROMs.
Brick smartphone problem has become more prominent than phone freezing or hanging issue. Android users are often seen looking for solutions to fix their soft brick and hard brick phones. Android phones are prone to get bricked and thus, it is important for us to know about the three techniques given above. These methods have been tried, tested and recommended by ay affected bricked phone users. Therefore, these tips are reliable and worth a try. So if your phone acts stubborn and refuses to boot normally, examine the problem carefully and adopt one of the solutions given above which best suits your situation.
- Title: 7 Fixes for Unfortunately, Phone Has Stopped on Nokia G310 | Dr.fone
- Author: Ariadne
- Created at : 2024-07-30 07:53:02
- Updated at : 2024-07-31 07:53:02
- Link: https://howto.techidaily.com/7-fixes-for-unfortunately-phone-has-stopped-on-nokia-g310-drfone-by-drfone-fix-android-problems-fix-android-problems/
- License: This work is licensed under CC BY-NC-SA 4.0.