
7 Fixes for Unfortunately, Phone Has Stopped on OnePlus Ace 3 | Dr.fone
7 Fixes for “Unfortunately, Phone Has Stopped” on OnePlus Ace 3
Encountering issues with the Phone app is never welcoming. Being one of the useful apps, seeing it crashing and unresponsive gives sheer despondency. If talked about the triggering points, they are numerous. But the central point is what to do when the Phone app keeps crashing. In this article, we have discussed this issue in detail. To know this and more about why the “Unfortunately, Phone has stopped” error crops up, read this article and get the problem sorted on your own.

Part 1: When can the “Unfortunately, Phone has stopped” error come?
First things first! You need to stay updated on why the Phone app keeps stopping or crashing before jumping to any solution. Following are the points when this error comes up to annoy you.
- When you install a custom ROM, the issue might occur.
- The upgrading of the software or incomplete updates can lead to crashing the Phone app.
- Data crashes can be another reason why this error shows up.
- Infection through malware and virus on your phone is also included when the Phone app might crash.
Part 2: 7 Fixes for the “Unfortunately, Phone Has Stopped” error
 vMix HD - Software based live production. vMix HD includes everything in vMix Basic HD plus 1000 inputs, Video List, 4 Overlay Channels, and 1 vMix Call
2.1 Open the Phone app in Safe Mode
First and foremost, the thing that can let you get rid of this trouble is Safe Mode. It is a feature that will end any excessive background functioning of the OnePlus Ace 3 device. For instance, your device will be able to run sans any third-party apps when in Safe mode. Since the important functions and the naïve apps will be running on the OnePlus Ace 3 device, you will get to know if it’s really a software glitch or not by running the Phone app in Safe mode. And this is the first solution we would recommend you make use of when the Phone app has stopped. Here is how to enable Safe Mode.
- Switch off the OnePlus Ace 3 phone first.
- Now keep pressing the “Power” button until you see the OnePlus Ace 3 logo on the screen.
- Release the button and immediately press and hold the “Volume Down” key.
- Leave the key once the OnePlus Ace 3 device is in Safe mode. Now, the third-party apps will be disabled and you can check if the Phone app is still not responding or everything is fine.
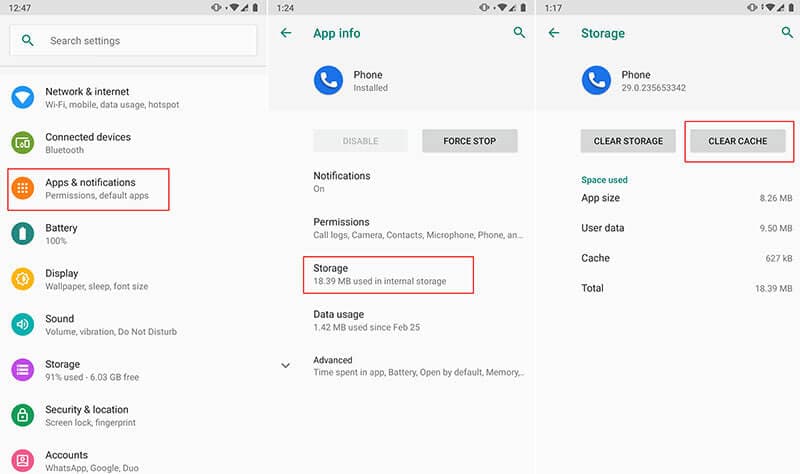
2.2 Clear the cache of the Phone app
The cache should be cleaned timely if you want any app to work properly. Due to the constant usage, the temporary files get collected and may corrupt if not cleared. Hence, the next solution you should try when the Phone app keeps stopping is to clear the cache. Here are the steps to be performed.
- Open “Settings” on your device and go to “Application” or “Apps”.
- Now from the list of all applications, go to “Phone” and tap on it.
- Now, click on “Storage” and choose “Clear Cache”.
 DEX 3 RE is Easy-To-Use DJ Mixing Software for MAC and Windows Designed for Today’s Versatile DJ.
Mix from your own library of music, iTunes or use the Pulselocker subsciprtion service for in-app access to over 44 million songs. Use with over 85 supported DJ controllers or mix with a keyboard and mouse.
DEX 3 RE is everything you need without the clutter - the perfect 2-deck mixing software solution for mobile DJs or hard-core hobbiests.
PCDJ DEX 3 RE (DJ Software for Win & MAC - Product Activation For 3 Machines)
2.3 Update Google Play services
Since Android is created by Google, there must be some Google Play services that are crucial to run several system functions. And if attempting the previous methods isn’t of any use, try updating Google Play services when you find the Phone app stopped. For doing this, you need to make sure that automatic updates are turned on in Google settings. If not, enable it and get the apps including Google Play services updated for smoother functions.
2.4 Update the OnePlus Ace 3 firmware
When the firmware is not updated, it may conflict with some apps and maybe that’s why your Phone app falls prey. Therefore, updating OnePlus Ace 3 firmware will be a sane step that should be taken when the Phone app has stopped. Follow the below-mentioned steps and then check if the Phone app is opening or not.
- Open “Settings” and go to “About Device”.
- Now tap on “Software Updates” and check for the availability of the new update.
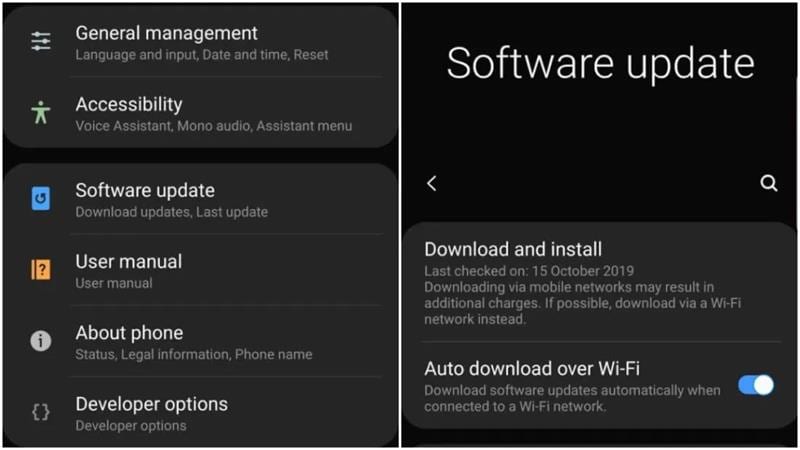
- Download and install it and then try to use the Phone app.

2.5 Clear partition cache
Here is another resolution for the “Unfortunately Phone has stopped” error. Clearing the partition cache will remove the whole cache of the OnePlus Ace 3 device and make it work like before.
- Switch off your device to begin with and enter the recovery mode by pressing the “Home”, “Power” and “Volume Up” buttons.
- The recovery mode screen will appear now.
- From the menu, you need to choose “Wipe Cache Partition”. For this, you can use the Volume keys to scroll up and down.
- To select, press the “Power” button.
- The process will begin and the OnePlus Ace 3 device will restart post it. Check if the problem still persists or it is finished. If unfortunately not, get to the next and the most productive solution.
 WinUtilities Pro
 ZoneAlarm Extreme Security NextGen
2.6 Get the OnePlus Ace 3 system repaired in one click
If still, the Phone app keeps stopping after trying everything, here is the most effective method that can surely help you. Dr.Fone - System Repair (Android) is a one-click tool that promises to repair Android devices hassle-free. Be it apps crashing, the black screen, or any other issue, the tool has no problem fixing any sort of issue. Here are the benefits of Dr.Fone - System Repair (Android).

Dr.Fone - System Repair (Android)
Android repair tool to fix “Unfortunately, Phone Has Stopped” on OnePlus Ace 3 devices.
- It takes no special skills to operate it and fairly works to bring the Android system to normalcy.
- It shows great compatibility with all OnePlus Ace 3 devices and other Android phones supporting over 1000 Android brands.
- Fixes any kind of Android issue without any complication.
- Easy to use and trusted by millions of users and therefore has a higher success rate.
- Can be downloaded freely and friendly user interface.
3,106,444 people have downloaded it
How to fix crashing Phone app using Dr.Fone - System Repair (Android)
Step 1: Get the Software Installed
Click the “Start Download” button to download the tool on your computer, and then open the program to begin the repair, click on “System Repair”.
 Easy and Safe Partition Software & Hard Disk Manager

Step 2: Plug the Phone with PC
Take your original USB cord and then connect your OnePlus Ace 3 to the computer. When the OnePlus Ace 3 device is connected, click on “Android” from the two tabs > click “Start”

Step 3: Enter the Details
As the next step, enter some important details on the next screen. Be sure to enter the right name, brand, and model of the OnePlus Ace 3 device. When done everything, verify once and click on “Next”.

Step 4: Downloading Firmware
Downloading firmware will be the next step. Prior to this, you have to go through the instructions given onscreen to enter the DFU mode. Please click on “Next” and the program will bring the suitable firmware version and start downloading it.

Step 5: Get the OnePlus Ace 3 device Repaired
When you see the firmware has been downloaded, the issue will begin to get resolved. Hang on and wait until you get notified for the repair of the OnePlus Ace 3 device.

 safe & secure
2.7 Factory reset
If none of the above methods worked for you, the last resort you are left with is a factory reset. This method will wipe everything from your device and make it function like normal. We also suggest you make a backup of your data if it is important so as to prevent the loss. Here is how to do this to fix the crashing Phone app.
- Open “Settings” and go to the “Backup and Reset” option.
- Look for “Factory data reset” and then tap on “Reset phone”.
- Within a while, your device will go through resetting and boot up to normalcy.

safe & secure
Authentication Error Occurred on OnePlus Ace 3? Here Are 10 Proven Fixes
There are times when users get an authentication error while they connect to a Wifi network. The problem is mostly found in Android whenever a device tries to establish a connection to Wifi. If your device is also experiencing an authentication problem Wifi, then don’t worry. It can easily be resolved. In this post, we will make you familiar with the root cause for the OnePlus Ace 3 Wifi problem and how you can resolve whenever authentication error occurred on your device.
Part 1: Any idea about the Wi-Fi authentication problem?
Wi-Fi authentication has to be done every time you wish to connect to a Wi-Fi network over your smartphone or laptop. To authenticate yourself and connect to the protected Wi-Fi network, you need to have the password of it. But if after you’re putting in the correct password and still experiencing the wifi authentication problem. Here’s what you need to know.
Authentication error occurs when the “deal” between the Wi-Fi router and device fails due to certain reasons. First, the OnePlus Ace 3 device sends the password of the network and the “connect” request in an encrypted format to the Wi-Fi router. Then, the router decrypts the password and compares the password saved on it. Now, if the password matches, it sends affirmation for the “connect” request, and then the OnePlus Ace 3 device is allowed to connect to the network.

Part 2: Why Authentication Error Occurred when Connecting to Wifi?
There could be plenty of reasons for facing an authentication error on your device. Most of the time, it occurs whenever a Wifi router seems to malfunction. Furthermore, if your phone has been recently updated, then chances are that there could be an issue with its drivers. A security attack can also make your device malfunction as well. An unstable connection or a router blockage can also be a reason for this issue.
In this scenario, whenever you try to connect to a Wifi network (even after supplying the correct password and username), it doesn’t connect to it. Instead, it displays an authentication error occurred promptly. Thankfully, there are plenty of ways to overcome the authentication problem Wifi. In the next section, we have provided three different solutions to fix the OnePlus Ace 3 Wifi problem (as it mostly happens on Android devices).
 Greeting Card Builder
Part 3: 10 Solutions to Fix Wifi Authentication Error
Before we make you familiar with different fixes for the Wifi authentication error, it is important to check your router beforehand. Chances are that you could be getting the authentication error because your router is not functioning properly. You can restart it and try to connect any other device to it as well to check it. After making sure that there is no problem with your network or router, follow these suggestions to overcome the authentication error occurred issue.
Check if extra characters added in Wi-Fi password
Ensure that no other extra characters are being added in the Wi-Fi password while you’re entering it. Key in the password carefully while viewing the characters, and then check if the authentication error occurs or not.
One-Click to Fix Wifi Authentication Error by Android System Repair
Android system repair is considered the most effective way to fix Wifi Authentication Error. As the bottom-layer Android system files may be corrupted unconsciously with days of phone use, the Wifi Authentication Error may be one of the symptoms.
So Android repair requires programming knowledge to do it?
No! With Dr.Fone - System Repair (Android), you can do Android repair in just a few steps and get all issues like Wifi Authentication error fixed easily.
Dr.Fone - System Repair (Android)
An easy-to-operate tool to fix Android system issues like a Wifi authentication error
- Fixes all Android system issues like a black screen of death, Wifi authentication error, etc.
- One-click to fix the Wifi authentication error. No technical skills required.
- Supports all the new OnePlus Ace 3 devices like Galaxy S8, S9, etc.
- Easy-to-follow instructions provided on each of the screens.
3981454 people have downloaded it
Here are the steps to fix Wifi Authentication Error by Android system repair:
Note: Android repair is effective to permanently fix Wifi Authentication Error, but may wipe out the existing phone data. Backup all the important Android data to PC before you go on.
- After the Dr.Fone tool is downloaded, install, and launch it. You can see the following screen.
- Connect your OnePlus Ace 3 to the computer, and select “Android Repair” in the middle.
- Select all the details that match your device, and click “Next”.
- Next up, you should boot your OnePlus Ace 3 in download mode by following the on-screen instructions.

- Allow the program to download the corresponding firmware. After that, the Android repair will start and get the Wifi Authentication Error fixed in minutes.

 Nero Burning ROM:
The ultimate burning program for all your needs!
Use static IP address instead of DHCP
DHCP, or Dynamic Host Configuration Protocol is the default IP address assignment for the Wi-Fi settings on many devices. Whereas DHCP can cause IP address conflict during the dynamic IP address assignment. So, you’d better change “DHCP” to “Static” to see if the authentication error persists.
Step 1: Head to the “Settings” of your OnePlus Ace 3 and then opt for “Wireless and Networks” followed by “WLAN/WiFi”.
Step 2: Now, hit on the WiFi network that is showing “authentication error occurred”.
Step 3: Depending on your OnePlus Ace 3 model, look for “IP Settings” and tap on it. Now, switch the “DHCP” to “Static”.
Step 4: Note down the static IP address fields and wipe off all the fields. Punch it in again and then save it.

 PearlMountain Image Converter
Check carefully for duplicate Wi-Fi names before you connect
Perhaps, you might connect to a WiFi with a similar name. There are good chances that some users do not modify their WiFi network name and possibly, your neighbor may have the same WiFi network, service provider. Therefore, ensure you connect to the correct WiFi network.
Reset the Wifi network
One of the easiest ways to fix the authentication problem of Wifi is to reset the network. To do this, you would be required to forget the respective network first and then connect to it again. This can be done by simply following these steps.
1. Firstly, you need to forget a Wifi network. To do it, go to your phone’s Settings > WiFi and network. From here, you can see a list of all the Wifi hotspots that your phone connects to. Select the network you wish to forget.

2. When you would select a network, it will provide the basic information related to it. Just tap on the “Forget” button and agree to the pop-up message. This will erase the network’s information from your device.

3. Afterward, turn on your Wifi again and tap to the network you wish to connect to. Simply provide the credentials and tap on the “Connect” button to reestablish the connection. This way, you can reset the network successfully.

Modify network connection
If the above solution won’t work, then you would be required to walk the extra mile to fix the OnePlus Ace 3 Wifi problem. After you reset a network connection, if still getting issues regarding the authentication of the network, you need to modify the connection. In this technique, you will be changing the IP settings on your phone to alter the way it establishes a secure connection. You can do it by following these steps.
1. To start with, visit your phone’s Settings and open the Wifi page.

2. This will display a list of all the Wifi networks that are associated with your device. Just long-tap on the Wifi network that you wish to modify. It will open another pop-up window. From here, tap on the option of “Manage network settings”. Sometimes, users also get an option of “Modify network settings” here as well. Simply select it to proceed.

3. It will display basic information related to your Wifi network. Just tap on the “Show advanced options” button to access more options related to the network setting.

4. From the IP Settings menu, change the field from DHCP to Static. This will let you establish a static connection between your device and the router.

5. As soon as you will change it to static, you will get different fields related to your network’s IP address, gateway, DNS, and more. Simply fill these fields and tap on the “Save” button once you are done.

Now, try to connect to the Wifi hotspot again. You would be able to overcome the authentication problem of Wifi.
Change Network Security Type
It has been observed that, when we connect to Wifi, our device chooses a wrong security type. This clashes with the default security protocol of the router and authentication error occurred due to this. If your device is facing the same issue, then it can be fixed by simply changing its security type. To do this, follow these instructions:
1. To change the security type of a network, you need to “Add the network”. If you already have the Wifi network saved, then simply forget the network by following the above-mentioned tutorial.
2. Now, turn on your device’s Wifi and tap on the option of “Add network”. Here, you would be asked to give a network name and select the security type. To manually select it, tap on the “Security” option.
 /a>
/a>
3. From here, you will get a list of various security protocols that you can pick. Select “WPA/WPA2-PSK” and save your selection.

Now, try to connect to the network again. Most likely, it will let you fix the authentication error on your device.
Update Android firmware to the latest
There are instances where an outdated OS version of your OnePlus Ace 3 may create a hindrance in establishing a connection between your device and the WiFi network. You need to update your Android firmware to the latest version and then check if the problem persists or not.
Step 1: Launch “Settings” of your OnePlus Ace 3 and then get into the “About Phone” option.
Step 2: Now, opt for the “System Update” option. If the update is available, get your device updated to the latest OS version.
Restart the router and reset Android network settings
Sometimes, the WiFi router may hang up while establishing a connection and therefore, the wifi authentication problem occurs. Try restarting your Wi-Fi router and then check if your device connects successfully. If this doesn’t work, try to reset your Android Network Settings .
Bonus tip: Turn Airplane mode on/off
By simply turning on the Airplane mode (and later turning it off), you can easily fix the authentication problem Wifi most of the time. You can find a toggle button for Airplane mode on the notification bar of your phone. If you can’t find it there, then go to your phone’s Settings > Connection > More Networks and turn on the feature of “Airplane Mode”.

Let it do for a while. Afterward, turn it off and try to connect to the Wifi network again.
After following these quick and easy suggestions, you would be able to fix the OnePlus Ace 3 Wifi problem for sure. Even if you use any other Android device, then its authentication error can easily be resolved after these effective solutions. Go ahead and give these expert solutions a try and let us know about your experience as well. If you have any other solution to fix the authentication problem Wifi, then share it with us as well in the comments.
[8 Quick Fixes] Unfortunately, Snapchat has Stopped on OnePlus Ace 3
Have you ever been deep in conversation with a loved one or friend, taking advantage of all the funny filters and games Snapchat has to offer when you’ve suddenly been presented with the ‘Unfortunately, Snapchat has Stopped’ error code? This is usually followed by the app crashing back to the main menu.
If so, don’t worry; you’re not alone. Snapchat crashing in this way is nothing new, but it can be incredibly annoying when it keeps happening and stops you from enjoying the conversations you care about.
Fortunately, there are plenty of solutions out there to help you out and get the app working again as it should do. Today, we’re going to explore them all to help you get back to what you were doing before and as though there was never a problem.
Part 1. Install Snapchat again from Google Play Store


One of the best ways to resolve the Snapchat crashing problem or Snap Map not working issue is to delete the app and reinstall it again. When you’re using your phone, there is data continually flowing around and data being sent here, there, and everywhere.
During these processes, bugs can occur, and if they can’t sort themselves out, the best thing to do is to reset your app and start from a fresh installation. Here’s how to do it.
Step 1: Hold down the Snapchat app from your main menu and press the ‘x’ button to uninstall the app.
Step 2: Open the Google App Store from your device and search ‘Snapchat’ in the search bar. Find the official app page and download the app onto your device.
Step 3: The app will automatically install itself once downloaded. Open the app, sign in to your account using your log-in details, and you should be able to use the app like normal.
Part 2. Check for new Snapchat Updates

Hand in hand with the problem above, sometimes a bug can restrict Snapchat from working, or perhaps your personal update settings. If you receive a Snapchat from someone with an upgraded version, this can crash your app.
Here’s how to make sure you’re running the latest version of Snapchat is Snapchat isn’t responding.
- Launch the Play Store and navigate to the My Apps and Games page
- Tap the Update button
- The app will now automatically update to the latest version
Part 3. Wipe the cache of Snapchat
If you have a lot of data in your Snapchat cache, this can cause the app to become overloaded in which you’ll need to clear it to start again and refresh the app. This is a common problem that can cause Snapchat has stopped working error.
Here’s how to fix it.
Open the Snapchat app and tap the Profile icon on the top left-hand side of your screen
Tap the Settings gear icon on the top right
Scroll down the Settings menu and tap the Clear Cache option


- Here, you can choose to Clear All, but you can select individual areas if you prefer
 WonderFox DVD Ripper Pro
Tap the Confirm option to clear your cache preference completely

Part 4. Fix the system issues that caused Snapchat stopping
If you’re experiencing the Snapchat crashing on Android often, or you’re experiencing similar errors with other apps, this can be an indication that there’s something wrong with your Android operating system.
The best way to fix this is to repair your device using the software known as Dr.Fone - System Repair (Android). This is a powerful repair system that can completely recover your device from any errors, including the Snapchat keeps crashing error.
Dr.Fone - System Repair (Android)
Dedicated repair tool to fix Snapchat crashing on Android.
- Recover your device from any problem, including black screen or unresponsive screen.
- Supports over 1000+ unique Android devices, models, and brands.
- Trusted by over 50+ million customers around the world.
- Can fully repair faults with your OnePlus Ace 3’s firmware in a few simple steps.
- One of the most user-friendly applications in the world.
3,889,035 people have downloaded it
To help you make the most of this Android repair software and to fix your Snapchat not responding error, here’s a step-by-step guide on how to use it.
Step 1: Download the Dr.Fone - System Repair (Android) software to your computer. Install the software to your Mac or Windows computer by following the onscreen instructions.
Once completed, open the software, so you’re on the main menu.
Step 2: From the main menu, click the System Repair option, followed by the Android option. Of course, if you have an iOS device you want to repair in the future, the option is there if you want it. Also, connect your OnePlus Ace 3 to your computer using the USB cable.
Step 3: Confirm details.
On the next screen, use the drop-down menus to confirm the model, brand, operating system, and carrier of your device. Click Next to confirm the details are correct.
Step 4: You’ll now need to put your phone into Download Mode, sometimes referred to as Recovery Mode. For this, you can follow the onscreen instructions. Make sure your device stays connected to your computer throughout this process.
The method will slightly differ depending on whether your device has a home button, so make sure you follow the right instructions for your individual device.
Step 5: Once in Download Mode, the software will now download and install a fresh version of your OnePlus Ace 3’s operating system. This can take some time, so make sure your device stays connected, and your computer stays on and doesn’t shut down.

Step 6: That’s it! Once you see the screen saying your device has been repaired, you’ll be able to close the Dr.Fone - System Repair (Android) software, disconnect your phone, and can start using Snapchat as normal without the Snapchat not responding error coming up!
safe & secure
Part 5. Check for the Android update
Parental Control Software
Similar to some of the other solutions we’ve listed above, if you’re using an outdated version of the Android operating system, but the latest version of Snapchat is coded to the most recent, this can be a cause for the Snapchat crashing on Android problem to occur.
Fortunately, it’s easy to check to make sure you’re running the latest version of Android and to download and install the update if you need it. Here’s how, which will help to sort out your Snapchat keeps crashing Android problems.
Step 1: Open the Settings menu on your OnePlus Ace 3 and select the About Phone option.
Step 2: Tap the ‘Check for Updates’ option. If an update is available, you’ll then have the option to Install Now or Install Overnight. If no update is available, you’ll see a notification stating your device is up to date and no action is needed.
Part 6. Connect to another Wi-Fi
In some cases, you may be trying to connect to a Wi-Fi network that’s not very stable. This may keep cutting the connection to your device, which in turn is causing Snapchat to crash on Android.
To resolve this, you can simply try connecting to another Wi-Fi network or a data plan to see whether this is the problem. If so, changing network and then using the Snapchat app should stop any error messages from occurring.
Step 1: Open the Settings menu on your OnePlus Ace 3, followed by the Wi-Fi option.
 HD Video Converter Factory Pro

Step 2: Tap the new Wi-Fi network you’re currently connected to, and then tap the ‘Forget’ option, to stop your phone connecting to it.

Step 3: Now tap the new Wi-Fi network you want to connect to. Insert the Wi-Fi security code and connect. Now try reopening and using the Snapchat to see if you can use it.

Part 7. Stop using the custom ROM


If you’re running a custom Android ROM on your device, with some versions of the ROM and some apps, you’re going to experience errors simply because of the way the apps and the ROMs are coded and designed.
Unfortunately, there’s no easy fix to this, and if you want to continue using the app, you’ll need to reflash your OnePlus Ace 3 back to its original firmware, and then wait until the ROM developers update the ROM to be compatible with social apps like Snapchat.
However, this reflashing process is simple thanks to the Dr.Fone - System Repair (Android) software that we listed above. To follow the detailed step-by-step guide, follow the steps on Part 4 of this article, or follow the quick guide instructions below.
- Download and install the Dr.Fone - System Repair (Android) software to your computer
- Connect your OnePlus Ace 3 to your Windows computer using the USB cable
- Open the software and click the Repair option.
- Select the Android device repair option
- Make sure your carrier and device information are correct
- Put your device into Download Mode by following the onscreen instructions
- Allow the software to repair your OnePlus Ace 3 automatically
 Glary Utilities PRO - Premium all-in-one utility to clean, speed up, maintain and protect your PC
Part 8. Reset the factory settings of your Android
 Power Tools add-on for Google Sheets, 12-month subscription

One of the last resorts you can take is factory resetting your OnePlus Ace 3 back to its original settings. From the day you first started using your device, you’ve been using the system and downloading files and apps, and over time this increases the chances of creating a bug.
However, by resetting your device to factory settings, you can reset these bugs and get your apps and device working again free from the Unfortunately, Snapchat has stopped error message. Here’s how to factory reset your device.
Make sure you back up your personal files from your device first like your photos and music files because factory resetting your device will clear your device’s memory.
Step 1: Tap the Settings menu on your device and click the Backup and Reset option.
Step 2: Click the Reset Phone option. That’s it! The phone will take several minutes to complete the process, after which your phone will be reset to its original state.
- Title: 7 Fixes for Unfortunately, Phone Has Stopped on OnePlus Ace 3 | Dr.fone
- Author: Ariadne
- Created at : 2024-07-30 07:53:22
- Updated at : 2024-07-31 07:53:22
- Link: https://howto.techidaily.com/7-fixes-for-unfortunately-phone-has-stopped-on-oneplus-ace-3-drfone-by-drfone-fix-android-problems-fix-android-problems/
- License: This work is licensed under CC BY-NC-SA 4.0.