
7 Fixes for Unfortunately, Phone Has Stopped on Vivo Y100i Power 5G | Dr.fone
7 Fixes for “Unfortunately, Phone Has Stopped” on Vivo Y100i Power 5G
Encountering issues with the Phone app is never welcoming. Being one of the useful apps, seeing it crashing and unresponsive gives sheer despondency. If talked about the triggering points, they are numerous. But the central point is what to do when the Phone app keeps crashing. In this article, we have discussed this issue in detail. To know this and more about why the “Unfortunately, Phone has stopped” error crops up, read this article and get the problem sorted on your own.
Part 1: When can the “Unfortunately, Phone has stopped” error come?
First things first! You need to stay updated on why the Phone app keeps stopping or crashing before jumping to any solution. Following are the points when this error comes up to annoy you.
- When you install a custom ROM, the issue might occur.
- The upgrading of the software or incomplete updates can lead to crashing the Phone app.
- Data crashes can be another reason why this error shows up.
- Infection through malware and virus on your phone is also included when the Phone app might crash.

Part 2: 7 Fixes for the “Unfortunately, Phone Has Stopped” error
2.1 Open the Phone app in Safe Mode
First and foremost, the thing that can let you get rid of this trouble is Safe Mode. It is a feature that will end any excessive background functioning of the Vivo Y100i Power 5G device. For instance, your device will be able to run sans any third-party apps when in Safe mode. Since the important functions and the naïve apps will be running on the Vivo Y100i Power 5G device, you will get to know if it’s really a software glitch or not by running the Phone app in Safe mode. And this is the first solution we would recommend you make use of when the Phone app has stopped. Here is how to enable Safe Mode.
- Switch off the Vivo Y100i Power 5G phone first.
- Now keep pressing the “Power” button until you see the Vivo Y100i Power 5G logo on the screen.
- Release the button and immediately press and hold the “Volume Down” key.
- Leave the key once the Vivo Y100i Power 5G device is in Safe mode. Now, the third-party apps will be disabled and you can check if the Phone app is still not responding or everything is fine.

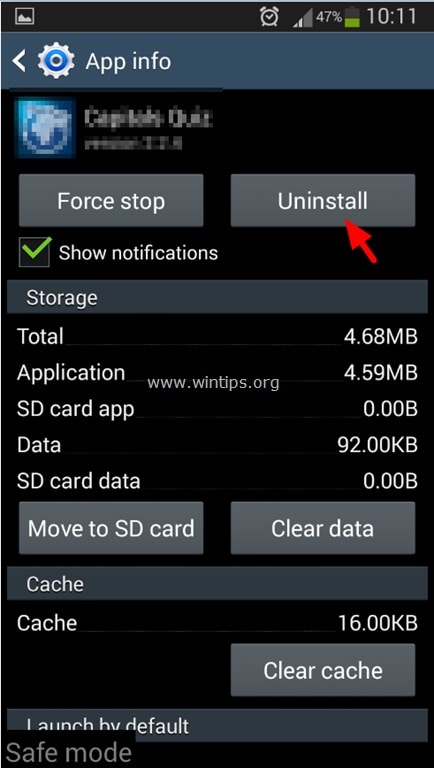
2.2 Clear the cache of the Phone app
The cache should be cleaned timely if you want any app to work properly. Due to the constant usage, the temporary files get collected and may corrupt if not cleared. Hence, the next solution you should try when the Phone app keeps stopping is to clear the cache. Here are the steps to be performed.
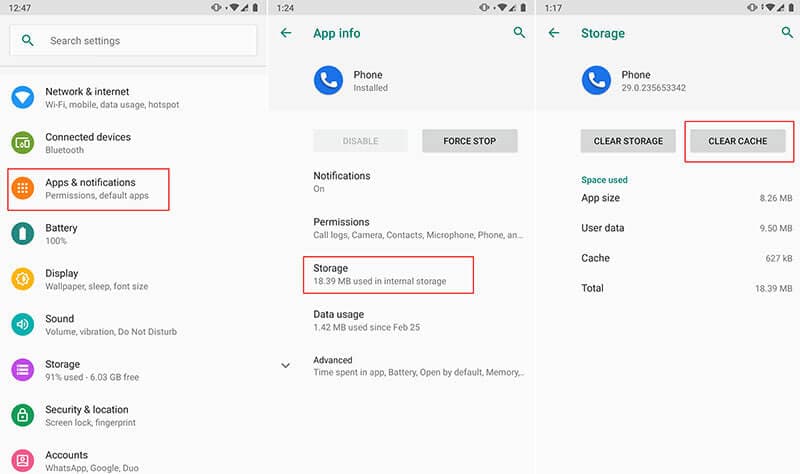
- Open “Settings” on your device and go to “Application” or “Apps”.
- Now from the list of all applications, go to “Phone” and tap on it.
- Now, click on “Storage” and choose “Clear Cache”.

2.3 Update Google Play services
Since Android is created by Google, there must be some Google Play services that are crucial to run several system functions. And if attempting the previous methods isn’t of any use, try updating Google Play services when you find the Phone app stopped. For doing this, you need to make sure that automatic updates are turned on in Google settings. If not, enable it and get the apps including Google Play services updated for smoother functions.

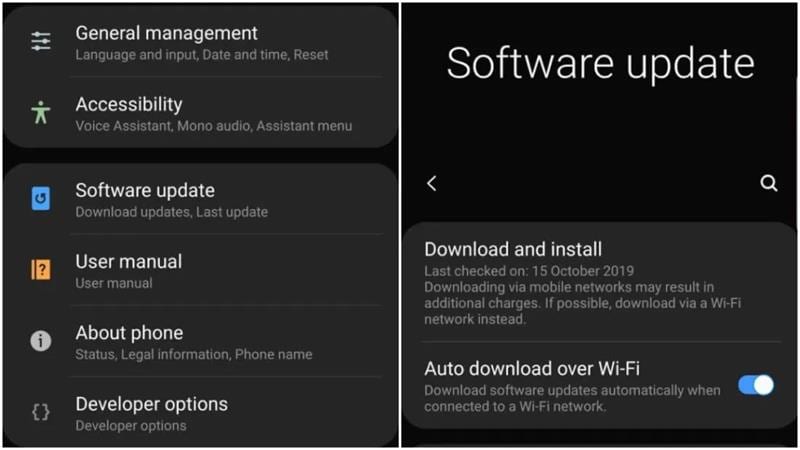
2.4 Update the Vivo Y100i Power 5G firmware
When the firmware is not updated, it may conflict with some apps and maybe that’s why your Phone app falls prey. Therefore, updating Vivo Y100i Power 5G firmware will be a sane step that should be taken when the Phone app has stopped. Follow the below-mentioned steps and then check if the Phone app is opening or not.
- Open “Settings” and go to “About Device”.
- Now tap on “Software Updates” and check for the availability of the new update.
- Download and install it and then try to use the Phone app.

2.5 Clear partition cache
Here is another resolution for the “Unfortunately Phone has stopped” error. Clearing the partition cache will remove the whole cache of the Vivo Y100i Power 5G device and make it work like before.
- Switch off your device to begin with and enter the recovery mode by pressing the “Home”, “Power” and “Volume Up” buttons.
- The recovery mode screen will appear now.
- From the menu, you need to choose “Wipe Cache Partition”. For this, you can use the Volume keys to scroll up and down.
- To select, press the “Power” button.
- The process will begin and the Vivo Y100i Power 5G device will restart post it. Check if the problem still persists or it is finished. If unfortunately not, get to the next and the most productive solution.

2.6 Get the Vivo Y100i Power 5G system repaired in one click
If still, the Phone app keeps stopping after trying everything, here is the most effective method that can surely help you. Dr.Fone - System Repair (Android) is a one-click tool that promises to repair Android devices hassle-free. Be it apps crashing, the black screen, or any other issue, the tool has no problem fixing any sort of issue. Here are the benefits of Dr.Fone - System Repair (Android).

 ZoneAlarm Extreme Security NextGen
Dr.Fone - System Repair (Android)
Android repair tool to fix “Unfortunately, Phone Has Stopped” on Vivo Y100i Power 5G devices.
- It takes no special skills to operate it and fairly works to bring the Android system to normalcy.
- It shows great compatibility with all Vivo Y100i Power 5G devices and other Android phones supporting over 1000 Android brands.
- Fixes any kind of Android issue without any complication.
- Easy to use and trusted by millions of users and therefore has a higher success rate.
- Can be downloaded freely and friendly user interface.
3,106,444 people have downloaded it
How to fix crashing Phone app using Dr.Fone - System Repair (Android)
Step 1: Get the Software Installed
Click the “Start Download” button to download the tool on your computer, and then open the program to begin the repair, click on “System Repair”.


Step 2: Plug the Phone with PC
Take your original USB cord and then connect your Vivo Y100i Power 5G to the computer. When the Vivo Y100i Power 5G device is connected, click on “Android” from the two tabs > click “Start”

Step 3: Enter the Details
As the next step, enter some important details on the next screen. Be sure to enter the right name, brand, and model of the Vivo Y100i Power 5G device. When done everything, verify once and click on “Next”.

Step 4: Downloading Firmware
Downloading firmware will be the next step. Prior to this, you have to go through the instructions given onscreen to enter the DFU mode. Please click on “Next” and the program will bring the suitable firmware version and start downloading it.

Step 5: Get the Vivo Y100i Power 5G device Repaired
When you see the firmware has been downloaded, the issue will begin to get resolved. Hang on and wait until you get notified for the repair of the Vivo Y100i Power 5G device.

 safe & secure

2.7 Factory reset
If none of the above methods worked for you, the last resort you are left with is a factory reset. This method will wipe everything from your device and make it function like normal. We also suggest you make a backup of your data if it is important so as to prevent the loss. Here is how to do this to fix the crashing Phone app.
- Open “Settings” and go to the “Backup and Reset” option.
- Look for “Factory data reset” and then tap on “Reset phone”.
- Within a while, your device will go through resetting and boot up to normalcy.


safe & secure
Proven Ways to Fix There Was A Problem Parsing the Package on Vivo Y100i Power 5G
Unable to install your favorite Apps from Google Play Store because there was a problem parsing the package?
The Parse Error or there was a problem parsing the package error is very common with Android devices. Android is a versatile platform and, therefore, a very popular OS. It is an open software and allows users to download and use various types of apps from the Play store. Android is also a cheaper alternative as compared to other Operating Software.
Since many of us are well versed with most of the Android devices, parse error, or there is a problem parsing the package is an error is not something new and uncommon.
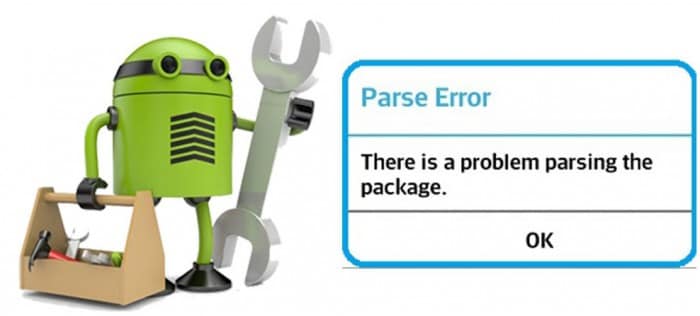
The error message usually pops up on the Vivo Y100i Power 5G device screen when we try to download and install an App, for example, “There is a problem parsing the package Pokémon Go ”.
The error message which appears reads as follows:
“Parse error: There is a problem parsing the package”.
Android users who have experienced this would know that the parse error leaves us with only one option, i.e., “OK” as shown in the image below.
There was a problem parsing the package may occur due to several reasons, most of which are listed and explained below. Furthermore, there is a list of solutions to choose from to eliminate the “there is a problem parsing the package” error.
Read on to find out more.
Part 1: Reasons for the parsing error
Parse Error, better known as “there was a problem parsing the package” error is very common and normally surfaces when we try to download and install new Apps onto our Android devices from Google Play Store.
The reason for the error message to pop-up are many but none of them can be blamed singularly for the “there is a problem parsing the package” error. Given below is a list of the most probable reasons for Parse Error to stop an App from installing. Examine them carefully before moving on to the solutions to fix the “there was a problem parsing the package” error.
• Updating the OS may cause some disturbances in the manifest files of different Apps leading to Parse Error.
• Sometimes, the APK File, i.e., Android Application Package, gets infected due to improper or incomplete App installation causing “there is a problem parking the package” error.
• When Apps are downloaded and installed from unknown sources, due permission is needed. In the absence of such permission, the chances of the Parse Error to occur increase.
• Certain Apps are not compatible or supported by the latest and updated Android versions.
• Anti-virus and other cleaning Apps are also a major reason for the “there was a problem parsing the package” error.
The causes listed above are not App specific. The Parse Error may occur due to any one or more of these reasons, but what is more important is to try to get rid of the problem.
Let us move on to learn ways to fix the there was a problem parsing the package error.
Part 2: 8 Solutions to fix the parsing error
“There is problem parking the package” error can be dealt with easily if only we do not panic and deliberately follows the steps explained in this segment. Here are 7 of the most reliable and trustworthy methods to fix the Parse Error.
They are easy, user-friendly, and do not take much of your time. So don not waste any more of your time and try them now.
2.1 One Click to Fix ‘There is a Problem Parsing the Package
If you’re still encountering the Parsing error, there may be a problem with the Vivo Y100i Power 5G device data on your device, which means you’ll need to repair it. Luckily, there’s a simple, one-click solution you can follow called Dr.Fone - System Repair .
Dr.Fone - System Repair (Android)
Android repair tool to fix all android system issues in one click
- Simple, clean, and user-friendly interface
- No technical knowledge required
- Easy one-click repair to fix ‘there is a problem parsing the package’ error
- Should repair most parsing problems with apps, like ‘there is a problem parsing the package Pokemon Go’ error
- Supports most Vivo Y100i Power 5G devices and all the latest models like Galaxy S9/S8/Note 8
3981454 people have downloaded it
If this sounds like the solution you’re looking for, here’s a step by guide on how to use it yourself;
Note: Please note that this repair process can erase all data on your phone, including your personal information. This is why it’s so important to back up your Vivo Y100i Power 5G before proceeding.
Step #1 Head over to the Dr.Fone website and download the software. Install the downloaded software and open it. From the main menu, select the System Repair option.
Input your device and firmware information to confirm you’re installing the right version of the operating system.
Step #2 Follow the onscreen instructions on how to get into Download Mode to start the Repair process.

Once complete, the firmware will start downloading.

Step #3 Once the firmware has downloaded, it will automatically install it to your device.
When this is completed, you’ll be free to disconnect your Vivo Y100i Power 5G and use it how you please without the ‘there is a problem with the parsing package’ error.
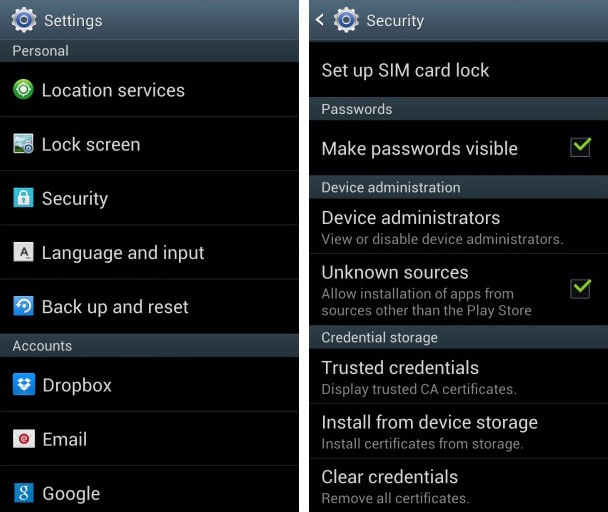
2.2 Allow installation from unknown sources
When we install Apps from other sources and not Google Play Store, there might be a glitch in using such Apps. To overcome this problem, turn on “Allow App installation from other sources”. Follow the steps given below for better understanding:
• Visit “Settings” and select “Applications”.
• Now tick mark on the option saying allow App installation from unknown sources.
2.3 Enable USB debugging
USB debugging is not considered necessary by many users but these methods give you an edge over others while using an Android device as it lets you access things on your phone, etc which you could not earlier.
To enable USB Debugging to fix “There is a problem parsing the package” error, follow these steps:
• Visit “Settings” and select “About Device”.
• Now click on “Build Number” not once but continuously for seven times.

• Once you see a pop-up saying “You are now a developer”, go back to “Settings”.

• In this step, select “Developer Options” and turn on “USB Debugging”.

This should solve the problem. If not, move on to the other techniques.
2.4 Check APK File
An incomplete and irregular App installation may cause the .apk file to get corrupted. Make sure you download the file completely. If need be, delete the existing App or its .apk file and reinstall it from Google Play Store for it to be compatible with your device’s software and to use the App smoothly.
2.5 Check App Manifest File
Manifested App files are nothing but .apk files which are improvised by you. Such changes may cause the Parse Error to occur more frequently. Modifications in the App file can be made by changing its name, App settings, or more advanced customizations. Make sure you roll back all changes and restore the App file to its original state to prevent it from getting corrupted.
2.6 Disable Antivirus and other cleaner Apps
Antivirus software and other cleaning Apps are very helpful in blocking unwanted and harmful Apps from damaging your device. However, sometimes such Apps also prevent you from using other safe Apps.
We do not suggest that you delete the Antivirus App permanently. Temporary uninstallation will be useful here. To do so:
• Visit “Settings” and then select “Apps”.
• Select the antivirus App to click on “Uninstall” and then tap “OK”.

Now download and install the desired App again. Once this is done, do not forget to install the Antivirus App again.
2.7 Clear Cache cookies of Play Store
Clearing Play Store Cache cleans the Android Market platform by deleting all clogged up unwanted data. Follow the steps given below to delete Play Store cache:
• Tap on Google Play Store App.
• Now visit Play Store’s “Settings”.


• Select “General Settings” to “Clear local search history”.
 SwifDoo PDF 2-Year Plan
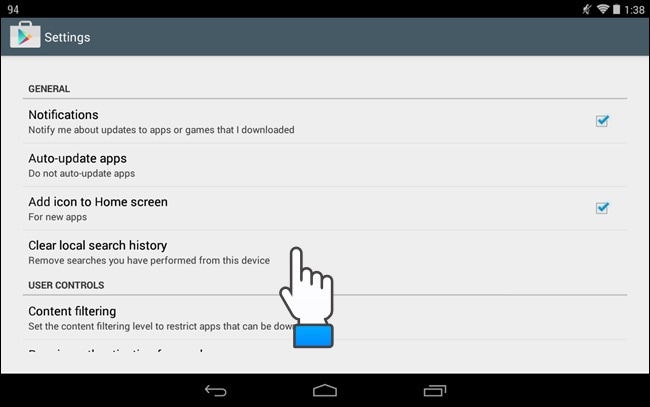
2.8 Factory Reset Android
Factory Resetting your device to fix the Parse Error should be the last thing you try. Make sure you take a back-up of all your data on your Google Account or a Pen Drive because this technique erases all media, contents, data, and other files, including your device settings.
Follow the steps given below to factory reset your device:
• Visit “Settings”.
• Now select “Backup and Reset”.


• In this step, select “Factory data reset” and then “Reset Device” to confirm Factory Reset.
The whole process of factory resetting your Vivo Y100i Power 5G might sound tedious, risky, and cumbersome but it helps to fix the Android SystemUI has stopped error 9 out of 10 times. So, think carefully before using this remedy.
Parse Error: There was a problem parsing the package is an error message that has troubled many Android users. The good part is that the above-stated fixes not only solve the problem but also prevent it from occurring in the future. So, keep them in mind the next time you or anyone you know faces such an issue.
What To Do if Your Vivo Y100i Power 5G Auto Does Not Work
Embracing the convenience of Android Auto enhances your driving experience. It seamlessly connects your smartphone with your vehicle. However, in the realm of technology, glitches and malfunctions are commonplace. Android Auto, too, may encounter software or hardware issues that disrupt its functionality.
In this guide, you’ll delve into the common problems users face when Android Auto does not work and provide practical solutions to get you back on the road smoothly. From troubleshooting software glitches to addressing hardware concerns, this article aims to equip you with the knowledge to tackle Android Auto problems effectively.

Part 1. A Briefer on Android Auto
Android Auto is a revolutionary application designed to enhance the in-car experience by seamlessly connecting Android smartphones to compatible vehicles. It serves as a co-pilot, offering hands-free navigation, communication, and entertainment options, minimizing distractions while driving.
 LYRX is an easy-to-use karaoke software with the professional features karaoke hosts need to perform with precision. LYRX is karaoke show hosting software that supports all standard karaoke file types as well as HD video formats, and it’s truly fun to use.
How Android Auto Works
Understanding the mechanics of this technology is essential for effective Android Auto troubleshooting. It mirrors your Android smartphone’s interface onto your car’s infotainment system. It provides a simplified and optimized version of your device’s features on the road.
Android Auto connects your smartphone to your car’s infotainment system via USB cable or wirelessly, depending on your device and car compatibility. Once clicked, it displays a user-friendly interface on your car’s screen, allowing you to access navigation through Google Maps, make calls, send messages, and control multimedia apps with voice commands or touchscreen gestures.
By integrating familiar smartphone functionalities into your car, Android Auto aims to provide a safer and more enjoyable driving experience, reducing the need for manual phone interactions while on the road. Understanding this foundation will empower you to effectively troubleshoot when issues arise.
 Glary Utilities PRO - Premium all-in-one utility to clean, speed up, maintain and protect your PC

Part 2. Common Issues Android Auto Faces + Troubleshooting/Repair
Even if it is such a great technology, sometimes Android Auto won’t connect. It also deals with common issues that can affect its performance. In this section, you’ll delve into these challenges and equip you with practical troubleshooting solutions to fix your Android Auto experience.
Connection Issues
Connection glitches through Bluetooth or USB can cause Android Auto issues. USB connection problems often come from subpar cables.
The solution here is straightforward – invest in a high-quality USB cable. This ensures a stable link between your smartphone and the car’s infotainment system. Meanwhile, Bluetooth pairing problems may require a bit of digital maneuvering. Try restarting your phone, rebooting the car’s infotainment system, or resetting Bluetooth settings to establish a smooth connection.
App-Specific Problems (Certain Apps Not Working)
Android Auto relies heavily on various navigation, communication, and entertainment applications.
If specific apps refuse to cooperate, a quick remedy is to restart the head unit. If the issue persists, consider uninstalling and reinstalling the problematic applications. This step ensures a clean slate for the apps, potentially resolving any underlying compatibility or performance issues.


Screen and Display Problems (Head Unit)
Issues with the screen or display on your car’s head unit can be disconcerting. To troubleshoot, commence with a simple restart of the head unit.
If the problem lingers, escalate the solution by restarting the entire car. Should these steps prove ineffective, seeking professional assistance at a maintenance center is advisable. This ensures a thorough examination and potential resolution of hardware-related problems, providing a comprehensive fix for persistent screen and display issues.

Voice Commands Not Working
Voice commands serve as a cornerstone of the Android Auto hands-free experience. When they falter, it can disrupt the seamless interaction with the system.
Begin by scrutinizing your internet connection, as voice commands rely on a stable link to function effectively. If the issue persists, a basic restart of the head unit might recalibrate the system, restoring the functionality of voice commands.
Understanding that these issues are inherent to any technology, Android Auto users can confidently navigate and troubleshoot these problems with the provided solutions. By addressing these commonplace concerns, users empower themselves to swiftly overcome hurdles, ensuring a seamless and gratifying driving experience with Android Auto.
Part 3. A Quicker Solution: Wondershare Dr.Fone – System Repair
If navigating through various troubleshooting steps seems complicated, especially if the issue resides within your Vivo Y100i Power 5G, a swift and efficient solution comes in the form of Wondershare Dr.Fone - System Repair.
While the methods presented earlier primarily address software glitches, Dr.Fone can tackle more profound issues, offering a quick fix to revitalize your Android Auto experience. It is a comprehensive toolkit that caters to various Android needs, ensuring a seamless and optimized experience. Among its array of features, the System Repair feature in Dr.Fone acts as a reset button for your Vivo Y100i Power 5G.
It addresses issues that go beyond the scope of regular troubleshooting. It gives your phone a fresh start by repairing the Android system and resolving glitches, crashes, and other persistent software-related problems. This revitalizes your telephone and can significantly impact Android Auto’s performance.
Note: If the problem persists and is related to the car’s head unit, a visit to the maintenance center might be necessary after exhausting these software-based solutions.
How To Use Wondershare Dr. Fone’s System Repair
To use Dr. Fone’s System Repair feature, follow the steps below. These steps will work with any Android phone.
- Step 1: Begin by launching Dr.Fone on your computer. From the left panel, access the Toolbox menu and click System Repair. Ensure your Vivo Y100i Power 5G is connected.
safe & secure
4,014,082 people have downloaded it
- Step 2: On the subsequent screen, select Android as your device.
 Glarysoft File Recovery Pro - Helps to recover your lost file/data, even permanently deleted data.

- Step 3: Initiate the Android System Repair by clicking Start.
- Step 4: Confirm the accuracy of your device details. If needed, edit any information that may be incorrect.
- Step 5: Place your phone into Download mode following the guidelines tailored for phones with or without home buttons. Your phone will commence downloading the dedicated firmware.
- Step 6: Once the firmware is downloaded, verify and proceed with the installation by clicking Fix Now. Confirm the firmware installation by inputting “000000” into the text box in the appearing window. Click Confirm afterward.


- Step 7: Upon completion of the process, your phone should now be restored. Click Done to conclude.
safe & secure
4,276,578 people have downloaded it
Conclusion
In wrapping up this guide, you’ve explored common reasons Android Auto does not work. You’ve also been provided practical solutions to keep your driving experience seamless. Remember, regular maintenance of your car’s head unit and periodic checks on your Vivo Y100i Power 5G can preemptively address potential issues.
By staying proactive, you ensure a consistently smooth ride with Android Auto. For comprehensive system repair and addressing broader Android-related needs, consider trying out Dr.Fone. It’s a versatile tool that can enhance your Android experience and keep your digital journey hassle-free. Take control of your drive and explore the full potential of your Vivo Y100i Power 5Gs with Dr.Fone today.
- Title: 7 Fixes for Unfortunately, Phone Has Stopped on Vivo Y100i Power 5G | Dr.fone
- Author: Ariadne
- Created at : 2024-07-30 07:56:48
- Updated at : 2024-07-31 07:56:48
- Link: https://howto.techidaily.com/7-fixes-for-unfortunately-phone-has-stopped-on-vivo-y100i-power-5g-drfone-by-drfone-fix-android-problems-fix-android-problems/
- License: This work is licensed under CC BY-NC-SA 4.0.