
7 Fixes for Unfortunately, Phone Has Stopped on Vivo Y17s | Dr.fone
7 Fixes for “Unfortunately, Phone Has Stopped” on Vivo Y17s
Encountering issues with the Phone app is never welcoming. Being one of the useful apps, seeing it crashing and unresponsive gives sheer despondency. If talked about the triggering points, they are numerous. But the central point is what to do when the Phone app keeps crashing. In this article, we have discussed this issue in detail. To know this and more about why the “Unfortunately, Phone has stopped” error crops up, read this article and get the problem sorted on your own.
Part 1: When can the “Unfortunately, Phone has stopped” error come?
First things first! You need to stay updated on why the Phone app keeps stopping or crashing before jumping to any solution. Following are the points when this error comes up to annoy you.
- When you install a custom ROM, the issue might occur.
- The upgrading of the software or incomplete updates can lead to crashing the Phone app.
- Data crashes can be another reason why this error shows up.
- Infection through malware and virus on your phone is also included when the Phone app might crash.

Part 2: 7 Fixes for the “Unfortunately, Phone Has Stopped” error

2.1 Open the Phone app in Safe Mode
First and foremost, the thing that can let you get rid of this trouble is Safe Mode. It is a feature that will end any excessive background functioning of the Vivo Y17s device. For instance, your device will be able to run sans any third-party apps when in Safe mode. Since the important functions and the naïve apps will be running on the Vivo Y17s device, you will get to know if it’s really a software glitch or not by running the Phone app in Safe mode. And this is the first solution we would recommend you make use of when the Phone app has stopped. Here is how to enable Safe Mode.
- Switch off the Vivo Y17s phone first.
- Now keep pressing the “Power” button until you see the Vivo Y17s logo on the screen.
- Release the button and immediately press and hold the “Volume Down” key.
- Leave the key once the Vivo Y17s device is in Safe mode. Now, the third-party apps will be disabled and you can check if the Phone app is still not responding or everything is fine.
2.2 Clear the cache of the Phone app
The cache should be cleaned timely if you want any app to work properly. Due to the constant usage, the temporary files get collected and may corrupt if not cleared. Hence, the next solution you should try when the Phone app keeps stopping is to clear the cache. Here are the steps to be performed.
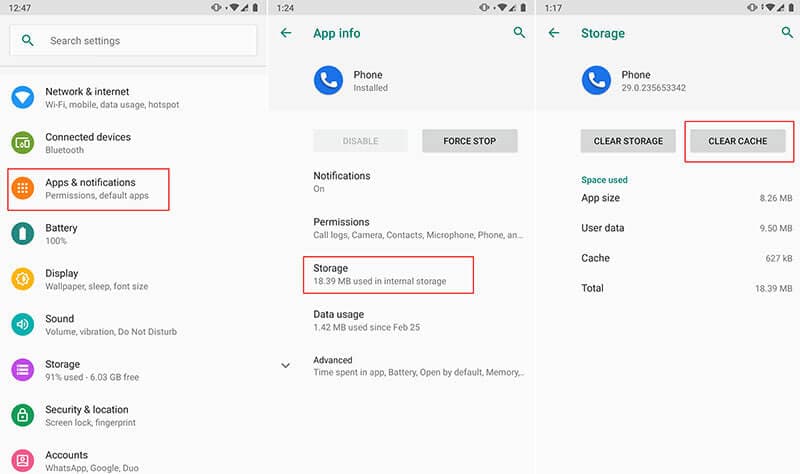
- Open “Settings” on your device and go to “Application” or “Apps”.
- Now from the list of all applications, go to “Phone” and tap on it.
- Now, click on “Storage” and choose “Clear Cache”.
 Power Tools add-on for Google Sheets, 12-month subscription
2.3 Update Google Play services
Since Android is created by Google, there must be some Google Play services that are crucial to run several system functions. And if attempting the previous methods isn’t of any use, try updating Google Play services when you find the Phone app stopped. For doing this, you need to make sure that automatic updates are turned on in Google settings. If not, enable it and get the apps including Google Play services updated for smoother functions.
2.4 Update the Vivo Y17s firmware
When the firmware is not updated, it may conflict with some apps and maybe that’s why your Phone app falls prey. Therefore, updating Vivo Y17s firmware will be a sane step that should be taken when the Phone app has stopped. Follow the below-mentioned steps and then check if the Phone app is opening or not.
- Open “Settings” and go to “About Device”.
- Now tap on “Software Updates” and check for the availability of the new update.
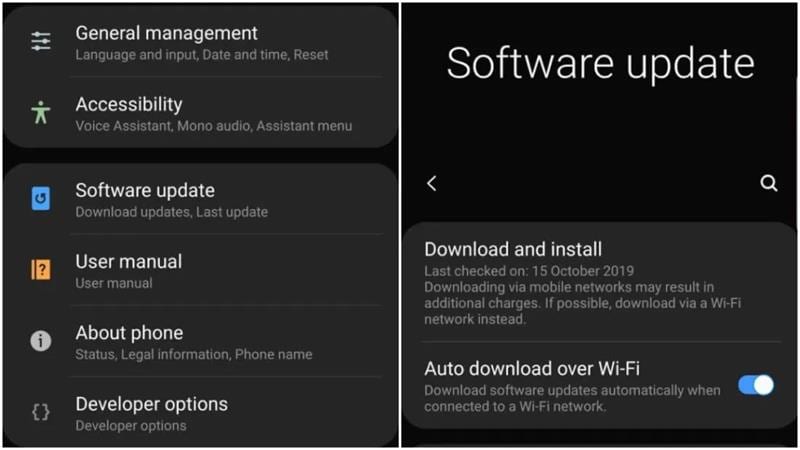
- Download and install it and then try to use the Phone app.

2.5 Clear partition cache
Here is another resolution for the “Unfortunately Phone has stopped” error. Clearing the partition cache will remove the whole cache of the Vivo Y17s device and make it work like before.
- Switch off your device to begin with and enter the recovery mode by pressing the “Home”, “Power” and “Volume Up” buttons.
- The recovery mode screen will appear now.
- From the menu, you need to choose “Wipe Cache Partition”. For this, you can use the Volume keys to scroll up and down.
- To select, press the “Power” button.
- The process will begin and the Vivo Y17s device will restart post it. Check if the problem still persists or it is finished. If unfortunately not, get to the next and the most productive solution.

2.6 Get the Vivo Y17s system repaired in one click
If still, the Phone app keeps stopping after trying everything, here is the most effective method that can surely help you. Dr.Fone - System Repair (Android) is a one-click tool that promises to repair Android devices hassle-free. Be it apps crashing, the black screen, or any other issue, the tool has no problem fixing any sort of issue. Here are the benefits of Dr.Fone - System Repair (Android).

 Allavsoft Batch Download Online Videos, Music Offline to MP4, MP3, MOV, etc format
Dr.Fone - System Repair (Android)
Android repair tool to fix “Unfortunately, Phone Has Stopped” on Vivo Y17s devices.
- It takes no special skills to operate it and fairly works to bring the Android system to normalcy.
- It shows great compatibility with all Vivo Y17s devices and other Android phones supporting over 1000 Android brands.
- Fixes any kind of Android issue without any complication.
- Easy to use and trusted by millions of users and therefore has a higher success rate.
- Can be downloaded freely and friendly user interface.
3,106,444 people have downloaded it
How to fix crashing Phone app using Dr.Fone - System Repair (Android)
Step 1: Get the Software Installed
Click the “Start Download” button to download the tool on your computer, and then open the program to begin the repair, click on “System Repair”.

Step 2: Plug the Phone with PC
Take your original USB cord and then connect your Vivo Y17s to the computer. When the Vivo Y17s device is connected, click on “Android” from the two tabs > click “Start”

Step 3: Enter the Details
As the next step, enter some important details on the next screen. Be sure to enter the right name, brand, and model of the Vivo Y17s device. When done everything, verify once and click on “Next”.

Step 4: Downloading Firmware
Downloading firmware will be the next step. Prior to this, you have to go through the instructions given onscreen to enter the DFU mode. Please click on “Next” and the program will bring the suitable firmware version and start downloading it.


Step 5: Get the Vivo Y17s device Repaired
When you see the firmware has been downloaded, the issue will begin to get resolved. Hang on and wait until you get notified for the repair of the Vivo Y17s device.

 Glarysoft File Recovery Pro - Helps to recover your lost file/data, even permanently deleted data.
 safe & secure
2.7 Factory reset
If none of the above methods worked for you, the last resort you are left with is a factory reset. This method will wipe everything from your device and make it function like normal. We also suggest you make a backup of your data if it is important so as to prevent the loss. Here is how to do this to fix the crashing Phone app.
- Open “Settings” and go to the “Backup and Reset” option.
- Look for “Factory data reset” and then tap on “Reset phone”.
- Within a while, your device will go through resetting and boot up to normalcy.


safe & secure
7 Solutions to Fix Error Code 963 on Google Play Of Vivo Y17s
People are increasingly complaining about Google Play Error Codes which pop-up during downloading, installing or updating an App via Google Play Store. Amongst these, the most recent and common one being Error Code 963.
Google Play Error 963 is a typical error which shows up not only when you try to download and install an App but also during App update.
Error 963 cannot be attributed to a particular App or its update. It is a Google Play Store error and is experienced by Android users across the world.
Error Code 963, just like any other Google Play Store errors, is not something difficult to deal with. It’s a minor glitch which can be fixed easily. There is no need to worry or panic if you see Error 963 on Google Play Store preventing your favorite App from downloading or updating.
Read on to find out more about the Google Play Error 963 and best ways to fix it.
Part 1: What is Error Code 963?
Error 963 is a common Google Play Store error which basically hinders Apps from downloading and updating. Many people get worried when Error Code 963 does not let them install new Apps or update existing ones. However, please understand that Google Play Error is not such a big deal as it may sound and can be overcome easily.
Error 963 pop-up message reads as follows: “cannot be downloaded due to an error (963)” as shown in the image below.

A similar message shows up even while you are trying to update an App, as shown in the screenshot below.

Error Code 963 is basically an outcome of data crash which mostly is seen in cheaper smartphones. There might another reason for Error 963 preventing Apps from downloading and updating, which is Google Play Store Cache being corrupted. People also speculate SD Card related issues as many-a-times external memory enhancer chips do not support large Apps and their updates. Also, Error 963 is very common with HTC M8 and HTC M9 smartphones.
All these reasons and more can handle with ease and you can continue to use Google play services smoothly. In the following segment, we will discuss various fixes to cure the problem to enable to you download, install and update Apps on your device normally.
Part 2: Easiest solution to fix Error Code 963 on Android
When it comes to the most convenient solution to fix error 963, Dr.Fone - System Repair (Android) cannot be missed. It is the most productive program that covers a wide range of Android issues. It ensures full safety while performing and one can fix the Android issues in a hassle-free way.
Dr.Fone - System Repair (Android)
One click to fix Google Play error 963
- The tool is recommended for its higher success rate.
- Not just Google Play error 963, it can fix a large number of system issues including app crashing, black/white screen etc.
- It’s considered as the first tool that offers one-click operation for Android repairing.
- There’s no technical expertise needed to use this tool.
4,997,014 people have downloaded it
This section will provide you the tutorial guide for how to fix error code 963.
Note: Before moving to solve the error 963, we would like to inform you that the process may result in wiping away your data. And therefore, we suggest you to make backup of your Vivo Y17s prior to fixing this Google Play error 963.
Phase 1: Connecting and preparing the Vivo Y17s device
Step 1 – To begin fixing error 963, run Dr.Fone after downloading and installing it on your PC. Now, pick out the ‘System Repair’ tab from the main screen. Thereupon, with the help of a USB cable, make connection between your Vivo Y17s and PC
Step 2 – On the left panel, you’re supposed to choose ‘Android Repair’ and then click the ‘Start’ button.
Step 3 – On the following screen, you need to choose the appropriate details for your device like the name, brand, model, country/region etc. Later, go for warning confirmation and hit ‘Next’.
Phase 2: Taking Android device in Download mode for repairing
Step 1 – It is essential to get your Vivo Y17s or tablet entered in Download mode. For this, following are the steps to be taken:
If the Vivo Y17s device contains Home button:
- Turn the Vivo Y17s device off and then keep holding the ‘Power’, ‘Volume Down’ and ‘Home’ buttons altogether for about 10 seconds. Next, release them all and push the ‘Volume Up’ key. This way, your device will enter the Download mode.

If the Vivo Y17s device contains no Home button:
- Switch off your phone/tablet and press the ‘Volume Down’, ‘Bixby’ and ‘Power’ buttons for 10 seconds. Leave the buttons and then press the ‘Volume Up’ button for entering download mode.
 CalendarBudget - Monthly subscription membership to CalendarBudget via web browser or mobile app. Support included.
Step 2 – Press the ‘Next’ button and then the program will commence the firmware downloading.

Step 3 – Upon successful downloading and verification of the firmware, the process of Android device repairing will begin automatically.

Step 4 – Within a while, the Google play error 963 will be vanished.
Part 3: 6 Common Solutions to fix Error Code 963

Since there is no specific reason for Error Code 963 to occur, similarly there is no one solution to the problem. You may use any one of them below or try them all to never see Error Code 963 on your device.
1. Clear Play Store Cache and Play Store Data
Clearing Google Play Store Cache and Data basically means keeping Google Play Store clean and free from trouble-making data stored in respect of it. It is advisable to carry out this process regularly to prevent Errors like Error Code 963 from occurring.
Follow the steps given below to fix Error Code 963:
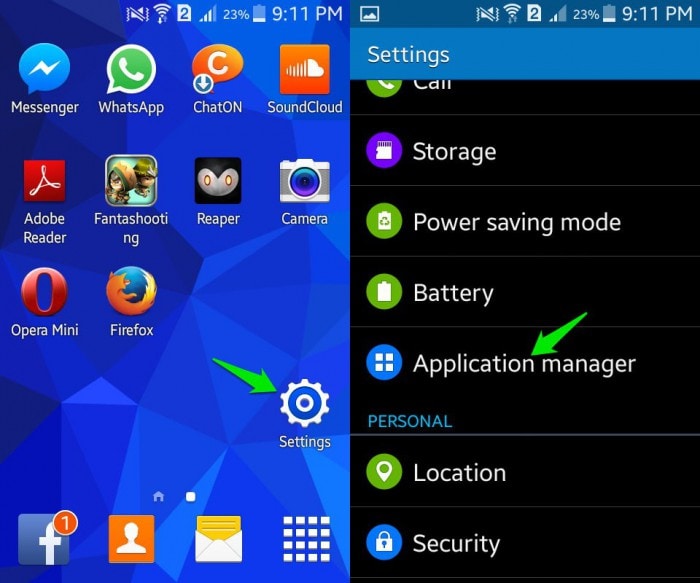
Visit “Settings” and select “Application Manager”.

company, user or members of the same household. Action! - screen and game recorder</a>

Now select “All” to see all downloaded and built-in Apps on your device.
Select “Google Play Store” and from the options that appear, tap on “Clear Cache” and “Clear Data”.

Key features:
• Import from any devices and cams, including GoPro and drones. All formats supported. Сurrently the only free video editor that allows users to export in a new H265/HEVC codec, something essential for those working with 4K and HD.
• Everything for hassle-free basic editing: cut, crop and merge files, add titles and favorite music
• Visual effects, advanced color correction and trendy Instagram-like filters
• All multimedia processing done from one app: video editing capabilities reinforced by a video converter, a screen capture, a video capture, a disc burner and a YouTube uploader
• Non-linear editing: edit several files with simultaneously
• Easy export to social networks: special profiles for YouTube, Facebook, Vimeo, Twitter and Instagram
• High quality export – no conversion quality loss, double export speed even of HD files due to hardware acceleration
• Stabilization tool will turn shaky or jittery footage into a more stable video automatically.
• Essential toolset for professional video editing: blending modes, Mask tool, advanced multiple-color Chroma Key

Once you are done clearing Google Play Store Cache and Data, try to download, install or update the App facing Google Play Error 963 again.
2. Uninstall updates for Play Store
Uninstalling Google Play Store updates is an easy and quick task. This method is known to have helped many as it brings back the Play Store to its original state, free from all updates.
Visit “Settings” and select “Application Manager”.
Now select “Google Play Store” from “All” Apps.
 TubeDigger - online video downloader from mostly any site

In this step, click on “Uninstall Updates” as shown below.


3. Shift the App from SD Card to device’s memory
This method is strictly for certain Apps which cannot be updated because they are stored on an external memory card, i.e., SD Card. Such memory enhancing chips do not support large Apps and due to a shortage of space prevents them from updating. It advisable to move such Apps from the SD Card to the Vivo Y17s device’s internal memory and then try to update it.
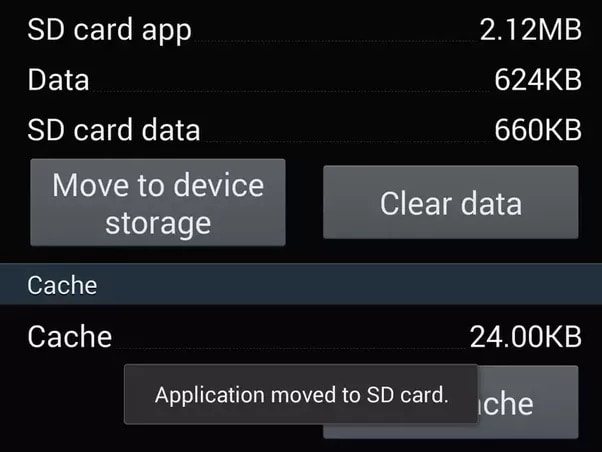
Visit “Settings” and select “Apps”.

From “All” Apps click on the App which is unable to update.
Now click on “Move to Phone” or “Move to internal storage” and try to download its update again from the Google Play Store.
Try updating the App now. If the Apps’s update does not download even now, DO NOT worry. There are three more ways to help you.
4. Unmount your external Memory Card
Error Code963 may also occur due to an external memory chip used in your device to enhance its storage capacity. This is very common and can be dealt with by unmounting the SD Card temporarily.
To unmount your SD Card:
Visit “Settings” and keep scrolling downwards.
Now select “Storage”.
From the options that appear, select “Unmount SD Card” as explained in the screenshot below.


Note: If the App or its update downloads successfully now, do not forget to mount the SD Card back.
5. Remove and Re-add your Google account
Deleting and re-adding your Google account in might sound a little tedious but it does not take much of your precious time. Moreover, this technique is very effective when it comes to fixing Error Code 963.
Carefully follow the steps given below to remove and then re-add your Google account:
Visit “Settings”, under “Accounts” select “Google”.
Select your account and from the “Menu” select “Remove account” as shown below.

Once your account is removed, follow the steps given hereunder to add it back again after a few minutes:
Go back to “Accounts” and select “Add Account”.

Select “Google” as shown above.
In this step feed in your account details and your Google account will be configured once again.
6. Special technique for HTC users
This technique is specially crafted fro HTC smartphone users who frequently face Google Play Error 963.
Follow the step-by-step instructions given below to uninstall all updates for your HTC One M8 Lock Screen App:
Visit “Settings” and find “HTC Lock Screen” under “Apps”.
Now click on “Force Stop”.
In this step, Click on “Uninstall Updates”.
This remedy is as simple as it sounds and has helped many HTC users to get rid of Error 963.
Google Play Errors are a very common phenomenon these days, especially Error Code 963 which usually occurs in the Google Play Store when we try to download, install or update an App. There is no need to worry if you see Error Code 963 pop-up on your screen as your device and its software are not to be blamed for Error 963 to suddenly surface. It is a random error and can be fixed easily by you. You do not need any technical assistance to deal with the issue. All you need to do is follow the steps introduced in this article to use Google Play Store and its services smoothly.
What To Do When Vivo Y17s Has Black Screen of Death?
Have you ever got the error of freezing the Android device home screen? Or the notification light keeps blinking without anything shown on display? Then you are facing Android black screen of death.
This scenario is common with many Android mobile users, and they always hunt for solutions to get rid of this Android black screen problem. Here are some more situations that can assure you that you are facing Android black screen of death.
- The light of the phone is blinking but the Vivo Y17s device is not responding.
- The phone is hanging and freezing very frequently.
- The mobile is rebooting and crashing more often and the battery is draining a lot faster.
- Phone restarts on its own.
If you face these situations, you might be facing the Android black screen of death issue. Follow this article, and we’ll discuss how to get rid of this annoying problem at ease.
Part 1: Why Android device gets black screen of death?
Similar to the “Blue Screen of Death “ (BSOD) on computers, the Android Black Screen of Death indicates a severe system crash or malfunction. When this issue occurs, the Vivo Y17s device’s display remains blank, and you are unable to interact with the Vivo Y17s device, access apps, or perform any actions. The cause of the Android black screen of death can vary, but some common factors include:
- Install incompatible apps or apps with bugs and viruses.
- Have bugs or errors in the Android operating system.
- Keep the mobile charged for long after it’s fully charged.
- Use a non-compatible charger.
- Use an old battery.
- Incorrectly install or incomplete system updates.
- Excessive heat due to heavy usage or environmental factors.
If you face the situations mentioned above, this is clearly a case of the Android screen black. But don’t worry about that. You can follow the article below to get rid of this situation on your own.
Part 2: How to rescue data when Android gets black screen of death?
This annoying Android black screen of death is making it impossible to access your internal data. So, the possibility is that you might lose all the data. We have a solution for all of your data recovery problems from a damaged Android device.
The solution for recovery data is the Dr.Fone - Data Recovery (Android) toolkit by Wondershare. This tool is highly appreciated worldwide and very popular for its feature-rich user interface. This tool can perform a lot of functions that can successfully recover the data from a damaged device.

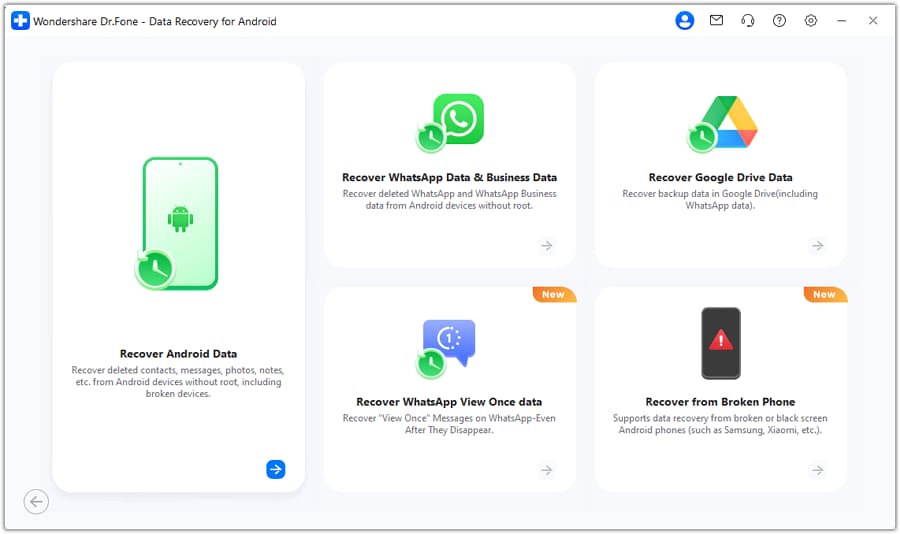
Use this revolutionary toolkit to get the data back from the black tablet screen of death. Connect the Vivo Y17s device with the PC after installing this tool and follow the on-screen instruction, and all of your data will be transferred to your PC. Unfortunately, the tool is supported on selected Vivo Y17s Android devices as of now.
Dr.Fone - Data Recovery (Android)
A Dedicated Tool to Retrieve Data from Broken Android Devices .
- Recover data from broken devices or devices that are damaged in any other way, such as those has black screen.
- Recover photos, videos, contacts, messages, call logs, and more.
- Highest retrieval rate in the industry.
- Compatible with most Vivo Y17s devices.
3981454 people have downloaded it
Part 3: 9 Solutions to fix the black screen of death of Android
- 3.1 One click to fix the black screen of death
- 3.2 Force restart your Vivo Y17s
- 3.3 Check and clean your phone
- 3.4 Remove the battery
- 3.5 Recharge the Vivo Y17s device
- 3.6 Wipe cache partition to fix black screen of death
- 3.7 Uninstall incompatible apps
- 3.8 Reboot to safe mode
- 3.9 Factory reset to fix Android black screen of death
3.1 One click to fix the black screen of death
Facing an Android device with a black screen of death, I believe, is one of the gloomiest moments of one’s life, especially for those who know little about the technical part of Android. But here is the truth we have to admit: most cases of the black screen of death arise due to system glitches in Android.
What to do? Shall we find someone who is tech-savvy to seek help? Come on, this is the 21st century, and there are always one-click solutions to deal with technical issues for laymen like you and me.
Dr.Fone - System Repair (Android)
Fix Black Screen of Death for Android In One Click
- Fix all Android system issues like a black screen of death, OTA update failures, etc.
- Update the firmware of Android devices. No technical skills are required.
- Support all the new Vivo Y17s devices like Galaxy S22, S23, etc.
- Click-through operations to bring Android out of the black screen of death.
3,364,231 people have downloaded it
Here are the easy steps to get your Vivo Y17s out of the black screen of death:
- Download and install the Dr.Fone tool. After launching it, you can see the following screen pop up.

- Select “System Repair” from the home page, and then click on the “Android “.
 LYRX is an easy-to-use karaoke software with the professional features karaoke hosts need to perform with precision. LYRX is karaoke show hosting software that supports all standard karaoke file types as well as HD video formats, and it’s truly fun to use.
- Click “Start” to commence the Android system repair. In the next screen, select and confirm your Android model details like name, model, country, etc. and go on.

Boot your Android into Download mode by following the on-screen demonstrations.
Then the tool will download the Android firmware and flash the new firmware to your Vivo Y17s.
A moment later, your Vivo Y17s will be repaired completely, and the black screen of death will be fixed.

Video guide: How to fix the Android black screen of death step by step

safe & secure
3.2 Force restart your Vivo Y17s
Because it is the quickest and most painless solution, most people do this when their Android phone screen goes black too fast. The majority of phone issues can be resolved by performing a hard reboot. Here are the necessary measures if you haven’t tried this method before.
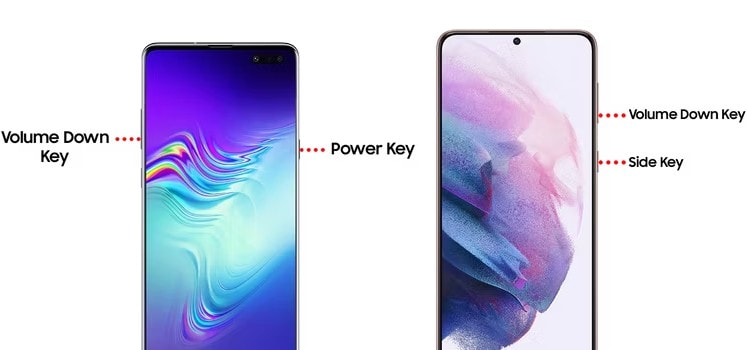
To reboot your Vivo Y17s, you may need to press a specific key combination, depending on the model you have, but most Android devices can be force restarted by doing the following steps:
Step 1: Press and hold the power button for about 10-15 seconds. Keep holding it until the Vivo Y17s device restarts.
Step 1: For Vivo Y17s devices, press and hold down the Power and Volume Down buttons for about 7 seconds.

3.3 Check and clean your phone
This method might not be popular with Android users, but this can do wonders when dealing with an Android black screen of death issue. To do this, follow the steps provided below:
Step 1: Ensure your phone’s buttons and ports are not stuck before anything else.
Step 2: See if dirt prevents you from turning the Vivo Y17s device on. Then, quickly press and release the button a few times.
Step 3: If the phone isn’t charging normally, ensure the charging port isn’t clogged with dust and debris by checking and cleaning it. You can gently blow out any debris in the charging port or use a wooden toothpick to pry it open.
Step 4: After you’re done with the cleaning, it’s best to charge the phone for at least 10 minutes. Just give it a quick charge and then try to restart it.

3.4 Remove the battery
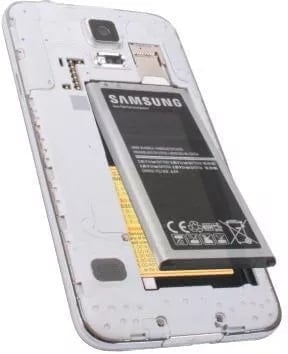
If your phone’s battery is removable, you can try taking it out and trying again if restarting and cleaning it doesn’t fix the problem.
Step 1: To get started, take the phone apart by starting at the back.
Step 2: After 20 to 30 seconds, take out the battery and put it back in.
Note: When replacing the battery, ensure the metal contacts correctly connect to the phone.
This easy and straightforward method should help you fix your Android screen black issue, but if it doesn’t, continue reading, as this article got more techniques you can try.
3.5 Recharge the Vivo Y17s device
If your Vivo Y17s screen suddenly goes black, let the battery die completely. Then once the battery is completely dead, you should plug it in to charge and turn it on by pressing the Power button. Try to check if you still encounter the issue after doing so.
3.6 Wipe cache partition to fix black screen of death
If your Vivo Y17s turns on, but the screen remains black, clearing the cache partition should solve the problem. After all, keeping caches on your phone would cause it to run more slowly and cause other problems. Therefore, the issue can be resolved by clearing the cache partition. Check the following steps on how to do this below:
Step 1: Turn off your Vivo Y17s.
Step 2: Boot the Vivo Y17s device into Recovery Mode.
Note: The steps necessary to enter recovery mode will vary depending on your specific Android phone model. To ensure you’re doing the correct steps for your device, consult the user manual or look it up online. The following instructions work for Vivo Y17s devices:
- For older Vivo Y17s devices with the home button: Press and hold the Volume Up button, the Power button, and the Home buttons simultaneously.
- For newer Vivo Y17s devices without the home button: Press and hold the Volume Up button and the Power button together.
- If the Vivo Y17s device logo appears, release your grip, and the phone will restart.
Step 3: Find the Wipe cache partition option using the volume controls after entering Recovery Mode.
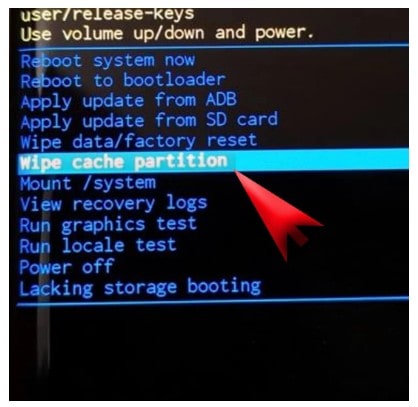
Step 4: Select Wipe cache partition by pressing the Power button.
Step 5: On the next screen, use the Volume Down button to highlight “Yes” and then press the Power button to confirm the cache wipe.
Step 6: The cache partition will be wiped, and you will see the “Cache wipe complete” message on the screen.
Step 7: Use the Volume Down button to navigate to the “Reboot system now” option and press the Power button to reboot your Vivo Y17s device.
After rebooting, you can see that you have successfully got rid of the annoying Android black screen of death. For most of the cases, this method solves the problem. If not, you have to move to the next method.
3.7 Uninstall incompatible apps
Android screen black can be a result of installing a bug or incompatible apps. If you have recently installed an app that crashes frequently, that may be the reason for the issue. Uninstalling the app from the Vivo Y17s device may solve the problem with ease. For doing this, you need to boot your device in Safe mode. Follow the below steps.
Step 1: Power down your device by pressing and holding the Power button until a menu appears.
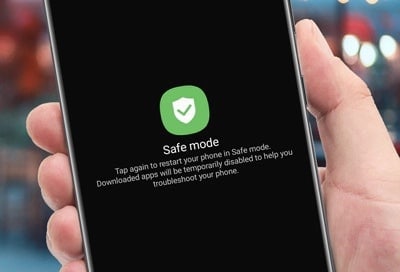
Step 2: Navigate to Safe Mode by pressing and holding the Power Off button.
Step 3: Tap the “Safe mode” icon to enter Safe mode. You should now see Safe Mode at the Vivo Y17s device’s bottom.
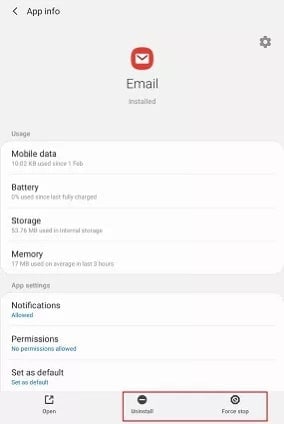
Step 4: After selecting Settings, head to the Apps section.
Step 5: Select the app by clicking on it; the App Info window should appear. To uninstall the app, tap the Uninstall option from the menu below the screen.
Step 6: Now restart the Vivo Y17s device by pressing the power button and let it boot up in normal mode.
If the app is the reason for Android black screen of death, then after uninstalling, you can get rid of this issue. If not, now you have to factory reset your device to solve the problem.
3.8 Reboot to safe mode
Even after multiple attempts to launch them, certain applications act suspiciously and cause the Vivo Y17s device to crash. When an Android phone suddenly goes black, you can often isolate the problem to a specific app by booting into Safe mode.
Step 1: Begin by restarting your phone. To do that, press the Power button until a menu appears.
Step 2: Press the Power Off button to enter Safe mode.
Step 3: Activate Safe mode by clicking the “Safe Mode” icon.
Step 4: To return to Normal mode, turn off your device and then turn it back on.
3.9 Factory reset to fix Android black screen of death
The factory reset is the option that enables the factory state of your device by erasing all data, settings, bugs, and apps. Your device will be fresh like factory condition after this reset. Worth mentioning here, you’ll lose all the internal data and installed apps after this reset. So, to overcome the Android tablet black screen of death, you must perform this action as the last option. Follow the below steps carefully.
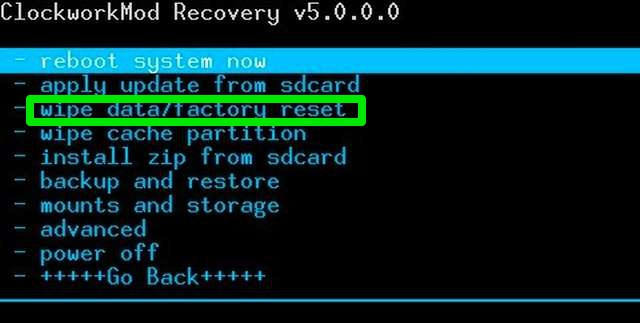
Step 1: Turn off the Vivo Y17s device. Then press the Volume Up + Power button + home button (or press Volume Up + Power buttonS) altogether and let the mobile boot into recovery mode.
Step 2: After booting up in recovery mode, you can find the “Factory data reset” option. Navigate to that option with the volume up and down arrow and select it with the power button.
Step 3: In this step, you need to confirm your action by tapping on the “Yes” option. After this, your device will start erasing. This may take a while to complete the whole process.
Now, your device will reboot automatically and you can see the Android black screen of death problem is solved.
Part 4: How to avoid Android black screen of death?
These are the general methods to overcome the situation of Android screen black. But to avoid this situation, here are a few tips to follow –
- Install apps from trusted suppliers only.
- Use security or antivirus software on your device.
- Take a backup at regular intervals.
- Always keep Android OS updated.
- Don’t keep your mobile charged for a long duration after a full charge.
- If your battery gets old, replace it soon.
- Keep your device’s storage well-maintained. Regularly delete unnecessary data.
- Close unused apps running in the background to conserve system resources.
- Prevent phone overheating by avoiding excessive usage, and not exposing it to direct sunlight for extended periods.
By following these steps, you should avoid the most unpleasant situations, such as the Android screen black. We all know that “Prevention is always better than cure”.
The Bottom Line
There could be a lot of reasons why an Android black screen issue occurs, but the important thing is knowing the correct ways how to fix it. And this article has covered nine proven methods to help you fix an Android phone screen black problem.
But among the methods discussed above, Dr.Fone – System Repair just stood out as this program does not only help you with a black screen of death problem, but it covers many other Android system issues too. It’s also a highly intuitive program that requires no skills to operate.
safe & secure
- Title: 7 Fixes for Unfortunately, Phone Has Stopped on Vivo Y17s | Dr.fone
- Author: Ariadne
- Created at : 2024-07-30 07:56:50
- Updated at : 2024-07-31 07:56:50
- Link: https://howto.techidaily.com/7-fixes-for-unfortunately-phone-has-stopped-on-vivo-y17s-drfone-by-drfone-fix-android-problems-fix-android-problems/
- License: This work is licensed under CC BY-NC-SA 4.0.