
7 Fixes for Unfortunately, Phone Has Stopped on Vivo Y36i | Dr.fone
7 Fixes for “Unfortunately, Phone Has Stopped” on Vivo Y36i
Encountering issues with the Phone app is never welcoming. Being one of the useful apps, seeing it crashing and unresponsive gives sheer despondency. If talked about the triggering points, they are numerous. But the central point is what to do when the Phone app keeps crashing. In this article, we have discussed this issue in detail. To know this and more about why the “Unfortunately, Phone has stopped” error crops up, read this article and get the problem sorted on your own.
 vMix Pro - Software based live production. vMix Pro includes everything in vMix 4K plus 8 channels of Replay and 8 vMix Call
Part 1: When can the “Unfortunately, Phone has stopped” error come?
First things first! You need to stay updated on why the Phone app keeps stopping or crashing before jumping to any solution. Following are the points when this error comes up to annoy you.
- When you install a custom ROM, the issue might occur.
- The upgrading of the software or incomplete updates can lead to crashing the Phone app.
- Data crashes can be another reason why this error shows up.
- Infection through malware and virus on your phone is also included when the Phone app might crash.
Part 2: 7 Fixes for the “Unfortunately, Phone Has Stopped” error
### 2.1 Open the Phone app in Safe ModeFirst and foremost, the thing that can let you get rid of this trouble is Safe Mode. It is a feature that will end any excessive background functioning of the Vivo Y36i device. For instance, your device will be able to run sans any third-party apps when in Safe mode. Since the important functions and the naïve apps will be running on the Vivo Y36i device, you will get to know if it’s really a software glitch or not by running the Phone app in Safe mode. And this is the first solution we would recommend you make use of when the Phone app has stopped. Here is how to enable Safe Mode.
- Switch off the Vivo Y36i phone first.
- Now keep pressing the “Power” button until you see the Vivo Y36i logo on the screen.
- Release the button and immediately press and hold the “Volume Down” key.
- Leave the key once the Vivo Y36i device is in Safe mode. Now, the third-party apps will be disabled and you can check if the Phone app is still not responding or everything is fine.
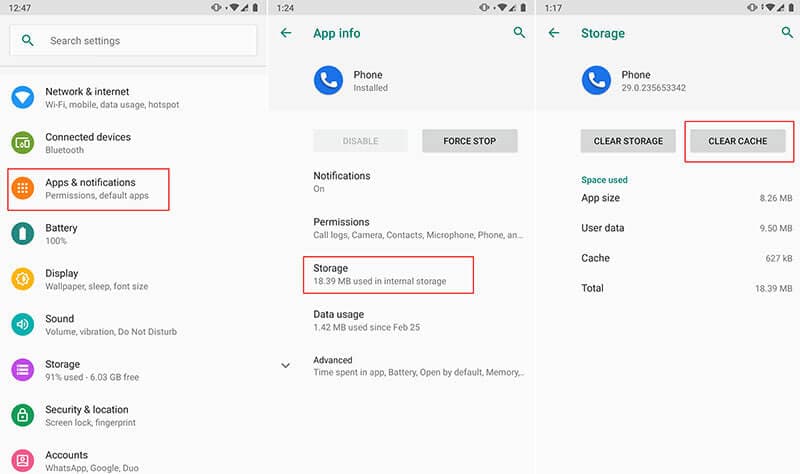
2.2 Clear the cache of the Phone app
The cache should be cleaned timely if you want any app to work properly. Due to the constant usage, the temporary files get collected and may corrupt if not cleared. Hence, the next solution you should try when the Phone app keeps stopping is to clear the cache. Here are the steps to be performed.
- Open “Settings” on your device and go to “Application” or “Apps”.
- Now from the list of all applications, go to “Phone” and tap on it.
- Now, click on “Storage” and choose “Clear Cache”.
2.3 Update Google Play services
Since Android is created by Google, there must be some Google Play services that are crucial to run several system functions. And if attempting the previous methods isn’t of any use, try updating Google Play services when you find the Phone app stopped. For doing this, you need to make sure that automatic updates are turned on in Google settings. If not, enable it and get the apps including Google Play services updated for smoother functions.
 Epubor Audible Converter for Mac: Download and convert Audible AAXC/AA/AAX to MP3 with 100% original quality preserved.
2.4 Update the Vivo Y36i firmware
When the firmware is not updated, it may conflict with some apps and maybe that’s why your Phone app falls prey. Therefore, updating Vivo Y36i firmware will be a sane step that should be taken when the Phone app has stopped. Follow the below-mentioned steps and then check if the Phone app is opening or not.
- Open “Settings” and go to “About Device”.
- Now tap on “Software Updates” and check for the availability of the new update.
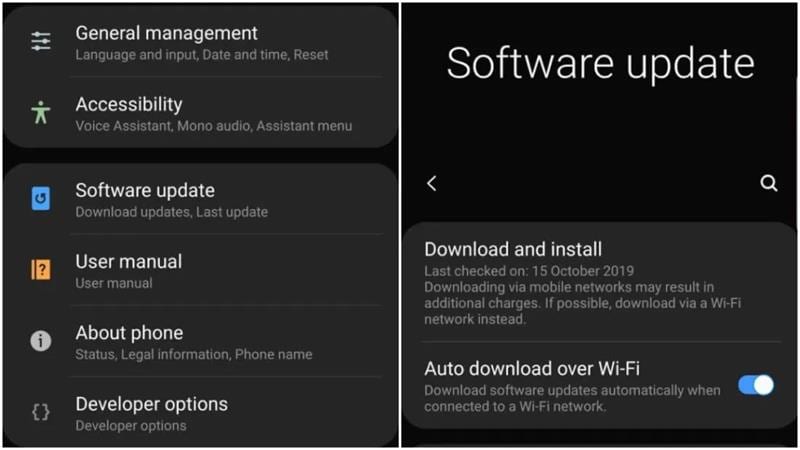
- Download and install it and then try to use the Phone app.

2.5 Clear partition cache
Here is another resolution for the “Unfortunately Phone has stopped” error. Clearing the partition cache will remove the whole cache of the Vivo Y36i device and make it work like before.
- Switch off your device to begin with and enter the recovery mode by pressing the “Home”, “Power” and “Volume Up” buttons.
- The recovery mode screen will appear now.
- From the menu, you need to choose “Wipe Cache Partition”. For this, you can use the Volume keys to scroll up and down.
- To select, press the “Power” button.
- The process will begin and the Vivo Y36i device will restart post it. Check if the problem still persists or it is finished. If unfortunately not, get to the next and the most productive solution.


2.6 Get the Vivo Y36i system repaired in one click
If still, the Phone app keeps stopping after trying everything, here is the most effective method that can surely help you. Dr.Fone - System Repair (Android) is a one-click tool that promises to repair Android devices hassle-free. Be it apps crashing, the black screen, or any other issue, the tool has no problem fixing any sort of issue. Here are the benefits of Dr.Fone - System Repair (Android).

Dr.Fone - System Repair (Android)
Android repair tool to fix “Unfortunately, Phone Has Stopped” on Vivo Y36i devices.
- It takes no special skills to operate it and fairly works to bring the Android system to normalcy.
- It shows great compatibility with all Vivo Y36i devices and other Android phones supporting over 1000 Android brands.
- Fixes any kind of Android issue without any complication.
- Easy to use and trusted by millions of users and therefore has a higher success rate.
- Can be downloaded freely and friendly user interface.
3,106,444 people have downloaded it
How to fix crashing Phone app using Dr.Fone - System Repair (Android)
Step 1: Get the Software Installed
Click the “Start Download” button to download the tool on your computer, and then open the program to begin the repair, click on “System Repair”.

Step 2: Plug the Phone with PC
Take your original USB cord and then connect your Vivo Y36i to the computer. When the Vivo Y36i device is connected, click on “Android” from the two tabs > click “Start”

Step 3: Enter the Details
As the next step, enter some important details on the next screen. Be sure to enter the right name, brand, and model of the Vivo Y36i device. When done everything, verify once and click on “Next”.
 SwifDoo PDF Perpetual (1 PC) Free upgrade. No monthly fees ever.

Step 4: Downloading Firmware
Downloading firmware will be the next step. Prior to this, you have to go through the instructions given onscreen to enter the DFU mode. Please click on “Next” and the program will bring the suitable firmware version and start downloading it.

Step 5: Get the Vivo Y36i device Repaired
When you see the firmware has been downloaded, the issue will begin to get resolved. Hang on and wait until you get notified for the repair of the Vivo Y36i device.

 safe & secure
2.7 Factory reset
If none of the above methods worked for you, the last resort you are left with is a factory reset. This method will wipe everything from your device and make it function like normal. We also suggest you make a backup of your data if it is important so as to prevent the loss. Here is how to do this to fix the crashing Phone app.
- Open “Settings” and go to the “Backup and Reset” option.
- Look for “Factory data reset” and then tap on “Reset phone”.
- Within a while, your device will go through resetting and boot up to normalcy.


WPS Office Premium ( File Recovery, Photo Scanning, Convert PDF)–Yearly
safe & secure

How to Fix Error 495 While Download/Updating Android Apps On Vivo Y36i
Error 495 is a common error that occurs while downloading or updating apps from Google Play Store. This error is usually caused by a problem with the Google Play Store, and it can be fixed by clearing the cache and data of the Google Play Store app. If you are experiencing this error, follow the steps below to fix it.
In this article, you will learn why the Android error 495 pops up, possible solutions to bypass, as well as a dedicated repair tool to radically fix error 495.
We always like to explore every new feature or the features that already exist on our devices. We have a tendency to be the master of our device and want to know every bit of the handset. Unexpected errors ruin that experience and it is just frustrating to experience these errors. And the worst part is that we have no idea where we are wrong or what we did that led to the error. Same is the case with the error 495 which occurs due to downloading or updating of Android Apps. You may have spent countless hours on the internet to find the right solution for error code 495 but even after following many of the most guaranteed steps sometimes the error still doesn’t go away.
However, this article will provide you various methods to get rid of the Error 495 play store problem that you face and you will not have to depend on any other sources for your solution.
Reasons for Google play error 495
Android Apps are most commonly downloaded from the Google Play Store with the help of Wi-Fi or Cellular Data. One may come across many types of errors. Mostly the errors come in during the download or update or installing time. Error 495 occurs when the user isn’t being able to download or install an app over Wi-Fi, but the user is able to do the same thing over cellular data.
Technically speaking, the issue is caused when the connection to the Google Play servers, where the app is hosted, times out. Which is unable to resolve by itself.
Also, there could be another reason that it cannot sync with the servers.
Now that we know the possible reasons for the error 495, let us also know how to get rid of it in the sections below.
Solution 1: One Click to Fix error 495 by Android Repair
Tried several methods to make the error 495 disappear, but nothing works? Well, many people have experienced the same frustration. The root cause is that something is wrong with the Android system. You need to have your Android system repaired to fix error 495 in this situation.
Note: Having your Android system repaired may lose existing data on your Android. Backup the data on your Android before the Android repair.
Dr.Fone - System Repair (Android)
Best tool for fundamental Android repair in one click
- Fixes all Android system issues like error 495, system UI not working, etc.
- One click for Android repair. No special technics needed.
- Supports all the new Vivo Y36i devices like Galaxy Note 8, S8, S9, etc.
- Step-by-step on-screen instructions provided to fix error 495 without any hassle.
3,390,486 people have downloaded it
With Dr.Fone - System Repair (Android) , you can easily fix error 495 in few steps. Here is how:
- Download, install, and launch Dr.Fone - System Repair (Android). Connect your Android to your computer with a USB cable.
- Select the option “Repair” > “Android Repair”, and click “Start”.

- Select the Vivo Y36i device information like brand, name, model, etc., and confirm your selection by typing in “000000”.

- Press the stated keys to boot your Android in download mode to download the firmware as instructed.

- After the firmware is downloaded, the program will automatically start to repair your Android.

Solution 2: Clear the Google Service Framework cache to Fix error 495
Step 1:
Go to the “settings” of your device. Once the series of sections comes up, tap on the “APPS” section.
Step 2:
Click on ‘All Apps’ or ‘Swipe to All’ and the open the section named “Google Services Framework App”
 .
.
STEP 3:
Open “App Details” and the screen shown in the image should come up on your device. As shown in the image, follow the three steps. First, tap on “Force Stop” and then second, tap on the “Clear Data” option and finally go ahead and tap on the “Clear Cache” option.
Following the above steps should solve your problem of Google Play Error 495. And you can enjoy back to using the apps which you couldn’t download or update due to the Error 495.
 Any DRM Removal for Win:Remove DRM from Adobe, Kindle, Sony eReader, Kobo, etc, read your ebooks anywhere.
Solution 3: Reset App Preference in Google play Store to Fix error 495
STEP 1:
Go to the settings section in your device. It will be differently placed for different devices and different users.


STEP 2:
Once the Settings section is open. A lot of further sections will pop up. No find the section named “Application Manager” or “Apps”. After locating it, tap on that section.

STEP 3:
Now go ahead and tap or slide to a section named “ALL”.
STEP 4:
After reaching the “ALL” section tap the touch button to open menu/properties and choose an option named “Reset Apps” or “Reset App Preferences”.
There’s no need to be alarmed because on clicking the reset option, the apps won’t be deleted but it is only going to re-set them. And hence solving the Error 495 created in the Google Play.

Solution 4: Fix Error Code 495 by installing a VPN app
The Error code 495 can be easily removed in another interesting way too. On downloading a Virtual Private Network (VPN) and then operating the play store automatically solves the error 495.
STEP 1:
Install Hideman VPN (using any other VPN will also make it work) from Google Play store. (If the error persists for this app too then download it from a different app store or by using a third-party store).
STEP 2:
Now open the app and select the United States as the country of connection and press the option named Connect.
STEP 3:
Open Google Play Store and Download any app without the Error Code 495 coming in and bothering.
This fix will work for most of the Google Play Errors and not just only The Error Code 495.
Solution 5: Remove your Google Account & Reconfigure it to fix error 495
Removing the Google account and re-configuring it is a very common method adopted to get rid of the Error 495. Adopt the following steps to complete this method.
STEP 1:
Go to the “Settings” section of your device. Like it was mentioned before, different devices and different users will have the placement of the settings section in a different place.

STEP 2:
Go to the accounts section in the settings tab.

STEP 3:
In the accounts section tap on the Google Account part
STEP 4:
Inside The Google section, there’ll be an option called “Remove Account”. Tap on that section, to remove your google account.
 WonderFox DVD Ripper Pro
STEP 5:
Now go ahead and re-enter/ re-register your Google account and check if the Error 495 still persists.
Now you have completed all the steps and your problem should be solved.
Solution 6: Fix error code 495 by Removing your Google Play Store Data & Cache
One of the best and most accurate methods in the series of various steps in eradicating the Error Code 495 in Google Play Store is by removing the Google play Store Data and Cache. In order to do so follow the steps mentioned below. After following the steps it is guaranteed that the Error code 495 will be done with and you won’t experience any such problems in the future.
STEP 1:
Go to the “Settings” section into your mobile device. The settings can be accessed by scrolling down and pulling down the drop-down menu and most likely the settings app will be on the top-right corner. Otherwise, it will be found after opening the app drawer.

STEP 2:
Once after opening the settings section, select the “Installed apps” or the “Apps” section.

STEP 3:
Find the “Google Play Store” section and select that too.
STEP 4:
Tap on the “Clear data” & “Clear Cache”.


Doing the above steps will clear your caches of the Google Play Store. Now you have a new google Play store.
Hence in this article, we got to know about the error 495 and the possible solutions to it as well. Also, this article explains how Error code 495 can be removed by 5 different ways. These are the best ways by which you can remove or get rid of the Error Code 495. In case one of the method fails, use the other one to rectify this recurring error 495 on your Vivo Y36i.
Reasons for Vivo Y36i Stuck on Boot Screen and Ways To Fix Them
One of the main reasons why people own a phone is for convenience. It will be ironic if that device, supposed to grant convenience, provides problems instead. Some people face this when their Android phone is stuck on the logo page and unable to do anything. As expected, this is common in Android phones and is why people are unhappy with Android phones.
This article will share the possible reasons why your Android phone is stuck on the boot screen. This article will share three possible reasons for this problem and five valuable tips to help fix this issue. If all else fails, we have an application to share and recommend that is guaranteed to solve your problem in no time. Keep on reading to find out more!
Part 1. Why Is Your Vivo Y36i Stuck on the Boot Screen?
There are countless reasons why a problem happens, just like why your Android phone is stuck on the logo page. This section sieved out the top 3 reasons why your Android boot screen happens and some tips to overcome it.
 Video Converter Factory Pro
1. Changes to the Software
Android is a flexible operating system. It allows users to customize it in any way they desire, which is Android’s beauty. The customizable nature of the operating system allows users to unlock, root, flash, and tinker. However, this flexibility in customization might be a double edge sword. Accidental tampering with the Android system might result in software problems, such as being stuck on the Android boot screen.
Fortunately, this is not a complicated fix. Android accepts different fixes and allows the system to return to how it once was. Even with software issues, the system does not get completely inoperable. The best way to fix changes to the software is to start from the beginning of the process. This might offer the best chance for you to restore your phone to normal.
Although it is fun to customize and change the software, following trusted sources ensures you do not damage your phone. Having an Android phone stuck on the logo page is one of the many examples of the problems that might happen if changes to the software go out of hand.

2. Android Software Updates
Updates are a common cause of Android phones stuck on the logo. It happened when the update did not complete as it should have been. Several reasons for incomplete updates, such as poor internet connection, the connection between computer and phone being lost, a power cut, the phone freezing, and the list go on. When an update is uncompleted, issues such as being stuck at the Android boot screen and many others might occur.
Before an update starts, your mobile device will notify you of the duration of the update. As a tip, set aside an additional 10-15 minutes on top of the update duration to ensure your update is completed successfully. It will be ideal for activating the software update only when there is sufficient power in your phone or keep it charging during the update.
When an update is disrupted or stopped before it completes, the existing Android version will become corrupted while the new software to be updated is incomplete. This means that your Vivo Y36i has no system to run on. Always complete your software updates, and you will not have the problem of your Android phone getting stuck on the logo.

3. Malfunctioning Applications
If you noticed that your Android phone is stuck on the logo page only after installing certain apps, there is a high chance that the app is not compatible with the existing apps in your phone or with the Android version. When an app conflicts with the Android system or other apps, this will run into problems with your phone.
This problem typically happens when an app is downloaded from a third-party source, not the official Google Play Store. This app from a third-party source might be malicious or contain a virus. This can cause problems such as being stuck at the Android boot screen.
To overcome this, locate the app that has been giving you issues and remove the app from your phone. Restart your device, and you should be able to have your Vivo Y36i functioning properly.
 /a>
/a>
Part 2. 5 Helpful Ways To Fix Android Phones Stuck on Boot Screen
After understanding the common problems on why your Android phone is stuck on the logo page, here are five easy solutions you can try solving at home.
1. Force Reboot
When encountering problems with your Vivo Y36i, such as being stuck at the Android boot screen, you should first try a forced reboot. This simple yet effective solution could be what you need to solve all your Android problems. It is essential to leave your device turned off for at least a minute or two before turning it back on.
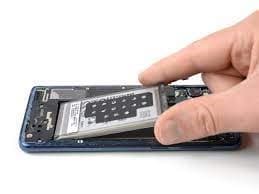
2. Pull Out Battery
Another way to restart your Vivo Y36i when it is frozen is to try taking the battery out. Android devices are designed with a removable battery, and sometimes you can resolve the issue easily by removing the battery and replacing it after a couple of seconds. Then, turn on your device again and test to see if your Android phone is stuck on the logo page.
If it works, then the problem is solved. However, some Android devices come with a built-in battery. For these kinds of devices, a stimulated battery pull should be attempted. A simulated battery pull is a set of instructions telling your Vivo Y36i to switch off and on again. If your device does not offer the simulated battery pull option, omit this troubleshooting option.
 Software Update Pro - Check and update software installed on your computer.
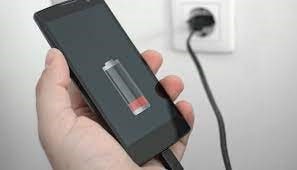
3. Charge Your Device
If your Android phone is stuck on the logo page and not getting past it, no matter how many times you have tried, it may be due to a low battery! As simple as it sounds, plug your device into a power outlet and try restarting your phone. You might be surprised that this simple fix is all it takes to solve your Android problem.
4. Wipe Cache Data
Cache refers to a software or hardware component of an Android device that stores your program and data for reference. This data might result from the daily usage of your device or duplicate data from a different source on the Vivo Y36i device. Similar to a computer, if the cache occupies too much space on your device, it might cause your Vivo Y36i to become slower and eventually get stuck at the Android boot screen.
Wiping out the cache data from your Vivo Y36i could free up more space, allow your device to function faster, and avoid problems such as being stuck at the Android boot screen. Do not worry; wiping the cache data is entirely safe and will not lead to any loss of important data or programs on your phone.

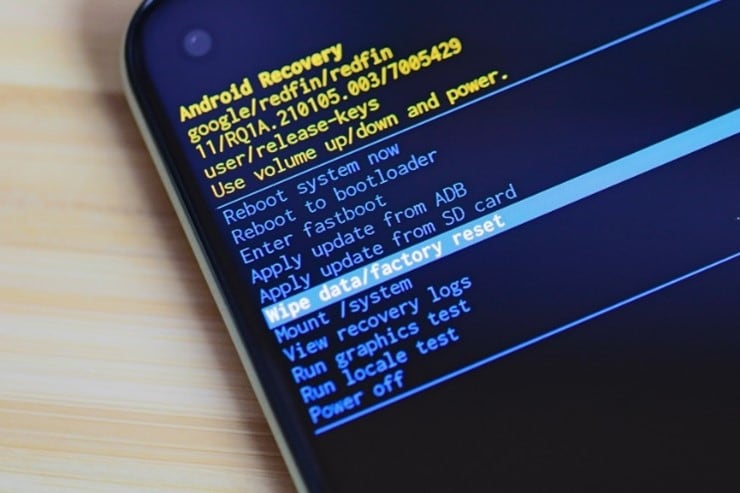
5. Factory Reset
If all the methods above fail, performing a factory rest might be your last option. However, it is important to note that performing a factory reset will erase everything on your phone, including apps, contacts, photos, etc. As a tip, back up all your data from your device before performing a factory reset. That way, you can still retrieve all your precious information after the reset.
Follow the steps below to perform a factory rest on your Vivo Y36i:
Step 1: Turn off your phone and press the Power button and Volume Down button at the same time
Step 2: Use the Volume button to scroll the options and highlight Wipe data/factory reset. Press the Power button to begin the factory reset.

Part 3. Bonus Tip: Best App To Solve Android Phone Stuck On Boot Screen
If all the solutions above do not work and you do not want to perform a factory reset on your phone, one option is to use an app called Dr.Fone. It is one of the most effective phone recovery solutions and can help to bring your Vivo Y36i back to a state like it was brand new. Being stuck on the Android boot screen will be a problem of the past.
Refer to the tutorial below to solve your Android phone is stuck on the logo page issue.
Step 1: Download and install Dr.Fone – System Repair (Android) on your computer. Open the application and connect your Vivo Y36i to the computer.
Step 2: Select the issue you face on the next page. If you use a Vivo Y36i phone, select Stuck at Vivo Y36i Logo. Alternatively, you can click on Black Screen or Stuck in Boot Loop.
Step 3: Input the Brand, Name, Model, Country, and Carrier of your phone and click on Next.
Step 4: Follow the instructions provided on the page and wait for the system repair to finish. After which, click on Done to complete the process.
safe & secure
Conclusion
This article summarizes some possible reasons your Android phone is stuck on the logo page. Five useful strategies were shared to easily overcome your Vivo Y36i being stuck in the boot. However, if all the above methods do not work, we recommend trying the Dr.Fone-System Repair.
Dr.Fone-System Repair repairs the operating system issues and fixes the problem with your Vivo Y36i. Once you power on your Vivo Y36i again, you can rest assured that it will be like new.
- Title: 7 Fixes for Unfortunately, Phone Has Stopped on Vivo Y36i | Dr.fone
- Author: Ariadne
- Created at : 2024-07-30 07:57:01
- Updated at : 2024-07-31 07:57:01
- Link: https://howto.techidaily.com/7-fixes-for-unfortunately-phone-has-stopped-on-vivo-y36i-drfone-by-drfone-fix-android-problems-fix-android-problems/
- License: This work is licensed under CC BY-NC-SA 4.0.