
7 Solutions to Fix Error Code 963 on Google Play Of Xiaomi Redmi Note 12 5G | Dr.fone
7 Solutions to Fix Error Code 963 on Google Play Of Xiaomi Redmi Note 12 5G
People are increasingly complaining about Google Play Error Codes which pop-up during downloading, installing or updating an App via Google Play Store. Amongst these, the most recent and common one being Error Code 963.
Google Play Error 963 is a typical error which shows up not only when you try to download and install an App but also during App update.
Error 963 cannot be attributed to a particular App or its update. It is a Google Play Store error and is experienced by Android users across the world.
Error Code 963, just like any other Google Play Store errors, is not something difficult to deal with. It’s a minor glitch which can be fixed easily. There is no need to worry or panic if you see Error 963 on Google Play Store preventing your favorite App from downloading or updating.
Read on to find out more about the Google Play Error 963 and best ways to fix it.
Part 1: What is Error Code 963?
Error 963 is a common Google Play Store error which basically hinders Apps from downloading and updating. Many people get worried when Error Code 963 does not let them install new Apps or update existing ones. However, please understand that Google Play Error is not such a big deal as it may sound and can be overcome easily.
Error 963 pop-up message reads as follows: “cannot be downloaded due to an error (963)” as shown in the image below.

A similar message shows up even while you are trying to update an App, as shown in the screenshot below.

Error Code 963 is basically an outcome of data crash which mostly is seen in cheaper smartphones. There might another reason for Error 963 preventing Apps from downloading and updating, which is Google Play Store Cache being corrupted. People also speculate SD Card related issues as many-a-times external memory enhancer chips do not support large Apps and their updates. Also, Error 963 is very common with HTC M8 and HTC M9 smartphones.
All these reasons and more can handle with ease and you can continue to use Google play services smoothly. In the following segment, we will discuss various fixes to cure the problem to enable to you download, install and update Apps on your device normally.

Part 2: Easiest solution to fix Error Code 963 on Android
When it comes to the most convenient solution to fix error 963, Dr.Fone - System Repair (Android) cannot be missed. It is the most productive program that covers a wide range of Android issues. It ensures full safety while performing and one can fix the Android issues in a hassle-free way.
Dr.Fone - System Repair (Android)
One click to fix Google Play error 963
- The tool is recommended for its higher success rate.
- Not just Google Play error 963, it can fix a large number of system issues including app crashing, black/white screen etc.
- It’s considered as the first tool that offers one-click operation for Android repairing.
- There’s no technical expertise needed to use this tool.
4,997,014 people have downloaded it
This section will provide you the tutorial guide for how to fix error code 963.
Note: Before moving to solve the error 963, we would like to inform you that the process may result in wiping away your data. And therefore, we suggest you to make backup of your Xiaomi Redmi Note 12 5G prior to fixing this Google Play error 963.
Phase 1: Connecting and preparing the Xiaomi Redmi Note 12 5G device
Step 1 – To begin fixing error 963, run Dr.Fone after downloading and installing it on your PC. Now, pick out the ‘System Repair’ tab from the main screen. Thereupon, with the help of a USB cable, make connection between your Xiaomi Redmi Note 12 5G and PC

Step 2 – On the left panel, you’re supposed to choose ‘Android Repair’ and then click the ‘Start’ button.

Step 3 – On the following screen, you need to choose the appropriate details for your device like the name, brand, model, country/region etc. Later, go for warning confirmation and hit ‘Next’.

Phase 2: Taking Android device in Download mode for repairing
Step 1 – It is essential to get your Xiaomi Redmi Note 12 5G or tablet entered in Download mode. For this, following are the steps to be taken:
If the Xiaomi Redmi Note 12 5G device contains Home button:
- Turn the Xiaomi Redmi Note 12 5G device off and then keep holding the ‘Power’, ‘Volume Down’ and ‘Home’ buttons altogether for about 10 seconds. Next, release them all and push the ‘Volume Up’ key. This way, your device will enter the Download mode.

If the Xiaomi Redmi Note 12 5G device contains no Home button:
- Switch off your phone/tablet and press the ‘Volume Down’, ‘Bixby’ and ‘Power’ buttons for 10 seconds. Leave the buttons and then press the ‘Volume Up’ button for entering download mode.

Step 2 – Press the ‘Next’ button and then the program will commence the firmware downloading.

Step 3 – Upon successful downloading and verification of the firmware, the process of Android device repairing will begin automatically.


Step 4 – Within a while, the Google play error 963 will be vanished.
 Glary Utilities PRO - Premium all-in-one utility to clean, speed up, maintain and protect your PC

Part 3: 6 Common Solutions to fix Error Code 963

Since there is no specific reason for Error Code 963 to occur, similarly there is no one solution to the problem. You may use any one of them below or try them all to never see Error Code 963 on your device.
1. Clear Play Store Cache and Play Store Data
Clearing Google Play Store Cache and Data basically means keeping Google Play Store clean and free from trouble-making data stored in respect of it. It is advisable to carry out this process regularly to prevent Errors like Error Code 963 from occurring.
Follow the steps given below to fix Error Code 963:
Visit “Settings” and select “Application Manager”.

Now select “All” to see all downloaded and built-in Apps on your device.
Select “Google Play Store” and from the options that appear, tap on “Clear Cache” and “Clear Data”.

Once you are done clearing Google Play Store Cache and Data, try to download, install or update the App facing Google Play Error 963 again.
2. Uninstall updates for Play Store
Uninstalling Google Play Store updates is an easy and quick task. This method is known to have helped many as it brings back the Play Store to its original state, free from all updates.
Visit “Settings” and select “Application Manager”.

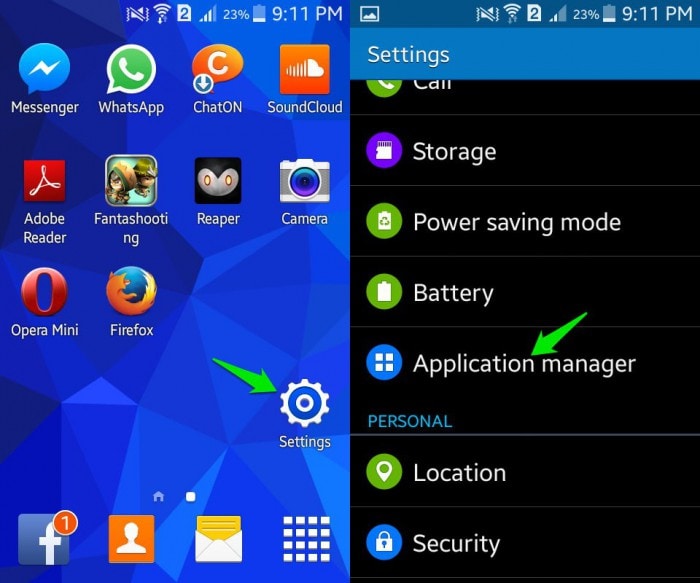
Now select “Google Play Store” from “All” Apps.


In this step, click on “Uninstall Updates” as shown below.
 Any DRM Removal for Mac: Remove DRM from Adobe, Kindle, Sony eReader, Kobo, etc, read your ebooks anywhere.
3. Shift the App from SD Card to device’s memory
This method is strictly for certain Apps which cannot be updated because they are stored on an external memory card, i.e., SD Card. Such memory enhancing chips do not support large Apps and due to a shortage of space prevents them from updating. It advisable to move such Apps from the SD Card to the Xiaomi Redmi Note 12 5G device’s internal memory and then try to update it.
Visit “Settings” and select “Apps”.
From “All” Apps click on the App which is unable to update.
Now click on “Move to Phone” or “Move to internal storage” and try to download its update again from the Google Play Store.
Try updating the App now. If the Apps’s update does not download even now, DO NOT worry. There are three more ways to help you.
4. Unmount your external Memory Card
Error Code963 may also occur due to an external memory chip used in your device to enhance its storage capacity. This is very common and can be dealt with by unmounting the SD Card temporarily.
To unmount your SD Card:
Visit “Settings” and keep scrolling downwards.
Now select “Storage”.
From the options that appear, select “Unmount SD Card” as explained in the screenshot below.
 Forex Robotron Basic Package
Note: If the App or its update downloads successfully now, do not forget to mount the SD Card back.
5. Remove and Re-add your Google account
Deleting and re-adding your Google account in might sound a little tedious but it does not take much of your precious time. Moreover, this technique is very effective when it comes to fixing Error Code 963.
Carefully follow the steps given below to remove and then re-add your Google account:
Visit “Settings”, under “Accounts” select “Google”.
Select your account and from the “Menu” select “Remove account” as shown below.


Once your account is removed, follow the steps given hereunder to add it back again after a few minutes:
Go back to “Accounts” and select “Add Account”.

Select “Google” as shown above.
In this step feed in your account details and your Google account will be configured once again.
6. Special technique for HTC users
This technique is specially crafted fro HTC smartphone users who frequently face Google Play Error 963.
Follow the step-by-step instructions given below to uninstall all updates for your HTC One M8 Lock Screen App:
Visit “Settings” and find “HTC Lock Screen” under “Apps”.
Now click on “Force Stop”.
In this step, Click on “Uninstall Updates”.
This remedy is as simple as it sounds and has helped many HTC users to get rid of Error 963.
Google Play Errors are a very common phenomenon these days, especially Error Code 963 which usually occurs in the Google Play Store when we try to download, install or update an App. There is no need to worry if you see Error Code 963 pop-up on your screen as your device and its software are not to be blamed for Error 963 to suddenly surface. It is a random error and can be fixed easily by you. You do not need any technical assistance to deal with the issue. All you need to do is follow the steps introduced in this article to use Google Play Store and its services smoothly.
 EmEditor Professional (Lifetime License, non-store app)
How to Flash Dead Xiaomi Redmi Note 12 5G Safely
- Fix malfunctioning Android to normal in one click.
- Highest success rate to fix all Android issues.
- Step-by-step guidance through the fixing process.
- No skills required to operate this program.
A phone is considered to be dead when it becomes completely unresponsive and refuses to switch on. Similarly, an Android phone is said to be dead when it does not boot up. You may try to switch it on several times by pressing the power button but in vain. You will see no sign of the phone’s logo or anything like a welcome screen. The Android phone’s screen remains black and does not illuminate when you try to turn it on. Interestingly, even when you charge this dead device, it does not show that it is getting charged.
Many people regard this as a battery issue, and many think of it as a temporary software crash. Some users also seem to believe that this is because of a virus attack. However, if you are looking for ways that tell how to fix a dead Android phone, you must understand that a dead phone or device can be cured by flashing custom firmware safely. If you are keen to know how to flash a dead Android phone or how to flash dead Android phones using PC, here are ways to help you.
Given below are eight techniques to flash your Xiaomi Redmi Note 12 5G safely, depending upon which phone you are using. It may seem time-consuming and tedious, but we can assure you that it works. So, move ahead and read on to learn about flashing new firmware, your Xiaomi Redmi Note 12 5G, MTK Android, and Xiaomi Redmi Note 12 5G safely.
 safe & secure
Part 1: Can a Dead Phone Be Flashed?
Flashing a dead Android phone might be skeptical for many users who have been in such a situation. Although it is possible to flash a dead Android phone, it is essential to be aware of the reasons that lead you into such a situation. Before a remedy, diagnosing the problem is a necessity for retaining the Xiaomi Redmi Note 12 5G device.
From battery issues to physical damage to the Xiaomi Redmi Note 12 5G device, there can be many reasons your Xiaomi Redmi Note 12 5G died. The reasons for a dead Android phone are not restricted to these points. There can be software-related issues or firmware issues that might cause such havoc on your Android.
## Part 2: How to flash Xiaomi Redmi Note 12 5G in one clickWhile you are worried about how to flash Xiaomi Redmi Note 12 5G instantly with a single click, Dr.Fone - System Repair (Android) swiftly makes its way with a galore of options for you. This amazing tool from Wondershare can fix a plethora of Android system issues such as crashing of apps, black screen of death, failed system update, etc. Moreover, it can also get your device out of boot loop, unresponsive bricked Android mobiles as well as stuck at the Xiaomi Redmi Note 12 5G logo.
 Easy and Safe Partition Software & Hard Disk Manager
Dr.Fone - System Repair (Android)
One-click solution to flash Xiaomi Redmi Note 12 5G
- The high success rate in fixing Xiaomi Redmi Note 12 5G Android devices.
- All the latest Xiaomi Redmi Note 12 5G devices are supported by this software.
- One-click operation of this tool helps you how to flash Xiaomi Redmi Note 12 5G easily.
- Being very intuitive, it doesn’t need you to be tech-savvy to use this software.
- It is one of its kind and the first one-click Android repair software on the market.
3981454 people have downloaded it
Step-by-step Tutorial
We are going to explain how to flash a dead Android phone using a PC using Dr.Fone - System Repair (Android)
Note: Before you understand how to flash Dead Android phone, take a backup of your data and then proceed to avoid any data loss.
Phase 1: Prepare your Xiaomi Redmi Note 12 5G
Step 1: Once you have downloaded and installed Dr.Fone, launch it. From the main menu, tap on ‘System Repair’ and get your Xiaomi Redmi Note 12 5G connected to it.
Step 2: Click ‘Android Repair’ from the available options, and then press the ‘Start’ button to fix the Dead Android phone by flashing it.
Step 3: On the Xiaomi Redmi Note 12 5G device information screen, pick the appropriate device brand, name, model, and other details followed by tapping the ‘Next’ button.
Phase 2: Put the Android device in Download mode to start repair.
Step 1: It is essential to boot your Xiaomi Redmi Note 12 5G in Download mode before repairing.
- If the Xiaomi Redmi Note 12 5G device has a ‘Home’ button: Turn it off and then hold down the ‘Volume Down’, ‘Home’, and ‘Power’ buttons altogether for 5-10 seconds. Un-hold all of them and hit the ‘Volume Up’ button for entering ‘Download’ mode.
- In the absence of a ‘Home’ button: Switch off the Android device and hold the ‘Volume Down’, ‘Bixby’, and ‘Power’ buttons for 5 to 10 seconds, then release them. Hit the ‘Volume Up’ button for entering the ‘Download’ mode.
Step 2: Press the ‘Next’ button for initiating firmware download.
Step 3: Once the firmware gets downloaded and verified Dr.Fone - System Repair (Android) starts to flash your Dead Android phone. All the Android system issues will be fixed soon after.
safe & secure
Part 3: How to flash Xiaomi Redmi Note 12 5G dead phone with Odin?
In this segment, we will learn how to fix the dead Android phone, i.e., Xiaomi Redmi Note 12 5G phones using Odin software. Odin is software used internally by Xiaomi Redmi Note 12 5G to generally unblock devices and perform a more utility-based job, namely, flashing new firmware in place of the old one. There are different variants available, so choose the one which is supported by your Galaxy phone. Here is a step-by-step explanation of how to flash dead Android phone (Xiaomi Redmi Note 12 5G) using Odin software.
Step 1: Install the driver software on the computer. You can find the best driver software for your device and PC on the official Xiaomi Redmi Note 12 5G website. You may also download Xiaomi Redmi Note 12 5G Kies on your PC. Once you have downloaded and installed the driver software, restart the PC.
Step 2: Now download suitable firmware for your device in the form of a zip folder that you can open and store on your desktop.

Make sure the file is .bin, .tar, or .tar.md5 only as these are the only file types recognized by Odin.


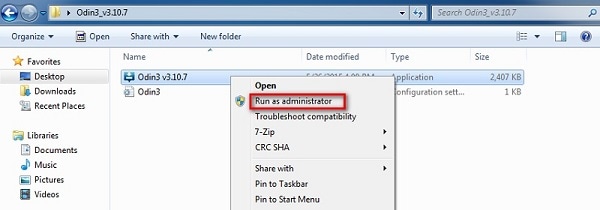
Step 3: In this step, download the latest version of Odin on your PC and move it to the desktop, and then right-click on the downloaded Odin file to select “Run as Administrator”.
 vMix Pro - Software based live production. vMix Pro includes everything in vMix 4K plus 8 channels of Replay and 8 vMix Call
Step 4: Now, boot your dead device to Download Mode by pressing the power, volume down, and home button together. When the phone vibrates, release the power button only.

Step 5: Gently press the volume up button, and you will see the Download Mode Screen.
 OtsAV DJ Pro
Step 6: Now, you may use a USB to connect your Xiaomi Redmi Note 12 5G to the PC. Odin will recognize your device, and in the Odin window, you will see a message saying “Added”.

Step 7: In this step, find the tar.md5 file you downloaded by clicking on “PDA” or “AP” on the Odin window and then click “Start”.
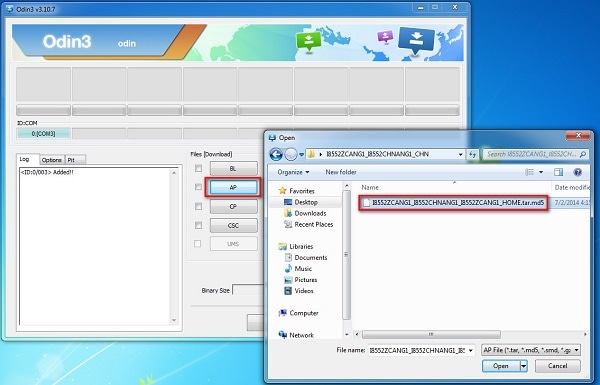
Finally, once the flashing process is complete, your Xiaomi Redmi Note 12 5G phone will reboot and start normally, and you may see a “Pass” or “Reset” message on the Odin window on the PC.
 KoolReport Pro is an advanced solution for creating data reports and dashboards in PHP. Equipped with all extended packages , KoolReport Pro is able to connect to various datasources, perform advanced data analysis, construct stunning charts and graphs and export your beautiful work to PDF, Excel, JPG or other formats. Plus, it includes powerful built-in reports such as pivot report and drill-down report which will save your time in building ones.
 It will help you to write dynamic data reports easily, to construct intuitive dashboards or to build a whole business intelligence cockpit.
KoolReport Pro package goes with Full Source Code, Royal Free, ONE (1) Year Priority Support, ONE (1) Year Free Upgrade and 30-Days Money Back Guarantee.
Developer License allows Single Developer to create Unlimited Reports, deploy on Unlimited Servers and able deliver the work to Unlimited Clients.
Part 4: How to flash MTK Android dead phone with SP Flash tool?
SP Flash tool, also known as SmartPhone Flash tool is a popular freeware tool used to flash custom ROM or firmware in MTK Android phones. It is a very successful tool and is extremely easy to use.
Let us look at the steps given below to learn how to flash dead Android phones using PC with the help of the SP Flash tool.
Step 1: To start with, download and install the MTK driver on your PC and then download the ROM/firmware you wish to use for flashing purposes.
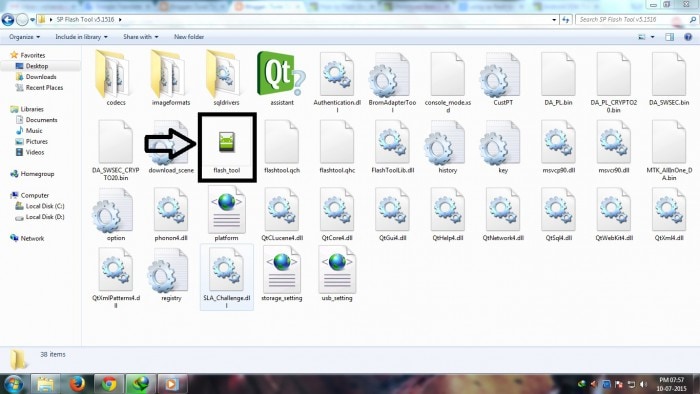
Step 2: Once done, you should download the SP Flash tool and extract it on your PC and move on to launch the Flash_tool.exe file to open the SP Flash tool window.
Step 3: Now, on the SP Flash tool window, click on “Download” and select “Scatter-loading”.
 WonderFox DVD Ripper Pro
Step 4: The last step would be to locate the file downloaded by you and click “Open” and then finally, select “Download” on the SP Flash tool window.
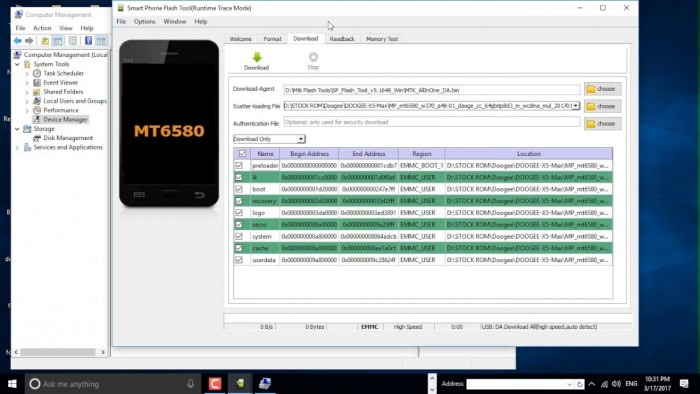
After completing the above steps, connect your dead device to the PC with a USB cable and wait for it to get recognized. The flashing process will take a few minutes to finish and then you will see a green circle indicating “OK Download”.
That’s it! Now simply disconnect your phone and wait for it to reboot.
Part 5: How to flash Xiaomi Redmi Note 12 5G dead phone with the Phoenix tool?
Phoenix tool, better known as PhoenixSuit, is a tool similar to the SP False tool and Odin. It works very well with Xiaomi Redmi Note 12 5G and is the best answer to “How to fix dead Android phone?”, “How to flash dead Android phone using PC?”, etc.
Let’s look at the steps of flashing the Xiaomi Redmi Note 12 5G dead phone with the Phoenix tool.
First, download and install the Xiaomi Redmi Note 12 5G PC Suite driver on your PC. Then you will need to download the PhoenixSuit tool and then launch it.

Now, on the toolbar, click “Tools” and select “Data Package Download” from the drop-down list.
Then move to download the firmware for your dead Xiaomi Redmi Note 12 5G and save it in a new Folder. Once done, go back to the Phoenix tool window and click on “File” and select “Open Product”.

Simply, feed in the details and then click “OK”.

After this, click on “Flashing” and select “Firmware update” and then browse to select the appropriate product code and then click “OK” again.
Then move on to select “Dead Phone USB Flashing” from the Firmware Update Box.

Lastly, just click on “Refurbish” and connect your phone to the PC using a USB cable.
That was it, the flashing process may take up to a few minutes after which your dead Xiaomi Redmi Note 12 5G will restart automatically.
Part 6: How to flash a dead phone that won’t turn on via factory reset?
Using tools for flashing Android devices can be a solution; however, it is heavily restricted to the Xiaomi Redmi Note 12 5G device models. For a generalized solution, there can be other options that you can go with. Factory resetting an Android device by putting it in Recovery Mode is one way. To know how to flash a dead Android phone using factory reset, go through the steps featured below:
Step 1: To initiate the process, you will have to put your Xiaomi Redmi Note 12 5G in Recovery Mode. Generally, Android phones are put in Recovery Mode by holding the “Power” and “Volume Up” keys for a few seconds after turning them off. The key combinations can vary according to your Xiaomi Redmi Note 12 5G.
Step 2: As the Android boot menu opens on your screen, use the “Volume Down” and “Volume Up” keys to scroll up and down the menu. On accessing the “Wipe Data/Factory Reset” option, use the “Power” key to select the particular option.

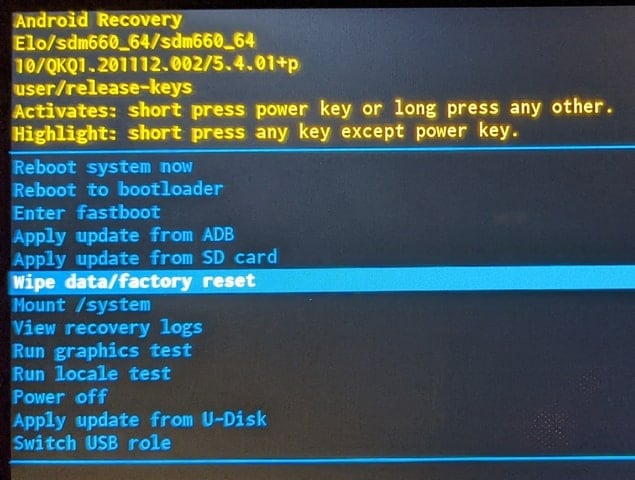
Step 3: Continue to select the “Yes” option for confirming the factory reset of the Android device. The phone will automatically reboot after successfully factory resetting.
Part 7: How to flash a dead Android phone by checking screen faulty
The screen of your Xiaomi Redmi Note 12 5G may be faulty, due to which it is not launching. While seeking the right way of how to fix a dead Android phone, you can force restart your phone using the Volume buttons according to your device model.
If the Android vibrates on restarting and the screen does not lighten up, the problem can be directed to a hardware fault. The screen is broken and needs physical assistance to resolve the issue.

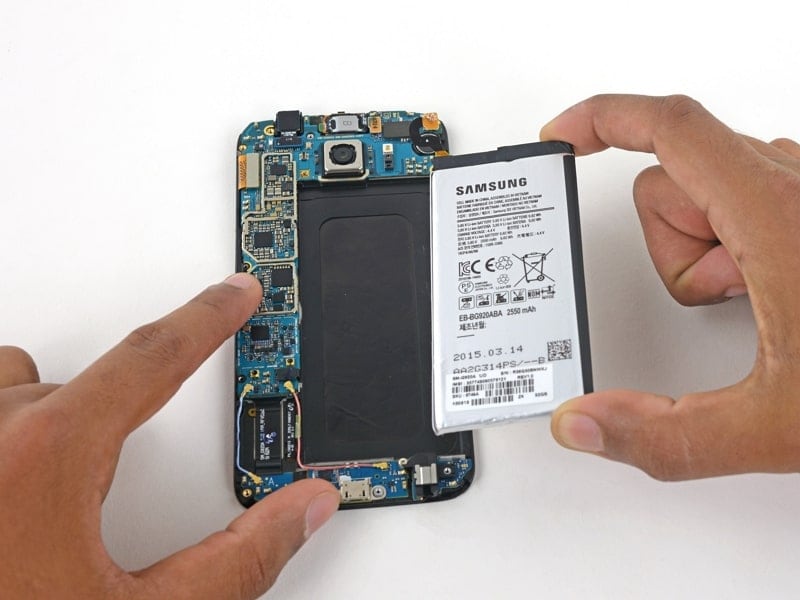
Part 8: How to fix a dead Android phone by changing the battery
Another solution that can help you fix the dead Android phone is changing its battery. The battery of an Android device can last up to 3 years. When its capacity drops to a bare minimum, it is best to change the battery of your Android. Upon trying to restart your Xiaomi Redmi Note 12 5G, if it does not, you might need to replace your battery. All Android phone batteries are removable, which should be regulated with proper supervision.
Part 9: How to repair dead Android phone by contacting official support
If you are unable to discover any proper solution for how to flash dead Android phones, you might have to consult the respective customer support of the Android phone manufacturers. Consult customer support to discover why the phone is dead and how it can be flashed. The respective personnel will assist you in resolving the issue, which might require monetary input from your side.
Conclusion
A dead Android phone might be the cause of worry, but the techniques given above to flash your dead Android device safely are very helpful. These methods have been tried and tested by users all over the world and thus, we recommend them to you. If your phone is dead or has become unresponsive, do not panic. Depending on your phone’s brand, here are ways to guide you on how to fix the dead Android phone and how to flash dead Android phone using PC.
It has been observed that Wondershare Dr.Fone – System Repair (Android) assists in the best way. Resolve all your concerns involving your dead Android phone and flash it to make it operable again.
Carefully follow the instructions given, and you will be able to reboot your dead Android phone successfully.
Authentication Error Occurred on Xiaomi Redmi Note 12 5G? Here Are 10 Proven Fixes
There are times when users get an authentication error while they connect to a Wifi network. The problem is mostly found in Android whenever a device tries to establish a connection to Wifi. If your device is also experiencing an authentication problem Wifi, then don’t worry. It can easily be resolved. In this post, we will make you familiar with the root cause for the Xiaomi Redmi Note 12 5G Wifi problem and how you can resolve whenever authentication error occurred on your device.
 Lyric Video Creator Professional Version
Part 1: Any idea about the Wi-Fi authentication problem?
Wi-Fi authentication has to be done every time you wish to connect to a Wi-Fi network over your smartphone or laptop. To authenticate yourself and connect to the protected Wi-Fi network, you need to have the password of it. But if after you’re putting in the correct password and still experiencing the wifi authentication problem. Here’s what you need to know.
Authentication error occurs when the “deal” between the Wi-Fi router and device fails due to certain reasons. First, the Xiaomi Redmi Note 12 5G device sends the password of the network and the “connect” request in an encrypted format to the Wi-Fi router. Then, the router decrypts the password and compares the password saved on it. Now, if the password matches, it sends affirmation for the “connect” request, and then the Xiaomi Redmi Note 12 5G device is allowed to connect to the network.
Part 2: Why Authentication Error Occurred when Connecting to Wifi?
There could be plenty of reasons for facing an authentication error on your device. Most of the time, it occurs whenever a Wifi router seems to malfunction. Furthermore, if your phone has been recently updated, then chances are that there could be an issue with its drivers. A security attack can also make your device malfunction as well. An unstable connection or a router blockage can also be a reason for this issue.
In this scenario, whenever you try to connect to a Wifi network (even after supplying the correct password and username), it doesn’t connect to it. Instead, it displays an authentication error occurred promptly. Thankfully, there are plenty of ways to overcome the authentication problem Wifi. In the next section, we have provided three different solutions to fix the Xiaomi Redmi Note 12 5G Wifi problem (as it mostly happens on Android devices).

Part 3: 10 Solutions to Fix Wifi Authentication Error
Before we make you familiar with different fixes for the Wifi authentication error, it is important to check your router beforehand. Chances are that you could be getting the authentication error because your router is not functioning properly. You can restart it and try to connect any other device to it as well to check it. After making sure that there is no problem with your network or router, follow these suggestions to overcome the authentication error occurred issue.
Check if extra characters added in Wi-Fi password
Ensure that no other extra characters are being added in the Wi-Fi password while you’re entering it. Key in the password carefully while viewing the characters, and then check if the authentication error occurs or not.
One-Click to Fix Wifi Authentication Error by Android System Repair
Android system repair is considered the most effective way to fix Wifi Authentication Error. As the bottom-layer Android system files may be corrupted unconsciously with days of phone use, the Wifi Authentication Error may be one of the symptoms.
So Android repair requires programming knowledge to do it?
No! With Dr.Fone - System Repair (Android), you can do Android repair in just a few steps and get all issues like Wifi Authentication error fixed easily.
Dr.Fone - System Repair (Android)
An easy-to-operate tool to fix Android system issues like a Wifi authentication error
- Fixes all Android system issues like a black screen of death, Wifi authentication error, etc.
- One-click to fix the Wifi authentication error. No technical skills required.
- Supports all the new Xiaomi Redmi Note 12 5G devices like Galaxy S8, S9, etc.
- Easy-to-follow instructions provided on each of the screens.
3981454 people have downloaded it
Here are the steps to fix Wifi Authentication Error by Android system repair:
Note: Android repair is effective to permanently fix Wifi Authentication Error, but may wipe out the existing phone data. Backup all the important Android data to PC before you go on.
- After the Dr.Fone tool is downloaded, install, and launch it. You can see the following screen.
- Connect your Xiaomi Redmi Note 12 5G to the computer, and select “Android Repair” in the middle.
- Select all the details that match your device, and click “Next”.
- Next up, you should boot your Xiaomi Redmi Note 12 5G in download mode by following the on-screen instructions.

- Allow the program to download the corresponding firmware. After that, the Android repair will start and get the Wifi Authentication Error fixed in minutes.

Use static IP address instead of DHCP
DHCP, or Dynamic Host Configuration Protocol is the default IP address assignment for the Wi-Fi settings on many devices. Whereas DHCP can cause IP address conflict during the dynamic IP address assignment. So, you’d better change “DHCP” to “Static” to see if the authentication error persists.
Step 1: Head to the “Settings” of your Xiaomi Redmi Note 12 5G and then opt for “Wireless and Networks” followed by “WLAN/WiFi”.
Step 2: Now, hit on the WiFi network that is showing “authentication error occurred”.
Step 3: Depending on your Xiaomi Redmi Note 12 5G model, look for “IP Settings” and tap on it. Now, switch the “DHCP” to “Static”.
Step 4: Note down the static IP address fields and wipe off all the fields. Punch it in again and then save it.
 PCDJ Karaoki is the complete professional karaoke software designed for KJs and karaoke venues. Karaoki includes an advanced automatic singer rotation list with singer history, key control, news ticker, next singers screen, a song book exporter and printer, a jukebox background music player and many other features designed so you can host karaoke shows faster and easier!
Check carefully for duplicate Wi-Fi names before you connect
Perhaps, you might connect to a WiFi with a similar name. There are good chances that some users do not modify their WiFi network name and possibly, your neighbor may have the same WiFi network, service provider. Therefore, ensure you connect to the correct WiFi network.
Reset the Wifi network
One of the easiest ways to fix the authentication problem of Wifi is to reset the network. To do this, you would be required to forget the respective network first and then connect to it again. This can be done by simply following these steps.
1. Firstly, you need to forget a Wifi network. To do it, go to your phone’s Settings > WiFi and network. From here, you can see a list of all the Wifi hotspots that your phone connects to. Select the network you wish to forget.

2. When you would select a network, it will provide the basic information related to it. Just tap on the “Forget” button and agree to the pop-up message. This will erase the network’s information from your device.

3. Afterward, turn on your Wifi again and tap to the network you wish to connect to. Simply provide the credentials and tap on the “Connect” button to reestablish the connection. This way, you can reset the network successfully.

Modify network connection
If the above solution won’t work, then you would be required to walk the extra mile to fix the Xiaomi Redmi Note 12 5G Wifi problem. After you reset a network connection, if still getting issues regarding the authentication of the network, you need to modify the connection. In this technique, you will be changing the IP settings on your phone to alter the way it establishes a secure connection. You can do it by following these steps.
1. To start with, visit your phone’s Settings and open the Wifi page.


2. This will display a list of all the Wifi networks that are associated with your device. Just long-tap on the Wifi network that you wish to modify. It will open another pop-up window. From here, tap on the option of “Manage network settings”. Sometimes, users also get an option of “Modify network settings” here as well. Simply select it to proceed.

3. It will display basic information related to your Wifi network. Just tap on the “Show advanced options” button to access more options related to the network setting.

4. From the IP Settings menu, change the field from DHCP to Static. This will let you establish a static connection between your device and the router.


5. As soon as you will change it to static, you will get different fields related to your network’s IP address, gateway, DNS, and more. Simply fill these fields and tap on the “Save” button once you are done.

Now, try to connect to the Wifi hotspot again. You would be able to overcome the authentication problem of Wifi.
 Forex Robotron Gold Package
Change Network Security Type
It has been observed that, when we connect to Wifi, our device chooses a wrong security type. This clashes with the default security protocol of the router and authentication error occurred due to this. If your device is facing the same issue, then it can be fixed by simply changing its security type. To do this, follow these instructions:
1. To change the security type of a network, you need to “Add the network”. If you already have the Wifi network saved, then simply forget the network by following the above-mentioned tutorial.
2. Now, turn on your device’s Wifi and tap on the option of “Add network”. Here, you would be asked to give a network name and select the security type. To manually select it, tap on the “Security” option.

3. From here, you will get a list of various security protocols that you can pick. Select “WPA/WPA2-PSK” and save your selection.


Now, try to connect to the network again. Most likely, it will let you fix the authentication error on your device.
Update Android firmware to the latest
There are instances where an outdated OS version of your Xiaomi Redmi Note 12 5G may create a hindrance in establishing a connection between your device and the WiFi network. You need to update your Android firmware to the latest version and then check if the problem persists or not.
Step 1: Launch “Settings” of your Xiaomi Redmi Note 12 5G and then get into the “About Phone” option.
Step 2: Now, opt for the “System Update” option. If the update is available, get your device updated to the latest OS version.
Restart the router and reset Android network settings
Sometimes, the WiFi router may hang up while establishing a connection and therefore, the wifi authentication problem occurs. Try restarting your Wi-Fi router and then check if your device connects successfully. If this doesn’t work, try to reset your Android Network Settings .
Bonus tip: Turn Airplane mode on/off
By simply turning on the Airplane mode (and later turning it off), you can easily fix the authentication problem Wifi most of the time. You can find a toggle button for Airplane mode on the notification bar of your phone. If you can’t find it there, then go to your phone’s Settings > Connection > More Networks and turn on the feature of “Airplane Mode”.

Let it do for a while. Afterward, turn it off and try to connect to the Wifi network again.
After following these quick and easy suggestions, you would be able to fix the Xiaomi Redmi Note 12 5G Wifi problem for sure. Even if you use any other Android device, then its authentication error can easily be resolved after these effective solutions. Go ahead and give these expert solutions a try and let us know about your experience as well. If you have any other solution to fix the authentication problem Wifi, then share it with us as well in the comments.
- Title: 7 Solutions to Fix Error Code 963 on Google Play Of Xiaomi Redmi Note 12 5G | Dr.fone
- Author: Ariadne
- Created at : 2024-07-30 08:12:22
- Updated at : 2024-07-31 08:12:22
- Link: https://howto.techidaily.com/7-solutions-to-fix-error-code-963-on-google-play-of-xiaomi-redmi-note-12-5g-drfone-by-drfone-fix-android-problems-fix-android-problems/
- License: This work is licensed under CC BY-NC-SA 4.0.