
8 Quick Fixes Unfortunately, Snapchat has Stopped on Infinix Note 30 VIP | Dr.fone
[8 Quick Fixes] Unfortunately, Snapchat has Stopped on Infinix Note 30 VIP
Have you ever been deep in conversation with a loved one or friend, taking advantage of all the funny filters and games Snapchat has to offer when you’ve suddenly been presented with the ‘Unfortunately, Snapchat has Stopped’ error code? This is usually followed by the app crashing back to the main menu.
If so, don’t worry; you’re not alone. Snapchat crashing in this way is nothing new, but it can be incredibly annoying when it keeps happening and stops you from enjoying the conversations you care about.
Fortunately, there are plenty of solutions out there to help you out and get the app working again as it should do. Today, we’re going to explore them all to help you get back to what you were doing before and as though there was never a problem.
Part 1. Install Snapchat again from Google Play Store
Parental Control Software
One of the best ways to resolve the Snapchat crashing problem or Snap Map not working issue is to delete the app and reinstall it again. When you’re using your phone, there is data continually flowing around and data being sent here, there, and everywhere.
During these processes, bugs can occur, and if they can’t sort themselves out, the best thing to do is to reset your app and start from a fresh installation. Here’s how to do it.
Step 1: Hold down the Snapchat app from your main menu and press the ‘x’ button to uninstall the app.
Step 2: Open the Google App Store from your device and search ‘Snapchat’ in the search bar. Find the official app page and download the app onto your device.
Step 3: The app will automatically install itself once downloaded. Open the app, sign in to your account using your log-in details, and you should be able to use the app like normal.
Part 2. Check for new Snapchat Updates

Hand in hand with the problem above, sometimes a bug can restrict Snapchat from working, or perhaps your personal update settings. If you receive a Snapchat from someone with an upgraded version, this can crash your app.
Here’s how to make sure you’re running the latest version of Snapchat is Snapchat isn’t responding.
- Launch the Play Store and navigate to the My Apps and Games page
- Tap the Update button
- The app will now automatically update to the latest version
 Epubor Audible Converter for Win: Download and convert Audible AAXC/AA/AAX to MP3 with 100% original quality preserved.
Part 3. Wipe the cache of Snapchat
If you have a lot of data in your Snapchat cache, this can cause the app to become overloaded in which you’ll need to clear it to start again and refresh the app. This is a common problem that can cause Snapchat has stopped working error.
Here’s how to fix it.
- Open the Snapchat app and tap the Profile icon on the top left-hand side of your screen
 Easy and Safe Partition Software & Hard Disk Manager

- Tap the Settings gear icon on the top right


Scroll down the Settings menu and tap the Clear Cache option
Here, you can choose to Clear All, but you can select individual areas if you prefer
Tap the Confirm option to clear your cache preference completely


Part 4. Fix the system issues that caused Snapchat stopping
If you’re experiencing the Snapchat crashing on Android often, or you’re experiencing similar errors with other apps, this can be an indication that there’s something wrong with your Android operating system.
The best way to fix this is to repair your device using the software known as Dr.Fone - System Repair (Android). This is a powerful repair system that can completely recover your device from any errors, including the Snapchat keeps crashing error.
Dr.Fone - System Repair (Android)
Dedicated repair tool to fix Snapchat crashing on Android.
- Recover your device from any problem, including black screen or unresponsive screen.
- Supports over 1000+ unique Android devices, models, and brands.
- Trusted by over 50+ million customers around the world.
- Can fully repair faults with your Infinix Note 30 VIP’s firmware in a few simple steps.
- One of the most user-friendly applications in the world.
3,889,035 people have downloaded it
To help you make the most of this Android repair software and to fix your Snapchat not responding error, here’s a step-by-step guide on how to use it.
Step 1: Download the Dr.Fone - System Repair (Android) software to your computer. Install the software to your Mac or Windows computer by following the onscreen instructions.
Once completed, open the software, so you’re on the main menu.

Step 2: From the main menu, click the System Repair option, followed by the Android option. Of course, if you have an iOS device you want to repair in the future, the option is there if you want it. Also, connect your Infinix Note 30 VIP to your computer using the USB cable.

Step 3: Confirm details.
On the next screen, use the drop-down menus to confirm the model, brand, operating system, and carrier of your device. Click Next to confirm the details are correct.

Step 4: You’ll now need to put your phone into Download Mode, sometimes referred to as Recovery Mode. For this, you can follow the onscreen instructions. Make sure your device stays connected to your computer throughout this process.
The method will slightly differ depending on whether your device has a home button, so make sure you follow the right instructions for your individual device.

Step 5: Once in Download Mode, the software will now download and install a fresh version of your Infinix Note 30 VIP’s operating system. This can take some time, so make sure your device stays connected, and your computer stays on and doesn’t shut down.

Step 6: That’s it! Once you see the screen saying your device has been repaired, you’ll be able to close the Dr.Fone - System Repair (Android) software, disconnect your phone, and can start using Snapchat as normal without the Snapchat not responding error coming up!

 safe & secure
Part 5. Check for the Android update

Similar to some of the other solutions we’ve listed above, if you’re using an outdated version of the Android operating system, but the latest version of Snapchat is coded to the most recent, this can be a cause for the Snapchat crashing on Android problem to occur.
Fortunately, it’s easy to check to make sure you’re running the latest version of Android and to download and install the update if you need it. Here’s how, which will help to sort out your Snapchat keeps crashing Android problems.
Step 1: Open the Settings menu on your Infinix Note 30 VIP and select the About Phone option.
Step 2: Tap the ‘Check for Updates’ option. If an update is available, you’ll then have the option to Install Now or Install Overnight. If no update is available, you’ll see a notification stating your device is up to date and no action is needed.
Part 6. Connect to another Wi-Fi
In some cases, you may be trying to connect to a Wi-Fi network that’s not very stable. This may keep cutting the connection to your device, which in turn is causing Snapchat to crash on Android.
To resolve this, you can simply try connecting to another Wi-Fi network or a data plan to see whether this is the problem. If so, changing network and then using the Snapchat app should stop any error messages from occurring.
Step 1: Open the Settings menu on your Infinix Note 30 VIP, followed by the Wi-Fi option.

Step 2: Tap the new Wi-Fi network you’re currently connected to, and then tap the ‘Forget’ option, to stop your phone connecting to it.

Step 3: Now tap the new Wi-Fi network you want to connect to. Insert the Wi-Fi security code and connect. Now try reopening and using the Snapchat to see if you can use it.
 WonderFox DVD Ripper Pro
Part 7. Stop using the custom ROM

If you’re running a custom Android ROM on your device, with some versions of the ROM and some apps, you’re going to experience errors simply because of the way the apps and the ROMs are coded and designed.
Unfortunately, there’s no easy fix to this, and if you want to continue using the app, you’ll need to reflash your Infinix Note 30 VIP back to its original firmware, and then wait until the ROM developers update the ROM to be compatible with social apps like Snapchat.
However, this reflashing process is simple thanks to the Dr.Fone - System Repair (Android) software that we listed above. To follow the detailed step-by-step guide, follow the steps on Part 4 of this article, or follow the quick guide instructions below.
- Download and install the Dr.Fone - System Repair (Android) software to your computer
- Connect your Infinix Note 30 VIP to your Windows computer using the USB cable
- Open the software and click the Repair option.
- Select the Android device repair option
- Make sure your carrier and device information are correct
- Put your device into Download Mode by following the onscreen instructions
- Allow the software to repair your Infinix Note 30 VIP automatically
Part 8. Reset the factory settings of your Android

One of the last resorts you can take is factory resetting your Infinix Note 30 VIP back to its original settings. From the day you first started using your device, you’ve been using the system and downloading files and apps, and over time this increases the chances of creating a bug.
However, by resetting your device to factory settings, you can reset these bugs and get your apps and device working again free from the Unfortunately, Snapchat has stopped error message. Here’s how to factory reset your device.
Make sure you back up your personal files from your device first like your photos and music files because factory resetting your device will clear your device’s memory.
Step 1: Tap the Settings menu on your device and click the Backup and Reset option.
Step 2: Click the Reset Phone option. That’s it! The phone will take several minutes to complete the process, after which your phone will be reset to its original state.
Simple Solutions to Fix Android SystemUI Has Stopped Error For Infinix Note 30 VIP
In this article, you will learn possible causes of Android SystemUI stopping error and 4 methods to fix this issue. Get Dr.Fone - System Repair (Android) to fix Android SystemUI stopping more easily.
Android SystemUI isn’t responding or Android, unfortunately, the process com.android.systemui has stopped is a not a rare error and is observed in all Android devices these days. The error usually pops up on your device while you are using it with a message on the screen saying Android. Unfortunately, the process com.android.systemui has stopped.
The Android SystemUI isn’t responding error message may also read as “Unfortunately, SystemUI has stopped”.
Android SystemUI error can be very confusing as it leaves affected users with only one option, i.e., “OK”, as shown in the images above. If you click on “OK” you will continue to use your device smoothly, but only until the SystemUI isn’t responding error pops-up on your main screen again. You may restart your device, but the Android SystemUI has stopped the problem continues to annoy you until you find a permanent solution for it.
If you are also among the various users who see Android, unfortunately, the process com.android.systemui has stopped error, then do not worry. SystemUI isn’t responding. Error is not a serious issue and can be tackled easily by carefully examining the reasons behind the problem.
Looking for suitable solutions to fix Android SystemUI has stopped error? Then read on to find out all about Android SystemUI isn’t responding error and the most effective ways to fix it.

Part 1: Why Android SystemUI Has stopped happens?

Android device owners would agree that OS updates are very helpful as they fix the bug problem and improve the overall working of your device. However, sometimes these updates may be infected due to which they do not download and install properly. A corrupted OS update may cause Android; unfortunately, the process com.android.systemui has stopped error. All Android updates are directly designed around the Google App, and thus, the problem will persist until the Google App is also updated. Sometimes, even the Google App update may cause such a glitch if it is not successfully downloaded and installed.
Another reason for the Android SystemUI isn’t responding error to occur, maybe because of flashing a new ROM or due to improper firmware update installation. Even when you restore the backed up data from cloud or your Google Account, such Android, unfortunately, the process com.android.systemui has stopped error may show up.
It is not possible to say for sure which one of the above-mentioned reasons is causing your device to show Android SystemUI is not responding error. But what we can do is move on to fixing the Android SystemUI by following any one of the three methods given the following segments.
Part 2: How to fix “com.android.systemui has stopped” in one click
As we’ve learned that Android system UI isn’t responding issue is primarily because of the Android OS updates not installed properly or were corrupted. Hence, there comes the need for a powerful Android system repair tool that can help you rectify such annoying errors.
To serve the purpose, we would like to introduce, Dr.Fone - System Repair (Android) . It is one of its kind of applications and is highly recommended as it has a proven success rate to resolve almost all Android system issues.
It’s now time to understand how to fix Android ‘unfortunately, the process com.android.systemui has stopped’ or in simple words, Android system UI isn’t responding.
Note: Before we proceed to Android repair, please ensure to make a backup of all your data . This is because the Android repair process may wipe out all the data on your device to fix the Android OS issues.
Phase 1: Connect and prepare your Infinix Note 30 VIP
Step 1 – Download the Dr.Fone toolkit over your PC. Install it and launch it over. Opt for the “System Repair” tab from the main screen and get your Infinix Note 30 VIP connected to the PC.
Step 2 – You need to select “Android Repair” from the left panel and then hit the ‘Start’ button.
Step 3 – Next, you need to select the correct information about your device (i.e., brand, name, model, country/region, and carrier details). Check the warning down below and hit “Next”.
Phase 2: Boot Android in ‘Download’ mode to perform the repair.
Step 1 –You’re now required to boot your Android in Download mode. Here’s what you need to do to put your Android in DFU mode.
If your Android has a Home button:
- Turn off your device. Hold down “Volume Down + Home + Power” buttons altogether for about 10seconds. Let go of the buttons afterward and hit the Volume Up to boot in download mode.
In case your Android has no Home button:
- Turn off your device. Hold down “Volume Down + Bixby + Power” buttons altogether for about 10seconds. Let go of the buttons afterward and hit the Volume Up to boot in download mode.

Step 2 – Once done, hit “Next” to initiate the downloading of the firmware.
Step 3 – As soon as the download completes, the Android repair will automatically be started by the program.


Step 4 – In a just a matter of a few minutes, your Android system UI isn’t responding issue will be resolved.
.png) Kanto Player Professional
Kanto Player ProfessionalPart 3: Uninstall Google updates to fix Android SystemUI issue
All Android SystemUI isn’t responding errors are circled the Google App as the Android platform is heavily dependent on it. If you have recently updated your Google App and the Android, unfortunately, the process com.android.systemui has stopped error keeps popping up at regular intervals, make sure you uninstall Google App updates as soon as possible.
Follow the steps given below to fix the Android SystemUI has stopped issue by rolling back the Google App updates:
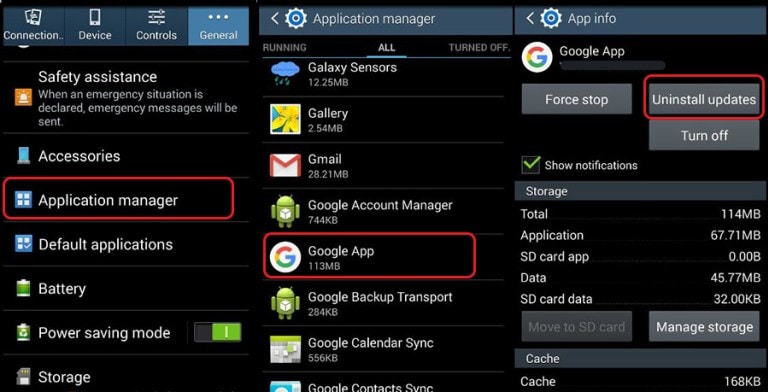
- Visit “Settings” and select “Apps” or “Application Manager”.
- Now swipe to view “All” Apps.
- From the list of Apps, select “Google App”.
- Finally, tap on “Uninstall Updates” as shown hereunder.
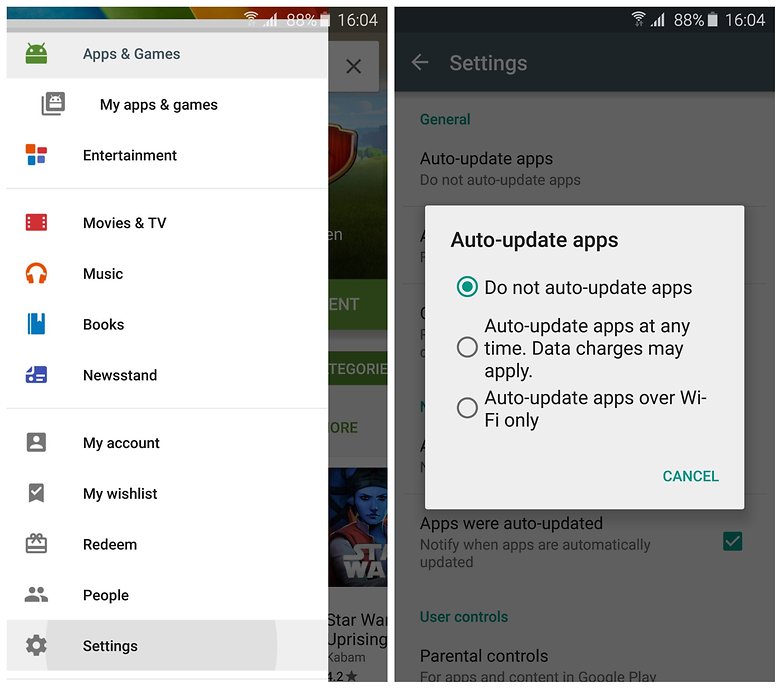
Note: To prevent the Android SystemUI isn’t responding error to occur in the future, do not forget to change your Google Play Store settings to “Do Not Auto-Update Apps”.
![]() FX PRO (Gold Robot + Silver Robot(Basic Package))
FX PRO (Gold Robot + Silver Robot(Basic Package))
Part 4: Wipe Cache partition to fix Android SystemUI error
Android, unfortunately, the process com.android.systemui has stopped error can also be fixed by clearing your cache partitions. These partitions are nothing but storage locations for your modem, kernels, system files, drivers, and built-in Apps data.
It is advisable to clear Cache portions regularly to keep your UI clean and free of glitches.
Android SystemUI isn’t responding error can be overcome by clearing the cache in recovery mode.
Different Android devices have different ways to put it in recovery mode. Refer to your device’s manual to enter the recovery mode screen on your device and then follow the steps given below to fix Android; unfortunately, the process com.android.systemui has stopped error by clearing the cache partition:
- Once you are the recovery mode screen, you will see several options as shown in the screenshot.

- Use the volume down key to scroll down and select ”Wipe cache partition” as shown below.

- After the process is completed, select “Reboot System” which is the first option in the recovery mode screen.
This method will help you de-clutter your device and erase all the clogged up unwanted files. You may lose App related data too, but that is a small price to pay to fix the Android SystemUI isn’t responding error.
If the Android SystemUI has stopped the problem persists, there is only one way out. Read on to find out about it.
Part 5: Fix Android SystemUI error by factory reset
Factory Resetting your device to fix Android; unfortunately, the process com.android.systemui has stopped error is a desperate measure and should be the last thing to do on your list. Take this step only when the above mentored two techniques fail to work.
Also, make sure you take a back-up of all your data and contents stored in your Infinix Note 30 VIP on the cloud, Google Account or an external memory device because once you perform a factory reset on your device, all media, contents, data and other files are wiped out, including your device settings.
Follow the steps given below to factory reset your device to solve the Android SystemUI isn’t responding problem:
- Visit “Settings” by clicking the settings icon as shown below.

- Now select “Backup and Reset”.

- In this step, select “Factory data reset” and then “Reset Device”.
- Finally, tap on “ERASE EVERYTHING” as shown below to Factory Reset your device.

After the factory reset process is completed, your device will automatically restart, and you will have to set it up once again.
The whole process of factory resetting your Infinix Note 30 VIP might sound tedious, risky, and cumbersome, but it helps to fix the Android SystemUI has stopped error 9 out of 10 times. So, think carefully before using this remedy.
Android SystemUI isn’t responding or Android, unfortunately, the process com.android.systemui has stopped error is commonly seen by users on their devices. It is not a random error and is linked to either the software, Google App, cache partition, or data stored in the Infinix Note 30 VIP device. It is fairly simple to deal with this issue as all you need to do is install or roll back your Android OS update, uninstall Google App updates, clear cache partition, or factory reset your device to clear all data, files, and settings stored in it. The methods listed and explained above are the best ways to fight the problem and to prevent it from troubling you in the future. These methods have been adopted by affected users all over the world who recommend them because they are safe and involve minimum risks as compared to other tools to solve the Android SystemUI has stopped error. So go ahead and try them now!
 OtsAV Radio Webcaster
Android Safe Mode - How to Turn off Safe Mode on Infinix Note 30 VIP?
Safe mode on Android is very useful to get rid of dangerous apps and malware. This allows the user to perform a uninstall of the crashed or malicious apps by putting safe mode on Android. Now the question is how to remove safe mode? In this article, we have discussed in detail how to get out of safe mode and also discussed some frequently asked questions. Keep reading this article.
Part 1: How to turn off safe mode on Android?
This is very important to turn off the safe mode after you put the safe mode on Android. Your mobile performance is limited in this mode. So you have to turn off safe mode. For doing this, there are some methods. Try to apply them one by one. If you succeed, stop there. Else go to the next method.
Method 1: Restarting the Infinix Note 30 VIP device
This is the easiest method to turn off the safe mode in Android. To use this method, follow the steps below.
Step 1 – Tap and hold the power button of your Infinix Note 30 VIP.
Step 2 – You could find the option “Restart”. Tap on it. (If you have only one option, move to the step no 2)
Step 3 – Now, your phone will boot up in some time and you can see the Infinix Note 30 VIP device is no more on safe mode.

This method, if goes well, will turn off safe mode in Android from your device. IF not, move to the next method instead.
Method 2: Do a soft reset:
The soft reset is very easy to perform. It won’t delete any of your personal files etc. Besides, it clears all the temp files and unnecessary data and recent apps so that you get a healthy device. This method is very good for turning off Safe mode on Android.
Step 1 – Tap and hold the power button.
Step 2 – Now, select “Power off” from the given option. This will make your device off.
Step 3 – Wait a few seconds and then turn it on again.
This time you can see your phone is no more in safe mode. Also, your junk files have been also removed. If you still find the Infinix Note 30 VIP device is the safe mode, follow the next method.
Method 3: Break all power
This method is sometimes very helpful to turn off safe mode on android by disconnecting all the power as well as resetting the SIM card.
Step 1 – Take the back cover off from the Infinix Note 30 VIP device and remove the battery. (Not all devices will give you this facility)
Step 2 – Take out the SIM card.
Step 3 – Reinsert the SIM card and insert the battery again.
Step 4 – Turn the Infinix Note 30 VIP device on by tapping and holding the power button.
Now, you can see your device is out of safe mode. If you still find your device in Safe mode, see the next method.
Method 4: Wipe the cache of the Infinix Note 30 VIP device.
The cache of the Infinix Note 30 VIP device sometimes creates an obstacle in overcoming the safe mode on Android. To solve this issue, follow the steps below.
Step 1 – Turn on your device in safe mode. It can generally be done by tapping the home, power, and volume up button on Android device. If this combination is not working for you, search the internet with your device model number.

Step 2 – Now you can find the recovery mode screen. Navigate to the “Wipe cache” option with the volume up and down button and select the option by tapping the power button.

Step 3 – Now follow on-screen instruction and your device will be rebooted.
After successful completion of this method, your device should no longer be in safe mode. If the problem still persists, the only solution is to do a factory reset. This will erase all the data from your device. So take backup of your internal storage.
Method 5: Factory data reset
To factory data reset, you have to follow the below steps.
Step 1 – Enter in the recovery mode by following the steps mentioned earlier.
Step 2 – Now select “Factory data reset” from the given options.
 Forex Robotron Gold Package
Step 3 – Now, follow the on-screen instructions and your device will be factory reset.
After this method, you can successfully get rid of the safe mode on Android. Restore your data from the backup you created.
Watch the video below to turn off safe mode on your phone:
Part 2: How to put the phone in safe mode?
If some apps or programs create a problem on your device, the solution is safe mode. Safe mode allows you to uninstall the app or the program out of your device safely. So, safe mode on Android is quite useful sometimes. Let’s have a look at how to turn on safe mode in Android.
Before this, remember to take a backup of your Infinix Note 30 VIP. We recommend you to use the Dr.Fone - Phone Backup (Android). This tool is the best in its class to provide users with a very easy-to-use user interface yet powerful solution.
Dr.Fone - Phone Backup (Android)_
Flexibly Backup and Restore Android Data
- Selectively backup Android data to the computer with one click.
- Preview and restore the backup to any Android devices.
- Supports 8000+ Android devices.
- There is no data lost during backup, export, or restore.
Always remember to use this tool before you enter in the safe mode as you never know what will happen next and you might end up with factory resetting. This, as the result, will erase all your valuable data. So always perform backup data before you proceed.
To enter the safe mode, follow the instructions below.
Step 1 – First of all, long press the power button and let the Power options appear.

Step 2 – Now, long press on the “Power off” option. This will instantly ask you if you want to reboot into safe mode. Select the option and your device will reboot in safe mode.
 The Tube Sites Submitter is a fast and efficient tool for anyone who needs to upload videos quickly, easily and automatically to hundreds of tube sites in mere minutes .
If you are using Android version 4.2 or earlier, turn off the Infinix Note 30 VIP device and turn it on the back by tapping the power button. When the logo appears, tap and hold the volume down button. This will allow the Infinix Note 30 VIP device to boot in safe mode.
Follow these steps carefully and now you can see a “Safe Mode” written at the corner of your device. This will confirm that you have successfully entered in Safe mode on Android.
Part 3: Safe mode on Android FAQs
In this section, we’ll discuss some frequently asked questions about the safe mode. Some users have many questions regarding the safe mode. Here we’ll try to cover some of them.
1. Why is My Infinix Note 30 VIP on safe mode?
This is a very common question around the world. For many Android device users, it’s quite common to see your phone in safe mode suddenly. Android is a secure platform and if your device sees any threat from your recently installed apps or any programs that want to harm your device; it would go into safe mode automatically. Sometimes, you might accidentally perform the steps discussed in part 2 and boot your device in safe mode.
2. Safe mode won’t turn off on My Infinix Note 30 VIP
For the solution to remove safe mode from your device you must follow the step-by-step methods as mentioned in part 1. This will surely take your device out of the safe mode.
The safe mode is a very useful program for any Android device. But it limits the programs of Android and you must remove safe mode after uninstalling the harmful app. This article showed you how to turn off safe mode easily.
- Title: 8 Quick Fixes Unfortunately, Snapchat has Stopped on Infinix Note 30 VIP | Dr.fone
- Author: Ariadne
- Created at : 2024-07-30 08:13:45
- Updated at : 2024-07-31 08:13:45
- Link: https://howto.techidaily.com/8-quick-fixes-unfortunately-snapchat-has-stopped-on-infinix-note-30-vip-drfone-by-drfone-fix-android-problems-fix-android-problems/
- License: This work is licensed under CC BY-NC-SA 4.0.