
8 Quick Fixes Unfortunately, Snapchat has Stopped on Motorola G54 5G | Dr.fone
[8 Quick Fixes] Unfortunately, Snapchat has Stopped on Motorola G54 5G
Have you ever been deep in conversation with a loved one or friend, taking advantage of all the funny filters and games Snapchat has to offer when you’ve suddenly been presented with the ‘Unfortunately, Snapchat has Stopped’ error code? This is usually followed by the app crashing back to the main menu.
If so, don’t worry; you’re not alone. Snapchat crashing in this way is nothing new, but it can be incredibly annoying when it keeps happening and stops you from enjoying the conversations you care about.
Fortunately, there are plenty of solutions out there to help you out and get the app working again as it should do. Today, we’re going to explore them all to help you get back to what you were doing before and as though there was never a problem.
Part 1. Install Snapchat again from Google Play Store

One of the best ways to resolve the Snapchat crashing problem or Snap Map not working issue is to delete the app and reinstall it again. When you’re using your phone, there is data continually flowing around and data being sent here, there, and everywhere.
During these processes, bugs can occur, and if they can’t sort themselves out, the best thing to do is to reset your app and start from a fresh installation. Here’s how to do it.
Step 1: Hold down the Snapchat app from your main menu and press the ‘x’ button to uninstall the app.
Step 2: Open the Google App Store from your device and search ‘Snapchat’ in the search bar. Find the official app page and download the app onto your device.
Step 3: The app will automatically install itself once downloaded. Open the app, sign in to your account using your log-in details, and you should be able to use the app like normal.
Part 2. Check for new Snapchat Updates

Hand in hand with the problem above, sometimes a bug can restrict Snapchat from working, or perhaps your personal update settings. If you receive a Snapchat from someone with an upgraded version, this can crash your app.
Here’s how to make sure you’re running the latest version of Snapchat is Snapchat isn’t responding.
- Launch the Play Store and navigate to the My Apps and Games page
- Tap the Update button
- The app will now automatically update to the latest version
 Power Tools add-on for Google Sheets, Lifetime subscription
Part 3. Wipe the cache of Snapchat
If you have a lot of data in your Snapchat cache, this can cause the app to become overloaded in which you’ll need to clear it to start again and refresh the app. This is a common problem that can cause Snapchat has stopped working error.
Here’s how to fix it.
Open the Snapchat app and tap the Profile icon on the top left-hand side of your screen

Tap the Settings gear icon on the top right

Parental Control Software
Scroll down the Settings menu and tap the Clear Cache option
Here, you can choose to Clear All, but you can select individual areas if you prefer


- Tap the Confirm option to clear your cache preference completely


Part 4. Fix the system issues that caused Snapchat stopping
If you’re experiencing the Snapchat crashing on Android often, or you’re experiencing similar errors with other apps, this can be an indication that there’s something wrong with your Android operating system.
The best way to fix this is to repair your device using the software known as Dr.Fone - System Repair (Android). This is a powerful repair system that can completely recover your device from any errors, including the Snapchat keeps crashing error.

Dr.Fone - System Repair (Android)
Dedicated repair tool to fix Snapchat crashing on Android.
- Recover your device from any problem, including black screen or unresponsive screen.
- Supports over 1000+ unique Android devices, models, and brands.
- Trusted by over 50+ million customers around the world.
- Can fully repair faults with your Motorola G54 5G’s firmware in a few simple steps.
- One of the most user-friendly applications in the world.
3,889,035 people have downloaded it
To help you make the most of this Android repair software and to fix your Snapchat not responding error, here’s a step-by-step guide on how to use it.
Step 1: Download the Dr.Fone - System Repair (Android) software to your computer. Install the software to your Mac or Windows computer by following the onscreen instructions.
Once completed, open the software, so you’re on the main menu.

Step 2: From the main menu, click the System Repair option, followed by the Android option. Of course, if you have an iOS device you want to repair in the future, the option is there if you want it. Also, connect your Motorola G54 5G to your computer using the USB cable.

Step 3: Confirm details.
On the next screen, use the drop-down menus to confirm the model, brand, operating system, and carrier of your device. Click Next to confirm the details are correct.

Step 4: You’ll now need to put your phone into Download Mode, sometimes referred to as Recovery Mode. For this, you can follow the onscreen instructions. Make sure your device stays connected to your computer throughout this process.
The method will slightly differ depending on whether your device has a home button, so make sure you follow the right instructions for your individual device.
 CalendarBudget - Monthly subscription membership to CalendarBudget via web browser or mobile app. Support included.
Step 5: Once in Download Mode, the software will now download and install a fresh version of your Motorola G54 5G’s operating system. This can take some time, so make sure your device stays connected, and your computer stays on and doesn’t shut down.

Step 6: That’s it! Once you see the screen saying your device has been repaired, you’ll be able to close the Dr.Fone - System Repair (Android) software, disconnect your phone, and can start using Snapchat as normal without the Snapchat not responding error coming up!


 safe & secure
Part 5. Check for the Android update

Similar to some of the other solutions we’ve listed above, if you’re using an outdated version of the Android operating system, but the latest version of Snapchat is coded to the most recent, this can be a cause for the Snapchat crashing on Android problem to occur.
Fortunately, it’s easy to check to make sure you’re running the latest version of Android and to download and install the update if you need it. Here’s how, which will help to sort out your Snapchat keeps crashing Android problems.
Step 1: Open the Settings menu on your Motorola G54 5G and select the About Phone option.
Step 2: Tap the ‘Check for Updates’ option. If an update is available, you’ll then have the option to Install Now or Install Overnight. If no update is available, you’ll see a notification stating your device is up to date and no action is needed.

Part 6. Connect to another Wi-Fi
In some cases, you may be trying to connect to a Wi-Fi network that’s not very stable. This may keep cutting the connection to your device, which in turn is causing Snapchat to crash on Android.
To resolve this, you can simply try connecting to another Wi-Fi network or a data plan to see whether this is the problem. If so, changing network and then using the Snapchat app should stop any error messages from occurring.
Step 1: Open the Settings menu on your Motorola G54 5G, followed by the Wi-Fi option.
 Screensaver Factory, Create stunning professional screensavers within minutes. Create screensavers for yourself, for marketing or unlimited royalty-free commercial distribution. Make screensavers from images, video and swf flash, add background music and smooth sprite and transition effects. Screensaver Factory is very easy to use, and it enables you to make self-installing screensaver files and CDs for easy setup and distribution. Screensaver Factory is the most advanced software of its kind.
Step 2: Tap the new Wi-Fi network you’re currently connected to, and then tap the ‘Forget’ option, to stop your phone connecting to it.

Step 3: Now tap the new Wi-Fi network you want to connect to. Insert the Wi-Fi security code and connect. Now try reopening and using the Snapchat to see if you can use it.
Part 7. Stop using the custom ROM

If you’re running a custom Android ROM on your device, with some versions of the ROM and some apps, you’re going to experience errors simply because of the way the apps and the ROMs are coded and designed.
Unfortunately, there’s no easy fix to this, and if you want to continue using the app, you’ll need to reflash your Motorola G54 5G back to its original firmware, and then wait until the ROM developers update the ROM to be compatible with social apps like Snapchat.
However, this reflashing process is simple thanks to the Dr.Fone - System Repair (Android) software that we listed above. To follow the detailed step-by-step guide, follow the steps on Part 4 of this article, or follow the quick guide instructions below.
- Download and install the Dr.Fone - System Repair (Android) software to your computer
- Connect your Motorola G54 5G to your Windows computer using the USB cable
- Open the software and click the Repair option.
- Select the Android device repair option
- Make sure your carrier and device information are correct
- Put your device into Download Mode by following the onscreen instructions
- Allow the software to repair your Motorola G54 5G automatically
Part 8. Reset the factory settings of your Android
 PearlMountain Image Converter
One of the last resorts you can take is factory resetting your Motorola G54 5G back to its original settings. From the day you first started using your device, you’ve been using the system and downloading files and apps, and over time this increases the chances of creating a bug.
However, by resetting your device to factory settings, you can reset these bugs and get your apps and device working again free from the Unfortunately, Snapchat has stopped error message. Here’s how to factory reset your device.
Make sure you back up your personal files from your device first like your photos and music files because factory resetting your device will clear your device’s memory.
Step 1: Tap the Settings menu on your device and click the Backup and Reset option.
Step 2: Click the Reset Phone option. That’s it! The phone will take several minutes to complete the process, after which your phone will be reset to its original state.
 TubeDigger - online video downloader from mostly any site
7 Solutions to Fix Error Code 963 on Google Play Of Motorola G54 5G
People are increasingly complaining about Google Play Error Codes which pop-up during downloading, installing or updating an App via Google Play Store. Amongst these, the most recent and common one being Error Code 963.
Google Play Error 963 is a typical error which shows up not only when you try to download and install an App but also during App update.
Error 963 cannot be attributed to a particular App or its update. It is a Google Play Store error and is experienced by Android users across the world.
Error Code 963, just like any other Google Play Store errors, is not something difficult to deal with. It’s a minor glitch which can be fixed easily. There is no need to worry or panic if you see Error 963 on Google Play Store preventing your favorite App from downloading or updating.
Read on to find out more about the Google Play Error 963 and best ways to fix it.
Part 1: What is Error Code 963?
Error 963 is a common Google Play Store error which basically hinders Apps from downloading and updating. Many people get worried when Error Code 963 does not let them install new Apps or update existing ones. However, please understand that Google Play Error is not such a big deal as it may sound and can be overcome easily.
Error 963 pop-up message reads as follows: “cannot be downloaded due to an error (963)” as shown in the image below.

A similar message shows up even while you are trying to update an App, as shown in the screenshot below.

Error Code 963 is basically an outcome of data crash which mostly is seen in cheaper smartphones. There might another reason for Error 963 preventing Apps from downloading and updating, which is Google Play Store Cache being corrupted. People also speculate SD Card related issues as many-a-times external memory enhancer chips do not support large Apps and their updates. Also, Error 963 is very common with HTC M8 and HTC M9 smartphones.
All these reasons and more can handle with ease and you can continue to use Google play services smoothly. In the following segment, we will discuss various fixes to cure the problem to enable to you download, install and update Apps on your device normally.
Part 2: Easiest solution to fix Error Code 963 on Android
When it comes to the most convenient solution to fix error 963, Dr.Fone - System Repair (Android) cannot be missed. It is the most productive program that covers a wide range of Android issues. It ensures full safety while performing and one can fix the Android issues in a hassle-free way.
Dr.Fone - System Repair (Android)
One click to fix Google Play error 963
- The tool is recommended for its higher success rate.
- Not just Google Play error 963, it can fix a large number of system issues including app crashing, black/white screen etc.
- It’s considered as the first tool that offers one-click operation for Android repairing.
- There’s no technical expertise needed to use this tool.
4,997,014 people have downloaded it
This section will provide you the tutorial guide for how to fix error code 963.
Note: Before moving to solve the error 963, we would like to inform you that the process may result in wiping away your data. And therefore, we suggest you to make backup of your Motorola G54 5G prior to fixing this Google Play error 963.
Phase 1: Connecting and preparing the Motorola G54 5G device
Step 1 – To begin fixing error 963, run Dr.Fone after downloading and installing it on your PC. Now, pick out the ‘System Repair’ tab from the main screen. Thereupon, with the help of a USB cable, make connection between your Motorola G54 5G and PC
Step 2 – On the left panel, you’re supposed to choose ‘Android Repair’ and then click the ‘Start’ button.
 Forex Robotron Gold Package
Step 3 – On the following screen, you need to choose the appropriate details for your device like the name, brand, model, country/region etc. Later, go for warning confirmation and hit ‘Next’.
Phase 2: Taking Android device in Download mode for repairing
Step 1 – It is essential to get your Motorola G54 5G or tablet entered in Download mode. For this, following are the steps to be taken:
If the Motorola G54 5G device contains Home button:
- Turn the Motorola G54 5G device off and then keep holding the ‘Power’, ‘Volume Down’ and ‘Home’ buttons altogether for about 10 seconds. Next, release them all and push the ‘Volume Up’ key. This way, your device will enter the Download mode.

If the Motorola G54 5G device contains no Home button:
- Switch off your phone/tablet and press the ‘Volume Down’, ‘Bixby’ and ‘Power’ buttons for 10 seconds. Leave the buttons and then press the ‘Volume Up’ button for entering download mode.


Step 2 – Press the ‘Next’ button and then the program will commence the firmware downloading.
Step 3 – Upon successful downloading and verification of the firmware, the process of Android device repairing will begin automatically.

Step 4 – Within a while, the Google play error 963 will be vanished.
Part 3: 6 Common Solutions to fix Error Code 963
 EmEditor Professional (Lifetime License, non-store app)

Since there is no specific reason for Error Code 963 to occur, similarly there is no one solution to the problem. You may use any one of them below or try them all to never see Error Code 963 on your device.
1. Clear Play Store Cache and Play Store Data
Clearing Google Play Store Cache and Data basically means keeping Google Play Store clean and free from trouble-making data stored in respect of it. It is advisable to carry out this process regularly to prevent Errors like Error Code 963 from occurring.
Follow the steps given below to fix Error Code 963:
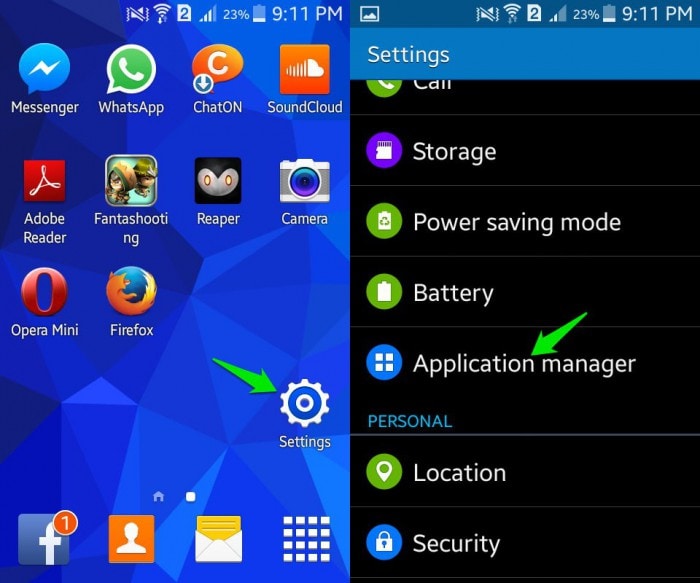
Visit “Settings” and select “Application Manager”.

Now select “All” to see all downloaded and built-in Apps on your device.
Select “Google Play Store” and from the options that appear, tap on “Clear Cache” and “Clear Data”.

Once you are done clearing Google Play Store Cache and Data, try to download, install or update the App facing Google Play Error 963 again.
2. Uninstall updates for Play Store
Uninstalling Google Play Store updates is an easy and quick task. This method is known to have helped many as it brings back the Play Store to its original state, free from all updates.
Visit “Settings” and select “Application Manager”.

Now select “Google Play Store” from “All” Apps.
 Glarysoft File Recovery Pro - Helps to recover your lost file/data, even permanently deleted data.

In this step, click on “Uninstall Updates” as shown below.
 PDF application, powered by AI-based OCR, for unified workflows with both digital and scanned documents.
3. Shift the App from SD Card to device’s memory
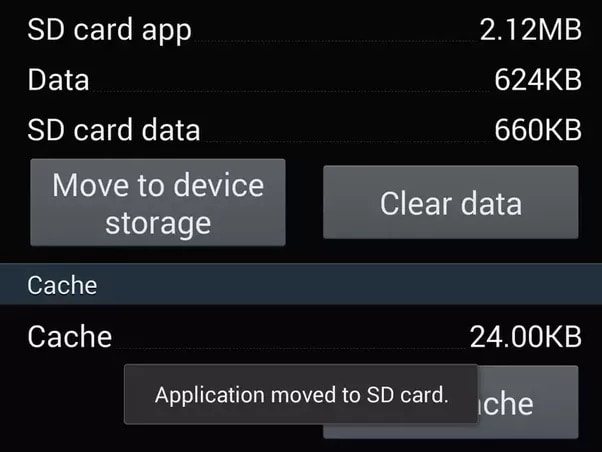
This method is strictly for certain Apps which cannot be updated because they are stored on an external memory card, i.e., SD Card. Such memory enhancing chips do not support large Apps and due to a shortage of space prevents them from updating. It advisable to move such Apps from the SD Card to the Motorola G54 5G device’s internal memory and then try to update it.
Visit “Settings” and select “Apps”.

From “All” Apps click on the App which is unable to update.
Now click on “Move to Phone” or “Move to internal storage” and try to download its update again from the Google Play Store.
Try updating the App now. If the Apps’s update does not download even now, DO NOT worry. There are three more ways to help you.
4. Unmount your external Memory Card
Error Code963 may also occur due to an external memory chip used in your device to enhance its storage capacity. This is very common and can be dealt with by unmounting the SD Card temporarily.
To unmount your SD Card:
Visit “Settings” and keep scrolling downwards.
Now select “Storage”.
From the options that appear, select “Unmount SD Card” as explained in the screenshot below.

Note: If the App or its update downloads successfully now, do not forget to mount the SD Card back.
5. Remove and Re-add your Google account
Deleting and re-adding your Google account in might sound a little tedious but it does not take much of your precious time. Moreover, this technique is very effective when it comes to fixing Error Code 963.
Carefully follow the steps given below to remove and then re-add your Google account:
Visit “Settings”, under “Accounts” select “Google”.
Select your account and from the “Menu” select “Remove account” as shown below.
 vMix Basic HD - Software based live production. vMix Basic HD includes 4 inputs, 3 cameras, streaming, recording, playlist.
Once your account is removed, follow the steps given hereunder to add it back again after a few minutes:
Go back to “Accounts” and select “Add Account”.

Select “Google” as shown above.
In this step feed in your account details and your Google account will be configured once again.
6. Special technique for HTC users
This technique is specially crafted fro HTC smartphone users who frequently face Google Play Error 963.
Follow the step-by-step instructions given below to uninstall all updates for your HTC One M8 Lock Screen App:
Visit “Settings” and find “HTC Lock Screen” under “Apps”.
Now click on “Force Stop”.
In this step, Click on “Uninstall Updates”.
This remedy is as simple as it sounds and has helped many HTC users to get rid of Error 963.
Google Play Errors are a very common phenomenon these days, especially Error Code 963 which usually occurs in the Google Play Store when we try to download, install or update an App. There is no need to worry if you see Error Code 963 pop-up on your screen as your device and its software are not to be blamed for Error 963 to suddenly surface. It is a random error and can be fixed easily by you. You do not need any technical assistance to deal with the issue. All you need to do is follow the steps introduced in this article to use Google Play Store and its services smoothly.
What To Do if Your Motorola G54 5G Auto Does Not Work
Embracing the convenience of Android Auto enhances your driving experience. It seamlessly connects your smartphone with your vehicle. However, in the realm of technology, glitches and malfunctions are commonplace. Android Auto, too, may encounter software or hardware issues that disrupt its functionality.
In this guide, you’ll delve into the common problems users face when Android Auto does not work and provide practical solutions to get you back on the road smoothly. From troubleshooting software glitches to addressing hardware concerns, this article aims to equip you with the knowledge to tackle Android Auto problems effectively.

Part 1. A Briefer on Android Auto
Android Auto is a revolutionary application designed to enhance the in-car experience by seamlessly connecting Android smartphones to compatible vehicles. It serves as a co-pilot, offering hands-free navigation, communication, and entertainment options, minimizing distractions while driving.
 Video Converter Factory Pro
How Android Auto Works
Understanding the mechanics of this technology is essential for effective Android Auto troubleshooting. It mirrors your Android smartphone’s interface onto your car’s infotainment system. It provides a simplified and optimized version of your device’s features on the road.
Android Auto connects your smartphone to your car’s infotainment system via USB cable or wirelessly, depending on your device and car compatibility. Once clicked, it displays a user-friendly interface on your car’s screen, allowing you to access navigation through Google Maps, make calls, send messages, and control multimedia apps with voice commands or touchscreen gestures.
By integrating familiar smartphone functionalities into your car, Android Auto aims to provide a safer and more enjoyable driving experience, reducing the need for manual phone interactions while on the road. Understanding this foundation will empower you to effectively troubleshoot when issues arise.


 Lyric Video Creator Professional Version
Part 2. Common Issues Android Auto Faces + Troubleshooting/Repair
Even if it is such a great technology, sometimes Android Auto won’t connect. It also deals with common issues that can affect its performance. In this section, you’ll delve into these challenges and equip you with practical troubleshooting solutions to fix your Android Auto experience.
Connection Issues
Connection glitches through Bluetooth or USB can cause Android Auto issues. USB connection problems often come from subpar cables.
The solution here is straightforward – invest in a high-quality USB cable. This ensures a stable link between your smartphone and the car’s infotainment system. Meanwhile, Bluetooth pairing problems may require a bit of digital maneuvering. Try restarting your phone, rebooting the car’s infotainment system, or resetting Bluetooth settings to establish a smooth connection.
App-Specific Problems (Certain Apps Not Working)
Android Auto relies heavily on various navigation, communication, and entertainment applications.
If specific apps refuse to cooperate, a quick remedy is to restart the head unit. If the issue persists, consider uninstalling and reinstalling the problematic applications. This step ensures a clean slate for the apps, potentially resolving any underlying compatibility or performance issues.

Screen and Display Problems (Head Unit)
Issues with the screen or display on your car’s head unit can be disconcerting. To troubleshoot, commence with a simple restart of the head unit.
If the problem lingers, escalate the solution by restarting the entire car. Should these steps prove ineffective, seeking professional assistance at a maintenance center is advisable. This ensures a thorough examination and potential resolution of hardware-related problems, providing a comprehensive fix for persistent screen and display issues.
Voice Commands Not Working
Voice commands serve as a cornerstone of the Android Auto hands-free experience. When they falter, it can disrupt the seamless interaction with the system.
Begin by scrutinizing your internet connection, as voice commands rely on a stable link to function effectively. If the issue persists, a basic restart of the head unit might recalibrate the system, restoring the functionality of voice commands.
Understanding that these issues are inherent to any technology, Android Auto users can confidently navigate and troubleshoot these problems with the provided solutions. By addressing these commonplace concerns, users empower themselves to swiftly overcome hurdles, ensuring a seamless and gratifying driving experience with Android Auto.
Part 3. A Quicker Solution: Wondershare Dr.Fone
If navigating through various troubleshooting steps seems complicated, especially if the issue resides within your Motorola G54 5G, a swift and efficient solution comes in the form of Wondershare Dr.Fone - System Repair.
While the methods presented earlier primarily address software glitches, Dr.Fone can tackle more profound issues, offering a quick fix to revitalize your Android Auto experience. It is a comprehensive toolkit that caters to various Android needs, ensuring a seamless and optimized experience. Among its array of features, the System Repair feature in Dr.Fone acts as a reset button for your Motorola G54 5G.
It addresses issues that go beyond the scope of regular troubleshooting. It gives your phone a fresh start by repairing the Android system and resolving glitches, crashes, and other persistent software-related problems. This revitalizes your telephone and can significantly impact Android Auto’s performance.
Note: If the problem persists and is related to the car’s head unit, a visit to the maintenance center might be necessary after exhausting these software-based solutions.
How To Use Wondershare Dr. Fone’s System Repair
To use Dr. Fone’s System Repair feature, follow the steps below. These steps will work with any Android phone.
- Step 1: Begin by launching Dr.Fone on your computer. From the left panel, access the Toolbox menu and click System Repair. Ensure your Motorola G54 5G is connected.
safe & secure
4,014,082 people have downloaded it
- Step 2: On the subsequent screen, select Android as your device.

- Step 3: Initiate the Android System Repair by clicking Start.
- Step 4: Confirm the accuracy of your device details. If needed, edit any information that may be incorrect.
- Step 5: Place your phone into Download mode following the guidelines tailored for phones with or without home buttons. Your phone will commence downloading the dedicated firmware.
 Simple and intuitive video editing
- Step 6: Once the firmware is downloaded, verify and proceed with the installation by clicking Fix Now. Confirm the firmware installation by inputting “000000” into the text box in the appearing window. Click Confirm afterward.

- Step 7: Upon completion of the process, your phone should now be restored. Click Done to conclude.
safe & secure
4,276,578 people have downloaded it
Conclusion
In wrapping up this guide, you’ve explored common reasons Android Auto does not work. You’ve also been provided practical solutions to keep your driving experience seamless. Remember, regular maintenance of your car’s head unit and periodic checks on your Motorola G54 5G can preemptively address potential issues.
By staying proactive, you ensure a consistently smooth ride with Android Auto. For comprehensive system repair and addressing broader Android-related needs, consider trying out Dr.Fone. It’s a versatile tool that can enhance your Android experience and keep your digital journey hassle-free. Take control of your drive and explore the full potential of your Motorola G54 5Gs with Dr.Fone today.
- Title: 8 Quick Fixes Unfortunately, Snapchat has Stopped on Motorola G54 5G | Dr.fone
- Author: Ariadne
- Created at : 2024-07-30 08:14:42
- Updated at : 2024-07-31 08:14:42
- Link: https://howto.techidaily.com/8-quick-fixes-unfortunately-snapchat-has-stopped-on-motorola-g54-5g-drfone-by-drfone-fix-android-problems-fix-android-problems/
- License: This work is licensed under CC BY-NC-SA 4.0.