
8 Quick Fixes Unfortunately, Snapchat has Stopped on Tecno Spark 10C | Dr.fone
[8 Quick Fixes] Unfortunately, Snapchat has Stopped on Tecno Spark 10C
Have you ever been deep in conversation with a loved one or friend, taking advantage of all the funny filters and games Snapchat has to offer when you’ve suddenly been presented with the ‘Unfortunately, Snapchat has Stopped’ error code? This is usually followed by the app crashing back to the main menu.
If so, don’t worry; you’re not alone. Snapchat crashing in this way is nothing new, but it can be incredibly annoying when it keeps happening and stops you from enjoying the conversations you care about.
Fortunately, there are plenty of solutions out there to help you out and get the app working again as it should do. Today, we’re going to explore them all to help you get back to what you were doing before and as though there was never a problem.
 PDF application, powered by AI-based OCR, for unified workflows with both digital and scanned documents.
 Part 1. Install Snapchat again from Google Play Store

One of the best ways to resolve the Snapchat crashing problem or Snap Map not working issue is to delete the app and reinstall it again. When you’re using your phone, there is data continually flowing around and data being sent here, there, and everywhere.
During these processes, bugs can occur, and if they can’t sort themselves out, the best thing to do is to reset your app and start from a fresh installation. Here’s how to do it.
Step 1: Hold down the Snapchat app from your main menu and press the ‘x’ button to uninstall the app.
Step 2: Open the Google App Store from your device and search ‘Snapchat’ in the search bar. Find the official app page and download the app onto your device.
Step 3: The app will automatically install itself once downloaded. Open the app, sign in to your account using your log-in details, and you should be able to use the app like normal.

Part 2. Check for new Snapchat Updates
 dotConnect for Oracle is an ADO.NET data provider for Oracle with Entity Framework Support.

Hand in hand with the problem above, sometimes a bug can restrict Snapchat from working, or perhaps your personal update settings. If you receive a Snapchat from someone with an upgraded version, this can crash your app.
Here’s how to make sure you’re running the latest version of Snapchat is Snapchat isn’t responding.
- Launch the Play Store and navigate to the My Apps and Games page
- Tap the Update button
- The app will now automatically update to the latest version

Part 3. Wipe the cache of Snapchat
If you have a lot of data in your Snapchat cache, this can cause the app to become overloaded in which you’ll need to clear it to start again and refresh the app. This is a common problem that can cause Snapchat has stopped working error.
Here’s how to fix it.
- Open the Snapchat app and tap the Profile icon on the top left-hand side of your screen

WPS Office Premium ( File Recovery, Photo Scanning, Convert PDF)–Yearly

Tap the Settings gear icon on the top right
Scroll down the Settings menu and tap the Clear Cache option
Here, you can choose to Clear All, but you can select individual areas if you prefer


- Tap the Confirm option to clear your cache preference completely


Part 4. Fix the system issues that caused Snapchat stopping
If you’re experiencing the Snapchat crashing on Android often, or you’re experiencing similar errors with other apps, this can be an indication that there’s something wrong with your Android operating system.
The best way to fix this is to repair your device using the software known as Dr.Fone - System Repair (Android). This is a powerful repair system that can completely recover your device from any errors, including the Snapchat keeps crashing error.
Dr.Fone - System Repair (Android)
Dedicated repair tool to fix Snapchat crashing on Android.
- Recover your device from any problem, including black screen or unresponsive screen.
- Supports over 1000+ unique Android devices, models, and brands.
- Trusted by over 50+ million customers around the world.
- Can fully repair faults with your Tecno Spark 10C’s firmware in a few simple steps.
- One of the most user-friendly applications in the world.
3,889,035 people have downloaded it
To help you make the most of this Android repair software and to fix your Snapchat not responding error, here’s a step-by-step guide on how to use it.
Step 1: Download the Dr.Fone - System Repair (Android) software to your computer. Install the software to your Mac or Windows computer by following the onscreen instructions.
Once completed, open the software, so you’re on the main menu.

Step 2: From the main menu, click the System Repair option, followed by the Android option. Of course, if you have an iOS device you want to repair in the future, the option is there if you want it. Also, connect your Tecno Spark 10C to your computer using the USB cable.

Step 3: Confirm details.
On the next screen, use the drop-down menus to confirm the model, brand, operating system, and carrier of your device. Click Next to confirm the details are correct.


Step 4: You’ll now need to put your phone into Download Mode, sometimes referred to as Recovery Mode. For this, you can follow the onscreen instructions. Make sure your device stays connected to your computer throughout this process.
The method will slightly differ depending on whether your device has a home button, so make sure you follow the right instructions for your individual device.

Step 5: Once in Download Mode, the software will now download and install a fresh version of your Tecno Spark 10C’s operating system. This can take some time, so make sure your device stays connected, and your computer stays on and doesn’t shut down.

Step 6: That’s it! Once you see the screen saying your device has been repaired, you’ll be able to close the Dr.Fone - System Repair (Android) software, disconnect your phone, and can start using Snapchat as normal without the Snapchat not responding error coming up!

 safe & secure
Part 5. Check for the Android update
 Jet Profiler for MySQL, Enterprise Version: Jet Profiler for MySQL is real-time query performance and diagnostics tool for the MySQL database server. Its detailed query information, graphical interface and ease of use makes this a great tool for finding performance bottlenecks in your MySQL databases.
Similar to some of the other solutions we’ve listed above, if you’re using an outdated version of the Android operating system, but the latest version of Snapchat is coded to the most recent, this can be a cause for the Snapchat crashing on Android problem to occur.
Fortunately, it’s easy to check to make sure you’re running the latest version of Android and to download and install the update if you need it. Here’s how, which will help to sort out your Snapchat keeps crashing Android problems.
Step 1: Open the Settings menu on your Tecno Spark 10C and select the About Phone option.
Step 2: Tap the ‘Check for Updates’ option. If an update is available, you’ll then have the option to Install Now or Install Overnight. If no update is available, you’ll see a notification stating your device is up to date and no action is needed.
Part 6. Connect to another Wi-Fi
In some cases, you may be trying to connect to a Wi-Fi network that’s not very stable. This may keep cutting the connection to your device, which in turn is causing Snapchat to crash on Android.
To resolve this, you can simply try connecting to another Wi-Fi network or a data plan to see whether this is the problem. If so, changing network and then using the Snapchat app should stop any error messages from occurring.
Step 1: Open the Settings menu on your Tecno Spark 10C, followed by the Wi-Fi option.


Step 2: Tap the new Wi-Fi network you’re currently connected to, and then tap the ‘Forget’ option, to stop your phone connecting to it.

Step 3: Now tap the new Wi-Fi network you want to connect to. Insert the Wi-Fi security code and connect. Now try reopening and using the Snapchat to see if you can use it.
 KoolReport Pro is an advanced solution for creating data reports and dashboards in PHP. Equipped with all extended packages , KoolReport Pro is able to connect to various datasources, perform advanced data analysis, construct stunning charts and graphs and export your beautiful work to PDF, Excel, JPG or other formats. Plus, it includes powerful built-in reports such as pivot report and drill-down report which will save your time in building ones.
 It will help you to write dynamic data reports easily, to construct intuitive dashboards or to build a whole business intelligence cockpit.
KoolReport Pro package goes with Full Source Code, Royal Free, ONE (1) Year Priority Support, ONE (1) Year Free Upgrade and 30-Days Money Back Guarantee.
Developer License allows Single Developer to create Unlimited Reports, deploy on Unlimited Servers and able deliver the work to Unlimited Clients.

Part 7. Stop using the custom ROM

If you’re running a custom Android ROM on your device, with some versions of the ROM and some apps, you’re going to experience errors simply because of the way the apps and the ROMs are coded and designed.
Unfortunately, there’s no easy fix to this, and if you want to continue using the app, you’ll need to reflash your Tecno Spark 10C back to its original firmware, and then wait until the ROM developers update the ROM to be compatible with social apps like Snapchat.
However, this reflashing process is simple thanks to the Dr.Fone - System Repair (Android) software that we listed above. To follow the detailed step-by-step guide, follow the steps on Part 4 of this article, or follow the quick guide instructions below.
- Download and install the Dr.Fone - System Repair (Android) software to your computer
- Connect your Tecno Spark 10C to your Windows computer using the USB cable
- Open the software and click the Repair option.
- Select the Android device repair option
- Make sure your carrier and device information are correct
- Put your device into Download Mode by following the onscreen instructions
- Allow the software to repair your Tecno Spark 10C automatically
Part 8. Reset the factory settings of your Android

One of the last resorts you can take is factory resetting your Tecno Spark 10C back to its original settings. From the day you first started using your device, you’ve been using the system and downloading files and apps, and over time this increases the chances of creating a bug.
However, by resetting your device to factory settings, you can reset these bugs and get your apps and device working again free from the Unfortunately, Snapchat has stopped error message. Here’s how to factory reset your device.
Make sure you back up your personal files from your device first like your photos and music files because factory resetting your device will clear your device’s memory.
Step 1: Tap the Settings menu on your device and click the Backup and Reset option.
Step 2: Click the Reset Phone option. That’s it! The phone will take several minutes to complete the process, after which your phone will be reset to its original state.
Restore Missing App Icon on Tecno Spark 10C: Step-by-Step Solutions
The growing conversation around the missing app icons on Android issue has caught our attention. While it seems confusing, it’s a problem that some Android users have encountered.
After all, the presence of app icons on our Android device’s home screen is important for convenient access to our frequently used applications. When your Tecno Spark 10C’s icons suddenly disappear, it can leave you feeling lost about how to use and access your apps.
No worries, though. We’ve got you covered with a simple guide in this article. Just follow the steps, and you’ll get those missing app icons back on your Tecno Spark 10C.
Part 1: Make Sure if the Missing App Is Installed
Before proceeding with troubleshooting the missing app icon on your Android device, it’s essential to confirm whether the app is still installed or if it has been accidentally deleted. To do it, you can have a quick check on Google Play:
- Step 1: Go to the Play Store.
- Step 2: Tap your Google profile at the top right and find Manage apps and devices.
- Step 3: Open Manage and select the “Installed” tab.
![]()
Now, see whether you can find the app icon that disappeared on your Android. If you can’t find it, it means the app has been accidentally deleted, and you can install it back on your device. However, if it’s confirmed to be installed on your Android but remains missing from your home screen, you can continue the following practice.
Part 2: How To Find the Missing App Icon on Android
“All my apps disappeared from my home Android screen. What should I do?”
If you’ve confirmed that the missing app is installed, but its icon is nowhere to be found on your home screen, don’t fret—there are several solutions you can take to locate and restore the missing app icon on Android.
1. Check hidden apps
How could the Android phone icon be missing? Well, app icons can disappear from your home screen for different reasons. One of the common reasons is you might have accidentally hidden it in your phone. To find and check whether the app is hidden, the steps can be different depending on the phone model you are using.
However, as a general guide, you can follow these steps:
- Step 1. Go to your phone’s Settings.
- Step 2. Use the search bar to look for “Hidden app.”
- Step 3. Once you find the “Hidden app” settings, watch the list to see if the missing app is there. If it is, you can toggle off the switch to unhide it.
![]()
2. Move the app to the home screen from the App Drawer
If your app icon disappeared on your Android, you can also easily restore it by adding the app to the home screen from the app drawer. Follow the step-by-step guide below:
- Step 1. Open the App Drawer on your Android. To do this, swipe from the bottom to the top, starting from your home screen. The App Drawer is where all your installed apps are neatly listed.
- Step 2. Once you open the App drawer, locate the app icon that has disappeared from your home screen. For example, you lost the phone icon on Android. Then, look for the phone icon from the App Drawer.
- Step 3. Long-press the Icon of the missing app and move it to the desired location on your home screen. You can drag it to an empty space or a specific folder.
- Step 4. Release to drop the app icon onto the home screen.
![]()
3. Re-enable disabled app
App icons can also disappear on the Android home screen if you unintentionally or intentionally disable them. Certain phone models even offer a functionality known as ‘Freezer,’ allowing users to temporarily halt the apps. While in a frozen state, the app remains inactive and doesn’t appear on the home screen until you unfrozen it.
To re-enable the disabled app, you can follow the steps here:
- Step 1. Open the Apps & Notifications on the Settings.
- Step 2. Select the app which icon is missing on your home screen. For example, tap the phone app if the phone icon disappears on your Android.
- Step 3: In the App Info, tap Enable.
 vMix Basic HD - Software based live production. vMix Basic HD includes 4 inputs, 3 cameras, streaming, recording, playlist.
4. Reset Android to factory settings
If the previous methods don’t work, you might need to do a factory reset on your Tecno Spark 10C. But before doing that, it’s important to back up your data first because a factory reset will clear all your data and cache when you press the reset button.
How to reset Android to factory setting:
- Step 1: Go to your Android Settings.
- Step 2: Select Backup and Reset > Factory data reset. Then, choose to erase all data.
Please be mindful that performing a factory reset on Android will reset your Android completely to its initial state.
 vMix HD - Software based live production. vMix HD includes everything in vMix Basic HD plus 1000 inputs, Video List, 4 Overlay Channels, and 1 vMix Call
![]()
Part 3: How to Fix System Error on Android Easily with Reliable Software
Missing app icons on Android can sometimes be a result of errors in your Android system launcher, causing inconvenience and potential disruptions to your device’s operation. To address this issue effectively, you can turn to Dr.Fone’s advanced system repair tool. This tool is designed to handle various system issues, providing an easy and reliable solution.
How to fix the Android system using Dr.Fone’s system repair tool:
- Step 1. Open the Repair Tool
Start by launching Wondershare Dr.Fone on your computer. Go to the Toolbox section and connect your Tecno Spark 10C. Choose System Repair and pick Android as your device type.

safe & secure
4,136,839 people have downloaded it
- Step 2. Begin Repair
Click Start on the new screen to kick off the repair. Since you’re dealing with the Android system, select System Damage.
- Step 3. Fill in the Tecno Spark 10C device Details
The platform will detect your Tecno Spark 10C’s brand. Confirm the Name, Model, Country, and Carrier. If your device is unlocked, choose OPEN in the Carrier section. Agree to the warning, click Next, and proceed with the repair.
 OtsAV TV Webcaster
- Step 4. Activate Download de
Follow the instructions to put your Tecno Spark 10C into Download Mode. Once you are in Download Mode, the firmware will be downloaded automatically.
- Step 5. Confirm Installation
Remember, the repair may erase data. It’s advisable to back up your data first before starting the repair. Enter “000000” to confirm the repair process, shown by a progress bar. Once finished, click Done and see if your phone has returned to normal.

More Articles About Android System:
9 Solutions for Android Process System isn’t Responding Error
How to Fix Android App Not Installed Error Quickly?
Authentication Error Occurred? Here Are 10 Proven Fixes
Conclusion
When the app disappears from the home screen of your Android, it can hinder your ability to access and use the app efficiently. There are several reasons why an app might disappear from your Android home screen, and addressing the issue depends on the specific circumstances.
Whether it’s due to accidental deletion or a system glitch, we have discussed various methods to recover the missing app and ensure smooth functionality in this article. In cases of system-related issues on your Tecno Spark 10C, it’s advisable to rely on trustworthy software such as Dr. Fone’s system repair tool for a comprehensive resolution.

Tecno Spark 10C Not Connecting to Wi-Fi? 12 Quick Ways to Fix
Nowadays, it’s pretty much essential to have your Tecno Spark 10C or smartphone connected to the internet. Whether you’re watching videos, looking something up, or using any kind of app, you need the internet for these applications to function correctly.
This is why it can so annoying when it gets to a point where the internet connection isn’t working. However, the problem of a web page not loading correctly is just the tip of the iceberg.
There are plenty of problems you could experience, whether it’s the Wi-Fi network keeps disconnecting on its own without any warning, perhaps a security issue where the passcode or IP address isn’t being registered properly, or even if the connection is just being super slow, even if there’s no reason too.
Luckily, despite there being so many problems out there, there are also many solutions. Today, we’re going to share with you the complete definitive guide to help you get your Tecno Spark 10C connected and free from problems and issues.
 TubeDigger - online video downloader from mostly any site
Part 1: Restart your Tecno Spark 10C
Begin by powering off your Tecno Spark 10C and unplugging your router. Wait for about a minute before plugging in the router and turning on your device. This simple reset can often restore stable connections and fix Android wifi not working.


Part 2: Turn on Airplane mode and turn off
Turn on Airplane Mode for a few seconds, then turn it off. This maneuver refreshes your device’s network connections and might rectify the Android not connecting to wifi issue.


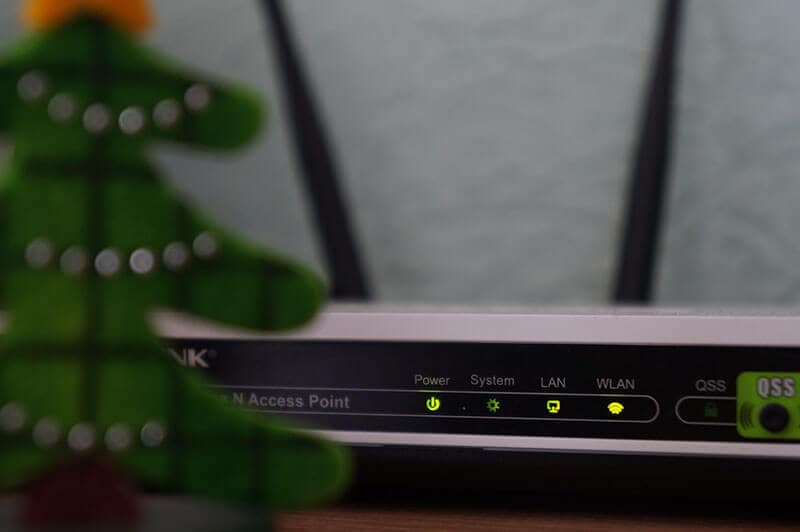
Part 3. Check Wi-Fi Router settings
The third step you’ll want to take is making sure the internet router in your house is working properly and is actually sending internet data to your Tecno Spark 10C. Of course, if you have other internet-enabled devices connected to the same router and they’re working fine, you know this isn’t the problem.
However, if you’ve got a problem with Wi-Fi not working on your Android and other devices in your home or office, you know you’ve got a router problem. Here’s how to solve it.
- Go to your internet router and check the indicator lights
- While this depends on your device, a green or blue light will mean the connection is good, whereas a red light indicates a problem
- Press the Restart button on your router and wait ten minutes before reconnecting your device and connecting again
- Call up your internet provider to see if there’s an internet connection issue in your area
- Open your web browser and log into your router settings to ensure your Tecno Spark 10C is connected to the Wi-Fi network and is allowed to send and receive data
Part 4. Boot your Android in safe mode
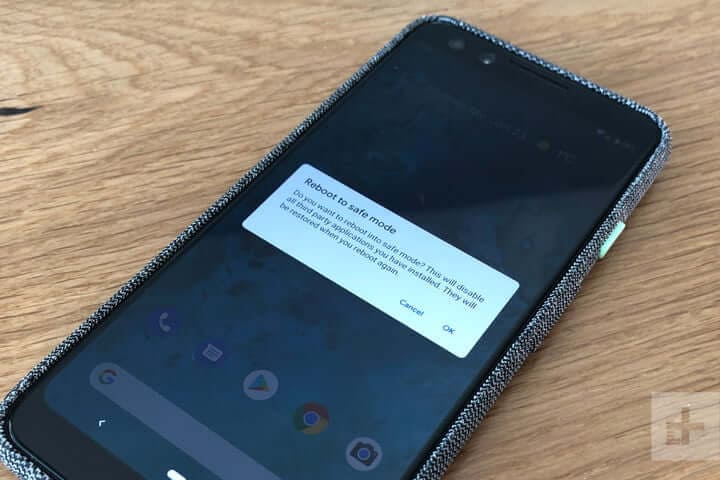
If you’re unable to connect to the internet, but other devices have no issues, you may find the issues is coming from within your Tecno Spark 10C itself. Fortunately, there are ways you can see whether this is the problem.
The best way to do this is to boot your device in Safe Mode. The process for doing this will depend on the make and model of your Tecno Spark 10C, but the basic process goes as follows;
- Turn off your Tecno Spark 10C by holding down the Power button and tapping Power Off. Wait a few minutes to ensure the Tecno Spark 10C device is completely off
- Press and hold the Power button to turn your phone on, but the press and hold both the volume up and volume down buttons at the same time
- You will see the words ‘Safe Mode’ appear on your screen as the Tecno Spark 10C device loads
- Now you will be booted in Safe Mode. Try connecting to the internet again to see if it works
If your device connects to the internet while in Safe Mode, you’ll know you have a problem with an app or service that’s running on your device. If this is the case, you’ll need to go through your apps and delete them and then reinstall them one at a time until you find the app or service that is causing your internet problems.
Part 5. Check the Android Wi-Fi adapter
If you’re using a Wi-Fi adapter on your device to connect to the internet, you’ll need to make sure this is working. This could be an adapter on your Tecno Spark 10C itself, especially if you’re using an older device, or if you’re using an adapter to boost the ranger of your router network.
You need to check both of these to make sure your connection is working properly.
- If using an Android Wi-Fi adapter, make sure all the Tecno Spark 10C device drivers are up to date, and if you’re using an app, make sure the app is updated, and all the settings allow an internet connection
- If you’re using a router adapter, make sure it’s set up properly, and your Tecno Spark 10C is connected to the adapter using the correct passwords. Try connecting another device to see if the internet connection is working on there
- Whichever method you’re using, try disconnecting your Tecno Spark 10C and forgetting the network, and then reconnecting and entering the right password to refresh the connection
Part 6. Check SSID and IP address on Android
To make a Wi-Fi connection work, your Tecno Spark 10C needs to match two codes that connect and relate to your router to establish the connection and work correctly. These are known as the SSID and the IP address.
Every wireless device will have its own codes and making sure they’re matched to the network you’re connecting to is crucial to ensuring the internet is working on your Tecno Spark 10C. Here’s how to check on your Tecno Spark 10C to make sure everything is correct.
- Tap the Settings menu option, followed by Wi-Fi on your Tecno Spark 10C
- Turn on your Wi-Fi network and connect it to your router
- Find the router name (SSID) and make sure it’s exactly the same as the SSID written on your router
- Once connected, tap the Wi-Fi network and you will see the IP address. Check both your phone and the router codes to make sure this number matches
When these numbers are matching, if your Android is still not connecting to wifi, you’ll know this wasn’t the problem.
Part 7. Fix Android system issues in one click
If none of the solutions above are working, this could indicate a real problem with the firmware and operating system of your Tecno Spark 10C. Fortunately, a fast solution to get everything working again is to completely repair the software of your phone.
You can do this easily using powerful Android recovery software known as Dr.Fone - System Repair (Android) . This is the leading repair tool on the market and is designed to fix and repair any firmware and software problems you may be having.
Dr.Fone - System Repair (Android)
A one-click tool to fix Wi-Fi not working on Android
- Can repair Android from any problem including the black screen of death
- A trusted software application used by 50+ million people around the world
- The most user-friendly mobile repair application available right now
- Supports over 1,000+ Android models and devices
- A world-class customer support team to help you whenever you need them
3,483,527 people have downloaded it
To help you have the best and the most accurate experience when using the Dr.Fone - System Repair (Android) application, here’s a complete step-by-step guide on how to use it.
Step One Make your way over to the Wondershare website and download the Dr.Fone - System Repair (Android) software. Install it onto your computer by following the on-screen instructions.
Once installed, connect your Tecno Spark 10C to your computer using a USB cable, and open the software, click “System Repair”.
Step Two Click the “Android” option in the menu and then click “Start” to begin the Repair process.
 Glary Utilities PRO - Premium all-in-one utility to clean, speed up, maintain and protect your PC
Step Three On the next screen, go through the options and use the drop-down menus to make sure the information is correct for your individual device. Accept the terms and conditions of the software, and then click the “Next” button.
Step Four Confirm you want the software to carry out the repair process by typing the ‘000000’ code into the pop-up box and pressing Confirm. Make sure you read everything displayed in this box beforehand to know what’s happening.
Step Five Now put your phone into Download Mode by following the on-screen instructions, so your device is ready for the repair process. The method for getting your phone into Download Mode will vary depending on your device, so make sure you’re following the right instructions.
Step Six Once the software has detected your device in Download Mode, it will automatically begin the repair process. You need to make sure your device stays connected throughout this time, and your computer stays on.

The whole process is automatic, so you won’t need to do anything until it’s finished. Once completed, you can disconnect your phone and start connecting it to the internet as normal!
safe & secure
Part 8. Check the Wi-Fi connectivity on another phone

When experiencing problems with your Wi-Fi network, it’s worth noting the problem might not be with your phone, but rather the Wi-Fi network itself. This is why it’s important to make sure you check the connection on another device.
Of course, if you’re already using another phone on your Wi-Fi network, you know this isn’t the case. However, if you’re not sure, here’s what you need to do;
- Get another Android or iOS phone or tablet
- Open the Settings menu and connect to the Wi-Fi network you’re having problems with
- Enter the password and connect to the network
- Open a web browser on the phone and try loading a web page
- If the page loads, you know the Wi-Fi network isn’t the problem
- If the page doesn’t load, you know you’ve got a problem with your Wi-Fi network
Part 9. Change the password of the Wi-Fi

Each Wi-Fi network router will give the opportunity to choose and change the password you have to let devices connect to your network. It’s important you try changing this because you never know if someone else has accessed your network and could be blocking your device. Here’s how it works;
- Log onto your computer and open your Wi-Fi settings
- Depending on the brand and method of your individual router, navigate to the Wi-Fi password settings menu
- Change the password to something complicated using all available digits and characters
- Save the password and restart the router to disconnect all devices
- Now connect your Tecno Spark 10C to the router using the new password
 PaperScan Professional: PaperScan Scanner Software is a powerful TWAIN & WIA scanning application centered on one idea: making document acquisition an unparalleled easy task for anyone.
Part 10. Reset network settings on Android
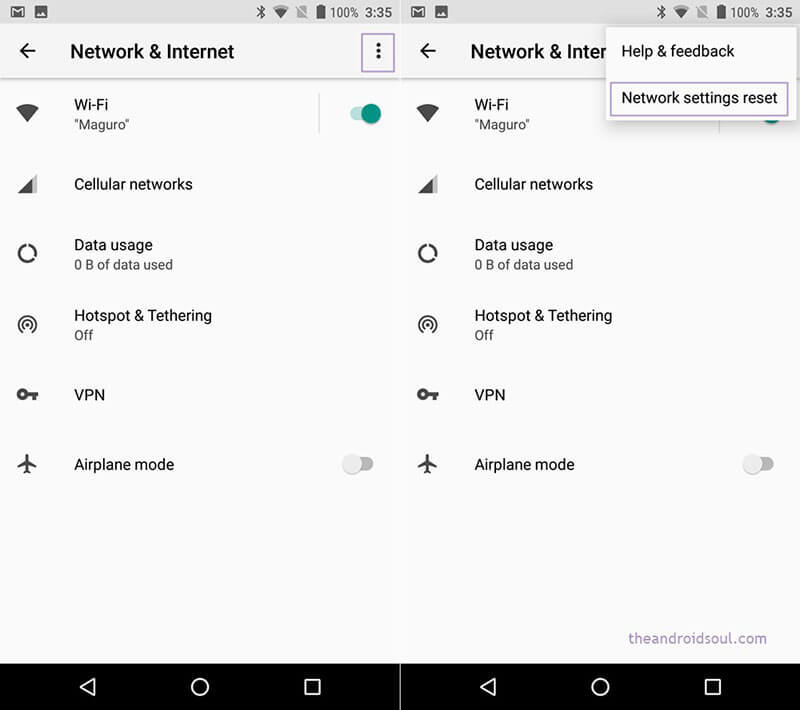
Just like the method above where you’ll be effectively resetting the network settings on your router, if this hasn’t worked, you’ll be able to reset the network settings on your Tecno Spark 10C, hopefully removing the bugs and allowing you to connect.
Here’s how you can do this easily on your Tecno Spark 10C;
- From the home screen of your Tecno Spark 10C, open the Settings menu
- Tap the Backup & Reset option
- Tap the Reset Network Settings option
- Tap the Reset Network option
- If you need to, enter the PIN number or passcode for the Android device, and the Tecno Spark 10C device will confirm the reset has taken place
- Reconnect your Tecno Spark 10C to your Wi-Fi network for the changes to take effect
Part 11. Clear partition cache in recovery mode
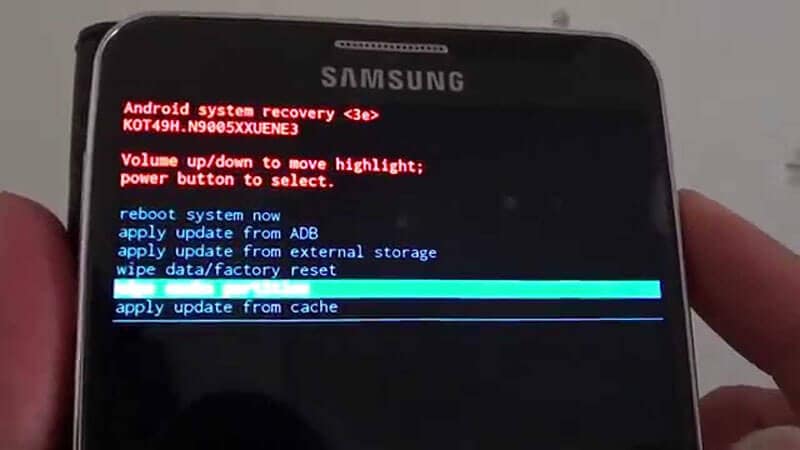
As you continue to use your Tecno Spark 10C, the partition cache will fill up with data your device needs and doesn’t need. However, by clearing your device’s partition cache, you can make clear up some space which should help your device have enough memory to connect to the internet.
- Turn off your Tecno Spark 10C
- Turn it on by holding down the power button, volume button, and home button
- When your phone vibrates, let go of the Power button, but continue to hold the volume button
- When a menu is displayed, use the volume buttons to navigate the menu
- Select the Android System Recovery option, followed by Wipe Cache Partition
- Restart your device and connect to the internet

Part 12. Reset factory settings
If worse comes to worst, another option you have is to factory reset your Tecno Spark 10C. As we’ve spoken about above, while using your phone from the day you started using it, your device will fill up with files and data which can become messy and causes bugs.
However, by factory resetting your device, you can start again from the factory default from which you first received it, ultimately clearing the bugs. Make sure you back up your device before proceeding because it will erase your personal files.
- Open the Settings menu on your Tecno Spark 10C
- Navigate to System > Advanced > Reset Options
- Tap the Reset phone option, and enter your PIN code if required
- Tap Erase Everything
- Wait for your phone to complete the process
- Restart your device and connect to the internet
safe & secure
- Title: 8 Quick Fixes Unfortunately, Snapchat has Stopped on Tecno Spark 10C | Dr.fone
- Author: Ariadne
- Created at : 2024-07-30 08:18:20
- Updated at : 2024-07-31 08:18:20
- Link: https://howto.techidaily.com/8-quick-fixes-unfortunately-snapchat-has-stopped-on-tecno-spark-10c-drfone-by-drfone-fix-android-problems-fix-android-problems/
- License: This work is licensed under CC BY-NC-SA 4.0.