
8 Solutions to Solve YouTube App Crashing on Tecno Pop 8 | Dr.fone
8 Solutions to Solve YouTube App Crashing on Tecno Pop 8
YouTube can be considered among the apps that are widely used by users. And seeing “Unfortunately YouTube has stopped” error on the Android display screen is a thing that you can’t stand. The reasons can be multiple for why YouTube is not working or it keeps crashing. For instance, an outdated app, not updated OS, low storage, or corrupted cache. No matter what has triggered the problem on your device, we have solutions for it. Please read and follow this article to get the problem sorted.
 Glarysoft File Recovery Pro - Helps to recover your lost file/data, even permanently deleted data.
Restart the app
The issues like YouTube keeps crashing are often get disappeared by just quitting and restarting the app. This is helpful to give a fresh start to the app and restarting will bring your device back to normal. Hence, the first resolution we would like to recommend is to restart your app. Follow the steps to do this.
- Go to “Settings” and tap “Apps & Notifications” or “Application”.
- Choose “YouTube” from the list of apps and open it.
- Tap on “Force Close” or “Force Stop”.
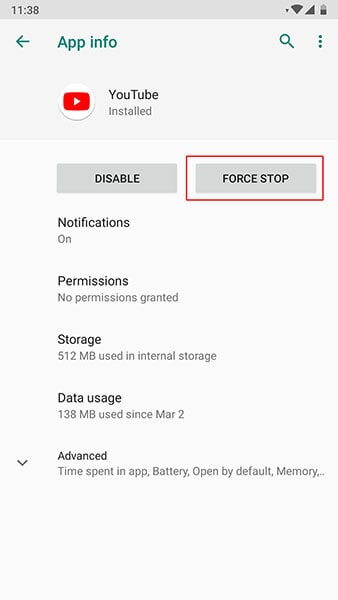
- You can now restart your device and then launch the app again. Check if this works or not.
Restart the Android
Similar to the app, if you restart the Tecno Pop 8 device, it will start operating properly making the YouTube app work better than before. So, as the next tip, please restart your device.
- Long press the “Power” key.
- Press “Restart” and confirm.


Use a VPN
There is a possibility that YouTube is prohibited in your region. Banning some apps is done for some safety reasons. And therefore, you need to check if this is done in your area or not. If yes, then we shouldn’t mention the reason why YouTube is not working on Android. In such a case, use a VPN to access YouTube.
Clear the Cache of YouTube
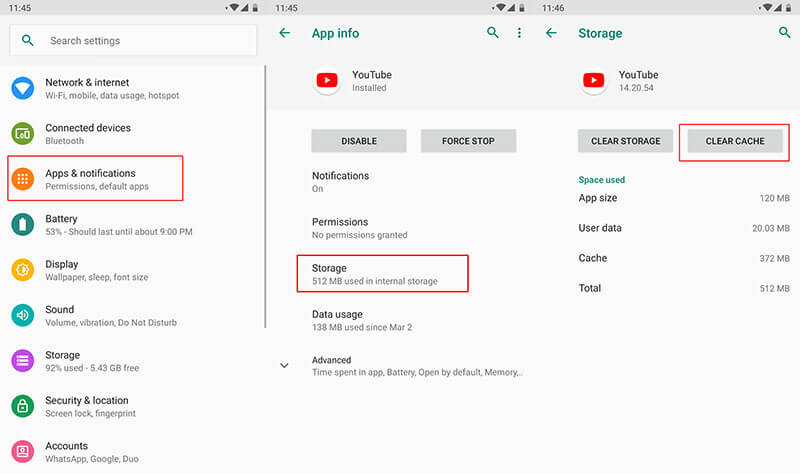
When the stored cache files start getting crash, the “Unfortunately YouTube has stopped” sort of errors are likely to appear. And therefore, if the above method didn’t work, try this one to get the problem resolved. We are going to clear the cache of YouTube to make it run smoothly.
- Go to “Settings” and tap “Apps & Notifications”/”Applications”.
- Now, choose “YouTube” from the list of apps.
- Open “Storage” and click on “Clear Cache”.
Parental Control Software
Reinstall YouTube from Play Store
If YouTube keeps crashing, make sure to uninstall and reinstall it from Play Store. Doing this will make the app gets refreshed, remove the glitches, and make it normal as a result. Here are the steps for it.
- Firstly, uninstall it by “Settings” > “Apps” > “YouTube” > “Uninstall”.
- Now, go to the “Play Store” and search “YouTube”. Tap on “Install”.
Reset Network Settings
The apps that run on the internet might start crashing due to connectivity issues. Therefore, resetting the network settings once can work as a great remedy to follow when YouTube has stopped on your Tecno Pop 8. This will remove all your network settings like Wi-Fi passwords etc.
- Tap on “Settings” followed by “Backup and reset”.
- Look for “Reset Network Settings”.
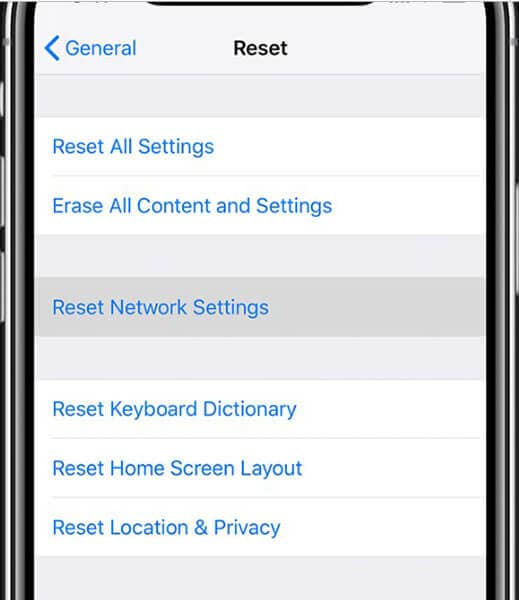
Note: In some phones, you may find the option in “System” > “Advanced” > “Reset”.
Re-flash the stock ROM of Android in one click
There are times when a corrupted system gives you such errors. And therefore, you should try re-flashing the stock ROM on your Tecno Pop 8. Before you wonder how we would like to introduce a highly recommended tool for this. It is Dr.Fone - System Repair (Android). It holds the proficiency to flash the stock ROM in just a click. So, when your YouTube is not responding due to a corrupted system, make use of this tool to get it solved. The benefits associated with this tool are as follows.
 The Tube Sites Submitter is a fast and efficient tool for anyone who needs to upload videos quickly, easily and automatically to hundreds of tube sites in mere minutes .
 Dr.Fone - System Repair (Android)
Android repair tool to flash the stock ROM of Android
- Easy to use and quickly fixes the issues
- Has the capability to repair any Android system issue
- 1000+ Android models are supported
- Takes no special technical knowledge to use
- Higher success rate with promising results
3981454 people have downloaded it
Step 1: Launch the Tool
Start with visiting the website on your PC and downloading the Dr.Fone toolkit. Install and open the tool. Now, from the main screen, choose “System Repair”.

Step 2: Connect Device
With the help of the USB cord, connect your Tecno Pop 8 to the computer. Click on “Android Repair” now from the left panel.


Step 3: Enter Information
Now, as the next step, you need to make sure of the details of your device. Please enter the name and brand of the phone. The country, region, and career are also to be added. Hit on “Next” once done.

Step 4: Download Firmware
Now, follow the instructions given on the screen according to your device. Click on “Next” and the program will start downloading the firmware.
 SwifDoo PDF 2-Year Plan
Step 5: Repair the Issue
Lastly, when the firmware is downloaded, the system will start getting repaired on its own. You need to wait until you are informed about the completion of the process.

Reset Factory Settings of this Device
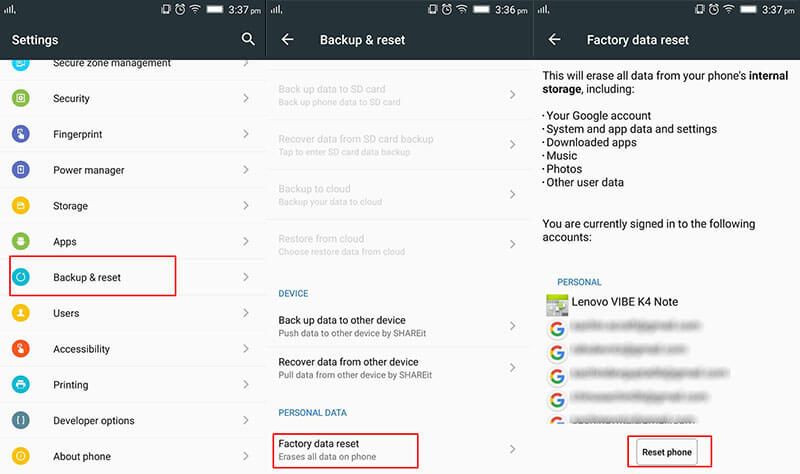
When nothing works, the last resort you can go with is resetting the Tecno Pop 8 device to factory state. Doing this will remove any sort of conflicting bugs and other stuff. However, this will remove the data from your device. So make sure to backup everything before going with this method. The steps are:
- Open “Settings” and tap “Backup & reset”.
- Go to “Factory data reset” and tap “Reset phone”
Simple Solutions to Fix Android SystemUI Has Stopped Error For Tecno Pop 8
In this article, you will learn possible causes of Android SystemUI stopping error and 4 methods to fix this issue. Get Dr.Fone - System Repair (Android) to fix Android SystemUI stopping more easily.
Android SystemUI isn’t responding or Android, unfortunately, the process com.android.systemui has stopped is a not a rare error and is observed in all Android devices these days. The error usually pops up on your device while you are using it with a message on the screen saying Android. Unfortunately, the process com.android.systemui has stopped.
The Android SystemUI isn’t responding error message may also read as “Unfortunately, SystemUI has stopped”.
Android SystemUI error can be very confusing as it leaves affected users with only one option, i.e., “OK”, as shown in the images above. If you click on “OK” you will continue to use your device smoothly, but only until the SystemUI isn’t responding error pops-up on your main screen again. You may restart your device, but the Android SystemUI has stopped the problem continues to annoy you until you find a permanent solution for it.
If you are also among the various users who see Android, unfortunately, the process com.android.systemui has stopped error, then do not worry. SystemUI isn’t responding. Error is not a serious issue and can be tackled easily by carefully examining the reasons behind the problem.
Looking for suitable solutions to fix Android SystemUI has stopped error? Then read on to find out all about Android SystemUI isn’t responding error and the most effective ways to fix it.
Part 1: Why Android SystemUI Has stopped happens?

Android device owners would agree that OS updates are very helpful as they fix the bug problem and improve the overall working of your device. However, sometimes these updates may be infected due to which they do not download and install properly. A corrupted OS update may cause Android; unfortunately, the process com.android.systemui has stopped error. All Android updates are directly designed around the Google App, and thus, the problem will persist until the Google App is also updated. Sometimes, even the Google App update may cause such a glitch if it is not successfully downloaded and installed.
Another reason for the Android SystemUI isn’t responding error to occur, maybe because of flashing a new ROM or due to improper firmware update installation. Even when you restore the backed up data from cloud or your Google Account, such Android, unfortunately, the process com.android.systemui has stopped error may show up.
It is not possible to say for sure which one of the above-mentioned reasons is causing your device to show Android SystemUI is not responding error. But what we can do is move on to fixing the Android SystemUI by following any one of the three methods given the following segments.
Part 2: How to fix “com.android.systemui has stopped” in one click
As we’ve learned that Android system UI isn’t responding issue is primarily because of the Android OS updates not installed properly or were corrupted. Hence, there comes the need for a powerful Android system repair tool that can help you rectify such annoying errors.
To serve the purpose, we would like to introduce, Dr.Fone - System Repair (Android) . It is one of its kind of applications and is highly recommended as it has a proven success rate to resolve almost all Android system issues.
It’s now time to understand how to fix Android ‘unfortunately, the process com.android.systemui has stopped’ or in simple words, Android system UI isn’t responding.
Note: Before we proceed to Android repair, please ensure to make a backup of all your data . This is because the Android repair process may wipe out all the data on your device to fix the Android OS issues.
Phase 1: Connect and prepare your Tecno Pop 8
Step 1 – Download the Dr.Fone toolkit over your PC. Install it and launch it over. Opt for the “System Repair” tab from the main screen and get your Tecno Pop 8 connected to the PC.

Step 2 – You need to select “Android Repair” from the left panel and then hit the ‘Start’ button.
 vMix HD - Software based live production. vMix HD includes everything in vMix Basic HD plus 1000 inputs, Video List, 4 Overlay Channels, and 1 vMix Call
Step 3 – Next, you need to select the correct information about your device (i.e., brand, name, model, country/region, and carrier details). Check the warning down below and hit “Next”.
Phase 2: Boot Android in ‘Download’ mode to perform the repair.
Step 1 –You’re now required to boot your Android in Download mode. Here’s what you need to do to put your Android in DFU mode.
If your Android has a Home button:
- Turn off your device. Hold down “Volume Down + Home + Power” buttons altogether for about 10seconds. Let go of the buttons afterward and hit the Volume Up to boot in download mode.


In case your Android has no Home button:
- Turn off your device. Hold down “Volume Down + Bixby + Power” buttons altogether for about 10seconds. Let go of the buttons afterward and hit the Volume Up to boot in download mode.


Step 2 – Once done, hit “Next” to initiate the downloading of the firmware.
Step 3 – As soon as the download completes, the Android repair will automatically be started by the program.

Step 4 – In a just a matter of a few minutes, your Android system UI isn’t responding issue will be resolved.

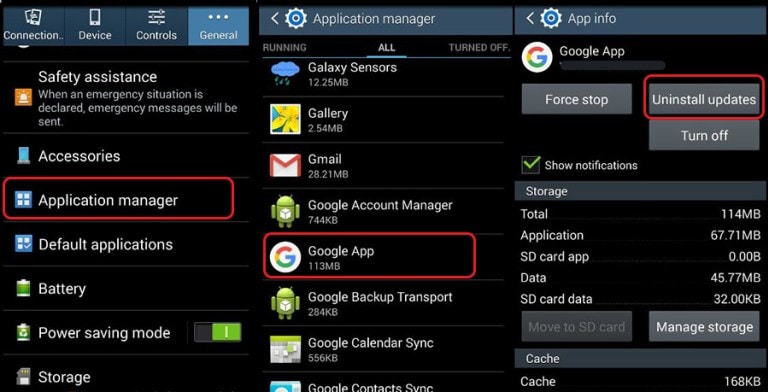
Part 3: Uninstall Google updates to fix Android SystemUI issue
All Android SystemUI isn’t responding errors are circled the Google App as the Android platform is heavily dependent on it. If you have recently updated your Google App and the Android, unfortunately, the process com.android.systemui has stopped error keeps popping up at regular intervals, make sure you uninstall Google App updates as soon as possible.
Follow the steps given below to fix the Android SystemUI has stopped issue by rolling back the Google App updates:
- Visit “Settings” and select “Apps” or “Application Manager”.
- Now swipe to view “All” Apps.
- From the list of Apps, select “Google App”.
- Finally, tap on “Uninstall Updates” as shown hereunder.
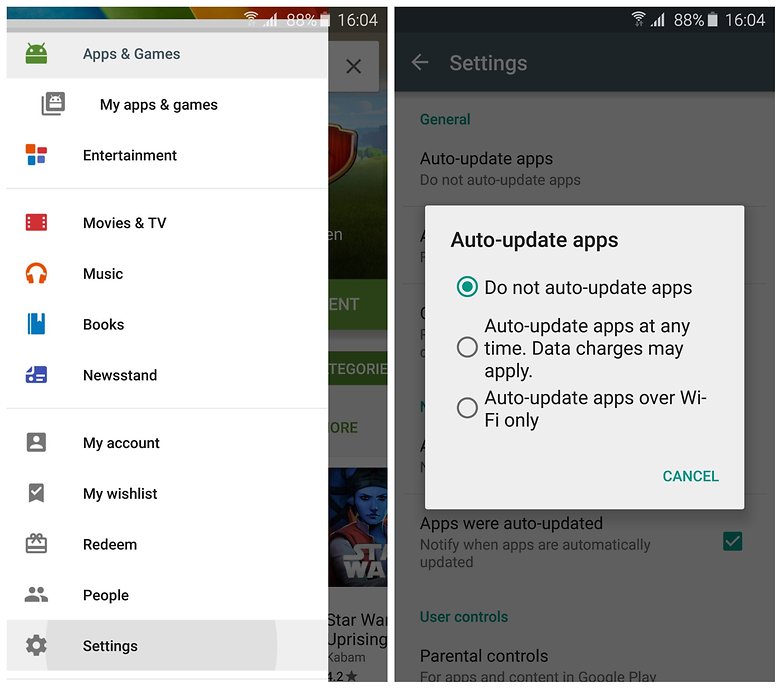
Note: To prevent the Android SystemUI isn’t responding error to occur in the future, do not forget to change your Google Play Store settings to “Do Not Auto-Update Apps”.
Part 4: Wipe Cache partition to fix Android SystemUI error
Android, unfortunately, the process com.android.systemui has stopped error can also be fixed by clearing your cache partitions. These partitions are nothing but storage locations for your modem, kernels, system files, drivers, and built-in Apps data.
It is advisable to clear Cache portions regularly to keep your UI clean and free of glitches.
Android SystemUI isn’t responding error can be overcome by clearing the cache in recovery mode.
Different Android devices have different ways to put it in recovery mode. Refer to your device’s manual to enter the recovery mode screen on your device and then follow the steps given below to fix Android; unfortunately, the process com.android.systemui has stopped error by clearing the cache partition:
- Once you are the recovery mode screen, you will see several options as shown in the screenshot.
 Epubor Audible Converter for Win: Download and convert Audible AAXC/AA/AAX to MP3 with 100% original quality preserved.
- Use the volume down key to scroll down and select ”Wipe cache partition” as shown below.

- After the process is completed, select “Reboot System” which is the first option in the recovery mode screen.
This method will help you de-clutter your device and erase all the clogged up unwanted files. You may lose App related data too, but that is a small price to pay to fix the Android SystemUI isn’t responding error.
If the Android SystemUI has stopped the problem persists, there is only one way out. Read on to find out about it.
Part 5: Fix Android SystemUI error by factory reset
Factory Resetting your device to fix Android; unfortunately, the process com.android.systemui has stopped error is a desperate measure and should be the last thing to do on your list. Take this step only when the above mentored two techniques fail to work.
Also, make sure you take a back-up of all your data and contents stored in your Tecno Pop 8 on the cloud, Google Account or an external memory device because once you perform a factory reset on your device, all media, contents, data and other files are wiped out, including your device settings.
Follow the steps given below to factory reset your device to solve the Android SystemUI isn’t responding problem:
- Visit “Settings” by clicking the settings icon as shown below.
 Screensaver Factory, Create stunning professional screensavers within minutes. Create screensavers for yourself, for marketing or unlimited royalty-free commercial distribution. Make screensavers from images, video and swf flash, add background music and smooth sprite and transition effects. Screensaver Factory is very easy to use, and it enables you to make self-installing screensaver files and CDs for easy setup and distribution. Screensaver Factory is the most advanced software of its kind.
- Now select “Backup and Reset”.

- In this step, select “Factory data reset” and then “Reset Device”.
- Finally, tap on “ERASE EVERYTHING” as shown below to Factory Reset your device.

After the factory reset process is completed, your device will automatically restart, and you will have to set it up once again.
The whole process of factory resetting your Tecno Pop 8 might sound tedious, risky, and cumbersome, but it helps to fix the Android SystemUI has stopped error 9 out of 10 times. So, think carefully before using this remedy.
Android SystemUI isn’t responding or Android, unfortunately, the process com.android.systemui has stopped error is commonly seen by users on their devices. It is not a random error and is linked to either the software, Google App, cache partition, or data stored in the Tecno Pop 8 device. It is fairly simple to deal with this issue as all you need to do is install or roll back your Android OS update, uninstall Google App updates, clear cache partition, or factory reset your device to clear all data, files, and settings stored in it. The methods listed and explained above are the best ways to fight the problem and to prevent it from troubling you in the future. These methods have been adopted by affected users all over the world who recommend them because they are safe and involve minimum risks as compared to other tools to solve the Android SystemUI has stopped error. So go ahead and try them now!
Guide: How To Unbrick a Bricked Tecno Pop 8 Phone
Tecno Pop 8 phones are super popular thanks to their excellent features and affordable prices. But being so popular means people try to customize them with custom software. If you’re not careful, you might have a “bricked” Tecno Pop 8 phone. It won’t work at all. It will be more like a brick than a smartphone.
Don’t worry, though. This guide is here to help. It will show you how to unbrick your phone step by step. You’ll learn to bring your phone back to life and make it work again. So, get started on fixing your bricked Tecno Pop 8 phone by reading this article.

Part 1. Common Reasons Why Tecno Pop 8 Phones Get Bricked
A bricked phone might sound like a techy term, but it’s pretty simple – when your Tecno Pop 8 phone turns into a lifeless block that won’t do anything. In this section, you’ll learn all about why this happens, so you can avoid these issues and keep your phone alive as long as possible.
- Trying to flash incompatible ROMs. Sometimes, people want their Tecno Pop 8 phones to run different software like a custom version of Android called a ROM. But if you use the correct ROM for your specific phone, it can mess things up nicely. Also, inexperience with ROM flashing can hard brickyour Tecno Pop 8 Be sure to follow guides and ask for community help online.
- Rooting mishaps/failures.“Rooting” means giving your phone superpowers, but if you mess up, it can go wrong. Your phone might not boot up, leaving you with a brick. Like the previous bullet, follow guides carefully, especially if inexperienced.
- Failed Firmware Updates. When your phone asks you to update its software, following the instructions carefully is essential. If you interrupt the process or something goes wrong, your phone could be bricked.
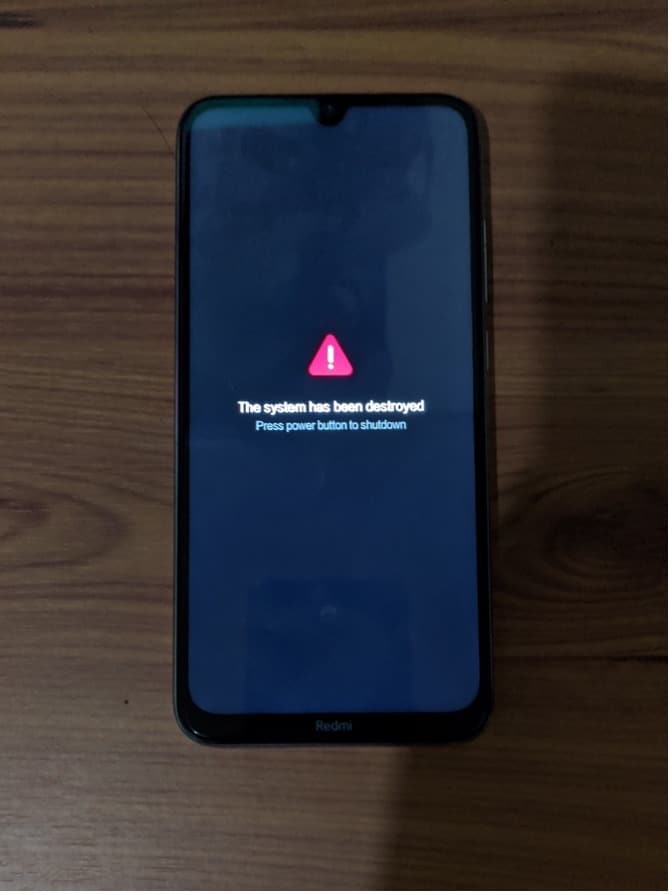
Now, you must know about soft and hard-bricking to learn how to diagnose your phone. Soft bricking is like a phone’s bad day – it might not start up. However, with the right help, you can fix it. Hard bricking is worse. It’s when your phone is a paperweight – it won’t turn on, respond, or do anything useful.
Part 2. Method 1: Use the Tecno Pop 8 Flash Tool To Recover Bricked Tecno Pop 8 Phones
Say you’ve accidentally bricked your Tecno Pop 8 phone due to rooting or ROM flashing. You might feel scared, but imagine having a magic wand that can fix your bricked phone. That’s what the Tecno Pop 8 Flash Tool is –a dedicated Tecno Pop 8 unbricking tool. It lets you install or flash different software onto your phone, giving it a fresh start. Most of the time, a simple firmware flash will unbrick your Tecno Pop 8.
The Tecno Pop 8 Flash Tool is a superhero for various situations. Here are some scenarios where it can save the day:
- **Device Recovery.**If your phone is bricked or acting strange, the Flash Tool can help bring it back to life.
- Firmware Updates. You can use it to install official updates released by Tecno Pop 8, ensuring your phone runs smoothly.
- **Device Customization.**Want a different look for your phone? The Flash Tool can help you install custom ROMs or themes.
- **Bug Fixes.**Got pesky bugs or glitches? The Flash Tool can replace corrupted software to make your phone behave.
- Performance Enhancement. If your phone feels sluggish, the Flash Tool can boost its speed by flashing a new OS.

How To Use the Tecno Pop 8 Flash Tool To Unbrick a Tecno Pop 8 Phone
Now that you know what the Tecno Pop 8 Flash Tool is all about, it’s time to learn how to use it. If you’ve bricked your Tecno Pop 8 phone, follow the steps below:
- Step 1. Download the Tecno Pop 8 Flash Tool and the stock firmware of your device on your computer.
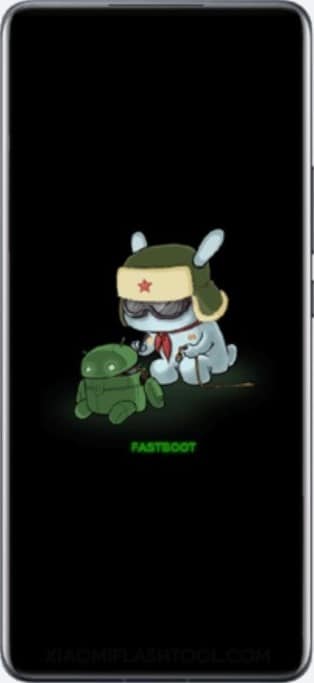
- Step 2. Turn off your phone. Then, press and hold the Volume Down + Power Key simultaneously for 6-8 seconds. This will force your phone to enter the Fastboot mode.


- Step 3. Connect your phone to your computer using a cable when you see this screen flash.
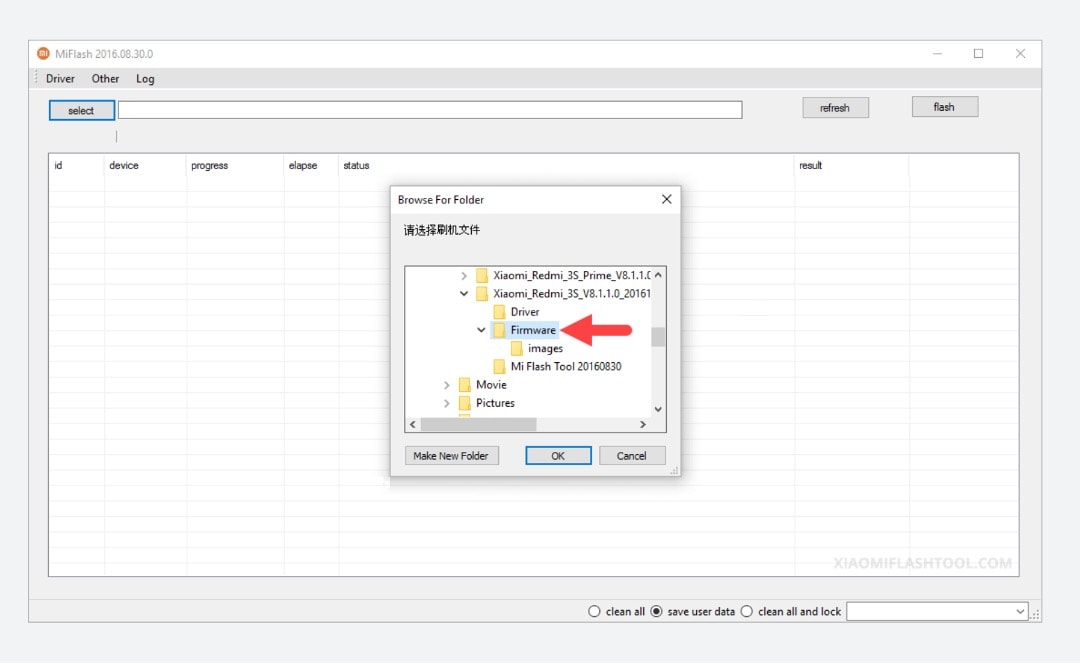
- Step 4. Using the Tecno Pop 8 Flash Tool, click Select. Then, locate the firmware files you downloaded earlier.
- Step 5. Click the refresh button until the flash tool recognizes your device. Then, click flash to replace the firmware. A text saying “success” should appear under the result column.
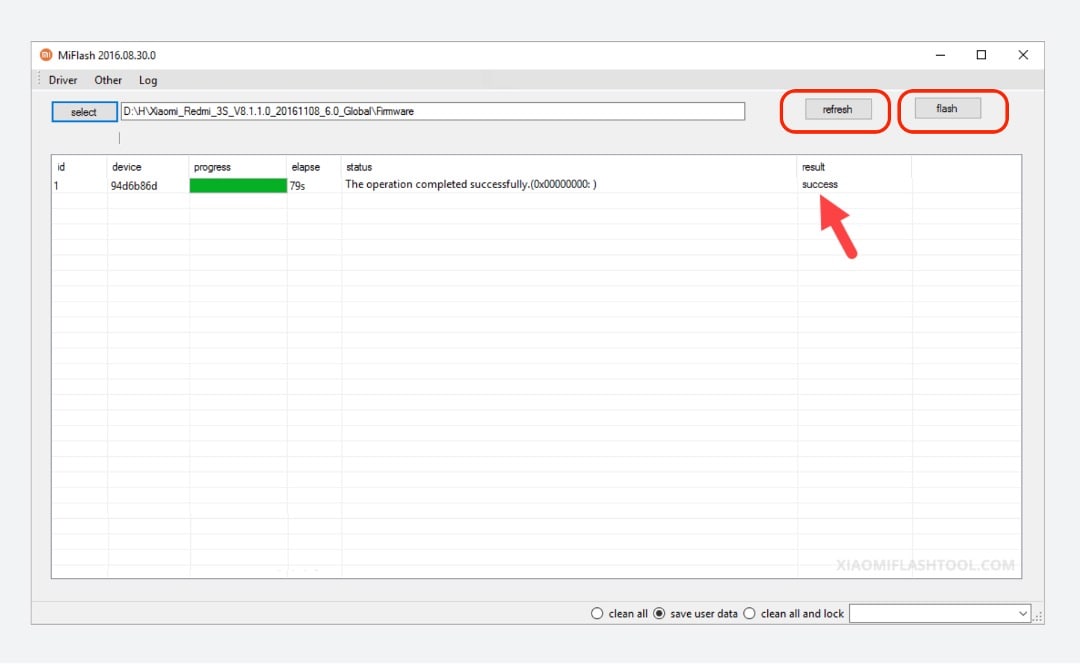
Congratulations! Your phone should be up and working after following these steps.
 ZoneAlarm Pro Antivirus + Firewall NextGen
Part 3. Method 2: Wondershare Dr.Fone System Repair – Your One-Stop Shop for Unbricking Your Tecno Pop 8 Phone
If you gave the Tecno Pop 8 Flash Tool a shot and your phone is still not cooperating, don’t lose hope. Sometimes, the magic touch needs a slight variation. That’s where Dr.Fone comes into play. This dedicated software can work wonders when fixing various phone problems. It can even help in cases of bricked Tecno Pop 8 phones involving software or firmware issues.
![]()
Dr.Fone - System Repair (Android)
Repair Android System Errors without Any Trouble.
- Fix your Android to normal, no skills required.
- Fix various Android system issues, stuck in boot loop , black screen , or won’t turn on , looping on start, etc.
- The high success rate in resolving Android system issues.
- Compatible with a wide range of Android devices and OS versions
- User-friendly interface with easy-to-follow steps.
3981454 people have downloaded it

One of Dr.Fone’s most astonishing powers is its “System Repair” feature. This is where the real magic happens. If your Tecno Pop 8 phone is bricked, it can help repair the underlying software glitches that caused the issue. Moreover, Dr.Fone brings a toolbox of features to the table, making it more than just a one-trick pony. Here are its key features:
- **Data Recovery:**If you’ve lost precious data, Dr.Fone can help recover it, even from a bricked phone.
- **Data Transfer:**You can quickly move data between devices, even if one is unresponsive.
- **System Backup & Restore:**Fone can help you create a backup of your phone’s system and restore it when needed.
- **Unlocking Tools:**If you’re locked out of your phone, Dr.Fone can help you regain access.
 Glarysoft File Recovery Pro Annually - Helps to recover your lost file/data, even permanently deleted data.
How To Use Dr.Fone System Recovery Feature To Unbrick a Tecno Pop 8 Phone
Now that you know about Dr.Fone, it’s time to understand how to use it. Hopefully, it can save your bricked Tecno Pop 8 phone from its problems. Follow the steps below:
- Step 1. DownloadDr.Fone from its official website , and launch it on your computer. After entering the Toolbox menu from the left panel, click System Repair. Make sure that your Tecno Pop 8 phone is connected.
- Step 2. Select Android on the next screen.


- Step 3. Initiate the Android System Repair by clicking Start.

- Step 4. Confirm your device details. You can edit any details that might be wrong.
- Step 5. Put your phone into Download mode. Follow the guidelines for phones with or without home buttons. Your phone will begin downloading the dedicated firmware.
- Step 6. After downloading the firmware, verify and proceed with the installation by clicking Fix Now. Confirm firmware installation by typing “000000” into the text box in the appearing window. Click Confirm afterward.

- Step 7. After the process is finished, your phone should now be okay. Click Done.
Before diving into the unbricking process, you must arm yourself with some tips and precautions to ensure your recovery journey is as smooth as possible. Here’s what you need to know:
- Backing Up Data: An Ounce of Prevention. Remember the golden rule: always back up your data before attempting any phone recovery. Unbricking might save your phone, but being safe is better than sorry.
- **Authentic Tools and Software: Stay on the Safe Side.**Using genuine and trustworthy tools is crucial when unbricking your Tecno Pop 8 This applies especially to Dr.Fone, which you should only download from the official website. Additionally, when recovering your phone’s software, use authentic Tecno Pop 8 ROMs (the operating system’s files).
- **Learning from Online Guides and Communities: Seek Guidance.**Navigating the unbricking process might seem daunting, but you’re not alone. There are many online guides, tutorials, and communities where people share their experiences and solutions.
Conclusion
So, there you have it – your guide to fixing a bricked Tecno Pop 8 phone. Remember, bricking happens when your phone stops working. You won’t be afraid when that happens, as you learned about the Tecno Pop 8 Flash Tool and Dr.Fone. They are your phone-saving superheroes that can unbrick even a hard-bricked Tecno Pop 8 phone.
As a parting reminder, always keep a tool ready for emergencies. For this, choose Dr.Fone. It’s a super tool for all your phone problems. Give it a shot and be confident with your phone wherever you go and whatever you do with it.
 safe & secure
3,052,835 people have downloaded it
- Title: 8 Solutions to Solve YouTube App Crashing on Tecno Pop 8 | Dr.fone
- Author: Ariadne
- Created at : 2024-07-30 08:25:39
- Updated at : 2024-07-31 08:25:39
- Link: https://howto.techidaily.com/8-solutions-to-solve-youtube-app-crashing-on-tecno-pop-8-drfone-by-drfone-fix-android-problems-fix-android-problems/
- License: This work is licensed under CC BY-NC-SA 4.0.