
8 Ultimate Fixes for Google Play Your Asus ROG Phone 7 Isnt Compatible | Dr.fone
8 Ultimate Fixes for Google Play Your Asus ROG Phone 7 Isn’t Compatible
Nowadays, keeping yourself informed about the newest apps and features is essential. Have you encountered the error message “Google Play your device isn’t compatible with this version?” When attempting to download or update an application, this problem can pose a significant obstacle. The good news is that you can now alleviate those concerns.
In this article, we delve into how to resolve the “your device isn’t compatible with this version Google Play” error. It will discuss the top 8 ultimate fixes for this vexing issue that many Android users face. From practical tips to advanced solutions, this article aims to empower you with the knowledge to overcome this challenge.
Part 1: Reasons Behind Your Device Isn’t Compatible With This Version Play Store
Encountering the frustrating “your device isn’t compatible with this version Google Play“ error can be disruptive. That’s why it is essential to go through the underlying reasons causing this compatibility issue:

1. Outdated Operating System Firmware
One of the primary culprits behind the compatibility error is outdated OS firmware. App developers release updates to keep up with the latest features and security patches. That’s why an obsolete OS version on your device may render it incompatible with the newer app versions available on the Google Play Store.

2. Insufficient Hardware Requirements
Each application has specific hardware prerequisites that your device needs to fulfill. In case your smartphone does not meet the required specifications, you won’t be able to utilize the app. Thus, Google Play Store may restrict access to certain applications, citing compatibility issues.
3. Corrupted Cache Files
Cache files are designed to enhance the speed and efficiency of app loading. Yet, they can sometimes become corrupt. When this occurs, it disrupts the app’s normal operation. Clearing these corrupted cache files is often a crucial step.
4. Geographic Restrictions
In certain cases, app developers or Google Play itself may impose geographic restrictions. This could lead to compatibility issues if your device is located in an area where the app is restricted. Understanding the geographical availability of an app is vital in finding the root cause.
4. Beta Versions and Unstable Releases
Engaging with beta versions or unstable releases of an app can result in compatibility issues. These versions are typically in the testing phase. That’s why their compatibility with a wide range of devices may not be guaranteed. If you find yourself facing compatibility errors, it’s worth checking if you are in a beta program.
 DEX 3 RE is Easy-To-Use DJ Mixing Software for MAC and Windows Designed for Today’s Versatile DJ.
Mix from your own library of music, iTunes or use the Pulselocker subsciprtion service for in-app access to over 44 million songs. Use with over 85 supported DJ controllers or mix with a keyboard and mouse.
DEX 3 RE is everything you need without the clutter - the perfect 2-deck mixing software solution for mobile DJs or hard-core hobbiests.
PCDJ DEX 3 RE (DJ Software for Win & MAC - Product Activation For 3 Machines)
Part 2: 8 Reliable Fixes for Google Play Your Device Isn’t Compatible With This Version
Facing the “Play Store your device isn’t compatible with this version” error is an all-too-familiar setback. However, fear not, as this article will be your guide in resolving this issue. Summarized below are the top 8 solutions to fix this error with ease:
Fix 1: Force Quit Google Play Store
Force quitting the Google Play Store is a simple yet effective first step in resolving compatibility issues. Occasionally, the app may encounter glitches or background errors. These can hinder its proper functioning. Force quitting the Google Play Store and restarting it can often rectify these issues. You can use the following steps to force quit Google Play Store:
- Step 1. On your Asus ROG Phone 7, find the Google Play Store and long-press its icon. Press “App info” from the pop-up menu to access the app information screen.
 Jet Profiler for MySQL, Enterprise Version: Jet Profiler for MySQL is real-time query performance and diagnostics tool for the MySQL database server. Its detailed query information, graphical interface and ease of use makes this a great tool for finding performance bottlenecks in your MySQL databases.
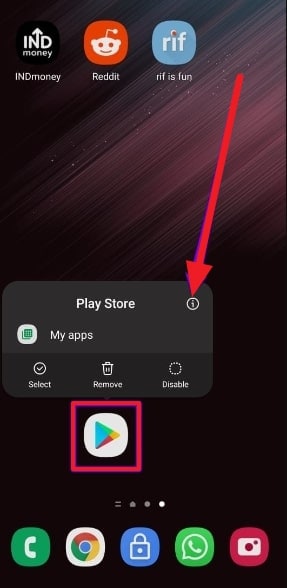
- Step 2. Here, tap the “Force Stop” option to force close the Google Play Store. After a while, relaunch the app to see if the issue is resolved.


Fix 2: Clear Google Play Store Cache
Clearing the cache of the Google Play Store is a targeted solution. It addresses potential compatibility issues arising from corrupted or outdated temporary files. The cache stores data that helps the app load faster. Yet, when these files become corrupted, it can lead to performance issues. Follow these steps to clear the Google Play Store cache and the “device not compatible Google Play” issue:
- Step 1. After finding the Google Play Store on your device, press and hold the icon until a pop-up menu appears. Here, touch the “App info” option to reach the screen displaying information about the app.
- Step 2. Here, press “Storage and Cache,” and on the following screen, tap “Clear cache.” Confirm your action to wipe the cache data. Afterward, access the targeted app again to check if the issue is resolved.


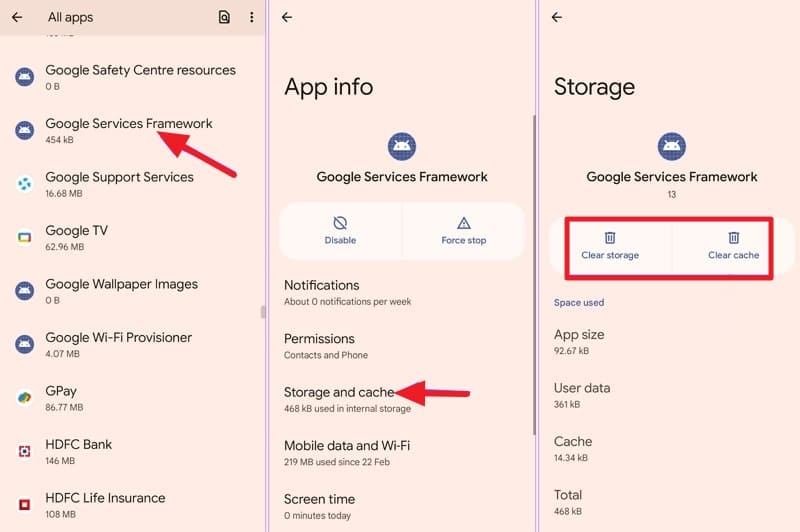
Fix 3: Remove the Google Services Framework’s Cache and Data
The Google Services Framework plays a crucial role in your Asus ROG Phone 7. It is essential in the functioning of various Google services, including the Google Play Store. Clearing its cache and data can be an effective method to tackle compatibility issues. Here’s a step-by-step guide on how to remove the Google Services Framework’s cache and data:
- Step 1. Open your device’s Settings and scroll down to tap “Apps.” There, press the “All Apps” options, and on the following screen, choose “Show System” from the top right corner.
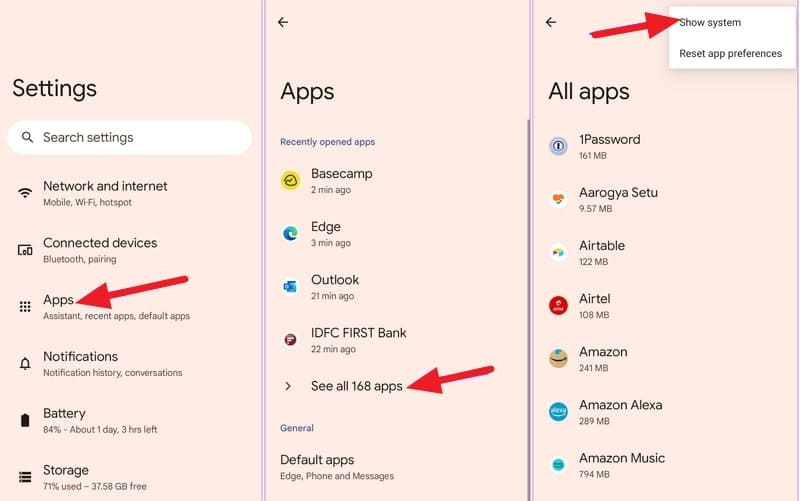
- Step 2. Now, find and tap the “Google Services Framework” app and go on to press “Storage and Cache.” Here, use “Clear Cache” and “Clear Storage” to clear its cache and data.
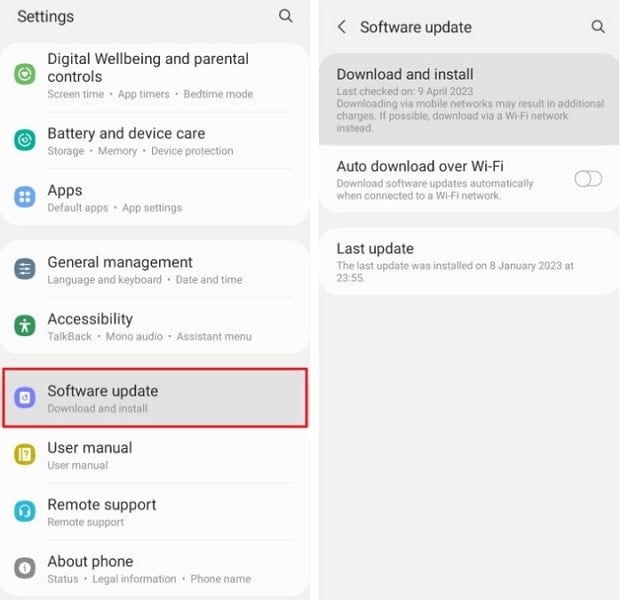
Fix 4: Update the Android OS Version
An outdated operating system is a common factor behind compatibility issues. This case is often used with Google Play Store and other important apps. Maintaining your Asus ROG Phone 7’s compatibility with the latest app releases is essential. To ensure your Android operating system is up-to-date, please proceed with the following steps:
Instructions. You will need to start by accessing the Asus ROG Phone 7 device’s “Settings.” Scroll down to find and press the “System” option. On the following screen, tap “Software Update” to check if an update is available. If there is one, follow the on-screen prompts to update your device’s OS.
Fix 5: Uninstall the Google Play Store Updates
In certain cases, issues with the Google Play Store itself may be contributing to compatibility errors. Uninstalling recent updates can revert the app to its default state. It can potentially resolve the problem. Follow these steps to uninstall updates for the Google Play Store and resolve “device not compatible Play Store” issues:
- Step 1. Using your Asus ROG Phone 7’s Settings, access the Google Play Store app in the “Apps” tab. Once on its info page, tap the three dots icon from the top right corner.

- Step 2. From the available options, choose “Uninstall updates.” Then confirm your decision when prompted to delete the Google Play Store updates.

Fix 6: Sideload the Incompatible Android App
If all else fails and the compatibility issue persists, sideloading the app can be a workaround. It means installing the app manually without using the Google Play Store. This approach proves especially valuable for users with a strong determination to access a specific application. Below is a comprehensive, step-by-step tutorial on how to sideload an app:
- Step 1. Long-press the Google Chrome icon to open the app info menu. Navigate to the “Install unknown apps” section. Here, toggle the switch to enable “Allow from this source.”

- Step 2. Afterward, access a reliable, trusted website where the APK for the targeted app is available. Download and install the app to resolve the compatibility issues.

 Lyric Video Creator Professional Version
Fix 7: Install a Custom ROM
Have you exhausted other options and are still grappling with compatibility issues? Installing a custom ROM could be a more advanced but effective solution. Custom ROMs are modified versions of Android operating systems developed by the Android community. Engaging in this procedure entails large modifications to your device’s software. It is crucial to comprehend the potential consequences and proceed with caution.
Installing a custom ROM may void your device’s warranty. Moreover, it’s crucial to choose a ROM compatible with your device model. Installing a custom ROM is an advanced solution that should be approached with caution. It has the capability to address compatibility issues. Nevertheless, it demands a certain level of technical expertise and may not be suitable for all users.
Fix 8: Try Using a Third-Party App Store
The final solution to avoid compatibility issues on the Google Play Store is to use a different app store. Exploring alternative app stores can be a pragmatic workaround. Several third-party app stores offer a diverse range of applications. They might provide the desired app without encountering compatibility errors and help avoid the “device not compatible Google Play” error.
You can explore reputable third-party app stores such as Aptoide, Amazon Appstore, GetJar, or SlideME. Ensure the chosen app store is reputable and widely used, minimizing potential security risks. Exercise caution and ensure the legitimacy of the app store to avoid security risks.

Part 3: Is Your Play Store Not Working Properly? Fix It Now With Wondershare Dr.Fone
If you are unable to download any application on your Asus ROG Phone 7, it might be because of your Play Store issue. Play Store is the crucial element in your device, providing your facility with many features and functions. Get it fixed by trying Wondershare Dr.Fone – System Repair (Android) tool within a few clicks.
The System Repair tool in Dr.Fone helps you to resolve this issue in your Android Phone with powerful mechanisms and efficient working. It provides a user-friendly interface to fix Play Store Not Working with much ease.
Key Features of Wondershare Dr.Fone
- Fone – System Repair (Android) allows you to repair your Asus ROG Phone 7 easily in just a few clicks.
- This tool is also used to resolve the Black Screen of Death issue and Bricked Android devices problem.
- Users can fix their Android devices of any model or brand within minutes.
- With its easy-to-follow guide and steps, no technical expertise is required to use Dr.Fone’s software.
![]()
Dr.Fone - System Repair (Android)
Repair Android System Errors without Any Trouble.
- Fix your Android to normal, no skills required.
- Fix various Android system issues, stuck in boot loop , black screen , or won’t turn on , looping on start, etc.
- The high success rate in resolving Android system issues.
- Compatible with a wide range of Android devices and OS versions
- User-friendly interface with easy-to-follow steps.
3981454 people have downloaded it
Steps Involved To Fix Play Store Not Working Properly via Wondershare Dr.Fone
Now, we will be discussing the guide to resolve your “Google Play your device isn’t compatible with this version” errors. Here is how to fix the Play Store not working properly with Wondershare Dr.Fone – System Repair (Android):
- Step 1: Access Wondershare Dr.Fone on Computer
The first thing you need to do is to launch Wondershare Dr.Fone on your PC and access the “Toolbox” panel, followed by the “System Repair” section. Then, select the “Android” device and hit the “Start” button to proceed with the repair process.
 Any DRM Removal for Win:Remove DRM from Adobe, Kindle, Sony eReader, Kobo, etc, read your ebooks anywhere.
- Step 2: Put Device Details and Download the Firmware
After that, you need to enter the Asus ROG Phone 7 device details like the “Name, Model, Brand, etc.” and put your phone on a Download Mode. Following this step, the firmware will download on its own, and you need to click the “Fix Now” button to install it on your Asus ROG Phone 7.

- Step 3: Confirm the Installation and End the Process
In the last step, you will have to put in the code and proceed with the “Confirm” button to initiate the repair process. This may delete all your data in the Asus ROG Phone 7 device, and once it has ended, select the “Done” button to conclude the process.

 safe & secure
3,120,524 people have downloaded it
Conclusion
To conclude, encountering compatibility issues like “Google Play your device isn’t compatible with this version,” can be a frustrating roadblock. However, this article has armed you with the knowledge through exploring various fixes. You now possess a toolkit of solutions to overcome the notorious issue. From forced quitting the Google Play Store to exploring the realm of custom ROMs, each fix has been crafted to cater to different user preferences.
For users seeking a comprehensive solution, Wondershare Dr.Fone emerges as a versatile and powerful tool. It goes beyond conventional troubleshooting methods. Its “Android Repair” feature is tailored to address various Android system issues, including those affecting the Google Play Store.
How To Fix Part of the Touch Screen Not Working on Asus ROG Phone 7
You probably touch the screen of your phone hundreds of times per day. It’s no surprise that smartphone touchscreens are one of the most common components to fail, given their delicate glass construction. However, a part of the touch screen not working on your Asus ROG Phone 7 does not necessarily mean it is a hardware issue. There could be other reasons why your Android’s touch screen stopped responding.
If your phone’s touchscreen frequently fails to respond, there are several things you can try before calling a professional. This article will reveal those proven fixes you can easily perform independently.
Part 1. Why Is Part of My Screen Not Working
There are two possible causes as to why your phone’s touch screen is not working. One is the touch screen may have been damaged, and the other is the Asus ROG Phone 7 device may be experiencing technical difficulties.
If you drop your phone and it becomes stuck against something, the touch screen’s connectivity may fail. Only a part of the touch screen may sometimes become damaged and unresponsive. That may also occur when there is a technical failure, such as the phone hanging. A part of the touch screen not working can occur when malware is downloaded or when phone settings are changed.
Now, the problem can affect any Android phone, and users may encounter the following error messages on their respective phone models:
- Asus ROG Phone 7 P40 lite half touch screen not working
- Nexus touch screen not working
- LG screen is unresponsive to touch
- Asus ROG Phone 7 left side of the screen is not working
- Redmi’s whole screen is unresponsive to touch
Part 2. Different Types of Touch Screen Issues and What You Should Check Before Fixing
You may experience a variety of touch screens not working on Android issues:
- A certain part of the touch screen is not working.
- Your touches do not register on the touch screen.
- The touch screen incorrectly responds to your touch.
- Half touch screen is not working.
- The touch screen becomes frozen or hangs.
- The screen flashes, flickers, or remains blank.
- Theleft side of the phone screen is not working.
Before proceeding to how to fix an unresponsive touch screen on an Android device, you should complete the following steps:
- Examine the screen of your device. Check to see if it is cracked or chipped.
- If the screen is damaged, it must be replaced.
- Remove the Asus ROG Phone 7 device cover and screen protector if they are not damaged.
- If there is a sticker on the Asus ROG Phone 7 device screen, you must remove it.
- Before continuing, make sure your screen is spotless.
Part 3. How To Fix Part of the Touch Screen Not Working (No Physical Damage)
If you have already tried running the Asus ROG Phone 7 device in diagnostic mode and verified that it is not physically damaged, then the problem is most likely technical. If your Asus ROG Phone 7’s screen is not responding to touches for technical reasons, follow the methods below to resolve the issue.
Restart Your Device
When your touch screen stops working, the first thing you should do is restart your device. The operation is known as soft resetting. You cannot turn your device off from the option on the screen because the touch screen is not responding. Here are the steps to take.
Step 1: Hold the “Power” button until the Asus ROG Phone 7 device turns off.
Tip: If you hold down the power button for a few seconds, you will see the “Power Off” and “Restart” options on the screen. You can’t use it because the entire screen isn’t responding. Hence, you should press and hold the “Power” button for as long as necessary.
 ZoneAlarm Pro Antivirus + Firewall NextGen

Step 2: When the Asus ROG Phone 7 device turns off, wait a few seconds.
Step 3: Press and hold the “Power” button to restart the Asus ROG Phone 7 device.
Check to see if the Android auto touch screen is not working problem has been resolved. Otherwise, proceed with the following methods.
 ZoneAlarm Extreme Security NextGen
Turn On Safe Mode
You should switch to Safe mode whenever an application or piece of software causes a problem on your device. Only the most fundamental system components are loaded and used when operating in Safe mode.
If your touch screen is functional in safe mode, the issue is most likely internal. You can quickly fix the Android touchscreen issue by following the prompts given below to activate the safe mode:
Step 1: To force a restart, press and hold the Asus ROG Phone 7 device’s “Power” button for an extended period.
Step 2: Maintain pressure on the “Power” button. Take your finger off it once you see the manufacturer’s logo.
Step 3: When you let go of the “Power” button, press and hold the “Volume Down” button. After that, a “Safe Mode” label will appear in your screen’s lower-left corner.

Turn Off Developer Options
Every smartphone is bound to have limitations. However, smartphone makers include a “Developer Options” menu for advanced users. Here, restrictions are removed, and user preferences can be customized.
If you enable Developer Options on some Android devices, they may stop working properly. If you have recently activated Developer Options and your touchscreen is no longer responding as expected, you should disable it. To do so, follow the instructions below:
Step 1: Launch the Settings app on your device.
Step 2: Select the System menu item, which usually locates at the bottom of the screen.
Step 3: Tap the Advanced options menu, then select Developer Options.
Step 4: You will then find the switch to turn it on or off. Disable itby toggling the button off.

Step 5: Restart your device to check if the part of the touch screen not working issue has been resolved.
Reset Device to Factory Settings
Resetting your device to its factory settings will return it to its state when you first unboxed it. All your phone’s data and installed apps will be erased, including any malware on your device that may be causing the issue to occur. Here’s how to restore your device to factory settings:
Step 1: Since your touch screen is not working, you can factory reset it using Google’s Find My Device web service.
Step 2: Go to Find My Device from any device and sign in to the Google account associated with the damaged screen device.
Step 3: After successfully logging in, you will see your device’s name. Select the Erase Device option.

Step 4: Confirm by pressing the Erase Device button.
Tip: Since all your data will be removed, it’s recommended to back up your data first before resetting your device to factory settings.

Part 4. Fix Using a Third-Party App – Wondershare Dr.Fone
If you’ve exhausted all other options and still can’t fix your Android’s part of the touch screen not working issue, it’s time to resort to Dr.Fone – System Repair! It allows you to repair Android system issues with a single click.
Many users have reported exceptions on their Android devices, such as touch screen failure, black screen of death, system UI failure, app crashing, etc. And in this case, people should seek an Android repair tool.
Dr.Fone – System Repair has made it easier than ever for Android users experiencing technical issues with their device, including an unresponsive touch screen, among other system issues. The best part is that no data will be lost while repairing Android system issues.
Follow the steps given below on how to use Wondershare Dr.Fone System Repair for Android:
Step 1: Select the System Repair option from the main window after starting Dr. Fone.
Step 2: Connect your Asus ROG Phone 7 or tablet to the computer using the appropriate cable. Choose Android Repair from the three options shown on the left side of the screen.
 PCDJ DEX 3 for Windows & MAC is the total entertainment DJ software solution, offering audio, video, and karaoke mixing ability. Automatic beat-sync, smart looping, 4 decks, DJ MIDI controller support, Karaoke Streaming and much more.
Step 3: The device information screen will appear in the next window. There, input your device’s unified brand, name, model, country/region, and carrier information. Then click Next after you confirm the warning.

The Android repair procedure may wipe out all data on your device. To confirm and proceed, enter “000000”.
Note: It is strongly advised that you back up your Android data before attempting Android repair.
Step 4: Before repairing your Asus ROG Phone 7, you must boot it into Download mode. To boot your Asus ROG Phone 7 or tablet into DFU mode, follow the steps below:
For a device that has a Home button:
- Turn off your phone or tablet.
- Hold the Volume Down, Home, and Power buttons for 5 to 10 seconds.
- To enter Download mode, release all the buttons and press the Volume Up button.


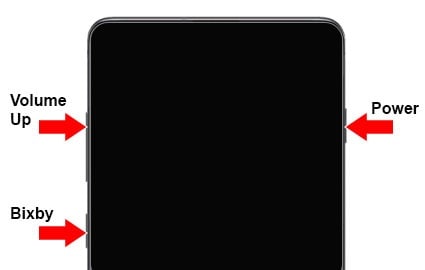
For a device that lacks a Home button:
- Turn off the Asus ROG Phone 7 device.
- Hold the Volume Down, Bixby, and Power buttons for 5 to 10 seconds.
- To enter Download mode, release all the buttons and press the Volume Up button.

Step 5: Then press the Next button. The program will then download the firmware. After downloading and verifying the firmware, the program will automatically repair your Asus ROG Phone 7. And in a while, your Asus ROG Phone 7’s system issues will be resolved.

Supported OS
Check Dr.Fone’s supported operating systems below before using the application to fix your mobile technical issues.
| Platform | Supported OS |
|---|---|
| Windows | Windows 11/10/8.1/8/7/Vista/XP |
| Mac | Mac 14/13/12/11/10.15/10.14/X/10.13/10.12/10.11/10.10/10.9/10.8 |

Key Features
Dr.Fone – System Repair is a data management and recovery tool that contains several toolkits in one program, each designed to repair a specific phone problem. Check out its key features below:
- One-click Android Repair Tool
- Troubleshoots and repairs a wide range of Android system problems, including black screen of death, Play Store not working, apps crashing, phone stuck in a boot loop, and bricked Android issues
- A high success rate for fixing Android system issues
- Fixes Android system back to normal
Pros
Here are the advantages of using Dr.Fone – System Repair:
- Highly intuitive UI/UX/. No need for any skill to operate it
- Provides a comprehensive set of toolkits, including advanced data recovery and system repair
- Data management is simple and seamless for both Android and iOS devices
- Data backup with Dr. Fone is simple and quick.
Cons
Check below to know Dr.Fone – System Repair’s limitations:
- Depending on the toolkit required, the program can be costly.
safe & secure

Conclusion
Fixing an Android part of the touch screen not working issue can be quickly done with just a few fixes you can do on your own. However, there may be times when the solutions provided above may not work, and the worst part is factory resetting your phone erases all your data.
That’s why Dr.Fone – System Repair might be your best solution. It has all the tools you need to keep your Asus ROG Phone 7 100%. Not only that, but with Dr.Fone, you can repair your Android system issues without dealing with any data loss.
 Easy GIF Animator is a powerful animated GIF editor and the top tool for creating animated pictures, banners, buttons and GIF videos. You get extensive animation editing features, animation effects, unmatched image quality and optimization for the web. No other GIF animation software matches our features and ease of use, that’s why Easy GIF Animator is so popular.
9 Solutions to Fix Process System Isn’t Responding Error on Asus ROG Phone 7
The “Process system isn’t responding” is a common error that occurs in almost every kind of Android device. Even though most Android smartphone manufacturers have taken a huge leap in the last few years, the operating system still suffers from a few pitfalls. The process system isn’t responding Android is one of those errors that have been reported plenty of times. I definitely understand encountering the ‘Process System Isn’t Responding’ error on your Asus ROG Phone 7 can be frustrating.
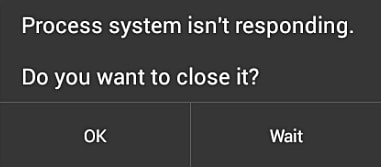
However, there are several straightforward methods to resolve this issue. This article will provide a step-by-step guide on how to fix the problem and restore your device to normal functionality.
Before solving any Android system issues, try this Android backup software to take a full backup, in case any data loss happens.
Part 1: Reasons for process system isn’t responding error
There could be plenty of reasons for getting the process system is not responding in Android.
- Software Glitch: Android systems may experience temporary glitches due to factors like memory management issues, conflicts between apps or services, or system updates.
- Insufficient System Resources: Low system storage is another reason for getting the error. If you have too many apps on your phone, then it might take a toll on its memory and generate the “process system isn’t responding” prompt.
- Third-Party Apps: Users have also complained that they receive the “Android process system is not responding” error after installing a new app. If you have installed an app from a source other than Google Play Store, then the chances are that you can get this error. Though, even after installing an app from Play Store, there is a bleak probability of facing this issue as well.
- Outdated Software: Using outdated apps, particularly system apps or critical components, may lead to compatibility issues with the latest Android version.
- System Updates: Most of the time, it happens whenever a device is restarted after updating its Android version. Your device could have undergone a bad update or might have had an unsupported driver. This can result in the occurrence of process system not responding issue.
- Corrupt Cache Files: Corrupted cache files can lead to conflicts and result in error.
- Overclocking or Modifications: Rooting or modifying the Android device, or applying overclocking settings, can lead to instability and the process system not responding error.
- Hardware Issues: Rarely, hardware problems like failing components can interfere with the proper functioning of the system.
No matter what the cause is, there are plenty of ways to overcome this issue. We have listed a handful of them in this post.

Part 2: How to Fix Android Process Not Responding? 8 Fixes
When this error occurs, it can disrupt the normal operation of the Asus ROG Phone 7 device, causing apps to freeze or crash. Fortunately, there are several effective methods to address this problem.
Fix 1: Restart your device
This is one of the easiest ways to resolve the process system not responding error. If you are getting this error on your phone, then try to manually restart your device. The way to restart your phone might differ from one device to another. Mostly, it can be done by long-pressing the power button. This will provide different power options. Tap on the “Reboot” one to restart your phone.
 /a>
/a>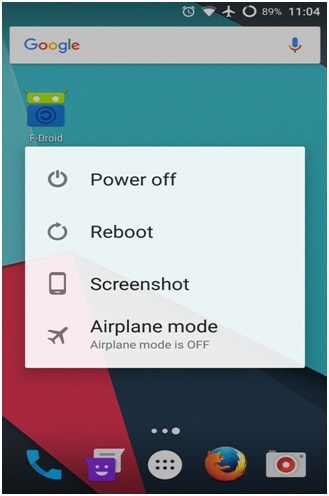
If it won’t work, then long press the Power and Volume up buttons at the same time until the screen goes off. Afterward, use the power button again to turn it on.
Fix 2: Reset App Preferences
Sometimes the apps interfere with the Asus ROG Phone 7 device’s settings because they were given permission to access specific functions. It is recommended to allow the asked permission precisely because some suspicious apps can also steal your sensitive data. Here are the straightforward instructions you need to follow to reset the app preferences:
Proceed to the “Apps and Notifications” settings from the Settings app. Next, tap the “See All Apps” option and access the “Three Dots” menu. Here select the “Reset App Preferences” option and confirm the process from the confirmation pop-up.
 vMix Pro - Software based live production. vMix Pro includes everything in vMix 4K plus 8 channels of Replay and 8 vMix Call
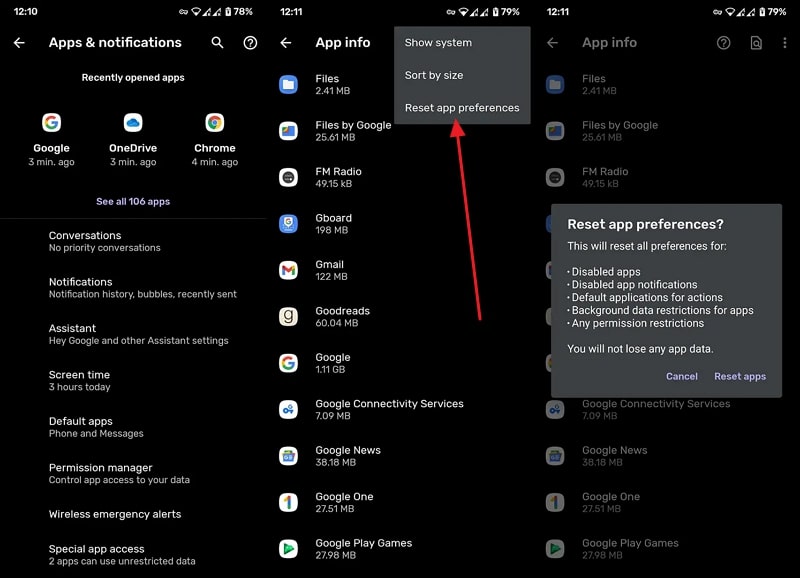
 dotConnect for Oracle is an ADO.NET data provider for Oracle with Entity Framework Support.
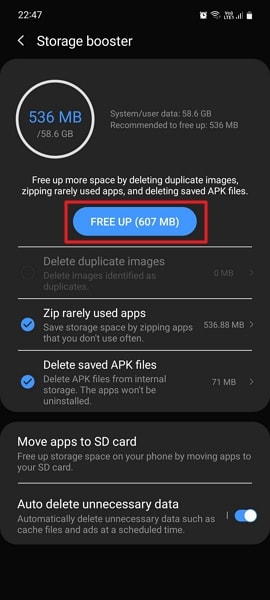
Fix 3: Free Up Space to Make Sure Android Have Enough Internal Memory
In case the Android internal memory is completely filled, it will slow down the processing speed of the Asus ROG Phone 7 device. Internal memory is vital for the Asus ROG Phone 7 device to run all the background apps or the process required by the OS to run the Asus ROG Phone 7 device efficiently. You can follow these steps to free up some space on your Asus ROG Phone 7:
Step 1: Open the Settings app on your Asus ROG Phone 7 and access the “Battery and Device Care” option by scrolling down. Next, tap on the “Three Dots” from the top right corner and choose the “Storage Booster” feature.

Step 2: Following this, you can select the data you want to remove from the internal memory. Your device will show the space it will free up for you, and you can press the “Free Up” button to free up the storage.
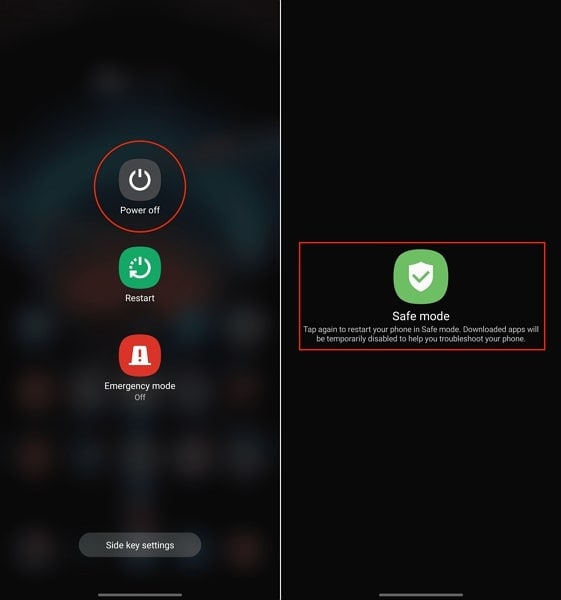
Fix 4: Enter Safe Mode to Uninstall Suspicious Apps
This issue can also occur if you have installed an app from the Google Play Store with a very low rating or an APK. Unlike Apple App Store, anyone can easily upload their mobile apps on Play Store, so it is important to check the app’s credibility before installing it. Following are the simplified instructions to enter the safe mode and delete all suspicious applications:
Press and hold the “Power” button of your Android and press and hold the “Power Off” option to access the “Safe Mode” feature. Afterward, confirm to enter the safe mode and remove all the suspicious apps from the Asus ROG Phone 7 device. You can do this by holding on to the app and selecting the “Uninstall” option from the pop-up options.


company, user or members of the same household. Action! - screen and game recorder</a>
Fix 5: Update All Apps on your Device
Updating the apps is crucial for any Android device to work with high efficiency and performance. Apps are developed to make the users’ daily tasks easy to execute. However, there might be some negligence in the development, which can leave some bugs in the app. These bugs are fixed with time by releasing the new version of the app. To update your Android app, proceed with the following step-by-step instructions:
Step 1: Locate the Play Store from the Android home screen and access it. Then, tap the “Profile” icon from the top right corner and proceed to the “Manage apps and devices” option. Afterward, you can check how many app updates are available from the “Updates available” option. To update the apps, you will have to go inside this option.
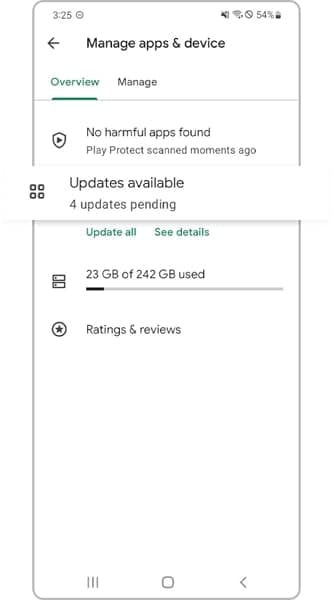
Step 2: You can tap on the “Update All” button if you want to update all the apps one by one. Otherwise, you can press the “Update” option adjacent to each app name to update the frequently used ones.

 Nero Burning ROM:
The ultimate burning program for all your needs!
Fix 6: Check the SD card
If you are still getting the process system isn’t responding to Android error, then chances are that there could be an issue with your SD card. Firstly, check if your SD card is working fine or not. If it is corrupted, then get another memory card for your phone. Also, it should have a prominent amount of free storage. You might be facing this issue if the SD card has limited free space.
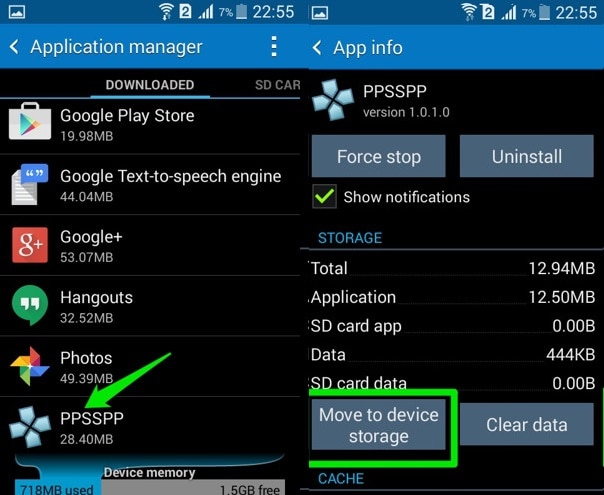
Also, if you are storing apps on the SD card, then your phone might encounter the process isn’t responding issue whenever you run a respective app. Therefore, you should move apps from your SD card to the phone’s internal memory. To do this, go to your phone’s Settings > Application Manager and select any app. If the app is stored on the SD card, then you will get an option of “Move to devise storage”. Just tap on it and manually move every app to your device storage.
Fix 7: One click to fix the process system isn’t responding error
If all the above tricks don’t get your device out of the process system not responding state, then there may be some system issues on your Android. In this case, an Android repair can successfully fix issues like process system isn’t responding.
Note: Android repair may wipe out existing Android data. Back up your Android data before going on.
Dr.Fone - System Repair (Android)
Android repair tool to fix all Android system issues in one click
- Fix all Android system issues like the black screen of death, system UI not working, etc.
- One-click for Android repair. No technical skills are required.
- Supports all the new Asus ROG Phone 7 devices like Galaxy S8, S9, S22, etc.
- Step-by-step instructions are provided. Friendly UI.
3981454 people have downloaded it
Follow the easy steps below to fix process system isn’t responding error:
- 1. Download and install the Dr.Fone tool. Then select “System Repair” from the main window.

- 2. Connect your Asus ROG Phone 7 to the PC. After the Asus ROG Phone 7 device is detected, select the “Android” tab.

- 3. Select and confirm the correct device details of your Android. Then boot your Asus ROG Phone 7 in download mode and proceed.
- 4. Download the firmware and click “Fix Now”.
- 5. After a while, your Android will be repaired with the “process system isn’t responding” error fixed.
 SwifDoo PDF Perpetual (1 PC) Free upgrade. No monthly fees ever.
safe & secure
Fix 8: Factory reset Android
It is always considered the most used way to factory reset your phone in order to resolve the process system not responding error. Though, this should be your last resort, as it will wipe off your device’s data entirely. Even if you are performing a factory reset, make sure that you back up your data by using a reliable tool like Wondershare Dr.Fone .
Wondershare Dr.Fone
Flexibly Back up and Restore Android Data
- Back up Android data to the computer with one click.
- Preview and restore selectively the backup to any Android device.
- Supports 8000+ Android devices.
- There is no data lost during backup, export, or restoration.
3,981,454 people have downloaded it
If your phone is functioning, then you can easily factory reset it by visiting Settings > General > Backup & Restore and selecting the option of “Factory Data Reset”. Your device will display a warning regarding all the data files that would be lost or un-synced. Just tap on the “Reset” button to factory reset your device.
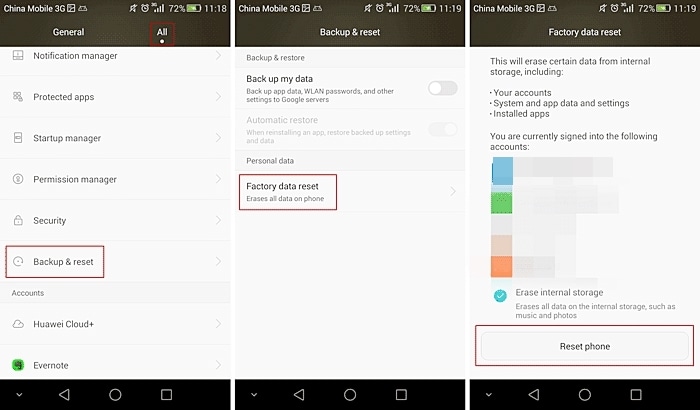
If your device is not functioning or locked, then you can perform the factory reset operation by putting your phone into Recovery mode. Most of the time, it can be done by pressing the Power and Volume up button simultaneously for at least 10 seconds. Though, the key combinations might change from one device to another.
 Video Converter Factory Pro
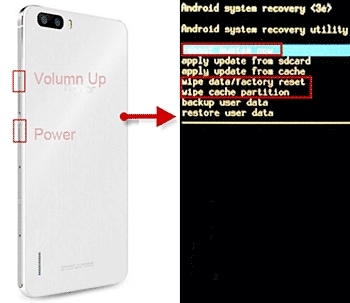
After entering the Recovery mode, go to the “wipe data/factory reset” option using the Volume up and down button. Use the Power button to make a selection. If you get an additional message, then select the “yes – delete all data” option. When it is done, you can simply reboot your device.
Fix 9: Unroot the Asus ROG Phone 7 device
It has been further discovered that the process system isn’t responding error is more common in rooted devices. Therefore, if you also have a rooted Android device, then you can choose to unroot it in order to fix this issue. There are different ways to unroot an Android device. One of the easiest ways to do it is by using the SuperSU app.
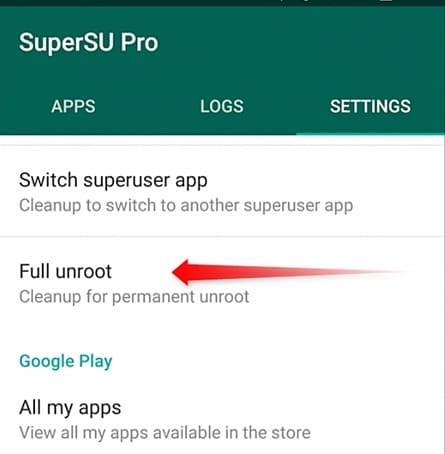
You can always download either SuperSU or SuperSU Pro app from its website here . Simply install it on our device and launch it whenever you wish to unroot it. Visit its “Settings” tab and select the option of “Full unroot”.
This will generate a warning message regarding all the repercussions of the unrooting process. Just tap on “Continue” to initiate the process.

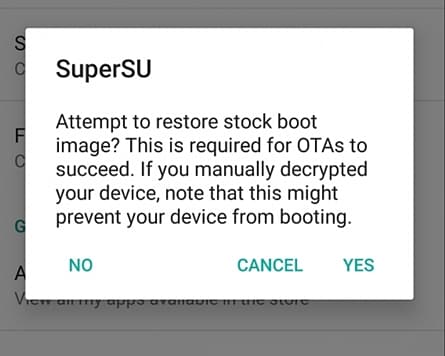
If you are using an older version of Android, then you might get another pop-up to restore boot images. Simply make the desired selection and start the process. After a while, your device would be restarted the usual way, and it would be unrooted. Most probably, this will resolve the process system isn’t responding error as well.
Now that you know different ways to fix the process system not responding error, you can easily overcome this issue and make the most out of your device. Simply start with the easy fixes, and if they don’t work, then take extreme measures like unrooting your device or restoring it to factory setting. Also, make sure to back up your data before taking any extreme measures.
- Title: 8 Ultimate Fixes for Google Play Your Asus ROG Phone 7 Isnt Compatible | Dr.fone
- Author: Ariadne
- Created at : 2024-07-30 08:27:38
- Updated at : 2024-07-31 08:27:38
- Link: https://howto.techidaily.com/8-ultimate-fixes-for-google-play-your-asus-rog-phone-7-isnt-compatible-drfone-by-drfone-fix-android-problems-fix-android-problems/
- License: This work is licensed under CC BY-NC-SA 4.0.