
8 Ultimate Fixes for Google Play Your OnePlus 12 Isnt Compatible | Dr.fone
8 Ultimate Fixes for Google Play Your OnePlus 12 Isn’t Compatible
Nowadays, keeping yourself informed about the newest apps and features is essential. Have you encountered the error message “Google Play your device isn’t compatible with this version?” When attempting to download or update an application, this problem can pose a significant obstacle. The good news is that you can now alleviate those concerns.
In this article, we delve into how to resolve the “your device isn’t compatible with this version Google Play” error. It will discuss the top 8 ultimate fixes for this vexing issue that many Android users face. From practical tips to advanced solutions, this article aims to empower you with the knowledge to overcome this challenge.
Part 1: Reasons Behind Your Device Isn’t Compatible With This Version Play Store
Encountering the frustrating “your device isn’t compatible with this version Google Play“ error can be disruptive. That’s why it is essential to go through the underlying reasons causing this compatibility issue:

1. Outdated Operating System Firmware
One of the primary culprits behind the compatibility error is outdated OS firmware. App developers release updates to keep up with the latest features and security patches. That’s why an obsolete OS version on your device may render it incompatible with the newer app versions available on the Google Play Store.
 Any DRM Removal for Mac: Remove DRM from Adobe, Kindle, Sony eReader, Kobo, etc, read your ebooks anywhere.
2. Insufficient Hardware Requirements
Each application has specific hardware prerequisites that your device needs to fulfill. In case your smartphone does not meet the required specifications, you won’t be able to utilize the app. Thus, Google Play Store may restrict access to certain applications, citing compatibility issues.
3. Corrupted Cache Files
Cache files are designed to enhance the speed and efficiency of app loading. Yet, they can sometimes become corrupt. When this occurs, it disrupts the app’s normal operation. Clearing these corrupted cache files is often a crucial step.
4. Geographic Restrictions
In certain cases, app developers or Google Play itself may impose geographic restrictions. This could lead to compatibility issues if your device is located in an area where the app is restricted. Understanding the geographical availability of an app is vital in finding the root cause.

4. Beta Versions and Unstable Releases
Engaging with beta versions or unstable releases of an app can result in compatibility issues. These versions are typically in the testing phase. That’s why their compatibility with a wide range of devices may not be guaranteed. If you find yourself facing compatibility errors, it’s worth checking if you are in a beta program.

Part 2: 8 Reliable Fixes for Google Play Your Device Isn’t Compatible With This Version
Facing the “Play Store your device isn’t compatible with this version” error is an all-too-familiar setback. However, fear not, as this article will be your guide in resolving this issue. Summarized below are the top 8 solutions to fix this error with ease:
Fix 1: Force Quit Google Play Store
Force quitting the Google Play Store is a simple yet effective first step in resolving compatibility issues. Occasionally, the app may encounter glitches or background errors. These can hinder its proper functioning. Force quitting the Google Play Store and restarting it can often rectify these issues. You can use the following steps to force quit Google Play Store:
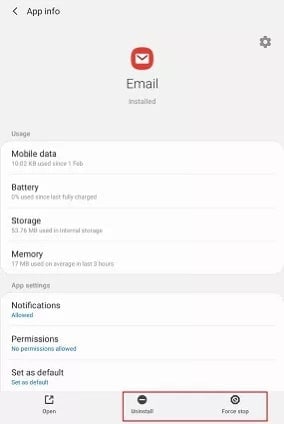
- Step 1. On your OnePlus 12, find the Google Play Store and long-press its icon. Press “App info” from the pop-up menu to access the app information screen.
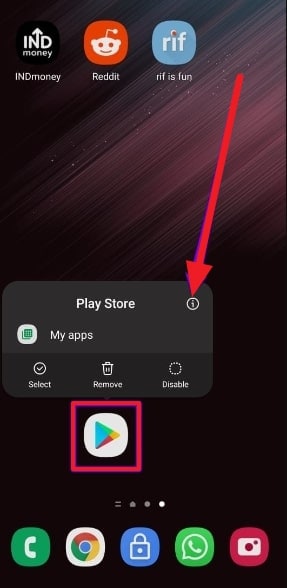
- Step 2. Here, tap the “Force Stop” option to force close the Google Play Store. After a while, relaunch the app to see if the issue is resolved.
 Project Manager - Asset Browser for 3Ds Max


Fix 2: Clear Google Play Store Cache
Clearing the cache of the Google Play Store is a targeted solution. It addresses potential compatibility issues arising from corrupted or outdated temporary files. The cache stores data that helps the app load faster. Yet, when these files become corrupted, it can lead to performance issues. Follow these steps to clear the Google Play Store cache and the “device not compatible Google Play” issue:
- Step 1. After finding the Google Play Store on your device, press and hold the icon until a pop-up menu appears. Here, touch the “App info” option to reach the screen displaying information about the app.

- Step 2. Here, press “Storage and Cache,” and on the following screen, tap “Clear cache.” Confirm your action to wipe the cache data. Afterward, access the targeted app again to check if the issue is resolved.

Fix 3: Remove the Google Services Framework’s Cache and Data
The Google Services Framework plays a crucial role in your OnePlus 12. It is essential in the functioning of various Google services, including the Google Play Store. Clearing its cache and data can be an effective method to tackle compatibility issues. Here’s a step-by-step guide on how to remove the Google Services Framework’s cache and data:
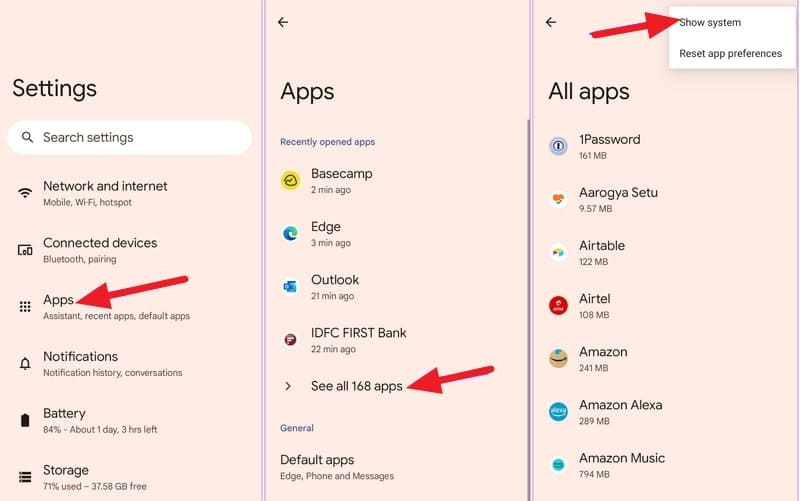
- Step 1. Open your device’s Settings and scroll down to tap “Apps.” There, press the “All Apps” options, and on the following screen, choose “Show System” from the top right corner.
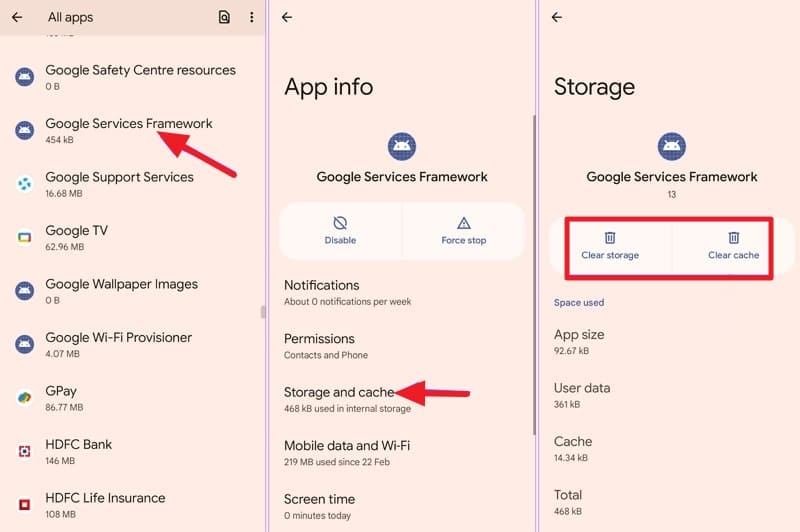
- Step 2. Now, find and tap the “Google Services Framework” app and go on to press “Storage and Cache.” Here, use “Clear Cache” and “Clear Storage” to clear its cache and data.
 Power Tools add-on for Google Sheets, Lifetime subscription
Fix 4: Update the Android OS Version
An outdated operating system is a common factor behind compatibility issues. This case is often used with Google Play Store and other important apps. Maintaining your OnePlus 12’s compatibility with the latest app releases is essential. To ensure your Android operating system is up-to-date, please proceed with the following steps:
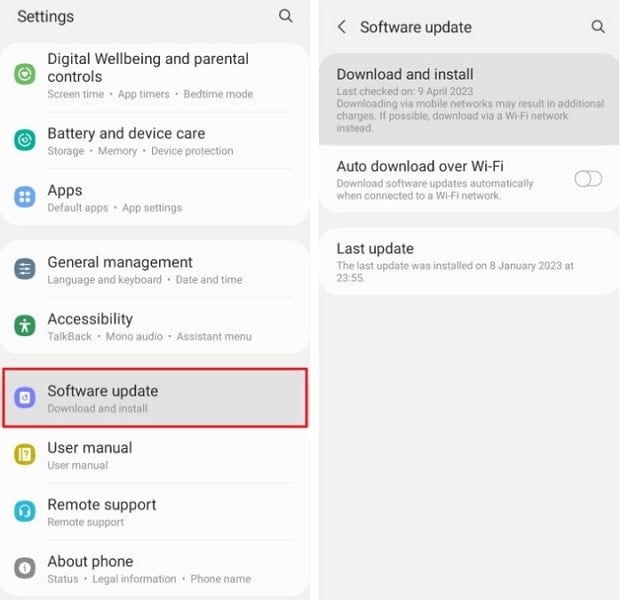
Instructions. You will need to start by accessing the OnePlus 12 device’s “Settings.” Scroll down to find and press the “System” option. On the following screen, tap “Software Update” to check if an update is available. If there is one, follow the on-screen prompts to update your device’s OS.
Fix 5: Uninstall the Google Play Store Updates
In certain cases, issues with the Google Play Store itself may be contributing to compatibility errors. Uninstalling recent updates can revert the app to its default state. It can potentially resolve the problem. Follow these steps to uninstall updates for the Google Play Store and resolve “device not compatible Play Store” issues:
- Step 1. Using your OnePlus 12’s Settings, access the Google Play Store app in the “Apps” tab. Once on its info page, tap the three dots icon from the top right corner.
 NeoDownloader - Fast and fully automatic image/video/music downloader.

- Step 2. From the available options, choose “Uninstall updates.” Then confirm your decision when prompted to delete the Google Play Store updates.

 PCDJ Karaoki is the complete professional karaoke software designed for KJs and karaoke venues. Karaoki includes an advanced automatic singer rotation list with singer history, key control, news ticker, next singers screen, a song book exporter and printer, a jukebox background music player and many other features designed so you can host karaoke shows faster and easier!
Fix 6: Sideload the Incompatible Android App
If all else fails and the compatibility issue persists, sideloading the app can be a workaround. It means installing the app manually without using the Google Play Store. This approach proves especially valuable for users with a strong determination to access a specific application. Below is a comprehensive, step-by-step tutorial on how to sideload an app:
- Step 1. Long-press the Google Chrome icon to open the app info menu. Navigate to the “Install unknown apps” section. Here, toggle the switch to enable “Allow from this source.”

- Step 2. Afterward, access a reliable, trusted website where the APK for the targeted app is available. Download and install the app to resolve the compatibility issues.

 Epubor Audible Converter for Win: Download and convert Audible AAXC/AA/AAX to MP3 with 100% original quality preserved.
Fix 7: Install a Custom ROM
Have you exhausted other options and are still grappling with compatibility issues? Installing a custom ROM could be a more advanced but effective solution. Custom ROMs are modified versions of Android operating systems developed by the Android community. Engaging in this procedure entails large modifications to your device’s software. It is crucial to comprehend the potential consequences and proceed with caution.
Installing a custom ROM may void your device’s warranty. Moreover, it’s crucial to choose a ROM compatible with your device model. Installing a custom ROM is an advanced solution that should be approached with caution. It has the capability to address compatibility issues. Nevertheless, it demands a certain level of technical expertise and may not be suitable for all users.
Fix 8: Try Using a Third-Party App Store
The final solution to avoid compatibility issues on the Google Play Store is to use a different app store. Exploring alternative app stores can be a pragmatic workaround. Several third-party app stores offer a diverse range of applications. They might provide the desired app without encountering compatibility errors and help avoid the “device not compatible Google Play” error.
You can explore reputable third-party app stores such as Aptoide, Amazon Appstore, GetJar, or SlideME. Ensure the chosen app store is reputable and widely used, minimizing potential security risks. Exercise caution and ensure the legitimacy of the app store to avoid security risks.

Part 3: Is Your Play Store Not Working Properly? Fix It Now With Wondershare Dr.Fone
If you are unable to download any application on your OnePlus 12, it might be because of your Play Store issue. Play Store is the crucial element in your device, providing your facility with many features and functions. Get it fixed by trying Wondershare Dr.Fone – System Repair (Android) tool within a few clicks.
The System Repair tool in Dr.Fone helps you to resolve this issue in your Android Phone with powerful mechanisms and efficient working. It provides a user-friendly interface to fix Play Store Not Working with much ease.
Key Features of Wondershare Dr.Fone
- Fone – System Repair (Android) allows you to repair your OnePlus 12 easily in just a few clicks.
- This tool is also used to resolve the Black Screen of Death issue and Bricked Android devices problem.
- Users can fix their Android devices of any model or brand within minutes.
- With its easy-to-follow guide and steps, no technical expertise is required to use Dr.Fone’s software.
 Easy GIF Animator is a powerful animated GIF editor and the top tool for creating animated pictures, banners, buttons and GIF videos. You get extensive animation editing features, animation effects, unmatched image quality and optimization for the web. No other GIF animation software matches our features and ease of use, that’s why Easy GIF Animator is so popular.
![]()
 The Tube Sites Submitter is a fast and efficient tool for anyone who needs to upload videos quickly, easily and automatically to hundreds of tube sites in mere minutes .
 Dr.Fone - System Repair (Android)
Repair Android System Errors without Any Trouble.
- Fix your Android to normal, no skills required.
- Fix various Android system issues, stuck in boot loop , black screen , or won’t turn on , looping on start, etc.
- The high success rate in resolving Android system issues.
- Compatible with a wide range of Android devices and OS versions
- User-friendly interface with easy-to-follow steps.
3981454 people have downloaded it
Steps Involved To Fix Play Store Not Working Properly via Wondershare Dr.Fone
Now, we will be discussing the guide to resolve your “Google Play your device isn’t compatible with this version” errors. Here is how to fix the Play Store not working properly with Wondershare Dr.Fone – System Repair (Android):
- Step 1: Access Wondershare Dr.Fone on Computer
The first thing you need to do is to launch Wondershare Dr.Fone on your PC and access the “Toolbox” panel, followed by the “System Repair” section. Then, select the “Android” device and hit the “Start” button to proceed with the repair process.
 ZoneAlarm Extreme Security NextGen

- Step 2: Put Device Details and Download the Firmware
After that, you need to enter the OnePlus 12 device details like the “Name, Model, Brand, etc.” and put your phone on a Download Mode. Following this step, the firmware will download on its own, and you need to click the “Fix Now” button to install it on your OnePlus 12.


- Step 3: Confirm the Installation and End the Process
In the last step, you will have to put in the code and proceed with the “Confirm” button to initiate the repair process. This may delete all your data in the OnePlus 12 device, and once it has ended, select the “Done” button to conclude the process.

 safe & secure
3,120,524 people have downloaded it
Conclusion
To conclude, encountering compatibility issues like “Google Play your device isn’t compatible with this version,” can be a frustrating roadblock. However, this article has armed you with the knowledge through exploring various fixes. You now possess a toolkit of solutions to overcome the notorious issue. From forced quitting the Google Play Store to exploring the realm of custom ROMs, each fix has been crafted to cater to different user preferences.
For users seeking a comprehensive solution, Wondershare Dr.Fone emerges as a versatile and powerful tool. It goes beyond conventional troubleshooting methods. Its “Android Repair” feature is tailored to address various Android system issues, including those affecting the Google Play Store.
Simple Solutions to Fix Android SystemUI Has Stopped Error For OnePlus 12
In this article, you will learn possible causes of Android SystemUI stopping error and 4 methods to fix this issue. Get Dr.Fone - System Repair (Android) to fix Android SystemUI stopping more easily.
Android SystemUI isn’t responding or Android, unfortunately, the process com.android.systemui has stopped is a not a rare error and is observed in all Android devices these days. The error usually pops up on your device while you are using it with a message on the screen saying Android. Unfortunately, the process com.android.systemui has stopped.
The Android SystemUI isn’t responding error message may also read as “Unfortunately, SystemUI has stopped”.
Android SystemUI error can be very confusing as it leaves affected users with only one option, i.e., “OK”, as shown in the images above. If you click on “OK” you will continue to use your device smoothly, but only until the SystemUI isn’t responding error pops-up on your main screen again. You may restart your device, but the Android SystemUI has stopped the problem continues to annoy you until you find a permanent solution for it.
If you are also among the various users who see Android, unfortunately, the process com.android.systemui has stopped error, then do not worry. SystemUI isn’t responding. Error is not a serious issue and can be tackled easily by carefully examining the reasons behind the problem.
Looking for suitable solutions to fix Android SystemUI has stopped error? Then read on to find out all about Android SystemUI isn’t responding error and the most effective ways to fix it.
Part 1: Why Android SystemUI Has stopped happens?

Android device owners would agree that OS updates are very helpful as they fix the bug problem and improve the overall working of your device. However, sometimes these updates may be infected due to which they do not download and install properly. A corrupted OS update may cause Android; unfortunately, the process com.android.systemui has stopped error. All Android updates are directly designed around the Google App, and thus, the problem will persist until the Google App is also updated. Sometimes, even the Google App update may cause such a glitch if it is not successfully downloaded and installed.
Another reason for the Android SystemUI isn’t responding error to occur, maybe because of flashing a new ROM or due to improper firmware update installation. Even when you restore the backed up data from cloud or your Google Account, such Android, unfortunately, the process com.android.systemui has stopped error may show up.
It is not possible to say for sure which one of the above-mentioned reasons is causing your device to show Android SystemUI is not responding error. But what we can do is move on to fixing the Android SystemUI by following any one of the three methods given the following segments.
Part 2: How to fix “com.android.systemui has stopped” in one click
As we’ve learned that Android system UI isn’t responding issue is primarily because of the Android OS updates not installed properly or were corrupted. Hence, there comes the need for a powerful Android system repair tool that can help you rectify such annoying errors.
To serve the purpose, we would like to introduce, Dr.Fone - System Repair (Android) . It is one of its kind of applications and is highly recommended as it has a proven success rate to resolve almost all Android system issues.
It’s now time to understand how to fix Android ‘unfortunately, the process com.android.systemui has stopped’ or in simple words, Android system UI isn’t responding.
Note: Before we proceed to Android repair, please ensure to make a backup of all your data . This is because the Android repair process may wipe out all the data on your device to fix the Android OS issues.
Phase 1: Connect and prepare your OnePlus 12
Step 1 – Download the Dr.Fone toolkit over your PC. Install it and launch it over. Opt for the “System Repair” tab from the main screen and get your OnePlus 12 connected to the PC.

Step 2 – You need to select “Android Repair” from the left panel and then hit the ‘Start’ button.

Step 3 – Next, you need to select the correct information about your device (i.e., brand, name, model, country/region, and carrier details). Check the warning down below and hit “Next”.
Phase 2: Boot Android in ‘Download’ mode to perform the repair.
Step 1 –You’re now required to boot your Android in Download mode. Here’s what you need to do to put your Android in DFU mode.
If your Android has a Home button:
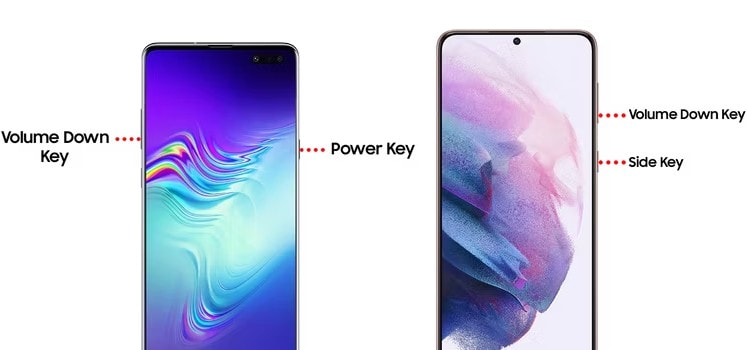
- Turn off your device. Hold down “Volume Down + Home + Power” buttons altogether for about 10seconds. Let go of the buttons afterward and hit the Volume Up to boot in download mode.
 OtsAV TV Webcaster
In case your Android has no Home button:
- Turn off your device. Hold down “Volume Down + Bixby + Power” buttons altogether for about 10seconds. Let go of the buttons afterward and hit the Volume Up to boot in download mode.

Step 2 – Once done, hit “Next” to initiate the downloading of the firmware.

Step 3 – As soon as the download completes, the Android repair will automatically be started by the program.

Step 4 – In a just a matter of a few minutes, your Android system UI isn’t responding issue will be resolved.

Part 3: Uninstall Google updates to fix Android SystemUI issue
All Android SystemUI isn’t responding errors are circled the Google App as the Android platform is heavily dependent on it. If you have recently updated your Google App and the Android, unfortunately, the process com.android.systemui has stopped error keeps popping up at regular intervals, make sure you uninstall Google App updates as soon as possible.
Follow the steps given below to fix the Android SystemUI has stopped issue by rolling back the Google App updates:
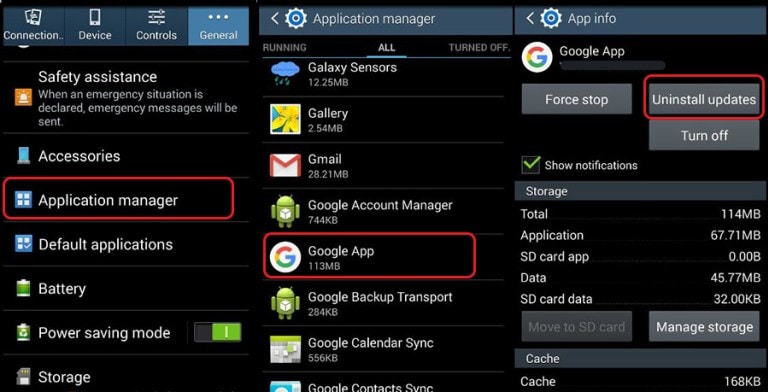
- Visit “Settings” and select “Apps” or “Application Manager”.
- Now swipe to view “All” Apps.
- From the list of Apps, select “Google App”.
- Finally, tap on “Uninstall Updates” as shown hereunder.
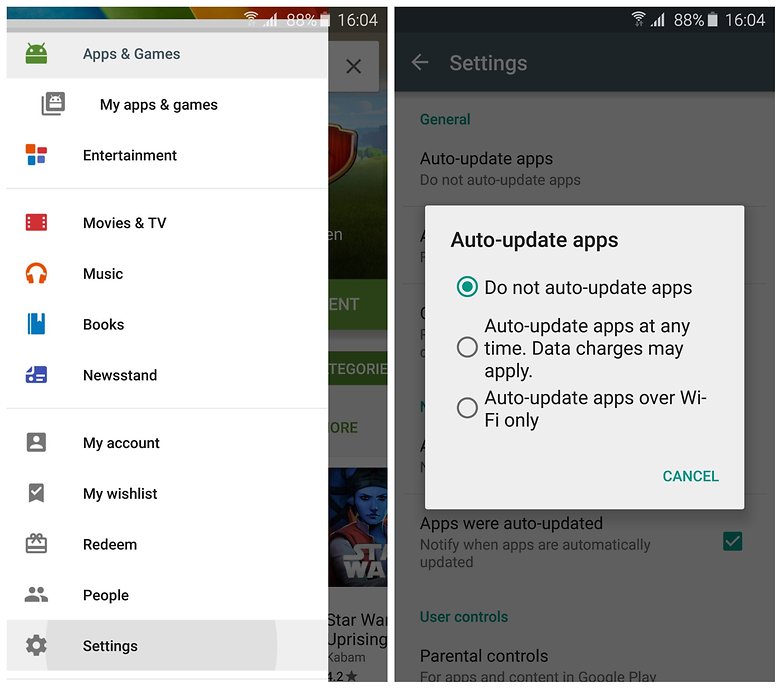
Note: To prevent the Android SystemUI isn’t responding error to occur in the future, do not forget to change your Google Play Store settings to “Do Not Auto-Update Apps”.
Part 4: Wipe Cache partition to fix Android SystemUI error
Android, unfortunately, the process com.android.systemui has stopped error can also be fixed by clearing your cache partitions. These partitions are nothing but storage locations for your modem, kernels, system files, drivers, and built-in Apps data.
It is advisable to clear Cache portions regularly to keep your UI clean and free of glitches.
Android SystemUI isn’t responding error can be overcome by clearing the cache in recovery mode.
Different Android devices have different ways to put it in recovery mode. Refer to your device’s manual to enter the recovery mode screen on your device and then follow the steps given below to fix Android; unfortunately, the process com.android.systemui has stopped error by clearing the cache partition:
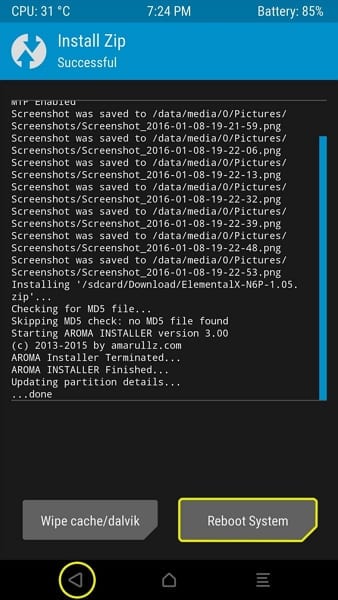
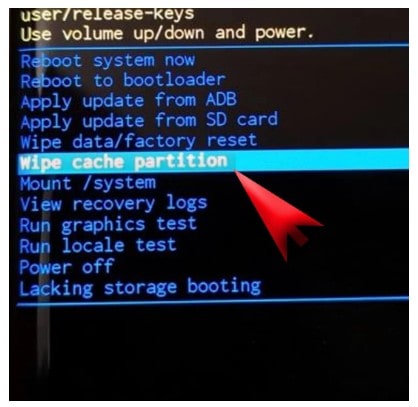
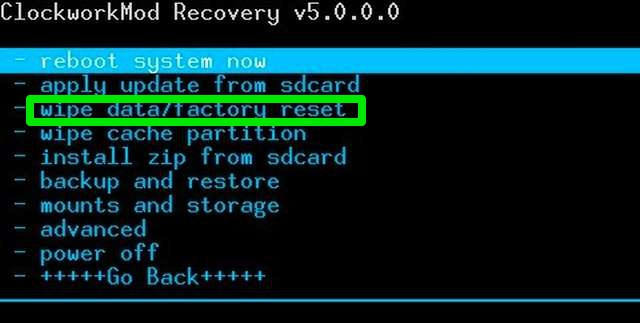
- Once you are the recovery mode screen, you will see several options as shown in the screenshot.

- Use the volume down key to scroll down and select ”Wipe cache partition” as shown below.
 Allavsoft Batch Download Online Videos, Music Offline to MP4, MP3, MOV, etc format

- After the process is completed, select “Reboot System” which is the first option in the recovery mode screen.
This method will help you de-clutter your device and erase all the clogged up unwanted files. You may lose App related data too, but that is a small price to pay to fix the Android SystemUI isn’t responding error.
If the Android SystemUI has stopped the problem persists, there is only one way out. Read on to find out about it.
Part 5: Fix Android SystemUI error by factory reset
Factory Resetting your device to fix Android; unfortunately, the process com.android.systemui has stopped error is a desperate measure and should be the last thing to do on your list. Take this step only when the above mentored two techniques fail to work.
Also, make sure you take a back-up of all your data and contents stored in your OnePlus 12 on the cloud, Google Account or an external memory device because once you perform a factory reset on your device, all media, contents, data and other files are wiped out, including your device settings.
Follow the steps given below to factory reset your device to solve the Android SystemUI isn’t responding problem:
- Visit “Settings” by clicking the settings icon as shown below.
 Forex Robotron Gold Package
- Now select “Backup and Reset”.


- In this step, select “Factory data reset” and then “Reset Device”.
- Finally, tap on “ERASE EVERYTHING” as shown below to Factory Reset your device.
 Greeting Card Builder
After the factory reset process is completed, your device will automatically restart, and you will have to set it up once again.
The whole process of factory resetting your OnePlus 12 might sound tedious, risky, and cumbersome, but it helps to fix the Android SystemUI has stopped error 9 out of 10 times. So, think carefully before using this remedy.
Android SystemUI isn’t responding or Android, unfortunately, the process com.android.systemui has stopped error is commonly seen by users on their devices. It is not a random error and is linked to either the software, Google App, cache partition, or data stored in the OnePlus 12 device. It is fairly simple to deal with this issue as all you need to do is install or roll back your Android OS update, uninstall Google App updates, clear cache partition, or factory reset your device to clear all data, files, and settings stored in it. The methods listed and explained above are the best ways to fight the problem and to prevent it from troubling you in the future. These methods have been adopted by affected users all over the world who recommend them because they are safe and involve minimum risks as compared to other tools to solve the Android SystemUI has stopped error. So go ahead and try them now!
What To Do When OnePlus 12 Has Black Screen of Death?
Have you ever got the error of freezing the Android device home screen? Or the notification light keeps blinking without anything shown on display? Then you are facing Android black screen of death.
This scenario is common with many Android mobile users, and they always hunt for solutions to get rid of this Android black screen problem. Here are some more situations that can assure you that you are facing Android black screen of death.
- The light of the phone is blinking but the OnePlus 12 device is not responding.
- The phone is hanging and freezing very frequently.
- The mobile is rebooting and crashing more often and the battery is draining a lot faster.
- Phone restarts on its own.
If you face these situations, you might be facing the Android black screen of death issue. Follow this article, and we’ll discuss how to get rid of this annoying problem at ease.
Part 1: Why Android device gets black screen of death?
Similar to the “Blue Screen of Death “ (BSOD) on computers, the Android Black Screen of Death indicates a severe system crash or malfunction. When this issue occurs, the OnePlus 12 device’s display remains blank, and you are unable to interact with the OnePlus 12 device, access apps, or perform any actions. The cause of the Android black screen of death can vary, but some common factors include:
- Install incompatible apps or apps with bugs and viruses.
- Have bugs or errors in the Android operating system.
- Keep the mobile charged for long after it’s fully charged.
- Use a non-compatible charger.
- Use an old battery.
- Incorrectly install or incomplete system updates.
- Excessive heat due to heavy usage or environmental factors.
If you face the situations mentioned above, this is clearly a case of the Android screen black. But don’t worry about that. You can follow the article below to get rid of this situation on your own.
Part 2: How to rescue data when Android gets black screen of death?
This annoying Android black screen of death is making it impossible to access your internal data. So, the possibility is that you might lose all the data. We have a solution for all of your data recovery problems from a damaged Android device.
The solution for recovery data is the Dr.Fone - Data Recovery (Android) toolkit by Wondershare. This tool is highly appreciated worldwide and very popular for its feature-rich user interface. This tool can perform a lot of functions that can successfully recover the data from a damaged device.
Use this revolutionary toolkit to get the data back from the black tablet screen of death. Connect the OnePlus 12 device with the PC after installing this tool and follow the on-screen instruction, and all of your data will be transferred to your PC. Unfortunately, the tool is supported on selected OnePlus 12 Android devices as of now.
Dr.Fone - Data Recovery (Android)
A Dedicated Tool to Retrieve Data from Broken Android Devices .
- Recover data from broken devices or devices that are damaged in any other way, such as those has black screen.
- Recover photos, videos, contacts, messages, call logs, and more.
- Highest retrieval rate in the industry.
- Compatible with most OnePlus 12 devices.
3981454 people have downloaded it
Part 3: 9 Solutions to fix the black screen of death of Android
- 3.1 One click to fix the black screen of death
- 3.2 Force restart your OnePlus 12
- 3.3 Check and clean your phone
- 3.4 Remove the battery
- 3.5 Recharge the OnePlus 12 device
- 3.6 Wipe cache partition to fix black screen of death
- 3.7 Uninstall incompatible apps
- 3.8 Reboot to safe mode
- 3.9 Factory reset to fix Android black screen of death

3.1 One click to fix the black screen of death
Facing an Android device with a black screen of death, I believe, is one of the gloomiest moments of one’s life, especially for those who know little about the technical part of Android. But here is the truth we have to admit: most cases of the black screen of death arise due to system glitches in Android.
What to do? Shall we find someone who is tech-savvy to seek help? Come on, this is the 21st century, and there are always one-click solutions to deal with technical issues for laymen like you and me.
Dr.Fone - System Repair (Android)
Fix Black Screen of Death for Android In One Click
- Fix all Android system issues like a black screen of death, OTA update failures, etc.
- Update the firmware of Android devices. No technical skills are required.
- Support all the new OnePlus 12 devices like Galaxy S22, S23, etc.
- Click-through operations to bring Android out of the black screen of death.
3,364,231 people have downloaded it
Here are the easy steps to get your OnePlus 12 out of the black screen of death:
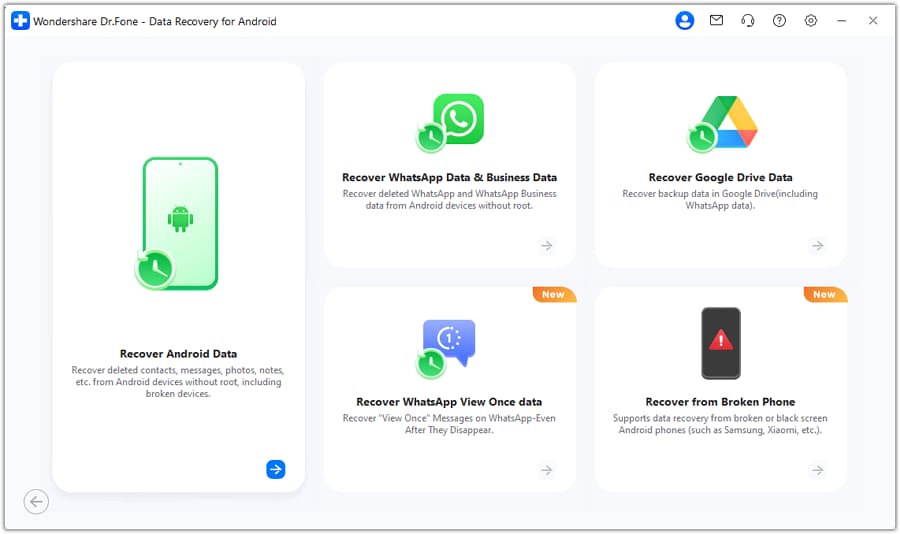
- Download and install the Dr.Fone tool. After launching it, you can see the following screen pop up.

Select “System Repair” from the home page, and then click on the “Android “.
Click “Start” to commence the Android system repair. In the next screen, select and confirm your Android model details like name, model, country, etc. and go on.

Boot your Android into Download mode by following the on-screen demonstrations.
Then the tool will download the Android firmware and flash the new firmware to your OnePlus 12.


- A moment later, your OnePlus 12 will be repaired completely, and the black screen of death will be fixed.

Video guide: How to fix the Android black screen of death step by step
safe & secure
3.2 Force restart your OnePlus 12
Because it is the quickest and most painless solution, most people do this when their Android phone screen goes black too fast. The majority of phone issues can be resolved by performing a hard reboot. Here are the necessary measures if you haven’t tried this method before.
To reboot your OnePlus 12, you may need to press a specific key combination, depending on the model you have, but most Android devices can be force restarted by doing the following steps:
Step 1: Press and hold the power button for about 10-15 seconds. Keep holding it until the OnePlus 12 device restarts.
Step 1: For OnePlus 12 devices, press and hold down the Power and Volume Down buttons for about 7 seconds.

3.3 Check and clean your phone
This method might not be popular with Android users, but this can do wonders when dealing with an Android black screen of death issue. To do this, follow the steps provided below:
Step 1: Ensure your phone’s buttons and ports are not stuck before anything else.
Step 2: See if dirt prevents you from turning the OnePlus 12 device on. Then, quickly press and release the button a few times.
Step 3: If the phone isn’t charging normally, ensure the charging port isn’t clogged with dust and debris by checking and cleaning it. You can gently blow out any debris in the charging port or use a wooden toothpick to pry it open.
Step 4: After you’re done with the cleaning, it’s best to charge the phone for at least 10 minutes. Just give it a quick charge and then try to restart it.

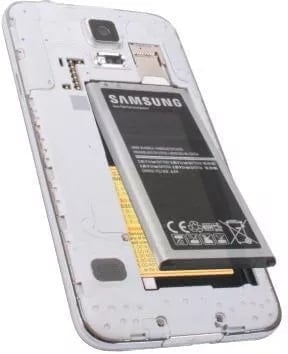
3.4 Remove the battery
If your phone’s battery is removable, you can try taking it out and trying again if restarting and cleaning it doesn’t fix the problem.
Step 1: To get started, take the phone apart by starting at the back.
Step 2: After 20 to 30 seconds, take out the battery and put it back in.
Note: When replacing the battery, ensure the metal contacts correctly connect to the phone.

This easy and straightforward method should help you fix your Android screen black issue, but if it doesn’t, continue reading, as this article got more techniques you can try.
3.5 Recharge the OnePlus 12 device
If your OnePlus 12 screen suddenly goes black, let the battery die completely. Then once the battery is completely dead, you should plug it in to charge and turn it on by pressing the Power button. Try to check if you still encounter the issue after doing so.
3.6 Wipe cache partition to fix black screen of death
If your OnePlus 12 turns on, but the screen remains black, clearing the cache partition should solve the problem. After all, keeping caches on your phone would cause it to run more slowly and cause other problems. Therefore, the issue can be resolved by clearing the cache partition. Check the following steps on how to do this below:
Step 1: Turn off your OnePlus 12.
Step 2: Boot the OnePlus 12 device into Recovery Mode.
Note: The steps necessary to enter recovery mode will vary depending on your specific Android phone model. To ensure you’re doing the correct steps for your device, consult the user manual or look it up online. The following instructions work for OnePlus 12 devices:
- For older OnePlus 12 devices with the home button: Press and hold the Volume Up button, the Power button, and the Home buttons simultaneously.
- For newer OnePlus 12 devices without the home button: Press and hold the Volume Up button and the Power button together.
- If the OnePlus 12 device logo appears, release your grip, and the phone will restart.
Step 3: Find the Wipe cache partition option using the volume controls after entering Recovery Mode.
Step 4: Select Wipe cache partition by pressing the Power button.
Step 5: On the next screen, use the Volume Down button to highlight “Yes” and then press the Power button to confirm the cache wipe.
Step 6: The cache partition will be wiped, and you will see the “Cache wipe complete” message on the screen.
Step 7: Use the Volume Down button to navigate to the “Reboot system now” option and press the Power button to reboot your OnePlus 12 device.
After rebooting, you can see that you have successfully got rid of the annoying Android black screen of death. For most of the cases, this method solves the problem. If not, you have to move to the next method.
3.7 Uninstall incompatible apps
Android screen black can be a result of installing a bug or incompatible apps. If you have recently installed an app that crashes frequently, that may be the reason for the issue. Uninstalling the app from the OnePlus 12 device may solve the problem with ease. For doing this, you need to boot your device in Safe mode. Follow the below steps.
Step 1: Power down your device by pressing and holding the Power button until a menu appears.
Step 2: Navigate to Safe Mode by pressing and holding the Power Off button.
Step 3: Tap the “Safe mode” icon to enter Safe mode. You should now see Safe Mode at the OnePlus 12 device’s bottom.
Step 4: After selecting Settings, head to the Apps section.
Step 5: Select the app by clicking on it; the App Info window should appear. To uninstall the app, tap the Uninstall option from the menu below the screen.
Step 6: Now restart the OnePlus 12 device by pressing the power button and let it boot up in normal mode.
If the app is the reason for Android black screen of death, then after uninstalling, you can get rid of this issue. If not, now you have to factory reset your device to solve the problem.
3.8 Reboot to safe mode
Even after multiple attempts to launch them, certain applications act suspiciously and cause the OnePlus 12 device to crash. When an Android phone suddenly goes black, you can often isolate the problem to a specific app by booting into Safe mode.
Step 1: Begin by restarting your phone. To do that, press the Power button until a menu appears.
Step 2: Press the Power Off button to enter Safe mode.
Step 3: Activate Safe mode by clicking the “Safe Mode” icon.

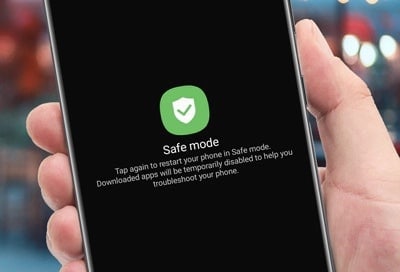
Step 4: To return to Normal mode, turn off your device and then turn it back on.
3.9 Factory reset to fix Android black screen of death
The factory reset is the option that enables the factory state of your device by erasing all data, settings, bugs, and apps. Your device will be fresh like factory condition after this reset. Worth mentioning here, you’ll lose all the internal data and installed apps after this reset. So, to overcome the Android tablet black screen of death, you must perform this action as the last option. Follow the below steps carefully.
Step 1: Turn off the OnePlus 12 device. Then press the Volume Up + Power button + home button (or press Volume Up + Power buttonS) altogether and let the mobile boot into recovery mode.
Step 2: After booting up in recovery mode, you can find the “Factory data reset” option. Navigate to that option with the volume up and down arrow and select it with the power button.
Step 3: In this step, you need to confirm your action by tapping on the “Yes” option. After this, your device will start erasing. This may take a while to complete the whole process.
Now, your device will reboot automatically and you can see the Android black screen of death problem is solved.
Part 4: How to avoid Android black screen of death?
These are the general methods to overcome the situation of Android screen black. But to avoid this situation, here are a few tips to follow –
- Install apps from trusted suppliers only.
- Use security or antivirus software on your device.
- Take a backup at regular intervals.
- Always keep Android OS updated.
- Don’t keep your mobile charged for a long duration after a full charge.
- If your battery gets old, replace it soon.
- Keep your device’s storage well-maintained. Regularly delete unnecessary data.
- Close unused apps running in the background to conserve system resources.
- Prevent phone overheating by avoiding excessive usage, and not exposing it to direct sunlight for extended periods.
By following these steps, you should avoid the most unpleasant situations, such as the Android screen black. We all know that “Prevention is always better than cure”.
The Bottom Line
There could be a lot of reasons why an Android black screen issue occurs, but the important thing is knowing the correct ways how to fix it. And this article has covered nine proven methods to help you fix an Android phone screen black problem.
But among the methods discussed above, Dr.Fone – System Repair just stood out as this program does not only help you with a black screen of death problem, but it covers many other Android system issues too. It’s also a highly intuitive program that requires no skills to operate.
safe & secure
- Title: 8 Ultimate Fixes for Google Play Your OnePlus 12 Isnt Compatible | Dr.fone
- Author: Ariadne
- Created at : 2024-07-30 08:30:22
- Updated at : 2024-07-31 08:30:22
- Link: https://howto.techidaily.com/8-ultimate-fixes-for-google-play-your-oneplus-12-isnt-compatible-drfone-by-drfone-fix-android-problems-fix-android-problems/
- License: This work is licensed under CC BY-NC-SA 4.0.