
8 Ultimate Fixes for Google Play Your Vivo T2 5G Isnt Compatible | Dr.fone
8 Ultimate Fixes for Google Play Your Vivo T2 5G Isn’t Compatible
Nowadays, keeping yourself informed about the newest apps and features is essential. Have you encountered the error message “Google Play your device isn’t compatible with this version?” When attempting to download or update an application, this problem can pose a significant obstacle. The good news is that you can now alleviate those concerns.
In this article, we delve into how to resolve the “your device isn’t compatible with this version Google Play” error. It will discuss the top 8 ultimate fixes for this vexing issue that many Android users face. From practical tips to advanced solutions, this article aims to empower you with the knowledge to overcome this challenge.
Part 1: Reasons Behind Your Device Isn’t Compatible With This Version Play Store
Encountering the frustrating “your device isn’t compatible with this version Google Play“ error can be disruptive. That’s why it is essential to go through the underlying reasons causing this compatibility issue:

1. Outdated Operating System Firmware
One of the primary culprits behind the compatibility error is outdated OS firmware. App developers release updates to keep up with the latest features and security patches. That’s why an obsolete OS version on your device may render it incompatible with the newer app versions available on the Google Play Store.
2. Insufficient Hardware Requirements
Each application has specific hardware prerequisites that your device needs to fulfill. In case your smartphone does not meet the required specifications, you won’t be able to utilize the app. Thus, Google Play Store may restrict access to certain applications, citing compatibility issues.
3. Corrupted Cache Files
Cache files are designed to enhance the speed and efficiency of app loading. Yet, they can sometimes become corrupt. When this occurs, it disrupts the app’s normal operation. Clearing these corrupted cache files is often a crucial step.
4. Geographic Restrictions
In certain cases, app developers or Google Play itself may impose geographic restrictions. This could lead to compatibility issues if your device is located in an area where the app is restricted. Understanding the geographical availability of an app is vital in finding the root cause.

Key features:
• Import from any devices and cams, including GoPro and drones. All formats supported. Сurrently the only free video editor that allows users to export in a new H265/HEVC codec, something essential for those working with 4K and HD.
• Everything for hassle-free basic editing: cut, crop and merge files, add titles and favorite music
• Visual effects, advanced color correction and trendy Instagram-like filters
• All multimedia processing done from one app: video editing capabilities reinforced by a video converter, a screen capture, a video capture, a disc burner and a YouTube uploader
• Non-linear editing: edit several files with simultaneously
• Easy export to social networks: special profiles for YouTube, Facebook, Vimeo, Twitter and Instagram
• High quality export – no conversion quality loss, double export speed even of HD files due to hardware acceleration
• Stabilization tool will turn shaky or jittery footage into a more stable video automatically.
• Essential toolset for professional video editing: blending modes, Mask tool, advanced multiple-color Chroma Key
4. Beta Versions and Unstable Releases
Engaging with beta versions or unstable releases of an app can result in compatibility issues. These versions are typically in the testing phase. That’s why their compatibility with a wide range of devices may not be guaranteed. If you find yourself facing compatibility errors, it’s worth checking if you are in a beta program.
Part 2: 8 Reliable Fixes for Google Play Your Device Isn’t Compatible With This Version
Facing the “Play Store your device isn’t compatible with this version” error is an all-too-familiar setback. However, fear not, as this article will be your guide in resolving this issue. Summarized below are the top 8 solutions to fix this error with ease:

Fix 1: Force Quit Google Play Store
Force quitting the Google Play Store is a simple yet effective first step in resolving compatibility issues. Occasionally, the app may encounter glitches or background errors. These can hinder its proper functioning. Force quitting the Google Play Store and restarting it can often rectify these issues. You can use the following steps to force quit Google Play Store:
- Step 1. On your Vivo T2 5G, find the Google Play Store and long-press its icon. Press “App info” from the pop-up menu to access the app information screen.
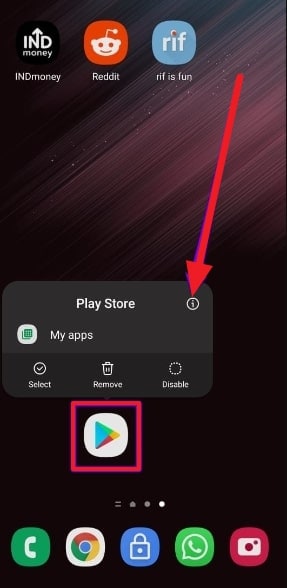
- Step 2. Here, tap the “Force Stop” option to force close the Google Play Store. After a while, relaunch the app to see if the issue is resolved.


Fix 2: Clear Google Play Store Cache
Clearing the cache of the Google Play Store is a targeted solution. It addresses potential compatibility issues arising from corrupted or outdated temporary files. The cache stores data that helps the app load faster. Yet, when these files become corrupted, it can lead to performance issues. Follow these steps to clear the Google Play Store cache and the “device not compatible Google Play” issue:
- Step 1. After finding the Google Play Store on your device, press and hold the icon until a pop-up menu appears. Here, touch the “App info” option to reach the screen displaying information about the app.

- Step 2. Here, press “Storage and Cache,” and on the following screen, tap “Clear cache.” Confirm your action to wipe the cache data. Afterward, access the targeted app again to check if the issue is resolved.

WPS Office Premium ( File Recovery, Photo Scanning, Convert PDF)–Yearly

 Glarysoft File Recovery Pro - Helps to recover your lost file/data, even permanently deleted data.
Fix 3: Remove the Google Services Framework’s Cache and Data
The Google Services Framework plays a crucial role in your Vivo T2 5G. It is essential in the functioning of various Google services, including the Google Play Store. Clearing its cache and data can be an effective method to tackle compatibility issues. Here’s a step-by-step guide on how to remove the Google Services Framework’s cache and data:
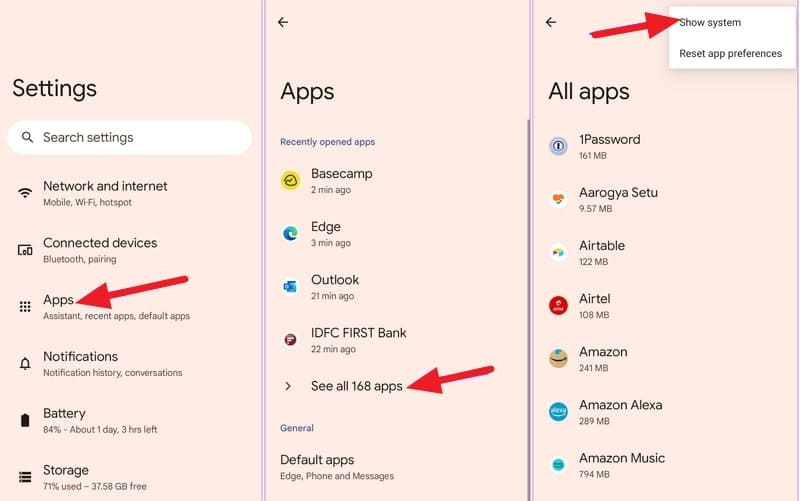
- Step 1. Open your device’s Settings and scroll down to tap “Apps.” There, press the “All Apps” options, and on the following screen, choose “Show System” from the top right corner.

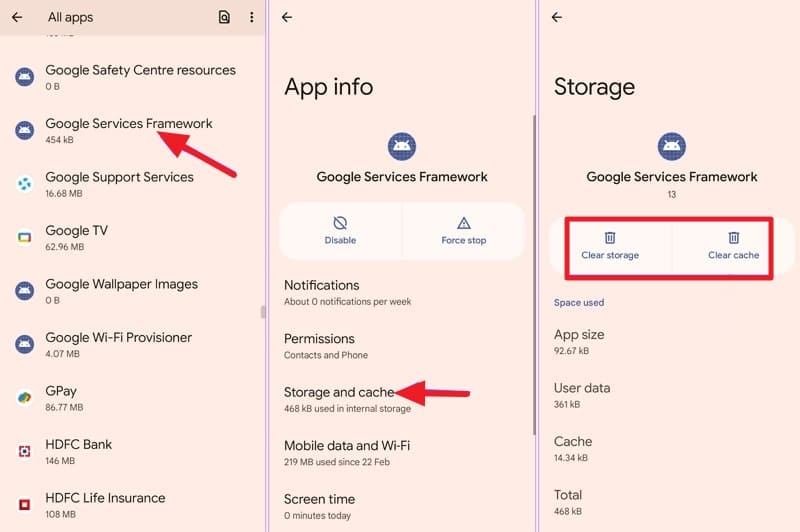
- Step 2. Now, find and tap the “Google Services Framework” app and go on to press “Storage and Cache.” Here, use “Clear Cache” and “Clear Storage” to clear its cache and data.
Fix 4: Update the Android OS Version
An outdated operating system is a common factor behind compatibility issues. This case is often used with Google Play Store and other important apps. Maintaining your Vivo T2 5G’s compatibility with the latest app releases is essential. To ensure your Android operating system is up-to-date, please proceed with the following steps:
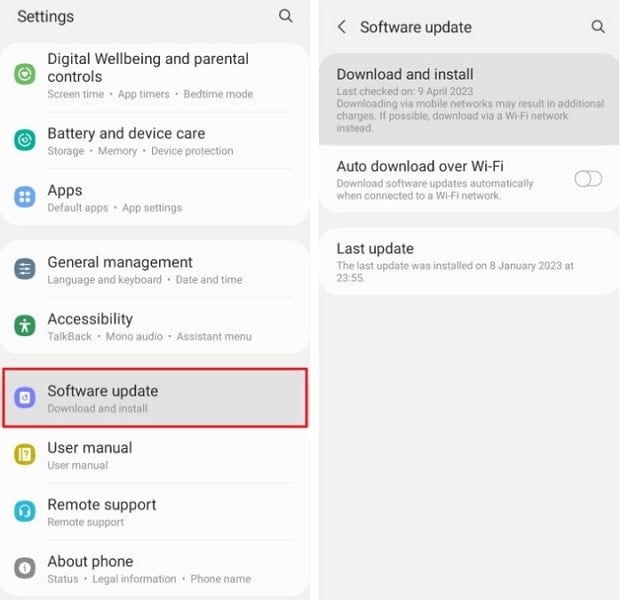
Instructions. You will need to start by accessing the Vivo T2 5G device’s “Settings.” Scroll down to find and press the “System” option. On the following screen, tap “Software Update” to check if an update is available. If there is one, follow the on-screen prompts to update your device’s OS.
 With Screensaver Wonder you can easily make a screensaver from your own pictures and video files. Create screensavers for your own computer or create standalone, self-installing screensavers for easy sharing with your friends. Together with its sister product Screensaver Factory, Screensaver Wonder is one of the most popular screensaver software products in the world, helping thousands of users decorate their computer screens quickly and easily.
Fix 5: Uninstall the Google Play Store Updates
In certain cases, issues with the Google Play Store itself may be contributing to compatibility errors. Uninstalling recent updates can revert the app to its default state. It can potentially resolve the problem. Follow these steps to uninstall updates for the Google Play Store and resolve “device not compatible Play Store” issues:
- Step 1. Using your Vivo T2 5G’s Settings, access the Google Play Store app in the “Apps” tab. Once on its info page, tap the three dots icon from the top right corner.


- Step 2. From the available options, choose “Uninstall updates.” Then confirm your decision when prompted to delete the Google Play Store updates.

Fix 6: Sideload the Incompatible Android App
If all else fails and the compatibility issue persists, sideloading the app can be a workaround. It means installing the app manually without using the Google Play Store. This approach proves especially valuable for users with a strong determination to access a specific application. Below is a comprehensive, step-by-step tutorial on how to sideload an app:
- Step 1. Long-press the Google Chrome icon to open the app info menu. Navigate to the “Install unknown apps” section. Here, toggle the switch to enable “Allow from this source.”

- Step 2. Afterward, access a reliable, trusted website where the APK for the targeted app is available. Download and install the app to resolve the compatibility issues.

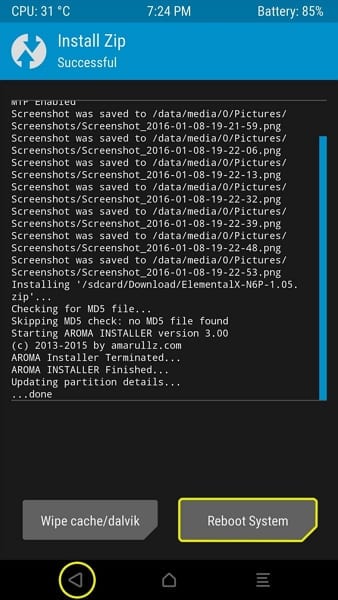
Fix 7: Install a Custom ROM
Have you exhausted other options and are still grappling with compatibility issues? Installing a custom ROM could be a more advanced but effective solution. Custom ROMs are modified versions of Android operating systems developed by the Android community. Engaging in this procedure entails large modifications to your device’s software. It is crucial to comprehend the potential consequences and proceed with caution.
Installing a custom ROM may void your device’s warranty. Moreover, it’s crucial to choose a ROM compatible with your device model. Installing a custom ROM is an advanced solution that should be approached with caution. It has the capability to address compatibility issues. Nevertheless, it demands a certain level of technical expertise and may not be suitable for all users.
Fix 8: Try Using a Third-Party App Store
The final solution to avoid compatibility issues on the Google Play Store is to use a different app store. Exploring alternative app stores can be a pragmatic workaround. Several third-party app stores offer a diverse range of applications. They might provide the desired app without encountering compatibility errors and help avoid the “device not compatible Google Play” error.
You can explore reputable third-party app stores such as Aptoide, Amazon Appstore, GetJar, or SlideME. Ensure the chosen app store is reputable and widely used, minimizing potential security risks. Exercise caution and ensure the legitimacy of the app store to avoid security risks.

Part 3: Is Your Play Store Not Working Properly? Fix It Now With Wondershare Dr.Fone
If you are unable to download any application on your Vivo T2 5G, it might be because of your Play Store issue. Play Store is the crucial element in your device, providing your facility with many features and functions. Get it fixed by trying Wondershare Dr.Fone – System Repair (Android) tool within a few clicks.
The System Repair tool in Dr.Fone helps you to resolve this issue in your Android Phone with powerful mechanisms and efficient working. It provides a user-friendly interface to fix Play Store Not Working with much ease.

Key Features of Wondershare Dr.Fone
- Fone – System Repair (Android) allows you to repair your Vivo T2 5G easily in just a few clicks.
- This tool is also used to resolve the Black Screen of Death issue and Bricked Android devices problem.
- Users can fix their Android devices of any model or brand within minutes.
- With its easy-to-follow guide and steps, no technical expertise is required to use Dr.Fone’s software.
![]()

Dr.Fone - System Repair (Android)
Repair Android System Errors without Any Trouble.
- Fix your Android to normal, no skills required.
- Fix various Android system issues, stuck in boot loop , black screen , or won’t turn on , looping on start, etc.
- The high success rate in resolving Android system issues.
- Compatible with a wide range of Android devices and OS versions
- User-friendly interface with easy-to-follow steps.
3981454 people have downloaded it
 vMix Pro - Software based live production. vMix Pro includes everything in vMix 4K plus 8 channels of Replay and 8 vMix Call
Steps Involved To Fix Play Store Not Working Properly via Wondershare Dr.Fone
Now, we will be discussing the guide to resolve your “Google Play your device isn’t compatible with this version” errors. Here is how to fix the Play Store not working properly with Wondershare Dr.Fone – System Repair (Android):
- Step 1: Access Wondershare Dr.Fone on Computer
The first thing you need to do is to launch Wondershare Dr.Fone on your PC and access the “Toolbox” panel, followed by the “System Repair” section. Then, select the “Android” device and hit the “Start” button to proceed with the repair process.

- Step 2: Put Device Details and Download the Firmware
After that, you need to enter the Vivo T2 5G device details like the “Name, Model, Brand, etc.” and put your phone on a Download Mode. Following this step, the firmware will download on its own, and you need to click the “Fix Now” button to install it on your Vivo T2 5G.

- Step 3: Confirm the Installation and End the Process
In the last step, you will have to put in the code and proceed with the “Confirm” button to initiate the repair process. This may delete all your data in the Vivo T2 5G device, and once it has ended, select the “Done” button to conclude the process.

 safe & secure
3,120,524 people have downloaded it
Conclusion
To conclude, encountering compatibility issues like “Google Play your device isn’t compatible with this version,” can be a frustrating roadblock. However, this article has armed you with the knowledge through exploring various fixes. You now possess a toolkit of solutions to overcome the notorious issue. From forced quitting the Google Play Store to exploring the realm of custom ROMs, each fix has been crafted to cater to different user preferences.
For users seeking a comprehensive solution, Wondershare Dr.Fone emerges as a versatile and powerful tool. It goes beyond conventional troubleshooting methods. Its “Android Repair” feature is tailored to address various Android system issues, including those affecting the Google Play Store.
Restore Missing App Icon on Vivo T2 5G: Step-by-Step Solutions
The growing conversation around the missing app icons on Android issue has caught our attention. While it seems confusing, it’s a problem that some Android users have encountered.
After all, the presence of app icons on our Android device’s home screen is important for convenient access to our frequently used applications. When your Vivo T2 5G’s icons suddenly disappear, it can leave you feeling lost about how to use and access your apps.
No worries, though. We’ve got you covered with a simple guide in this article. Just follow the steps, and you’ll get those missing app icons back on your Vivo T2 5G.
Part 1: Make Sure if the Missing App Is Installed
Before proceeding with troubleshooting the missing app icon on your Android device, it’s essential to confirm whether the app is still installed or if it has been accidentally deleted. To do it, you can have a quick check on Google Play:
- Step 1: Go to the Play Store.
- Step 2: Tap your Google profile at the top right and find Manage apps and devices.
- Step 3: Open Manage and select the “Installed” tab.
![]()
Now, see whether you can find the app icon that disappeared on your Android. If you can’t find it, it means the app has been accidentally deleted, and you can install it back on your device. However, if it’s confirmed to be installed on your Android but remains missing from your home screen, you can continue the following practice.
Part 2: How To Find the Missing App Icon on Android
“All my apps disappeared from my home Android screen. What should I do?”
If you’ve confirmed that the missing app is installed, but its icon is nowhere to be found on your home screen, don’t fret—there are several solutions you can take to locate and restore the missing app icon on Android.

1. Check hidden apps
How could the Android phone icon be missing? Well, app icons can disappear from your home screen for different reasons. One of the common reasons is you might have accidentally hidden it in your phone. To find and check whether the app is hidden, the steps can be different depending on the phone model you are using.
However, as a general guide, you can follow these steps:
- Step 1. Go to your phone’s Settings.
- Step 2. Use the search bar to look for “Hidden app.”
- Step 3. Once you find the “Hidden app” settings, watch the list to see if the missing app is there. If it is, you can toggle off the switch to unhide it.
![]()
2. Move the app to the home screen from the App Drawer
If your app icon disappeared on your Android, you can also easily restore it by adding the app to the home screen from the app drawer. Follow the step-by-step guide below:
- Step 1. Open the App Drawer on your Android. To do this, swipe from the bottom to the top, starting from your home screen. The App Drawer is where all your installed apps are neatly listed.
- Step 2. Once you open the App drawer, locate the app icon that has disappeared from your home screen. For example, you lost the phone icon on Android. Then, look for the phone icon from the App Drawer.
- Step 3. Long-press the Icon of the missing app and move it to the desired location on your home screen. You can drag it to an empty space or a specific folder.
- Step 4. Release to drop the app icon onto the home screen.
![]()
3. Re-enable disabled app
App icons can also disappear on the Android home screen if you unintentionally or intentionally disable them. Certain phone models even offer a functionality known as ‘Freezer,’ allowing users to temporarily halt the apps. While in a frozen state, the app remains inactive and doesn’t appear on the home screen until you unfrozen it.
To re-enable the disabled app, you can follow the steps here:
- Step 1. Open the Apps & Notifications on the Settings.
- Step 2. Select the app which icon is missing on your home screen. For example, tap the phone app if the phone icon disappears on your Android.
- Step 3: In the App Info, tap Enable.
4. Reset Android to factory settings
If the previous methods don’t work, you might need to do a factory reset on your Vivo T2 5G. But before doing that, it’s important to back up your data first because a factory reset will clear all your data and cache when you press the reset button.
How to reset Android to factory setting:
- Step 1: Go to your Android Settings.
- Step 2: Select Backup and Reset > Factory data reset. Then, choose to erase all data.
Please be mindful that performing a factory reset on Android will reset your Android completely to its initial state.
 vMix HD - Software based live production. vMix HD includes everything in vMix Basic HD plus 1000 inputs, Video List, 4 Overlay Channels, and 1 vMix Call
![]()
Part 3: How to Fix System Error on Android Easily with Reliable Software
Missing app icons on Android can sometimes be a result of errors in your Android system launcher, causing inconvenience and potential disruptions to your device’s operation. To address this issue effectively, you can turn to Dr.Fone’s advanced system repair tool. This tool is designed to handle various system issues, providing an easy and reliable solution.
How to fix the Android system using Dr.Fone’s system repair tool:
- Step 1. Open the Repair Tool
Start by launching Wondershare Dr.Fone on your computer. Go to the Toolbox section and connect your Vivo T2 5G. Choose System Repair and pick Android as your device type.
safe & secure
4,136,839 people have downloaded it
- Step 2. Begin Repair
Click Start on the new screen to kick off the repair. Since you’re dealing with the Android system, select System Damage.

- Step 3. Fill in the Vivo T2 5G device Details
The platform will detect your Vivo T2 5G’s brand. Confirm the Name, Model, Country, and Carrier. If your device is unlocked, choose OPEN in the Carrier section. Agree to the warning, click Next, and proceed with the repair.
- Step 4. Activate Download de
Follow the instructions to put your Vivo T2 5G into Download Mode. Once you are in Download Mode, the firmware will be downloaded automatically.


- Step 5. Confirm Installation
Remember, the repair may erase data. It’s advisable to back up your data first before starting the repair. Enter “000000” to confirm the repair process, shown by a progress bar. Once finished, click Done and see if your phone has returned to normal.
 NeoDownloader - Fast and fully automatic image/video/music downloader.
More Articles About Android System:
9 Solutions for Android Process System isn’t Responding Error
How to Fix Android App Not Installed Error Quickly?
Authentication Error Occurred? Here Are 10 Proven Fixes
 TubeDigger - online video downloader from mostly any site
Conclusion
When the app disappears from the home screen of your Android, it can hinder your ability to access and use the app efficiently. There are several reasons why an app might disappear from your Android home screen, and addressing the issue depends on the specific circumstances.
Whether it’s due to accidental deletion or a system glitch, we have discussed various methods to recover the missing app and ensure smooth functionality in this article. In cases of system-related issues on your Vivo T2 5G, it’s advisable to rely on trustworthy software such as Dr. Fone’s system repair tool for a comprehensive resolution.
Gmail Not Working on Vivo T2 5G: 7 Common Problems & Fixes
Ever since Android is introduced, it has almost eliminated the need of computers to work through Gmail. Gmail carries much importance especially when you’re a working person. A lot of work is done through mails on daily basis. But maybe today is not your lucky day. Maybe Gmail is giving you a hard time today. Is it? Is your Gmail not responding or keeps stopping you from going further? Well! There is no need to be bothered anymore. We are discussing some of the general Gmail problems along with their fixes. So, if your Gmail is not working on Android, you can go through this article and find the relevant solution.
Problem 1: Gmail App not responding or keeps crashing
First and foremost, the most common situation people meet with is when there Gmail keeps crashing. Or simply, it doesn’t respond at all. When you open it, it stuck for a few seconds and then you have to close it. It seriously is an annoying issue. If your Gmail is also not responding or crashing and you aren’t able to work properly, following are the solution you can follow.
Clear Cache
The first thing you can do to fix Gmail not responding issue is to clear the cache of Gmail. This has higher chance to get the issue resolved. To do this:
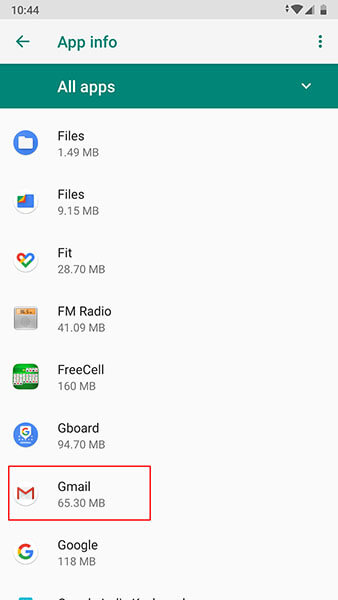
- Go to “Settings” and look for “Apps & Notifications”. Please note that the option may vary in some Android phone like it maybe “Application” or “App Manager”. So, don’t panic and look for the option carefully.

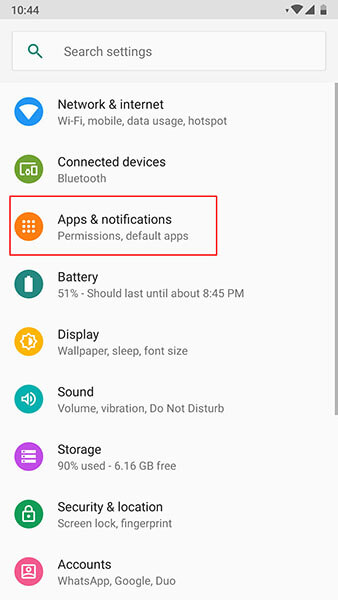
Now, from the apps list, search “Gmail” and tap on it.
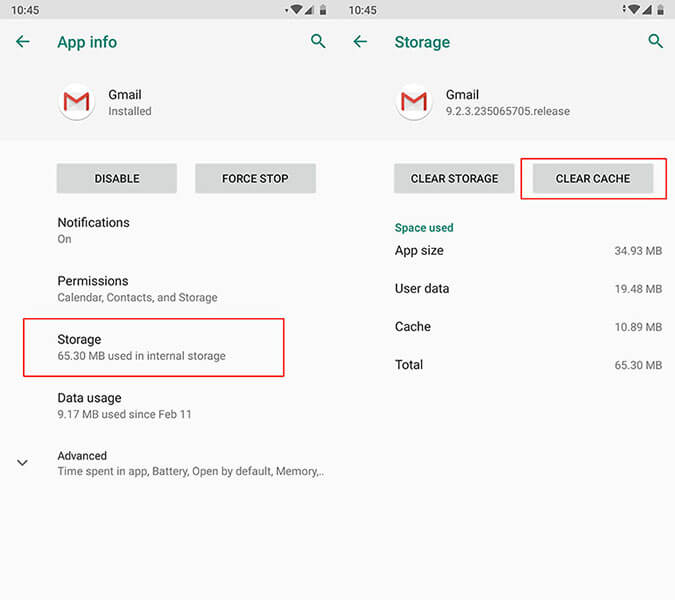
Go to “Storage” followed by “Clear Cache”.

Restart the Vivo T2 5G device
Restarting the Vivo T2 5G device in the first place simply resolves many problems and so in the instance when Gmail keeps stopping. Simply long press the power button of your device and restart the Vivo T2 5G device. See of the problem gets vanished or not.
Factory Reset the Vivo T2 5G device
The next option that you can try is resetting your device. This will lead to data loss so we suggest you to take backup firstly and then proceed with this method.
Hit on “Settings” and search for “Backup & Reset” option.
Tap on “Reset” or “Erase all data” (the option name again may vary).

If unfortunately the above solutions don’t work, there is a requirement to flash the stock Android ROM again. Before you wonder how, there is a professional one-click tool that can surely be of assistance. It is Dr.Fone - System Repair (Android) . The tool takes special care of the Android phones and fixes almost every system issues with ease. It takes no special technical skills and performs efficiently.
 LYRX is an easy-to-use karaoke software with the professional features karaoke hosts need to perform with precision. LYRX is karaoke show hosting software that supports all standard karaoke file types as well as HD video formats, and it’s truly fun to use.
Problem 2: Gmail won’t sync between all ends
The next most common problem where people get stuck with is when there Gmail won’t sync. Here are the solutions to this particular problem.
Make Space in the Phone
When Gmail stops syncing, one of the things that can save you is clearing the storage. It is the space that maybe the culprit and therefore the syncing don’t work at all. We would like to suggest you removing the unwanted apps to clear the storage or deleting the downloaded files. You can also transfer the important files to your computer and make the space vacant.
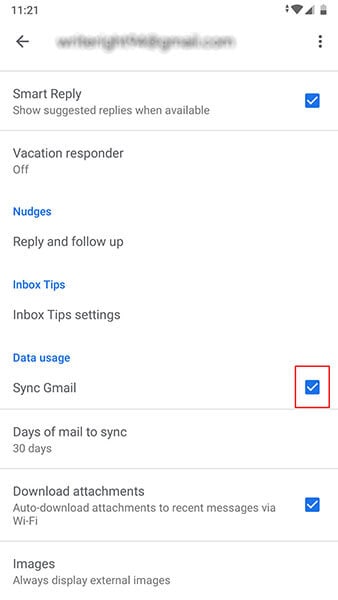
Check Gmail Sync Settings
When still the Gmail not working issue persists and you can’t sync, make sure to check the Gmal sync settings. For this, follow the steps below:
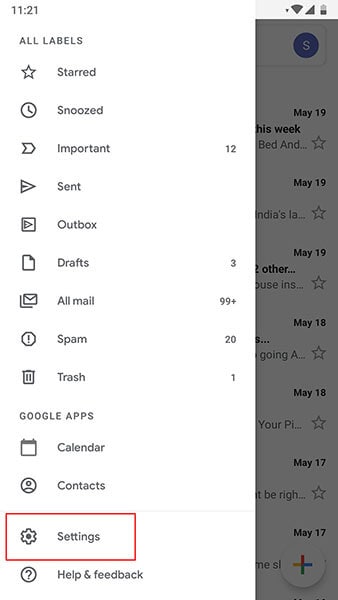
Launch the Gmail app and tap on the menu icon (three horizontal lines).
Tap “Settings” and choose your account.
Check the box next to “Sync Gmail” if it’s not checked.

Restart the Vivo T2 5G device
Again, restarting can also be helpful in this situation. When you boot the Vivo T2 5G device again, check if your Gmail can sync or not.
Problem 3: Gmail won’t load
In case you are using the Gmail over your web browser and it has tested your patience in loading, here are the solutions that could prove to be fruitful for you. Please check these out.
Ensure to Use Gmail Supported Browser
First of all, you need to make sure that the browser you are using works with Gmail or not. Gmail can smoothly perform in Google Chrome, Firefox, Safari, Internet Explorer and Microsoft Edge. However, the browsers should be updated. So, please make sure that these browsers are running on the latest versions. Moreover, in case you use Chromebook, don’t forget to update the operating system in order to let it support Gmail.
Clear Cache of web browser
If you tried the above method but to no avail, try to clear the cache and cookies of the web browser. But by doing so, the browser history will be removed. As well as, the records of the websites you previously enjoyed will also be lost.
Check browser extensions or add-ons
If not the above one, try this tip. It encourages you to check your browser extensions. Perhaps these are interfering with the Gmail and due to this conflict, Gmail won’t load. You can either turn off these extensions and plug-ins temporarily or make use of the incognito mode of the browser where there are no such things like extensions and plug-ins.
Problem 4: Gmail can’t send or receive
Gmail also gives you problem in sending or receive mails and messages. And to troubleshoot such issue, following are the solutions mentioned.
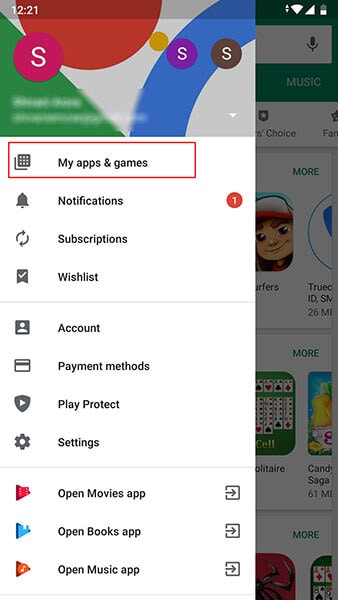
Check the Latest Version of Gmail
This issue is likely to emerge when you are using an outdated version of Gmail. And therefore, the first solution says you to check if the Gmail update is available. You can go to the Play Store and from the “My apps & games” option, you can see if Gmail needs to be updated or not.
Verify Internet Connection
Another thing that carries weight while you can send or receive mails is the internet connection. As we all know that Gmail won’t respond if the Vivo T2 5G device is not connected to the internet. Therefore, you are advised to turn off Wi-Fi and then enable it again. Also, please ensure to switch to Wi-Fi if you are using the cellular data. This may hamper the process and stop you from receiving or sending mails.

Remove you Account and Add Again
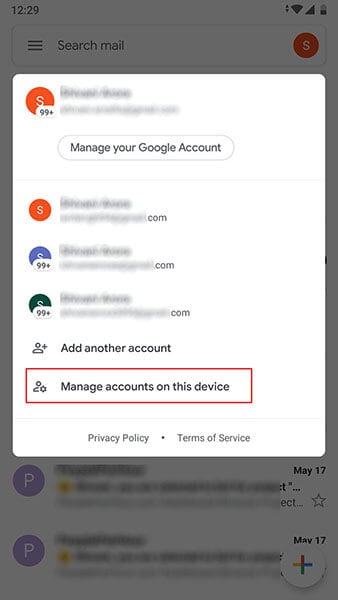
If still Gmail keeps stopping you to go ahead, make sure to once sign out from it. To do this:
Open your Gmail app and go to “Manage accounts on this device”.
Now, tap on the account you are working with. Tap on “REMOVE ACCOUNT” thereafter. After this, you can again sign in and then check if the problem is gone or not.
 Glary Utilities PRO - Premium all-in-one utility to clean, speed up, maintain and protect your PC

Problem 5: Stuck in sending
Now, here is another annoying problem that doesn’t let Gmail working on Android properly. This problem addresses the situation where users send a mail but it gets stuck on sending. If this is the problem that you are going through, the following solutions will help you.

Try Alternative Gmail Address
First of all, if Gmail is not working due to stuck in sending issue, we advise you to make use of some other Gmail address to send the mail. If the problem still occurs, jump to the next solution.
Check Network Connection
As already mentioned, be sure of an active internet connection while working with Gmail. When you are not using a stable connection, it may lead to stuck on sending, Gmail crashing and many other issues. You can fix the issue by doing these three things:
- Most importantly, use only Wi-Fi rather than cellular data if you want a smoother process.
- Turn off Wi-Fi and then turn it on again after nearly 5 seconds. Do the same with the router. Plug it out and the plug in.
- Lastly, turn on Airplane mode and after a few seconds, turn it off again.
Now try to send the mail and see if things are still the same or not.
### Check AttachmentsLarge attachments can also be the reason for this issue. We would here like to suggest you to check the attachments you are sending. If these are not so important, you can remove them and send the mail. Or if it is not possible to send the mail without attachments, compressing the files can be a solution.
Problem 6: “Account not synced” issue
Many times, the users get the error that says “Account not synced” while they try to work with Gmail. And this is the 6th problem we are introducing. The ways mentioned below will assist to get out of the trouble.

Make Space in the Phone
When Gmail stops to further the process by prompting “Accounts not synced” issue, be sure that your Vivo T2 5G has some storage in it. If not, create it straight away. As we also mentioned in one of the above solutions, you can either delete the unnecessary files or transfer the important files to the PC to make the space in the phone. Go along with this tip and see if it works.
Check Gmail Sync Settings
As another solution, check Gmail sync settings to get the issue fixed.
Simply open Gmail and hit the menu icon which is three horizontal lines on the top.
Go to “Settings” and choose your account.
See the tiny box beside “Sync Gmail” and check it if it is not.
Restart the Vivo T2 5G device
If the above method went futile, simply restart your device. Take help of the Power button on your device. Long press it and from the options, restart it. This will hopefully work for you.
Problem 7: Gmail app running slow
The last problem that you may face is the slow-going Gmail app. In simple words, you may experience that Gmail app is operating extremely slowly. To fix this, following solutions will help you.
Restart the Phone
It is a universal method to fix minor Android system issues. And here too, we would like you to restart your Vivo T2 5G in the first place when you find that Gmail is not responding due to the sluggish behavior.
Clear Storage of Device
Usually all the apps start running slow when the Vivo T2 5G device is not having sufficient space. As the apps need space to function quickly and appropriately, having the Vivo T2 5G device on low storage can prove to be a bad luck for Gmail. So, make sure you wipe out the items you no longer needed on your device and create some room so that the Gmail responds nicely and won’t be running slow anymore.
Update Gmail App
As the last tip that will indeed help you is to update the Gmail app. Until you update the app when required, Gmail keeps stopping you from working and you will definitely get frustrated. Therefore, go to Play Store and look for the Gmail update. If it is available, welcome it with smile and bid farewell to the problem of slow running Gmail.
What if your problem still doesn’t get resolved after following these 3 tips? Well! If that is the case, we will again recommend you to make use of an expert one-click tool to flash the stock Android ROM.
Dr.Fone - System Repair (Android) is going to help you serving the purpose. This mighty tool possesses huge success rate and one can rely on it for its simplicity and security. It is designed to work with numerous problem related to Android system. So, no matter if your Gmail keeps crashing or keeps stopping, it has the solution for everything.
Dr.Fone - System Repair
Fix all Gmail issues caused by Android system:
- Gmail app corruption or not opening
- Gmail app crashing or stopping
- Gmail app not responding
- Title: 8 Ultimate Fixes for Google Play Your Vivo T2 5G Isnt Compatible | Dr.fone
- Author: Ariadne
- Created at : 2024-07-30 08:33:34
- Updated at : 2024-07-31 08:33:34
- Link: https://howto.techidaily.com/8-ultimate-fixes-for-google-play-your-vivo-t2-5g-isnt-compatible-drfone-by-drfone-fix-android-problems-fix-android-problems/
- License: This work is licensed under CC BY-NC-SA 4.0.