
8 Workable Fixes to the SIM not provisioned MM#2 Error on Asus ROG Phone 8 | Dr.fone
8 Workable Fixes to the SIM not provisioned MM#2 Error on Asus ROG Phone 8
SIM cards are small chips that act as a connecting medium between your cell phone and your carrier. It is programmed to help your carrier identify your cell phone account with certain information. And eventually, you are enabled to make calls and to make use of mobile internet. Now, if your device is showing “SIM not provisioned” on Android then it signifies that the connection to carrier network cannot be established or perhaps, your carrier isn’t able to identify your cell phone account.
Part 1. Why does the error “SIM not provisioned MM#2” pop up?
There can be numerous reasons behind the pop up that reads “SIM not provisioned” on Android. But basically, it most probably affects the users who have registered a new SIM card. If you get to experience this issue in other situations or if the SIM is not working in Android, then the problem is with the SIM card and needs to be replaced. Anyways, here is a list of situations when the “SIM not provisioned” error may bother you.
- You got a new SIM card for your new phone.
- You are transferring your contacts into the new SIM card.
- In case, the carrier network provider’s authorization server is unavailable.
- Perhaps, you’re out of the reach of the carrier coverage area and that too, without active roaming agreement.
- Though new SIM cards work flawlessly. But it is often necessary to get your SIM card activated due to security reasons.
Just in case, you haven’t bought any new SIM card and the one you were using was working fine until now, then the most probable reasons behind it could be listed below:
- If your SIM card is too old, possibly it might have gone dead, try replacing it.
- Perhaps, the SIM card was not properly inserted into the slot or there might be some dirt between the SIM and smartphone pins.
A yet another reason could be that your SIM card got deactivated by your carrier provider as it could have been locked to a particular phone. Now, if you insert such a SIM card to another device or a new device even, you may get to witness a message that reads “SIM not valid”.

2.1 One click to fix the “SIM not provisioned MM#2” error on Android
Without talking any further, let’s straightly get to the first and the easiest way to repair SIM not provisioned issue on Android. For this purpose, we’re glad to introduce Dr.Fone - System Repair (Android) , one of its kind of tool that is capable of repairing almost all sort of Android OS issues in just a matter of few clicks. Whether it is SIM not provisioned on Android or SIM not working in Android or your device stuck in a boot loop or black/white screen of death. The most probable reason for these errors is Android OS corruption. And with Dr.Fone – Repair (Android) you can efficiently and effectively repair your Android OS in a hassle freeway.
Dr.Fone - System Repair (Android)
Android repair tool to fix “SIM not provisioned MM#2” error
- Fix any type of Android system issue with ease.
- Even novice users can use it without any hassle.
- Compatible with all major Asus ROG Phone 8 smartphone models.
- Highest success rate in the market for fixing Android issues.
- Supports all Android OS versions.
3981454 people have downloaded it
Step by step Tutorial to fix “SIM not provisioned MM#2” error
Step 1. Connect your Asus ROG Phone 8
Download and launch the Dr.Fone toolkit on your computer and then opt for the “System Repair” option from the main interface. Meanwhile, get your Asus ROG Phone 8 connected with the computer using a genuine cable.


Step 2. Opt for Android Repair and key in important information
Now, hit on the “Android Repair” from the 3 options on the left, followed by hitting the “Start” button. From the upcoming screen, you’ll be asked to key in important device-related information, like brand, model, country, and carrier details. Hit “Next” afterward.

Step 3. Boot your device in Download mode
You must put your device in Download mode for better repairing of your Android OS. Simply follow the onscreen guide to boot your Android in DFU mode and hit “Next” thereafter. Once done, the software will automatically start downloading the most compatible and recent firmware for your device.

Step 4. Initiate Repairing
As soon as the download completes, the software verifies the firmware and automatically initiates repairing your Asus ROG Phone 8. Within a short period, you’ll notice that your Asus ROG Phone 8 has been successfully repaired.

 safe & secure
2.2 Ensure the SIM card is not dirty or wet
At times, the issue can be as simple as cleaning your SIM card and SIM slot properly. Ensuring that SIM is not wet either and then putting it back into its place. If this works, then the SIM not working in Android was due to the dirt or moisture that was preventing proper contact between SIM card pins and smartphone circuit.
 WonderFox DVD Ripper Pro
2.3 Insert the SIM card correctly
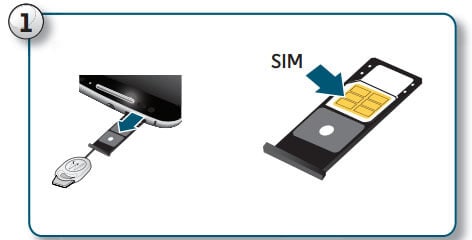
If your SIM card was working properly until yet, there is a good possibility that the SIM card may have moved a bit from its actual location. Eventually, there is poor contact between the SIM card pins and the circuit. Try inserting your SIM card properly with the following steps.
- Power off your Asus ROG Phone 8 and with the help of Q pin, eject the SIM card holder from the SIM slot of your device.
- Now, grab a soft rubber pencil eraser and gently rub it in on the gold pins of SIM card to clean them properly. Then, with the help of a soft cloth wipe away the rubber residue from the SIM card.
- Next, push the SIM back into the SIM card holder properly and push it back into the SIM slot now.
- Turn your device back on and look if your SIM not provisioned on the Android issue is resolved or not.
2.4 Activate the SIM card
Usually, when you buy a new SIM card, it gets automatically activated within 24 hours of being plugged into a new device. But if that’s not happening in your case and you’re wondering how to activate SIM card, make use of the three options below to enable activation:
- Call your carrier service provider
- Send an SMS
- Log on to your carrier’s website and look for the activation page over it.
Note: The aforementioned options are straightforward and are quick ways to enable activation. It depends on your carrier network whether they support them.
2.5 Contact your carrier
Even if your SIM isn’t activated, grab another working device to make a phone call to your carrier or network. Ensure, to explain the entire situation and the error message to them. Be patient while they investigate the issue. It may eat up a heck load of time or may get resolved in a few minutes that completely depend upon the complexity of the issue.

2.6 Try the other SIM card slot
A yet another reason why SIM not working in Android can be because of the SIM card slot might have gone corrupted. Thanks to the dual SIM technology, you do not have to rush immediately to get it to check or repair. You can simply rule out this possibility by ejecting the SIM card from its original SIM slot and then replacing it into the other SIM card slot. If this solution did work out for you then it is obvious that the problem was with the SIM card slot that got corrupted. And hence, it was triggering SIM not responding issue.
 ZoneAlarm Pro Antivirus + Firewall NextGen
2.7 Try the SIM card in other phones
Or just in case, you’ve still no joy and the SIM not provisioned on Android message is bothering you. Try making use of another Android device. Eject the SIM card from the Asus ROG Phone 8 device which is creating problems and try plugging it into other Asus ROG Phone 8] and other smartphones. Perhaps, this will let you know whether the issue is with your device only or with the SIM card itself.

2.8 Try a new SIM card
Still, wondering how to fix SIM not provisioned? Perhaps, nothing worked for you, right? Well, on that note, you must head to your carrier store and request a new SIM card. Also, inform them about the “SIM not provisioned MM2” error, they will be able to execute proper diagnostics over your old SIM card and hopefully get it resolved. Or else, they’ll equip you with a brand new SIM card and swap the new SIM card into your device and get it activated in the meantime. Eventually, restoring the normal functioning of your device.
Conclusion
In wrapping up, SIM not provisioned errors on Android can be troubling, but they’re certainly fixable. There are several methods, from a simple device restart to reaching out to your network provider. But if these don’t work, we suggest trying Dr.Fone - System Repair (Android) . This tool is known for its ability to handle an array of Android issues and could be just what your device needs. Navigate your tech challenges with ease using Dr.Fone.
safe & secure
How To Deal With the Asus ROG Phone 8 Screen Black But Still Works?
With the advance of technology over the years, many of us rely on smartphones to communicate, work, and play. As such, it can be pretty concerning when your device begins to act strange like your phone screen suddenly went blank.

Whether you’re using an iPhone or an Android device, you’ll eventually encounter a problematic symptom like this. Therefore, this article will explore what to do when your phone screen goes black. After exploring below, you’ll learn the common causes of why your phone screen went black and how to fix it. Read on below to learn more.
Part 1: Why Did My Asus ROG Phone 8 Screen Go Black but Still Works? Common Causes
Experiencing a cell phone blank screen is not exclusive to Android or iOS users. A phone screen not turning on happens all the time due to several factors that may or may not be out of your control. While they can be frustrating, here are some common causes you should know as to why your phone screen went black but still works.
A Drained Battery
The first thing that comes to mind when your phone screen suddenly goes black is you have a drained battery. Even though this is obvious, it’s still important to mention, as this is usually what most people encounter. To fix this problem, plug your smartphone into a charger and wait for your device to turn on again. If it works, then you just prevented a rather annoying experience.


App Troubles
If your phone is working, but the screen is black, there’s also a high probability that you are having an isolated issue with a particular application. An app could be loading something, which often happens for streaming apps such as YouTube, Netflix, Prime, and more, especially if you have slow internet connectivity.
Software Issues
A potential reason why your phone screen went black but still works could be because of your smartphone’s software. This problem suggests that your Asus ROG Phone 8 is crashing, potentially freezing your device if not addressed immediately. If this is the cause, then your device is likely experiencing a critical system error, and you should directly try to reboot your phone.
Hardware Problem
If you dropped your phone, there’s a high chance the LCD connectors went loose due to the physical impact. If this happened to you, the phone might be working, but the screen is black due to the LCD cable dislodging. Another issue could be your phone got exposed to extreme temperatures. This can also cause a black screen but your phone is still on.

Part 2: How To Fix Black Screen on Your Phone
Here are four valuable methods you should know on what to do when your phone screen goes black on your iPhone or Android smartphone to get them working again.
Method 1: Force Restart your Android/iOS Smartphone
If your phone screen is black but still works, force restarting it is the easiest way to fix it. The following are the detailed steps for both Android and iOS devices.
How to Force Restart your Android Device
Here is how you force restart an Android device when your phone screen doesn’t turn on.
Step 1: Press and hold the Power and Volume Down buttons simultaneously.
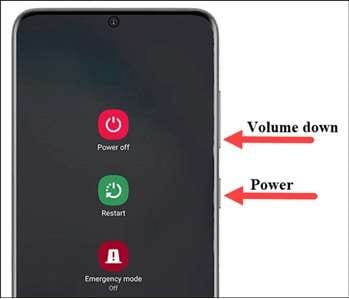
Step 2: Hold the same buttons until your device restarts, and display the phone’s logo.
How to Force Restart your iOS Device
If you own the latest iPhone models, here are the method of restarting it from iPhone 8 up to 14.
Step 1: Press and immediately release Volume Up. Next, press and immediately release Volume Down.

Step 2: Press and hold Sleep/Wake until you see the Apple logo.
Note
If you own an iPhone 7, press and hold the Side button and Volume Down simultaneously until you see the apple logo.
Method 2: Uninstall or Update Outdated Applications
In some cases, your phone screen is black but still works because of installing incompatible apps on your iOS/Android device. If the installed app is frequently crashing, it may be the source of a blank cell phone screen. Uninstall the problem app to see if the black screen disappears or not.
Method 3: Inspect the LCD Connectors
If your phone screen goes black but still works, you should inspect the logic board to the LCD screen to see if it has become disconnected. It is common for smartphones that often get dropped a few times. It’s best to plug the connectors back to regain your screen’s functionality.
However, this requires technical know-how. It’s better to seek help from a professional as you could risk causing more damage to your device if you don’t know what you’re doing.
Method 4: Perform a Factory Reset
If all the methods above did not solve your problem, the last resort you can take is to perform a Factory Reset. This method works on Android and iOS smartphones and erases all your data. It is the quickest way to try to fix why your phone screen went black. Here are the steps.
For Android Users
If you’re on Android, tap Settings > Backup and Reset. Tap on Factory data reset > Delete all to initiate the factory reset.
If you cannot do this, here’s how to perform a factory reset manually using Recovery Mode.
Note
The process of booting into Recovery Mode is not the same across all Android devices and depends on the manufacturer and model of your phone. Refer to your owners manual to see which method is the right one for your Asus ROG Phone 8.
Step 1A: Press and hold the Power button and Volume Down buttons simultaneously and continue holding until the screen starts.
Step 1B: For Android devices with a Home button, press and hold the Home button and the Power button and continue holding until the screen starts.
Step 1C: Press and hold the Power button as well as the Volume Up and Volume Down buttons simultaneously and continue holding until the screen starts.

Step 2: Use the Volume buttons to navigate the choices and select Wipe data/factory reset and confirm your choice with the Power button.

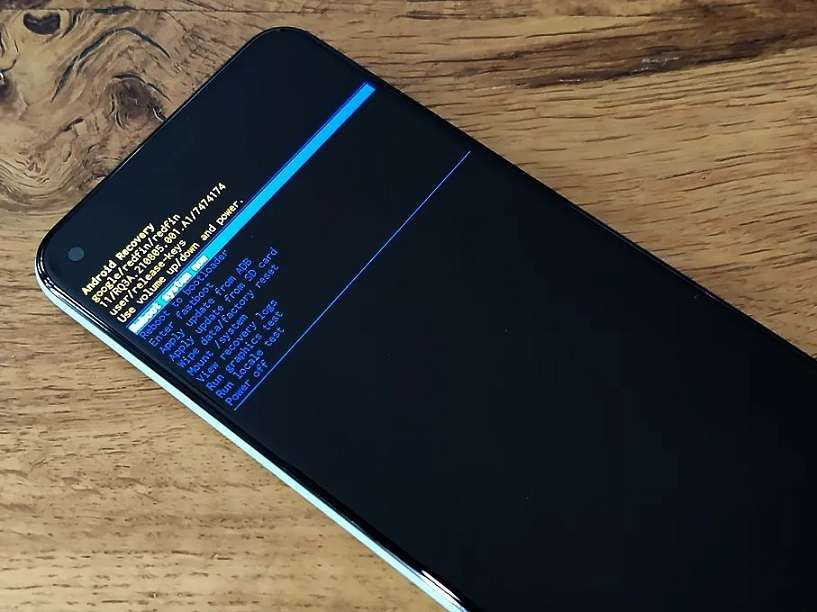
Step 3: Simply wait for the process to complete and wait for your Asus ROG Phone 8 to restart automatically.
F****or iOS Users
Step 1: For iOS users, meanwhile, tap Settings > General > Transfer or Reset iPhone.
Step 2: Next, choose Erase All Content and Settings. Check the list of items you want to remove.

Step 3: Tap Continue and enter your iPhone passcode. A message warns you that the process will delete all media and data and reset all settings.
Step 4: Tap Erase iPhone to confirm. You’ll be asked to type in your Apple ID and password if Find My is active. Enter your password and tap Erase.
Part 3: How To Fix Black Screen Phone With an Alternative
If your phone screen went black but still works and doing the methods above did not solve the issue, you can use Wondershare Dr.Fone for iOS and Android as a last resort. It’s one of the most popular smartphone repair tools today, enabling you to fix all kinds of annoying scenarios. These include black screen, boot loop, white screen of death, bricked iOS or Android device, and more.
 /a>
/a>

Key Features
Dr.Fone – System Repair for iOS and Android has fantastic features you can immediately take advantage of. Here are its key features below.
- Fix all Android and iOS Problems in Minutes
Dr.Fone – System Repair can fix all kinds of issues on your Android/iOS, such as a black screen, white screen of death, screen freeze, boot loop, or recovery mode. All of this can be done within less than 10 minutes to save you precious time.
- Supports up to 1000+ Android Smartphones and the latest iOS
All iOS versions, including the latest iOS 16 and iOS 16 beta, are fully supported by Dr.Fone – System Repair. The app handles all your smartphone issues without data loss to secure your info. On the other hand, if you own an Android, the app supports up to 1000+ Android smartphones, making it highly versatile for Android owners.
Tech Specs
Dr.Fone – System Repair (Android)’s minimum system requirements for your computer are listed below.
| Computer OS | Android |
|---|---|
| Windows 11, 10, 8.1, 8, 7 | Android 2.1 and up to the latest |
Meanwhile, here are the system requirements for Dr.Fone – System Repair (iOS).
| Computer OS | iOS |
|---|---|
| Windows 11, 10, 8.1, 8, 7 | Supports all iOS versions, including the latest iOS 16 and iOS 16 beta |
| macOS 12, 11, 10.15, 10.14, 10.13, 10.12, 10.11, 10.10, 10.9, 10.8 |
Pros and Cons
If you’re still undecided about Dr.Fone – System Repair, here are its pros and cons.
Pros
- Fone – System Repair for iOS and Android has a clutter-free and beginner-friendly user interface. It’s easy to understand and use, so you can start immediately.
- Both the iOS and Android versions finish the repair tasks within less than 10 minutes to save you time.
Cons
- Each version for each OS is sold separately.
- The free version works up to your device’s compatibility. Once you start the repair process, the app will ask you for a valid license key.
How to Fix Black Phone Screen With Dr.Fone – System Repair
Here’s how to fix your phone screen with Dr.Fone – System Repair on iOS/Android.
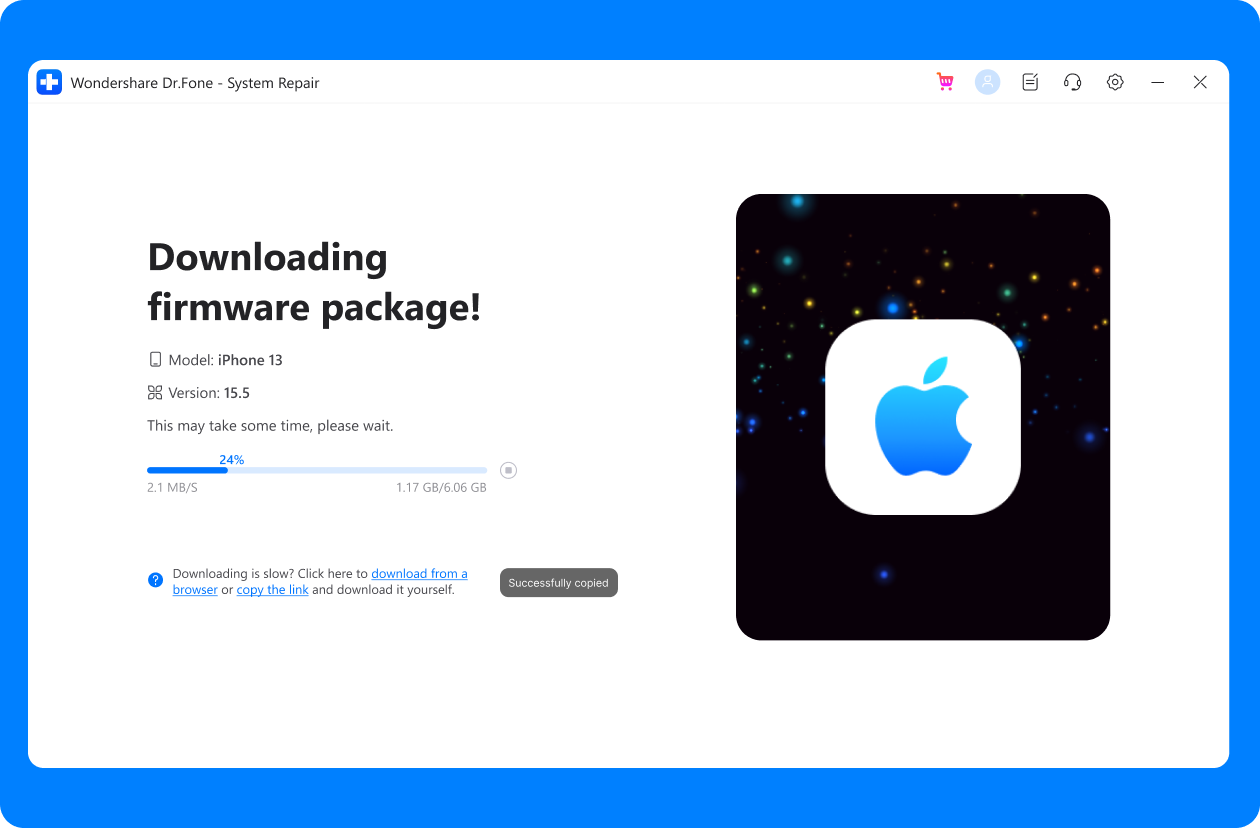
Step 1: Download and install Dr.Fone – System Repair for iOS or Android. Next, open the program and connect your smartphone.
Step 2A (For iOS): Choose the correct model of your iPhone for the program to be able to download the appropriate firmware package.

Step 2B (For Android): Click Start. On the next window, choose the Brand, Name, Model, Country, and Carrier of your smartphone, then click Next.
 OtsAV Radio Webcaster
Step 3: Follow the on-screen instructions provided on the main program window and wait for the repair process to complete.
 Nero Burning ROM:
The ultimate burning program for all your needs!
 safe & secure
4,262,204 people have downloaded it
Conclusion
Our increasing reliance on smartphones has led to amazing advancements in new technologies. However, lingering issues such as your phone screen not turning on or your phone screen being black but still working are ongoing problems to many. That’s why learning how to prevent these events is essential to take care of your smartphone.
Doing all the recommended methods above usually solves the case. If the different fixes don’t work for you, Dr.Fone – System Repair for iOS and Android can help resolve all your problems within less than 10 minutes. You can download it for free on Windows and Mac to test it yourself.
How to Fix Error 495 While Download/Updating Android Apps On Asus ROG Phone 8
Error 495 is a common error that occurs while downloading or updating apps from Google Play Store. This error is usually caused by a problem with the Google Play Store, and it can be fixed by clearing the cache and data of the Google Play Store app. If you are experiencing this error, follow the steps below to fix it.
In this article, you will learn why the Android error 495 pops up, possible solutions to bypass, as well as a dedicated repair tool to radically fix error 495.
We always like to explore every new feature or the features that already exist on our devices. We have a tendency to be the master of our device and want to know every bit of the handset. Unexpected errors ruin that experience and it is just frustrating to experience these errors. And the worst part is that we have no idea where we are wrong or what we did that led to the error. Same is the case with the error 495 which occurs due to downloading or updating of Android Apps. You may have spent countless hours on the internet to find the right solution for error code 495 but even after following many of the most guaranteed steps sometimes the error still doesn’t go away.
However, this article will provide you various methods to get rid of the Error 495 play store problem that you face and you will not have to depend on any other sources for your solution.
Reasons for Google play error 495
Android Apps are most commonly downloaded from the Google Play Store with the help of Wi-Fi or Cellular Data. One may come across many types of errors. Mostly the errors come in during the download or update or installing time. Error 495 occurs when the user isn’t being able to download or install an app over Wi-Fi, but the user is able to do the same thing over cellular data.
Technically speaking, the issue is caused when the connection to the Google Play servers, where the app is hosted, times out. Which is unable to resolve by itself.
Also, there could be another reason that it cannot sync with the servers.
Now that we know the possible reasons for the error 495, let us also know how to get rid of it in the sections below.

Key features:
• Import from any devices and cams, including GoPro and drones. All formats supported. Сurrently the only free video editor that allows users to export in a new H265/HEVC codec, something essential for those working with 4K and HD.
• Everything for hassle-free basic editing: cut, crop and merge files, add titles and favorite music
• Visual effects, advanced color correction and trendy Instagram-like filters
• All multimedia processing done from one app: video editing capabilities reinforced by a video converter, a screen capture, a video capture, a disc burner and a YouTube uploader
• Non-linear editing: edit several files with simultaneously
• Easy export to social networks: special profiles for YouTube, Facebook, Vimeo, Twitter and Instagram
• High quality export – no conversion quality loss, double export speed even of HD files due to hardware acceleration
• Stabilization tool will turn shaky or jittery footage into a more stable video automatically.
• Essential toolset for professional video editing: blending modes, Mask tool, advanced multiple-color Chroma Key
Solution 1: One Click to Fix error 495 by Android Repair
Tried several methods to make the error 495 disappear, but nothing works? Well, many people have experienced the same frustration. The root cause is that something is wrong with the Android system. You need to have your Android system repaired to fix error 495 in this situation.
Note: Having your Android system repaired may lose existing data on your Android. Backup the data on your Android before the Android repair.
Dr.Fone - System Repair (Android)
Best tool for fundamental Android repair in one click
- Fixes all Android system issues like error 495, system UI not working, etc.
- One click for Android repair. No special technics needed.
- Supports all the new Asus ROG Phone 8 devices like Galaxy Note 8, S8, S9, etc.
- Step-by-step on-screen instructions provided to fix error 495 without any hassle.
3,390,486 people have downloaded it
With Dr.Fone - System Repair (Android) , you can easily fix error 495 in few steps. Here is how:
- Download, install, and launch Dr.Fone - System Repair (Android). Connect your Android to your computer with a USB cable.
 SwifDoo PDF Perpetual (2-PC) Free upgrade. No monthly fees ever.
- Select the option “Repair” > “Android Repair”, and click “Start”.

- Select the Asus ROG Phone 8 device information like brand, name, model, etc., and confirm your selection by typing in “000000”.
- Press the stated keys to boot your Android in download mode to download the firmware as instructed.


- After the firmware is downloaded, the program will automatically start to repair your Android.

Solution 2: Clear the Google Service Framework cache to Fix error 495
Step 1:
Go to the “settings” of your device. Once the series of sections comes up, tap on the “APPS” section.
Step 2:
Click on ‘All Apps’ or ‘Swipe to All’ and the open the section named “Google Services Framework App”
 .
.
STEP 3:
Open “App Details” and the screen shown in the image should come up on your device. As shown in the image, follow the three steps. First, tap on “Force Stop” and then second, tap on the “Clear Data” option and finally go ahead and tap on the “Clear Cache” option.
Following the above steps should solve your problem of Google Play Error 495. And you can enjoy back to using the apps which you couldn’t download or update due to the Error 495.
 Epubor Audible Converter for Mac: Download and convert Audible AAXC/AA/AAX to MP3 with 100% original quality preserved.
Solution 3: Reset App Preference in Google play Store to Fix error 495
STEP 1:
Go to the settings section in your device. It will be differently placed for different devices and different users.

STEP 2:
Once the Settings section is open. A lot of further sections will pop up. No find the section named “Application Manager” or “Apps”. After locating it, tap on that section.

STEP 3:
Now go ahead and tap or slide to a section named “ALL”.
STEP 4:
After reaching the “ALL” section tap the touch button to open menu/properties and choose an option named “Reset Apps” or “Reset App Preferences”.
There’s no need to be alarmed because on clicking the reset option, the apps won’t be deleted but it is only going to re-set them. And hence solving the Error 495 created in the Google Play.


Solution 4: Fix Error Code 495 by installing a VPN app
The Error code 495 can be easily removed in another interesting way too. On downloading a Virtual Private Network (VPN) and then operating the play store automatically solves the error 495.
STEP 1:
Install Hideman VPN (using any other VPN will also make it work) from Google Play store. (If the error persists for this app too then download it from a different app store or by using a third-party store).
STEP 2:
Now open the app and select the United States as the country of connection and press the option named Connect.
STEP 3:
Open Google Play Store and Download any app without the Error Code 495 coming in and bothering.
This fix will work for most of the Google Play Errors and not just only The Error Code 495.
Solution 5: Remove your Google Account & Reconfigure it to fix error 495
Removing the Google account and re-configuring it is a very common method adopted to get rid of the Error 495. Adopt the following steps to complete this method.
STEP 1:
Go to the “Settings” section of your device. Like it was mentioned before, different devices and different users will have the placement of the settings section in a different place.

STEP 2:
Go to the accounts section in the settings tab.
 Project Manager - Asset Browser for 3Ds Max

STEP 3:
In the accounts section tap on the Google Account part
STEP 4:
Inside The Google section, there’ll be an option called “Remove Account”. Tap on that section, to remove your google account.

STEP 5:
Now go ahead and re-enter/ re-register your Google account and check if the Error 495 still persists.
Now you have completed all the steps and your problem should be solved.
Solution 6: Fix error code 495 by Removing your Google Play Store Data & Cache
One of the best and most accurate methods in the series of various steps in eradicating the Error Code 495 in Google Play Store is by removing the Google play Store Data and Cache. In order to do so follow the steps mentioned below. After following the steps it is guaranteed that the Error code 495 will be done with and you won’t experience any such problems in the future.
STEP 1:
Go to the “Settings” section into your mobile device. The settings can be accessed by scrolling down and pulling down the drop-down menu and most likely the settings app will be on the top-right corner. Otherwise, it will be found after opening the app drawer.

STEP 2:
Once after opening the settings section, select the “Installed apps” or the “Apps” section.

STEP 3:
Find the “Google Play Store” section and select that too.
STEP 4:
Tap on the “Clear data” & “Clear Cache”.


Doing the above steps will clear your caches of the Google Play Store. Now you have a new google Play store.
Hence in this article, we got to know about the error 495 and the possible solutions to it as well. Also, this article explains how Error code 495 can be removed by 5 different ways. These are the best ways by which you can remove or get rid of the Error Code 495. In case one of the method fails, use the other one to rectify this recurring error 495 on your Asus ROG Phone 8.
- Title: 8 Workable Fixes to the SIM not provisioned MM#2 Error on Asus ROG Phone 8 | Dr.fone
- Author: Ariadne
- Created at : 2024-07-30 08:35:11
- Updated at : 2024-07-31 08:35:11
- Link: https://howto.techidaily.com/8-workable-fixes-to-the-sim-not-provisioned-mm2-error-on-asus-rog-phone-8-drfone-by-drfone-fix-android-problems-fix-android-problems/
- License: This work is licensed under CC BY-NC-SA 4.0.