
8 Workable Fixes to the SIM not provisioned MM#2 Error on Infinix Note 30 5G | Dr.fone
8 Workable Fixes to the SIM not provisioned MM#2 Error on Infinix Note 30 5G
SIM cards are small chips that act as a connecting medium between your cell phone and your carrier. It is programmed to help your carrier identify your cell phone account with certain information. And eventually, you are enabled to make calls and to make use of mobile internet. Now, if your device is showing “SIM not provisioned” on Android then it signifies that the connection to carrier network cannot be established or perhaps, your carrier isn’t able to identify your cell phone account.

Part 1. Why does the error “SIM not provisioned MM#2” pop up?
There can be numerous reasons behind the pop up that reads “SIM not provisioned” on Android. But basically, it most probably affects the users who have registered a new SIM card. If you get to experience this issue in other situations or if the SIM is not working in Android, then the problem is with the SIM card and needs to be replaced. Anyways, here is a list of situations when the “SIM not provisioned” error may bother you.
- You got a new SIM card for your new phone.
- You are transferring your contacts into the new SIM card.
- In case, the carrier network provider’s authorization server is unavailable.
- Perhaps, you’re out of the reach of the carrier coverage area and that too, without active roaming agreement.
- Though new SIM cards work flawlessly. But it is often necessary to get your SIM card activated due to security reasons.
Just in case, you haven’t bought any new SIM card and the one you were using was working fine until now, then the most probable reasons behind it could be listed below:
- If your SIM card is too old, possibly it might have gone dead, try replacing it.
- Perhaps, the SIM card was not properly inserted into the slot or there might be some dirt between the SIM and smartphone pins.
A yet another reason could be that your SIM card got deactivated by your carrier provider as it could have been locked to a particular phone. Now, if you insert such a SIM card to another device or a new device even, you may get to witness a message that reads “SIM not valid”.
2.1 One click to fix the “SIM not provisioned MM#2” error on Android
Without talking any further, let’s straightly get to the first and the easiest way to repair SIM not provisioned issue on Android. For this purpose, we’re glad to introduce Dr.Fone - System Repair (Android) , one of its kind of tool that is capable of repairing almost all sort of Android OS issues in just a matter of few clicks. Whether it is SIM not provisioned on Android or SIM not working in Android or your device stuck in a boot loop or black/white screen of death. The most probable reason for these errors is Android OS corruption. And with Dr.Fone – Repair (Android) you can efficiently and effectively repair your Android OS in a hassle freeway.
Dr.Fone - System Repair (Android)
Android repair tool to fix “SIM not provisioned MM#2” error
- Fix any type of Android system issue with ease.
- Even novice users can use it without any hassle.
- Compatible with all major Infinix Note 30 5G smartphone models.
- Highest success rate in the market for fixing Android issues.
- Supports all Android OS versions.
3981454 people have downloaded it
Step by step Tutorial to fix “SIM not provisioned MM#2” error
Step 1. Connect your Infinix Note 30 5G
Download and launch the Dr.Fone toolkit on your computer and then opt for the “System Repair” option from the main interface. Meanwhile, get your Infinix Note 30 5G connected with the computer using a genuine cable.

Step 2. Opt for Android Repair and key in important information
Now, hit on the “Android Repair” from the 3 options on the left, followed by hitting the “Start” button. From the upcoming screen, you’ll be asked to key in important device-related information, like brand, model, country, and carrier details. Hit “Next” afterward.
 Lyric Video Creator Professional Version

Step 3. Boot your device in Download mode
You must put your device in Download mode for better repairing of your Android OS. Simply follow the onscreen guide to boot your Android in DFU mode and hit “Next” thereafter. Once done, the software will automatically start downloading the most compatible and recent firmware for your device.

Step 4. Initiate Repairing
As soon as the download completes, the software verifies the firmware and automatically initiates repairing your Infinix Note 30 5G. Within a short period, you’ll notice that your Infinix Note 30 5G has been successfully repaired.

 safe & secure
2.2 Ensure the SIM card is not dirty or wet
At times, the issue can be as simple as cleaning your SIM card and SIM slot properly. Ensuring that SIM is not wet either and then putting it back into its place. If this works, then the SIM not working in Android was due to the dirt or moisture that was preventing proper contact between SIM card pins and smartphone circuit.
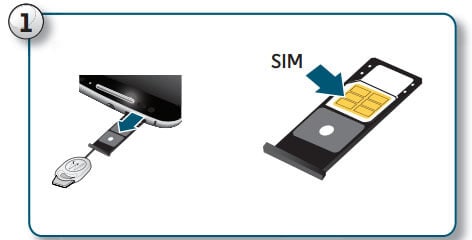
2.3 Insert the SIM card correctly
If your SIM card was working properly until yet, there is a good possibility that the SIM card may have moved a bit from its actual location. Eventually, there is poor contact between the SIM card pins and the circuit. Try inserting your SIM card properly with the following steps.
- Power off your Infinix Note 30 5G and with the help of Q pin, eject the SIM card holder from the SIM slot of your device.
- Now, grab a soft rubber pencil eraser and gently rub it in on the gold pins of SIM card to clean them properly. Then, with the help of a soft cloth wipe away the rubber residue from the SIM card.
- Next, push the SIM back into the SIM card holder properly and push it back into the SIM slot now.
- Turn your device back on and look if your SIM not provisioned on the Android issue is resolved or not.

2.4 Activate the SIM card
Usually, when you buy a new SIM card, it gets automatically activated within 24 hours of being plugged into a new device. But if that’s not happening in your case and you’re wondering how to activate SIM card, make use of the three options below to enable activation:
- Call your carrier service provider
- Send an SMS
- Log on to your carrier’s website and look for the activation page over it.
Note: The aforementioned options are straightforward and are quick ways to enable activation. It depends on your carrier network whether they support them.

2.5 Contact your carrier
Even if your SIM isn’t activated, grab another working device to make a phone call to your carrier or network. Ensure, to explain the entire situation and the error message to them. Be patient while they investigate the issue. It may eat up a heck load of time or may get resolved in a few minutes that completely depend upon the complexity of the issue.

2.6 Try the other SIM card slot
A yet another reason why SIM not working in Android can be because of the SIM card slot might have gone corrupted. Thanks to the dual SIM technology, you do not have to rush immediately to get it to check or repair. You can simply rule out this possibility by ejecting the SIM card from its original SIM slot and then replacing it into the other SIM card slot. If this solution did work out for you then it is obvious that the problem was with the SIM card slot that got corrupted. And hence, it was triggering SIM not responding issue.
2.7 Try the SIM card in other phones
Or just in case, you’ve still no joy and the SIM not provisioned on Android message is bothering you. Try making use of another Android device. Eject the SIM card from the Infinix Note 30 5G device which is creating problems and try plugging it into other Infinix Note 30 5G] and other smartphones. Perhaps, this will let you know whether the issue is with your device only or with the SIM card itself.
2.8 Try a new SIM card
Still, wondering how to fix SIM not provisioned? Perhaps, nothing worked for you, right? Well, on that note, you must head to your carrier store and request a new SIM card. Also, inform them about the “SIM not provisioned MM2” error, they will be able to execute proper diagnostics over your old SIM card and hopefully get it resolved. Or else, they’ll equip you with a brand new SIM card and swap the new SIM card into your device and get it activated in the meantime. Eventually, restoring the normal functioning of your device.
Conclusion
In wrapping up, SIM not provisioned errors on Android can be troubling, but they’re certainly fixable. There are several methods, from a simple device restart to reaching out to your network provider. But if these don’t work, we suggest trying Dr.Fone - System Repair (Android) . This tool is known for its ability to handle an array of Android issues and could be just what your device needs. Navigate your tech challenges with ease using Dr.Fone.
Best Methods for Infinix Note 30 5G Won’t Turn On
The Infinix Note 30 5G 3 boasts numerous impressive features, making it a desirable phone. However, occasional malfunctions can result in the Infinix Note 30 5G 3 won’t turn on issue. This issue can be incredibly frustrating. Don’t panic if you encounter this issue! There exist solutions to rectify it. This comprehensive guide aims to assist you in diagnosing and resolving the problem.
It will offer both basic steps and advanced techniques. With clear instructions and insightful tips, we’ll help troubleshoot your Infinix Note 30 5G 3. Should you encounter this setback, follow this guide diligently to revive your Infinix Note 30 5G 3 and have it up and running again.
Scenario 1. Phone Not Charged
A Infinix Note 30 5G 4 not turning on might simply be a victim of a drained battery due to lack of charging. Several factors could lead to this, including a damaged charging cable or adapter. Moreover, issues with the power source or a malfunctioning charging port can be the issue.
Reason 1. Damaged Charging Cable or Adapter
Solution: Replace the charging cable or adapter with a known working one. Try using a different USB-C cable and adapter to ensure it’s not a faulty connection.
![]()
Reason 2. Faulty Power Source
Solution: Verify the power source by trying different outlets or USB ports. Ensure the power source is functional by testing it with another device.

![]()
Reason 3. Charging Port Issues
Solution: Check the charging port thoroughly to identify any dirt, debris, or signs of damage. Gently clean the port using compressed air or a small brush. If there’s visible damage, consider professional repair services.
 SwifDoo PDF 2-Year Plan
![]()
Scenario 2. Check for Damages
Sometimes, a Infinix Note 30 5G 3 might not turn on due to physical damage incurred by the Infinix Note 30 5G device. Instances such as accidental drops, exposure to water or moisture, or even hardware malfunctions can be the reason. These can cause visible or invisible damage, leading to Infinix Note 30 5G 4 won’t turn on.
Reason 1. Physical Impact or Dropping
Solution: If the Infinix Note 30 5G 3 has experienced a significant impact or drop, inspect the exterior for any visible damage. A cracked screen or internal hardware issue might prevent the Infinix Note 30 5G device from turning on. Consider professional repair services if necessary.
![]()
 CalendarBudget - Monthly subscription membership to CalendarBudget via web browser or mobile app. Support included.
 Reason 2. Water or Moisture Exposure
Solution: If the Infinix Note 30 5G 3 has been exposed to water or moisture, immediately turn it off. Moreover, do not attempt to power it on. Place the Infinix Note 30 5G device in a bowl of uncooked rice or silica gel packets to help absorb moisture. Alternatively, use a vacuum or hairdryer in a cool setting to draw out moisture. It’s crucial to let the Infinix Note 30 5G device dry completely before attempting to power it on.
![]()
 Glarysoft File Recovery Pro Annually - Helps to recover your lost file/data, even permanently deleted data.
Reason 3. Hardware Malfunction
Solution: Check for any hardware malfunction symptoms such as overheating , unusual sounds, or a burnt smell. If any such signs are evident, refrain from attempting to turn on the Infinix Note 30 5G device. You should seek professional assistance from authorized service centers.
![]()

Scenario 3. Buggy Android Smartphone
An Android smartphone, including the Infinix Note 30 5G 3 XL, can encounter situations where the OS becomes extremely buggy. It leads to various issues, such as the Infinix Note 30 5G 3 XL won’t turn on or getting stuck in a boot loop . Software glitches, corrupted system files, or incompatible apps can contribute to such problems.
Reason 1. Device Stuck in the Boot Loop
Solution: Try initiating a force restart to help fix this issue. You can do that by pressing and holding the “Power” and “Volume Up” keys at the same time for 10 seconds.
![]()
Reason 2. Software Glitches or System Crash
Solution: If encountering issues with the Infinix Note 30 5G device not powering on because of software glitches or a system crash, try initiating Safe Mode by simultaneously pressing and holding the ‘Power’ button along with a Volume key. This action will cause the Power menu to be displayed. Here, tap and hold the “Power off” for a while and tap “OK” once the Safe Mode prompt appears.
![]()
Scenario 4. System Glitches? Try Wondershare Dr.Fone as a Prioritized Solution
If you have attempted the solutions mentioned above without success, it is essential to explore a more robust option. This is important if the issue seems to be a major software problem that cannot be resolved using basic troubleshooting methods. In such cases, Wondershare Dr.Fone – System Repair emerges as a viable solution. Besides, It is a perfect fit to address the “Infinix Note 30 5G 4 Not Turning On“ issue effectively.
Dr.Fone is designed to tackle various repairing problems that occur in Android devices. With its comprehensive setup, it can effectively address errors related to the Infinix Note 30 5G. These measures are aligned to meet the specific requirements of your device. This is helpful in minimizing the time needed for troubleshooting.
 vMix Pro - Software based live production. vMix Pro includes everything in vMix 4K plus 8 channels of Replay and 8 vMix Call
Key Features of Wondershare Dr.Fone
- Fone allows you to repair the Android device with just a few clicks. By following the on-screen instructions, you can complete the whole process conveniently.
- It fixes all Android-related problems, including the Black screen of death , the Play Store not working, and more.
- This tool is compatible with all the mainstream Infinix Note 30 5G models, including the latest ones.
Steps Required To Resolve System Glitches via Wondershare Dr.Fone – System Repair
Now, we’ll provide you with a guide to resolve the Not Turning On issue of your Infinix Note 30 5G. Go through the steps mentioned below to use Dr.Fone for the repair process.
- Step 1: Open Dr.Fone and Access System Repair Tool
Starting with, you will have to activate Dr.Fone on your computer and head to the “Toolbar” panel on the left of the window. From there, navigate to the “System Repair” tool and continue with the “Android” device to proceed with the repair process.

 safe & secure
4,082,195 people have downloaded it
- Step 2: Start Android System Repair
In the next step, choose the “Start” button that appears, by which your device will be recognized. You have to put in the “Name, Model, Country, and Carrier” details of the Infinix Note 30 5G device and hit the “Next” option. Then, you need to put your Infinix Note 30 5G on Download Mode following the on-screen instructions.
- Step 3: Utilize the Firmware
Afterward, the firmware will start to download automatically once the Infinix Note 30 5G device enters a Download Mode. You need to select the “Fix Now” button and continue typing in a “000000” code. Then, proceed with the “Confirm” option to install the firmware on your device.

- Step 4: End the System Repair of Android
Lastly, the repair process will get started and can be viewed in a progress bar. Once it ends, hit the “Done” button to conclude the activity, and check your device to see if it starts properly.
 SwifDoo PDF Perpetual (1 PC) Free upgrade. No monthly fees ever.
Scenario 5. Need for a Power Cycle
At times, an Android device, including the Infinix Note 30 5G 3/4, might benefit from a power cycle procedure. This process involves completely refreshing the Infinix Note 30 5G device’s system. It potentially my Infinix Note 30 5G 3 won’t turn on issues, temporary bugs, or system hang-ups. These issues prevent the Infinix Note 30 5G device from turning on or functioning properly.
Reason 1. System Freeze or Unresponsive Device
Solution: If the Infinix Note 30 5G 3/4 is unresponsive or frozen, perform a forced restart by holding down the “Power” and “Volume Up” for about 10 seconds. This action should force the Infinix Note 30 5G device to shut down and reboot, potentially resolving the issue.
![]()
Reason 2. Battery Optimization and Refreshment
Solution: Sometimes, a power cycle helps optimize the Infinix Note 30 5G device’s battery performance and refreshes the system. Allow the Infinix Note 30 5G 3/4 to completely power down, charge it for at least 30 minutes, then attempt to turn it on.
Reason 3. Software Hang-Up or Temporary Glitch
Solution. To shut down your Infinix Note 30 5G 3/4, press and hold the power button, then choose ‘Power Off’ from the menu that appears. After the Infinix Note 30 5G device powers down, wait for about 30 seconds to 1 minute to ensure it has fully shut down before moving forward. Subsequently, press and hold the power button until the Google logo displays to restart your device.
 Any DRM Removal for Mac: Remove DRM from Adobe, Kindle, Sony eReader, Kobo, etc, read your ebooks anywhere.
Scenario 6. Software Damaged? Restore Immediately
When an Android device experiences severe software damage, it can lead to major issues like the Infinix Note 30 5G 3 won’t turn on. This can hinder the functionality of the Infinix Note 30 5G device. It also includes the inability to turn on or persistent system malfunctions. In such cases, performing a complete phone restore becomes a necessary solution:
Reason 1. Corrupted System Files or Firmware Issues
Solution. In cases of severe software damage or corruption of system files, performing a settings reset becomes imperative. It is to restore the Infinix Note 30 5G device to its default settings and resolve underlying issues.
 Simple and intuitive video editing
![]()
Reason 2. Factory Reset as a Solution
Performing a factory reset serves as the ultimate solution. This is true when facing critical software damage that leads to a non-responsive Infinix Note 30 5G 3/4. This process erases all user data, apps, settings, and files stored on the Infinix Note 30 5G device, reverting it to its original factory state.
Steps To Perform a Factory Reset on Infinix Note 30 5G 3/4
- Step 1. Access the “Settings” application on your Infinix Note 30 5G 3/4. Then, navigate through the menu until you locate the “System” category located further down the list. Within the “System” settings, tap the last option named “Reset Options.”
![]()
- Step 2. On the following screen, press the “Erase All Data (Factory Reset)” option. Afterward, follow the on-screen instructions to complete the process.
![]()
Scenario 7. Phone Hangs on Installed App
There are scenarios where a phone, like the Infinix Note 30 5G 3, hangs or gets stuck on a specific installed app. It happens during the startup process, and it can prevent the Infinix Note 30 5G device from turning on properly. This issue often arises due to a malfunctioning or poorly coded app. This app disrupts the Infinix Note 30 5G device’s startup routine, causing Infinix Note 30 5G 4 won’t turn on.
Reason 1. Third-Party Apps Interference
Solution: Start by booting the Infinix Note 30 5G 3 into Safe Mode. This mode disables third-party apps, allowing you to access the Infinix Note 30 5G device without interference from downloaded applications.
 dotConnect for Oracle is an ADO.NET data provider for Oracle with Entity Framework Support.
![]()
Reason 2. Problematic App
Solution: While in Safe Mode, observe if the Infinix Note 30 5G device boots up properly. If it successfully boots, it suggests that a third-party application is causing the problem. To pinpoint the problematic app, uninstall recently added apps individually and restart the Infinix Note 30 5G device after each removal. This process helps pinpoint the problematic app causing the hang during startup.
![]()
Reason 3. Stacked Up App Cache and Data
Solution: If the problematic app is identified, try clearing its cache and data. Go to Settings and then access “Apps.” Within “Apps,” find the Problematic App and tap “Storage & cache.” On the subsequent display, select “Clear cache “ and “Clear storage” to restore the application to its original settings. After restarting the Infinix Note 30 5G device, verify whether the problem persists.
![]()
 Easy GIF Animator is a powerful animated GIF editor and the top tool for creating animated pictures, banners, buttons and GIF videos. You get extensive animation editing features, animation effects, unmatched image quality and optimization for the web. No other GIF animation software matches our features and ease of use, that’s why Easy GIF Animator is so popular.
Reason 4. Outdated Application
Solution: If the application is essential, ensure to seek updates within the Google Play Store. Updating the app to its latest version could potentially resolve any compatibility issues. Alternatively, if updates are not available or don’t resolve the problem, consider uninstalling and reinstalling the app.
![]()
Conclusion
In conclusion, this article has aimed to address the perplexing issue of a Infinix Note 30 5G 3 won’t turn on. It offered a range of solutions depending on different underlying reasons. The guide included basic methods like checking for charging issues and examining hardware damage. Moreover, it included advanced techniques like software repair tools such as Wondershare Dr.Fone.
Users are encouraged to follow the step-by-step instructions outlined here. These solutions can serve as effective remedies for resolving the problem. For more in-depth and advanced solutions, considering Dr.Fone stands as a significant option. It offers a robust system repair feature for resolving intricate software-related issues.
safe & secure
3,673,294 people have downloaded it
What to Do if Google Play Services Keeps Stopping on Infinix Note 30 5G


Is the annoying Google Play Services error constantly popping up on your phone? Is it happening while reading, gaming, or browsing social media?
The error constantly plagues thousands of Android users, and it can be incredibly frustrating when you’re using the phone for something important or doing something entirely unrelated to the Google Play app.
Oddly enough, the “Unfortunately, Google Play Services has stopped.” error isn’t severe – you can fix it with a few general and easy-to-do fixes, a factory reset, or a system repair. Below, you’ll find info about why it’s happening and a list of ten possible solutions.
Why Am I Getting the Message “Google Play Services Keeps Stopping?”
Computers and phones often speak in error codes and apps that stop working. Even minor connectivity issues can cause these problems, leaving you wondering what’s wrong with your device or displaying the “Unfortunately, Google Play Services has stopped working.” error message.
Software errors are another set of problems that can also cause this issue. Namely, an average phone user has at least 40 installed apps, and sometimes these apps don’t play well together. They generate problems or steal resources from each other, such as RAM, causing crashes and errors.
There’s also the issue of wrong app versions. Although each Android phone uses the Android operating system, these systems can be vastly different, and the apps built for them can be made to be phone-specific and only run on a specific phone model.
That’s also the case with Google Play Store and Google Play Services.
Why Google Play Services Keeps Stopping
The Google Play Services keeps stopping error is an infamous one, and it can appear for various reasons and even on brand new phones. However, these causes can be categorized into three groups, which are:
- Network Issues
- Software Errors
- Wrong Play Services Version
Regardless of what’s causing the issue on your phone, we’ve compiled a list of ten possible solutions, and you can find those below.
Solutions to Try When Google Play Services Keeps Stopping
There are many solutions for the issue of Google Play Services that keeps stopping. We’ve listed the most famous and effective ones, and you’ll find them below in no particular order. Try them out and see whether they fix the issue.
1. Do a Factory Reset
A factory reset on any smartphone removes all your data on the phone’s internal storage and can even wipe your SD card clean if you select the option. Before you reset your phone to factory settings, ensure you’ve backed up all your essential apps and files. When you’re ready, you can do a factory reset by following these steps:
Step 1: Go into Settingsand search for “reset.”
Step 2: Choose Factory reset.
Step 3: Tap the Erase all dataor Reset device at the bottom, whichever button is there.
Step 4: Input your password and confirm the action.

Your phone will now restart and start the reset process. Once the factory reset completes, your phone will look brand new, and you’ll need to install all your apps again. Moreover, your Google Play Services app will likely get fixed by this, too.

company, user or members of the same household. Action! - screen and game recorder</a>
2. Update Your System
As keeping your phone’s system and apps updated to the latest possible version is essential and recommended for the best performance and highest efficiency, you can try updating it to see whether it fixes your Google Play Services error. Here’s how:
- Step 1: Open the Settings
- Step 2: Head into System> System update.
- Step 3: If there’s an update available, click it and go through the process of updating your phone’s system.
Restarting your phone after an update, even if it doesn’t restart itself, is highly advisable, ensuring that the new updates apply without issues.
3. Revert to the Previous Version
As we’ve discussed the wrong Play Services versions above, it’s worth noting that sometimes even the developers can make mistakes and roll out the wrong version for your phone. So, if you notice that the phone is getting the error after you’ve updated Google Services or the Play Store, you can quickly revert to the previous version, and here’s how:
- Step 1: Head into Settings> Apps > Google Play Services.
- Step 2: Press the Disablebutton at the bottom of the screen.
- Step 3: Restart the phone, repeat the process by clicking Enablethis time, and restart the phone again.
As these are system apps, you can’t remove them from the phone, and disabling them will only remove the updates, leaving you with a base version that came with your phone out of the box.
4. Uninstall the App’s Updates and Reinstall
Like reverting to the previous version, you can also try reinstalling updates to fix the Google Play Services has stopped working error. The process is similar to the one above, but we’ve still included the steps. Here’s how you can do that:
Step 1: Go into Settings> Apps and find Google Play Services.
Step 2: Tap it and press Uninstall Updatesat the bottom.
Step 3: Exit the Settingsapp and restart the phone.
Step 4: Open the Play Storeapp and head into the app’s settings by clicking your profile icon. Then scroll to the bottom, and tap Settings.
Step 5: Find and tap the Play Store versionto update your Google Play Services.

As you’re already there, you might as well update all other apps after you tap Manage apps & device. That will ensure that older and not-up-to-date apps aren’t causing the issue.
5. Check Storage
Believe it or not, one of the leading causes of the Google Play Services issue is a phone overfilled with apps. Namely, if you have insufficient storage, the Google Play Store app will likely crash and display errors such as “Unfortunately, Google Play Services has stopped working.”
Head into your phone’s Settings and select Storage to see how your phone’s doing storage-wise. Deleting a few apps you don’t use and transferring your photo and video library to a PC is highly advisable if your phone’s storage space lacks gigabytes.
6. Do a System Repair
Although the other solutions here are general fixes that might help, a system repair might take a bit longer but will undoubtedly fix your issue. You can use the Wondershare Dr.Fone app to repair the system and eliminate the annoying “Unfortunately, Google Play Services has stopped working” error.
Moreover, Dr. Fone works on Android and iOS devices and can fix various phone issues, including boot loops, a white screen of death, a stuck phone, etc. That’s why we’ve included a guide on using it for an Android phone issue. Here’s how:
- Step 1: Launch the Wondershare Dr.Fone app on your PC and head into Toolkit> System Repair > Android.

Step 2: Select the type of issue you want to fix > Start.
Step 3: Select the make and model of your phone so that Dr.Fone can find the appropriate Android software.
Step 4: Connect the phone to the PC via a USB cable and follow the on-screen instructions to put the phone into Download Mode. The instructions are available for both phones with and without the home button.


- Step 5: Select the appropriate Android firmware, download it, and hit Fix Nowafter it downloads.


Step 6: Enter the code and hit Confirmto continue the system repair process. When it’s done, click the Done
That’s all it takes to do a system repair with Wondershare Dr.Fone. Give the software a few minutes to complete, during which your phone might restart a few times. Once it’s done, your Google Play Services app will undoubtedly work.
7. Clear Cache
The easiest and the most obvious fix for many Android apps is clearing the app’s cache. Here’s how you can do that for Google Play Services and Google Play Store:
Step 1: Go into Settings> Apps and find the Google Play Store
Step 2: Tap Storageand hit the Clear cache
Step 3: Repeat the process for the Google Play Services

If this doesn’t work, move on to another possible fix.
8. Check Date and Time Settings
Oddly enough, the Google Play Services app is prone to failure because of an incorrectly set time or date. That’s because Google’s servers constantly check these settings before issuing updates to the Infinix Note 30 5G devices, so you’ll need to ensure they’re correct beforehand. Here’s how:
- Step 1: Head into Settings> System > Date & Time.
- Step 2: Ensure that both “**Use network–provided time” and “Use network-provided time zone**” are toggled on.

Key features:
• Import from any devices and cams, including GoPro and drones. All formats supported. Сurrently the only free video editor that allows users to export in a new H265/HEVC codec, something essential for those working with 4K and HD.
• Everything for hassle-free basic editing: cut, crop and merge files, add titles and favorite music
• Visual effects, advanced color correction and trendy Instagram-like filters
• All multimedia processing done from one app: video editing capabilities reinforced by a video converter, a screen capture, a video capture, a disc burner and a YouTube uploader
• Non-linear editing: edit several files with simultaneously
• Easy export to social networks: special profiles for YouTube, Facebook, Vimeo, Twitter and Instagram
• High quality export – no conversion quality loss, double export speed even of HD files due to hardware acceleration
• Stabilization tool will turn shaky or jittery footage into a more stable video automatically.
• Essential toolset for professional video editing: blending modes, Mask tool, advanced multiple-color Chroma Key

- Step 3: If this doesn’t work, you can try repeating the process and manually setting the time and the time zone.
Once you check or change these settings, try using the Google Play Store app and check whether the issue is fixed. Restarting the phone after changing the settings is also highly advisable.
9. Troubleshoot Your Internet Connection
Another regularly overlooked troublemaker is a poor internet connection. That’s because most apps nowadays are meant to work in online mode only, and losing connection or using a bad one interferes with the app’s functionality.
To test the internet connection on your Infinix Note 30 5G, you should open a browser and head to a random internet page to see if it’s opening and whether there are any delays. If it’s working fine, your internet connection isn’t the problem.
10. Adjust Google Play Services Permissions
Although permissions rarely change, they can cause issues if you change them accidentally. These settings can be found in the same place where you would uninstall updates or clear the app’s cache, so you can use some of the steps mentioned above to check them.
Once inside Permission Settings, check whether the Google Play Services and Play Store apps have sufficient permission to do their jobs and whether any required permissions were recently removed. If so, grant these two apps their permissions back.

safe & secure
4,953,228 people have downloaded it
Conclusion
Although it’s an incredibly frustrating error, the “Unfortunately, Google Play Services has stopped” message is more annoying than serious. We’ve explained why it happens, but we’ve also given you a list of solutions to fix it.
Our list includes various fixes, from simple ones, like deleting the app’s cache and ensuring your network works fine, to more serious ones, like doing a factory reset. Alternatively, you can do a system repair with the help of Wondershare Dr.Fone, which will certainly fix the problem, but it might be a bit more complicated than cache deletion.
- Title: 8 Workable Fixes to the SIM not provisioned MM#2 Error on Infinix Note 30 5G | Dr.fone
- Author: Ariadne
- Created at : 2024-07-30 08:36:09
- Updated at : 2024-07-31 08:36:09
- Link: https://howto.techidaily.com/8-workable-fixes-to-the-sim-not-provisioned-mm2-error-on-infinix-note-30-5g-drfone-by-drfone-fix-android-problems-fix-android-problems/
- License: This work is licensed under CC BY-NC-SA 4.0.