
8 Workable Fixes to the SIM not provisioned MM#2 Error on Motorola Moto G13 | Dr.fone
8 Workable Fixes to the SIM not provisioned MM#2 Error on Motorola Moto G13
SIM cards are small chips that act as a connecting medium between your cell phone and your carrier. It is programmed to help your carrier identify your cell phone account with certain information. And eventually, you are enabled to make calls and to make use of mobile internet. Now, if your device is showing “SIM not provisioned” on Android then it signifies that the connection to carrier network cannot be established or perhaps, your carrier isn’t able to identify your cell phone account.
Part 1. Why does the error “SIM not provisioned MM#2” pop up?
There can be numerous reasons behind the pop up that reads “SIM not provisioned” on Android. But basically, it most probably affects the users who have registered a new SIM card. If you get to experience this issue in other situations or if the SIM is not working in Android, then the problem is with the SIM card and needs to be replaced. Anyways, here is a list of situations when the “SIM not provisioned” error may bother you.
- You got a new SIM card for your new phone.
- You are transferring your contacts into the new SIM card.
- In case, the carrier network provider’s authorization server is unavailable.
- Perhaps, you’re out of the reach of the carrier coverage area and that too, without active roaming agreement.
- Though new SIM cards work flawlessly. But it is often necessary to get your SIM card activated due to security reasons.
Just in case, you haven’t bought any new SIM card and the one you were using was working fine until now, then the most probable reasons behind it could be listed below:
- If your SIM card is too old, possibly it might have gone dead, try replacing it.
- Perhaps, the SIM card was not properly inserted into the slot or there might be some dirt between the SIM and smartphone pins.
A yet another reason could be that your SIM card got deactivated by your carrier provider as it could have been locked to a particular phone. Now, if you insert such a SIM card to another device or a new device even, you may get to witness a message that reads “SIM not valid”.
2.1 One click to fix the “SIM not provisioned MM#2” error on Android
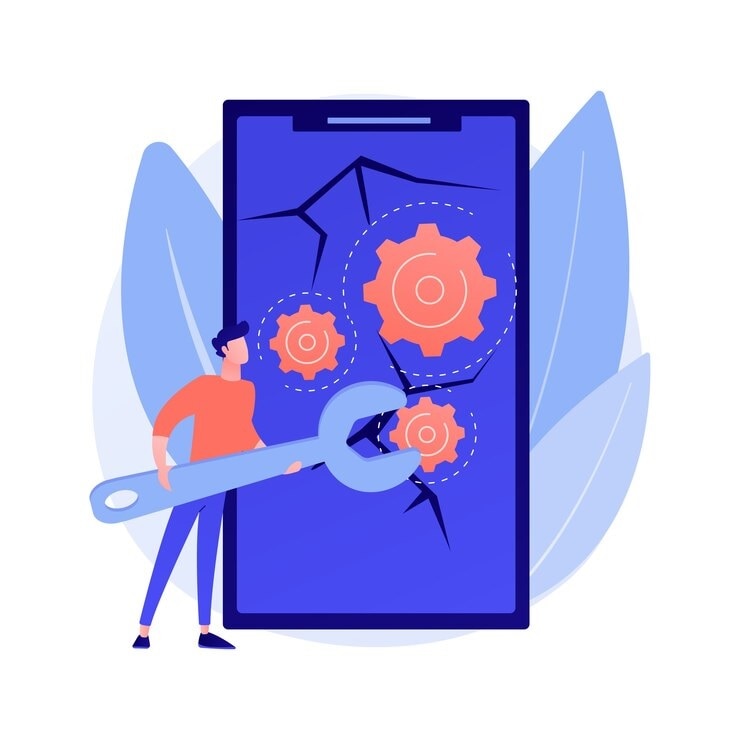
Without talking any further, let’s straightly get to the first and the easiest way to repair SIM not provisioned issue on Android. For this purpose, we’re glad to introduce Dr.Fone - System Repair (Android) , one of its kind of tool that is capable of repairing almost all sort of Android OS issues in just a matter of few clicks. Whether it is SIM not provisioned on Android or SIM not working in Android or your device stuck in a boot loop or black/white screen of death. The most probable reason for these errors is Android OS corruption. And with Dr.Fone – Repair (Android) you can efficiently and effectively repair your Android OS in a hassle freeway.
Dr.Fone - System Repair (Android)
Android repair tool to fix “SIM not provisioned MM#2” error
- Fix any type of Android system issue with ease.
- Even novice users can use it without any hassle.
- Compatible with all major Motorola Moto G13 smartphone models.
- Highest success rate in the market for fixing Android issues.
- Supports all Android OS versions.
3981454 people have downloaded it
Step by step Tutorial to fix “SIM not provisioned MM#2” error
Step 1. Connect your Motorola Moto G13
Download and launch the Dr.Fone toolkit on your computer and then opt for the “System Repair” option from the main interface. Meanwhile, get your Motorola Moto G13 connected with the computer using a genuine cable.
 Easy and Safe Partition Software & Hard Disk Manager

Step 2. Opt for Android Repair and key in important information
Now, hit on the “Android Repair” from the 3 options on the left, followed by hitting the “Start” button. From the upcoming screen, you’ll be asked to key in important device-related information, like brand, model, country, and carrier details. Hit “Next” afterward.
 Jet Profiler for MySQL, Enterprise Version: Jet Profiler for MySQL is real-time query performance and diagnostics tool for the MySQL database server. Its detailed query information, graphical interface and ease of use makes this a great tool for finding performance bottlenecks in your MySQL databases.
Step 3. Boot your device in Download mode
You must put your device in Download mode for better repairing of your Android OS. Simply follow the onscreen guide to boot your Android in DFU mode and hit “Next” thereafter. Once done, the software will automatically start downloading the most compatible and recent firmware for your device.

company, user or members of the same household. Action! - screen and game recorder</a>

Step 4. Initiate Repairing
As soon as the download completes, the software verifies the firmware and automatically initiates repairing your Motorola Moto G13. Within a short period, you’ll notice that your Motorola Moto G13 has been successfully repaired.


 safe & secure
2.2 Ensure the SIM card is not dirty or wet
At times, the issue can be as simple as cleaning your SIM card and SIM slot properly. Ensuring that SIM is not wet either and then putting it back into its place. If this works, then the SIM not working in Android was due to the dirt or moisture that was preventing proper contact between SIM card pins and smartphone circuit.

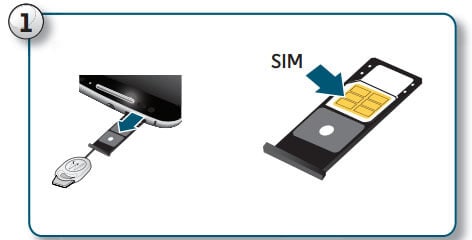
2.3 Insert the SIM card correctly
If your SIM card was working properly until yet, there is a good possibility that the SIM card may have moved a bit from its actual location. Eventually, there is poor contact between the SIM card pins and the circuit. Try inserting your SIM card properly with the following steps.
- Power off your Motorola Moto G13 and with the help of Q pin, eject the SIM card holder from the SIM slot of your device.
- Now, grab a soft rubber pencil eraser and gently rub it in on the gold pins of SIM card to clean them properly. Then, with the help of a soft cloth wipe away the rubber residue from the SIM card.
- Next, push the SIM back into the SIM card holder properly and push it back into the SIM slot now.
- Turn your device back on and look if your SIM not provisioned on the Android issue is resolved or not.
2.4 Activate the SIM card
Usually, when you buy a new SIM card, it gets automatically activated within 24 hours of being plugged into a new device. But if that’s not happening in your case and you’re wondering how to activate SIM card, make use of the three options below to enable activation:
- Call your carrier service provider
- Send an SMS
- Log on to your carrier’s website and look for the activation page over it.
Note: The aforementioned options are straightforward and are quick ways to enable activation. It depends on your carrier network whether they support them.
2.5 Contact your carrier
Even if your SIM isn’t activated, grab another working device to make a phone call to your carrier or network. Ensure, to explain the entire situation and the error message to them. Be patient while they investigate the issue. It may eat up a heck load of time or may get resolved in a few minutes that completely depend upon the complexity of the issue.
 KoolReport Pro is an advanced solution for creating data reports and dashboards in PHP. Equipped with all extended packages , KoolReport Pro is able to connect to various datasources, perform advanced data analysis, construct stunning charts and graphs and export your beautiful work to PDF, Excel, JPG or other formats. Plus, it includes powerful built-in reports such as pivot report and drill-down report which will save your time in building ones.
 It will help you to write dynamic data reports easily, to construct intuitive dashboards or to build a whole business intelligence cockpit.
KoolReport Pro package goes with Full Source Code, Royal Free, ONE (1) Year Priority Support, ONE (1) Year Free Upgrade and 30-Days Money Back Guarantee.
Developer License allows Single Developer to create Unlimited Reports, deploy on Unlimited Servers and able deliver the work to Unlimited Clients.

2.6 Try the other SIM card slot
A yet another reason why SIM not working in Android can be because of the SIM card slot might have gone corrupted. Thanks to the dual SIM technology, you do not have to rush immediately to get it to check or repair. You can simply rule out this possibility by ejecting the SIM card from its original SIM slot and then replacing it into the other SIM card slot. If this solution did work out for you then it is obvious that the problem was with the SIM card slot that got corrupted. And hence, it was triggering SIM not responding issue.

2.7 Try the SIM card in other phones
Or just in case, you’ve still no joy and the SIM not provisioned on Android message is bothering you. Try making use of another Android device. Eject the SIM card from the Motorola Moto G13 device which is creating problems and try plugging it into other Motorola Moto G13] and other smartphones. Perhaps, this will let you know whether the issue is with your device only or with the SIM card itself.

WPS Office Premium ( File Recovery, Photo Scanning, Convert PDF)–Yearly
2.8 Try a new SIM card
Still, wondering how to fix SIM not provisioned? Perhaps, nothing worked for you, right? Well, on that note, you must head to your carrier store and request a new SIM card. Also, inform them about the “SIM not provisioned MM2” error, they will be able to execute proper diagnostics over your old SIM card and hopefully get it resolved. Or else, they’ll equip you with a brand new SIM card and swap the new SIM card into your device and get it activated in the meantime. Eventually, restoring the normal functioning of your device.
 LYRX is an easy-to-use karaoke software with the professional features karaoke hosts need to perform with precision. LYRX is karaoke show hosting software that supports all standard karaoke file types as well as HD video formats, and it’s truly fun to use.
Conclusion
In wrapping up, SIM not provisioned errors on Android can be troubling, but they’re certainly fixable. There are several methods, from a simple device restart to reaching out to your network provider. But if these don’t work, we suggest trying Dr.Fone - System Repair (Android) . This tool is known for its ability to handle an array of Android issues and could be just what your device needs. Navigate your tech challenges with ease using Dr.Fone.
safe & secure
 TubeDigger - online video downloader from mostly any site
Troubleshooting Guide: How to Fix an Unresponsive Motorola Moto G13 Screen

Smart devices have become an integral part of our lives, and Motorola Moto G13 phones are increasingly popular due to their advanced features and affordable prices. These phones offer numerous benefits, including high-quality cameras, fast processors, long-lasting batteries, and sleek designs.
However, like any other electronic device, Motorola Moto G13 phones can sometimes encounter issues that may impede their functionality. One common problem that users face is an unresponsive screen, which can be frustrating and disruptive to daily activities.
This article will discuss some valuable solutions for dealing with Motorola Moto G13 phone screen unresponsiveness. We will provide step-by-step instructions for troubleshooting and getting your phone back in working order. Whether you’re a novice or an experienced user, these tips and tricks will help you navigate this problem and get back to using your phone without any issues. So, let’s dive in and explore how to fix a Motorola Moto G13 phone with an unresponsive screen.
 EmEditor Professional (Lifetime License, non-store app)
What causes the Motorola Moto G13 Screen unresponsive?
The Motorola Moto G13 screen may become unresponsive due to various reasons. Here are some common situations and their possible causes:
During Use/Gaming: The screen may become unresponsive due to overheating when using or gaming on a Motorola Moto G13 phone. This can be caused by running too many apps simultaneously or playing games for an extended period, especially on models such as the Motorola Moto G13 9 Pro, which generates much heat during gaming.
**No Response When Touching the Screen:**Sometimes, the Motorola Moto G13 screen may not respond when touched due to a faulty touch screen or display. This can happen due to physical damage or a manufacturing defect. Some Motorola Moto G13 Nord 2 users have reported this issue.
After Dropping the Phone: If a Motorola Moto G13 phone has been dropped, the screen may become unresponsive due to physical damage or a loose connection. This can happen to any model, including the Motorola Moto G13.
Overheating, physical damage, and manufacturing defects are some common causes of Motorola Moto G13 screen unresponsiveness, which may occur during use/gaming, no response when touching the screen, or after dropping the phone.
The common solutions to solve a Motorola Moto G13 Screen unresponsive
Here are the three most common solutions to deal with phone screens being unresponsive, regardless of the brand:
Restart the Motorola Moto G13 device

Restarting the Motorola Moto G13 device is a simple and quick solution to an unresponsive phone screen. To restart the phone, press and hold the power button until the screen turns off, then press and hold the power button again to turn the phone back on.
Check the Charging Port and Battery
Sometimes, an unresponsive screen can be caused by a dead battery or a faulty charging port. To check for these issues:
Step 1: Plug the phone into a charger and wait for at least 30 minutes to see if the battery charges.
Step 2: Try a different charger or cable to see if the issue is with the charging accessories.
Contact the Pros

If the above solutions don’t work, contacting a professional is best. A trained technician can diagnose and fix the problem. Contact the phone manufacturer or an authorized repair center to get help with your phone.
For different Motorola Moto G13 models, there may be additional solutions to consider:

Check the Phone’s Temperature


Sometimes, a Motorola Moto G13 phone’s screen, specifically Motorola Moto G13 8 Pro, may become unresponsive due to overheating. To check the phone’s temperature:
Step 1: Go to Settings > Battery > Battery Temperature.
Step 2: If the phone is overheating, let it cool down before using it again.
Reset to Factory Settings
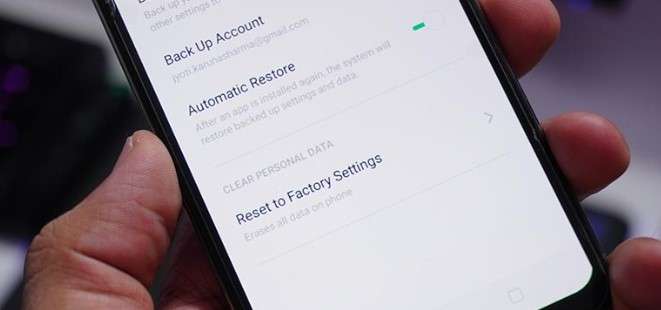
A factory reset may help fix the problem if none of the above solutions work. Note that this will erase all data and settings on the phone, so be sure to back up your data before resetting. To reset the phone:
Step 1: Go to Settings > Additional Settings > Backup and Reset > Erase All Data.
Step 2: Follow the on-screen instructions to reset the phone.
Replace a New Screen

If the phone’s screen is physically damaged or cracked, it may need to be replaced. To replace the screen:
- Contact a professional repair center or the manufacturer for replacement parts and installation.
How to avoid Motorola Moto G13 Screen being unresponsive?
To avoid Motorola Moto G13 screen being unresponsive, here are some suggestions based on the possible causes:

Check Software Updates on Time
Make sure to regularly check for and install software updates on your Motorola Moto G13 phone. These updates often include bug fixes and security patches that can help prevent issues like overheating and screen unresponsiveness.
 /a>
/a>Check Hardware from Time to Time
Regularly inspect your phone’s hardware components such as charging ports, battery, and screen for any signs of damage or wear and tear. If you notice any issues, get them fixed promptly to prevent them from causing further damage.
Avoid extreme temperatures
Keep your Motorola Moto G13 device in a temperature-controlled environment. High temperatures can cause the screen to become unresponsive, and low temperatures can cause it to freeze.
Keep the screen clean
Dirt and debris on the screen can cause it to become unresponsive. Use a microfiber cloth to clean the screen regularly.
 Forex Robotron Basic Package
Reduce the number of running apps
Running too many apps at once can overload the system and cause the screen to become unresponsive. Close any apps you’re not using to free up system resources.
Use Wondershare Dr.Fone to Repair or Manage Your Data
Wondershare Dr.Fone is a helpful tool that can help manage and repair your phone’s data. It can be used to back up your data, transfer files between devices, and even fix issues like an unresponsive screen. Dr.Fone has the DF13 version to be launched, which includes more features to help manage your phone’s data effectively.
By following these suggestions, you can help prevent screen unresponsiveness on your Motorola Moto G13 phone. Download Dr.Fone at https://drfone.wondershare.com/ to manage your phone’s data effectively and fix any issues that may arise.
 safe & secure
Conclusion
Motorola Moto G13 phones offer numerous benefits, including high-quality cameras, fast processors, long-lasting batteries, and sleek designs. However, like any other electronic device, Motorola Moto G13 phones can sometimes encounter issues, such as an unresponsive screen. The causes of an unresponsive screen may include overheating, physical damage, and manufacturing defects.
To deal with an unresponsive screen, users can try restarting the Motorola Moto G13 device, checking the charging port and battery, or contacting a professional. Additional solutions for specific Motorola Moto G13 models include checking the phone’s temperature, resetting to factory settings, or replacing a new screen. To avoid an unresponsive screen, users can check software updates on time, inspect the phone’s hardware, avoid extreme temperatures, keep the screen clean, and reduce the number of running apps. Dr.Fone is a helpful tool that can help manage and repair your phone’s data.
 Power Tools add-on for Google Sheets, Lifetime subscription
Play Store Not Working On Motorola Moto G13? 8 Solutions Inside
A functional Google Play Store is crucial for Android users to access, update, and install apps. Unfortunately, common issues like your Google Play Store not working can disrupt this experience. If you find your Play Store misbehaving more often than not, don’t fret.
In this guide, discover reliable solutions when your Google Play Store is not responding. The article will teach you how to tackle these problems and ensure a seamless app experience. Don’t let technical glitches hinder your digital journey—follow these troubleshooting steps for a swift resolution. Explore the page below to learn more.

Part I. 7 Common Google Play Store Issues Users Encounter
The Google Play Store serves as the epicenter for Android users. It facilitates seamless access to a vast array of apps. However, encountering issues with the platform can impact the functionality of your device. Below are 7 common issues on why your Google Play Store is not responding.
Inability To Open the Play Store
The inability to open the Play Store leaves you without access to new apps or updates. The issue is often accompanied by error messages, which can leave you scratching your head.
Crashing Issues
Frequent crashes undermine the stability of the Play Store. Users attempting to browse or download apps may find themselves abruptly kicked out of the application. It can disrupt your intended tasks and cause annoyance in the long run.

Not Responding Errors
The dreaded “Not Responding” message can bring usability to a standstill. Users navigating the Play Store may experience delays or complete unresponsiveness. It can lead to a frustrating and unproductive experience.
Download and Installation Failures
When downloads and installations fail, you will be unable to enjoy new apps or updates. This issue can be annoying when trying to access crucial software improvements or security updates.
Authentication and Account Issues
Problems with authentication and account access can lock users out of their Google accounts on the Play Store. It prevents users from purchasing or downloading apps. The issue not only hampers functionality but also raises security concerns.
Update Problems
Difficulties in updating apps can leave users with outdated software. It can potentially compromise security and miss out on new features. The issue diminishes the user experience by depriving you of the latest enhancements.
Connection and Network Errors
Persistent connection and network errors impede the Play Store’s ability to fetch data. It hinders users from browsing and downloading apps. The issue is frustrating in areas with unstable internet connectivity.
Part II. Why Does the Google Play Store Keep Stopping?
If you’re wondering why does Google Play Store keeps stopping on your phone, there can be several factors. Here are some of them below.
 Simple and intuitive video editing
- **Network issues.**Unstable or poor internet connections can disrupt the communication between the Motorola Moto G13 device and the Play Store. It can lead to frequent crashes.
- **Outdated Play Store version.**Running an outdated version of the Play Store may result in compatibility issues. The lack of essential updates can cause the application to stop unexpectedly.
- Cache and data accumulation. Over time, cached data and accumulated data in the Play Store can become corrupted. It can hinder the smooth operation of your phone and contribute to sudden stops.
- Google account problems. Authentication issues, incorrect credentials, or other problems with the linked Google account can disrupt the Play Store’s functionality. This can also lead to repeated crashes.
- **System glitches and bugs.**Inherent glitches and bugs within the Android operating system may affect the Play Store’s performance. They can cause your device to stop unexpectedly.
Part III.7 Quick Solutions To Resolve Play Store Not Working Issues
Encountering issues with the Google Play Store can be frustrating. It disrupts your ability to download, update, or access essential apps. Here are seven quick solutions when your Google Play Store unfortunately has stopped.
Clear Cache and Data
Revitalize your Google Play Store by addressing performance issues. Clearing cache and data can be a crucial step when troubleshooting malfunctions or glitches in the app. Here’s how.
- Step 1: Head to your device’s Settings and navigate to Apps or Application Manager.
- Step 2: Locate and select Google Play Store. Within Storage, choose Clear Cache and Clear Data. Confirm your action and restart the Play Store.

Update Play Store
Enhance your Play Store’s functionality by ensuring it’s up-to-date. This method suits those who haven’t updated their Google Play Store for a long time. Follow the steps below.
- Step 1: Open the Play Store app and tap the three horizontal lines in the top-left corner to access the menu.
- Step 2: Select Settings and scroll down to find the Play Store version. Install any available updates.

Check Internet Connection
Ensure a stable internet connection on your device. Switch between Wi-Fi and mobile data to identify connectivity issues. Restart your router or modem if problems persist.
Reset App Preferences
Restore your device’s app settings to default for improved functionality. Below are the steps.
- Step 1: Go to your device’s Settings and select Apps or Application Manager.
- Step 2: Tap the three dots in the top-right corner and choose Reset app preferences.

Re-add Google Account
Resolve Play Store issues by re-adding your Google account. Follow these steps in Settings to remove and re-add your Google account, ensuring a seamless and error-free experience.
- Step 1: Navigate to Settings and choose Accounts or Users & Accounts.
- Step 2: Select Google and remove the account. Re-add the Google account and verify if the Play Store functions properly.

Uninstall Play Store Updates
This method troubleshoots Play Store problems by uninstalling updates. Here’s how.
- Step 1: Access Settings and go to Apps or Application Manager.
- Step 2: Find Google Play Store and tap on Uninstall Updates. Confirm the action and restart the Play Store.

Perform a System Update
Ensure your device’s overall stability by performing a system update to ensure the stable operation of the Play Store. Follow the steps below.
- Step 1: Access Settings, scroll down, and select System or Software Update.
- Step 2: Next, choose System update or Check for Updates and install any available system updates**.**

If you’re still asking yourself why my Google Play Store is not opening after conventional methods prove ineffective, it may lead you to explore third-party tools. As a final recourse, considering reputable tools like Wondershare Dr.Fone - System Repair introduces a fresh approach to troubleshooting your device.
Part IV. How To Repair Play Store Not Working With an Alternative
Repairing your Google Play Store can be swift and effective with Dr.Fone - System Repair. This tool offers advanced features to diagnose and fix various system issues without the advanced skills required. It provides a quick and efficient resolution for a malfunctioning Google Play Store. Follow these three simple steps to get started:
- Step 1: Begin by downloading and installing Dr.Fone - System Repair (Android) on your computer.
Parental Control Software
safe & secure4,207,329 people have downloaded it
- Step 2: Launch the program and connect your Motorola Moto G13 to the computer using a USB cable. Choose the Motorola Moto G13 device type and click Start to initiate the repair process.

- Step 3: Dr.Foneshould automatically detect the brand of your device. Next, choose the Name, Model, Country, and Carrier. Tick the checkmark and click Next to continue. Follow the on-screen instructions and wait for the repair process to complete.
 SwifDoo PDF Perpetual (2-PC) Free upgrade. No monthly fees ever.
- Step 4: Simply click Done on the prompt window displaying a confirmation message to exit the tool if your Motorola Moto G13 starts successfully. In the event that the Motorola Moto G13 device fails to start, select Try Again to initiate the process once more.
Bonus: What Else Can Dr.Fone - System Repair Do?
Beyond its utility in fixing Google Play Store malfunctions, Dr.Fone is known for its user-friendly interface and high success rate. Its ability to address a wide range of Android issues offers a comprehensive solution to various system-related problems. Below are the platform’s key highlights.
Key Features
- Fixes diverse Android issues. Dr.Fone - System Repair excels in resolving a multitude of Android problems. This includes a black screen, a boot loop, and bricked Android devices. Its comprehensive approach ensures you can rely on a single tool to tackle a wide range of system-related issues.
- Support for over 1000 Android models. Dr.Fone supports over 1000 Android models. The broad coverage ensures diverse devices can use the software to troubleshoot and repair their Android systems.
- User-Friendly interface. Dr.Fone is designed with simplicity in mind. It offers an easy-to-use interface that caters to both novice and experienced users.
- High success rate. The software boasts a high success rate in resolving Android issues. Its effectiveness in tackling various problems has garnered trust among users. It’s one of the go-to solutions for those seeking reliable and efficient system repairs.
safe & secure
4,131,376 people have downloaded it
Conclusion
Addressing issues when your Google Play Store does not work is crucial for an uninterrupted Android experience. Follow the outlined steps to regain control and enjoy a seamless app experience. Don’t let frustrations linger; take immediate action for a hassle-free Google Play Store.
Lastly, having Dr.Fone - System Repair at your side offers a reliable solution for a wide range of Android concerns. Don’t worry if your Google Play store is not responding, and Dr.Fone can fix it in minutes.
- Title: 8 Workable Fixes to the SIM not provisioned MM#2 Error on Motorola Moto G13 | Dr.fone
- Author: Ariadne
- Created at : 2024-07-30 08:37:11
- Updated at : 2024-07-31 08:37:11
- Link: https://howto.techidaily.com/8-workable-fixes-to-the-sim-not-provisioned-mm2-error-on-motorola-moto-g13-drfone-by-drfone-fix-android-problems-fix-android-problems/
- License: This work is licensed under CC BY-NC-SA 4.0.