
8 Workable Fixes to the SIM not provisioned MM#2 Error on Vivo S18e | Dr.fone
8 Workable Fixes to the SIM not provisioned MM#2 Error on Vivo S18e
SIM cards are small chips that act as a connecting medium between your cell phone and your carrier. It is programmed to help your carrier identify your cell phone account with certain information. And eventually, you are enabled to make calls and to make use of mobile internet. Now, if your device is showing “SIM not provisioned” on Android then it signifies that the connection to carrier network cannot be established or perhaps, your carrier isn’t able to identify your cell phone account.
Part 1. Why does the error “SIM not provisioned MM#2” pop up?
There can be numerous reasons behind the pop up that reads “SIM not provisioned” on Android. But basically, it most probably affects the users who have registered a new SIM card. If you get to experience this issue in other situations or if the SIM is not working in Android, then the problem is with the SIM card and needs to be replaced. Anyways, here is a list of situations when the “SIM not provisioned” error may bother you.
- You got a new SIM card for your new phone.
- You are transferring your contacts into the new SIM card.
- In case, the carrier network provider’s authorization server is unavailable.
- Perhaps, you’re out of the reach of the carrier coverage area and that too, without active roaming agreement.
- Though new SIM cards work flawlessly. But it is often necessary to get your SIM card activated due to security reasons.
Just in case, you haven’t bought any new SIM card and the one you were using was working fine until now, then the most probable reasons behind it could be listed below:
- If your SIM card is too old, possibly it might have gone dead, try replacing it.
- Perhaps, the SIM card was not properly inserted into the slot or there might be some dirt between the SIM and smartphone pins.
A yet another reason could be that your SIM card got deactivated by your carrier provider as it could have been locked to a particular phone. Now, if you insert such a SIM card to another device or a new device even, you may get to witness a message that reads “SIM not valid”.
2.1 One click to fix the “SIM not provisioned MM#2” error on Android
Without talking any further, let’s straightly get to the first and the easiest way to repair SIM not provisioned issue on Android. For this purpose, we’re glad to introduce Dr.Fone - System Repair (Android) , one of its kind of tool that is capable of repairing almost all sort of Android OS issues in just a matter of few clicks. Whether it is SIM not provisioned on Android or SIM not working in Android or your device stuck in a boot loop or black/white screen of death. The most probable reason for these errors is Android OS corruption. And with Dr.Fone – Repair (Android) you can efficiently and effectively repair your Android OS in a hassle freeway.
Dr.Fone - System Repair (Android)
Android repair tool to fix “SIM not provisioned MM#2” error
- Fix any type of Android system issue with ease.
- Even novice users can use it without any hassle.
- Compatible with all major Vivo S18e smartphone models.
- Highest success rate in the market for fixing Android issues.
- Supports all Android OS versions.
3981454 people have downloaded it
Step by step Tutorial to fix “SIM not provisioned MM#2” error
Step 1. Connect your Vivo S18e
Download and launch the Dr.Fone toolkit on your computer and then opt for the “System Repair” option from the main interface. Meanwhile, get your Vivo S18e connected with the computer using a genuine cable.
 PDF application, powered by AI-based OCR, for unified workflows with both digital and scanned documents.
Step 2. Opt for Android Repair and key in important information
Now, hit on the “Android Repair” from the 3 options on the left, followed by hitting the “Start” button. From the upcoming screen, you’ll be asked to key in important device-related information, like brand, model, country, and carrier details. Hit “Next” afterward.

Step 3. Boot your device in Download mode
You must put your device in Download mode for better repairing of your Android OS. Simply follow the onscreen guide to boot your Android in DFU mode and hit “Next” thereafter. Once done, the software will automatically start downloading the most compatible and recent firmware for your device.

Step 4. Initiate Repairing
As soon as the download completes, the software verifies the firmware and automatically initiates repairing your Vivo S18e. Within a short period, you’ll notice that your Vivo S18e has been successfully repaired.


 safe & secure
2.2 Ensure the SIM card is not dirty or wet
At times, the issue can be as simple as cleaning your SIM card and SIM slot properly. Ensuring that SIM is not wet either and then putting it back into its place. If this works, then the SIM not working in Android was due to the dirt or moisture that was preventing proper contact between SIM card pins and smartphone circuit.
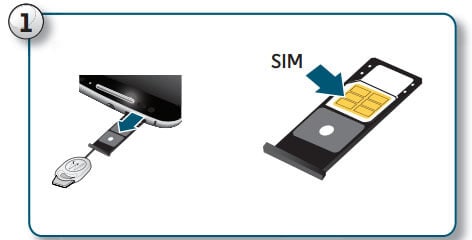
2.3 Insert the SIM card correctly
If your SIM card was working properly until yet, there is a good possibility that the SIM card may have moved a bit from its actual location. Eventually, there is poor contact between the SIM card pins and the circuit. Try inserting your SIM card properly with the following steps.
- Power off your Vivo S18e and with the help of Q pin, eject the SIM card holder from the SIM slot of your device.
- Now, grab a soft rubber pencil eraser and gently rub it in on the gold pins of SIM card to clean them properly. Then, with the help of a soft cloth wipe away the rubber residue from the SIM card.
- Next, push the SIM back into the SIM card holder properly and push it back into the SIM slot now.
- Turn your device back on and look if your SIM not provisioned on the Android issue is resolved or not.
2.4 Activate the SIM card
Usually, when you buy a new SIM card, it gets automatically activated within 24 hours of being plugged into a new device. But if that’s not happening in your case and you’re wondering how to activate SIM card, make use of the three options below to enable activation:
- Call your carrier service provider
- Send an SMS
- Log on to your carrier’s website and look for the activation page over it.
Note: The aforementioned options are straightforward and are quick ways to enable activation. It depends on your carrier network whether they support them.
 Greeting Card Builder
2.5 Contact your carrier
Even if your SIM isn’t activated, grab another working device to make a phone call to your carrier or network. Ensure, to explain the entire situation and the error message to them. Be patient while they investigate the issue. It may eat up a heck load of time or may get resolved in a few minutes that completely depend upon the complexity of the issue.

A yet another reason why SIM not working in Android can be because of the SIM card slot might have gone corrupted. Thanks to the dual SIM technology, you do not have to rush immediately to get it to check or repair. You can simply rule out this possibility by ejecting the SIM card from its original SIM slot and then replacing it into the other SIM card slot. If this solution did work out for you then it is obvious that the problem was with the SIM card slot that got corrupted. And hence, it was triggering SIM not responding issue.
2.7 Try the SIM card in other phones
Or just in case, you’ve still no joy and the SIM not provisioned on Android message is bothering you. Try making use of another Android device. Eject the SIM card from the Vivo S18e device which is creating problems and try plugging it into other Vivo S18e] and other smartphones. Perhaps, this will let you know whether the issue is with your device only or with the SIM card itself.
2.8 Try a new SIM card
Still, wondering how to fix SIM not provisioned? Perhaps, nothing worked for you, right? Well, on that note, you must head to your carrier store and request a new SIM card. Also, inform them about the “SIM not provisioned MM2” error, they will be able to execute proper diagnostics over your old SIM card and hopefully get it resolved. Or else, they’ll equip you with a brand new SIM card and swap the new SIM card into your device and get it activated in the meantime. Eventually, restoring the normal functioning of your device.
Conclusion
In wrapping up, SIM not provisioned errors on Android can be troubling, but they’re certainly fixable. There are several methods, from a simple device restart to reaching out to your network provider. But if these don’t work, we suggest trying Dr.Fone - System Repair (Android) . This tool is known for its ability to handle an array of Android issues and could be just what your device needs. Navigate your tech challenges with ease using Dr.Fone.
safe & secure
How to Exit Android Factory Mode On Vivo S18e?
You’ve often heard that recovery mode will solve just about any problem your Vivo S18e is experiencing. This is mostly true and one of the components of Android’s recovery mode, factory mode or factory reset is one of the most efficient ways to solve various problems on your device. While factory mode is often a good thing, there are times when your device can enter factory mode on its own. Other times, you can safely enter factory mode but not know how to get out.
Fortunately for you, this article will explain all aspects of factory mode and especially how to safely exit factory mode.
Part 1. What is Android Factory Mode?
Factory mode or what is commonly known as factory reset is one of the options available for you when your Vivo S18e is in recovery mode. Several options are available for you once you enter Recovery mode on your device but few are as effective as the wipe data/ factory reset option. This option is useful in solving a whole host of problems that your device could be experiencing.
If you have been using your Vivo S18e for a while now and its performance to be less than ideal, a factory reset might be a good solution. That is however not the only problem a factory reset or factory mode can solve. It will also work for a number or Android errors that you may experience, problems caused by faulty firmware updates and also tweaks made on your device that may not have worked as expected.
It is however important to note that a factory reset or factory mode does often result in the loss of all your data. Therefore a backup is necessary to protect against this data loss risk.

Part 2. Backup your Android Device First
Before we can see how to safely enter and exit factory mode, it is important to have a full backup of your device. We mentioned that a factory mode will likely erase all the data on your device. A backup will ensure that you can get your phone back to its original state before the factory mode.
In order to do a full and complete backup of your device you need to have a tool that will not only ensure that you backup everything on your device but one that makes it easy for you to accomplish this. One of the best tools in the market is Dr.Fone - Backup & Resotre (Android) . This software is designed to enable you to create a full backup of your device.
Dr.Fone - Backup & Restore (Android)
Flexibly Backup and Restore Android Data
- Selectively backup Android data to computer with one click.
- Preview and restore backup to any Android devices.
- Supports 8000+ Android devices.
- There is no data lost during backup, export or restore.
3,428,803 people have downloaded it
Follow these very simple steps to use this MobileTrans Phone Transfer software to create a full backup of your device.
Step 1. Launch Dr.Fone on your computer and choose “Backup & Restore”
Run the software on your computer and you can see all features displayed in the primary window. Choose this one: Backup & Restore. It allows you to get your device backed up entirely with one click.
Step 2. Plug in with your device
Then plug in with your device to the computer. When your devic is detected, click on Backup.

Step 3. Select the file types to backup
The program will display all the file types it can support to backup. Just select the ones you would like to backup and hit Backup.

Step 4. Start backing up your device to the computer
After choosing the file’s type for backup, click “Backup” to begin backing up your device to your computer. It will take you a few minutes, depending on the storage of the data.


Note: You can use the feature of “Restore From Backup” to restore the backup file to your device, when you have the need later.

Part 3: One Click Solution to fix Android stuck in factory mode
From the above parts, you are well aware about what is factory mode. As we discussed, this mode fixes most troubles with Android devices.
But for situations when your Vivo S18e gets stuck in this very same factory mode, the most feasible solution for you is Dr.Fone - System Repair (Android) . This tool fixes all Android system issues including unresponsive or bricked device, stuck on Vivo S18e logo or factory mode or blue screen of death with a single click.
Dr.Fone - System Repair (Android)
One click fix to Android stuck in factory mode
- You can easily fix your Android stuck in factory mode with this tool.
- The one-click solution’s ease of operation is appreciable.
- It has carved a niche being the first Android repair tool in the market.
- You don’t need to be a pro in technology to use this program.
- It is compatible with all latest Vivo S18e devices like Galaxy S9.
3,645,867 people have downloaded it
In this part we will explain how to exit Android recovery mode using Dr.Fone - System Repair (Android) . Prior to proceeding, you got to remember that device backup is paramount to keep your data safe. This process might erase your Vivo S18e data.
Phase 1: Ready your device and connect it
Step 1: Installation completion needs to be followed by running Dr.Fone on your system. Over the program window, tap ‘Repair’ afterwards and get the Android device connected.
Step 2: Select the ‘Android Repair’ option from the list to fix Android stuck in factory modeissue. Hit the ‘Start’ button soon after.


Step 3: Select Android device details on the Vivo S18e device information window, followed by tapping the ‘Next’ button.
Step 4: Enter ‘000000’ for confirmation then proceed.

Phase 2: Get in ‘Download’ mode for repairing the Android device
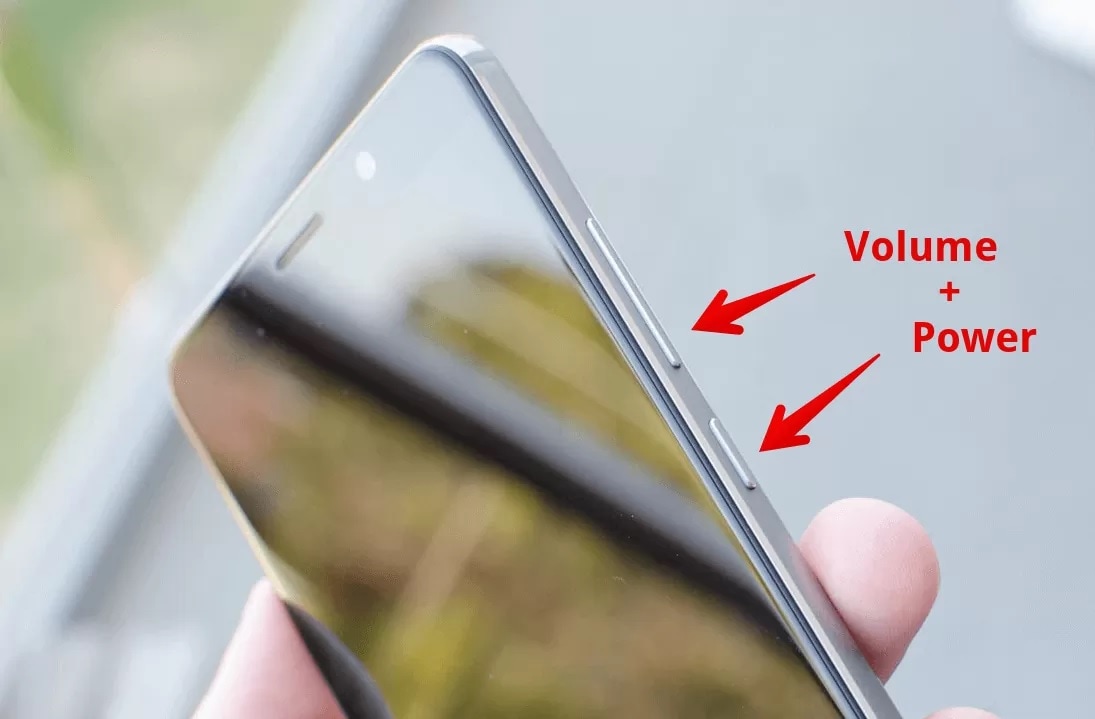
Step 1: It’s important to put the Android device in ‘Download’ mode, here are the steps to do so –
- On a ‘Home’ button-less device – turn off the Vivo S18e device and push down the ‘Volume Down’, ‘Power’ and ‘Bixby’ buttons for about 10 seconds and un-hold. Now, hit the ‘Volume Up’ button to get into ‘Download’ mode.


- For a device with ‘Home’ button – switch it off and hold down the ‘Power’, ‘Volume Down’ and ‘Home’ buttons together for 10 seconds and release. Click the ‘Volume Up’ button for entering ‘Download’ mode.

Step 2: Press ‘Next’ for initiating firmware downloading.
Step 3: Dr.Fone –Repair (Android) starts Android repair as soon as download and verification of firmware is done. All Android issues along with Android stuck in factory mode will be fixed now.

company, user or members of the same household. Action! - screen and game recorder</a>
Part 4. Common Solutions to Exit Factory Mode on Android
Having a backup of all your data will eliminate the risk of losing any of your data. You can now safely exit factory mode using one of the 2 methods below. These two methods will work on a rooted device.
Method 1: Using “ES File Explorer”
To use this method, you will need to have installed file explorer on your device.
Step 1: Open “ES File Explorer” and then press the icon on the top left corner
Step 2: Next, go to “Tools” and then turn on “Root Explorer”
Step 3: Go to Local> Device> efs> Factory App and then open factorymode as text in the “ES Note Editor” Turn it ON
Step 4: Open keystr as text in the “ES Note Editor” and change it to ON. Save it.
Step 5: Reboot the Vivo S18e device

Method 2: Using Terminal Emulator
Step 1: Install Terminal emulator
Step 2: Type “su”
Step 3: Then Type the following;
rm /efs/FactoryApp/keystr
rm /efs / FactoryApp/ Factorymode
Echo –n ON >> / efs/ FactoryApp/ keystr
Echo –n ON >> / efs/ FactoryApp/ factorymode
chown 1000.1000/ efs/FactoryApp/keystr
chown 1000.1000/ efs/FactoryApp/ factorymode
chmod 0744 / efs/FactoryApp/keystr
chmod 0744 / efs/ FactoryApp/ factorymode
reboot
You can also exit factory mode on unrooted device by going to Settings> Application manager> All and the search for Factory Test and “Clear Data”, “Clear Cache”
As much as factory mode can be a useful solution to a number of problems, it can be quite annoying when it pops up unexpectedly. Now you are equipped with 2 effective solutions to help you safely exit factory mode if ever you find yourself in this situation.
How To Restore a Bricked Vivo S18e Back to Operation
In moments of lag or freezing on your Android, you might brick Your Vivo S18e, which can be unsettling. This is more than just the loss of a device. A bricked cell phone also involves potential data erasure. Yet, it’s crucial to understand the true implications of a bricked phone. This page tackles how to address the issue of a bricked Android phone.
This comprehensive guide aims to the reasons behind Android phones becoming bricked. By reading below, you’ll learn effective methods to unbrick a mobile phone without the risk of data loss.


Part 1. What are Brick Phones: At a Glance
The term “bricked phone“ is used when a device becomes non-functional. This is typically due to a critical software or firmware error. There are two distinct scenarios for encountering a bricked phone: a soft brick and a hard brick.
- Soft Brick. A soft brick entails a phone that’s not operational due to software glitches or conflicts but is not irreparable.
- Hard Brick.A hard brick signifies a more dire situation. This is where the phone becomes inoperable, resembling an actual brick in terms of functionality.
The Common Causes of a Cell Phone Bricking
Below are the common causes why a cell phone bricks.
Failed Updates
When a firmware or system update fails, it can lead to a bricked phone. Updates involve intricate changes to the phone’s software. If interrupted or incompatible, the Vivo S18e device may get stuck in a state of partial functionality. This can result in a soft brick.
Failed Flashing
Flashing involves installing custom firmware or software onto a device. If the flashing process is interrupted or if the firmware used is not compatible with the Vivo S18e device’s hardware, it can cause a hard brick. The device’s essential software components may become corrupted, rendering the phone unusable.
Rooting
Rooting, which grants users superuser access to their device’s OS, can lead to bricking if not done right. Rooting often involves making deep system changes, and errors can disrupt the phone’s core functionality.
Installing Bad Apps
Installing malicious, incompatible, or poorly coded apps can lead to a soft brick situation. In severe cases, they can trigger a boot loop or render the phone unresponsive.
Others
Several less common factors can also contribute to bricking. Overclocking, attempting to modify the bootloader, or tampering with system files can lead to disastrous consequences. Hardware issues, such as faulty memory or battery problems, might also manifest as bricked devices.
Part 2. Unbricking Methods and Tools
Below are solutions that you can employ to fix various brick phone scenarios.

Reverting Android Device to Factory Defaults (Soft Brick)
A universal approach to trying to recover a brick phone exists for all Android phones. This is, consider restoring your device to its factory settings. You can find instructions specific to your phone model online. Although this procedure erases all your data, it’s possible to regain the use of your brick phone.

Get in Touch With the Manufacturer (Hard Brick and Soft Brick)
Normally, smartphone warranties span from 1 to 2 years. If your phone remains unrooted and falls within that coverage period, consider reaching out to the manufacturer. This direct approach could lead to your phone being repaired or replaced with a new one at no cost to you.
Seek Professional Assistance (Hard Brick and Soft Brick)
When your phone falls outside the warranty coverage, consider seeking help from a reputable repair shop. However, be aware that any lost data cannot be attributed to their efforts. Fortunately, you can recover lost data using reliable data recovery software once your phone is operational again.

Use a Dedicated App To Fix Bricked Mobile Phones (Hard Brick and Soft Brick)
Among the array of tools designed for unbricking and recovery, one standout is Wondershare Dr.Fone - System Repair (Android). With an exceptional recovery rate, it stands out as one of the top contenders for data retrieval. Its performance is notable when applied to modern brick phones, making it a highly effective choice for these devices.
Part 3. Unbricking Mobile Phones With Dr.Fone - System Repair (Android)
Dr.Fone - System Repair (Android) empowers you to resolve a range of prevalent Android problems. This Android repair tool eliminates the need to hunt for suitable firmware to flash your phone. By utilizing Dr.Fone – System Repair (Android), you can recover data on Your Vivo S18e with a few clicks.
 Lyric Video Creator Professional Version

 OtsAV Radio Webcaster
 safe & secure
4,039,461 people have downloaded it
Key Features
Below are some of the standout features of Dr.Fone - System Repair (Android)
Address Android Challenges Like a Professional
From common scenarios like black screens and boot loops to even bricked Android devices, this tool has you covered. Dr.Fone has simplified the process so that anyone can fix Android problems.
Support for Over 1000 Android Models
This software is designed to fix glitches including most modern Android devices. Whether your Vivo S18e is an unlocked variant or tied to carriers, you can restore it back to normal in just a matter of minutes.
Trial Access at No Cost
Dr.Fone - System Repair (Android) offers free access for you to test the initial steps and verify device compatibility. This cost-effective feature ensures value for money every step of the way.

Main Advantages of Using Dr.Fone – System Repair (Android)
Dr. Fone – System Repair (Android) is a great solution with numerous tools to help you manage your Vivo S18e in various ways. Here are some of the advantages of using the app for fixing bricked phones.
- Fone – System Repair (Android) comes with a clean UI making navigation and usage easy. The user-friendly design offers a seamless experience for beginners and professionals alike.
- Utilizing the app for system repair is an effortless and speedy process. It doesn’t take up much time to revive your bricked phoneso you can use it right away.
- The System Repair toolkit only needs you to click on a few buttons. Combined with its clean UI and speedy process, using the app is a breeze.
Part 4. How To Revive a Bricked Phone Using Dr.Fone – System Repair (Android)
Below are the steps to recover data on a bricked mobile phone.
- Step 1: Download and install Dr.Fone – System Repair (Android) on your computer. Launch the app and select System Repair. Next, choose Select Android as the Vivo S18e device type. Then, connect to your Vivo S18e. Choose Phone Brick as the Android problem and click Start.
- Step 2: Select the correct device information. Choose the Brand, Name, Model, Country, and Carrier. Tick the box next to I agree button and click Next to proceed to the next step.
- Step 3: Click on the Phone with Home button or Phone without Home button depending on your device. Follow the on-screen instructions and click Next to proceed with reviving your brick phone.
- Step 4: Once the Vivo S18e device enters Download Mode, the firmware will automatically start downloading. Follow the on-screen prompts and wait for the system to initiate the repair process. Once it concludes, the completion message will appear on the main window. Click Done to close the tool or click Try again to repeat the process.
 dotConnect for Oracle is an ADO.NET data provider for Oracle with Entity Framework Support.
safe & secure
4,311,328 people have downloaded it
Conclusion
Fixing a bricked phone may seem daunting, but solutions are within reach. This page explained the distinctions between soft and hard brick scenarios. It also identified common causes and revealed effective methods for unbricking.
Among these, Dr.Fone – System Repair (Android) emerges as a dependable ally. The tool offers a comprehensive toolkit for recovery and data rescue. The power to reclaim lost data lies in your hands. Act, follow the methods outlined, and recover your brick phone.
- Title: 8 Workable Fixes to the SIM not provisioned MM#2 Error on Vivo S18e | Dr.fone
- Author: Ariadne
- Created at : 2024-07-30 08:41:07
- Updated at : 2024-07-31 08:41:07
- Link: https://howto.techidaily.com/8-workable-fixes-to-the-sim-not-provisioned-mm2-error-on-vivo-s18e-drfone-by-drfone-fix-android-problems-fix-android-problems/
- License: This work is licensed under CC BY-NC-SA 4.0.