
9 Quick Fixes to Unfortunately TouchWiz has stopped Of Asus ROG Phone 7 Ultimate | Dr.fone
9 Quick Fixes to Unfortunately TouchWiz has stopped Of Asus ROG Phone 7 Ultimate
“Unfortunately TouchWiz home has stopped” is the talk of the town due to annoying TouchWiz UI, a front-end user interface developed by Asus ROG Phone 7 Ultimate. Not to mention, the Asus ROG Phone 7 Ultimate has borne a whole lot of heat from its agitated users over the years and the reason is pretty much obvious due to the pre-installed bloatware apps and the theme launch “TouchWiz home”. That not just brutally annoys users and eats up a heck of internal storage space but lags up too often due to low speed and stability. As a result users end up with “Unfortunately TouchWiz home has stopped” and “Unfortunately, TouchWiz has stopped”. Apparently, there are several flaws in the design and functioning of this launcher and hence, Touchwiz keeps stopping or becomes unresponsive.

Part 1: Common scenarios when TouchWiz keeps stopping
Here in this section, we will introduce some scenarios that can be blamed for why TouchWiz is not working. Check out the following points:
- More often than not, the TouchWiz keeps stopping after an Android update. When we update our Asus ROG Phone 7 Ultimate device, the old data and cache usually conflicts with TouchWIz thereby cropping up this mess.
- When you disable some built-in apps, you might get in trouble with TouchWiz. Doing this sometimes can hamper the TouchWiz operation and raise the “**unfortunately TouchWiz home has stopped**” error message.
- Many times installing some third-party apps and widgets can cause this problem. The apps like launchers can be conflicting with TouchWiz home launcher and therefore cease it to work. Also, a glitched widget is responsible for the same i.e. forces stop the TouchWiz.
Part 2: 9 Fixes to “Unfortunately TouchWiz has stopped”
Fix “TouchWiz keeps stopping” by repairing Android system
When your TouchWiz keeps stopping and you aren’t able to proceed further, the best way to handle the situation is to repair the Android system. And the best that can help you to serve the purpose is Dr.Fone - System Repair (Android). It has the ability to fix any sort of Android system issue without any complications. To fix this issue, the tool only takes few minutes of yours and performs smoothly. Moreover, you don’t have to worry if you aren’t tech pro. This tool requires no special technical know-how. Here are the advantages you get with this tool.

Dr.Fone - System Repair (Android)
One click tool to fix “Unfortunately TouchWiz has stopped”
- A very easy tool that fixes problems in just one click
- Provides full support all day all night as well as offers 7 day money back challenge
- Enjoys higher success rate and considered as first tool carrying such amazing functionalities
- Able to fix wide variety of Android issues including app crashing, black/white screen of death
- Fully secured and no harm regarding any virus infection
3,211,972 people have downloaded it
Step 1: Download the Program
The one-click repairing process begins with downloading Dr.Fone from its official website. When it is downloaded, follow the installation steps. Upon successful installation, launch the tool on your PC.
Step 2: Connect your Asus ROG Phone 7 Ultimate Device
After you open the software, hit on the “System Repair” button from the main interface. With the help of a genuine USB cable, get your Asus ROG Phone 7 Ultimate phone and connect it with the computer.
 PCDJ DEX 3 for Windows & MAC is the total entertainment DJ software solution, offering audio, video, and karaoke mixing ability. Automatic beat-sync, smart looping, 4 decks, DJ MIDI controller support, Karaoke Streaming and much more.
Step 3: Choose the Tab
Now, from the next screen, you are supposed to choose “Android Repair” tab. It is given on the left panel.


Step 4: Enter Right Information
Please keep your mobile details handy as you will need them in the next window. You will need to enter the correct brand, model, and country name etc. for better detection of your device.

Step 5: Confirm Actions
This process may result in removing your data hence we strongly recommend you to keep a backup of your data.
Tip: You can use Dr.Fone – Phone Backup (Android) to backup your Asus ROG Phone 7 Ultimate device in case you’re wondering how.
Step 6: Take your Device in Download mode
You will get some instructions on your screen to keep your device in Download mode. Follow them according to the Asus ROG Phone 7 Ultimate device you own and hit “Next”. When you do this, the program will detect your device and let you download the latest firmware.
 Epubor Audible Converter for Mac: Download and convert Audible AAXC/AA/AAX to MP3 with 100% original quality preserved.

Step 7: Repair Device
Now, when the firmware is downloaded, the program will itself begin to repair your device. Wait and keep the Asus ROG Phone 7 Ultimate device connected until you get the notification for process completion.


Clear the cache data the TouchWiz
Maximum Android devices are designed to deleted cache data upon getting updated to the newest Android system. However, Asus ROG Phone 7 Ultimate stands as an exception in such case. And therefore, many times TouchWiz starts stopping right after upgrading. Thus, due to the collection of cache data, TouchWiz can display error. This calls for removing the cache from TouchWiz and run things smoothly. Here is how to do this:
- Tap on “Apps” from the Home screen firstly.
- Launch “Settings” afterwards
- Look for “Applications” and tap on it followed by “Application Manager”.
- When Application Manager gets opened, swipe towards right to get into the “All” screen.
- Now, choose “TouchWiz” and tap “Clear Cache”.
- Now, tap “Clear Data” followed by “OK”.
- Now restart your device.


Please note that this will delete all your Home screens post this method.

Disable Motion & gesture settings
The functions regarding Motions and Gestures can be responsible for why TouchWiz home has stopped in your device. Usually the Asus ROG Phone 7 Ultimate devices running on Android version less than Marshmallow are prone to encountering this issue. Or the Asus ROG Phone 7 Ultimate devices having modest specs often fall prey to the issue. When you disable these settings, you might get out of the problem.
Change the Animation Scale
When you use TouchWiz, it may consume higher memory usage for high amount of graphic maintenance. As a result, the “**unfortunately TouchWiz home has stopped**” error might crop up. Taking this into consideration, you should try reconfiguring the animation scale and get rid of the error. Here’s how:
Clear Cache Partition
In case the above steps didn’t figure out the problem, here is the next tip. This method can be counted as one of the most effective one. Because it is able to fix minor issues in Android devices, we recommend you for “**TouchWiz home has stopped**” issue too. Let us know how you can do it:
- Turn off your Asus ROG Phone 7 Ultimate device.
- Start pressing and holding “Volume Up” and “Power” buttons simultaneously.
- Keep doing this until you see the Android screen. This will take your device into recovery mode.
- You will observe some options on the screen. Take help of Volume buttons, scroll down to choose “Wipe Cache Partition”. Press Power button to confirm and the Asus ROG Phone 7 Ultimate device will be rebooted.

Check now if the error is eliminated. If unfortunately not, please try the following solution.
Enable the easy mode
For some users, enabling Easy Mode has been of great assistance. This feature aims to make the user experience more efficient by simply eliminating complex features. The Easy Mode removes those features that confuse the users by messing up the screen. Hence, we suggest you to switch to this mode in order to remove “**TouchWiz not working**” problem. The steps are:
- Open “Settings” and go to “Personalization”.
- Hit on “Easy Mode” now.

Hope the TouchWiz won’t keep stopping error does not pop up anymore!
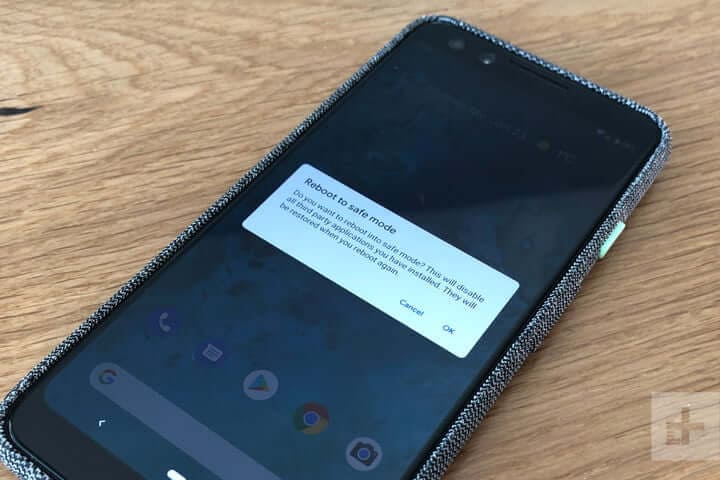
Boot your phone to safe mode
Here is the next solution to be followed when TouchWiz keeps stopping. As we already said, third-party apps can cause this issue, booting your device in the Safe mode will disable those apps temporarily. Hence you need to boot your Asus ROG Phone 7 Ultimate device to Safe mode and check if the reason is any third-party app.
- Switch off your device to initiate.
- Press “Power” button and keep doing this until device’s logo appears on the screen.
- When you see logo appearing, instantly release the button and start holding “Volume Down” button.
- Keep holding until rebooting finishes.
- You will now witness “Safe mode” on the bottom screen. You can now release the button.
 EmEditor Professional (Lifetime License, non-store app)

If the above method went futile and you’re still at the same place, then factory reset is the next logical step to be taken. We suggest this method because it will take your device to its factory state. As a result, TouchWiz will probably get normal and work perfectly.
Along with this, we would also suggest you go take backup of your data so that you won’t lose any of the personal information from your device after performing factory reset. For your convenience, we have stated the backup steps too in the following guide. Have a look:
- Run “Settings’ in your device and go to “Backup & Reset”.
- Notice if “Back up my data” is enabled or not. If not, turn it on and create backup.
- Now, scroll for “Factory Data reset” option and confirm it by clicking “Reset Phone”.

- Wait a few minutes and your device will reboot.
Install a new launcher to replace TouchWiz
We believe that you will find the above methods helpful. However, if still in case your TouchWiz is not working, we advice you that you should install a new theme launcher in your device. It will be a wise option to ditch TouchWiz in such scenario rather than tolerating the problem. Hope this advice will help you.
Asus ROG Phone 7 Ultimate Not Connecting to Wi-Fi? 12 Quick Ways to Fix
Nowadays, it’s pretty much essential to have your Asus ROG Phone 7 Ultimate or smartphone connected to the internet. Whether you’re watching videos, looking something up, or using any kind of app, you need the internet for these applications to function correctly.
This is why it can so annoying when it gets to a point where the internet connection isn’t working. However, the problem of a web page not loading correctly is just the tip of the iceberg.
There are plenty of problems you could experience, whether it’s the Wi-Fi network keeps disconnecting on its own without any warning, perhaps a security issue where the passcode or IP address isn’t being registered properly, or even if the connection is just being super slow, even if there’s no reason too.
Luckily, despite there being so many problems out there, there are also many solutions. Today, we’re going to share with you the complete definitive guide to help you get your Asus ROG Phone 7 Ultimate connected and free from problems and issues.
Part 1: Restart your Asus ROG Phone 7 Ultimate
Begin by powering off your Asus ROG Phone 7 Ultimate and unplugging your router. Wait for about a minute before plugging in the router and turning on your device. This simple reset can often restore stable connections and fix Android wifi not working.

Part 2: Turn on Airplane mode and turn off
Turn on Airplane Mode for a few seconds, then turn it off. This maneuver refreshes your device’s network connections and might rectify the Android not connecting to wifi issue.

 Project Manager - Asset Browser for 3Ds Max
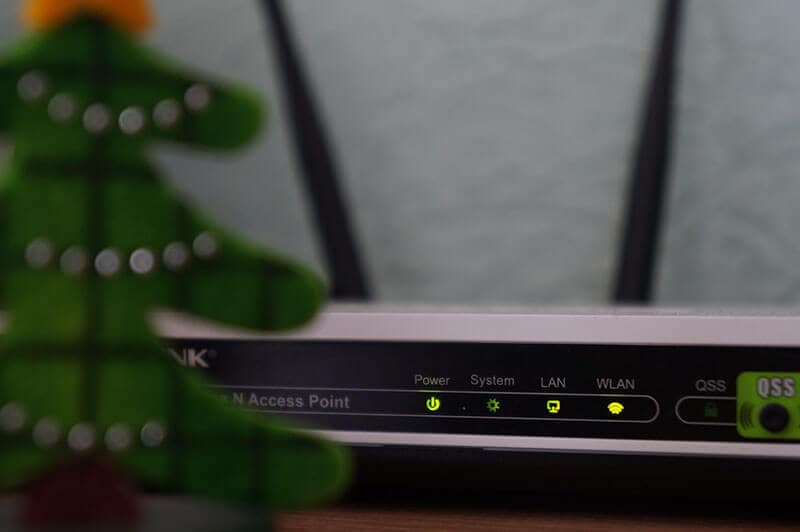
Part 3. Check Wi-Fi Router settings
The third step you’ll want to take is making sure the internet router in your house is working properly and is actually sending internet data to your Asus ROG Phone 7 Ultimate. Of course, if you have other internet-enabled devices connected to the same router and they’re working fine, you know this isn’t the problem.
However, if you’ve got a problem with Wi-Fi not working on your Android and other devices in your home or office, you know you’ve got a router problem. Here’s how to solve it.
- Go to your internet router and check the indicator lights
- While this depends on your device, a green or blue light will mean the connection is good, whereas a red light indicates a problem
- Press the Restart button on your router and wait ten minutes before reconnecting your device and connecting again
- Call up your internet provider to see if there’s an internet connection issue in your area
- Open your web browser and log into your router settings to ensure your Asus ROG Phone 7 Ultimate is connected to the Wi-Fi network and is allowed to send and receive data
Part 4. Boot your Android in safe mode

If you’re unable to connect to the internet, but other devices have no issues, you may find the issues is coming from within your Asus ROG Phone 7 Ultimate itself. Fortunately, there are ways you can see whether this is the problem.
The best way to do this is to boot your device in Safe Mode. The process for doing this will depend on the make and model of your Asus ROG Phone 7 Ultimate, but the basic process goes as follows;
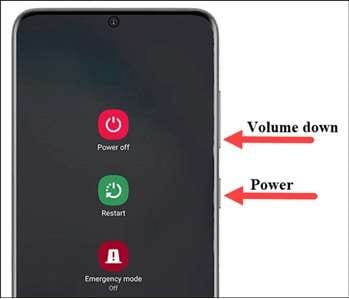
- Turn off your Asus ROG Phone 7 Ultimate by holding down the Power button and tapping Power Off. Wait a few minutes to ensure the Asus ROG Phone 7 Ultimate device is completely off
- Press and hold the Power button to turn your phone on, but the press and hold both the volume up and volume down buttons at the same time
- You will see the words ‘Safe Mode’ appear on your screen as the Asus ROG Phone 7 Ultimate device loads
- Now you will be booted in Safe Mode. Try connecting to the internet again to see if it works
If your device connects to the internet while in Safe Mode, you’ll know you have a problem with an app or service that’s running on your device. If this is the case, you’ll need to go through your apps and delete them and then reinstall them one at a time until you find the app or service that is causing your internet problems.
Part 5. Check the Android Wi-Fi adapter
If you’re using a Wi-Fi adapter on your device to connect to the internet, you’ll need to make sure this is working. This could be an adapter on your Asus ROG Phone 7 Ultimate itself, especially if you’re using an older device, or if you’re using an adapter to boost the ranger of your router network.
You need to check both of these to make sure your connection is working properly.
- If using an Android Wi-Fi adapter, make sure all the Asus ROG Phone 7 Ultimate device drivers are up to date, and if you’re using an app, make sure the app is updated, and all the settings allow an internet connection
- If you’re using a router adapter, make sure it’s set up properly, and your Asus ROG Phone 7 Ultimate is connected to the adapter using the correct passwords. Try connecting another device to see if the internet connection is working on there
- Whichever method you’re using, try disconnecting your Asus ROG Phone 7 Ultimate and forgetting the network, and then reconnecting and entering the right password to refresh the connection
Part 6. Check SSID and IP address on Android
To make a Wi-Fi connection work, your Asus ROG Phone 7 Ultimate needs to match two codes that connect and relate to your router to establish the connection and work correctly. These are known as the SSID and the IP address.
Every wireless device will have its own codes and making sure they’re matched to the network you’re connecting to is crucial to ensuring the internet is working on your Asus ROG Phone 7 Ultimate. Here’s how to check on your Asus ROG Phone 7 Ultimate to make sure everything is correct.
- Tap the Settings menu option, followed by Wi-Fi on your Asus ROG Phone 7 Ultimate
- Turn on your Wi-Fi network and connect it to your router
- Find the router name (SSID) and make sure it’s exactly the same as the SSID written on your router
- Once connected, tap the Wi-Fi network and you will see the IP address. Check both your phone and the router codes to make sure this number matches
When these numbers are matching, if your Android is still not connecting to wifi, you’ll know this wasn’t the problem.
Part 7. Fix Android system issues in one click
If none of the solutions above are working, this could indicate a real problem with the firmware and operating system of your Asus ROG Phone 7 Ultimate. Fortunately, a fast solution to get everything working again is to completely repair the software of your phone.
You can do this easily using powerful Android recovery software known as Dr.Fone - System Repair (Android) . This is the leading repair tool on the market and is designed to fix and repair any firmware and software problems you may be having.

Dr.Fone - System Repair (Android)
A one-click tool to fix Wi-Fi not working on Android
- Can repair Android from any problem including the black screen of death
- A trusted software application used by 50+ million people around the world
- The most user-friendly mobile repair application available right now
- Supports over 1,000+ Android models and devices
- A world-class customer support team to help you whenever you need them
3,483,527 people have downloaded it
To help you have the best and the most accurate experience when using the Dr.Fone - System Repair (Android) application, here’s a complete step-by-step guide on how to use it.
Step One Make your way over to the Wondershare website and download the Dr.Fone - System Repair (Android) software. Install it onto your computer by following the on-screen instructions.
Once installed, connect your Asus ROG Phone 7 Ultimate to your computer using a USB cable, and open the software, click “System Repair”.
Step Two Click the “Android” option in the menu and then click “Start” to begin the Repair process.
Step Three On the next screen, go through the options and use the drop-down menus to make sure the information is correct for your individual device. Accept the terms and conditions of the software, and then click the “Next” button.
Step Four Confirm you want the software to carry out the repair process by typing the ‘000000’ code into the pop-up box and pressing Confirm. Make sure you read everything displayed in this box beforehand to know what’s happening.

Step Five Now put your phone into Download Mode by following the on-screen instructions, so your device is ready for the repair process. The method for getting your phone into Download Mode will vary depending on your device, so make sure you’re following the right instructions.
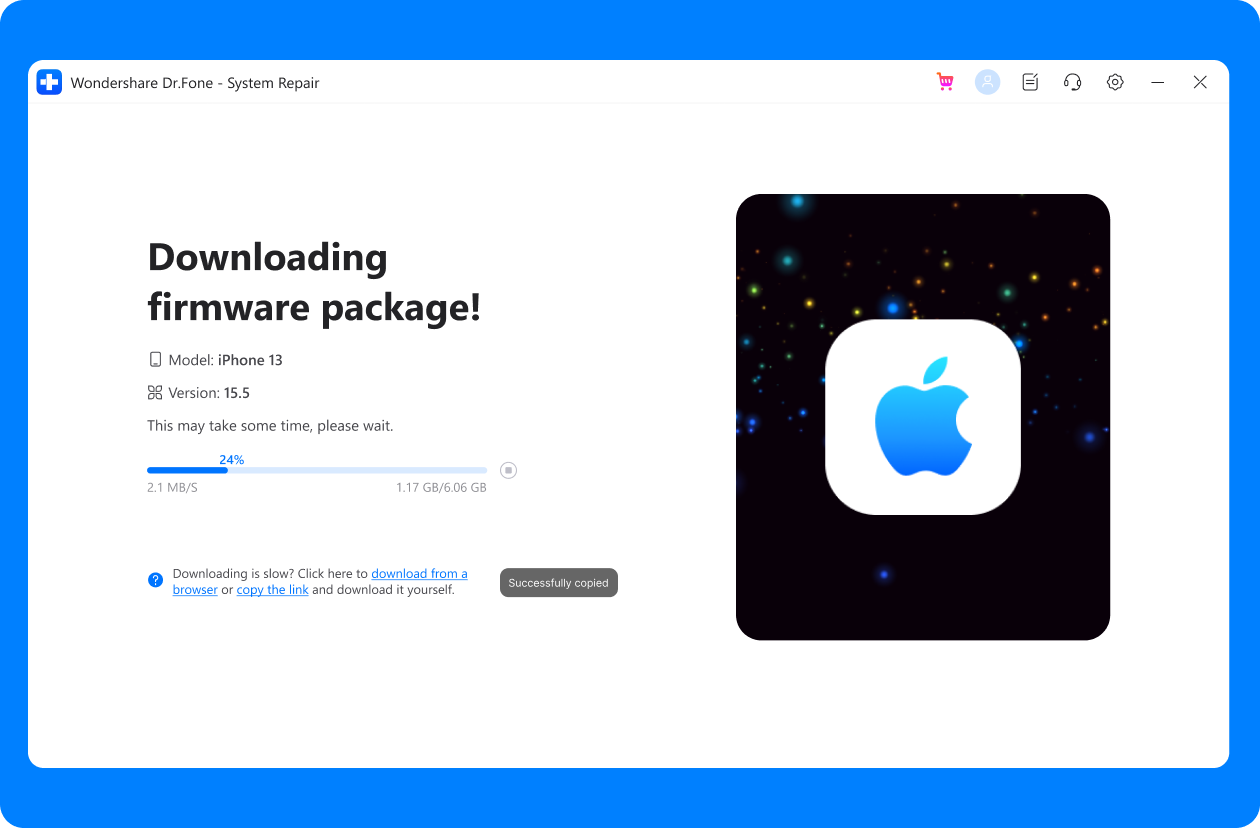
Step Six Once the software has detected your device in Download Mode, it will automatically begin the repair process. You need to make sure your device stays connected throughout this time, and your computer stays on.
 With Screensaver Wonder you can easily make a screensaver from your own pictures and video files. Create screensavers for your own computer or create standalone, self-installing screensavers for easy sharing with your friends. Together with its sister product Screensaver Factory, Screensaver Wonder is one of the most popular screensaver software products in the world, helping thousands of users decorate their computer screens quickly and easily.
The whole process is automatic, so you won’t need to do anything until it’s finished. Once completed, you can disconnect your phone and start connecting it to the internet as normal!
 The BootIt Collection covers multi-booting, partitioning, and disk imaging on traditional PC’s using the standard BIOS and newer PC’s using UEFI. The collection includes BootIt Bare Metal (BIBM) for standard BIOS systems and BootIt UEFI (BIU) for UEFI system.
 safe & secure
Part 8. Check the Wi-Fi connectivity on another phone

When experiencing problems with your Wi-Fi network, it’s worth noting the problem might not be with your phone, but rather the Wi-Fi network itself. This is why it’s important to make sure you check the connection on another device.
Of course, if you’re already using another phone on your Wi-Fi network, you know this isn’t the case. However, if you’re not sure, here’s what you need to do;
- Get another Android or iOS phone or tablet
- Open the Settings menu and connect to the Wi-Fi network you’re having problems with
- Enter the password and connect to the network
- Open a web browser on the phone and try loading a web page
- If the page loads, you know the Wi-Fi network isn’t the problem
- If the page doesn’t load, you know you’ve got a problem with your Wi-Fi network
Part 9. Change the password of the Wi-Fi

Each Wi-Fi network router will give the opportunity to choose and change the password you have to let devices connect to your network. It’s important you try changing this because you never know if someone else has accessed your network and could be blocking your device. Here’s how it works;
- Log onto your computer and open your Wi-Fi settings
- Depending on the brand and method of your individual router, navigate to the Wi-Fi password settings menu
- Change the password to something complicated using all available digits and characters
- Save the password and restart the router to disconnect all devices
- Now connect your Asus ROG Phone 7 Ultimate to the router using the new password
Part 10. Reset network settings on Android
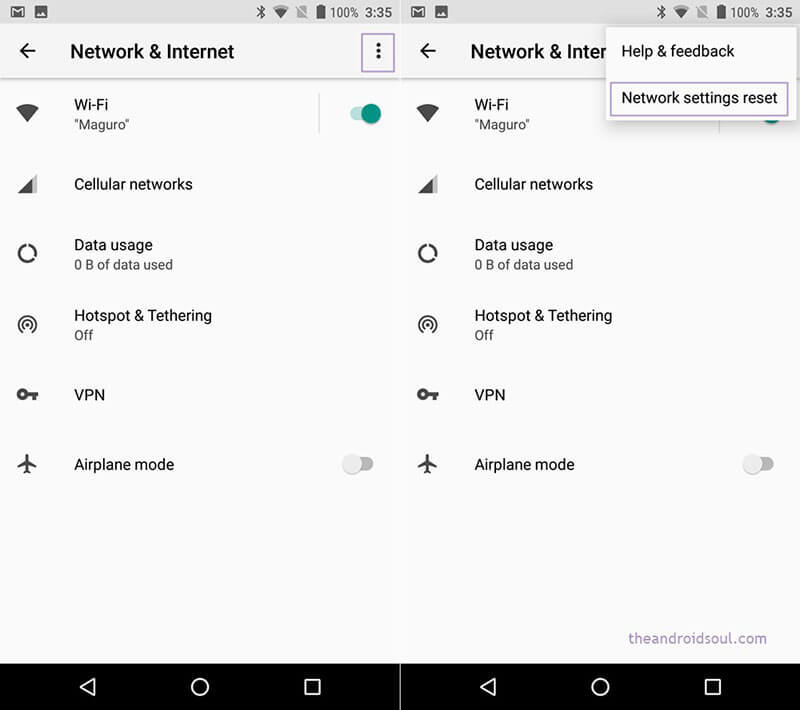
Just like the method above where you’ll be effectively resetting the network settings on your router, if this hasn’t worked, you’ll be able to reset the network settings on your Asus ROG Phone 7 Ultimate, hopefully removing the bugs and allowing you to connect.
Here’s how you can do this easily on your Asus ROG Phone 7 Ultimate;
- From the home screen of your Asus ROG Phone 7 Ultimate, open the Settings menu
- Tap the Backup & Reset option
- Tap the Reset Network Settings option
- Tap the Reset Network option
- If you need to, enter the PIN number or passcode for the Android device, and the Asus ROG Phone 7 Ultimate device will confirm the reset has taken place
- Reconnect your Asus ROG Phone 7 Ultimate to your Wi-Fi network for the changes to take effect

Part 11. Clear partition cache in recovery mode
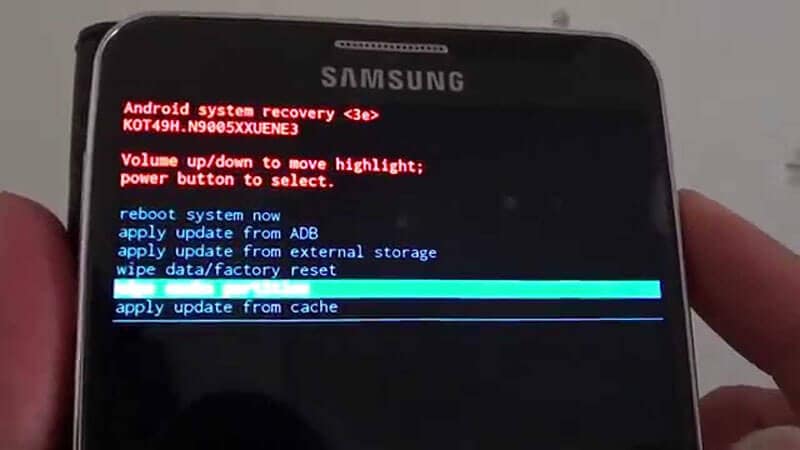
As you continue to use your Asus ROG Phone 7 Ultimate, the partition cache will fill up with data your device needs and doesn’t need. However, by clearing your device’s partition cache, you can make clear up some space which should help your device have enough memory to connect to the internet.
- Turn off your Asus ROG Phone 7 Ultimate
- Turn it on by holding down the power button, volume button, and home button
- When your phone vibrates, let go of the Power button, but continue to hold the volume button
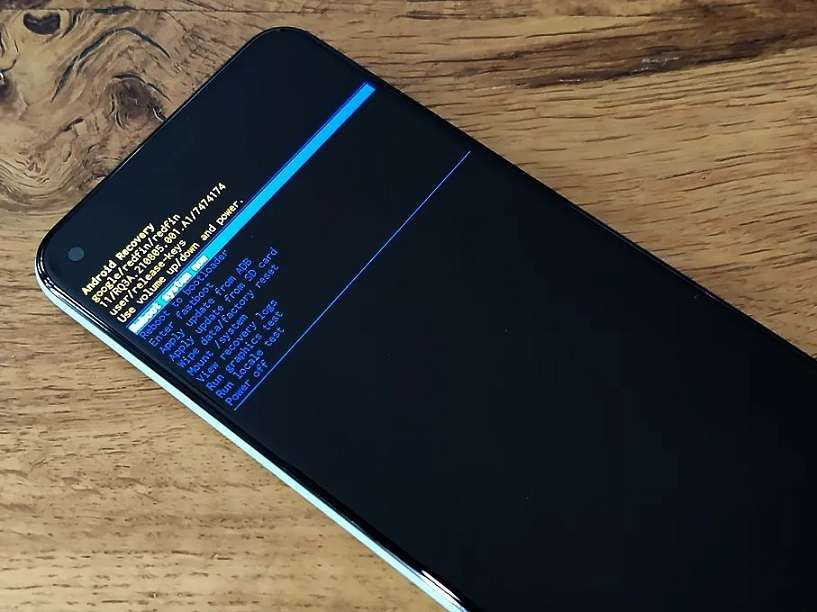
- When a menu is displayed, use the volume buttons to navigate the menu
- Select the Android System Recovery option, followed by Wipe Cache Partition
- Restart your device and connect to the internet
Part 12. Reset factory settings


If worse comes to worst, another option you have is to factory reset your Asus ROG Phone 7 Ultimate. As we’ve spoken about above, while using your phone from the day you started using it, your device will fill up with files and data which can become messy and causes bugs.
However, by factory resetting your device, you can start again from the factory default from which you first received it, ultimately clearing the bugs. Make sure you back up your device before proceeding because it will erase your personal files.
- Open the Settings menu on your Asus ROG Phone 7 Ultimate
- Navigate to System > Advanced > Reset Options
- Tap the Reset phone option, and enter your PIN code if required
- Tap Erase Everything
- Wait for your phone to complete the process
- Restart your device and connect to the internet
safe & secure
How To Deal With the Asus ROG Phone 7 Ultimate Screen Black But Still Works?
With the advance of technology over the years, many of us rely on smartphones to communicate, work, and play. As such, it can be pretty concerning when your device begins to act strange like your phone screen suddenly went blank.

Whether you’re using an iPhone or an Android device, you’ll eventually encounter a problematic symptom like this. Therefore, this article will explore what to do when your phone screen goes black. After exploring below, you’ll learn the common causes of why your phone screen went black and how to fix it. Read on below to learn more.
Part 1: Why Did My Asus ROG Phone 7 Ultimate Screen Go Black but Still Works? Common Causes
Experiencing a cell phone blank screen is not exclusive to Android or iOS users. A phone screen not turning on happens all the time due to several factors that may or may not be out of your control. While they can be frustrating, here are some common causes you should know as to why your phone screen went black but still works.
A Drained Battery
The first thing that comes to mind when your phone screen suddenly goes black is you have a drained battery. Even though this is obvious, it’s still important to mention, as this is usually what most people encounter. To fix this problem, plug your smartphone into a charger and wait for your device to turn on again. If it works, then you just prevented a rather annoying experience.

App Troubles
If your phone is working, but the screen is black, there’s also a high probability that you are having an isolated issue with a particular application. An app could be loading something, which often happens for streaming apps such as YouTube, Netflix, Prime, and more, especially if you have slow internet connectivity.
Software Issues
A potential reason why your phone screen went black but still works could be because of your smartphone’s software. This problem suggests that your Asus ROG Phone 7 Ultimate is crashing, potentially freezing your device if not addressed immediately. If this is the cause, then your device is likely experiencing a critical system error, and you should directly try to reboot your phone.
Hardware Problem
If you dropped your phone, there’s a high chance the LCD connectors went loose due to the physical impact. If this happened to you, the phone might be working, but the screen is black due to the LCD cable dislodging. Another issue could be your phone got exposed to extreme temperatures. This can also cause a black screen but your phone is still on.
 Simple and intuitive video editing
Part 2: How To Fix Black Screen on Your Phone
Here are four valuable methods you should know on what to do when your phone screen goes black on your iPhone or Android smartphone to get them working again.
 WonderFox DVD Ripper Pro
Method 1: Force Restart your Android/iOS Smartphone
If your phone screen is black but still works, force restarting it is the easiest way to fix it. The following are the detailed steps for both Android and iOS devices.
How to Force Restart your Android Device
Here is how you force restart an Android device when your phone screen doesn’t turn on.
Step 1: Press and hold the Power and Volume Down buttons simultaneously.
Step 2: Hold the same buttons until your device restarts, and display the phone’s logo.
How to Force Restart your iOS Device
If you own the latest iPhone models, here are the method of restarting it from iPhone 8 up to 14.
Step 1: Press and immediately release Volume Up. Next, press and immediately release Volume Down.

Step 2: Press and hold Sleep/Wake until you see the Apple logo.
Note
If you own an iPhone 7, press and hold the Side button and Volume Down simultaneously until you see the apple logo.
Method 2: Uninstall or Update Outdated Applications
In some cases, your phone screen is black but still works because of installing incompatible apps on your iOS/Android device. If the installed app is frequently crashing, it may be the source of a blank cell phone screen. Uninstall the problem app to see if the black screen disappears or not.
Method 3: Inspect the LCD Connectors
If your phone screen goes black but still works, you should inspect the logic board to the LCD screen to see if it has become disconnected. It is common for smartphones that often get dropped a few times. It’s best to plug the connectors back to regain your screen’s functionality.
However, this requires technical know-how. It’s better to seek help from a professional as you could risk causing more damage to your device if you don’t know what you’re doing.

Method 4: Perform a Factory Reset
If all the methods above did not solve your problem, the last resort you can take is to perform a Factory Reset. This method works on Android and iOS smartphones and erases all your data. It is the quickest way to try to fix why your phone screen went black. Here are the steps.
For Android Users
If you’re on Android, tap Settings > Backup and Reset. Tap on Factory data reset > Delete all to initiate the factory reset.
If you cannot do this, here’s how to perform a factory reset manually using Recovery Mode.
Note
The process of booting into Recovery Mode is not the same across all Android devices and depends on the manufacturer and model of your phone. Refer to your owners manual to see which method is the right one for your Asus ROG Phone 7 Ultimate.
Step 1A: Press and hold the Power button and Volume Down buttons simultaneously and continue holding until the screen starts.
Step 1B: For Android devices with a Home button, press and hold the Home button and the Power button and continue holding until the screen starts.
Step 1C: Press and hold the Power button as well as the Volume Up and Volume Down buttons simultaneously and continue holding until the screen starts.

Step 2: Use the Volume buttons to navigate the choices and select Wipe data/factory reset and confirm your choice with the Power button.
Step 3: Simply wait for the process to complete and wait for your Asus ROG Phone 7 Ultimate to restart automatically.
F****or iOS Users
Step 1: For iOS users, meanwhile, tap Settings > General > Transfer or Reset iPhone.
Step 2: Next, choose Erase All Content and Settings. Check the list of items you want to remove.

Step 3: Tap Continue and enter your iPhone passcode. A message warns you that the process will delete all media and data and reset all settings.
Step 4: Tap Erase iPhone to confirm. You’ll be asked to type in your Apple ID and password if Find My is active. Enter your password and tap Erase.
Part 3: How To Fix Black Screen Phone With an Alternative
If your phone screen went black but still works and doing the methods above did not solve the issue, you can use Wondershare Dr.Fone for iOS and Android as a last resort. It’s one of the most popular smartphone repair tools today, enabling you to fix all kinds of annoying scenarios. These include black screen, boot loop, white screen of death, bricked iOS or Android device, and more.
 dotConnect for Oracle is an ADO.NET data provider for Oracle with Entity Framework Support.
Key Features
Dr.Fone – System Repair for iOS and Android has fantastic features you can immediately take advantage of. Here are its key features below.
- Fix all Android and iOS Problems in Minutes
Dr.Fone – System Repair can fix all kinds of issues on your Android/iOS, such as a black screen, white screen of death, screen freeze, boot loop, or recovery mode. All of this can be done within less than 10 minutes to save you precious time.
- Supports up to 1000+ Android Smartphones and the latest iOS
All iOS versions, including the latest iOS 16 and iOS 16 beta, are fully supported by Dr.Fone – System Repair. The app handles all your smartphone issues without data loss to secure your info. On the other hand, if you own an Android, the app supports up to 1000+ Android smartphones, making it highly versatile for Android owners.


Tech Specs
Dr.Fone – System Repair (Android)’s minimum system requirements for your computer are listed below.
| Computer OS | Android |
|---|---|
| Windows 11, 10, 8.1, 8, 7 | Android 2.1 and up to the latest |
Meanwhile, here are the system requirements for Dr.Fone – System Repair (iOS).
| Computer OS | iOS |
|---|---|
| Windows 11, 10, 8.1, 8, 7 | Supports all iOS versions, including the latest iOS 16 and iOS 16 beta |
| macOS 12, 11, 10.15, 10.14, 10.13, 10.12, 10.11, 10.10, 10.9, 10.8 |
Pros and Cons
If you’re still undecided about Dr.Fone – System Repair, here are its pros and cons.
Pros
- Fone – System Repair for iOS and Android has a clutter-free and beginner-friendly user interface. It’s easy to understand and use, so you can start immediately.
- Both the iOS and Android versions finish the repair tasks within less than 10 minutes to save you time.
Cons
- Each version for each OS is sold separately.
- The free version works up to your device’s compatibility. Once you start the repair process, the app will ask you for a valid license key.
How to Fix Black Phone Screen With Dr.Fone – System Repair
Here’s how to fix your phone screen with Dr.Fone – System Repair on iOS/Android.
Step 1: Download and install Dr.Fone – System Repair for iOS or Android. Next, open the program and connect your smartphone.
Step 2A (For iOS): Choose the correct model of your iPhone for the program to be able to download the appropriate firmware package.
Step 2B (For Android): Click Start. On the next window, choose the Brand, Name, Model, Country, and Carrier of your smartphone, then click Next.
Step 3: Follow the on-screen instructions provided on the main program window and wait for the repair process to complete.
safe & secure
4,262,204 people have downloaded it
Conclusion
Our increasing reliance on smartphones has led to amazing advancements in new technologies. However, lingering issues such as your phone screen not turning on or your phone screen being black but still working are ongoing problems to many. That’s why learning how to prevent these events is essential to take care of your smartphone.
Doing all the recommended methods above usually solves the case. If the different fixes don’t work for you, Dr.Fone – System Repair for iOS and Android can help resolve all your problems within less than 10 minutes. You can download it for free on Windows and Mac to test it yourself.
- Title: 9 Quick Fixes to Unfortunately TouchWiz has stopped Of Asus ROG Phone 7 Ultimate | Dr.fone
- Author: Ariadne
- Created at : 2024-07-30 08:42:40
- Updated at : 2024-07-31 08:42:40
- Link: https://howto.techidaily.com/9-quick-fixes-to-unfortunately-touchwiz-has-stopped-of-asus-rog-phone-7-ultimate-drfone-by-drfone-fix-android-problems-fix-android-problems/
- License: This work is licensed under CC BY-NC-SA 4.0.