
9 Quick Fixes to Unfortunately TouchWiz has stopped Of Vivo S18e | Dr.fone
9 Quick Fixes to Unfortunately TouchWiz has stopped Of Vivo S18e
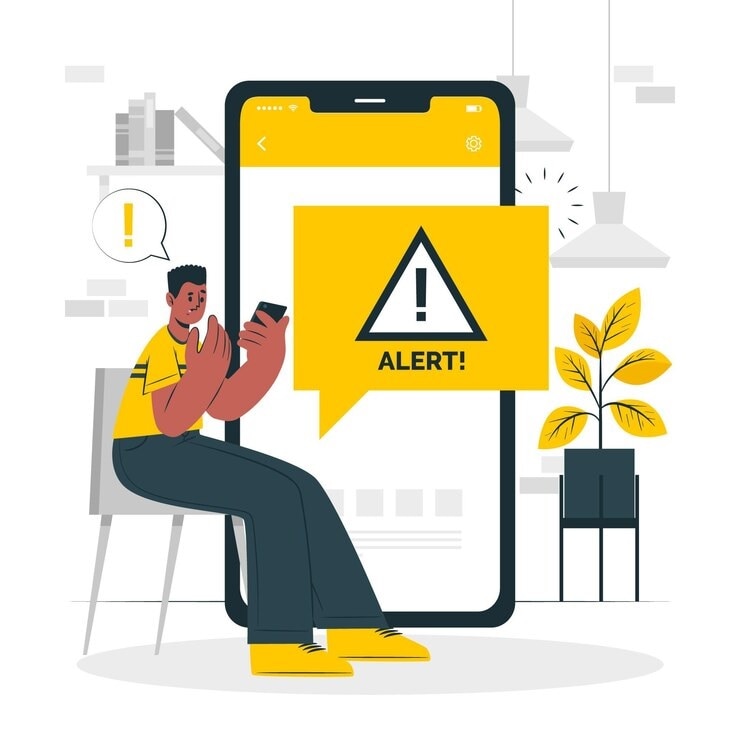
“Unfortunately TouchWiz home has stopped” is the talk of the town due to annoying TouchWiz UI, a front-end user interface developed by Vivo S18e. Not to mention, the Vivo S18e has borne a whole lot of heat from its agitated users over the years and the reason is pretty much obvious due to the pre-installed bloatware apps and the theme launch “TouchWiz home”. That not just brutally annoys users and eats up a heck of internal storage space but lags up too often due to low speed and stability. As a result users end up with “Unfortunately TouchWiz home has stopped” and “Unfortunately, TouchWiz has stopped”. Apparently, there are several flaws in the design and functioning of this launcher and hence, Touchwiz keeps stopping or becomes unresponsive.

Part 1: Common scenarios when TouchWiz keeps stopping
Here in this section, we will introduce some scenarios that can be blamed for why TouchWiz is not working. Check out the following points:
- More often than not, the TouchWiz keeps stopping after an Android update. When we update our Vivo S18e device, the old data and cache usually conflicts with TouchWIz thereby cropping up this mess.
- When you disable some built-in apps, you might get in trouble with TouchWiz. Doing this sometimes can hamper the TouchWiz operation and raise the “**unfortunately TouchWiz home has stopped**” error message.
- Many times installing some third-party apps and widgets can cause this problem. The apps like launchers can be conflicting with TouchWiz home launcher and therefore cease it to work. Also, a glitched widget is responsible for the same i.e. forces stop the TouchWiz.
Part 2: 9 Fixes to “Unfortunately TouchWiz has stopped”
Fix “TouchWiz keeps stopping” by repairing Android system
When your TouchWiz keeps stopping and you aren’t able to proceed further, the best way to handle the situation is to repair the Android system. And the best that can help you to serve the purpose is Dr.Fone - System Repair (Android). It has the ability to fix any sort of Android system issue without any complications. To fix this issue, the tool only takes few minutes of yours and performs smoothly. Moreover, you don’t have to worry if you aren’t tech pro. This tool requires no special technical know-how. Here are the advantages you get with this tool.
Dr.Fone - System Repair (Android)
One click tool to fix “Unfortunately TouchWiz has stopped”
- A very easy tool that fixes problems in just one click
- Provides full support all day all night as well as offers 7 day money back challenge
- Enjoys higher success rate and considered as first tool carrying such amazing functionalities
- Able to fix wide variety of Android issues including app crashing, black/white screen of death
- Fully secured and no harm regarding any virus infection
3,211,972 people have downloaded it
Step 1: Download the Program
The one-click repairing process begins with downloading Dr.Fone from its official website. When it is downloaded, follow the installation steps. Upon successful installation, launch the tool on your PC.
Step 2: Connect your Vivo S18e Device
After you open the software, hit on the “System Repair” button from the main interface. With the help of a genuine USB cable, get your Vivo S18e phone and connect it with the computer.

Step 3: Choose the Tab
Now, from the next screen, you are supposed to choose “Android Repair” tab. It is given on the left panel.

Step 4: Enter Right Information
Please keep your mobile details handy as you will need them in the next window. You will need to enter the correct brand, model, and country name etc. for better detection of your device.

Step 5: Confirm Actions
This process may result in removing your data hence we strongly recommend you to keep a backup of your data.
Tip: You can use Dr.Fone – Phone Backup (Android) to backup your Vivo S18e device in case you’re wondering how.
Step 6: Take your Device in Download mode
You will get some instructions on your screen to keep your device in Download mode. Follow them according to the Vivo S18e device you own and hit “Next”. When you do this, the program will detect your device and let you download the latest firmware.


Step 7: Repair Device
Now, when the firmware is downloaded, the program will itself begin to repair your device. Wait and keep the Vivo S18e device connected until you get the notification for process completion.


Clear the cache data the TouchWiz
Maximum Android devices are designed to deleted cache data upon getting updated to the newest Android system. However, Vivo S18e stands as an exception in such case. And therefore, many times TouchWiz starts stopping right after upgrading. Thus, due to the collection of cache data, TouchWiz can display error. This calls for removing the cache from TouchWiz and run things smoothly. Here is how to do this:
- Tap on “Apps” from the Home screen firstly.
- Launch “Settings” afterwards
- Look for “Applications” and tap on it followed by “Application Manager”.
- When Application Manager gets opened, swipe towards right to get into the “All” screen.
- Now, choose “TouchWiz” and tap “Clear Cache”.
- Now, tap “Clear Data” followed by “OK”.
- Now restart your device.

Please note that this will delete all your Home screens post this method.
Disable Motion & gesture settings
The functions regarding Motions and Gestures can be responsible for why TouchWiz home has stopped in your device. Usually the Vivo S18e devices running on Android version less than Marshmallow are prone to encountering this issue. Or the Vivo S18e devices having modest specs often fall prey to the issue. When you disable these settings, you might get out of the problem.
 Any DRM Removal for Mac: Remove DRM from Adobe, Kindle, Sony eReader, Kobo, etc, read your ebooks anywhere.
Change the Animation Scale
When you use TouchWiz, it may consume higher memory usage for high amount of graphic maintenance. As a result, the “**unfortunately TouchWiz home has stopped**” error might crop up. Taking this into consideration, you should try reconfiguring the animation scale and get rid of the error. Here’s how:
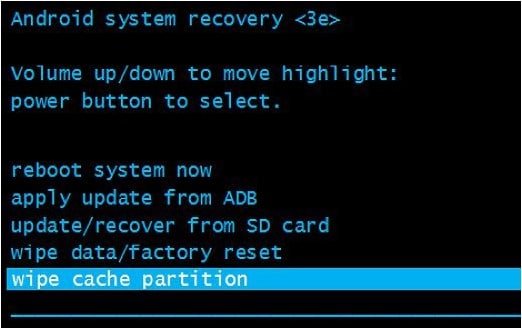
Clear Cache Partition
In case the above steps didn’t figure out the problem, here is the next tip. This method can be counted as one of the most effective one. Because it is able to fix minor issues in Android devices, we recommend you for “**TouchWiz home has stopped**” issue too. Let us know how you can do it:
- Turn off your Vivo S18e device.
- Start pressing and holding “Volume Up” and “Power” buttons simultaneously.
- Keep doing this until you see the Android screen. This will take your device into recovery mode.
- You will observe some options on the screen. Take help of Volume buttons, scroll down to choose “Wipe Cache Partition”. Press Power button to confirm and the Vivo S18e device will be rebooted.

Check now if the error is eliminated. If unfortunately not, please try the following solution.
Enable the easy mode
For some users, enabling Easy Mode has been of great assistance. This feature aims to make the user experience more efficient by simply eliminating complex features. The Easy Mode removes those features that confuse the users by messing up the screen. Hence, we suggest you to switch to this mode in order to remove “**TouchWiz not working**” problem. The steps are:
- Open “Settings” and go to “Personalization”.
- Hit on “Easy Mode” now.


Hope the TouchWiz won’t keep stopping error does not pop up anymore!
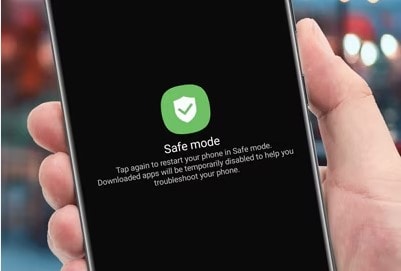
Boot your phone to safe mode
Here is the next solution to be followed when TouchWiz keeps stopping. As we already said, third-party apps can cause this issue, booting your device in the Safe mode will disable those apps temporarily. Hence you need to boot your Vivo S18e device to Safe mode and check if the reason is any third-party app.
- Switch off your device to initiate.
- Press “Power” button and keep doing this until device’s logo appears on the screen.
- When you see logo appearing, instantly release the button and start holding “Volume Down” button.
- Keep holding until rebooting finishes.
- You will now witness “Safe mode” on the bottom screen. You can now release the button.

Reset Factory settings
If the above method went futile and you’re still at the same place, then factory reset is the next logical step to be taken. We suggest this method because it will take your device to its factory state. As a result, TouchWiz will probably get normal and work perfectly.
Along with this, we would also suggest you go take backup of your data so that you won’t lose any of the personal information from your device after performing factory reset. For your convenience, we have stated the backup steps too in the following guide. Have a look:
- Run “Settings’ in your device and go to “Backup & Reset”.
- Notice if “Back up my data” is enabled or not. If not, turn it on and create backup.
- Now, scroll for “Factory Data reset” option and confirm it by clicking “Reset Phone”.

- Wait a few minutes and your device will reboot.
 CollageIt Pro
Install a new launcher to replace TouchWiz
We believe that you will find the above methods helpful. However, if still in case your TouchWiz is not working, we advice you that you should install a new theme launcher in your device. It will be a wise option to ditch TouchWiz in such scenario rather than tolerating the problem. Hope this advice will help you.

Ways to Unbrick Your Android Device: Various Ways for Recovery
When your Vivo S18e becomes unresponsive or frozen after mistakenly flashing a ROM or rooting, you are informed that the phone has been bricked. The most terrifying aspect will not just be gadget loss, but also data erasure. However, what exactly is a bricked phone, and, more importantly, how do you fix a bricked Android phone?
This article will explain what a bricked android phone is, why an Android phone becomes bricked, how to unbrick an Android phone without losing data and a third-party application you can use.
Part 1. Causes of Bricked Phones
In everyday settings, our mobile devices have become our greatest friends, therefore breaking your phone is the last thing you want to do. There are different reasons why devices brick, and we must be familiar with them in order to comprehend the various techniques to repair bricked devices.
Here are some common reasons why your Vivo S18e is bricked:
- **Flashing Stock/Custom ROM:**It is possible that you installed an incompatible ROM in the Android phone, that the phone shuts off during the process, or that you have performed other errors that cause your phone to restart indefinitely or to become stuck at the starting screen.
- **Rooting an Android device:**You are unable to effectively root the Vivo S18e device.
- **Android firmware is being updated:**If the phone is interrupted when updating the Android firmware, it will be bricked.
- **Installing harmful applications:**You installed harmful programs on your Vivo S18e, or the phone was infected with a virus.
Part 2. How to Fix a Bricked Phone
The first step is to establish how badly your device is bricked. In most cases, you will be working with soft bricks that are pretty simple to repair. If your phone is stuck in a boot loop or enters recovery mode every time you turn it on, you may have a soft brick.
To repair bricked Android phones and tablets, you must first thoroughly examine the Vivo S18e device’s state. Before you begin troubleshooting, determine the sort of bricking that your phone is experiencing. However, there is no specific software to unbrick your Vivo S18e; you may need to learn the complexities of this issue or hire a professional to do it for you.
 safe & secure
Here are some simple methods for repairing bricked Android devices:
 Epubor Audible Converter for Mac: Download and convert Audible AAXC/AA/AAX to MP3 with 100% original quality preserved.
Method 1. Reboot the Phone in Safe Mode
Trying to reboot your android device in safe mode is the first and easiest thing you should try if your phone is bricked. Here’s how to do it:
- Step 1: Turn off your smartphone and press the Volume Up + Power button to enter recovery mode. Then, using the volume controls, navigate the menu and select Reboot system now.
- Step 2: Select the highlighted option by pressing the Power button. After that, wait for your device to reset normally.
- Note: The steps for booting into recovery mode may change based on the manufacturer of your device. For further information, go to the user manual for your phone or tablet.
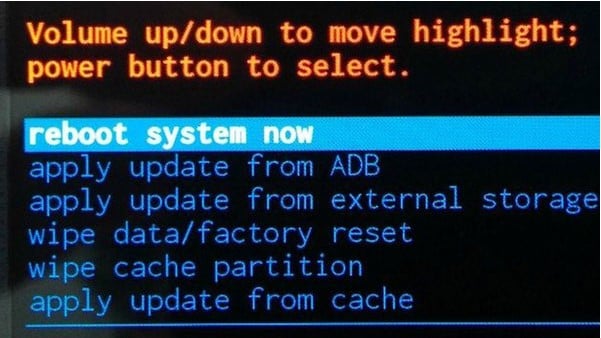
Method 2. Wipe the Cache Partition
This is the first indication that a user’s phone has gone bricked. The phone turned on automatically, however it became stuck or frozen on the logo screen. The issue might be caused by the undeleting of data and cache, which prevents the phone from displaying the home screen.
This issue, however, may be resolved by wiping the data and cache partitions in recovery mode. You must do the following to do this:
- Step 1: Turn off your smartphone and enter recovery mode by pressing the Power and Volume Down buttons simultaneously. Different devices have various approaches for entering recovery mode, so you may perform better.
- Step 2: After entering recovery mode, you should see the screen below. Remember to pick Advanced and then “Wipe Dalvik Cache” if your device is under Clockwork Mod recovery. Return to the main screen and select “Wipe Cache Partition” once more.
- Step 3: Finally, on your smartphone, choose the Reboot system immediately.
Method 3. Perform a Factory Reset
A factory reset can undo the alterations made to your device that resulted in the brick phone, but you will lose everything you have downloaded and installed in the process. Here’s how to restore a bricked Android phone to factory settings:
- Step 1: Boot your device into recovery mode (turn off your device, then press power button + volume up button).
- Step 2: Select “Wipe Data/“Factory Reset” then confirm the action. When the process is done, you’ll be returned to the recovery mode menu.
- Step 3: Select “Reboot System Now” to restart your device.


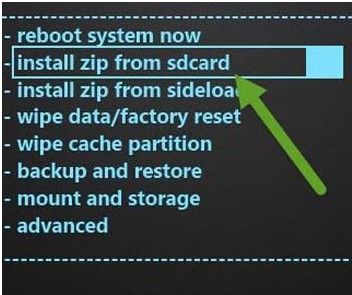
Method 4. Flash a Custom ROM
If you boot your phone directly into recovery mode, there’s a problem with the ROM you loaded. Then simply flash the following custom ROM on your phone:
- Step 1: Save the required ROM (in ZIP format) to an SD card. The SD card should then be inserted into your Vivo S18e.
- Step 2: Click the “Install zip from sdcard” button. Then, select the ZIP file that contains the ROM. Finally, click the “reboot system now” button.

Method 5. Using Wondershare Dr.Fone to Fix bricked Android Devices
Wondershare Dr.Fone - Data Recovery is the first data recovery solution for any damaged Android smartphone in the globe. It offers one of the greatest recovery rates and can recover a variety of information like images, videos, contacts, messages, and call logs. The program is most effective with Vivo S18e smartphones.
While it is not an Android unbrick tool, it is a useful tool for retrieving data when your Vivo S18e becomes bricked. It is quite easy to use:
- Step 1: Launch Wondershare Dr.Fone and select “Data Recovery” > “Recover Android Data” from the menu. Then, select “****Recover from Broken Phone”.

- Step 2: Choose the file types you wish to recover. Click “Next” and then select the type of damage your phone is experiencing. Select “Touch screen not responsive, or cannot access the phone” or “Black/broken screen”.

- Step 3: Use the recovery wizard to enter your Android smartphone into Download Mode. Connect your Android handset to the computer after following the instructions to begin automatically analyzing your device.

- Step 4: The program will provide a list of all recoverable files, organized by file type. To preview the file, highlight it. Choose the files you wish to recover and then click “Recover” to save all the data you want to restore.


 safe & secure

Part 3. How to Prevent Bricking Your Phone
How to prevent a device from “bricking” itself and how to repair it if it does The delay is set by the MCU, but it should be long enough to allow the debug adapter to connect to the Vivo S18e device and halt it before the Vivo S18e device disables itself.
Here are some things to remember to prevent your device from bricking:
- Avoiding unofficial firmware updates: Installing unapproved OS firmware on your phone will most certainly violate any manufacturer’s warranty you have on it. Read the installation instructions for your unique phone model thoroughly and then carefully follow them, taking time and patience.
- **Being cautious when rooting or jail breaking:**Rooting and Jail breaking disables parts of the operating system’s built-in security mechanisms, which are part of what makes the operating system safe, and your data protected from exposure or damage.
- **Install an antivirus application on your device:**Mobile devices increase the danger of data leaks and breaches. As a result, antiviral software is beneficial on mobile phones. Mobile Device Management is an excellent choice for virus protection on your mobile device.
- Backup your phone data regularly: Backing up your phone safeguards your data in the event that you lose it, it is stolen, or it no longer works. When it comes time to replace your phone, having a backup makes it simple to restore your data to the new device. Furthermore, backing up your phone allows you to organize your data so that it is easier to access.
- Avoid installing apps from untrusted sources: Apps installed from unauthorized sources make your device and personal data more exposed to dangers such as Ransomware. So you should be wary of where you download applications.

Conclusion
It is certainly upsetting when your gadget bricks, but you may attempt the solutions listed above to resolve the issue. Meanwhile, if you want to solve the problem quickly and easily, you can try Wondershare Dr.Fone. It can not only help you repair your Android smartphone, but it can also help you extract data from a bricked device, recover data, and many more Android device solutions!
 OtsAV Radio Webcaster
safe & secure
Play Store Not Working On Vivo S18e? 8 Solutions Inside
A functional Google Play Store is crucial for Android users to access, update, and install apps. Unfortunately, common issues like your Google Play Store not working can disrupt this experience. If you find your Play Store misbehaving more often than not, don’t fret.
In this guide, discover reliable solutions when your Google Play Store is not responding. The article will teach you how to tackle these problems and ensure a seamless app experience. Don’t let technical glitches hinder your digital journey—follow these troubleshooting steps for a swift resolution. Explore the page below to learn more.


Part I. 7 Common Google Play Store Issues Users Encounter
The Google Play Store serves as the epicenter for Android users. It facilitates seamless access to a vast array of apps. However, encountering issues with the platform can impact the functionality of your device. Below are 7 common issues on why your Google Play Store is not responding.
 WinUtilities Pro
Inability To Open the Play Store
The inability to open the Play Store leaves you without access to new apps or updates. The issue is often accompanied by error messages, which can leave you scratching your head.
Crashing Issues
Frequent crashes undermine the stability of the Play Store. Users attempting to browse or download apps may find themselves abruptly kicked out of the application. It can disrupt your intended tasks and cause annoyance in the long run.
Not Responding Errors
The dreaded “Not Responding” message can bring usability to a standstill. Users navigating the Play Store may experience delays or complete unresponsiveness. It can lead to a frustrating and unproductive experience.
Download and Installation Failures
When downloads and installations fail, you will be unable to enjoy new apps or updates. This issue can be annoying when trying to access crucial software improvements or security updates.
Authentication and Account Issues
Problems with authentication and account access can lock users out of their Google accounts on the Play Store. It prevents users from purchasing or downloading apps. The issue not only hampers functionality but also raises security concerns.
Update Problems
Difficulties in updating apps can leave users with outdated software. It can potentially compromise security and miss out on new features. The issue diminishes the user experience by depriving you of the latest enhancements.
Connection and Network Errors
Persistent connection and network errors impede the Play Store’s ability to fetch data. It hinders users from browsing and downloading apps. The issue is frustrating in areas with unstable internet connectivity.
Part II. Why Does the Google Play Store Keep Stopping?
If you’re wondering why does Google Play Store keeps stopping on your phone, there can be several factors. Here are some of them below.

- **Network issues.**Unstable or poor internet connections can disrupt the communication between the Vivo S18e device and the Play Store. It can lead to frequent crashes.
- **Outdated Play Store version.**Running an outdated version of the Play Store may result in compatibility issues. The lack of essential updates can cause the application to stop unexpectedly.
- Cache and data accumulation. Over time, cached data and accumulated data in the Play Store can become corrupted. It can hinder the smooth operation of your phone and contribute to sudden stops.
- Google account problems. Authentication issues, incorrect credentials, or other problems with the linked Google account can disrupt the Play Store’s functionality. This can also lead to repeated crashes.
- **System glitches and bugs.**Inherent glitches and bugs within the Android operating system may affect the Play Store’s performance. They can cause your device to stop unexpectedly.
Part III.7 Quick Solutions To Resolve Play Store Not Working Issues
Encountering issues with the Google Play Store can be frustrating. It disrupts your ability to download, update, or access essential apps. Here are seven quick solutions when your Google Play Store unfortunately has stopped.
 vMix 4K - Software based live production. vMix 4K includes everything in vMix HD plus 4K support, PTZ control, External/Fullscreen output, 4 Virtual Outputs, 1 Replay, 4 vMix Call, and 2 Recorders.
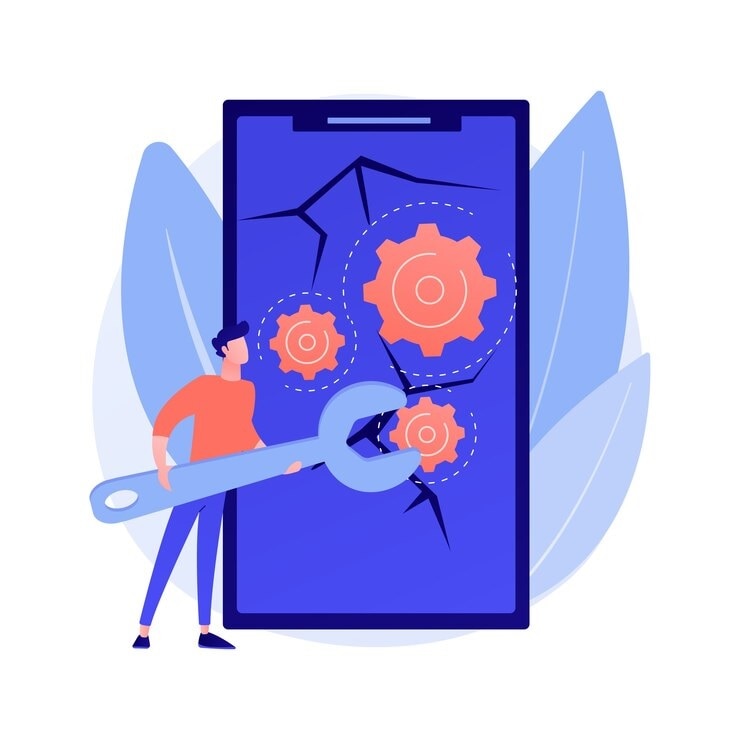
Clear Cache and Data
Revitalize your Google Play Store by addressing performance issues. Clearing cache and data can be a crucial step when troubleshooting malfunctions or glitches in the app. Here’s how.
- Step 1: Head to your device’s Settings and navigate to Apps or Application Manager.
- Step 2: Locate and select Google Play Store. Within Storage, choose Clear Cache and Clear Data. Confirm your action and restart the Play Store.

Update Play Store
Enhance your Play Store’s functionality by ensuring it’s up-to-date. This method suits those who haven’t updated their Google Play Store for a long time. Follow the steps below.
- Step 1: Open the Play Store app and tap the three horizontal lines in the top-left corner to access the menu.
- Step 2: Select Settings and scroll down to find the Play Store version. Install any available updates.

 OtsAV DJ Pro
Check Internet Connection
Ensure a stable internet connection on your device. Switch between Wi-Fi and mobile data to identify connectivity issues. Restart your router or modem if problems persist.
Reset App Preferences
Restore your device’s app settings to default for improved functionality. Below are the steps.
- Step 1: Go to your device’s Settings and select Apps or Application Manager.
- Step 2: Tap the three dots in the top-right corner and choose Reset app preferences.


Re-add Google Account
Resolve Play Store issues by re-adding your Google account. Follow these steps in Settings to remove and re-add your Google account, ensuring a seamless and error-free experience.
- Step 1: Navigate to Settings and choose Accounts or Users & Accounts.
- Step 2: Select Google and remove the account. Re-add the Google account and verify if the Play Store functions properly.

 LYRX is an easy-to-use karaoke software with the professional features karaoke hosts need to perform with precision. LYRX is karaoke show hosting software that supports all standard karaoke file types as well as HD video formats, and it’s truly fun to use.
Uninstall Play Store Updates
This method troubleshoots Play Store problems by uninstalling updates. Here’s how.
- Step 1: Access Settings and go to Apps or Application Manager.
- Step 2: Find Google Play Store and tap on Uninstall Updates. Confirm the action and restart the Play Store.

Perform a System Update
Ensure your device’s overall stability by performing a system update to ensure the stable operation of the Play Store. Follow the steps below.
- Step 1: Access Settings, scroll down, and select System or Software Update.
- Step 2: Next, choose System update or Check for Updates and install any available system updates**.**


If you’re still asking yourself why my Google Play Store is not opening after conventional methods prove ineffective, it may lead you to explore third-party tools. As a final recourse, considering reputable tools like Wondershare Dr.Fone - System Repair introduces a fresh approach to troubleshooting your device.
Part IV. How To Repair Play Store Not Working With an Alternative
Repairing your Google Play Store can be swift and effective with Dr.Fone - System Repair. This tool offers advanced features to diagnose and fix various system issues without the advanced skills required. It provides a quick and efficient resolution for a malfunctioning Google Play Store. Follow these three simple steps to get started:
- Step 1: Begin by downloading and installing Dr.Fone - System Repair (Android) on your computer.

 safe & secure
4,207,329 people have downloaded it
- Step 2: Launch the program and connect your Vivo S18e to the computer using a USB cable. Choose the Vivo S18e device type and click Start to initiate the repair process.
- Step 3: Dr.Foneshould automatically detect the brand of your device. Next, choose the Name, Model, Country, and Carrier. Tick the checkmark and click Next to continue. Follow the on-screen instructions and wait for the repair process to complete.
 PDF application, powered by AI-based OCR, for unified workflows with both digital and scanned documents.
- Step 4: Simply click Done on the prompt window displaying a confirmation message to exit the tool if your Vivo S18e starts successfully. In the event that the Vivo S18e device fails to start, select Try Again to initiate the process once more.
Bonus: What Else Can Dr.Fone - System Repair Do?
Beyond its utility in fixing Google Play Store malfunctions, Dr.Fone is known for its user-friendly interface and high success rate. Its ability to address a wide range of Android issues offers a comprehensive solution to various system-related problems. Below are the platform’s key highlights.
Key Features
- Fixes diverse Android issues. Dr.Fone - System Repair excels in resolving a multitude of Android problems. This includes a black screen, a boot loop, and bricked Android devices. Its comprehensive approach ensures you can rely on a single tool to tackle a wide range of system-related issues.
- Support for over 1000 Android models. Dr.Fone supports over 1000 Android models. The broad coverage ensures diverse devices can use the software to troubleshoot and repair their Android systems.
- User-Friendly interface. Dr.Fone is designed with simplicity in mind. It offers an easy-to-use interface that caters to both novice and experienced users.
- High success rate. The software boasts a high success rate in resolving Android issues. Its effectiveness in tackling various problems has garnered trust among users. It’s one of the go-to solutions for those seeking reliable and efficient system repairs.
safe & secure
4,131,376 people have downloaded it
Conclusion
Addressing issues when your Google Play Store does not work is crucial for an uninterrupted Android experience. Follow the outlined steps to regain control and enjoy a seamless app experience. Don’t let frustrations linger; take immediate action for a hassle-free Google Play Store.
Lastly, having Dr.Fone - System Repair at your side offers a reliable solution for a wide range of Android concerns. Don’t worry if your Google Play store is not responding, and Dr.Fone can fix it in minutes.
- Title: 9 Quick Fixes to Unfortunately TouchWiz has stopped Of Vivo S18e | Dr.fone
- Author: Ariadne
- Created at : 2024-07-30 08:48:37
- Updated at : 2024-07-31 08:48:37
- Link: https://howto.techidaily.com/9-quick-fixes-to-unfortunately-touchwiz-has-stopped-of-vivo-s18e-drfone-by-drfone-fix-android-problems-fix-android-problems/
- License: This work is licensed under CC BY-NC-SA 4.0.