
9 Solutions to Fix Process System Isnt Responding Error on Infinix Smart 7 | Dr.fone
9 Solutions to Fix Process System Isn’t Responding Error on Infinix Smart 7
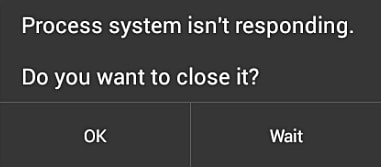
The “Process system isn’t responding” is a common error that occurs in almost every kind of Android device. Even though most Android smartphone manufacturers have taken a huge leap in the last few years, the operating system still suffers from a few pitfalls. The process system isn’t responding Android is one of those errors that have been reported plenty of times. I definitely understand encountering the ‘Process System Isn’t Responding’ error on your Infinix Smart 7 can be frustrating.
However, there are several straightforward methods to resolve this issue. This article will provide a step-by-step guide on how to fix the problem and restore your device to normal functionality.
Before solving any Android system issues, try this Android backup software to take a full backup, in case any data loss happens.
Part 1: Reasons for process system isn’t responding error
There could be plenty of reasons for getting the process system is not responding in Android.
- Software Glitch: Android systems may experience temporary glitches due to factors like memory management issues, conflicts between apps or services, or system updates.
- Insufficient System Resources: Low system storage is another reason for getting the error. If you have too many apps on your phone, then it might take a toll on its memory and generate the “process system isn’t responding” prompt.
- Third-Party Apps: Users have also complained that they receive the “Android process system is not responding” error after installing a new app. If you have installed an app from a source other than Google Play Store, then the chances are that you can get this error. Though, even after installing an app from Play Store, there is a bleak probability of facing this issue as well.
- Outdated Software: Using outdated apps, particularly system apps or critical components, may lead to compatibility issues with the latest Android version.
- System Updates: Most of the time, it happens whenever a device is restarted after updating its Android version. Your device could have undergone a bad update or might have had an unsupported driver. This can result in the occurrence of process system not responding issue.
- Corrupt Cache Files: Corrupted cache files can lead to conflicts and result in error.
- Overclocking or Modifications: Rooting or modifying the Android device, or applying overclocking settings, can lead to instability and the process system not responding error.
- Hardware Issues: Rarely, hardware problems like failing components can interfere with the proper functioning of the system.
No matter what the cause is, there are plenty of ways to overcome this issue. We have listed a handful of them in this post.
 OtsAV DJ Pro
Part 2: How to Fix Android Process Not Responding? 8 Fixes
When this error occurs, it can disrupt the normal operation of the Infinix Smart 7 device, causing apps to freeze or crash. Fortunately, there are several effective methods to address this problem.
Fix 1: Restart your device
This is one of the easiest ways to resolve the process system not responding error. If you are getting this error on your phone, then try to manually restart your device. The way to restart your phone might differ from one device to another. Mostly, it can be done by long-pressing the power button. This will provide different power options. Tap on the “Reboot” one to restart your phone.
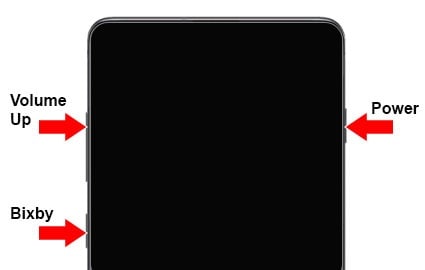
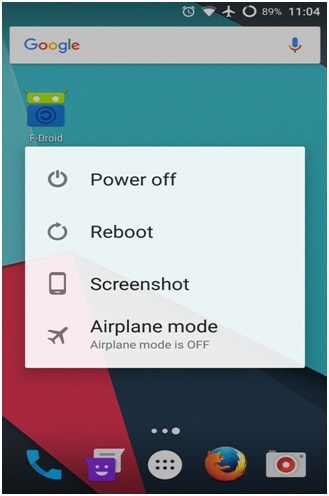If it won’t work, then long press the Power and Volume up buttons at the same time until the screen goes off. Afterward, use the power button again to turn it on.

Fix 2: Reset App Preferences
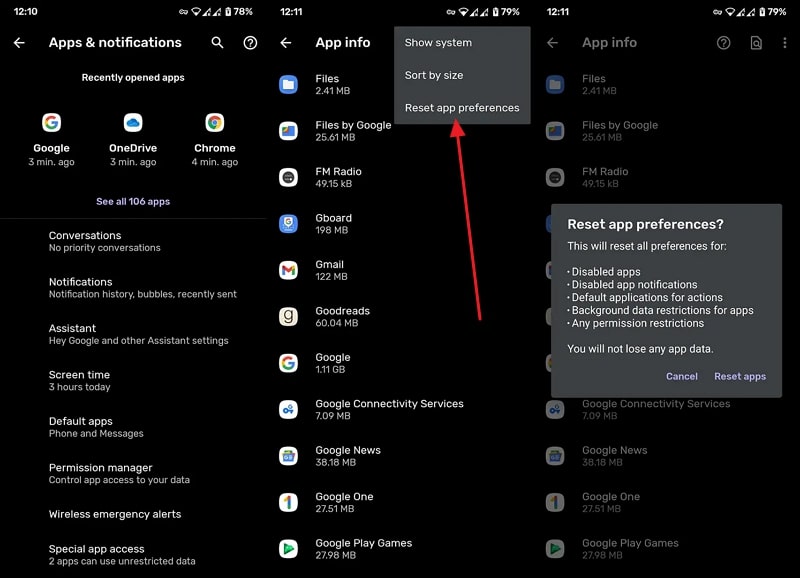
Sometimes the apps interfere with the Infinix Smart 7 device’s settings because they were given permission to access specific functions. It is recommended to allow the asked permission precisely because some suspicious apps can also steal your sensitive data. Here are the straightforward instructions you need to follow to reset the app preferences:
Proceed to the “Apps and Notifications” settings from the Settings app. Next, tap the “See All Apps” option and access the “Three Dots” menu. Here select the “Reset App Preferences” option and confirm the process from the confirmation pop-up.

Fix 3: Free Up Space to Make Sure Android Have Enough Internal Memory
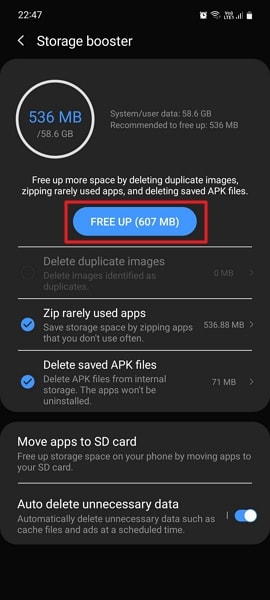
In case the Android internal memory is completely filled, it will slow down the processing speed of the Infinix Smart 7 device. Internal memory is vital for the Infinix Smart 7 device to run all the background apps or the process required by the OS to run the Infinix Smart 7 device efficiently. You can follow these steps to free up some space on your Infinix Smart 7:
Step 1: Open the Settings app on your Infinix Smart 7 and access the “Battery and Device Care” option by scrolling down. Next, tap on the “Three Dots” from the top right corner and choose the “Storage Booster” feature.
 Power Tools add-on for Google Sheets, 12-month subscription

Step 2: Following this, you can select the data you want to remove from the internal memory. Your device will show the space it will free up for you, and you can press the “Free Up” button to free up the storage.
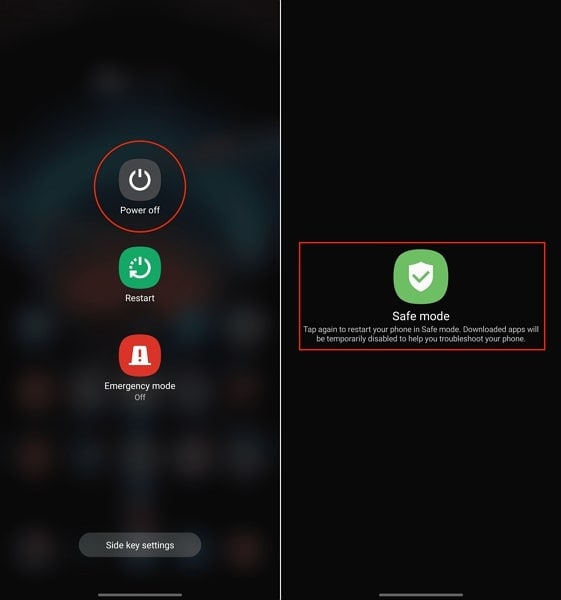
Fix 4: Enter Safe Mode to Uninstall Suspicious Apps
This issue can also occur if you have installed an app from the Google Play Store with a very low rating or an APK. Unlike Apple App Store, anyone can easily upload their mobile apps on Play Store, so it is important to check the app’s credibility before installing it. Following are the simplified instructions to enter the safe mode and delete all suspicious applications:
Press and hold the “Power” button of your Android and press and hold the “Power Off” option to access the “Safe Mode” feature. Afterward, confirm to enter the safe mode and remove all the suspicious apps from the Infinix Smart 7 device. You can do this by holding on to the app and selecting the “Uninstall” option from the pop-up options.

Fix 5: Update All Apps on your Device
Updating the apps is crucial for any Android device to work with high efficiency and performance. Apps are developed to make the users’ daily tasks easy to execute. However, there might be some negligence in the development, which can leave some bugs in the app. These bugs are fixed with time by releasing the new version of the app. To update your Android app, proceed with the following step-by-step instructions:
Step 1: Locate the Play Store from the Android home screen and access it. Then, tap the “Profile” icon from the top right corner and proceed to the “Manage apps and devices” option. Afterward, you can check how many app updates are available from the “Updates available” option. To update the apps, you will have to go inside this option.
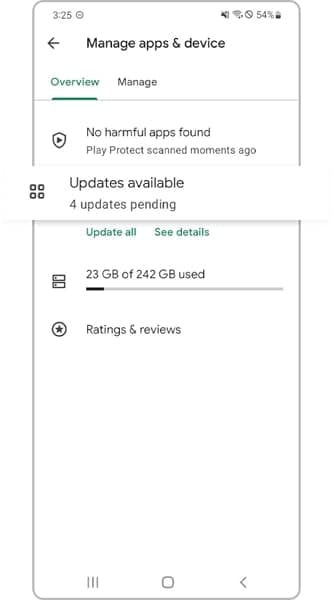
Step 2: You can tap on the “Update All” button if you want to update all the apps one by one. Otherwise, you can press the “Update” option adjacent to each app name to update the frequently used ones.

Fix 6: Check the SD card
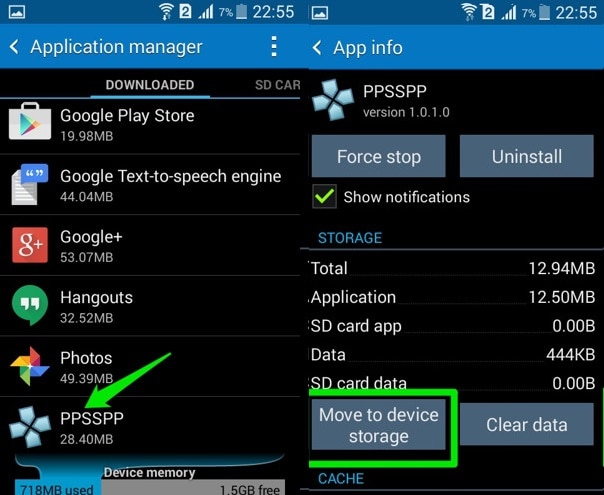
If you are still getting the process system isn’t responding to Android error, then chances are that there could be an issue with your SD card. Firstly, check if your SD card is working fine or not. If it is corrupted, then get another memory card for your phone. Also, it should have a prominent amount of free storage. You might be facing this issue if the SD card has limited free space.
Also, if you are storing apps on the SD card, then your phone might encounter the process isn’t responding issue whenever you run a respective app. Therefore, you should move apps from your SD card to the phone’s internal memory. To do this, go to your phone’s Settings > Application Manager and select any app. If the app is stored on the SD card, then you will get an option of “Move to devise storage”. Just tap on it and manually move every app to your device storage.
Fix 7: One click to fix the process system isn’t responding error
If all the above tricks don’t get your device out of the process system not responding state, then there may be some system issues on your Android. In this case, an Android repair can successfully fix issues like process system isn’t responding.
Note: Android repair may wipe out existing Android data. Back up your Android data before going on.
Dr.Fone - System Repair (Android)
Android repair tool to fix all Android system issues in one click
- Fix all Android system issues like the black screen of death, system UI not working, etc.
- One-click for Android repair. No technical skills are required.
- Supports all the new Infinix Smart 7 devices like Galaxy S8, S9, S22, etc.
- Step-by-step instructions are provided. Friendly UI.
3981454 people have downloaded it
Follow the easy steps below to fix process system isn’t responding error:
- 1. Download and install the Dr.Fone tool. Then select “System Repair” from the main window.

- 2. Connect your Infinix Smart 7 to the PC. After the Infinix Smart 7 device is detected, select the “Android” tab.
 Forex Robotron Basic Package
- 3. Select and confirm the correct device details of your Android. Then boot your Infinix Smart 7 in download mode and proceed.

- 4. Download the firmware and click “Fix Now”.

- 5. After a while, your Android will be repaired with the “process system isn’t responding” error fixed.

 safe & secure
Fix 8: Factory reset Android
It is always considered the most used way to factory reset your phone in order to resolve the process system not responding error. Though, this should be your last resort, as it will wipe off your device’s data entirely. Even if you are performing a factory reset, make sure that you back up your data by using a reliable tool like Wondershare Dr.Fone .
 vMix Pro - Software based live production. vMix Pro includes everything in vMix 4K plus 8 channels of Replay and 8 vMix Call
Wondershare Dr.Fone
Flexibly Back up and Restore Android Data
- Back up Android data to the computer with one click.
- Preview and restore selectively the backup to any Android device.
- Supports 8000+ Android devices.
- There is no data lost during backup, export, or restoration.
3,981,454 people have downloaded it
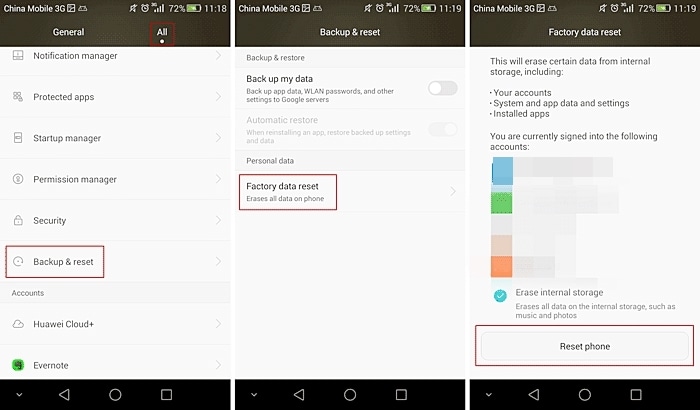
If your phone is functioning, then you can easily factory reset it by visiting Settings > General > Backup & Restore and selecting the option of “Factory Data Reset”. Your device will display a warning regarding all the data files that would be lost or un-synced. Just tap on the “Reset” button to factory reset your device.
If your device is not functioning or locked, then you can perform the factory reset operation by putting your phone into Recovery mode. Most of the time, it can be done by pressing the Power and Volume up button simultaneously for at least 10 seconds. Though, the key combinations might change from one device to another.
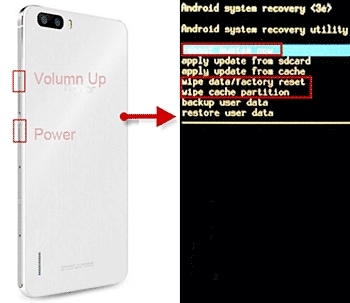
After entering the Recovery mode, go to the “wipe data/factory reset” option using the Volume up and down button. Use the Power button to make a selection. If you get an additional message, then select the “yes – delete all data” option. When it is done, you can simply reboot your device.
Fix 9: Unroot the Infinix Smart 7 device
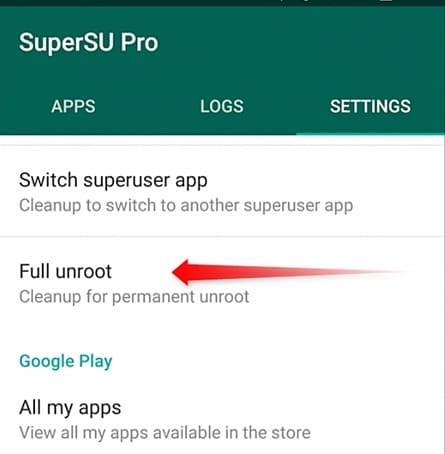
It has been further discovered that the process system isn’t responding error is more common in rooted devices. Therefore, if you also have a rooted Android device, then you can choose to unroot it in order to fix this issue. There are different ways to unroot an Android device. One of the easiest ways to do it is by using the SuperSU app.
You can always download either SuperSU or SuperSU Pro app from its website here . Simply install it on our device and launch it whenever you wish to unroot it. Visit its “Settings” tab and select the option of “Full unroot”.
 Glary Utilities PRO - Premium all-in-one utility to clean, speed up, maintain and protect your PC
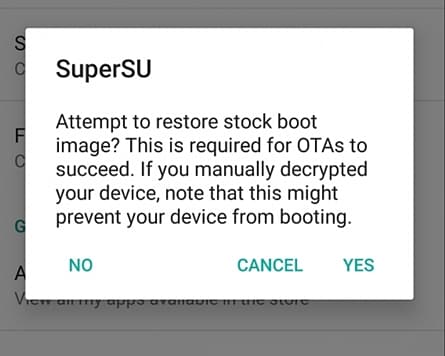
This will generate a warning message regarding all the repercussions of the unrooting process. Just tap on “Continue” to initiate the process.

If you are using an older version of Android, then you might get another pop-up to restore boot images. Simply make the desired selection and start the process. After a while, your device would be restarted the usual way, and it would be unrooted. Most probably, this will resolve the process system isn’t responding error as well.
Now that you know different ways to fix the process system not responding error, you can easily overcome this issue and make the most out of your device. Simply start with the easy fixes, and if they don’t work, then take extreme measures like unrooting your device or restoring it to factory setting. Also, make sure to back up your data before taking any extreme measures.
Troubleshooting Guide: How to Fix an Unresponsive Infinix Smart 7 Screen

Smart devices have become an integral part of our lives, and Infinix Smart 7 phones are increasingly popular due to their advanced features and affordable prices. These phones offer numerous benefits, including high-quality cameras, fast processors, long-lasting batteries, and sleek designs.
However, like any other electronic device, Infinix Smart 7 phones can sometimes encounter issues that may impede their functionality. One common problem that users face is an unresponsive screen, which can be frustrating and disruptive to daily activities.
This article will discuss some valuable solutions for dealing with Infinix Smart 7 phone screen unresponsiveness. We will provide step-by-step instructions for troubleshooting and getting your phone back in working order. Whether you’re a novice or an experienced user, these tips and tricks will help you navigate this problem and get back to using your phone without any issues. So, let’s dive in and explore how to fix a Infinix Smart 7 phone with an unresponsive screen.
What causes the Infinix Smart 7 Screen unresponsive?
The Infinix Smart 7 screen may become unresponsive due to various reasons. Here are some common situations and their possible causes:
During Use/Gaming: The screen may become unresponsive due to overheating when using or gaming on a Infinix Smart 7 phone. This can be caused by running too many apps simultaneously or playing games for an extended period, especially on models such as the Infinix Smart 7 9 Pro, which generates much heat during gaming.
**No Response When Touching the Screen:**Sometimes, the Infinix Smart 7 screen may not respond when touched due to a faulty touch screen or display. This can happen due to physical damage or a manufacturing defect. Some Infinix Smart 7 Nord 2 users have reported this issue.
After Dropping the Phone: If a Infinix Smart 7 phone has been dropped, the screen may become unresponsive due to physical damage or a loose connection. This can happen to any model, including the Infinix Smart 7.
Overheating, physical damage, and manufacturing defects are some common causes of Infinix Smart 7 screen unresponsiveness, which may occur during use/gaming, no response when touching the screen, or after dropping the phone.
The common solutions to solve a Infinix Smart 7 Screen unresponsive
Here are the three most common solutions to deal with phone screens being unresponsive, regardless of the brand:
Restart the Infinix Smart 7 device

Restarting the Infinix Smart 7 device is a simple and quick solution to an unresponsive phone screen. To restart the phone, press and hold the power button until the screen turns off, then press and hold the power button again to turn the phone back on.
Check the Charging Port and Battery
 Allavsoft Batch Download Online Videos, Music Offline to MP4, MP3, MOV, etc format
Sometimes, an unresponsive screen can be caused by a dead battery or a faulty charging port. To check for these issues:
Step 1: Plug the phone into a charger and wait for at least 30 minutes to see if the battery charges.
Step 2: Try a different charger or cable to see if the issue is with the charging accessories.
Contact the Pros

If the above solutions don’t work, contacting a professional is best. A trained technician can diagnose and fix the problem. Contact the phone manufacturer or an authorized repair center to get help with your phone.
For different Infinix Smart 7 models, there may be additional solutions to consider:

Check the Phone’s Temperature

Sometimes, a Infinix Smart 7 phone’s screen, specifically Infinix Smart 7 8 Pro, may become unresponsive due to overheating. To check the phone’s temperature:
Step 1: Go to Settings > Battery > Battery Temperature.
Step 2: If the phone is overheating, let it cool down before using it again.

Reset to Factory Settings
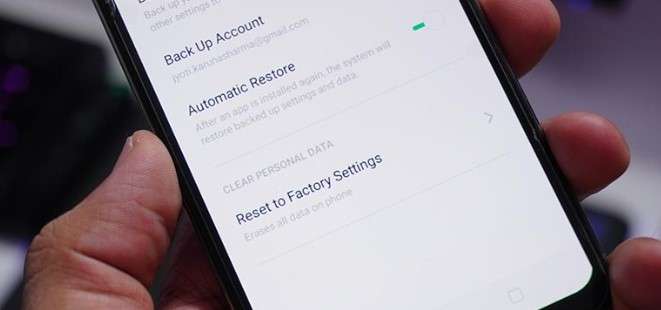
A factory reset may help fix the problem if none of the above solutions work. Note that this will erase all data and settings on the phone, so be sure to back up your data before resetting. To reset the phone:
Step 1: Go to Settings > Additional Settings > Backup and Reset > Erase All Data.
Step 2: Follow the on-screen instructions to reset the phone.
Replace a New Screen

If the phone’s screen is physically damaged or cracked, it may need to be replaced. To replace the screen:
- Contact a professional repair center or the manufacturer for replacement parts and installation.
How to avoid Infinix Smart 7 Screen being unresponsive?
To avoid Infinix Smart 7 screen being unresponsive, here are some suggestions based on the possible causes:

Check Software Updates on Time
Make sure to regularly check for and install software updates on your Infinix Smart 7 phone. These updates often include bug fixes and security patches that can help prevent issues like overheating and screen unresponsiveness.
Check Hardware from Time to Time
Regularly inspect your phone’s hardware components such as charging ports, battery, and screen for any signs of damage or wear and tear. If you notice any issues, get them fixed promptly to prevent them from causing further damage.
Avoid extreme temperatures
Keep your Infinix Smart 7 device in a temperature-controlled environment. High temperatures can cause the screen to become unresponsive, and low temperatures can cause it to freeze.
Keep the screen clean
Dirt and debris on the screen can cause it to become unresponsive. Use a microfiber cloth to clean the screen regularly.
Reduce the number of running apps
Running too many apps at once can overload the system and cause the screen to become unresponsive. Close any apps you’re not using to free up system resources.
Use Wondershare Dr.Fone to Repair or Manage Your Data
Wondershare Dr.Fone is a helpful tool that can help manage and repair your phone’s data. It can be used to back up your data, transfer files between devices, and even fix issues like an unresponsive screen. Dr.Fone has the DF13 version to be launched, which includes more features to help manage your phone’s data effectively.
By following these suggestions, you can help prevent screen unresponsiveness on your Infinix Smart 7 phone. Download Dr.Fone at https://drfone.wondershare.com/ to manage your phone’s data effectively and fix any issues that may arise.
safe & secure
Conclusion
Infinix Smart 7 phones offer numerous benefits, including high-quality cameras, fast processors, long-lasting batteries, and sleek designs. However, like any other electronic device, Infinix Smart 7 phones can sometimes encounter issues, such as an unresponsive screen. The causes of an unresponsive screen may include overheating, physical damage, and manufacturing defects.
To deal with an unresponsive screen, users can try restarting the Infinix Smart 7 device, checking the charging port and battery, or contacting a professional. Additional solutions for specific Infinix Smart 7 models include checking the phone’s temperature, resetting to factory settings, or replacing a new screen. To avoid an unresponsive screen, users can check software updates on time, inspect the phone’s hardware, avoid extreme temperatures, keep the screen clean, and reduce the number of running apps. Dr.Fone is a helpful tool that can help manage and repair your phone’s data.
 With Screensaver Wonder you can easily make a screensaver from your own pictures and video files. Create screensavers for your own computer or create standalone, self-installing screensavers for easy sharing with your friends. Together with its sister product Screensaver Factory, Screensaver Wonder is one of the most popular screensaver software products in the world, helping thousands of users decorate their computer screens quickly and easily.
Fix Unfortunately Settings Has Stopped on Infinix Smart 7 Quickly
All of you, sooner or later, must have found the “Unfortunately Settings has stopped” error on your Infinix Smart 7. The problem can occur if the Settings keeps stopping or crashing. Many times, you may try to open the Settings but it doesn’t even open. Or possibly, it may freeze after getting opened thereby hampering the Infinix Smart 7 device’s performance.

Well! There can be a number of reasons why this thing happens. For instance, custom ROM installations, not enough space in the Infinix Smart 7 device or perhaps an outdated version of Android. If you are struggling with the same issue and want to know what to do when Android Settings is not responding, this post will help you. We have explained everything in detail along with the solutions. So, scroll down and get things sorted.
- Part 1: Clear the cache of Settings and Google Play Service
- Part 2: Clear the Android phone’s RAM and retry
- Part 3: Uninstall the Google update
- Part 4: Uninstall the custom ROM or re-flash the stock ROM
- Part 5: Wipe cache partition to restore Settings
- Part 6: Factory reset your Android
- Part 7: Check and update Android OS
Part 1: Clear the cache of Settings and Google Play Service
It is possible that the corrupted cache files are responsible for this error. Hence, as the first tip, we would like you to clear the Settings cache if that is what triggers the “Unfortunately Settings has stopped” issue. Clearing it would definitely make Settings run appropriately. And The steps to clear the cache of the Google Play Services app are similar. Here is how to clear the cache of Settings:
- Open “Settings” on your Infinix Smart 7 and choose “Apps & Notifications”/”Apps”/”Application Manager” (the option may differ on different devices).
- In the list of applications, look for “Settings” and open it.
- Now, select “Storage” followed by “Clear Cache”.

Note: In some phones, the “Clear Cache” option may come after tapping on “Force Stop”. Therefore, go accordingly without getting confused.
Part 2: Clear the Android phone’s RAM and retry
As the next tip, we would like to suggest you clear your device’s RAM by ceasing the running apps in the background. RAM, if at the increased level, is responsible for the Infinix Smart 7 device’s freezing, poor performance, and most probably is the reason behind crashing Settings. Also, if the apps in the background keep running, they might conflict with the Settings and stop it to perform properly. Therefore clearing RAM is important when Android Settings is not responding. Here is how to do it.
- Firstly, you need to go to the Recent apps screen. For this, long-press the Home key.
Note: Please note that different devices have different ways to go to the Recent apps screen. Do it according to the Infinix Smart 7 device you own. - Now, swipe the apps and tap on the clear option. You will be able to notice the amount of RAM cleared

Part 3: Uninstall the Google update
Uninstalling Google Play Store updates has also responded well to many users. It has worked in the case of the “Unfortunately Settings has stopped” error. So, we would also like to suggest you use this tip if the others don’t work. Here are the steps to be followed for this.
- Open “Settings” on your Android and tap on “Application manager” or “Apps” or “Application.
- Now, head to all the apps and select “Google Play Store” from there.
- Tap on “Uninstall Updates” and restart your device to check if the crashing Settings issue has been resolved.


Part 4: Uninstall the custom ROM or re-flash the stock ROM
Using a custom ROM on your device brings up this problem due to incompatibility or improper installation. Therefore, you should either uninstall the custom ROM or re-flash the stock ROM. in order to re-flash the stock ROM of your Infinix Smart 7, the best way would be Dr.Fone - System Repair (Android). It offers one-click functionality to flash stock ROM and that too with full security. Supporting all Infinix Smart 7 devices, it ranks among its counterparts when it comes to fixing crashing Phone app issues or any other Android system issue. It is loaded with the beneficial features which are discussed below.
Dr.Fone - System Repair (Android)
Android repair tool to fix “Unfortunately, Settings Has Stopped”
- You needn’t be a tech-savvy to use this
- Supports a wide range of Android devices easily, 1000+ being more precise
- One-click tool and supports any sort of Android system issue
- Higher success rate along with millions of trusted users
- Trustworthy and offers an extremely easy interface
4,635,310 people have downloaded it
How to fix crashing Settings using Dr.Fone - System Repair (Android)
Step 1: Download Tool
Visit the official website of Dr.Fone and download the toolbox from there. Go for the installation process and wait until the installation gets over. Launch it now and choose the “System Repair” tab from the main window.
Step 2: Get the Phone Connected
With the help of a USB cable, plug your Infinix Smart 7 into the PC. Upon proper connection, hit on the “Android Repair” option from the left panel.
Step 3: Feed Correct Information
In the next window, you need to fill in some necessary information like the name and model of the mobile device. Enter details like country and career. Check once and hit on “Next”.


Step 4: Enter Download Mode
Now, you need to take your device into Download mode. For this, you need to follow the onscreen instruction according to your device. Click “Next” and you will notice the firmware downloading progress on your screen.

Step 5: Repair the Issue
Once the firmware is completely downloaded, your Infinix Smart 7 will automatically start getting repaired. Stay there and you will receive a notification that the repair is done.
 Video Converter Factory Pro
Part 5: Wipe cache partition to restore Settings
Like RAM, wiping cache is also vital so as to make the Infinix Smart 7 device’s operation smoother. And when you are getting the “Unfortunately Settings has stopped” error, it might be due to the collected cache. To remove it, you will need to enter the recovery mode. And the steps for recovery mode range from device to device. For instance, Infinix Smart 7 users have to press the “Home”, “Power” and “Volume Up” buttons. Similarly, HTC and LG device users are supposed to press the “Volume Down” and “Power” buttons. For Nexus, it is “Volume Up, Down” and Power key combinations. Therefore, before going further, make sure what device you own and enter the recovery mode according to it. Now, follow the detailed guide below to wipe the cache partition in order to fix crashing Settings.
- Primarily, turn off the Infinix Smart 7 device and enter the recovery mode by pressing the respective key combinations.
- You will notice a Recovery screen on your device.
- On showing up the recovery screen, look for the “Wipe Cache partition” option and use the “Volume Down” and “Volume Up” buttons to scroll down and up respectively.
- On reaching the required option, press the “Power” button to start wiping.
- Once finished, click the reboot option and the Infinix Smart 7 device will be rebooted, fixing the issue hopefully.

Part 6: Factory reset your Android
You can also opt for Factory resetting your device to fix the issue of Settings keeps stopping. By removing everything from the Infinix Smart 7 device, it will make your device run properly. If you have important data on your device, please make sure to create a backup before taking action if you don’t want to lose it. The steps are as follows.
- In the “Settings, go to “Backup and Reset”.
- Tap on “Factory data reset” followed by “Reset device”.
- Wait for the completion of the process and check if Settings is stopping or not after it gets rebooted.
 ZoneAlarm Extreme Security NextGen

 OtsAV TV Webcaster
Part 7: Check and update Android OS
A lot of times minor issues crop up due to the operating systems that get outdated. It is because the Infinix Smart 7 device needs to get updated from time-to-time for proper functioning otherwise it will not be able to match up with the fading technologies thereby coming up with issues like “Unfortunately Settings has stopped”. We recommend here you check for the available update and update your device. For this follow the guide below.
- Go to “Settings” and tap “About Phone” on your device.
- Now, hit on “System Update” and the Infinix Smart 7 device will look for any available update.
- If there is any, go along with the prompts to install it and make your phone even smarter.

Conclusion
If your Infinix Smart 7 shows the “Unfortunately Settings has stopped” error, don’t worry. This problem can come from many things like old software or cache issues. You can try easy fixes like clearing cache or updating your system. Sometimes, removing custom ROMs might be needed.
For iOS users facing similar problems, we recommend using Dr.Fone-System Repair (iOS) . It’s known for fixing many iOS problems without losing any data. Remember, a well-working device is just a few steps away!
 safe & secure
- Title: 9 Solutions to Fix Process System Isnt Responding Error on Infinix Smart 7 | Dr.fone
- Author: Ariadne
- Created at : 2024-07-30 08:55:24
- Updated at : 2024-07-31 08:55:24
- Link: https://howto.techidaily.com/9-solutions-to-fix-process-system-isnt-responding-error-on-infinix-smart-7-drfone-by-drfone-fix-android-problems-fix-android-problems/
- License: This work is licensed under CC BY-NC-SA 4.0.