
9 Solutions to Fix Realme V30 System Crash Issue | Dr.fone
9 Solutions to Fix Realme V30 System Crash Issue
Android crash, better known as Android system crash is not a recent issue and has troubled many users in the past as well. It means when your device crashes suddenly and refuses to turn on again or when your device freezes and becomes unresponsive. It may also happen that your Realme V30 crashes abruptly but boots up normally only to crash again after a few minutes or hours. Android Crash sounds like a very serious problem and something that could damage your device or permanently destroy the software, but Android system crash can be dealt with easily. Just in case you suffer from an Android crash and want to know how to fix the Android system crash issue, rest assured that this problem is fixable. There are various ways to tackle the situation, to be discussed further, and you may choose the one that best suits you.
In this article, we will also talk about a unique technique to retrieve the data from your device on which Android system crash issue occurs. So let’s go ahead and read on to know more to fix the Android crash error.
Part 1: How to rescue data the Android system crashes?
When you encounter an Android system crash, before looking for solutions to fix it, make sure you retrieve all your data and information stored on your device. This might sound tedious but a very important step indeed.
Dr.Fone - Data Recovery (Android) is currently one of the most popular tools to retrieve data from not only broken or damaged, locked devices, and unresponsive devices but also from devices that face an Android system crash. You may try the software for free for scanning the data to understand its work. Dr.Fone’s Data Extraction tool not only retrieves and back-up contacts and messages but also your photos, videos, audio files, WhatsApp, docs, call logs, and other file folders. It is also equipped to retrieve data from the Realme V30 device’s internal memory as well as Google drive.

Dr.Fone - Data Recovery (Android)
World’s 1st data retrieval software for broken Android devices.
- Recover data from broken devices or devices that are damaged in any other way such as those stuck in a reboot loop.
- Highest retrieval rate in the industry.
- Recover photos, videos, contacts, messages, call logs, and more.
- Compatible with Realme V30 devices.
3,623,313 people have downloaded it
You may follow the steps given below to rescue your data from crashed Android devices.
1. Download and install the software on your PC. Run the software and then select the Data Recovery feature. Using a USB, connect your Realme V30 to the PC.

2. Select “Android” > “Recover from Broken Phone” in the lower right corner.

3. Choose the “Touch screen not responsive or cannot access the phone” to continue.

4. You will now see device options before you. Select yours and move on to feed in your device name and model details.

5. Now press the volume down, power, and home button on your device together to boot the phone in Download mode.

6. As long as your phone is in Download mode, the software will start to analyze phone data.
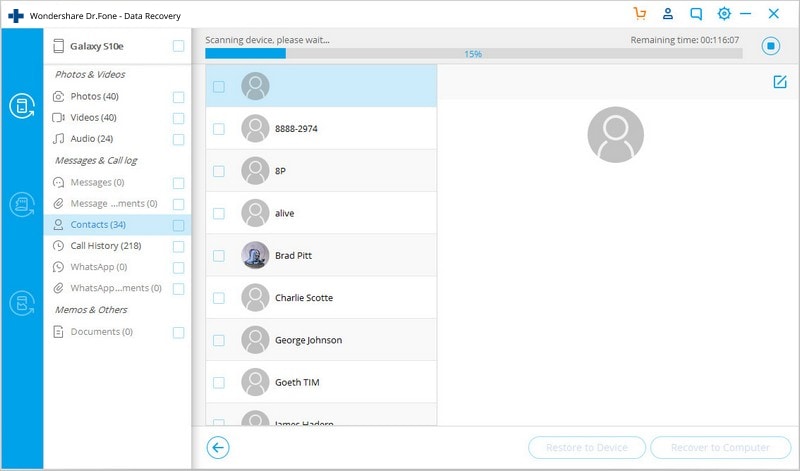
7. Finally, the process will take a few minutes to scan and display your phone data. Select “Recover to Computer” to retrieve all data on your PC as a backup.

Using Dr.Fone Damage Extraction software is intuitive and very safe. It prevents data loss and allows you to adopt various ways to recover your device from the Android system crash issue.

 safe & secure
 PaperScan Professional: PaperScan Scanner Software is a powerful TWAIN & WIA scanning application centered on one idea: making document acquisition an unparalleled easy task for anyone.
Part 2: Why does my Android phone system keep crashing?
Encountering a persistent issue like the Android phone system constantly crashing can be highly frustrating and disruptive. This part delves into the underlying causes of this problem. By understanding these reasons, you can take informed steps to troubleshoot and rectify the issue, ensuring a smoother and more enjoyable smartphone experience.
- Software Glitches and Bugs
- Incompatible or Poorly Optimized Apps
- Outdated Operating System
- Corrupted System Files
- Malware and Security Threats
- Hardware Overheating
- Physical or Hardware Issues
A crashing Android phone system can be attributed to a variety of factors, ranging from software glitches and compatibility issues to hardware-related problems. Keep reading to get it solved!
Part 3: Restart your Realme V30
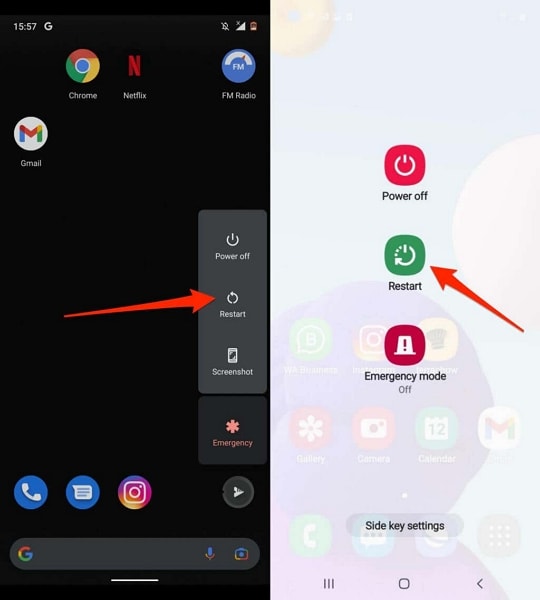
Once you have successfully retrieved your data, consider solving the Android crash issue as soon as possible. Before you redirect to a proper solution for repairing your Realme V30 system, you can try restarting your device as a quick remedy. Restart the Android device to clear temporary system data and potentially resolve any software glitches causing the crash, which can be done as follows:
Instructions: Hold your Realme V30’s “Power” button on the side of the phone. As the following window appears on the screen, select the “Reboot” option to restart the Android device successfully.
Part 4: Shut down unnecessary running apps
Another quick solution to avoid Android devices crashing is to shut down unnecessary apps running in the Realme V30 device’s background. To cater to that, you need to try out the following steps as a remedy to shutting down unwanted applications:
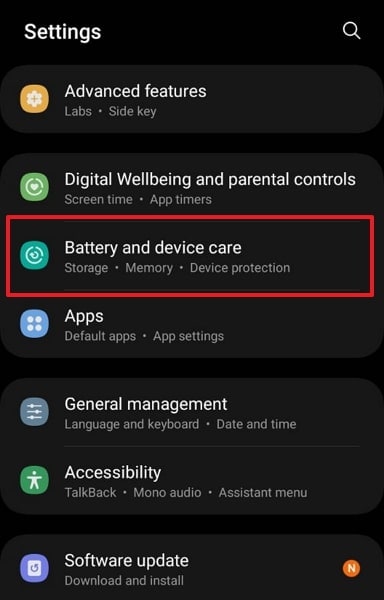
Step 1: Open the “Settings” of your Realme V30 and continue to the “Battery and device care” section from the available options. Continue to the “Memory” section on the next window to lead to the applications taking up space on your Realme V30.
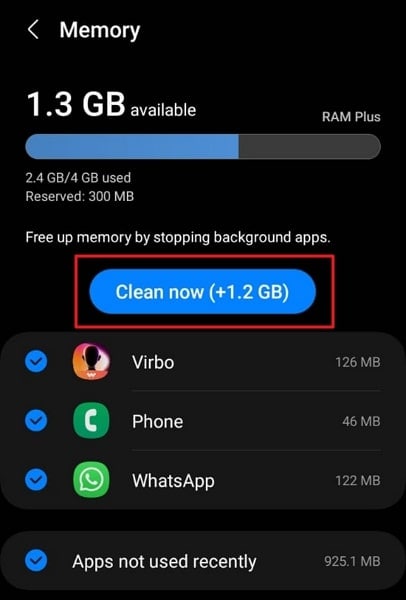
Step 2: As you progress further, you need to select the “Clean now” button to shut down all unnecessary background applications running on the Android.
Part 5: Uninstall incompatible Apps to fix Android crash issue
If your Android system crash takes place frequently but the Realme V30 device turns on normally after that, there is a chance that some Apps may be causing the problem. Unnecessary and large App files burden the Realme V30 device system and force it to crash every now and then. Make sure you download, install and store only those Apps which are fully compatible with your Android system. DO NOT download Apps from other unknown sources and use only Google Play store for the purpose. All other incompatible Apps must be deleted to prevent them from tweaking your software.
To uninstall unwanted and incompatible Apps, please follow the steps below.
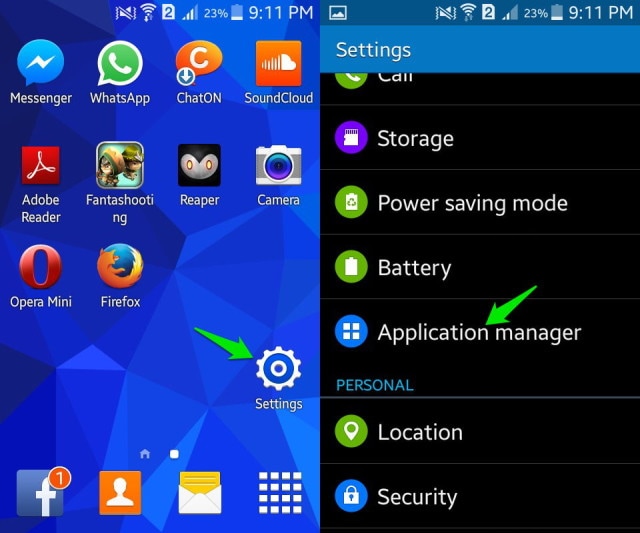
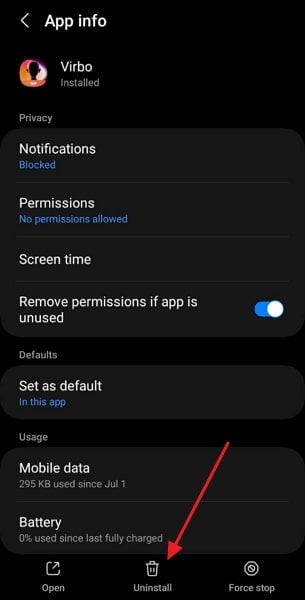
1. Visit “Settings” and search for “Application Manager” or “Apps”.
Select the App you wish to uninstall. From the options that appear before you, click on “Uninstall” to delete the App from your device.
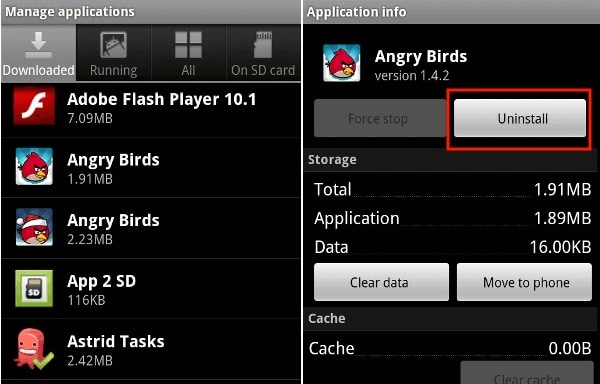
You may also uninstall an App directly from the Home Screen (only possible in certain devices) or from the Google Play Store.
 Software Update Pro - Check and update software installed on your computer.
Part 6: Check Android storage and free up space
If you are constantly facing issues of your Realme V30 crashing, there is a possibility that your device’s storage is full. The need to free up space arouses the need to know about the potential steps for checking storage and cleaning up space, which is discussed as follows:
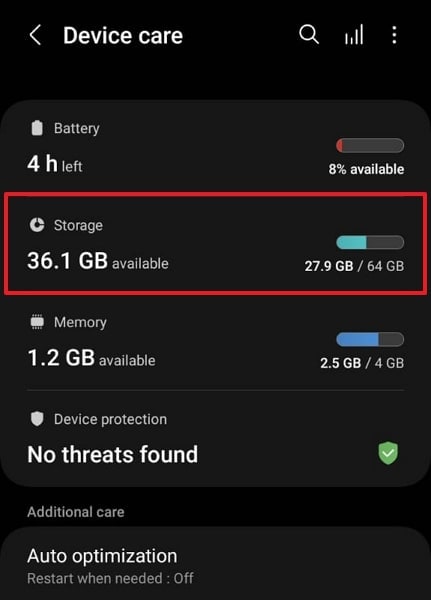
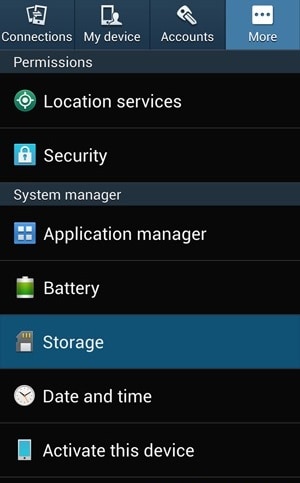
Step 1: You need to navigate into “Settings” and look for the “Battery and device care” section. As you lead next, select the “Storage” option to check the Android storage and see how it is segregated.
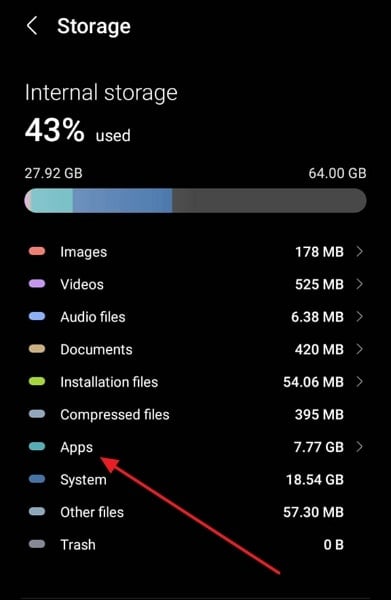
Step 2: As you navigate to the next screen, you can free up space by removing the applications from your Android. For that, tap on “Apps” to open a section containing the list of applications installed on the Android.
Step 3: Go through the list of applications and select any app you want to remove. As you navigate next, select “Uninstall” to lead to removing the app from the Android device.
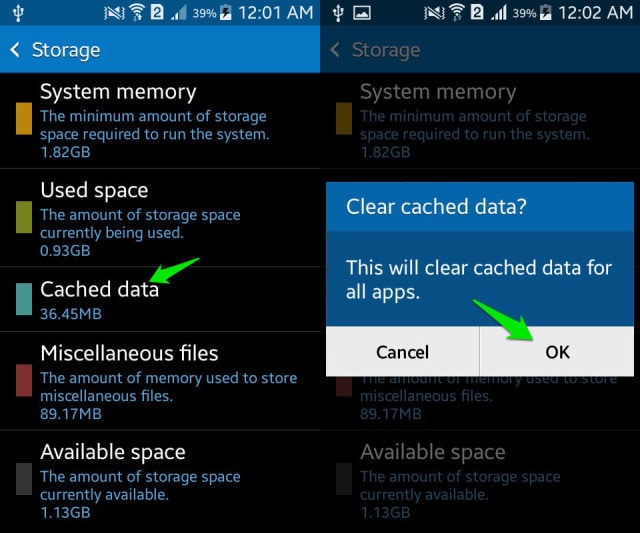
Clearing cache is a good idea because it cleans your device and reduces the burden on the Android software and gives it enough space to function normally and carry out its operations.
In case the Android system crash issue is temporary, follow the steps given below to clear your device’s cache:
1. On your Realme V30, visit “Settings” and find “Storage”
2. Now tap on “Cached Data”, and then click “OK” to clear all unwanted cache from your device as shown above.
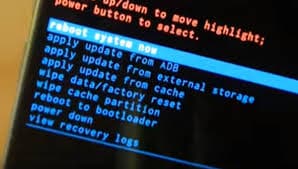
However, if the Android crash problem is such that your phone has frozen, becomes unresponsive, and does not turn on, you must first boot into the Recovery Mode screen.
1. Press the volume down button and power button together until you see a screen with multiple options before you.
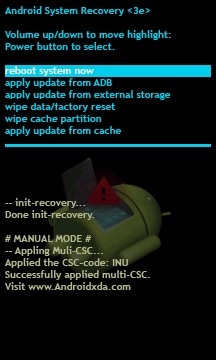
2. Once you are on the Recovery Mode screen, use the volume down key to scroll down and select ”Wipe cache partition” as shown below.

3. After the process is completed, select “Reboot System” which is the first option in the recovery mode screen.
This method will help you erase all the clogged-up and unwanted files and resolve the Android system crash issue. If clearing cache doesn’t help, try formatting your SD Card.
Part 8: Remove the SD card to fix the Android crash issue
Removing and formatting your SD Card to fix the Android System crash issue is helpful when a corrupted SD Card disturbs the Android software forcing it to shut down suddenly.
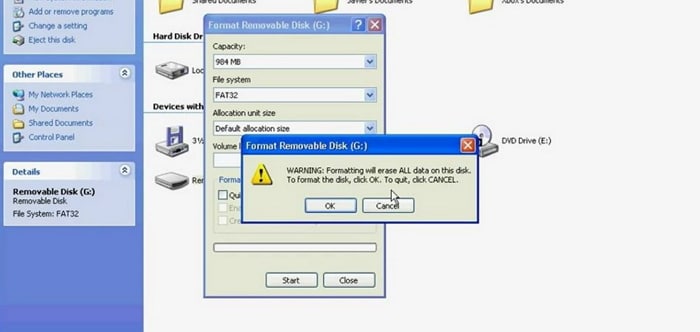
To format your SD Card, just follow the instructions below.
1. Firstly, eject it from the Realme V30 device.
2. Then using an SD Card reading tool, insert the Card in your PC. Open Computer and then right-click on the SD card to format it.

Part 9: Update to the latest software version
Updating the Android device will cast out all glitches that prevent it from operating properly. For that, let’s look into the steps explaining how to update your Android software version to the latest option:
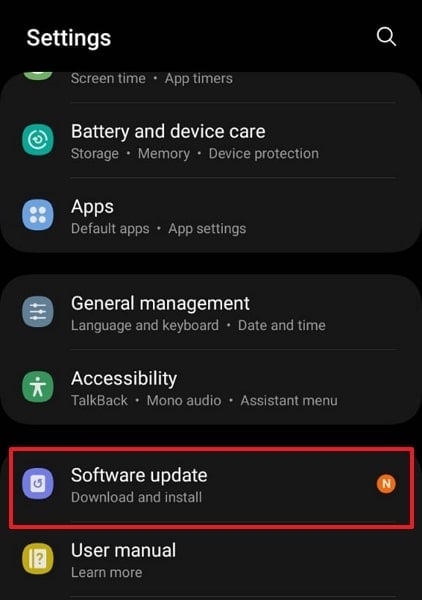
Step 1: As you lead into the “Settings” of your Android, scroll down and look for the “Software Update” option.

company, user or members of the same household. Action! - screen and game recorder</a>
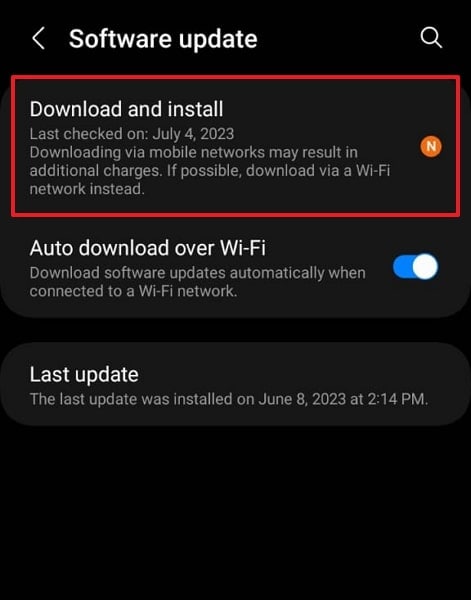
Step 2: On leading to the next screen, select the “Download and Install” option to continue updating your Android to the latest version.
 Project Manager - Asset Browser for 3Ds Max
Part 10: Use Wondershare Dr.Fone – System Repair To Fix Android System Crash
If you are not getting any specific solution to the problem, you can try fixing the Android system crash problems using specific tools. These third-party tools can be an excellent option for resolving system errors in Android devices. Wondershare Dr.Fone – System Repair (Android) is a great tool designed to resolve all system issues in Realme V30] and other smartphones.
It features a great system providing a one-click Android repair option for fixing all kinds of problems. Along with fixing all basic and advanced Android system issues, it features support for multiple Android devices.
Key Features of Wondershare Dr.Fone – System Repair (Android)
![]()
Dr.Fone - System Repair (Android)
Repair Android System Errors without Any Trouble.
- Fix your Android to normal, no skills required.
- Fix various Android system issues, stuck in boot loop , black screen , or won’t turn on , looping on start, etc.
- The high success rate in resolving Android system issues.
- Compatible with a wide range of Android devices and OS versions
- User-friendly interface with easy-to-follow steps.
3981454 people have downloaded it
As we redirect to resolving Android system errors using Wondershare Dr.Fone – System Repair, let’s look into some essential features that make up the entire tool:
- Features support for all the latest Android devices up to Realme V30 S22.
- It can help you resolve issues like Android’s black screen of death, being stuck in the boot loop, and many more.
- Provides an easy interface to execute procedures, making it a simple tool with no learning curve.
Steps To Repair Android System Crash Issue Using Dr.Fone – System Repair (Android)
Let’s redirect to the steps that can be used to repair Android system crash issues using Wondershare Dr.Fone – System Repair (Android):
Step 1: Launch and Open System Repair Tool
You need to download and install the latest version of Wondershare Dr.Fone on your computer. Proceed to launch and navigate into the “Toolbox” section. Look for the “System Repair” option and initiate the process while ensuring the Android device is connected to the computer through a USB cable.
Step 2: Start Repairing the Android
After selecting the nature of the Realme V30 device you want to repair, navigate to a new window where you need to click “Start” to initiate the system repair process.


Step 3: Define the Parameters of Device
You will be redirected to a new window where you need to define and verify some parameters before repairing the Android. Select the “Brand,” provide a “Name,” select a “Model,” and provide a country where it has been bought. Define the “Carrier” and click “Next” after confirming.

Step 4: Put Android in Download Mode
Whatsoever Android you own, you need to put it in Download Mode, depending on the buttons that the Realme V30 device has. The repairing process initiates as you enter the Download Mode, and new firmware is downloaded on the platform.

Step 5: Fix the Firmware of Android
Once it downloads and is verified, click the “Fix Now” button to repair the Android successfully. You may need to provide a PIN to confirm the process. Once provided, the next screen shows the progress of the repair process. As it completes, click the “Done” button to conclude fixing the Android system crash issue.

 HD Video Converter Factory Pro
safe & secure
Part 11: Factory reset the Realme V30 device to fix the Android crash issue
Factory Resetting is advisable only when nothing else works. Also, there are two ways of doing it depending on whether the Android crash is permanent or temporary.
Follow the steps given below to factory reset your device while it is switched on:
1. Visit “Settings”.
Now select “Backup and Reset”.
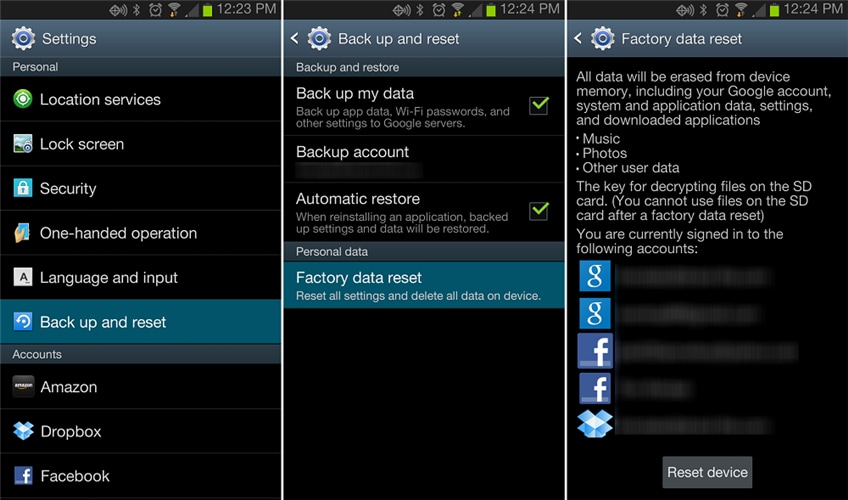
In this step, select “Factory data reset” and then “Reset Device” to confirm Factory Reset.
The process of factory resetting your Realme V30 is risky and cumbersome, as it deleted all data, but it helps to fix the Android System crash error.
You may also follow the instructions given below to Master set your device in Recovery Mode if it won’t turn on after an Android system crash has taken place:
When you are at the Recovery Mode screen, scroll down using volume down key, and from the options given, select “Factory Reset” using the power key.

Wait for your device to perform the task and then:
Reboot the phone in Recovery Mode by selecting the first option.
Bottomline, the tips given above have helped many to solve the Android system crash issue. So do not hesitate to try them, but don’t forget to extract your data with Dr.Fone’s Data Recovery tool.
safe & secure
6 Solutions to Fix Error 505 in Google Play Store on Realme V30
In case you are receiving the error code 505 while downloading an application from Google play store and have no clue what is it, then this is the right article for you. In this article we are covering the reasons behind the occurrence of Google play error 505. Not only that, we are also providing 6 solutions to fix the error code 505. Usually, this error is seen with Android 5.0 Lollipop version and occurs at the time when you try to install the already downloaded application making it hard to run the app.
Such an error is a kind of permission error. That is, in case you have two similar kinds of applications such as banking apps and both looking for similar kind of permission, causes conflict error named as error 505.
The occurrence chance is more in the old operating systems, 4 KitKat, Android version 4. Let us then proceed to know more about this error 505.
Part 1: Reasons for Google Play error 505

As per the report by some users, error 505 occurs in certain apps such as Weather App, SBI, ITV, Adobe Air 15, We Chat etc.
To have the right idea about the problem, we have listed all the reasons of it occurrence below:
- Google play store is not updated or refreshed (Causes the error during the downloading process)
- Due to installation of an outdated version (In case your Android version is outdated may result in error in the installation process)
- Cache memory(Is the redundant data occurs due to search history)
- Application is not compatible with the Android OS (If the app you are downloading is not the updated may cause error)
- Adobe air app
- Data crash (Many time app or Google play store crashed crashes after downloading it, reason may be some bugs, so many apps are open, less memory etc.)
Now that we know the reasons, let us also learn about the solutions that will guide you to resolve the error code 505.
Part 2: 6 Solutions to fix error code 505
Any error that occurs during downloading or installation process not only hinders with the new app but also takes a large amount of our time to solve the issue. To check that, let us go through the 6 solutions one by one.
Solution 1: One click to make error code 505 disappear
The most common cause for error code 505 pop-up is that Android system files that underpin the Google Play module are corrupted. To make error code 505 disappear in this condition, you should have your Android system repaired.
Dr.Fone - System Repair (Android)
One click to repair Android system and make error code 505 disappear
- Fix all Android system issues like error code 505, error code 495, error code 963, etc.
- One click to fix error code 505. No technical skills required.
- Supports all the new Realme V30 devices like Galaxy S8, S9, etc.
- Easy-to-understand instructions provided on each screen.
4,999,459 people have downloaded it
Now, you just need to follow these Android repair steps to fix error code 505:
Note: Android repair needs to flash the system firmware, which may erase existing Android data. To prevent data loss, back up all the important data from Android to PC .
Step1: Download the Dr.Fone - System Repair (Android) program , install and launch it. The following interface will pop up.

Step2: Select the “Android Repair” among the 3 tabs, connect your Android to PC, and click “Start”.
Step3: Choose the correct device details from each field, confirm them and continue.
Step4: Boot your Android in download mode, then start downloading the firmware of your device.
 PDF application, powered by AI-based OCR, for unified workflows with both digital and scanned documents.
Step5: After the Realme V30 device firmware is downloaded, the tool will start repairing your Android.

Step6: When your Android is repaired, the error code 505 will disappear.
Solution 2: Check whether Download Manger is ON or not
Many times download manager is set to disable due to which you are not able to download or install the app. So, it is required to make a check whether the download manager is set on or off. So that your installation process will work properly. The process to enable the download manager is as follows.
>Go to Settings
>Select the Application Manger or App (Option depends upon the Realme V30 device)
At the top, an option will appear
>Swipe right till you locate Download manager at top of the screen of the Realme V30 device
>Then Select Enable

Enabling download manager to give permission to the Realme V30 device to start the download or installation process.
Solution 3: Updating to the latest version of OS of your Realme V30
Working with an old operating system is ok, but many times old version also creates some problem and is the main reason behind the occurrence of any bug or error. So, updating the older version act like a rescue to get rid of any such issue or bug. The Process of updation is quite simple; you just need to follow the below steps and your device is ready to get updated to the latest version. Steps are:
- >Go to Settings
- >Select about Phone
- >Click on System Update
- >Check for updates
- >Click on Update
- >Need to click on Install (if any update is available)

Solution 4: Clearing the cache memory from Google services Framework and Google play store
While browsing data online or through Google play store some cache memory get stored for the fast access to the pages. Below mentioned simple steps will help you in clearing out the cache memory from Google services framework and Google play store.
Process to clear the Cache memory for Google Services Framework
- >Go to Settings
- >Select Applications
- >Click on Manage Applications
- >Click to select ‘ALL’
- >Click on Google services framework
- >Select ‘Clear data and clear cache’
That will remove the cache memory of your Google services framework
Steps to Cache memory of Google Play Store
- >Go to Settings
- >Applications
- >Manage Applications
- >Click to select ‘ALL’
- >Select Google Play store
- >Clear data and clear cache
It will clear the cache of Google play store

Clearing the cache memory remove the extra temporary memory, thus free up space for the further installation process.
Solution 5: Reinstalling play store Updates
The reason behind the installation error code 505 might be Google play store updates.
Due to continuous updation of new apps and services Google Play store used to be flooded with so many updates or sometimes does not updated properly. That sometimes caused the problem in dealing with app installation. Resolving the issue is important to make your play store ready for future updation and installation.

- >Go to Settings
- >Visit Application Manager or Apps
- >Select Google Play Store
- >Click on Uninstalling Updates
- >A Message will appear ‘Change play store app to factory version’- Accept it
- >Now Open Google play store>It will refresh the updates within 5 to 10 minutes(So you need to keep your internet connection on while Google play store is updating its store for new updates.)

Solution 6: Third party App
In the case, error 505 occur due to the installation of two or more apps with duplicate permission of data, as many times we use to install two similar kind of app that creates the situation where both seeking out for somewhat similar permissions for the installation. The manual finding is a long and tiring process. Then you can take the assistance of ‘Lucky Patcher App’ to find out which app is creating the conflict. This app will assist you in finding out the duplicity if any and then modifying it. Through this app, once you will find out which particular app is causing the conflict, then you can delete that conflicting app from your phone so that problem of error code 505 gets sort out.
Download link: https://www.luckypatchers.com/download/

Note: If still, you are in the state of trouble to solve the issue of error code 505 then Google Play help center is here to look out all troubles related to app store and its service. You can check out the details by visiting the following link:
https://support.google.com/googleplay/?hl=en-IN#topic=3364260
Or call them at their call center number regarding the issue.

Bonus FAQ about Google Play error
Q1: What is a 505 error code?
The HyperText Transfer Protocol (HTTP) error 505: HTTP Version Not Supported response status code means that the HTTP version used in the request is not supported by the server.
Q2: What is a 506 error?
The 506 error code is a frequent error when operating the Google Play Store. You will sometimes see this error code when you are downloading an app. The app may seem to be downloading just fine when suddenly, near the end of the installation, an error occurs, and a message pops up saying, “App could not be downloaded due to an error 506.”
Q3: How to fix the 506?
Solution 1: Restart your device which can help solve most problems.
Solution 2: Remove the SD card safely.
Solution 3: Correct date and time if it is wrong.
Solution 4: Add your Google Account again.
Solution 5: Clear Google Play Store data and cache.
However, sometimes the five simple couldn’t work anymore. A system repair software can be helpful quickly. We really recommend the Dr.Fone - System Repair (Android) , only a few minutes, the error will be fixed.
 PearlMountain Image Converter
Conclusion
Not being able to download or install the app is very frustrating and time-consuming also. Therefore, in this article, we went through the reasons behind the occurrence error code 505 as well as resolving the issue by following five effective methods. I hope that you would be able to sort out the error 505 by following above methods thus would be able to install the application without further delay.
Authentication Error Occurred on Realme V30? Here Are 10 Proven Fixes
There are times when users get an authentication error while they connect to a Wifi network. The problem is mostly found in Android whenever a device tries to establish a connection to Wifi. If your device is also experiencing an authentication problem Wifi, then don’t worry. It can easily be resolved. In this post, we will make you familiar with the root cause for the Realme V30 Wifi problem and how you can resolve whenever authentication error occurred on your device.
Part 1: Any idea about the Wi-Fi authentication problem?
Wi-Fi authentication has to be done every time you wish to connect to a Wi-Fi network over your smartphone or laptop. To authenticate yourself and connect to the protected Wi-Fi network, you need to have the password of it. But if after you’re putting in the correct password and still experiencing the wifi authentication problem. Here’s what you need to know.
Authentication error occurs when the “deal” between the Wi-Fi router and device fails due to certain reasons. First, the Realme V30 device sends the password of the network and the “connect” request in an encrypted format to the Wi-Fi router. Then, the router decrypts the password and compares the password saved on it. Now, if the password matches, it sends affirmation for the “connect” request, and then the Realme V30 device is allowed to connect to the network.
Part 2: Why Authentication Error Occurred when Connecting to Wifi?
There could be plenty of reasons for facing an authentication error on your device. Most of the time, it occurs whenever a Wifi router seems to malfunction. Furthermore, if your phone has been recently updated, then chances are that there could be an issue with its drivers. A security attack can also make your device malfunction as well. An unstable connection or a router blockage can also be a reason for this issue.
In this scenario, whenever you try to connect to a Wifi network (even after supplying the correct password and username), it doesn’t connect to it. Instead, it displays an authentication error occurred promptly. Thankfully, there are plenty of ways to overcome the authentication problem Wifi. In the next section, we have provided three different solutions to fix the Realme V30 Wifi problem (as it mostly happens on Android devices).
Part 3: 10 Solutions to Fix Wifi Authentication Error
Before we make you familiar with different fixes for the Wifi authentication error, it is important to check your router beforehand. Chances are that you could be getting the authentication error because your router is not functioning properly. You can restart it and try to connect any other device to it as well to check it. After making sure that there is no problem with your network or router, follow these suggestions to overcome the authentication error occurred issue.
Check if extra characters added in Wi-Fi password
Ensure that no other extra characters are being added in the Wi-Fi password while you’re entering it. Key in the password carefully while viewing the characters, and then check if the authentication error occurs or not.
One-Click to Fix Wifi Authentication Error by Android System Repair
Android system repair is considered the most effective way to fix Wifi Authentication Error. As the bottom-layer Android system files may be corrupted unconsciously with days of phone use, the Wifi Authentication Error may be one of the symptoms.
So Android repair requires programming knowledge to do it?
No! With Dr.Fone - System Repair (Android), you can do Android repair in just a few steps and get all issues like Wifi Authentication error fixed easily.
Dr.Fone - System Repair (Android)
An easy-to-operate tool to fix Android system issues like a Wifi authentication error
- Fixes all Android system issues like a black screen of death, Wifi authentication error, etc.
- One-click to fix the Wifi authentication error. No technical skills required.
- Supports all the new Realme V30 devices like Galaxy S8, S9, etc.
- Easy-to-follow instructions provided on each of the screens.
3981454 people have downloaded it
Here are the steps to fix Wifi Authentication Error by Android system repair:
Note: Android repair is effective to permanently fix Wifi Authentication Error, but may wipe out the existing phone data. Backup all the important Android data to PC before you go on.
- After the Dr.Fone tool is downloaded, install, and launch it. You can see the following screen.
 CalendarBudget - Monthly subscription membership to CalendarBudget via web browser or mobile app. Support included.
- Connect your Realme V30 to the computer, and select “Android Repair” in the middle.

- Select all the details that match your device, and click “Next”.
- Next up, you should boot your Realme V30 in download mode by following the on-screen instructions.

- Allow the program to download the corresponding firmware. After that, the Android repair will start and get the Wifi Authentication Error fixed in minutes.

Use static IP address instead of DHCP
DHCP, or Dynamic Host Configuration Protocol is the default IP address assignment for the Wi-Fi settings on many devices. Whereas DHCP can cause IP address conflict during the dynamic IP address assignment. So, you’d better change “DHCP” to “Static” to see if the authentication error persists.
Step 1: Head to the “Settings” of your Realme V30 and then opt for “Wireless and Networks” followed by “WLAN/WiFi”.
Step 2: Now, hit on the WiFi network that is showing “authentication error occurred”.
Step 3: Depending on your Realme V30 model, look for “IP Settings” and tap on it. Now, switch the “DHCP” to “Static”.
Step 4: Note down the static IP address fields and wipe off all the fields. Punch it in again and then save it.

Check carefully for duplicate Wi-Fi names before you connect
Perhaps, you might connect to a WiFi with a similar name. There are good chances that some users do not modify their WiFi network name and possibly, your neighbor may have the same WiFi network, service provider. Therefore, ensure you connect to the correct WiFi network.
Reset the Wifi network
One of the easiest ways to fix the authentication problem of Wifi is to reset the network. To do this, you would be required to forget the respective network first and then connect to it again. This can be done by simply following these steps.
1. Firstly, you need to forget a Wifi network. To do it, go to your phone’s Settings > WiFi and network. From here, you can see a list of all the Wifi hotspots that your phone connects to. Select the network you wish to forget.

2. When you would select a network, it will provide the basic information related to it. Just tap on the “Forget” button and agree to the pop-up message. This will erase the network’s information from your device.

3. Afterward, turn on your Wifi again and tap to the network you wish to connect to. Simply provide the credentials and tap on the “Connect” button to reestablish the connection. This way, you can reset the network successfully.


Modify network connection
If the above solution won’t work, then you would be required to walk the extra mile to fix the Realme V30 Wifi problem. After you reset a network connection, if still getting issues regarding the authentication of the network, you need to modify the connection. In this technique, you will be changing the IP settings on your phone to alter the way it establishes a secure connection. You can do it by following these steps.
1. To start with, visit your phone’s Settings and open the Wifi page.

2. This will display a list of all the Wifi networks that are associated with your device. Just long-tap on the Wifi network that you wish to modify. It will open another pop-up window. From here, tap on the option of “Manage network settings”. Sometimes, users also get an option of “Modify network settings” here as well. Simply select it to proceed.

3. It will display basic information related to your Wifi network. Just tap on the “Show advanced options” button to access more options related to the network setting.
 TubeDigger - online video downloader from mostly any site

4. From the IP Settings menu, change the field from DHCP to Static. This will let you establish a static connection between your device and the router.

5. As soon as you will change it to static, you will get different fields related to your network’s IP address, gateway, DNS, and more. Simply fill these fields and tap on the “Save” button once you are done.

Now, try to connect to the Wifi hotspot again. You would be able to overcome the authentication problem of Wifi.
Change Network Security Type
It has been observed that, when we connect to Wifi, our device chooses a wrong security type. This clashes with the default security protocol of the router and authentication error occurred due to this. If your device is facing the same issue, then it can be fixed by simply changing its security type. To do this, follow these instructions:
1. To change the security type of a network, you need to “Add the network”. If you already have the Wifi network saved, then simply forget the network by following the above-mentioned tutorial.
2. Now, turn on your device’s Wifi and tap on the option of “Add network”. Here, you would be asked to give a network name and select the security type. To manually select it, tap on the “Security” option.
3. From here, you will get a list of various security protocols that you can pick. Select “WPA/WPA2-PSK” and save your selection.
 SwifDoo PDF Perpetual (1 PC) Free upgrade. No monthly fees ever.

Now, try to connect to the network again. Most likely, it will let you fix the authentication error on your device.
Update Android firmware to the latest
There are instances where an outdated OS version of your Realme V30 may create a hindrance in establishing a connection between your device and the WiFi network. You need to update your Android firmware to the latest version and then check if the problem persists or not.
Step 1: Launch “Settings” of your Realme V30 and then get into the “About Phone” option.
Step 2: Now, opt for the “System Update” option. If the update is available, get your device updated to the latest OS version.
Restart the router and reset Android network settings
Sometimes, the WiFi router may hang up while establishing a connection and therefore, the wifi authentication problem occurs. Try restarting your Wi-Fi router and then check if your device connects successfully. If this doesn’t work, try to reset your Android Network Settings .
Bonus tip: Turn Airplane mode on/off
By simply turning on the Airplane mode (and later turning it off), you can easily fix the authentication problem Wifi most of the time. You can find a toggle button for Airplane mode on the notification bar of your phone. If you can’t find it there, then go to your phone’s Settings > Connection > More Networks and turn on the feature of “Airplane Mode”.


Let it do for a while. Afterward, turn it off and try to connect to the Wifi network again.
After following these quick and easy suggestions, you would be able to fix the Realme V30 Wifi problem for sure. Even if you use any other Android device, then its authentication error can easily be resolved after these effective solutions. Go ahead and give these expert solutions a try and let us know about your experience as well. If you have any other solution to fix the authentication problem Wifi, then share it with us as well in the comments.
- Title: 9 Solutions to Fix Realme V30 System Crash Issue | Dr.fone
- Author: Ariadne
- Created at : 2024-07-30 09:02:18
- Updated at : 2024-07-31 09:02:18
- Link: https://howto.techidaily.com/9-solutions-to-fix-realme-v30-system-crash-issue-drfone-by-drfone-fix-android-problems-fix-android-problems/
- License: This work is licensed under CC BY-NC-SA 4.0.