
Android Safe Mode - How to Turn off Safe Mode on Oppo Reno 9A? | Dr.fone
Android Safe Mode - How to Turn off Safe Mode on Oppo Reno 9A?
Safe mode on Android is very useful to get rid of dangerous apps and malware. This allows the user to perform a uninstall of the crashed or malicious apps by putting safe mode on Android. Now the question is how to remove safe mode? In this article, we have discussed in detail how to get out of safe mode and also discussed some frequently asked questions. Keep reading this article.
Part 1: How to turn off safe mode on Android?
This is very important to turn off the safe mode after you put the safe mode on Android. Your mobile performance is limited in this mode. So you have to turn off safe mode. For doing this, there are some methods. Try to apply them one by one. If you succeed, stop there. Else go to the next method.
Method 1: Restarting the Oppo Reno 9A device
This is the easiest method to turn off the safe mode in Android. To use this method, follow the steps below.
Step 1 – Tap and hold the power button of your Oppo Reno 9A.
Step 2 – You could find the option “Restart”. Tap on it. (If you have only one option, move to the step no 2)
Step 3 – Now, your phone will boot up in some time and you can see the Oppo Reno 9A device is no more on safe mode.


This method, if goes well, will turn off safe mode in Android from your device. IF not, move to the next method instead.
Method 2: Do a soft reset:
The soft reset is very easy to perform. It won’t delete any of your personal files etc. Besides, it clears all the temp files and unnecessary data and recent apps so that you get a healthy device. This method is very good for turning off Safe mode on Android.
Step 1 – Tap and hold the power button.
Step 2 – Now, select “Power off” from the given option. This will make your device off.
Step 3 – Wait a few seconds and then turn it on again.
This time you can see your phone is no more in safe mode. Also, your junk files have been also removed. If you still find the Oppo Reno 9A device is the safe mode, follow the next method.
Method 3: Break all power
This method is sometimes very helpful to turn off safe mode on android by disconnecting all the power as well as resetting the SIM card.
Step 1 – Take the back cover off from the Oppo Reno 9A device and remove the battery. (Not all devices will give you this facility)
Step 2 – Take out the SIM card.
Step 3 – Reinsert the SIM card and insert the battery again.
Step 4 – Turn the Oppo Reno 9A device on by tapping and holding the power button.
Now, you can see your device is out of safe mode. If you still find your device in Safe mode, see the next method.
Method 4: Wipe the cache of the Oppo Reno 9A device.
The cache of the Oppo Reno 9A device sometimes creates an obstacle in overcoming the safe mode on Android. To solve this issue, follow the steps below.
Step 1 – Turn on your device in safe mode. It can generally be done by tapping the home, power, and volume up button on Android device. If this combination is not working for you, search the internet with your device model number.


Step 2 – Now you can find the recovery mode screen. Navigate to the “Wipe cache” option with the volume up and down button and select the option by tapping the power button.

Step 3 – Now follow on-screen instruction and your device will be rebooted.
After successful completion of this method, your device should no longer be in safe mode. If the problem still persists, the only solution is to do a factory reset. This will erase all the data from your device. So take backup of your internal storage.
Method 5: Factory data reset
To factory data reset, you have to follow the below steps.
Step 1 – Enter in the recovery mode by following the steps mentioned earlier.
Step 2 – Now select “Factory data reset” from the given options.
 KoolReport Pro is an advanced solution for creating data reports and dashboards in PHP. Equipped with all extended packages , KoolReport Pro is able to connect to various datasources, perform advanced data analysis, construct stunning charts and graphs and export your beautiful work to PDF, Excel, JPG or other formats. Plus, it includes powerful built-in reports such as pivot report and drill-down report which will save your time in building ones.
 It will help you to write dynamic data reports easily, to construct intuitive dashboards or to build a whole business intelligence cockpit.
KoolReport Pro package goes with Full Source Code, Royal Free, ONE (1) Year Priority Support, ONE (1) Year Free Upgrade and 30-Days Money Back Guarantee.
Developer License allows Single Developer to create Unlimited Reports, deploy on Unlimited Servers and able deliver the work to Unlimited Clients.

Step 3 – Now, follow the on-screen instructions and your device will be factory reset.
After this method, you can successfully get rid of the safe mode on Android. Restore your data from the backup you created.
Watch the video below to turn off safe mode on your phone:
Part 2: How to put the phone in safe mode?
If some apps or programs create a problem on your device, the solution is safe mode. Safe mode allows you to uninstall the app or the program out of your device safely. So, safe mode on Android is quite useful sometimes. Let’s have a look at how to turn on safe mode in Android.
Before this, remember to take a backup of your Oppo Reno 9A. We recommend you to use the Dr.Fone - Phone Backup (Android). This tool is the best in its class to provide users with a very easy-to-use user interface yet powerful solution.
Dr.Fone - Phone Backup (Android)_
Flexibly Backup and Restore Android Data
- Selectively backup Android data to the computer with one click.
- Preview and restore the backup to any Android devices.
- Supports 8000+ Android devices.
- There is no data lost during backup, export, or restore.
Always remember to use this tool before you enter in the safe mode as you never know what will happen next and you might end up with factory resetting. This, as the result, will erase all your valuable data. So always perform backup data before you proceed.
To enter the safe mode, follow the instructions below.
Step 1 – First of all, long press the power button and let the Power options appear.


Step 2 – Now, long press on the “Power off” option. This will instantly ask you if you want to reboot into safe mode. Select the option and your device will reboot in safe mode.
 Screensaver Factory, Create stunning professional screensavers within minutes. Create screensavers for yourself, for marketing or unlimited royalty-free commercial distribution. Make screensavers from images, video and swf flash, add background music and smooth sprite and transition effects. Screensaver Factory is very easy to use, and it enables you to make self-installing screensaver files and CDs for easy setup and distribution. Screensaver Factory is the most advanced software of its kind.
If you are using Android version 4.2 or earlier, turn off the Oppo Reno 9A device and turn it on the back by tapping the power button. When the logo appears, tap and hold the volume down button. This will allow the Oppo Reno 9A device to boot in safe mode.
Follow these steps carefully and now you can see a “Safe Mode” written at the corner of your device. This will confirm that you have successfully entered in Safe mode on Android.
Part 3: Safe mode on Android FAQs
In this section, we’ll discuss some frequently asked questions about the safe mode. Some users have many questions regarding the safe mode. Here we’ll try to cover some of them.
1. Why is My Oppo Reno 9A on safe mode?
This is a very common question around the world. For many Android device users, it’s quite common to see your phone in safe mode suddenly. Android is a secure platform and if your device sees any threat from your recently installed apps or any programs that want to harm your device; it would go into safe mode automatically. Sometimes, you might accidentally perform the steps discussed in part 2 and boot your device in safe mode.
2. Safe mode won’t turn off on My Oppo Reno 9A
For the solution to remove safe mode from your device you must follow the step-by-step methods as mentioned in part 1. This will surely take your device out of the safe mode.
The safe mode is a very useful program for any Android device. But it limits the programs of Android and you must remove safe mode after uninstalling the harmful app. This article showed you how to turn off safe mode easily.
What to Do if Google Play Services Keeps Stopping on Oppo Reno 9A

Is the annoying Google Play Services error constantly popping up on your phone? Is it happening while reading, gaming, or browsing social media?
The error constantly plagues thousands of Android users, and it can be incredibly frustrating when you’re using the phone for something important or doing something entirely unrelated to the Google Play app.
Oddly enough, the “Unfortunately, Google Play Services has stopped.” error isn’t severe – you can fix it with a few general and easy-to-do fixes, a factory reset, or a system repair. Below, you’ll find info about why it’s happening and a list of ten possible solutions.

Why Am I Getting the Message “Google Play Services Keeps Stopping?”
Computers and phones often speak in error codes and apps that stop working. Even minor connectivity issues can cause these problems, leaving you wondering what’s wrong with your device or displaying the “Unfortunately, Google Play Services has stopped working.” error message.
Software errors are another set of problems that can also cause this issue. Namely, an average phone user has at least 40 installed apps, and sometimes these apps don’t play well together. They generate problems or steal resources from each other, such as RAM, causing crashes and errors.
There’s also the issue of wrong app versions. Although each Android phone uses the Android operating system, these systems can be vastly different, and the apps built for them can be made to be phone-specific and only run on a specific phone model.
That’s also the case with Google Play Store and Google Play Services.
Why Google Play Services Keeps Stopping
The Google Play Services keeps stopping error is an infamous one, and it can appear for various reasons and even on brand new phones. However, these causes can be categorized into three groups, which are:
- Network Issues
- Software Errors
- Wrong Play Services Version
Regardless of what’s causing the issue on your phone, we’ve compiled a list of ten possible solutions, and you can find those below.
Solutions to Try When Google Play Services Keeps Stopping
There are many solutions for the issue of Google Play Services that keeps stopping. We’ve listed the most famous and effective ones, and you’ll find them below in no particular order. Try them out and see whether they fix the issue.
1. Do a Factory Reset
A factory reset on any smartphone removes all your data on the phone’s internal storage and can even wipe your SD card clean if you select the option. Before you reset your phone to factory settings, ensure you’ve backed up all your essential apps and files. When you’re ready, you can do a factory reset by following these steps:
- Step 1: Go into Settingsand search for “reset.”
- Step 2: Choose Factory reset.
- Step 3: Tap the Erase all dataor Reset device at the bottom, whichever button is there.


- Step 4: Input your password and confirm the action.
Your phone will now restart and start the reset process. Once the factory reset completes, your phone will look brand new, and you’ll need to install all your apps again. Moreover, your Google Play Services app will likely get fixed by this, too.

2. Update Your System
As keeping your phone’s system and apps updated to the latest possible version is essential and recommended for the best performance and highest efficiency, you can try updating it to see whether it fixes your Google Play Services error. Here’s how:
- Step 1: Open the Settings
- Step 2: Head into System> System update.
- Step 3: If there’s an update available, click it and go through the process of updating your phone’s system.
Restarting your phone after an update, even if it doesn’t restart itself, is highly advisable, ensuring that the new updates apply without issues.
3. Revert to the Previous Version
As we’ve discussed the wrong Play Services versions above, it’s worth noting that sometimes even the developers can make mistakes and roll out the wrong version for your phone. So, if you notice that the phone is getting the error after you’ve updated Google Services or the Play Store, you can quickly revert to the previous version, and here’s how:
- Step 1: Head into Settings> Apps > Google Play Services.
- Step 2: Press the Disablebutton at the bottom of the screen.
- Step 3: Restart the phone, repeat the process by clicking Enablethis time, and restart the phone again.
As these are system apps, you can’t remove them from the phone, and disabling them will only remove the updates, leaving you with a base version that came with your phone out of the box.
4. Uninstall the App’s Updates and Reinstall
Like reverting to the previous version, you can also try reinstalling updates to fix the Google Play Services has stopped working error. The process is similar to the one above, but we’ve still included the steps. Here’s how you can do that:
- Step 1: Go into Settings> Apps and find Google Play Services.
- Step 2: Tap it and press Uninstall Updatesat the bottom.


- Step 3: Exit the Settingsapp and restart the phone.
- Step 4: Open the Play Storeapp and head into the app’s settings by clicking your profile icon. Then scroll to the bottom, and tap Settings.
- Step 5: Find and tap the Play Store versionto update your Google Play Services.
As you’re already there, you might as well update all other apps after you tap Manage apps & device. That will ensure that older and not-up-to-date apps aren’t causing the issue.
5. Check Storage
Believe it or not, one of the leading causes of the Google Play Services issue is a phone overfilled with apps. Namely, if you have insufficient storage, the Google Play Store app will likely crash and display errors such as “Unfortunately, Google Play Services has stopped working.”
Head into your phone’s Settings and select Storage to see how your phone’s doing storage-wise. Deleting a few apps you don’t use and transferring your photo and video library to a PC is highly advisable if your phone’s storage space lacks gigabytes.
6. Do a System Repair
Although the other solutions here are general fixes that might help, a system repair might take a bit longer but will undoubtedly fix your issue. You can use the Wondershare Dr.Fone app to repair the system and eliminate the annoying “Unfortunately, Google Play Services has stopped working” error.
Moreover, Dr. Fone works on Android and iOS devices and can fix various phone issues, including boot loops, a white screen of death, a stuck phone, etc. That’s why we’ve included a guide on using it for an Android phone issue. Here’s how:
- Step 1: Launch the Wondershare Dr.Fone app on your PC and head into Toolkit> System Repair > Android.

Step 2: Select the type of issue you want to fix > Start.
Step 3: Select the make and model of your phone so that Dr.Fone can find the appropriate Android software.
Step 4: Connect the phone to the PC via a USB cable and follow the on-screen instructions to put the phone into Download Mode. The instructions are available for both phones with and without the home button.
Step 5: Select the appropriate Android firmware, download it, and hit Fix Nowafter it downloads.


- Step 6: Enter the code and hit Confirmto continue the system repair process. When it’s done, click the Done


That’s all it takes to do a system repair with Wondershare Dr.Fone. Give the software a few minutes to complete, during which your phone might restart a few times. Once it’s done, your Google Play Services app will undoubtedly work.
![]() FX PRO (Gold Robot + Silver Robot(Basic Package))
FX PRO (Gold Robot + Silver Robot(Basic Package))
7. Clear Cache
The easiest and the most obvious fix for many Android apps is clearing the app’s cache. Here’s how you can do that for Google Play Services and Google Play Store:
Step 1: Go into Settings> Apps and find the Google Play Store
Step 2: Tap Storageand hit the Clear cache
Step 3: Repeat the process for the Google Play Services

If this doesn’t work, move on to another possible fix.
 vMix HD - Software based live production. vMix HD includes everything in vMix Basic HD plus 1000 inputs, Video List, 4 Overlay Channels, and 1 vMix Call
8. Check Date and Time Settings
Oddly enough, the Google Play Services app is prone to failure because of an incorrectly set time or date. That’s because Google’s servers constantly check these settings before issuing updates to the Oppo Reno 9A devices, so you’ll need to ensure they’re correct beforehand. Here’s how:
Step 1: Head into Settings> System > Date & Time.
Step 2: Ensure that both “**Use network–provided time” and “Use network-provided time zone**” are toggled on.
Step 3: If this doesn’t work, you can try repeating the process and manually setting the time and the time zone.

Once you check or change these settings, try using the Google Play Store app and check whether the issue is fixed. Restarting the phone after changing the settings is also highly advisable.
9. Troubleshoot Your Internet Connection
Another regularly overlooked troublemaker is a poor internet connection. That’s because most apps nowadays are meant to work in online mode only, and losing connection or using a bad one interferes with the app’s functionality.
To test the internet connection on your Oppo Reno 9A, you should open a browser and head to a random internet page to see if it’s opening and whether there are any delays. If it’s working fine, your internet connection isn’t the problem.
10. Adjust Google Play Services Permissions
Although permissions rarely change, they can cause issues if you change them accidentally. These settings can be found in the same place where you would uninstall updates or clear the app’s cache, so you can use some of the steps mentioned above to check them.
Once inside Permission Settings, check whether the Google Play Services and Play Store apps have sufficient permission to do their jobs and whether any required permissions were recently removed. If so, grant these two apps their permissions back.
 safe & secure
4,953,228 people have downloaded it
Conclusion
Although it’s an incredibly frustrating error, the “Unfortunately, Google Play Services has stopped” message is more annoying than serious. We’ve explained why it happens, but we’ve also given you a list of solutions to fix it.
Our list includes various fixes, from simple ones, like deleting the app’s cache and ensuring your network works fine, to more serious ones, like doing a factory reset. Alternatively, you can do a system repair with the help of Wondershare Dr.Fone, which will certainly fix the problem, but it might be a bit more complicated than cache deletion.
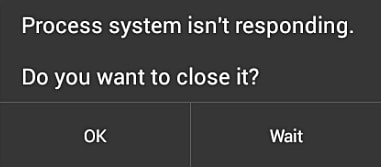
9 Solutions to Fix Process System Isn’t Responding Error on Oppo Reno 9A
The “Process system isn’t responding” is a common error that occurs in almost every kind of Android device. Even though most Android smartphone manufacturers have taken a huge leap in the last few years, the operating system still suffers from a few pitfalls. The process system isn’t responding Android is one of those errors that have been reported plenty of times. I definitely understand encountering the ‘Process System Isn’t Responding’ error on your Oppo Reno 9A can be frustrating.
However, there are several straightforward methods to resolve this issue. This article will provide a step-by-step guide on how to fix the problem and restore your device to normal functionality.
Before solving any Android system issues, try this Android backup software to take a full backup, in case any data loss happens.
Part 1: Reasons for process system isn’t responding error
There could be plenty of reasons for getting the process system is not responding in Android.
- Software Glitch: Android systems may experience temporary glitches due to factors like memory management issues, conflicts between apps or services, or system updates.
- Insufficient System Resources: Low system storage is another reason for getting the error. If you have too many apps on your phone, then it might take a toll on its memory and generate the “process system isn’t responding” prompt.
- Third-Party Apps: Users have also complained that they receive the “Android process system is not responding” error after installing a new app. If you have installed an app from a source other than Google Play Store, then the chances are that you can get this error. Though, even after installing an app from Play Store, there is a bleak probability of facing this issue as well.
- Outdated Software: Using outdated apps, particularly system apps or critical components, may lead to compatibility issues with the latest Android version.
- System Updates: Most of the time, it happens whenever a device is restarted after updating its Android version. Your device could have undergone a bad update or might have had an unsupported driver. This can result in the occurrence of process system not responding issue.
- Corrupt Cache Files: Corrupted cache files can lead to conflicts and result in error.
- Overclocking or Modifications: Rooting or modifying the Android device, or applying overclocking settings, can lead to instability and the process system not responding error.
- Hardware Issues: Rarely, hardware problems like failing components can interfere with the proper functioning of the system.
No matter what the cause is, there are plenty of ways to overcome this issue. We have listed a handful of them in this post.
Part 2: How to Fix Android Process Not Responding? 8 Fixes
When this error occurs, it can disrupt the normal operation of the Oppo Reno 9A device, causing apps to freeze or crash. Fortunately, there are several effective methods to address this problem.
Fix 1: Restart your device
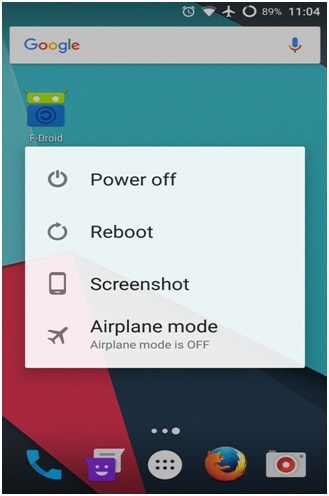
This is one of the easiest ways to resolve the process system not responding error. If you are getting this error on your phone, then try to manually restart your device. The way to restart your phone might differ from one device to another. Mostly, it can be done by long-pressing the power button. This will provide different power options. Tap on the “Reboot” one to restart your phone.

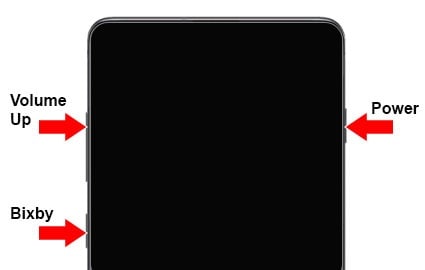
If it won’t work, then long press the Power and Volume up buttons at the same time until the screen goes off. Afterward, use the power button again to turn it on.
 NeoDownloader - Fast and fully automatic image/video/music downloader.
Fix 2: Reset App Preferences
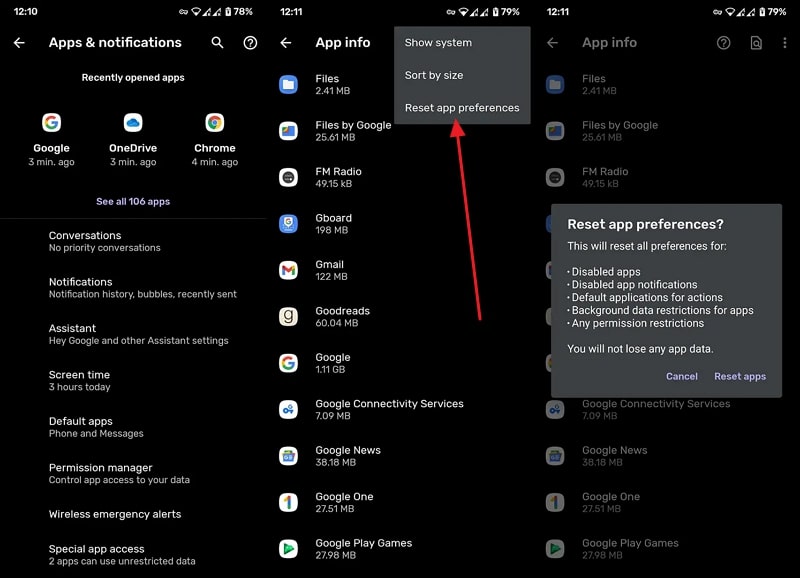
Sometimes the apps interfere with the Oppo Reno 9A device’s settings because they were given permission to access specific functions. It is recommended to allow the asked permission precisely because some suspicious apps can also steal your sensitive data. Here are the straightforward instructions you need to follow to reset the app preferences:
Proceed to the “Apps and Notifications” settings from the Settings app. Next, tap the “See All Apps” option and access the “Three Dots” menu. Here select the “Reset App Preferences” option and confirm the process from the confirmation pop-up.
Fix 3: Free Up Space to Make Sure Android Have Enough Internal Memory
In case the Android internal memory is completely filled, it will slow down the processing speed of the Oppo Reno 9A device. Internal memory is vital for the Oppo Reno 9A device to run all the background apps or the process required by the OS to run the Oppo Reno 9A device efficiently. You can follow these steps to free up some space on your Oppo Reno 9A:
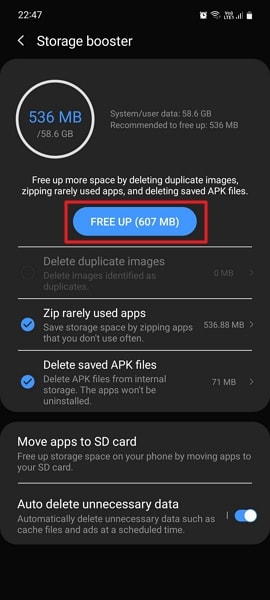
Step 1: Open the Settings app on your Oppo Reno 9A and access the “Battery and Device Care” option by scrolling down. Next, tap on the “Three Dots” from the top right corner and choose the “Storage Booster” feature.

Step 2: Following this, you can select the data you want to remove from the internal memory. Your device will show the space it will free up for you, and you can press the “Free Up” button to free up the storage.
 SwifDoo PDF Perpetual (1 PC) Free upgrade. No monthly fees ever.
Fix 4: Enter Safe Mode to Uninstall Suspicious Apps
This issue can also occur if you have installed an app from the Google Play Store with a very low rating or an APK. Unlike Apple App Store, anyone can easily upload their mobile apps on Play Store, so it is important to check the app’s credibility before installing it. Following are the simplified instructions to enter the safe mode and delete all suspicious applications:
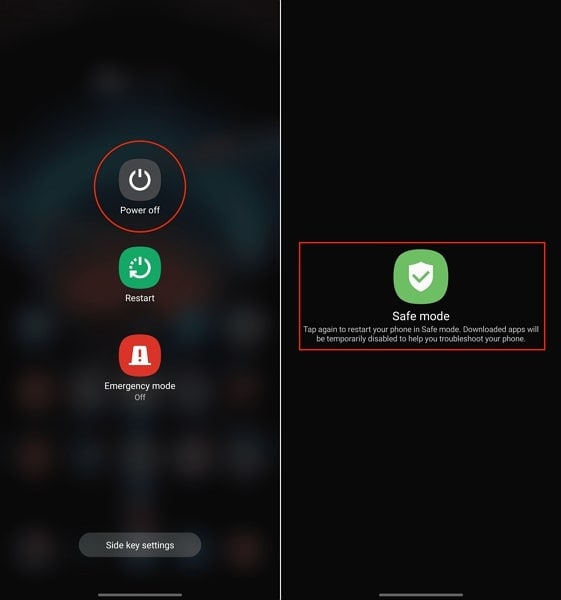
Press and hold the “Power” button of your Android and press and hold the “Power Off” option to access the “Safe Mode” feature. Afterward, confirm to enter the safe mode and remove all the suspicious apps from the Oppo Reno 9A device. You can do this by holding on to the app and selecting the “Uninstall” option from the pop-up options.
Fix 5: Update All Apps on your Device
Updating the apps is crucial for any Android device to work with high efficiency and performance. Apps are developed to make the users’ daily tasks easy to execute. However, there might be some negligence in the development, which can leave some bugs in the app. These bugs are fixed with time by releasing the new version of the app. To update your Android app, proceed with the following step-by-step instructions:
Step 1: Locate the Play Store from the Android home screen and access it. Then, tap the “Profile” icon from the top right corner and proceed to the “Manage apps and devices” option. Afterward, you can check how many app updates are available from the “Updates available” option. To update the apps, you will have to go inside this option.
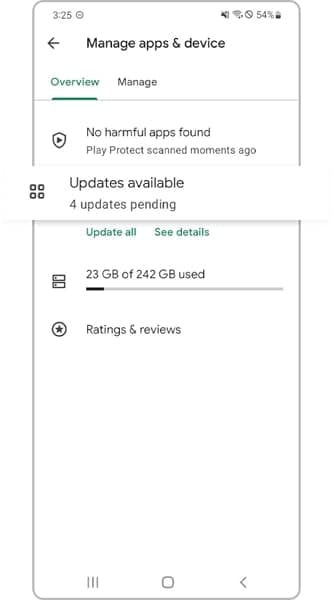
Step 2: You can tap on the “Update All” button if you want to update all the apps one by one. Otherwise, you can press the “Update” option adjacent to each app name to update the frequently used ones.

Fix 6: Check the SD card
If you are still getting the process system isn’t responding to Android error, then chances are that there could be an issue with your SD card. Firstly, check if your SD card is working fine or not. If it is corrupted, then get another memory card for your phone. Also, it should have a prominent amount of free storage. You might be facing this issue if the SD card has limited free space.
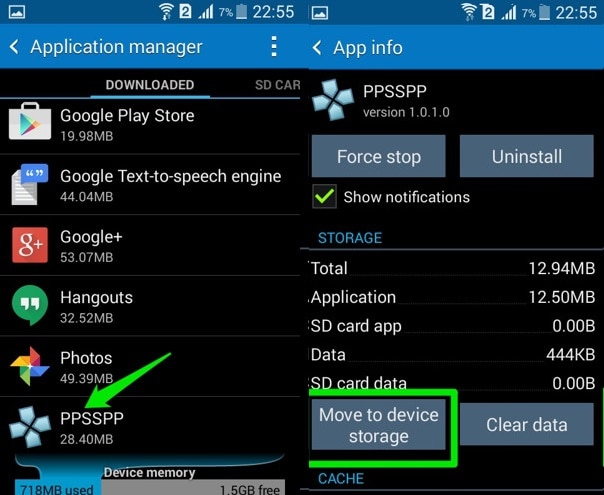
Also, if you are storing apps on the SD card, then your phone might encounter the process isn’t responding issue whenever you run a respective app. Therefore, you should move apps from your SD card to the phone’s internal memory. To do this, go to your phone’s Settings > Application Manager and select any app. If the app is stored on the SD card, then you will get an option of “Move to devise storage”. Just tap on it and manually move every app to your device storage.
Fix 7: One click to fix the process system isn’t responding error
If all the above tricks don’t get your device out of the process system not responding state, then there may be some system issues on your Android. In this case, an Android repair can successfully fix issues like process system isn’t responding.
Note: Android repair may wipe out existing Android data. Back up your Android data before going on.
Dr.Fone - System Repair (Android)
Android repair tool to fix all Android system issues in one click
- Fix all Android system issues like the black screen of death, system UI not working, etc.
- One-click for Android repair. No technical skills are required.
- Supports all the new Oppo Reno 9A devices like Galaxy S8, S9, S22, etc.
- Step-by-step instructions are provided. Friendly UI.
3981454 people have downloaded it
Follow the easy steps below to fix process system isn’t responding error:
- 1. Download and install the Dr.Fone tool. Then select “System Repair” from the main window.

- 2. Connect your Oppo Reno 9A to the PC. After the Oppo Reno 9A device is detected, select the “Android” tab.

- 3. Select and confirm the correct device details of your Android. Then boot your Oppo Reno 9A in download mode and proceed.
- 4. Download the firmware and click “Fix Now”.
 OtsAV DJ Pro
- 5. After a while, your Android will be repaired with the “process system isn’t responding” error fixed.

safe & secure
Fix 8: Factory reset Android
It is always considered the most used way to factory reset your phone in order to resolve the process system not responding error. Though, this should be your last resort, as it will wipe off your device’s data entirely. Even if you are performing a factory reset, make sure that you back up your data by using a reliable tool like Wondershare Dr.Fone .
Wondershare Dr.Fone
Flexibly Back up and Restore Android Data
- Back up Android data to the computer with one click.
- Preview and restore selectively the backup to any Android device.
- Supports 8000+ Android devices.
- There is no data lost during backup, export, or restoration.
3,981,454 people have downloaded it
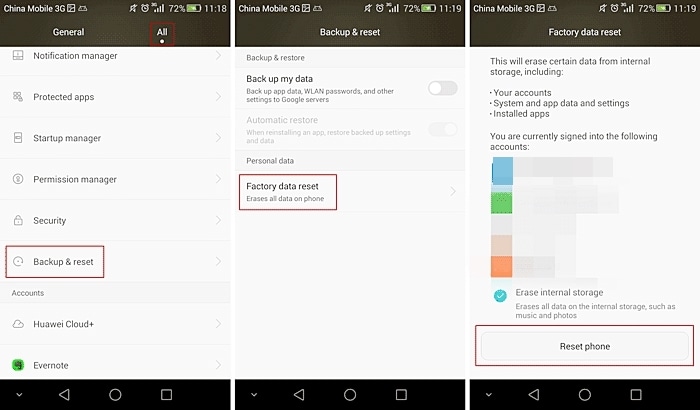
If your phone is functioning, then you can easily factory reset it by visiting Settings > General > Backup & Restore and selecting the option of “Factory Data Reset”. Your device will display a warning regarding all the data files that would be lost or un-synced. Just tap on the “Reset” button to factory reset your device.
If your device is not functioning or locked, then you can perform the factory reset operation by putting your phone into Recovery mode. Most of the time, it can be done by pressing the Power and Volume up button simultaneously for at least 10 seconds. Though, the key combinations might change from one device to another.
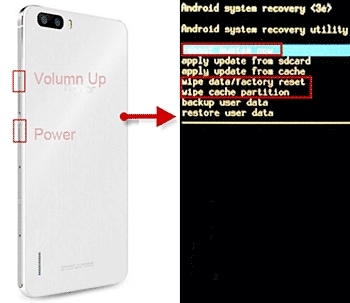
After entering the Recovery mode, go to the “wipe data/factory reset” option using the Volume up and down button. Use the Power button to make a selection. If you get an additional message, then select the “yes – delete all data” option. When it is done, you can simply reboot your device.
Fix 9: Unroot the Oppo Reno 9A device
It has been further discovered that the process system isn’t responding error is more common in rooted devices. Therefore, if you also have a rooted Android device, then you can choose to unroot it in order to fix this issue. There are different ways to unroot an Android device. One of the easiest ways to do it is by using the SuperSU app.
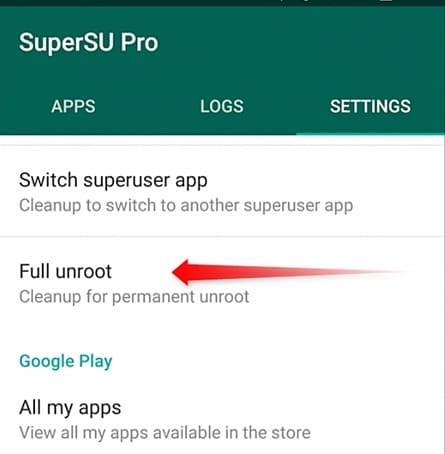
You can always download either SuperSU or SuperSU Pro app from its website here . Simply install it on our device and launch it whenever you wish to unroot it. Visit its “Settings” tab and select the option of “Full unroot”.
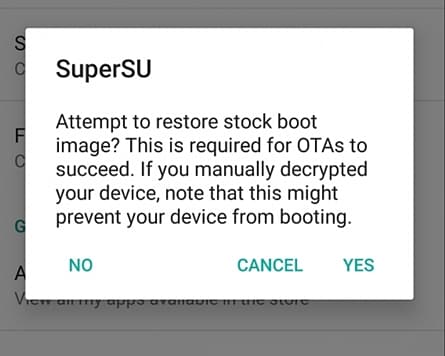
This will generate a warning message regarding all the repercussions of the unrooting process. Just tap on “Continue” to initiate the process.

If you are using an older version of Android, then you might get another pop-up to restore boot images. Simply make the desired selection and start the process. After a while, your device would be restarted the usual way, and it would be unrooted. Most probably, this will resolve the process system isn’t responding error as well.
Now that you know different ways to fix the process system not responding error, you can easily overcome this issue and make the most out of your device. Simply start with the easy fixes, and if they don’t work, then take extreme measures like unrooting your device or restoring it to factory setting. Also, make sure to back up your data before taking any extreme measures.
- Title: Android Safe Mode - How to Turn off Safe Mode on Oppo Reno 9A? | Dr.fone
- Author: Ariadne
- Created at : 2024-07-30 09:09:02
- Updated at : 2024-07-31 09:09:02
- Link: https://howto.techidaily.com/android-safe-mode-how-to-turn-off-safe-mode-on-oppo-reno-9a-drfone-by-drfone-fix-android-problems-fix-android-problems/
- License: This work is licensed under CC BY-NC-SA 4.0.