
Android Safe Mode - How to Turn off Safe Mode on Realme GT 3? | Dr.fone
Android Safe Mode - How to Turn off Safe Mode on Realme GT 3?
Safe mode on Android is very useful to get rid of dangerous apps and malware. This allows the user to perform a uninstall of the crashed or malicious apps by putting safe mode on Android. Now the question is how to remove safe mode? In this article, we have discussed in detail how to get out of safe mode and also discussed some frequently asked questions. Keep reading this article.

Part 1: How to turn off safe mode on Android?
This is very important to turn off the safe mode after you put the safe mode on Android. Your mobile performance is limited in this mode. So you have to turn off safe mode. For doing this, there are some methods. Try to apply them one by one. If you succeed, stop there. Else go to the next method.
Method 1: Restarting the Realme GT 3 device
This is the easiest method to turn off the safe mode in Android. To use this method, follow the steps below.
Step 1 – Tap and hold the power button of your Realme GT 3.
Step 2 – You could find the option “Restart”. Tap on it. (If you have only one option, move to the step no 2)
Step 3 – Now, your phone will boot up in some time and you can see the Realme GT 3 device is no more on safe mode.


This method, if goes well, will turn off safe mode in Android from your device. IF not, move to the next method instead.
Method 2: Do a soft reset:
The soft reset is very easy to perform. It won’t delete any of your personal files etc. Besides, it clears all the temp files and unnecessary data and recent apps so that you get a healthy device. This method is very good for turning off Safe mode on Android.
Step 1 – Tap and hold the power button.
Step 2 – Now, select “Power off” from the given option. This will make your device off.
Step 3 – Wait a few seconds and then turn it on again.
This time you can see your phone is no more in safe mode. Also, your junk files have been also removed. If you still find the Realme GT 3 device is the safe mode, follow the next method.
Method 3: Break all power
This method is sometimes very helpful to turn off safe mode on android by disconnecting all the power as well as resetting the SIM card.
Step 1 – Take the back cover off from the Realme GT 3 device and remove the battery. (Not all devices will give you this facility)
Step 2 – Take out the SIM card.
Step 3 – Reinsert the SIM card and insert the battery again.
Step 4 – Turn the Realme GT 3 device on by tapping and holding the power button.
Now, you can see your device is out of safe mode. If you still find your device in Safe mode, see the next method.
Method 4: Wipe the cache of the Realme GT 3 device.
The cache of the Realme GT 3 device sometimes creates an obstacle in overcoming the safe mode on Android. To solve this issue, follow the steps below.
Step 1 – Turn on your device in safe mode. It can generally be done by tapping the home, power, and volume up button on Android device. If this combination is not working for you, search the internet with your device model number.

Step 2 – Now you can find the recovery mode screen. Navigate to the “Wipe cache” option with the volume up and down button and select the option by tapping the power button.

Step 3 – Now follow on-screen instruction and your device will be rebooted.
After successful completion of this method, your device should no longer be in safe mode. If the problem still persists, the only solution is to do a factory reset. This will erase all the data from your device. So take backup of your internal storage.
Method 5: Factory data reset
To factory data reset, you have to follow the below steps.
Step 1 – Enter in the recovery mode by following the steps mentioned earlier.
Step 2 – Now select “Factory data reset” from the given options.

Step 3 – Now, follow the on-screen instructions and your device will be factory reset.
After this method, you can successfully get rid of the safe mode on Android. Restore your data from the backup you created.
Watch the video below to turn off safe mode on your phone:

Part 2: How to put the phone in safe mode?
If some apps or programs create a problem on your device, the solution is safe mode. Safe mode allows you to uninstall the app or the program out of your device safely. So, safe mode on Android is quite useful sometimes. Let’s have a look at how to turn on safe mode in Android.
Before this, remember to take a backup of your Realme GT 3. We recommend you to use the Dr.Fone - Phone Backup (Android). This tool is the best in its class to provide users with a very easy-to-use user interface yet powerful solution.

Dr.Fone - Phone Backup (Android)_
Flexibly Backup and Restore Android Data
- Selectively backup Android data to the computer with one click.
- Preview and restore the backup to any Android devices.
- Supports 8000+ Android devices.
- There is no data lost during backup, export, or restore.
Always remember to use this tool before you enter in the safe mode as you never know what will happen next and you might end up with factory resetting. This, as the result, will erase all your valuable data. So always perform backup data before you proceed.
To enter the safe mode, follow the instructions below.
Step 1 – First of all, long press the power button and let the Power options appear.

Step 2 – Now, long press on the “Power off” option. This will instantly ask you if you want to reboot into safe mode. Select the option and your device will reboot in safe mode.
 Epubor Audible Converter for Win: Download and convert Audible AAXC/AA/AAX to MP3 with 100% original quality preserved.
If you are using Android version 4.2 or earlier, turn off the Realme GT 3 device and turn it on the back by tapping the power button. When the logo appears, tap and hold the volume down button. This will allow the Realme GT 3 device to boot in safe mode.
Follow these steps carefully and now you can see a “Safe Mode” written at the corner of your device. This will confirm that you have successfully entered in Safe mode on Android.
Part 3: Safe mode on Android FAQs
In this section, we’ll discuss some frequently asked questions about the safe mode. Some users have many questions regarding the safe mode. Here we’ll try to cover some of them.
1. Why is My Realme GT 3 on safe mode?
This is a very common question around the world. For many Android device users, it’s quite common to see your phone in safe mode suddenly. Android is a secure platform and if your device sees any threat from your recently installed apps or any programs that want to harm your device; it would go into safe mode automatically. Sometimes, you might accidentally perform the steps discussed in part 2 and boot your device in safe mode.
2. Safe mode won’t turn off on My Realme GT 3
For the solution to remove safe mode from your device you must follow the step-by-step methods as mentioned in part 1. This will surely take your device out of the safe mode.
The safe mode is a very useful program for any Android device. But it limits the programs of Android and you must remove safe mode after uninstalling the harmful app. This article showed you how to turn off safe mode easily.
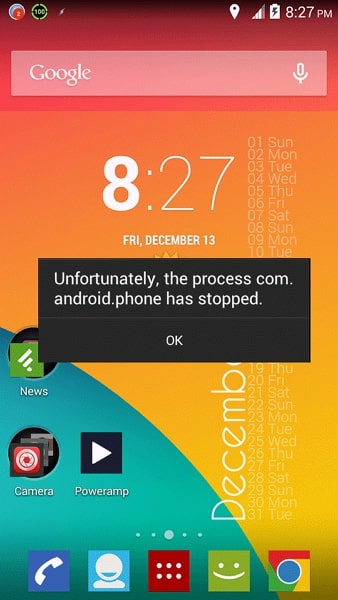
Fix the Error of Unfortunately the Process.com.android.phone Has Stopped on Realme GT 3
Nowadays, smartphones are integral to life. They serve as your communication lifeline and powerful personal assistant. However, it can be frustrating when a sudden error disrupts our phone’s functionality. One common error Android users encounter is the “Unfortunately, The process.com.android.phone has stopped” error. Fear not if you have come across this error message on your Realme GT 3.
This beginner’s guide is here to help you understand the causes of this problem. It will also provide you with practical “unfortunately the phone has stopped solutions.”
Part 1: Learn Why Unfortunately the process.com.android.phone Has Stopped
The error message “Unfortunately, the process com.android.phone has stopped“ typically appears on Android devices when there is an issue with the Phone app. Issues with underlying processes responsible for handling phone-related functions are also a cause.
It can prevent you from making or receiving phone calls, accessing contacts, or using other phone-related features. Following are some of the possible reasons why you may encounter this error:
App or System Update
When you update your device’s OS or the Phone app itself, it is possible to encounter bugs or compatibility issues. These issues can lead to the Phone app crashing and displaying this error message. Sometimes, the updated software may not work with the existing configurations of the Phone app. It results in instability which causes this error.

App Cache/Data Corruption
The Phone app relies on cached data and stored settings to function properly. If the cache or data of the app becomes corrupted, it can cause the Phone app to malfunction. The reasons include interrupted app installations or updates, improper shutdowns, or software conflicts. As a result, you may see the error message indicating that the process com.android.phone has stopped.
Insufficient System Resources
Android devices need sufficient memory (RAM) and processing power to run apps smoothly. If your device is running low on memory or processing capacity, it may struggle to handle the Phone app and its processes. It can lead to crashes and the error message. Running many resource-intensive apps at the same time also causes this issue. Other reasons include too many background processes that contribute to this error.
Conflicting Third-Party Apps
Third-party apps installed on your device can sometimes conflict with the Phone app. These conflicts can occur for various reasons, such as incompatible app versions. The software bugs within the third-party apps or configurations can also clash with the Phone app. Such conflicts can disrupt the normal operation of the Phone app. The result of all this trigger the error message.
Software or Firmware Glitches
Software glitches or firmware issues can occasionally occur in Android devices. These glitches can affect the functioning of system processes, including the Phone app. They may arise from programming errors and system inconsistencies. Sometimes unexpected interactions between different OS components can also lead to this error.
Part 2: 100% Working Fixes To Fix Unfortunately the process.com.android.phone Has Stopped
Having been denied access to your Phone can cause a lot of issues. Luckily, many simple fixes to the “process.com.android.phone has stopped“ error exist. These solutions have worked for many users, and by following them, you may be able to resolve the issue too. Given below are the top 8 fixes to resolve this error and restore your device’s phone functions:
Fix 1: Restart/Reboot your Android Device
One of the simplest yet effective solutions to tackle the “Unfortunately, the process com.android.phone has stopped“ error is to reboot your Realme GT 3. Restarting your device can often resolve temporary software glitches or conflicts. This fix requires no technical expertise.
So, it is worth trying before moving on to more complex solutions. Follow the guide below to restart your Realme GT 3 and potentially fix the error:
- Step: Long-press your Realme GT 3’s “Side” key and wait for the power menu to appear. Here, select “Restart” to initiate the reboot of your phone.


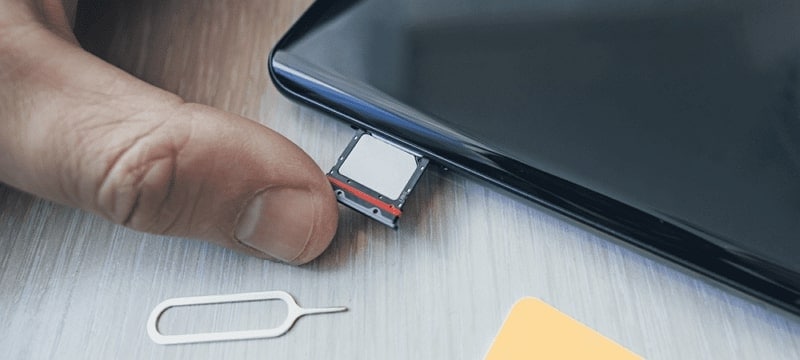
Fix 2: Re-insert the SIM Card
There is also a chance that the reason you are seeing this error message relates to the SIM card. A loose or improperly inserted SIM card can cause disruptions in the phone’s communication functions. As a result, you see the “Unfortunately, the process com.android.phone has stopped“ error.
To fix this error, you can remove the SIM card and then re-insert it. If the issue is actually related to a SIM card, the issue will get resolved after you resolve the problem.
 The BootIt Collection covers multi-booting, partitioning, and disk imaging on traditional PC’s using the standard BIOS and newer PC’s using UEFI. The collection includes BootIt Bare Metal (BIBM) for standard BIOS systems and BootIt UEFI (BIU) for UEFI system.
Fix 3: Clear the Cache and Data of the Phone App
The “Unfortunately, the process com.android.phone has stopped“ error is connected to the Phone app. In this situation, clearing the cache and data of the Phone app itself can often resolve the issue. This fix focuses on removing any corrupted or conflicting data within the app.
Once the corrupted data is gone, it will restore the Phone app to proper functioning. Here is how to clear the cache and data of the Phone app on an Android device:
- Step 1: Find the Phone app on your Realme GT 3 and long-press its icon. A small menu will pop up where you need to select “App Info.”

- Step 2: It will lead you to detailed information about the Phone app. Here, press “Storage,” and following that, you will see the “Clear Cache” and “Clear Data” options. Use them in the same order to clear the cache and data of the Phone app.

Fix 4: Disable Automatic Updates Feature
In some cases, this error may occur due to conflicts or compatibility issues with the automatic app updates feature. The automatic update on your Realme GT 3 keeps your apps updated. Disabling this feature temporarily can help resolve the problem.
As a result, you will be able to use the Phone app without interruptions. To disable the automatic updates option on the Google Play Store, you can use the following steps:
- Step 1: Navigate to the Google Play Store app on your Realme GT 3 and launch it. Next, tap on the profile icon in the screen’s top right corner. From the options presented, select “Settings.”
 Power Tools add-on for Google Sheets, 12-month subscription
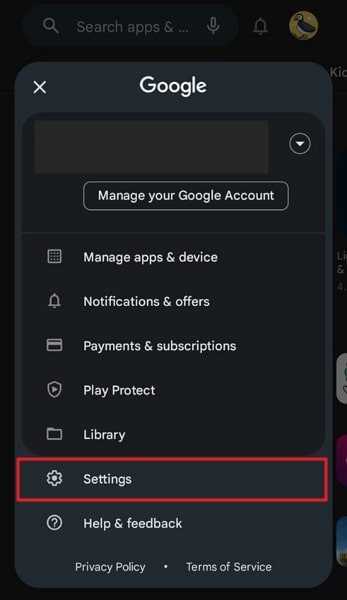
- Step 2: In Settings, press “Network Preferences” to expand the option. Now, open the “Auto-update apps” settings and enable the “Don’t auto-update apps” option.

Fix 5: Clear All Apps Cache and Data
When dealing with this error, clearing the cache and data of all apps on your Realme GT 3 can also help. Doing this will remove any corrupt or conflicting data that might be causing the issue. This fix targets the overall app ecosystem on your device.
It intends to ensure a clean slate and potentially resolve the error. Use the following guide to clear the cache and data of all apps:
- Step 1: Access your Realme GT 3’s Settings and tap the “Apps” option. It will lead you to all the apps running on your phone. Here, select an app to see detailed app info.
 Easy and Safe Partition Software & Hard Disk Manager

- Step 2: On the app info screen, scroll down and press “Storage.” Now use “Clear Cache” to clean the app’s cache and “Clear Data” to erase the app’s data. Repeat the same process for all the apps installed on your device.

Fix 6: Clear SIM Toolkit Cache and Data
It is worth considering the SIM Toolkit is a potential source of the problem. The SIM Toolkit is an app that provides functionality related to your SIM card. Its functions include accessing value-added services and managing mobile network settings. Clearing the cache and data of the SIM Toolkit app can help resolve this issue. The steps you need to clear the cache and data of this app are the following:
- Step 1: On your Realme GT 3, find the SIM Toolkit app. After finding it, press and hold its icon until a short menu appears. Choose “App Info” from the available options to access its settings.
- Step 2: Now, you need to tap “Storage” to proceed. On the next screen, first, tap “Clear Cache” to clean the cache, and later press “Clear Data.”

Fix 7: Perform Factory Reset
If all previous fixes have been unsuccessful, performing a factory reset is also an option to resolve this issue. It is a drastic measure that can potentially address underlying software issues. However, it’s important to note that a factory reset will erase the entire data and settings of your device.
So, it’s crucial to back up your important files before proceeding with this fix. By doing so, you can restore your device to its original state and eliminate the error. Use the detailed guide described below to factory reset your Realme GT 3:
- Step 1: Start by launching the Settings app and selecting “General Management.” Here, choose “Reset,” and following that on the next screen, tap “Factory data reset.”

- Step 2: After tapping “Factory data reset,” hit the “Reset” option. Next, enter your Realme GT 3 PIN to confirm the process, and use “Delete All” to start the factory reset process.

Fix 8: Try Wondershare Dr.Fone - The Best and Most Reliable Android System Repair Tool
It must be a frustrating experience to try one solution after the next and not be able to resolve the issue. In such situations, the best thing you can do is find a tool that can resolve all Android system problems. While there are many options available online, not all are great. The best Android system repair tool currently available is Wondershare Dr.Fone.
Using Wondershare Dr.Fone, you can fix issues like “Unfortunately, the process.com.android.phone has stopped,” Play Store not working, frozen phone, and many more. It is a specialized tool for resolving Android system issues in Realme GT 3 devices with support for all modern Realme GT 3 phones.
Key Features of Wondershare Dr.Fone
- You do not need any technical skills to fix your Android system issues when using Dr.Fone.
- It has the highest success rate in fixing complex software issues related to Android OS.
- Wondershare Dr.Fone supports over 1000 Android models for system repair and can fix most issues within minutes.
Steps To Fix the process.com.android.phone Has Stopped via Wondershare Dr.Fone
All you need to fix your Realme GT 3’s system issues is a computer with Wondershare Dr.Fone installed and your device connected to it. Here is the simplified process of resolving most Android system issues in a matter of minutes:
- Step 1: Link Your Android Device with Wondershare Dr.Fone
To start, connect your Realme GT 3 to your computer. Launch Wondershare Dr.Fone on your computer screen and click on “Toolbox,” located in the left sidebar. From the options available, select “System Repair” and follow it by clicking “Android” on the next screen.

- Step 2: Enter the Required Details of Your Realme GT 3
Click on “Start” to initiate the process, and following that, you will be prompted to provide specific details about your Realme GT 3. These details include the “Brand,” “Name,” “Model,” “Country,” and “Carrier.” Afterward, tick the box that says, “I agree with the warning, and I am ready to proceed,” and click “Next.”

- Step 3: Resolve The process.com.android.phone Has Stopped Issue
The subsequent step involves entering Download Mode on your device, following the on-screen instructions provided by the software. Once your device is in Download Mode, this Android repair toolkit will proceed to download and install the relevant firmware. Now, select “Fix Now” and confirm the repair of your Realme GT 3 by entering the code “000000.”

 safe & secure
3,595,007 people have downloaded it
Conclusion
To sum the article up, encountering the frustrating error message “Unfortunately, the process com.android.phone has stopped“ can be daunting. However, with the right knowledge and tools, resolving this issue becomes achievable. Throughout this guide, we have explored various troubleshooting methods. These included clearing the cache, rebooting the Realme GT 3 device, and even performing a factory reset.
While there are many options to fix this error, only one is an excellent choice: Wondershare Dr.Fone. With its powerful Android system repair feature, Wondershare Dr.Fone is a reliable solution to resolve this error.

Fix App Not Available in Your Country Play Store Problem on Realme GT 3
Mobile applications are important for smooth operations when it comes to smartphones. They offer convenience, entertainment, and functionality at your fingertips. However, encountering the “App Not Available in Your Country Play Store“ issue can be frustrating. It can quickly dampen the excitement of discovering a new app.
This is mainly due to geographical restrictions that are often imposed by developers. It poses a hurdle for users eager to access a particular application. However, there is no need to worry, as this article will help you in resolving this issue. It will delve into effective strategies and solutions to ensure the unavailability of an app is no longer an obstacle.
Part 1: Reasons Behind the App Not Available in Your Country Play Store Issue
Encountering the “Google Play App Not Available in Your Country“ issue can feel like hitting a roadblock. This restriction hampers your ability to explore and use valuable apps. It can also disrupt the smooth functioning of your daily digital activities. Before going for solutions, it is crucial to understand the reasons causing this restriction in installing apps on smartphones:
1. Regional Restrictions
One of the primary culprits behind this issue is the regional restrictions imposed by developers. Developers often roll out their apps gradually across different regions. It is done to adhere to legal and licensing requirements. This staggered release strategy ensures compliance with local laws. Moreover, it guarantees a smooth user experience tailored to specific geographical locations.
2. Licensing and Legal Constraints
Licensing agreements and legal constraints play an important role when it comes to the accessibility of apps. Developers may encounter licensing issues. This can prevent them from offering their apps in certain regions. It is due to copyright, trademark, or other legal considerations. Navigating the complex web of international laws and agreements is a big hassle. It becomes a determining factor in the availability of apps on the Play Store.
 vMix 4K - Software based live production. vMix 4K includes everything in vMix HD plus 4K support, PTZ control, External/Fullscreen output, 4 Virtual Outputs, 1 Replay, 4 vMix Call, and 2 Recorders.
3. Localization Challenges
Apps are often designed with specific markets in mind. These incorporate language, cultural, and regulatory considerations to enhance user experience. The absence of proper localization can render an app incompatible with specific regions. It includes factors such as adapting the app for different languages, currencies, and cultural nuances. This can result in the app being excluded from the Play Store app not available in your country.
4. Device and OS Compatibility
The compatibility between the app, the user’s device, and its OS is another factor that contributes to this issue. Developers might restrict their app availability to certain devices or OS versions. It can restrict access for users whose devices or OS do not meet the app’s requirements. This technical limitation adds another layer to the complexity of app availability.
5. Political and Economic Factors
In some instances, political tensions or economic considerations can also be a factor. It may influence the accessibility of apps in certain countries. Geo-political factors, trade sanctions, or economic conditions can impact the distribution of apps. This leads developers to exclude specific regions from their app’s availability.
Part 2: 4 Tested Methods To Fix Google Play App Not Available in Your Country
The right app can make a major difference in work efficiency or personal enjoyment. That’s why facing the “Play Store app not available in your country“ issue can be frustrating. The positive aspect is that many solutions exist for addressing this issue. Presented below are the top 4 approaches to resolving this matter:
Method 1: Change Your Google Play Store Country
One of the most direct ways to address this issue is by manually adjusting your Google Play Store country settings. Google allows users to change their country or region. Remember that you can only do it once a year. To utilize this approach, it’s essential to reside in the specified country. The other option is to provide a payment method originating from that particular region. Below is a detailed walkthrough for this procedure:
- Step 1. Launch the Google Play Store on your Realme GT 3 and tap the “Profile” icon from the top right corner. Here, choose “Settings” and follow on to tap “General.”
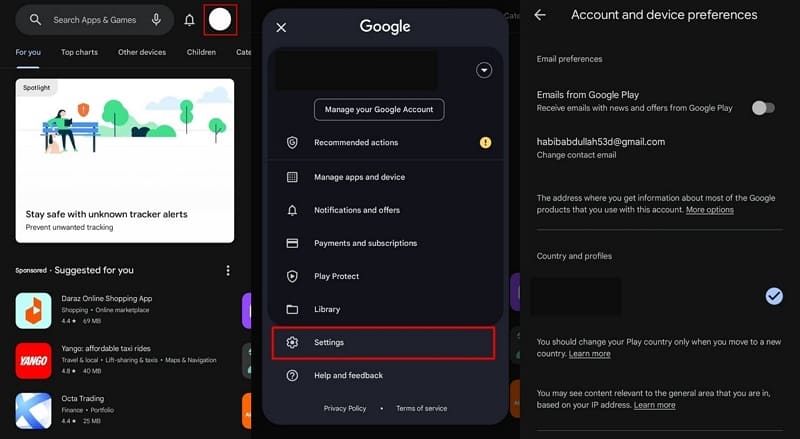
- Step 2. Within the “General” tab, move towards “Account and device preferences” and tap it. There, select “Country and profiles” and tap the country to change it. Now, follow the on-screen prompts to complete the procedure.
.png) Kanto Player Professional
Kanto Player Professional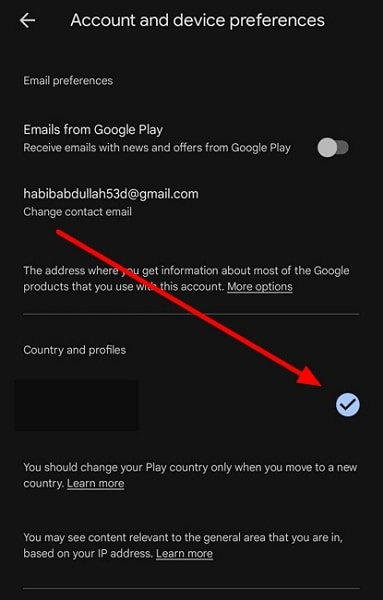

Method 2: Use a Reliable VPN
Confronting the message “This app is not accessible in your country” on the Play Store? Employing a Virtual Private Network (VPN) can be an effective strategy. It allows you to virtually transcend geographical restrictions. A VPN masks your actual location by routing your internet connection through servers in different regions.
You can utilize a reliable VPN to access the Play Store as though you were in a region where the desired app is accessible. Follow this step-by-step guide to address this concern:
- Step 1. Access the Google Play Store and download a reliable VPN for the procedure. Open the VPN you download and connect to the country of your choice. Once you have connected your device’s IP to another country using the VPN, continue to your home screen.

- Step 2. Look for Google Play Store on the home screen and long-press to open a menu. From the pop-up menu, choose “App Info,” and on the following screen, tap “Clear data.” Now, press “Clear cache” to wipe the cache.


- Step 3: Go back to the “App info” screen and press “Force Stop” to force close the app. Afterward, relaunch the Play Store and access your targeted apps.

Method 3: Download an APK File
One way to resolve the issue at hand is to sideload the app by downloading its APK file. It can be a viable and direct solution where other methods fail. This method involves installing the application manually, bypassing the Google Play Store. Follow these sequential instructions to download and install an APK file:
- Step 1. Before starting, ensure that you have enabled the installation from unknown sources. Afterward, find a reliable website and search for your targeted apps.
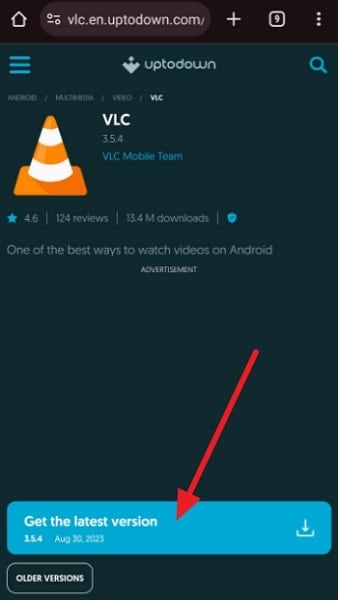
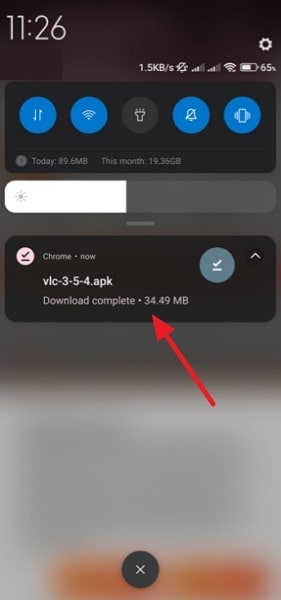
- Step 2. Once you have found the targeted app, download it on your Realme GT 3. When the download process is complete, tap the file to start the installation process.
Method 4: Try a Third-Party App Store
Google Play Store isn’t the only apps and games store. There exist many options, and exploring them can help you find the apps you are looking for. Typically, third-party app marketplaces are not bound by geographical limitations. Here’s a guide on acquiring an app from a third-party store:
- Step 1. Use a web browser on your Realme GT 3 to look for a reliable third-party app store like Aptoide. Once it is downloaded, install it on your smartphone.

- Step 2. Open the third-party app store and look for your targeted apps. Now, you should be able to download them without any restrictions.
Pro Tip: Fix Play Store Available in Your Country but Not Working on All Android Smartphones
If the Play Store is not working on your Realme GT 3s or an application is not downloading from it, we have a tip for you. Wondershare Dr.Fone – System Repair (Android) is a perfect solution for all the issues for your Realme GT 3s. Whether it is the Play Store functionality issue or the downloading of applications problem, System Repair (Android) is there to resolve them.
It fixes various Android issues in a matter of a few seconds. This toolkit has a high success rate of fixing Android issues, including the Play Store Not Working issue. It can also resolve the issue of Apps Keep Crashing, Phone Stuck in a Boot Loop, and much more.
Key Features of Wondershare Dr.Fone
There are some prevalent pointers you should know about Wondershare Dr.Fone. Before you continue using the tool for resolving Android problems, look into these prominent features:
- System Repair (Android) tool is used to fix other issues, too, like the black screen of death in Android.
- This software is compatible with all the Realme GT 3 models, including the latest one, Realme GT 3 S23.
- With no technical expertise required, you can execute all tasks to repair your Android issues with a few clicks.
![]()
 Lyric Video Creator Professional Version
Dr.Fone - System Repair (Android)
Repair Android System Errors without Any Trouble.
- Fix your Android to normal, no skills required.
- Fix various Android system issues, stuck in boot loop , black screen , or won’t turn on , looping on start, etc.
- The high success rate in resolving Android system issues.
- Compatible with a wide range of Android devices and OS versions
- User-friendly interface with easy-to-follow steps.
3981454 people have downloaded it
Steps Included To Fix Play Store Not Working on All Android Smartphones
While you have learned much about Wondershare Dr.Fone, in situations where an app is available but the Play Store is not working properly, it comes pretty handy. Here is how you can fix the Play Store not working problem on Android devices with Dr.Fone:
- Step 1: Activate Dr.Fone – System Repair Tool
At first, you will have to run Wondershare Dr.Fone - System Repair (Android) on your system and head towards the “System Repair” section from the “Toolbox.” Next, click on the “Android” device to continue, and hit the “Start” button to start the repair process.

- Step 2: Put Android Phone on Download Mode
On the next window, you need to enter the Realme GT 3 device details, including the “Name, Model, Country, and Carrier,” and hit the “Next” button. Then, proceed to put your Realme GT 3 on the “Download Mode” by following the on-screen instructions.
 Allavsoft Batch Download Online Videos, Music Offline to MP4, MP3, MOV, etc format

- Step 3: Confirm the Installation and Conclude the Process
Once the phone has been put in the Download Mode, the firmware will download automatically. Install it on your device by selecting the “Fix Now” icon. Now, enter the “Code” and confirm installation, after which hit the “Done” button once the process concludes.
safe & secure
3,289,252 people have downloaded it
Frequently Asked Questions
- How do we resolve the inability to change the Play Store country problem?
If you are unable to change your Play Store country, ensure that your Google Play Store account has no pending transactions. Verify that the payment methods associated with your Google account are valid. Clear the cache and data of the Google Play Store app in your device settings to reset any potential issues.
- Can you use the Google Play Store balance after changing the country?
Your Google Play Balance is linked to the country setting on your Google Play account. If you possess a Google Play balance and decide to switch countries, the balance becomes unusable in the new location. Changing countries on your account results in the inability to access or utilize the existing balance.
- Is it safe to download Android applications from a third-party store?
It is risky to download Android applications from a third-party store because of the viral content. There could be issues like App Authenticity, Outdated Apps, Policy Violations, etc. It is better to download these apps from official platforms like Google Play Store since they are more secure.

Conclusion
To summarize, the pursuit of the perfect app sometimes encounters hurdles. One frustrating issue often reported by users is the “App Not Available in Your Country Play Store“ issue. However, armed with the knowledge, you can now navigate through these challenges. From changing your Play Store country to using VPNs, this guide has covered a range of methods. Each method provides a unique approach, catering to different preferences and circumstances.
As a parting recommendation, we introduce Wondershare Dr.Fone. It is a powerful tool designed to tackle Play Store malfunctions head-on. With support for even Android 13, this software offers a complete solution for Android. Its comprehensive approach and easy-to-use interface make it a valuable addition to your toolkit.
- Title: Android Safe Mode - How to Turn off Safe Mode on Realme GT 3? | Dr.fone
- Author: Ariadne
- Created at : 2024-07-30 09:09:40
- Updated at : 2024-07-31 09:09:40
- Link: https://howto.techidaily.com/android-safe-mode-how-to-turn-off-safe-mode-on-realme-gt-3-drfone-by-drfone-fix-android-problems-fix-android-problems/
- License: This work is licensed under CC BY-NC-SA 4.0.