
Android Safe Mode - How to Turn off Safe Mode on Samsung Galaxy M34? | Dr.fone
Android Safe Mode - How to Turn off Safe Mode on Samsung Galaxy M34?
Safe mode on Android is very useful to get rid of dangerous apps and malware. This allows the user to perform a uninstall of the crashed or malicious apps by putting safe mode on Android. Now the question is how to remove safe mode? In this article, we have discussed in detail how to get out of safe mode and also discussed some frequently asked questions. Keep reading this article.

Part 1: How to turn off safe mode on Android?
This is very important to turn off the safe mode after you put the safe mode on Android. Your mobile performance is limited in this mode. So you have to turn off safe mode. For doing this, there are some methods. Try to apply them one by one. If you succeed, stop there. Else go to the next method.
Method 1: Restarting the Samsung Galaxy M34 device
This is the easiest method to turn off the safe mode in Android. To use this method, follow the steps below.
Step 1 – Tap and hold the power button of your Samsung Galaxy M34.
Step 2 – You could find the option “Restart”. Tap on it. (If you have only one option, move to the step no 2)
Step 3 – Now, your phone will boot up in some time and you can see the Samsung Galaxy M34 device is no more on safe mode.

This method, if goes well, will turn off safe mode in Android from your device. IF not, move to the next method instead.
Method 2: Do a soft reset:
The soft reset is very easy to perform. It won’t delete any of your personal files etc. Besides, it clears all the temp files and unnecessary data and recent apps so that you get a healthy device. This method is very good for turning off Safe mode on Android.
Step 1 – Tap and hold the power button.
Step 2 – Now, select “Power off” from the given option. This will make your device off.
Step 3 – Wait a few seconds and then turn it on again.
This time you can see your phone is no more in safe mode. Also, your junk files have been also removed. If you still find the Samsung Galaxy M34 device is the safe mode, follow the next method.
Method 3: Break all power
This method is sometimes very helpful to turn off safe mode on android by disconnecting all the power as well as resetting the SIM card.
Step 1 – Take the back cover off from the Samsung Galaxy M34 device and remove the battery. (Not all devices will give you this facility)
Step 2 – Take out the SIM card.
Step 3 – Reinsert the SIM card and insert the battery again.
Step 4 – Turn the Samsung Galaxy M34 device on by tapping and holding the power button.
Now, you can see your device is out of safe mode. If you still find your device in Safe mode, see the next method.
Method 4: Wipe the cache of the Samsung Galaxy M34 device.
The cache of the Samsung Galaxy M34 device sometimes creates an obstacle in overcoming the safe mode on Android. To solve this issue, follow the steps below.
Step 1 – Turn on your device in safe mode. It can generally be done by tapping the home, power, and volume up button on Android device. If this combination is not working for you, search the internet with your device model number.

Step 2 – Now you can find the recovery mode screen. Navigate to the “Wipe cache” option with the volume up and down button and select the option by tapping the power button.

Step 3 – Now follow on-screen instruction and your device will be rebooted.
After successful completion of this method, your device should no longer be in safe mode. If the problem still persists, the only solution is to do a factory reset. This will erase all the data from your device. So take backup of your internal storage.
Method 5: Factory data reset
To factory data reset, you have to follow the below steps.
Step 1 – Enter in the recovery mode by following the steps mentioned earlier.
Step 2 – Now select “Factory data reset” from the given options.

Step 3 – Now, follow the on-screen instructions and your device will be factory reset.
After this method, you can successfully get rid of the safe mode on Android. Restore your data from the backup you created.
Watch the video below to turn off safe mode on your phone:
 vMix 4K - Software based live production. vMix 4K includes everything in vMix HD plus 4K support, PTZ control, External/Fullscreen output, 4 Virtual Outputs, 1 Replay, 4 vMix Call, and 2 Recorders.
Part 2: How to put the phone in safe mode?
If some apps or programs create a problem on your device, the solution is safe mode. Safe mode allows you to uninstall the app or the program out of your device safely. So, safe mode on Android is quite useful sometimes. Let’s have a look at how to turn on safe mode in Android.
Before this, remember to take a backup of your Samsung Galaxy M34. We recommend you to use the Dr.Fone - Phone Backup (Android). This tool is the best in its class to provide users with a very easy-to-use user interface yet powerful solution.
Dr.Fone - Phone Backup (Android)_
Flexibly Backup and Restore Android Data
- Selectively backup Android data to the computer with one click.
- Preview and restore the backup to any Android devices.
- Supports 8000+ Android devices.
- There is no data lost during backup, export, or restore.
Always remember to use this tool before you enter in the safe mode as you never know what will happen next and you might end up with factory resetting. This, as the result, will erase all your valuable data. So always perform backup data before you proceed.
To enter the safe mode, follow the instructions below.
Step 1 – First of all, long press the power button and let the Power options appear.
.png) Kanto Player Professional
Kanto Player Professional
Step 2 – Now, long press on the “Power off” option. This will instantly ask you if you want to reboot into safe mode. Select the option and your device will reboot in safe mode.
 LYRX is an easy-to-use karaoke software with the professional features karaoke hosts need to perform with precision. LYRX is karaoke show hosting software that supports all standard karaoke file types as well as HD video formats, and it’s truly fun to use.
If you are using Android version 4.2 or earlier, turn off the Samsung Galaxy M34 device and turn it on the back by tapping the power button. When the logo appears, tap and hold the volume down button. This will allow the Samsung Galaxy M34 device to boot in safe mode.
Follow these steps carefully and now you can see a “Safe Mode” written at the corner of your device. This will confirm that you have successfully entered in Safe mode on Android.
Part 3: Safe mode on Android FAQs
In this section, we’ll discuss some frequently asked questions about the safe mode. Some users have many questions regarding the safe mode. Here we’ll try to cover some of them.
1. Why is My Samsung Galaxy M34 on safe mode?
This is a very common question around the world. For many Android device users, it’s quite common to see your phone in safe mode suddenly. Android is a secure platform and if your device sees any threat from your recently installed apps or any programs that want to harm your device; it would go into safe mode automatically. Sometimes, you might accidentally perform the steps discussed in part 2 and boot your device in safe mode.
2. Safe mode won’t turn off on My Samsung Galaxy M34
For the solution to remove safe mode from your device you must follow the step-by-step methods as mentioned in part 1. This will surely take your device out of the safe mode.
The safe mode is a very useful program for any Android device. But it limits the programs of Android and you must remove safe mode after uninstalling the harmful app. This article showed you how to turn off safe mode easily.
How to Resolve Samsung Galaxy M34 Screen Not Working

Nothing is more frustrating than your phone’s touch screen becoming unresponsive. Given the importance of smartphones in daily work, a phone with a touch screen not working can badly affect your routine. It is an issue found in most smartphone brands, even among Samsung Galaxy M34 phones, known for their efficient performance. If your Samsung Galaxy M34 screen is not working, it can be an exhausting experience.
Luckily for your, multiple ways are available to resolve this issue. This article will list six fixes for resolving the Samsung Galaxy M34 not working issue. It will also discuss the reasons behind this issue in detail and provide a list of tips to avoid it in the future.
Part 1: What Causes Samsung Galaxy M34 Screen Unresponsive?
Answering what causes Samsung Galaxy M34 screen unresponsiveness is difficult. Many reasons, ranging from minor bugs to serious hardware issues, can cause it. To find out the exact or near exact reason, you will have to review your device’s activity before this issue occurs. You can use the following common reasons behind the Samsung Galaxy M34 6T touch screen not working as the basis of your investigation:
1. Touchscreen Calibration
Excessive smartphone use can cause the touchscreen to go out of the required settings. It means until the touch screen is not recalibrated properly, the touch not working issues will continue to pop up.
2. Battery Issue
If your device’s battery is damaged or is at the end of its lifespan, it can cause the touch screen not responding issues. Moreover, the low battery and issue with the charging port can also lead to this problem.
3. Corrupted System Files
The presence of corrupted system files is also a significant cause of such issues. These corrupted files can also lead to serious performance issues on your phone.
4. Conflicting Settings
It is also possible that the conflicting settings in your device are causing this issue. These settings can range from touch sensitivity to screen refresh rate. Unless these conflicts are removed, the touchscreen performance will continue to degrade.
Part 2: The Common Solutions to Solve a Samsung Galaxy M34 Screen Unresponsive
Fixing the Samsung Galaxy M34screen not working is easy as long as it is not a serious hardware issue. While there are multiple ways to solve this problem, we have chosen the 6 most common and easy solutions. Listed below are the 6 common solutions to solve a Samsung Galaxy M34 screen unresponsive:

Solution 1. Restart the Samsung Galaxy M34 Phone
As with any other issue or device, the first fix you should always try first is to restart your device. It is the best solution to fix the Samsung Galaxy M34 not working issue if temporary bugs and glitches are the reason behind it. When you restart your device, it flushes out all temporary bugs and glitches while resetting your device’s processes. Use this guide to restart your Samsung Galaxy M34 device:
Instruction: Press and hold the “Power” button for a couple of seconds until it turns off. Wait a few moments and then use the “Power” button to turn on the Samsung Galaxy M34 device. In some of the Samsung Galaxy M34 devices, you also have to use the “Volume Down” button along with the “Power” button to restart the Samsung Galaxy M34 device.
Solution 2. Check the Charging Port and Battery
The issues with the battery of your Samsung Galaxy M34 5 can also lead to Samsung Galaxy M34 not working. It can be due to your device’s low or near-empty battery. While in some cases, serious issues with the battery can also be behind this problem. Similarly, the reason behind your phone’s touch not working can be charging port issues.
Thus, you should check and clean your device’s charging port and see if it resolves the problem. Moreover, turn off your device, charge it, and then restart it to check if the touch screen not working issue is gone.
Solution 3. Contact the Samsung Galaxy M34 Customer Support
Contacting Samsung Galaxy M34 customer support can also help resolve the Samsung Galaxy M34 screen not working problem. It is especially helpful if you are unable to find the cause and want to seek an expert opinion. The Samsung Galaxy M34 customer support will help you find the issue and recommend a solution.
It is an excellent option if your Samsung Galaxy M34 device’s touch is not working due to hardware issues. They can help guide you to a suitable service center to fix your phone and resolve this issue.


Solution 4. Wipe the Cache of Your Samsung Galaxy M34 Device
A common reason for Samsung Galaxy M34 Nord being stuck on the loading screen is the filled cache partition. If you do not clean out the cache partition of your Samsung Galaxy M34 device, its performance will degrade. As a result, your device will experience issues like the touch screen not working or getting stuck at the loading screen. Here is how you can clear the cache of your Samsung Galaxy M34 device:
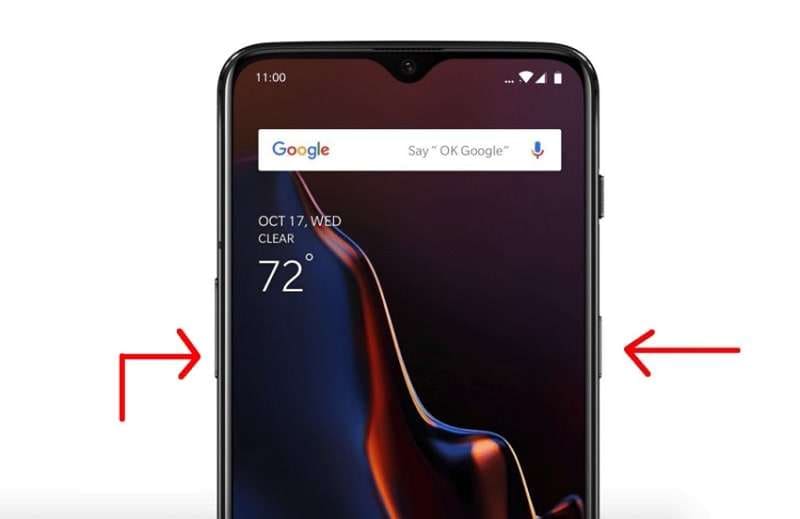
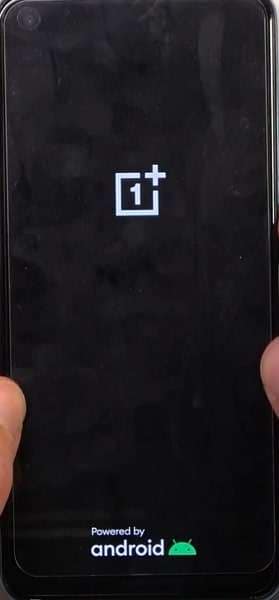
Step 1: Turn off your device by pressing and holding the “Power” button. Once it is turned off, press and hold the “Power” and “Volume Down” buttons until you see the Samsung Galaxy M34 logo.
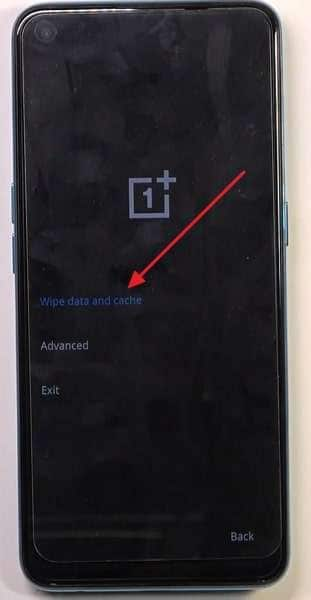
Step 2: Now, enter your phone’s PIN or pattern and choose a language. After selecting the language, choose “Wipe data and cache.”
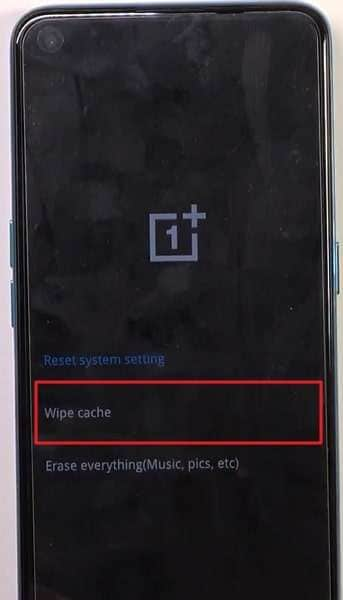
Step 3: Select “Wipe cache” on the next screen and confirm the action through “Yes” in the ensuing window. Once the process is complete, choose “Reboot” to restart your device.

Solution 5. Reset to Factory Settings
Sometimes, clearing the cache partition doesn’t help resolve the touchscreen issue. In that case, You have to factory reset your Samsung Galaxy M34 device. It is the best and last solution if other fixes haven’t worked and you can’t pinpoint the reason. Factory resetting your Samsung Galaxy M34 will delete all phone data. Thus, you should create a proper backup before trying this fix. Follow these steps to factory reset your Samsung Galaxy M34 in no time:
Step 1: Launch Settings on your Samsung Galaxy M34 device and tap “System” to select “Reset Options.”
 DLNow Video Downloader
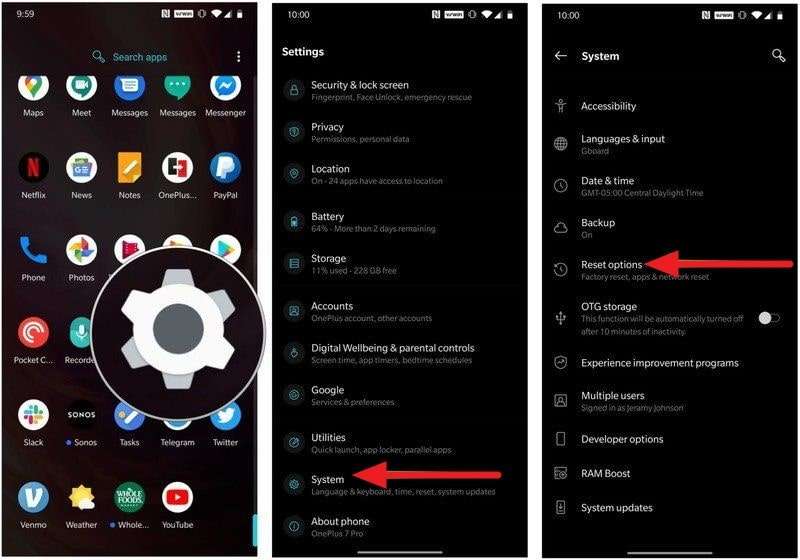
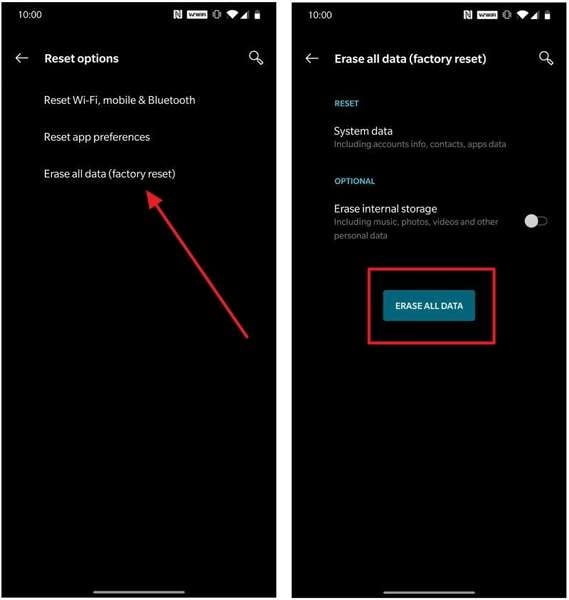
Step 2: In the “Reset Options,” select “Erase all data (factory reset)” and confirm the action by again pressing “Erase All Data.” It will start the factory reset process.

Solution 6. Replace the Old Screen with A New Screen
If none of the above-mentioned fixes have worked so far, you should replace the touch screen. Replacing the touch screen is recommended in case of hardware and severe software issues. However, it can be quite an expensive fix as new touch screens aren’t cheap. The prices for new touchscreens differ depending on the model. These prices start from $20 and go up to hundreds of dollars.
Part 3: How to Avoid Samsung Galaxy M34 Screen being Unresponsive?
Protecting your Samsung Galaxy M34 device against system issues like touch not working is not difficult. While it is true that you can’t 100% avoid such problems, the risks can still be reduced to a great extent. To prevent your Samsung Galaxy M34 screen from being unresponsive, here are some tips you can follow:
- ****Regular Updates:****You should always ensure that your Samsung Galaxy M34 device runs on the latest software version available. It can help prevent bugs or glitches that might cause the screen to become unresponsive.
- ****Device Protection:****It is also essential that you use a good quality phone case and screen protector. These will protect your Samsung Galaxy M34 device from physical damage. Drops, bumps, or scratches can damage the screen and make it unresponsive.
- ****Delete Unnecessary Apps:****If you have too many apps on your Samsung Galaxy M34 devices, it can cause screen unresponsiveness issues. Thus, you should only install the apps you need and delete the apps that are no longer needed.
- ****Use Dr.Fone 13:****Having a professional tool like Fone in your arsenal helps a lot in protecting against system issues. If a system issue is able to pass through, Dr.Fone has the ability to resolve the issue in a matter of seconds. Moreover, it is a complete smartphone tool with data transfer, location changer, and system repair features.
A new version of Dr.Fone is expected to release in the latter half of this month. The new version will include many improvements, advanced features, and increased device support. Furthermore, it will also have a better and more user-friendly interface.


Conclusion
To sum up this article, it can be said that issues like Samsung Galaxy M34 not working are part of life. These issues can occur anytime and are hard to completely protect against. Thus, having a problem solver like Wondershare Dr.Fone is the best choice. It will not only help you safeguard against system issues but also resolve them if they occur.
How To Revive Your Bricked Samsung Galaxy M34 in Minutes
Samsung Galaxy M34 has established a notable presence within the custom development arena. This trait holds for Samsung Galaxy M34. Today, it’s still one of the most popular budget smartphones available. The popular smartphone offers the freedom to flash custom ROMs, attain administrative privileges, access countless customization options, and much more.
Yet, delving into these capabilities comes with its share of risks. The potential for your Samsung Galaxy M34 to brick is high if you don’t know what you’re doing. This page teaches you how to unbrick your Samsung Galaxy M34 if it happens.
Part 1. Potential Causes of a Samsung Galaxy M34 Becoming Bricked
The factors that lead to your Samsung Galaxy M34 to brick vary. The possible solutions also depend upon the underlying causes. At times, the manufacturer’s intervention remains the only viable remedy. Below are the most frequent causes of bricking.
- The presence of malicious malware can harm your Samsung Galaxy M34. This can result in a ‘bricked’ state devoid of functionality.
- Altering the bootloader, system partition, or other critical software components risks triggering a bricking event.
- Bricking can also occur due to errors during the update process. Whether through automatic or manual downloads, any interruption during software updates can cause your Samsung Galaxy M34 to brick.
- Using inappropriate methods when performing root access can also result in bricking. Performing root access is dangerous as it grants entry to the Samsung Galaxy M34 device’s root directory housing the operating system.
Every Android device is susceptible to experiencing a system failure that leads to a bricked state. The risk remains consistent whether your device is from Samsung Galaxy M34, Samsung Galaxy M34, Samsung Galaxy M34, or any other brand. That’s why it’s strongly advised against modifying their smartphones, especially when you don’t know what you’re doing.
Part 2. Techniques To Unbrick a Samsung Galaxy M34
When faced with a bricked Samsung Galaxy M34, below are various techniques to revive it. Whether through software resets or hardware interventions, these methods can help breathe life back into your device.
Discharge the Battery
A particular suggestion involves allowing the Samsung Galaxy M34 device’s battery to discharge fully, enabling proper functionality of the Flash Tool software. This process typically spans a few days and is recommended by some specialists.

Perform a Factory Reset
Accessing the Samsung Galaxy M34 device settings is impossible if your Samsung Galaxy M34 bricks. For this reason, it is recommended to enter Recovery Mode. Here’s how.
- Step 1: Press and hold the Power button and select the Restart option. During the reboot, press the Volume Up and Power keys simultaneously.
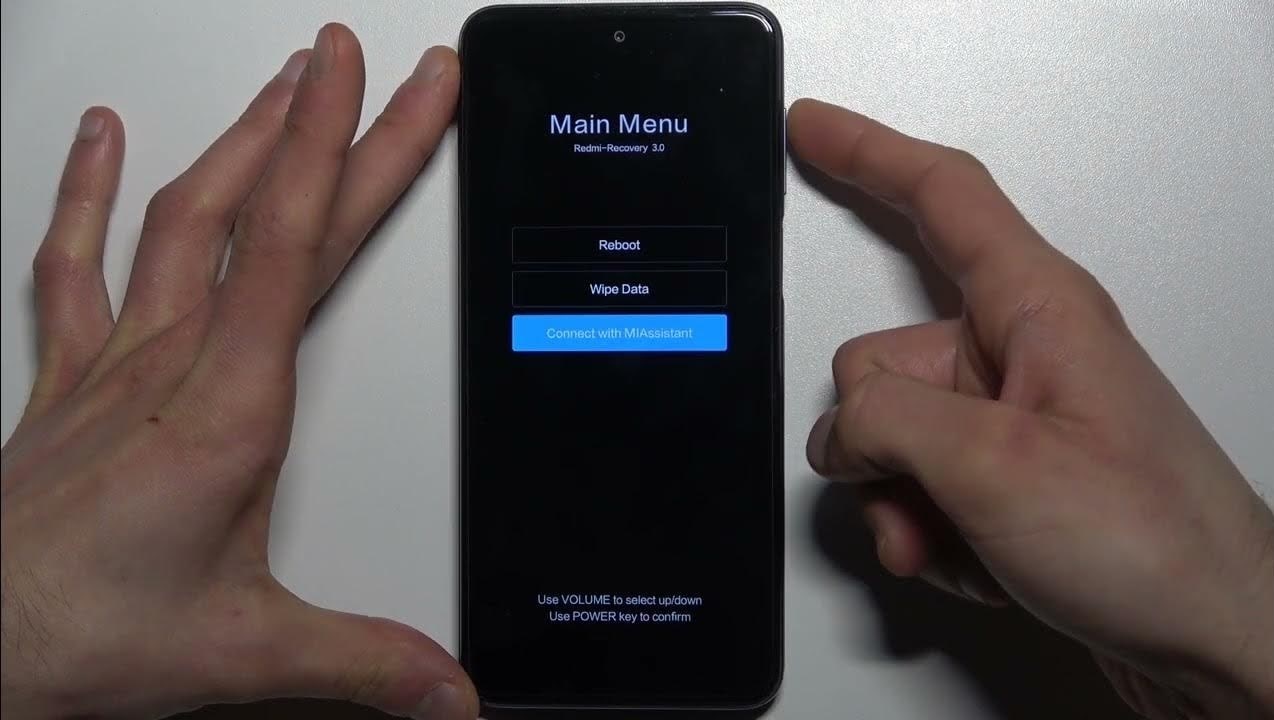
- Step 2: The main menu will show three options: Reboot, Wipe Data, and Connect with MIAssistant. Choose Reboot.
 ZoneAlarm Pro Antivirus + Firewall NextGen
Explore Dedicated Software Tools To Fix Bricked Phones
Samsung Galaxy M34 offers its official software tools, such as the Samsung Galaxy M34Flash Tool. It’s designed for advanced users familiar with flashing firmware onto their devices. Here’s how.
- Step 1: Download and install the Samsung Galaxy M34Flash Tool .
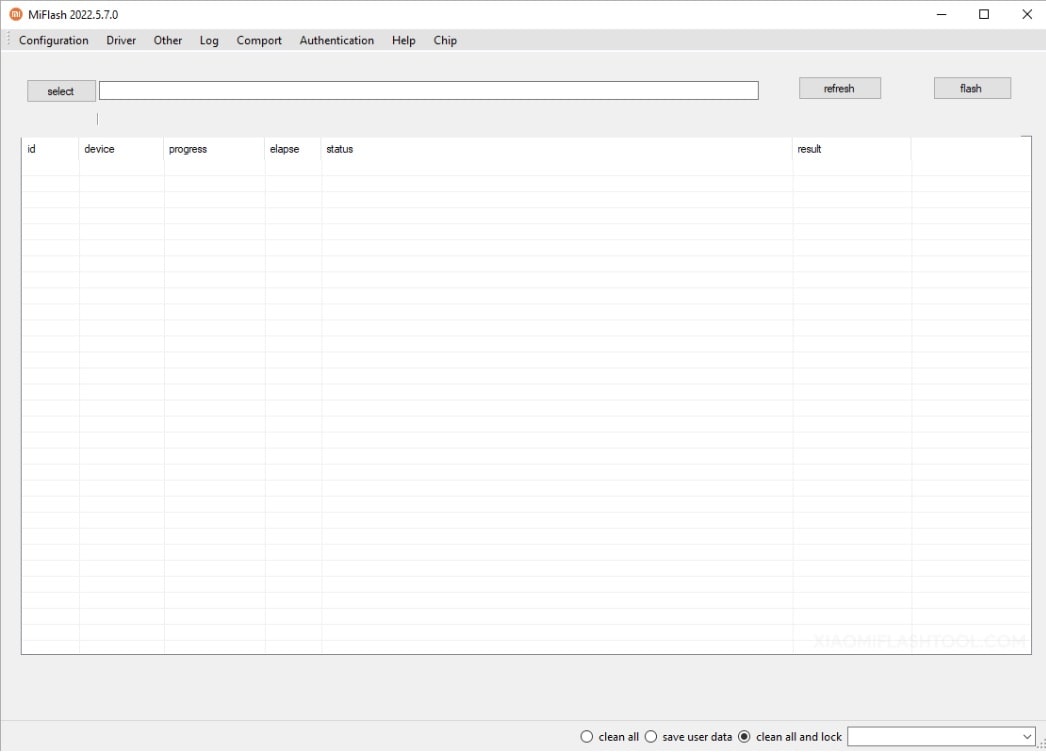
- Step 2: Download the Stock Firmware of Samsung Galaxy M34 and extract it on your computer. Press and Hold the Power and Volume Down buttons for at least 5-10 seconds to enter Fastboot Mode.

- Step 3: Connect your Samsung Galaxy M34 to the computer using a USB cable. Launch Samsung Galaxy M34Flash Tool and locate the Firmware you have downloaded on the computer. Click the refresh > flash to begin the flashing process.
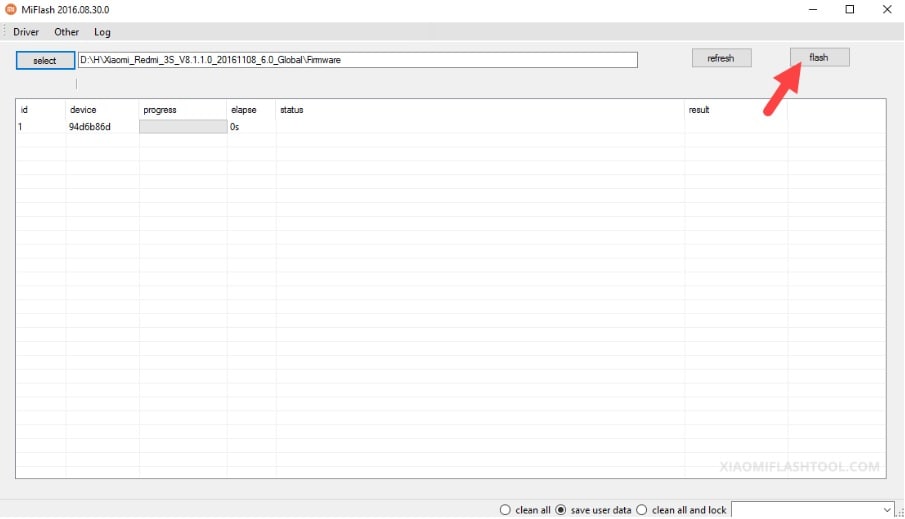
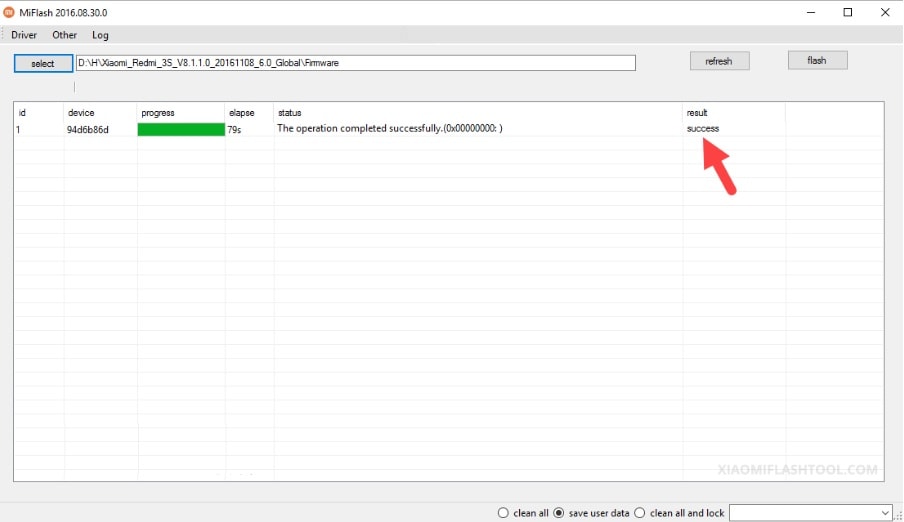
- Step 4: The SUCCESS result should appear in the Samsung Galaxy M34Flash Tool once the flashing process is done.
However, if the Samsung Galaxy M34Flash Tool did not unbrick your Samsung Galaxy M34, consider using Wondershare Dr.Fone - System Repair (Android). The platform allows you to unbrick your Samsung Galaxy M34 with a few clicks.
Part 3. Reviving Your Samsung Galaxy M34 Using Wondershare Dr.Fone - System Repair (Android)
Dr.Fone - System Repair (Android) equips Samsung Galaxy M34 users with the ability to tackle soft brick and hard brick issues. This specialized Android repair tool enables you to restore your Samsung Galaxy M34 through a streamlined process, requiring just a few simple clicks.

 safe & secure
3,227,773 people have downloaded it
Key Features
Dr.Fone - System Repair (Android) offers several benefits to unbrick your Samsung Galaxy M34 easily. Below are its key features.
- Fix Common Samsung Galaxy M34 Problems in Minutes. This tool provides comprehensive solutions for common issues like black screen, Play Store not working, boot loops, or even bricked Android devices .
- Compatibility with Over 1000 Android Models. This app fixes glitches across modern Android devices. The software is compatible with an extensive range of models. Whether your Samsung Galaxy M34 is unlocked or carrier-bound, restoration is not a problem.
- Unparalleled Software Flexibility. Dr.Fone - System Repair (Android) also boasts an added capacity to mend iOS devices. This versatile tool is your all-inclusive solution for mobile devices, ensuring convenience whether you own an iOS or Android device.
Advantage of Dr.Fone - System Repair (Android) for Unbricking Samsung Galaxy M34
Here are three benefits to choosing Dr.Fone - System Repair (Android) for unbricking a Samsung Galaxy M34. You’ll further believe Dr.Fone is a reliable assistant when reviving your bricked Samsung Galaxy M34.
Simplified Firmware Management
Dr.Fone eliminates the tedious search for appropriate firmware when unbricking your Samsung Galaxy M34. The platform automatically downloads the correct firmware for your device. The hassle of identifying and manually procuring firmware is removed, saving time and ensuring a smoother unbricking process.
User-Friendly Approach
One of Dr.Fone’s key strengths is its user-friendly design. It caters to users with varying levels of technical expertise by employing a step-by-step process. This approach guides users through the repair process with clarity. It reduces the requirement for advanced technical knowledge.
Free Version for Evaluation
Dr.Fone - System Repair (Android) offers a free version for everyone. It allows users to test its capabilities before committing to a purchase. This trial version grants users the opportunity to assess the tool’s effectiveness and suitability for unbricking their Samsung Galaxy M34. This instills confidence before investing in a full license.
 The Tube Sites Submitter is a fast and efficient tool for anyone who needs to upload videos quickly, easily and automatically to hundreds of tube sites in mere minutes .
 How To Unbrick Samsung Galaxy M34 Using Dr.Fone - System Repair (Android)
Dr. Fone’s features are perfect for unbricking Samsung Galaxy M34 devices. Below are the procedures to restore your Samsung Galaxy M34 from its bricked state.
![]()
Dr.Fone - System Repair (Android)
Repair Android System Errors without Any Trouble.
- Fix your Android to normal, no skills required.
- Fix various Android system issues, stuck in boot loop , black screen , or won’t turn on , looping on start, etc.
- The high success rate in resolving Android system issues.
- Compatible with a wide range of Android devices and OS versions
- User-friendly interface with easy-to-follow steps.
3981454 people have downloaded it
- Step 1: Download and install Dr.Fone - System Repair (Android) on your computer. After launching the application, click System Repair. Then, click Android as the Samsung Galaxy M34 device type. Connect your Samsung Galaxy M34. Indicate Phone Brick as the Android issue and initiate the process by clicking Start.

- Step 2: Select the appropriate device information corresponding to your Samsung Galaxy M34. Choose Brand, Name, Model, Country, and Carrier. Confirm by checking the I agree button, then proceed to the next step by clicking Next.

- Step 3: Given that the Samsung Galaxy M34 lacks a Home button, click the Phone without Home button option. Follow the prompts displayed on-screen and proceed by clicking Next to initiate the process of restoring your bricked phone.

- Step 4: As your Samsung Galaxy M34 enters Download Mode, the firmware download will start automatically. Follow the on-screen instructions. Wait for the system to initiate the repair procedure automatically. Upon completion, a message will pop up on the main window. Click Done to exit the tool. You can click Try again to repeat the process if needed.

You May Also like:
How To Fix iPhone Bricked After iOS 17/iOS 16/iOS 15 Update
How to Fix It If Your Samsung Galaxy M34 Phone Got Bricked?
Conclusion
Don’t let a bricked Samsung Galaxy M34 stand in your way. Use the array of techniques from basic troubleshooting to advanced software tools to breathe life back into your device. Unbrick your Samsung Galaxy M34 to its full functionality using the methods provided or Dr.Fone’s adept assistance.
Lastly, you can still refer to Samsung Galaxy M34 for repairs. It remains the primary solution in numerous cases. Utilizing your warranty can alleviate the associated costs. Seeking assistance from a specialized technician is also a viable route to consider for a thorough device assessment.
- Title: Android Safe Mode - How to Turn off Safe Mode on Samsung Galaxy M34? | Dr.fone
- Author: Ariadne
- Created at : 2024-07-30 09:10:20
- Updated at : 2024-07-31 09:10:20
- Link: https://howto.techidaily.com/android-safe-mode-how-to-turn-off-safe-mode-on-samsung-galaxy-m34-drfone-by-drfone-fix-android-problems-fix-android-problems/
- License: This work is licensed under CC BY-NC-SA 4.0.