
App Wont Open on Your Realme C51? Here Are All Fixes | Dr.fone
App Won’t Open on Your Realme C51? Here Are All Fixes
It is not a very rare phenomenon where an App won’t open, crash abruptly or face trouble while launching on an Android device. Many Android phone users also add to the fact that whenever they try to launch an App, it keeps loading but does not run smoothly, as it should in normal circumstances.
In such a scenario it is obvious for Android Smartphone users to look for possible solutions for such a random error so that their App/Apps load and work normally.
Many people are also interested in knowing about the causes behind why an App won’t open or why multiple/all Apps won’t open. This article will answer your query about why won’t my App open on an Android phone by listing a few probable causes for the problem.
Here are all the fixes you need if an App won’t open on your Realme C51. Read on to find out all about why Apps won’t open on your Realme C51 and solutions to overcome such a problem.
Part 1: Possible reasons for Apps won’t open
If you are an Android phone user and face a problem while trying to open an App on your device, you will ask yourself “Why won’t my App open?”. To answer your question and explain to you why an App won’t open on your phone, here are some probable and simple reasons to make you understand the real problem.
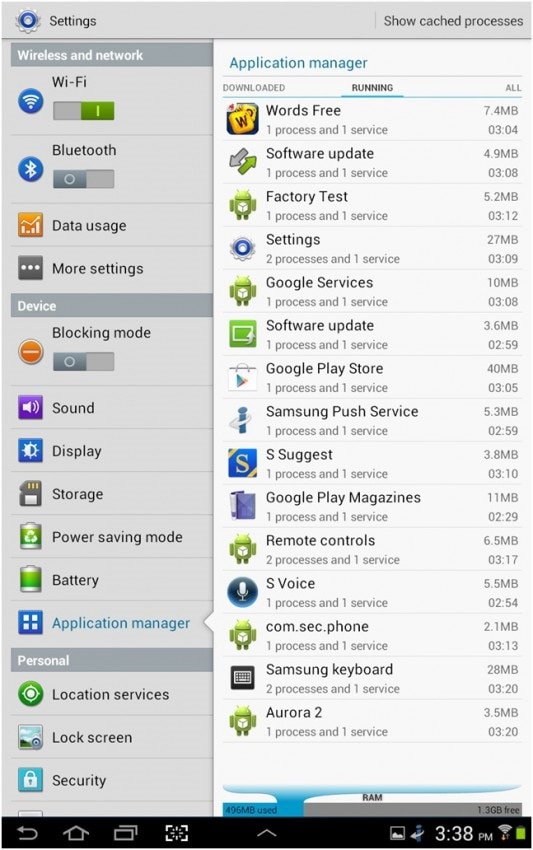
It is appropriate to tag our generation as smartphone addicts because we use smartphones for anything and everything. All our important information, such as photos, videos, audio files, documents, notes, calendars, emails, etc, are stored on our phones. This causes a major storage/space problem in our phones and a shortage of storage space is one of the main reasons why an App won’t open or why all Apps won’t open on your Realme C51. To see how much of your storage space is occupied by Apps, go to “Settings” and select “Application Manager”.

Another possible reason for Apps to crash or why an App won’t open is a possible data crash. This may occur due to an unstable internet connection or various other background software interruptions.
The causes for the problem to occur are many and no specific reason can be established as the only reason why Apps won’t open on your Realme C51. There are a lot of speculations about why such a problem occurs and persists, but it is more important to focus on how to fix if a particular App won’t open or if all Apps won’t open on Android.
Part 2: Quickest solution to fix apps won’t open on Android
You have already understood ‘why won’t your app open?’ at the start of this article. But, you are not happy with the traditional solutions to fix the app won’t open issue.
Well, in such a case Dr.Fone - System Repair (Android) can prove to be your savior. It resolves failed Android system update issues, crashing apps, and black screen of death. It can also get an unresponsive or bricked Android device or boot loop stuck device fixed with one click.
Dr.Fone - System Repair (Android)
Why won’t my app open? The quick fix is here!
- This is the first software in the industry that repairs Android systems.
- All the latest Realme C51 tablets and mobiles are compatible with it.
- With single-click operation, fixing the app won’t open problems is super easy.
- No technical skills are needed to use the tool.
- The high success rate for Realme C51 Android device issue fixing.
3981454 people have downloaded it
Here comes the detailed guide to fix apps won’t open problem using Dr.Fone - System Repair (Android)
Note: When you are up to fixing apps won’t open issues, make sure to back up your Realme C51 beforehand. These processes might lead to data erasing and you don’t want to suffer data loss this way.
Phase 1: Preparation and connection of Android device
Step 1: Post-installation and launch of Dr.Fone on your computer, you got to press the ‘System Repair’ tab. Connect the Android device later.

Step 2: Hit the ‘Android Repair’ located on the left panel followed by tapping the ‘Start’ button.

Step 3: Feed your Realme C51 details under the Realme C51 device information screen. Please check the warning and press the ‘Next’ button right after that.

Phase 2: Repairing your Realme C51 under ‘Download’ mode
Step 1: You got to boot the Android device under Download mode, as it’s important. The steps for that are as follows –
- Android devise with a ‘Home’ button – Press together ‘Volume Down’, ‘Home’, and ‘Power’ buttons together for 5 to 10 seconds after turning off the Realme C51 device. Release them afterward and click the ‘Volume Up’ button to get into the ‘Download’ mode.

- When there is no ‘Home’ button – Turn off the Realme C51 device and then for 5 to 10 seconds, keep the ‘Volume Down’, ‘Bixby’, and ‘Power’ buttons pressed. Tap the ‘Volume Up’ button after releasing all the buttons to enter the ‘Download’ mode.

Step 2: Hitting the ‘Next’ button starts downloading the Android firmware.

Step 3: Once Dr.Fone - System Repair (Android) verifies the downloaded firmware, it begins fixing the app won’t open the issue asap.

Part 3: 3 Common fixes if a particular App won’t open
In this segment, we will discuss the three best ways to help you fix the problem if only a particular App won’t open/launch/ run and takes an indefinite time to load.
1. Update the App
It is always advisable to keep your Android software as well as your Apps up-to-date and you must constantly check for any updates which may be available in the Google Play Store.
Follow the steps given below to update the app which won’t open on your phone:
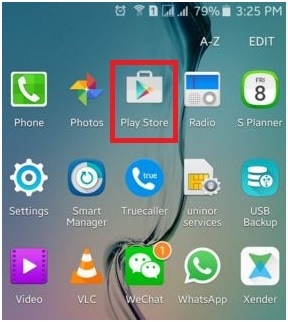
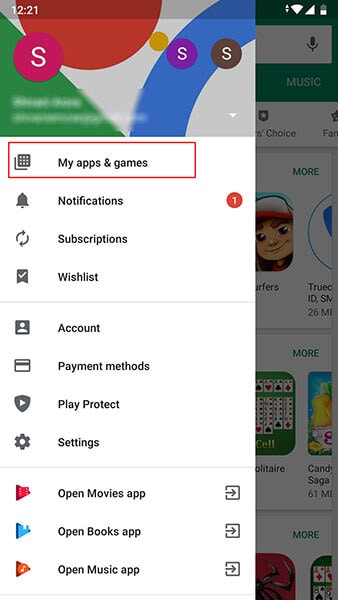
• Visit Google Play Store on your Realme C51.
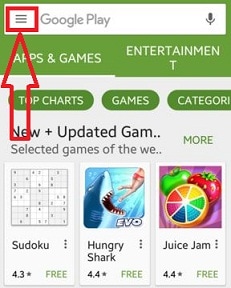
• Now select “My Apps & Games” from the main menu.

• In this step, you may click on “Update All” to update all Apps for which an update is available or manually select the Apps which you wish to Update.

Once the App is updated, close all Apps and tabs running in the background. Now try to launch the app once again. If it opens, your problem is solved. If not, DO NOT worry as there are more ways to help you.
2. Force Stop the App
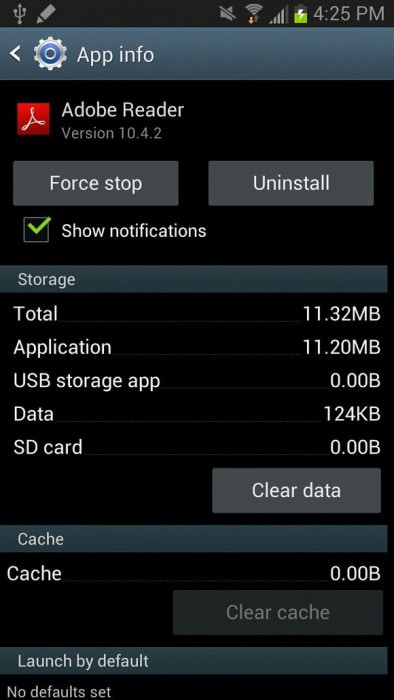
Closing the App completely which won’t open on your phone is a good idea. To make sure that no operations are running in the background related to the App, you must “Force Stop” it. Doing this is extremely simple and all you need to do is follow the steps given herein under:
• Visit “Settings” on your phone.
• Click on “Apps” to see a list of all the Apps on your Realme C51.
• Select the App which won’t open.
• Now click on “Force Stop” as shown below.
3. Clear App Cache and Data
This method resolves the issue to a great extent by wiping off unnecessary App content from your device.
Carefully follow the step-by-step instructions given below to clear all App cache and data:
• Visit “Settings” and select “Apps”.
• From the list of Apps that appears, select the App that won’t open.
• Now tap on “Clear Cache” and “Clear data” directly or under “Storage”.

Part 4: 3 Common fix if all Apps won’t open on Android
In this segment, we will discuss solutions to the problem if all your Apps won’t open. They are simple and easy to follow and solve the error in no time.
1. Android updates
Firstly, it is very important to keep your Android software updated at all times as an old Android version might not support new Apps or updated Apps.
To update your software:
• Visit “Settings” and keep going downwards.
• Now select “About Phone”.
• From the options available on the screen, tap on “System Updates”

• In this step, if you are prompted for an update, follow the instruction given and do so.
Updating your Android software solves most of your problems. This method might sound weird but works wonders when it comes to App related issues.
2. Restart the phone
Restarting your Realme C51 to fix an error might sound old school but it gives good results when your Apps won’t open. Restarting your phone is fairly simple. All you need to do is:
• Long press the power button.
• Now click on “Restart”.

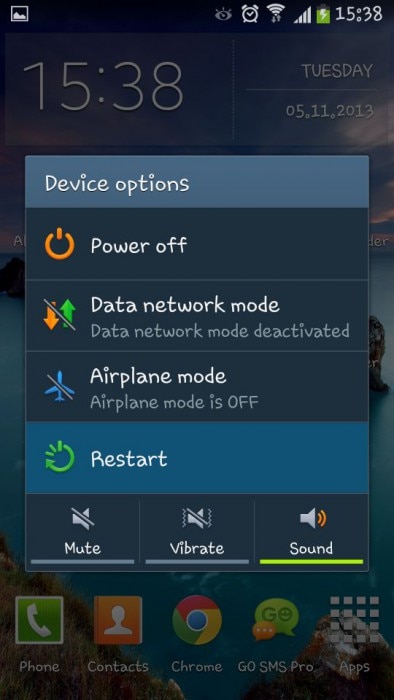
Your phone will automatically restart and once it does, you can try to launch the App. You may also restart your Realme C51 by pressing the power button for about 15-20 seconds.
3. Reset Factory Settings
This method is a little tedious and must be last on your list. Also, make sure you take a backup of all your data and contents stored on your Realme C51 and this solution will completely wipe off your phone making as good as a new smartphone.
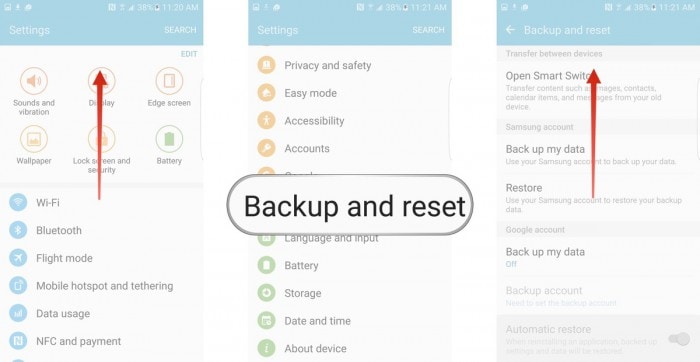
To Factory Reset your Realme C51, carefully follow the guidelines given below:
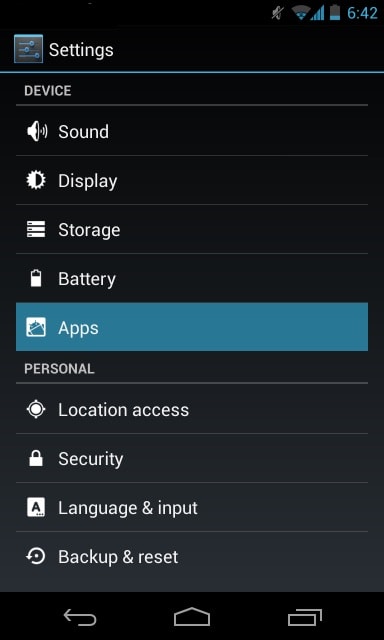
• Visit “Settings” to find the “Backup and reset” option as shown in the screenshot below.
• Now click on “Factory Data Reset”>“Reset Device”>“Erase Everything”
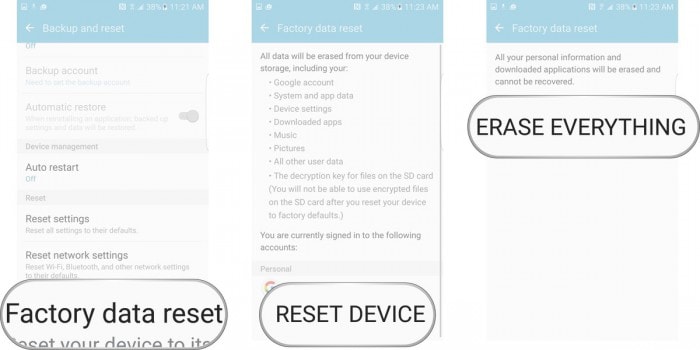
Your phone will now reboot and will be required to set up from scratch.
“Why Won’t my App open” is a question asked by many Android phone users who fear that the problem occurs due to a virus attack or a system failure. However, this is not the case. The reason for the error to the surface is quite minor and can be fixed by you, sitting at home, without resorting to any kind of technical or external assistance. The solutions listed above are easy to understand and not very time-consuming.
So go ahead and try them out now!
Gmail Not Working on Realme C51: 7 Common Problems & Fixes
Ever since Android is introduced, it has almost eliminated the need of computers to work through Gmail. Gmail carries much importance especially when you’re a working person. A lot of work is done through mails on daily basis. But maybe today is not your lucky day. Maybe Gmail is giving you a hard time today. Is it? Is your Gmail not responding or keeps stopping you from going further? Well! There is no need to be bothered anymore. We are discussing some of the general Gmail problems along with their fixes. So, if your Gmail is not working on Android, you can go through this article and find the relevant solution.

Problem 1: Gmail App not responding or keeps crashing
First and foremost, the most common situation people meet with is when there Gmail keeps crashing. Or simply, it doesn’t respond at all. When you open it, it stuck for a few seconds and then you have to close it. It seriously is an annoying issue. If your Gmail is also not responding or crashing and you aren’t able to work properly, following are the solution you can follow.
Clear Cache
The first thing you can do to fix Gmail not responding issue is to clear the cache of Gmail. This has higher chance to get the issue resolved. To do this:
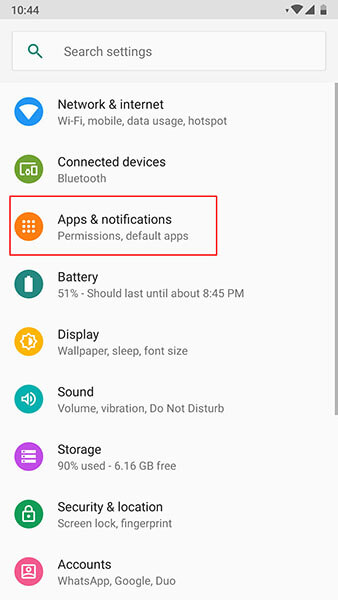
- Go to “Settings” and look for “Apps & Notifications”. Please note that the option may vary in some Android phone like it maybe “Application” or “App Manager”. So, don’t panic and look for the option carefully.

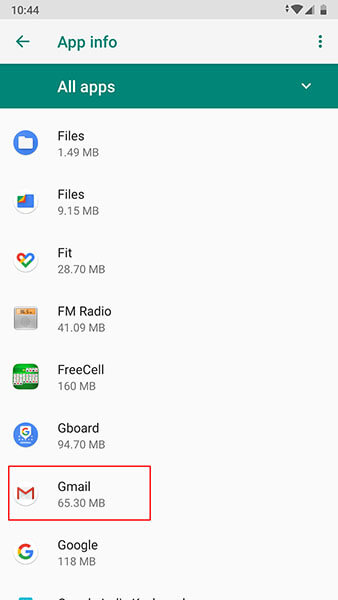
- Now, from the apps list, search “Gmail” and tap on it.
Parental Control Software
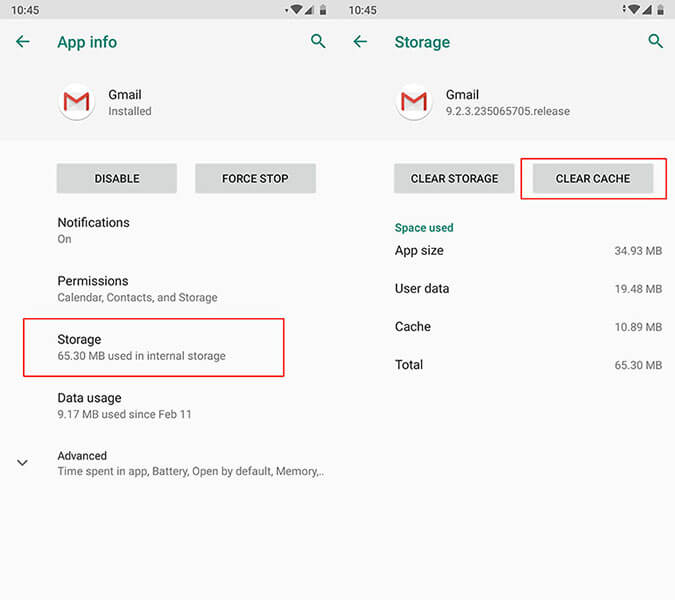
- Go to “Storage” followed by “Clear Cache”.
 CollageIt Pro
Restart the Realme C51 device
Restarting the Realme C51 device in the first place simply resolves many problems and so in the instance when Gmail keeps stopping. Simply long press the power button of your device and restart the Realme C51 device. See of the problem gets vanished or not.

Factory Reset the Realme C51 device
The next option that you can try is resetting your device. This will lead to data loss so we suggest you to take backup firstly and then proceed with this method.
- Hit on “Settings” and search for “Backup & Reset” option.


- Tap on “Reset” or “Erase all data” (the option name again may vary).
If unfortunately the above solutions don’t work, there is a requirement to flash the stock Android ROM again. Before you wonder how, there is a professional one-click tool that can surely be of assistance. It is Dr.Fone - System Repair (Android) . The tool takes special care of the Android phones and fixes almost every system issues with ease. It takes no special technical skills and performs efficiently.

Problem 2: Gmail won’t sync between all ends
The next most common problem where people get stuck with is when there Gmail won’t sync. Here are the solutions to this particular problem.

Make Space in the Phone
When Gmail stops syncing, one of the things that can save you is clearing the storage. It is the space that maybe the culprit and therefore the syncing don’t work at all. We would like to suggest you removing the unwanted apps to clear the storage or deleting the downloaded files. You can also transfer the important files to your computer and make the space vacant.

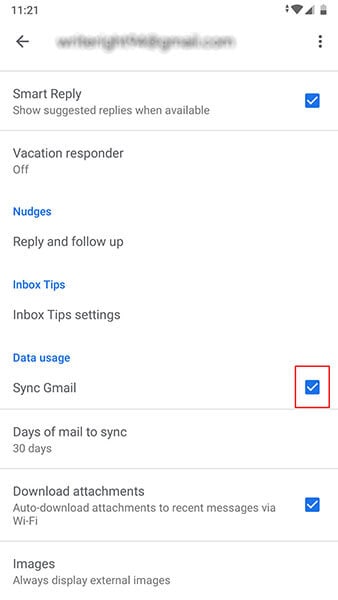
Check Gmail Sync Settings
When still the Gmail not working issue persists and you can’t sync, make sure to check the Gmal sync settings. For this, follow the steps below:
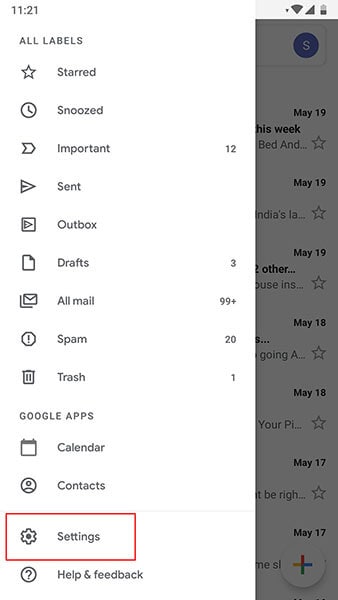
Launch the Gmail app and tap on the menu icon (three horizontal lines).
Tap “Settings” and choose your account.
Check the box next to “Sync Gmail” if it’s not checked.
Again, restarting can also be helpful in this situation. When you boot the Realme C51 device again, check if your Gmail can sync or not.
Problem 3: Gmail won’t load
In case you are using the Gmail over your web browser and it has tested your patience in loading, here are the solutions that could prove to be fruitful for you. Please check these out.
Ensure to Use Gmail Supported Browser
First of all, you need to make sure that the browser you are using works with Gmail or not. Gmail can smoothly perform in Google Chrome, Firefox, Safari, Internet Explorer and Microsoft Edge. However, the browsers should be updated. So, please make sure that these browsers are running on the latest versions. Moreover, in case you use Chromebook, don’t forget to update the operating system in order to let it support Gmail.
Clear Cache of web browser
If you tried the above method but to no avail, try to clear the cache and cookies of the web browser. But by doing so, the browser history will be removed. As well as, the records of the websites you previously enjoyed will also be lost.

Check browser extensions or add-ons
If not the above one, try this tip. It encourages you to check your browser extensions. Perhaps these are interfering with the Gmail and due to this conflict, Gmail won’t load. You can either turn off these extensions and plug-ins temporarily or make use of the incognito mode of the browser where there are no such things like extensions and plug-ins.
Problem 4: Gmail can’t send or receive
Gmail also gives you problem in sending or receive mails and messages. And to troubleshoot such issue, following are the solutions mentioned.
Check the Latest Version of Gmail
This issue is likely to emerge when you are using an outdated version of Gmail. And therefore, the first solution says you to check if the Gmail update is available. You can go to the Play Store and from the “My apps & games” option, you can see if Gmail needs to be updated or not.
Verify Internet Connection
Another thing that carries weight while you can send or receive mails is the internet connection. As we all know that Gmail won’t respond if the Realme C51 device is not connected to the internet. Therefore, you are advised to turn off Wi-Fi and then enable it again. Also, please ensure to switch to Wi-Fi if you are using the cellular data. This may hamper the process and stop you from receiving or sending mails.
Remove you Account and Add Again
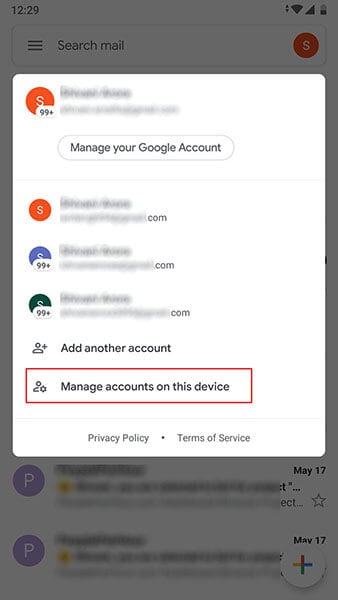
If still Gmail keeps stopping you to go ahead, make sure to once sign out from it. To do this:
Open your Gmail app and go to “Manage accounts on this device”.
Now, tap on the account you are working with. Tap on “REMOVE ACCOUNT” thereafter. After this, you can again sign in and then check if the problem is gone or not.

Problem 5: Stuck in sending
Now, here is another annoying problem that doesn’t let Gmail working on Android properly. This problem addresses the situation where users send a mail but it gets stuck on sending. If this is the problem that you are going through, the following solutions will help you.
Try Alternative Gmail Address
First of all, if Gmail is not working due to stuck in sending issue, we advise you to make use of some other Gmail address to send the mail. If the problem still occurs, jump to the next solution.
 The Tube Sites Submitter is a fast and efficient tool for anyone who needs to upload videos quickly, easily and automatically to hundreds of tube sites in mere minutes .
 Check Network Connection
As already mentioned, be sure of an active internet connection while working with Gmail. When you are not using a stable connection, it may lead to stuck on sending, Gmail crashing and many other issues. You can fix the issue by doing these three things:
- Most importantly, use only Wi-Fi rather than cellular data if you want a smoother process.
- Turn off Wi-Fi and then turn it on again after nearly 5 seconds. Do the same with the router. Plug it out and the plug in.
- Lastly, turn on Airplane mode and after a few seconds, turn it off again.
Now try to send the mail and see if things are still the same or not.
Check Attachments
Large attachments can also be the reason for this issue. We would here like to suggest you to check the attachments you are sending. If these are not so important, you can remove them and send the mail. Or if it is not possible to send the mail without attachments, compressing the files can be a solution.

Problem 6: “Account not synced” issue
Many times, the users get the error that says “Account not synced” while they try to work with Gmail. And this is the 6th problem we are introducing. The ways mentioned below will assist to get out of the trouble.
Make Space in the Phone
When Gmail stops to further the process by prompting “Accounts not synced” issue, be sure that your Realme C51 has some storage in it. If not, create it straight away. As we also mentioned in one of the above solutions, you can either delete the unnecessary files or transfer the important files to the PC to make the space in the phone. Go along with this tip and see if it works.
Check Gmail Sync Settings
As another solution, check Gmail sync settings to get the issue fixed.
- Simply open Gmail and hit the menu icon which is three horizontal lines on the top.
- Go to “Settings” and choose your account.
 PDF application, powered by AI-based OCR, for unified workflows with both digital and scanned documents.
- See the tiny box beside “Sync Gmail” and check it if it is not.
 LYRX is an easy-to-use karaoke software with the professional features karaoke hosts need to perform with precision. LYRX is karaoke show hosting software that supports all standard karaoke file types as well as HD video formats, and it’s truly fun to use.
Restart the Realme C51 device
If the above method went futile, simply restart your device. Take help of the Power button on your device. Long press it and from the options, restart it. This will hopefully work for you.

Problem 7: Gmail app running slow
The last problem that you may face is the slow-going Gmail app. In simple words, you may experience that Gmail app is operating extremely slowly. To fix this, following solutions will help you.
Restart the Phone
It is a universal method to fix minor Android system issues. And here too, we would like you to restart your Realme C51 in the first place when you find that Gmail is not responding due to the sluggish behavior.
Clear Storage of Device
Usually all the apps start running slow when the Realme C51 device is not having sufficient space. As the apps need space to function quickly and appropriately, having the Realme C51 device on low storage can prove to be a bad luck for Gmail. So, make sure you wipe out the items you no longer needed on your device and create some room so that the Gmail responds nicely and won’t be running slow anymore.
Update Gmail App
As the last tip that will indeed help you is to update the Gmail app. Until you update the app when required, Gmail keeps stopping you from working and you will definitely get frustrated. Therefore, go to Play Store and look for the Gmail update. If it is available, welcome it with smile and bid farewell to the problem of slow running Gmail.
What if your problem still doesn’t get resolved after following these 3 tips? Well! If that is the case, we will again recommend you to make use of an expert one-click tool to flash the stock Android ROM.
Dr.Fone - System Repair (Android) is going to help you serving the purpose. This mighty tool possesses huge success rate and one can rely on it for its simplicity and security. It is designed to work with numerous problem related to Android system. So, no matter if your Gmail keeps crashing or keeps stopping, it has the solution for everything.
Dr.Fone - System Repair
Fix all Gmail issues caused by Android system:
- Gmail app corruption or not opening
- Gmail app crashing or stopping
- Gmail app not responding
How to Exit Android Factory Mode On Realme C51?
You’ve often heard that recovery mode will solve just about any problem your Realme C51 is experiencing. This is mostly true and one of the components of Android’s recovery mode, factory mode or factory reset is one of the most efficient ways to solve various problems on your device. While factory mode is often a good thing, there are times when your device can enter factory mode on its own. Other times, you can safely enter factory mode but not know how to get out.
Fortunately for you, this article will explain all aspects of factory mode and especially how to safely exit factory mode.

Part 1. What is Android Factory Mode?
Factory mode or what is commonly known as factory reset is one of the options available for you when your Realme C51 is in recovery mode. Several options are available for you once you enter Recovery mode on your device but few are as effective as the wipe data/ factory reset option. This option is useful in solving a whole host of problems that your device could be experiencing.
If you have been using your Realme C51 for a while now and its performance to be less than ideal, a factory reset might be a good solution. That is however not the only problem a factory reset or factory mode can solve. It will also work for a number or Android errors that you may experience, problems caused by faulty firmware updates and also tweaks made on your device that may not have worked as expected.
It is however important to note that a factory reset or factory mode does often result in the loss of all your data. Therefore a backup is necessary to protect against this data loss risk.
 WonderFox DVD Ripper Pro
Part 2. Backup your Android Device First
Before we can see how to safely enter and exit factory mode, it is important to have a full backup of your device. We mentioned that a factory mode will likely erase all the data on your device. A backup will ensure that you can get your phone back to its original state before the factory mode.
In order to do a full and complete backup of your device you need to have a tool that will not only ensure that you backup everything on your device but one that makes it easy for you to accomplish this. One of the best tools in the market is Dr.Fone - Backup & Resotre (Android) . This software is designed to enable you to create a full backup of your device.

company, user or members of the same household. Action! - screen and game recorder</a>
Dr.Fone - Backup & Restore (Android)
Flexibly Backup and Restore Android Data
- Selectively backup Android data to computer with one click.
- Preview and restore backup to any Android devices.
- Supports 8000+ Android devices.
- There is no data lost during backup, export or restore.
3,428,803 people have downloaded it
Follow these very simple steps to use this MobileTrans Phone Transfer software to create a full backup of your device.
Step 1. Launch Dr.Fone on your computer and choose “Backup & Restore”
Run the software on your computer and you can see all features displayed in the primary window. Choose this one: Backup & Restore. It allows you to get your device backed up entirely with one click.
Step 2. Plug in with your device
Then plug in with your device to the computer. When your devic is detected, click on Backup.

Step 3. Select the file types to backup
The program will display all the file types it can support to backup. Just select the ones you would like to backup and hit Backup.

WPS Office Premium ( File Recovery, Photo Scanning, Convert PDF)–Yearly

Step 4. Start backing up your device to the computer
After choosing the file’s type for backup, click “Backup” to begin backing up your device to your computer. It will take you a few minutes, depending on the storage of the data.
 vMix HD - Software based live production. vMix HD includes everything in vMix Basic HD plus 1000 inputs, Video List, 4 Overlay Channels, and 1 vMix Call
Note: You can use the feature of “Restore From Backup” to restore the backup file to your device, when you have the need later.
Part 3: One Click Solution to fix Android stuck in factory mode
From the above parts, you are well aware about what is factory mode. As we discussed, this mode fixes most troubles with Android devices.
But for situations when your Realme C51 gets stuck in this very same factory mode, the most feasible solution for you is Dr.Fone - System Repair (Android) . This tool fixes all Android system issues including unresponsive or bricked device, stuck on Realme C51 logo or factory mode or blue screen of death with a single click.
Dr.Fone - System Repair (Android)
One click fix to Android stuck in factory mode
- You can easily fix your Android stuck in factory mode with this tool.
- The one-click solution’s ease of operation is appreciable.
- It has carved a niche being the first Android repair tool in the market.
- You don’t need to be a pro in technology to use this program.
- It is compatible with all latest Realme C51 devices like Galaxy S9.
3,645,867 people have downloaded it
In this part we will explain how to exit Android recovery mode using Dr.Fone - System Repair (Android) . Prior to proceeding, you got to remember that device backup is paramount to keep your data safe. This process might erase your Realme C51 data.
Phase 1: Ready your device and connect it
Step 1: Installation completion needs to be followed by running Dr.Fone on your system. Over the program window, tap ‘Repair’ afterwards and get the Android device connected.
Step 2: Select the ‘Android Repair’ option from the list to fix Android stuck in factory modeissue. Hit the ‘Start’ button soon after.
Step 3: Select Android device details on the Realme C51 device information window, followed by tapping the ‘Next’ button.
 OtsAV DJ Pro
Step 4: Enter ‘000000’ for confirmation then proceed.
 Screensaver Factory, Create stunning professional screensavers within minutes. Create screensavers for yourself, for marketing or unlimited royalty-free commercial distribution. Make screensavers from images, video and swf flash, add background music and smooth sprite and transition effects. Screensaver Factory is very easy to use, and it enables you to make self-installing screensaver files and CDs for easy setup and distribution. Screensaver Factory is the most advanced software of its kind.
Phase 2: Get in ‘Download’ mode for repairing the Android device
Step 1: It’s important to put the Android device in ‘Download’ mode, here are the steps to do so –
- On a ‘Home’ button-less device – turn off the Realme C51 device and push down the ‘Volume Down’, ‘Power’ and ‘Bixby’ buttons for about 10 seconds and un-hold. Now, hit the ‘Volume Up’ button to get into ‘Download’ mode.
- For a device with ‘Home’ button – switch it off and hold down the ‘Power’, ‘Volume Down’ and ‘Home’ buttons together for 10 seconds and release. Click the ‘Volume Up’ button for entering ‘Download’ mode.
Step 2: Press ‘Next’ for initiating firmware downloading.
Step 3: Dr.Fone –Repair (Android) starts Android repair as soon as download and verification of firmware is done. All Android issues along with Android stuck in factory mode will be fixed now.
Part 4. Common Solutions to Exit Factory Mode on Android
Having a backup of all your data will eliminate the risk of losing any of your data. You can now safely exit factory mode using one of the 2 methods below. These two methods will work on a rooted device.
Method 1: Using “ES File Explorer”
To use this method, you will need to have installed file explorer on your device.
Step 1: Open “ES File Explorer” and then press the icon on the top left corner
Step 2: Next, go to “Tools” and then turn on “Root Explorer”
Step 3: Go to Local> Device> efs> Factory App and then open factorymode as text in the “ES Note Editor” Turn it ON
Step 4: Open keystr as text in the “ES Note Editor” and change it to ON. Save it.
Step 5: Reboot the Realme C51 device

Method 2: Using Terminal Emulator
Step 1: Install Terminal emulator
Step 2: Type “su”
Step 3: Then Type the following;
rm /efs/FactoryApp/keystr
rm /efs / FactoryApp/ Factorymode
Echo –n ON >> / efs/ FactoryApp/ keystr
Echo –n ON >> / efs/ FactoryApp/ factorymode
chown 1000.1000/ efs/FactoryApp/keystr
chown 1000.1000/ efs/FactoryApp/ factorymode
chmod 0744 / efs/FactoryApp/keystr
chmod 0744 / efs/ FactoryApp/ factorymode
reboot
You can also exit factory mode on unrooted device by going to Settings> Application manager> All and the search for Factory Test and “Clear Data”, “Clear Cache”
As much as factory mode can be a useful solution to a number of problems, it can be quite annoying when it pops up unexpectedly. Now you are equipped with 2 effective solutions to help you safely exit factory mode if ever you find yourself in this situation.
- Title: App Wont Open on Your Realme C51? Here Are All Fixes | Dr.fone
- Author: Ariadne
- Created at : 2024-07-30 09:24:31
- Updated at : 2024-07-31 09:24:31
- Link: https://howto.techidaily.com/app-wont-open-on-your-realme-c51-here-are-all-fixes-drfone-by-drfone-fix-android-problems-fix-android-problems/
- License: This work is licensed under CC BY-NC-SA 4.0.