
App Wont Open on Your Realme Note 50? Here Are All Fixes | Dr.fone
App Won’t Open on Your Realme Note 50? Here Are All Fixes
It is not a very rare phenomenon where an App won’t open, crash abruptly or face trouble while launching on an Android device. Many Android phone users also add to the fact that whenever they try to launch an App, it keeps loading but does not run smoothly, as it should in normal circumstances.
In such a scenario it is obvious for Android Smartphone users to look for possible solutions for such a random error so that their App/Apps load and work normally.
Many people are also interested in knowing about the causes behind why an App won’t open or why multiple/all Apps won’t open. This article will answer your query about why won’t my App open on an Android phone by listing a few probable causes for the problem.
Here are all the fixes you need if an App won’t open on your Realme Note 50. Read on to find out all about why Apps won’t open on your Realme Note 50 and solutions to overcome such a problem.

Part 1: Possible reasons for Apps won’t open
If you are an Android phone user and face a problem while trying to open an App on your device, you will ask yourself “Why won’t my App open?”. To answer your question and explain to you why an App won’t open on your phone, here are some probable and simple reasons to make you understand the real problem.
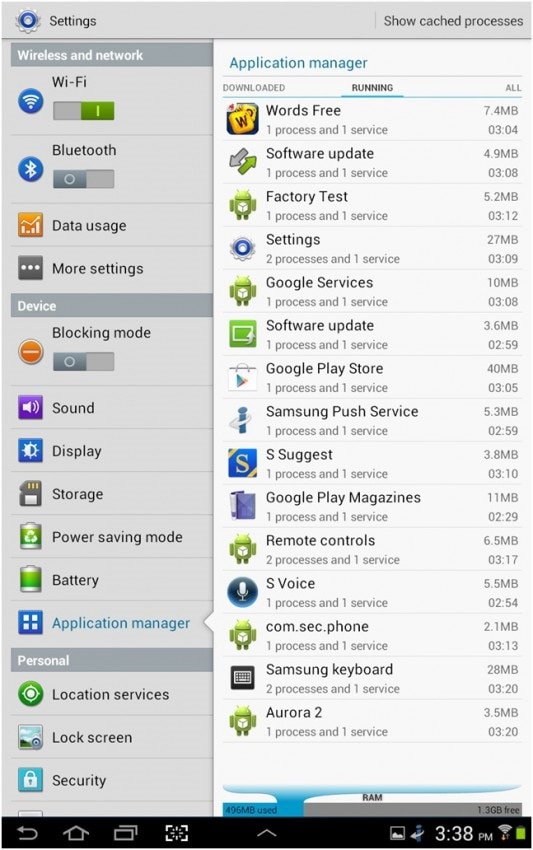
It is appropriate to tag our generation as smartphone addicts because we use smartphones for anything and everything. All our important information, such as photos, videos, audio files, documents, notes, calendars, emails, etc, are stored on our phones. This causes a major storage/space problem in our phones and a shortage of storage space is one of the main reasons why an App won’t open or why all Apps won’t open on your Realme Note 50. To see how much of your storage space is occupied by Apps, go to “Settings” and select “Application Manager”.

Another possible reason for Apps to crash or why an App won’t open is a possible data crash. This may occur due to an unstable internet connection or various other background software interruptions.
The causes for the problem to occur are many and no specific reason can be established as the only reason why Apps won’t open on your Realme Note 50. There are a lot of speculations about why such a problem occurs and persists, but it is more important to focus on how to fix if a particular App won’t open or if all Apps won’t open on Android.
Part 2: Quickest solution to fix apps won’t open on Android
You have already understood ‘why won’t your app open?’ at the start of this article. But, you are not happy with the traditional solutions to fix the app won’t open issue.
Well, in such a case Dr.Fone - System Repair (Android) can prove to be your savior. It resolves failed Android system update issues, crashing apps, and black screen of death. It can also get an unresponsive or bricked Android device or boot loop stuck device fixed with one click.
Dr.Fone - System Repair (Android)
Why won’t my app open? The quick fix is here!
- This is the first software in the industry that repairs Android systems.
- All the latest Realme Note 50 tablets and mobiles are compatible with it.
- With single-click operation, fixing the app won’t open problems is super easy.
- No technical skills are needed to use the tool.
- The high success rate for Realme Note 50 Android device issue fixing.
3981454 people have downloaded it
Here comes the detailed guide to fix apps won’t open problem using Dr.Fone - System Repair (Android)
Note: When you are up to fixing apps won’t open issues, make sure to back up your Realme Note 50 beforehand. These processes might lead to data erasing and you don’t want to suffer data loss this way.
Phase 1: Preparation and connection of Android device
Step 1: Post-installation and launch of Dr.Fone on your computer, you got to press the ‘System Repair’ tab. Connect the Android device later.

WPS Office Premium ( File Recovery, Photo Scanning, Convert PDF)–Yearly

Step 2: Hit the ‘Android Repair’ located on the left panel followed by tapping the ‘Start’ button.


Step 3: Feed your Realme Note 50 details under the Realme Note 50 device information screen. Please check the warning and press the ‘Next’ button right after that.

Phase 2: Repairing your Realme Note 50 under ‘Download’ mode
Step 1: You got to boot the Android device under Download mode, as it’s important. The steps for that are as follows –
- Android devise with a ‘Home’ button – Press together ‘Volume Down’, ‘Home’, and ‘Power’ buttons together for 5 to 10 seconds after turning off the Realme Note 50 device. Release them afterward and click the ‘Volume Up’ button to get into the ‘Download’ mode.


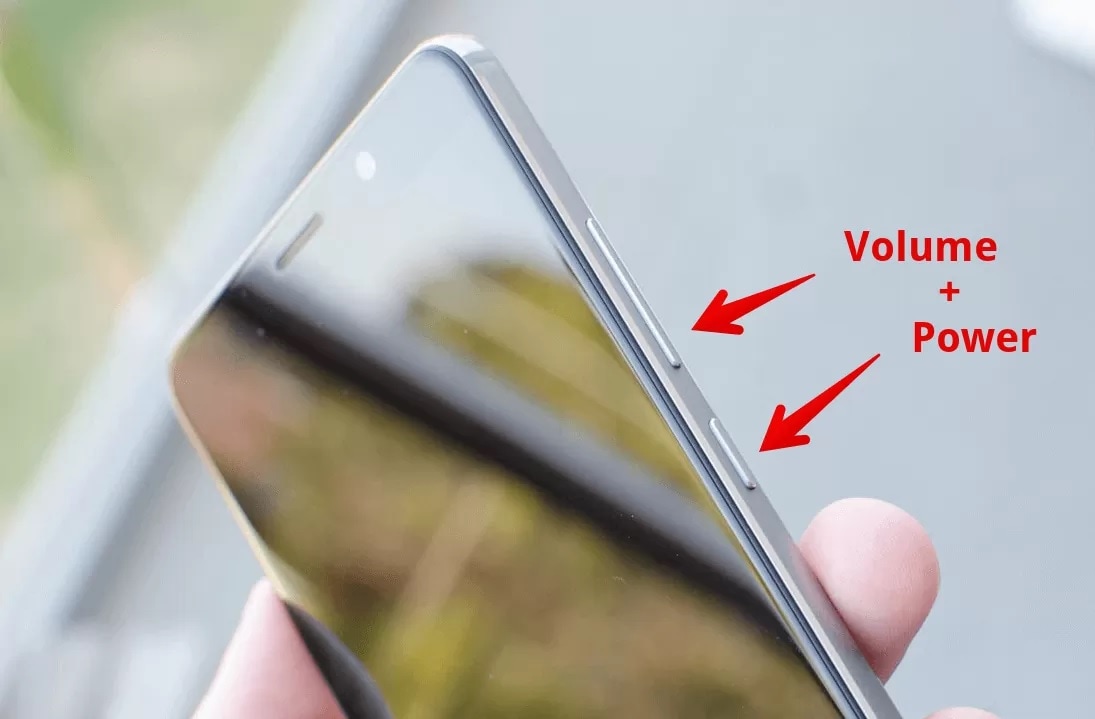
- When there is no ‘Home’ button – Turn off the Realme Note 50 device and then for 5 to 10 seconds, keep the ‘Volume Down’, ‘Bixby’, and ‘Power’ buttons pressed. Tap the ‘Volume Up’ button after releasing all the buttons to enter the ‘Download’ mode.
 ZoneAlarm Extreme Security NextGen

Step 2: Hitting the ‘Next’ button starts downloading the Android firmware.

Step 3: Once Dr.Fone - System Repair (Android) verifies the downloaded firmware, it begins fixing the app won’t open the issue asap.


Part 3: 3 Common fixes if a particular App won’t open
In this segment, we will discuss the three best ways to help you fix the problem if only a particular App won’t open/launch/ run and takes an indefinite time to load.
1. Update the App
It is always advisable to keep your Android software as well as your Apps up-to-date and you must constantly check for any updates which may be available in the Google Play Store.
Follow the steps given below to update the app which won’t open on your phone:
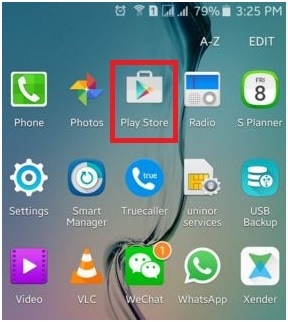
• Visit Google Play Store on your Realme Note 50.
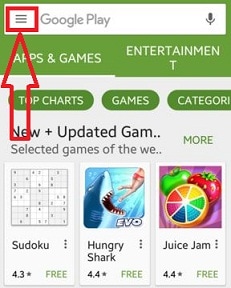
• Now select “My Apps & Games” from the main menu.
• In this step, you may click on “Update All” to update all Apps for which an update is available or manually select the Apps which you wish to Update.

Once the App is updated, close all Apps and tabs running in the background. Now try to launch the app once again. If it opens, your problem is solved. If not, DO NOT worry as there are more ways to help you.
2. Force Stop the App
Closing the App completely which won’t open on your phone is a good idea. To make sure that no operations are running in the background related to the App, you must “Force Stop” it. Doing this is extremely simple and all you need to do is follow the steps given herein under:
• Visit “Settings” on your phone.
• Click on “Apps” to see a list of all the Apps on your Realme Note 50.

• Select the App which won’t open.
• Now click on “Force Stop” as shown below.
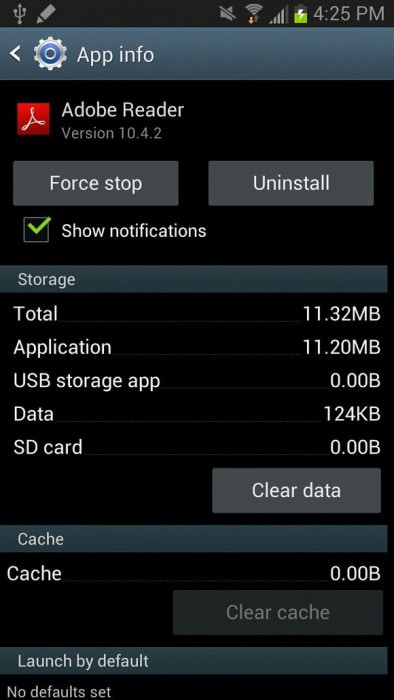
3. Clear App Cache and Data
This method resolves the issue to a great extent by wiping off unnecessary App content from your device.
Carefully follow the step-by-step instructions given below to clear all App cache and data:
• Visit “Settings” and select “Apps”.
• From the list of Apps that appears, select the App that won’t open.
• Now tap on “Clear Cache” and “Clear data” directly or under “Storage”.
 Glary Utilities PRO - Premium all-in-one utility to clean, speed up, maintain and protect your PC

Part 4: 3 Common fix if all Apps won’t open on Android
In this segment, we will discuss solutions to the problem if all your Apps won’t open. They are simple and easy to follow and solve the error in no time.
1. Android updates
Firstly, it is very important to keep your Android software updated at all times as an old Android version might not support new Apps or updated Apps.
To update your software:
• Visit “Settings” and keep going downwards.
• Now select “About Phone”.
• From the options available on the screen, tap on “System Updates”


• In this step, if you are prompted for an update, follow the instruction given and do so.
Updating your Android software solves most of your problems. This method might sound weird but works wonders when it comes to App related issues.
2. Restart the phone
Restarting your Realme Note 50 to fix an error might sound old school but it gives good results when your Apps won’t open. Restarting your phone is fairly simple. All you need to do is:
• Long press the power button.
• Now click on “Restart”.
Parental Control Software
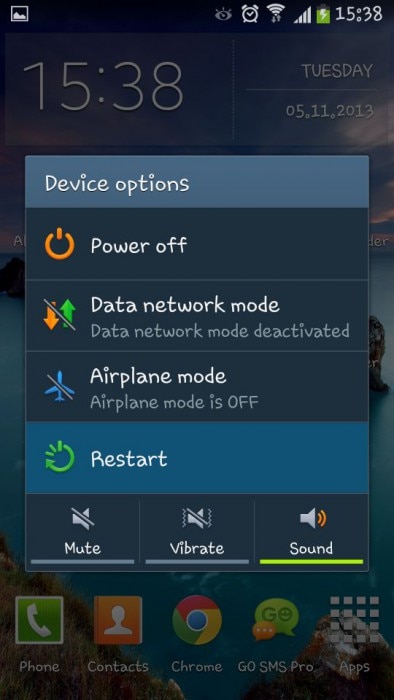Your phone will automatically restart and once it does, you can try to launch the App. You may also restart your Realme Note 50 by pressing the power button for about 15-20 seconds.
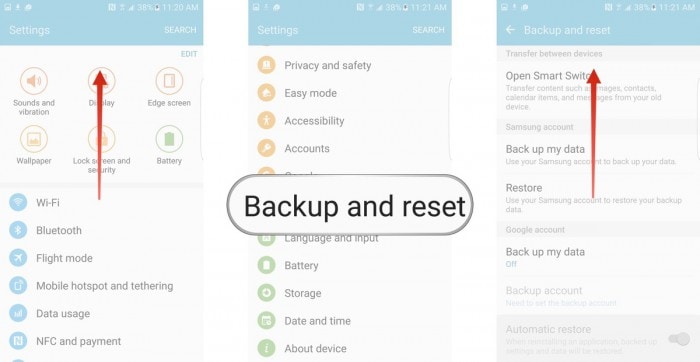
3. Reset Factory Settings
This method is a little tedious and must be last on your list. Also, make sure you take a backup of all your data and contents stored on your Realme Note 50 and this solution will completely wipe off your phone making as good as a new smartphone.
To Factory Reset your Realme Note 50, carefully follow the guidelines given below:
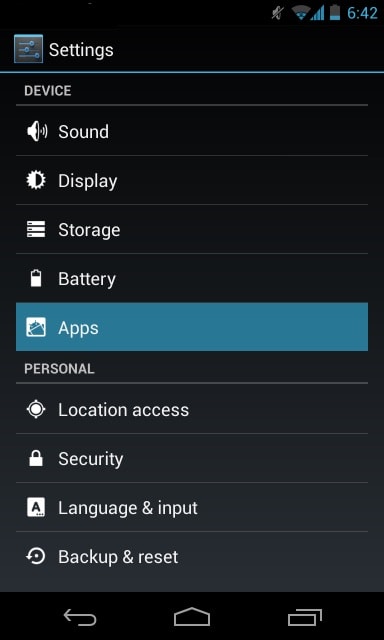
• Visit “Settings” to find the “Backup and reset” option as shown in the screenshot below.
• Now click on “Factory Data Reset”>“Reset Device”>“Erase Everything”
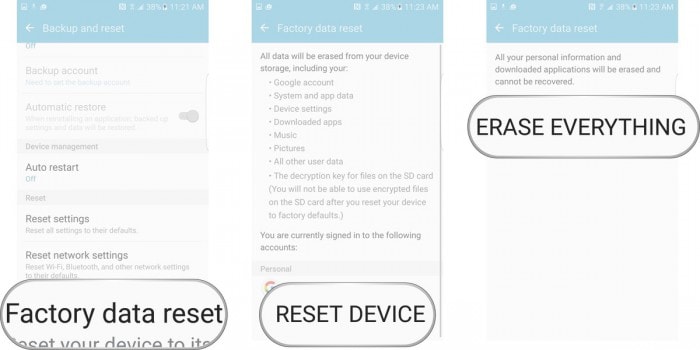
Your phone will now reboot and will be required to set up from scratch.
“Why Won’t my App open” is a question asked by many Android phone users who fear that the problem occurs due to a virus attack or a system failure. However, this is not the case. The reason for the error to the surface is quite minor and can be fixed by you, sitting at home, without resorting to any kind of technical or external assistance. The solutions listed above are easy to understand and not very time-consuming.
So go ahead and try them out now!
What to Do if Google Play Services Keeps Stopping on Realme Note 50

Is the annoying Google Play Services error constantly popping up on your phone? Is it happening while reading, gaming, or browsing social media?
The error constantly plagues thousands of Android users, and it can be incredibly frustrating when you’re using the phone for something important or doing something entirely unrelated to the Google Play app.
Oddly enough, the “Unfortunately, Google Play Services has stopped.” error isn’t severe – you can fix it with a few general and easy-to-do fixes, a factory reset, or a system repair. Below, you’ll find info about why it’s happening and a list of ten possible solutions.
Why Am I Getting the Message “Google Play Services Keeps Stopping?”
Computers and phones often speak in error codes and apps that stop working. Even minor connectivity issues can cause these problems, leaving you wondering what’s wrong with your device or displaying the “Unfortunately, Google Play Services has stopped working.” error message.
Software errors are another set of problems that can also cause this issue. Namely, an average phone user has at least 40 installed apps, and sometimes these apps don’t play well together. They generate problems or steal resources from each other, such as RAM, causing crashes and errors.
There’s also the issue of wrong app versions. Although each Android phone uses the Android operating system, these systems can be vastly different, and the apps built for them can be made to be phone-specific and only run on a specific phone model.
That’s also the case with Google Play Store and Google Play Services.
 vMix HD - Software based live production. vMix HD includes everything in vMix Basic HD plus 1000 inputs, Video List, 4 Overlay Channels, and 1 vMix Call
Why Google Play Services Keeps Stopping
The Google Play Services keeps stopping error is an infamous one, and it can appear for various reasons and even on brand new phones. However, these causes can be categorized into three groups, which are:
- Network Issues
- Software Errors
- Wrong Play Services Version
Regardless of what’s causing the issue on your phone, we’ve compiled a list of ten possible solutions, and you can find those below.
Solutions to Try When Google Play Services Keeps Stopping
There are many solutions for the issue of Google Play Services that keeps stopping. We’ve listed the most famous and effective ones, and you’ll find them below in no particular order. Try them out and see whether they fix the issue.
1. Do a Factory Reset
A factory reset on any smartphone removes all your data on the phone’s internal storage and can even wipe your SD card clean if you select the option. Before you reset your phone to factory settings, ensure you’ve backed up all your essential apps and files. When you’re ready, you can do a factory reset by following these steps:
Step 1: Go into Settingsand search for “reset.”
Step 2: Choose Factory reset.
Step 3: Tap the Erase all dataor Reset device at the bottom, whichever button is there.
Step 4: Input your password and confirm the action.

Your phone will now restart and start the reset process. Once the factory reset completes, your phone will look brand new, and you’ll need to install all your apps again. Moreover, your Google Play Services app will likely get fixed by this, too.
 dotConnect for Oracle is an ADO.NET data provider for Oracle with Entity Framework Support.
2. Update Your System
As keeping your phone’s system and apps updated to the latest possible version is essential and recommended for the best performance and highest efficiency, you can try updating it to see whether it fixes your Google Play Services error. Here’s how:
- Step 1: Open the Settings
- Step 2: Head into System> System update.
- Step 3: If there’s an update available, click it and go through the process of updating your phone’s system.
Restarting your phone after an update, even if it doesn’t restart itself, is highly advisable, ensuring that the new updates apply without issues.
3. Revert to the Previous Version
As we’ve discussed the wrong Play Services versions above, it’s worth noting that sometimes even the developers can make mistakes and roll out the wrong version for your phone. So, if you notice that the phone is getting the error after you’ve updated Google Services or the Play Store, you can quickly revert to the previous version, and here’s how:
- Step 1: Head into Settings> Apps > Google Play Services.
- Step 2: Press the Disablebutton at the bottom of the screen.
- Step 3: Restart the phone, repeat the process by clicking Enablethis time, and restart the phone again.
As these are system apps, you can’t remove them from the phone, and disabling them will only remove the updates, leaving you with a base version that came with your phone out of the box.
 CalendarBudget - Monthly subscription membership to CalendarBudget via web browser or mobile app. Support included.
 4. Uninstall the App’s Updates and Reinstall
Like reverting to the previous version, you can also try reinstalling updates to fix the Google Play Services has stopped working error. The process is similar to the one above, but we’ve still included the steps. Here’s how you can do that:
- Step 1: Go into Settings> Apps and find Google Play Services.
- Step 2: Tap it and press Uninstall Updatesat the bottom.
 KoolReport Pro is an advanced solution for creating data reports and dashboards in PHP. Equipped with all extended packages , KoolReport Pro is able to connect to various datasources, perform advanced data analysis, construct stunning charts and graphs and export your beautiful work to PDF, Excel, JPG or other formats. Plus, it includes powerful built-in reports such as pivot report and drill-down report which will save your time in building ones.
 It will help you to write dynamic data reports easily, to construct intuitive dashboards or to build a whole business intelligence cockpit.
KoolReport Pro package goes with Full Source Code, Royal Free, ONE (1) Year Priority Support, ONE (1) Year Free Upgrade and 30-Days Money Back Guarantee.
Developer License allows Single Developer to create Unlimited Reports, deploy on Unlimited Servers and able deliver the work to Unlimited Clients.

- Step 3: Exit the Settingsapp and restart the phone.
- Step 4: Open the Play Storeapp and head into the app’s settings by clicking your profile icon. Then scroll to the bottom, and tap Settings.
- Step 5: Find and tap the Play Store versionto update your Google Play Services.
As you’re already there, you might as well update all other apps after you tap Manage apps & device. That will ensure that older and not-up-to-date apps aren’t causing the issue.
5. Check Storage
Believe it or not, one of the leading causes of the Google Play Services issue is a phone overfilled with apps. Namely, if you have insufficient storage, the Google Play Store app will likely crash and display errors such as “Unfortunately, Google Play Services has stopped working.”
Head into your phone’s Settings and select Storage to see how your phone’s doing storage-wise. Deleting a few apps you don’t use and transferring your photo and video library to a PC is highly advisable if your phone’s storage space lacks gigabytes.
6. Do a System Repair
Although the other solutions here are general fixes that might help, a system repair might take a bit longer but will undoubtedly fix your issue. You can use the Wondershare Dr.Fone app to repair the system and eliminate the annoying “Unfortunately, Google Play Services has stopped working” error.
Moreover, Dr. Fone works on Android and iOS devices and can fix various phone issues, including boot loops, a white screen of death, a stuck phone, etc. That’s why we’ve included a guide on using it for an Android phone issue. Here’s how:
- Step 1: Launch the Wondershare Dr.Fone app on your PC and head into Toolkit> System Repair > Android.

- Step 2: Select the type of issue you want to fix > Start.

- Step 3: Select the make and model of your phone so that Dr.Fone can find the appropriate Android software.
 CollageIt Pro
Step 4: Connect the phone to the PC via a USB cable and follow the on-screen instructions to put the phone into Download Mode. The instructions are available for both phones with and without the home button.
Step 5: Select the appropriate Android firmware, download it, and hit Fix Nowafter it downloads.

Step 6: Enter the code and hit Confirmto continue the system repair process. When it’s done, click the Done

That’s all it takes to do a system repair with Wondershare Dr.Fone. Give the software a few minutes to complete, during which your phone might restart a few times. Once it’s done, your Google Play Services app will undoubtedly work.
7. Clear Cache
The easiest and the most obvious fix for many Android apps is clearing the app’s cache. Here’s how you can do that for Google Play Services and Google Play Store:
Step 1: Go into Settings> Apps and find the Google Play Store
Step 2: Tap Storageand hit the Clear cache
Step 3: Repeat the process for the Google Play Services

If this doesn’t work, move on to another possible fix.
8. Check Date and Time Settings
Oddly enough, the Google Play Services app is prone to failure because of an incorrectly set time or date. That’s because Google’s servers constantly check these settings before issuing updates to the Realme Note 50 devices, so you’ll need to ensure they’re correct beforehand. Here’s how:
- Step 1: Head into Settings> System > Date & Time.
- Step 2: Ensure that both “**Use network–provided time” and “Use network-provided time zone**” are toggled on.

- Step 3: If this doesn’t work, you can try repeating the process and manually setting the time and the time zone.
Once you check or change these settings, try using the Google Play Store app and check whether the issue is fixed. Restarting the phone after changing the settings is also highly advisable.
9. Troubleshoot Your Internet Connection
Another regularly overlooked troublemaker is a poor internet connection. That’s because most apps nowadays are meant to work in online mode only, and losing connection or using a bad one interferes with the app’s functionality.
To test the internet connection on your Realme Note 50, you should open a browser and head to a random internet page to see if it’s opening and whether there are any delays. If it’s working fine, your internet connection isn’t the problem.
10. Adjust Google Play Services Permissions
Although permissions rarely change, they can cause issues if you change them accidentally. These settings can be found in the same place where you would uninstall updates or clear the app’s cache, so you can use some of the steps mentioned above to check them.
Once inside Permission Settings, check whether the Google Play Services and Play Store apps have sufficient permission to do their jobs and whether any required permissions were recently removed. If so, grant these two apps their permissions back.
 safe & secure
4,953,228 people have downloaded it
Conclusion
Although it’s an incredibly frustrating error, the “Unfortunately, Google Play Services has stopped” message is more annoying than serious. We’ve explained why it happens, but we’ve also given you a list of solutions to fix it.
Our list includes various fixes, from simple ones, like deleting the app’s cache and ensuring your network works fine, to more serious ones, like doing a factory reset. Alternatively, you can do a system repair with the help of Wondershare Dr.Fone, which will certainly fix the problem, but it might be a bit more complicated than cache deletion.
How To Restore a Bricked Realme Note 50 Back to Operation
In moments of lag or freezing on your Android, you might brick Your Realme Note 50, which can be unsettling. This is more than just the loss of a device. A bricked cell phone also involves potential data erasure. Yet, it’s crucial to understand the true implications of a bricked phone. This page tackles how to address the issue of a bricked Android phone.
This comprehensive guide aims to the reasons behind Android phones becoming bricked. By reading below, you’ll learn effective methods to unbrick a mobile phone without the risk of data loss.

Part 1. What are Brick Phones: At a Glance
The term “bricked phone“ is used when a device becomes non-functional. This is typically due to a critical software or firmware error. There are two distinct scenarios for encountering a bricked phone: a soft brick and a hard brick.
- Soft Brick. A soft brick entails a phone that’s not operational due to software glitches or conflicts but is not irreparable.
- Hard Brick.A hard brick signifies a more dire situation. This is where the phone becomes inoperable, resembling an actual brick in terms of functionality.
The Common Causes of a Cell Phone Bricking
Below are the common causes why a cell phone bricks.
Failed Updates
When a firmware or system update fails, it can lead to a bricked phone. Updates involve intricate changes to the phone’s software. If interrupted or incompatible, the Realme Note 50 device may get stuck in a state of partial functionality. This can result in a soft brick.
Failed Flashing
Flashing involves installing custom firmware or software onto a device. If the flashing process is interrupted or if the firmware used is not compatible with the Realme Note 50 device’s hardware, it can cause a hard brick. The device’s essential software components may become corrupted, rendering the phone unusable.
Rooting
Rooting, which grants users superuser access to their device’s OS, can lead to bricking if not done right. Rooting often involves making deep system changes, and errors can disrupt the phone’s core functionality.
Installing Bad Apps
Installing malicious, incompatible, or poorly coded apps can lead to a soft brick situation. In severe cases, they can trigger a boot loop or render the phone unresponsive.
Others
Several less common factors can also contribute to bricking. Overclocking, attempting to modify the bootloader, or tampering with system files can lead to disastrous consequences. Hardware issues, such as faulty memory or battery problems, might also manifest as bricked devices.
Part 2. Unbricking Methods and Tools
Below are solutions that you can employ to fix various brick phone scenarios.
Reverting Android Device to Factory Defaults (Soft Brick)
A universal approach to trying to recover a brick phone exists for all Android phones. This is, consider restoring your device to its factory settings. You can find instructions specific to your phone model online. Although this procedure erases all your data, it’s possible to regain the use of your brick phone.
### Get in Touch With the Manufacturer (Hard Brick and Soft Brick)Normally, smartphone warranties span from 1 to 2 years. If your phone remains unrooted and falls within that coverage period, consider reaching out to the manufacturer. This direct approach could lead to your phone being repaired or replaced with a new one at no cost to you.
Seek Professional Assistance (Hard Brick and Soft Brick)
When your phone falls outside the warranty coverage, consider seeking help from a reputable repair shop. However, be aware that any lost data cannot be attributed to their efforts. Fortunately, you can recover lost data using reliable data recovery software once your phone is operational again.
 PCDJ Karaoki is the complete professional karaoke software designed for KJs and karaoke venues. Karaoki includes an advanced automatic singer rotation list with singer history, key control, news ticker, next singers screen, a song book exporter and printer, a jukebox background music player and many other features designed so you can host karaoke shows faster and easier!
Use a Dedicated App To Fix Bricked Mobile Phones (Hard Brick and Soft Brick)
Among the array of tools designed for unbricking and recovery, one standout is Wondershare Dr.Fone - System Repair (Android). With an exceptional recovery rate, it stands out as one of the top contenders for data retrieval. Its performance is notable when applied to modern brick phones, making it a highly effective choice for these devices.
Part 3. Unbricking Mobile Phones With Dr.Fone - System Repair (Android)
Dr.Fone - System Repair (Android) empowers you to resolve a range of prevalent Android problems. This Android repair tool eliminates the need to hunt for suitable firmware to flash your phone. By utilizing Dr.Fone – System Repair (Android), you can recover data on Your Realme Note 50 with a few clicks.

safe & secure
4,039,461 people have downloaded it
 PDF application, powered by AI-based OCR, for unified workflows with both digital and scanned documents.
 Key Features
Below are some of the standout features of Dr.Fone - System Repair (Android)
Address Android Challenges Like a Professional
From common scenarios like black screens and boot loops to even bricked Android devices, this tool has you covered. Dr.Fone has simplified the process so that anyone can fix Android problems.
Support for Over 1000 Android Models
This software is designed to fix glitches including most modern Android devices. Whether your Realme Note 50 is an unlocked variant or tied to carriers, you can restore it back to normal in just a matter of minutes.
Trial Access at No Cost
Dr.Fone - System Repair (Android) offers free access for you to test the initial steps and verify device compatibility. This cost-effective feature ensures value for money every step of the way.
Main Advantages of Using Dr.Fone – System Repair (Android)
Dr. Fone – System Repair (Android) is a great solution with numerous tools to help you manage your Realme Note 50 in various ways. Here are some of the advantages of using the app for fixing bricked phones.
- Fone – System Repair (Android) comes with a clean UI making navigation and usage easy. The user-friendly design offers a seamless experience for beginners and professionals alike.
- Utilizing the app for system repair is an effortless and speedy process. It doesn’t take up much time to revive your bricked phoneso you can use it right away.
- The System Repair toolkit only needs you to click on a few buttons. Combined with its clean UI and speedy process, using the app is a breeze.
Part 4. How To Revive a Bricked Phone Using Dr.Fone – System Repair (Android)
Below are the steps to recover data on a bricked mobile phone.
- Step 1: Download and install Dr.Fone – System Repair (Android) on your computer. Launch the app and select System Repair. Next, choose Select Android as the Realme Note 50 device type. Then, connect to your Realme Note 50. Choose Phone Brick as the Android problem and click Start.
 PDF application, powered by AI-based OCR, for unified workflows with both digital and scanned documents.
- Step 2: Select the correct device information. Choose the Brand, Name, Model, Country, and Carrier. Tick the box next to I agree button and click Next to proceed to the next step.

- Step 3: Click on the Phone with Home button or Phone without Home button depending on your device. Follow the on-screen instructions and click Next to proceed with reviving your brick phone.
- Step 4: Once the Realme Note 50 device enters Download Mode, the firmware will automatically start downloading. Follow the on-screen prompts and wait for the system to initiate the repair process. Once it concludes, the completion message will appear on the main window. Click Done to close the tool or click Try again to repeat the process.
safe & secure
4,311,328 people have downloaded it
Conclusion
Fixing a bricked phone may seem daunting, but solutions are within reach. This page explained the distinctions between soft and hard brick scenarios. It also identified common causes and revealed effective methods for unbricking.
Among these, Dr.Fone – System Repair (Android) emerges as a dependable ally. The tool offers a comprehensive toolkit for recovery and data rescue. The power to reclaim lost data lies in your hands. Act, follow the methods outlined, and recover your brick phone.
- Title: App Wont Open on Your Realme Note 50? Here Are All Fixes | Dr.fone
- Author: Ariadne
- Created at : 2024-07-30 09:24:50
- Updated at : 2024-07-31 09:24:50
- Link: https://howto.techidaily.com/app-wont-open-on-your-realme-note-50-here-are-all-fixes-drfone-by-drfone-fix-android-problems-fix-android-problems/
- License: This work is licensed under CC BY-NC-SA 4.0.