
Asus ROG Phone 8 Camera Not Working Unexpected Error? Fix It Now | Dr.fone
Asus ROG Phone 8 Camera Not Working Unexpected Error? Fix It Now
For all its glory and goodness, the Android OS often has its users pulling their hair in frustration at just how buggy the OS can be at times. So, if you’re having one of those days today, we are here to help. Camera app is one of the most used apps on smartphones today. People only launch the app when they want to take a photo, for everything else there’s a dedicated photo gallery app. What happens when you launch the camera app only to realize it threw an error and you missed your photo moment? Don’t throw the phone, not yet. Let us help you out.

Part I: Why Is Android Camera Not Working?
There are a few reasons why the camera app is not working on your Asus ROG Phone 8.
Low Memory
Camera app does rely heavily on system resources, so in case you have too many apps open and for some reason the OS is not able to manage the resources appropriately for the camera app to function as it should, you will get a camera error.
Low Storage
The camera app needs storage space to save the photos it takes. So, in case your phone is running low on storage space, the camera app would likely malfunction as it would have no way to store the photos it would be taking.
General Bugs And Glitches
OS bugs and general glitches within the OS and the camera app can cause camera not working issue anytime during everyday operation. This is part and parcel of any technology.
Hardware Issues
In the rarest cases, there might have developed an actual hardware issue with the camera system on your Asus ROG Phone 8. The likely culprit is misuse and abuse, such as a dropped phone or maybe the phone was too hot for extended periods of time, causing hardware issues.
Part II: How To Fix Android Camera Not Working Issue?
So, how to get the Android camera not working problem solved? There are a few ways you can try fixing the camera not working issue on your Asus ROG Phone 8 right where you are, without needing to take the Asus ROG Phone 8 device to the manufacturer’s service center.
II.I: Restart The Handset
One of the first things to do any time an app or your phone or tablet does not work like it should, restarting the Asus ROG Phone 8 device refreshes everything just enough to resolve most commonly occurring issues.

Use the power button on your smartphone to restart your Android handset and see if this resolves the issue.
 Greeting Card Builder
II.II: Close And Relaunch The Camera App
If the camera app (or any app for that matter) has been in the background for a while and then it is brought to the foreground, there are always chances of it crashing for any reason, or not working as expected. So, closing the app completely and relaunching it is recommended.
Step 1: Launch the app switcher on your specific Android device the way your device manufacturer suggests you to. Usually, it is a swipe up and hold gesture to get into the app switcher.
 SwifDoo PDF Perpetual (1 PC) Free upgrade. No monthly fees ever.

Step 2: Next, you can choose to close just the camera app or, better yet, close all apps by tapping the Close All button. Flicking any app upwards (quick upward swipe) is how you close an app. If there is no Close All button anywhere, repeat the gesture for all open apps.

II.III: Check App Permissions
These days, thanks to strides in the privacy initiatives, apps need permissions before they can function the way they do. Most of the times, apps such as camera do have the necessary permissions, but sometimes it is possible that the permissions are set incorrectly. To check if the camera app has the requisite permissions, do the following:
Step 1: Go to Settings > Apps > Camera > Permissions.

company, user or members of the same household. Action! - screen and game recorder</a>

Step 2: Tap Camera.


Step 3: See if the selected option is Allow Only While Using This App. If not, select it.
II.IV: Clear The Camera App Cache
Clearing the camera app cache is sometimes helpful. To do that:
Step 1: Go to Settings > Apps > Camera and tap Storage Usage.

Step 2: Tap Clear Cache.

II.V: Clear The Photo Gallery App Cache
The camera app is closely tied to the photo gallery app that comes baked in into Android OS. That is because photos that the camera app takes are stored in the photo gallery app. Consequently, if there were any issues in the photo gallery app, that could lead to the camera app not working on Android problem. Here’s how to clear the photo gallery app cache:
Step 1: Go to Settings > Apps > Photos > Storage Usage.


Step 2: Tap Clear Cache.
II.VI: Check For App Updates
This does not happen always, but sometimes, with known bugs and issues, there may be an update released that fixes those bugs and issues that prevent some users from using a given app reliably. Checking for updates is a good step to make sure that your camera app is updated to the latest version possible.
Step 1: Go to Play Store and tap your profile picture on the right.

Step 2: Tap Manage Apps and Device.

Step 3: If there are updates available, Tap Update All to update all apps.
II.VII: Cool The Phone Down
We do not realize the immense power that is packed into the thin smartphone form factor these days. If you have been using the phone to video chat for a while now, you might not realize that the phone has become hot, especially if you are using a desk stand. Same for shooting high-resolution videos; the phone does get quite hot shooting high-resolution videos.
If this is the case, close all apps and let the phone cool down. You might even want to shut the phone off to help cool it faster.

II.VIII: Nudge The Camera System
You may want to tap your camera system (the lenses and surrounding area) gently to see if that gets the camera working. In case it did, this is indicative of a hardware issue, and you should get it checked at the service center at your earliest convenience.

II.IX: Fix Android Camera Not Working Issue In One Click (With Dr.Fone)
Now, if the above fixes have not worked, you might want to repair your Android OS once before you make that appointment with the service centre. And, we have just the app to help you fix your camera not working on Android problem quickly.
Wondershare Dr.Fone is a multi-module app that works on both Windows and macOS and is the only app you will ever need to resolve nearly all of your smartphone and tablet issues that you are likely to encounter. Need to take backups? Dr.Fone Phone Backup has you covered with the ability to take and restore even selective backups, and to any location such as your computer or an external disk as well. Want to transfer WhatsApp chats to a new phone? Use WhatsApp Transfer to do just that! Bought a new phone? Use Phone Transfer to transfer contents from old phone to new, and then use Dr.Fone Data Eraser to securely wipe your old phone before giving it away!
Today, we will use Dr.Fone’s System Repair (Android) module to fix Android camera not working issue quickly.
Download Dr.Fone here.
 safe & secure
Step 1: Launch Dr.Fone app on your PC or Mac.

Step 2: Click System Repair module and then Android.

Step 3: For now, don’t bother with the scenarios given and click Start to go to the next screen.

Step 4: Your Android device will be detected by Dr.Fone. If anything seems incorrect, use the dropdown options to change it, and click Next.

Step 5: Your phone needs to be put into Download mode before it can be repaired. Follow the instructions shown onscreen and click Next.

Step 6: Dr.Fone automatically downloads the most recent firmware for your device and when it is ready, waits for your input. Click Fix Now to start the repair process.

Step 7: You will need to enter a 6-digit code (digit zero, six times – 000000) to confirm and begin the repair process.

When the repair is complete, Dr.Fone shows the final screen as below:


safe & secure
 Any DRM Removal for Mac: Remove DRM from Adobe, Kindle, Sony eReader, Kobo, etc, read your ebooks anywhere.
Conclusion
The camera app on your smartphone is one of the most important apps you use. This is not a game; this is an app that makes previous memories possible for you. So, when you get any of those incorrigible errors that are impossible to make sense of, what do you do? This guide gives you 9 fixes to fix Android camera not working error quickly and easily.
Fix Unfortunately Settings Has Stopped on Asus ROG Phone 8 Quickly
All of you, sooner or later, must have found the “Unfortunately Settings has stopped” error on your Asus ROG Phone 8. The problem can occur if the Settings keeps stopping or crashing. Many times, you may try to open the Settings but it doesn’t even open. Or possibly, it may freeze after getting opened thereby hampering the Asus ROG Phone 8 device’s performance.
 Allavsoft Batch Download Online Videos, Music Offline to MP4, MP3, MOV, etc format

Well! There can be a number of reasons why this thing happens. For instance, custom ROM installations, not enough space in the Asus ROG Phone 8 device or perhaps an outdated version of Android. If you are struggling with the same issue and want to know what to do when Android Settings is not responding, this post will help you. We have explained everything in detail along with the solutions. So, scroll down and get things sorted.
- Part 1: Clear the cache of Settings and Google Play Service
- Part 2: Clear the Android phone’s RAM and retry
- Part 3: Uninstall the Google update
- Part 4: Uninstall the custom ROM or re-flash the stock ROM
- Part 5: Wipe cache partition to restore Settings
- Part 6: Factory reset your Android
- Part 7: Check and update Android OS
Part 1: Clear the cache of Settings and Google Play Service
It is possible that the corrupted cache files are responsible for this error. Hence, as the first tip, we would like you to clear the Settings cache if that is what triggers the “Unfortunately Settings has stopped” issue. Clearing it would definitely make Settings run appropriately. And The steps to clear the cache of the Google Play Services app are similar. Here is how to clear the cache of Settings:
- Open “Settings” on your Asus ROG Phone 8 and choose “Apps & Notifications”/”Apps”/”Application Manager” (the option may differ on different devices).
- In the list of applications, look for “Settings” and open it.
- Now, select “Storage” followed by “Clear Cache”.

Note: In some phones, the “Clear Cache” option may come after tapping on “Force Stop”. Therefore, go accordingly without getting confused.
 Power Tools add-on for Google Sheets, Lifetime subscription
Part 2: Clear the Android phone’s RAM and retry
As the next tip, we would like to suggest you clear your device’s RAM by ceasing the running apps in the background. RAM, if at the increased level, is responsible for the Asus ROG Phone 8 device’s freezing, poor performance, and most probably is the reason behind crashing Settings. Also, if the apps in the background keep running, they might conflict with the Settings and stop it to perform properly. Therefore clearing RAM is important when Android Settings is not responding. Here is how to do it.
- Firstly, you need to go to the Recent apps screen. For this, long-press the Home key.
Note: Please note that different devices have different ways to go to the Recent apps screen. Do it according to the Asus ROG Phone 8 device you own. - Now, swipe the apps and tap on the clear option. You will be able to notice the amount of RAM cleared

Part 3: Uninstall the Google update
Uninstalling Google Play Store updates has also responded well to many users. It has worked in the case of the “Unfortunately Settings has stopped” error. So, we would also like to suggest you use this tip if the others don’t work. Here are the steps to be followed for this.
- Open “Settings” on your Android and tap on “Application manager” or “Apps” or “Application.
- Now, head to all the apps and select “Google Play Store” from there.
- Tap on “Uninstall Updates” and restart your device to check if the crashing Settings issue has been resolved.

Part 4: Uninstall the custom ROM or re-flash the stock ROM
Using a custom ROM on your device brings up this problem due to incompatibility or improper installation. Therefore, you should either uninstall the custom ROM or re-flash the stock ROM. in order to re-flash the stock ROM of your Asus ROG Phone 8, the best way would be Dr.Fone - System Repair (Android). It offers one-click functionality to flash stock ROM and that too with full security. Supporting all Asus ROG Phone 8 devices, it ranks among its counterparts when it comes to fixing crashing Phone app issues or any other Android system issue. It is loaded with the beneficial features which are discussed below.
Dr.Fone - System Repair (Android)
Android repair tool to fix “Unfortunately, Settings Has Stopped”
- You needn’t be a tech-savvy to use this
- Supports a wide range of Android devices easily, 1000+ being more precise
- One-click tool and supports any sort of Android system issue
- Higher success rate along with millions of trusted users
- Trustworthy and offers an extremely easy interface
4,635,310 people have downloaded it
How to fix crashing Settings using Dr.Fone - System Repair (Android)
Step 1: Download Tool
Visit the official website of Dr.Fone and download the toolbox from there. Go for the installation process and wait until the installation gets over. Launch it now and choose the “System Repair” tab from the main window.
Step 2: Get the Phone Connected
With the help of a USB cable, plug your Asus ROG Phone 8 into the PC. Upon proper connection, hit on the “Android Repair” option from the left panel.
Step 3: Feed Correct Information
In the next window, you need to fill in some necessary information like the name and model of the mobile device. Enter details like country and career. Check once and hit on “Next”.
Step 4: Enter Download Mode
Now, you need to take your device into Download mode. For this, you need to follow the onscreen instruction according to your device. Click “Next” and you will notice the firmware downloading progress on your screen.
 Glary Utilities PRO - Premium all-in-one utility to clean, speed up, maintain and protect your PC
Step 5: Repair the Issue
Once the firmware is completely downloaded, your Asus ROG Phone 8 will automatically start getting repaired. Stay there and you will receive a notification that the repair is done.
Part 5: Wipe cache partition to restore Settings
Like RAM, wiping cache is also vital so as to make the Asus ROG Phone 8 device’s operation smoother. And when you are getting the “Unfortunately Settings has stopped” error, it might be due to the collected cache. To remove it, you will need to enter the recovery mode. And the steps for recovery mode range from device to device. For instance, Asus ROG Phone 8 users have to press the “Home”, “Power” and “Volume Up” buttons. Similarly, HTC and LG device users are supposed to press the “Volume Down” and “Power” buttons. For Nexus, it is “Volume Up, Down” and Power key combinations. Therefore, before going further, make sure what device you own and enter the recovery mode according to it. Now, follow the detailed guide below to wipe the cache partition in order to fix crashing Settings.
- Primarily, turn off the Asus ROG Phone 8 device and enter the recovery mode by pressing the respective key combinations.
- You will notice a Recovery screen on your device.
- On showing up the recovery screen, look for the “Wipe Cache partition” option and use the “Volume Down” and “Volume Up” buttons to scroll down and up respectively.
- On reaching the required option, press the “Power” button to start wiping.
- Once finished, click the reboot option and the Asus ROG Phone 8 device will be rebooted, fixing the issue hopefully.

Part 6: Factory reset your Android
You can also opt for Factory resetting your device to fix the issue of Settings keeps stopping. By removing everything from the Asus ROG Phone 8 device, it will make your device run properly. If you have important data on your device, please make sure to create a backup before taking action if you don’t want to lose it. The steps are as follows.
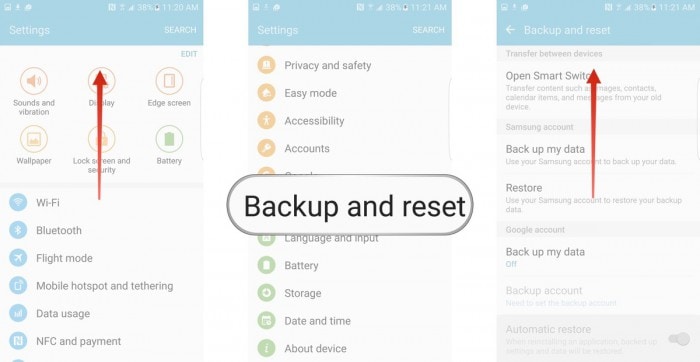
- In the “Settings, go to “Backup and Reset”.
- Tap on “Factory data reset” followed by “Reset device”.
- Wait for the completion of the process and check if Settings is stopping or not after it gets rebooted.

Part 7: Check and update Android OS
A lot of times minor issues crop up due to the operating systems that get outdated. It is because the Asus ROG Phone 8 device needs to get updated from time-to-time for proper functioning otherwise it will not be able to match up with the fading technologies thereby coming up with issues like “Unfortunately Settings has stopped”. We recommend here you check for the available update and update your device. For this follow the guide below.
- Go to “Settings” and tap “About Phone” on your device.
- Now, hit on “System Update” and the Asus ROG Phone 8 device will look for any available update.
- If there is any, go along with the prompts to install it and make your phone even smarter.

Conclusion
If your Asus ROG Phone 8 shows the “Unfortunately Settings has stopped” error, don’t worry. This problem can come from many things like old software or cache issues. You can try easy fixes like clearing cache or updating your system. Sometimes, removing custom ROMs might be needed.
For iOS users facing similar problems, we recommend using Dr.Fone-System Repair (iOS) . It’s known for fixing many iOS problems without losing any data. Remember, a well-working device is just a few steps away!
 safe & secure
4 Solutions to Fix Unfortunately Your App Has Stopped Error on Asus ROG Phone 8
We often find people complaining, “Unfortunately Youtube has stopped”, “Unfortunately the internet has stopped” or “Unfortunately Netalpha has stopped”. An error that causes Apps to randomly stop working is experienced by users daily. This is a strange error as it occurs while you are using an App, and it suddenly stops working or crashes. You are brought back from the App screen to the Home Screen of your device with an error message saying: “Unfortunately, it has stopped working.”

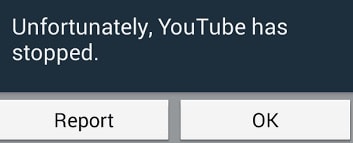
Apps not working or stopped while working, such as unfortunately Netalpha has stopped or unfortunately the internet has stopped, is a very confusing error because one moment your App is running smoothly and the next moment it shuts down automatically with an error message. Unfortunately, Youtube has stopped working, Netalpha has stopped. Unfortunately, the internet has stopped, and many more such examples of Apps stopping while working normally are witnessed by users all over the world, and they are constantly on a lookout for solutions to fix such an error.
Read on to find out why exactly your App stops working suddenly and 3 of the best and most effective ways to tackle the problem.
Part 1: Why your App stops working suddenly?
Unfortunately, Youtube has stopped; unfortunately, Netalpha has stopped working, etc. are error messages that pop-up now and then while using Apps on Android mobile devices. It is important to understand that such errors are not App/Apps specific and may occur to any App/Apps. There is no one specific App or genre of Apps that face this problem.
The reason behind unfortunately internet has stopped or any other App which experiences such a glitch in data crash. A data crash is not a serious problem and only means a situation wherein an App, OS, or software stops working normally and exits abruptly. This may happen due to various reasons such as unstable internet connection, both cellular and WiFi. Another reason for Apps to stop working could be corrupted Cache files, which have not been cleared in a long time.
Many users also feel that incomplete or improper installation may cause the App to crash and stop working suddenly.
There may be many more reasons for them; unfortunately, App has stopped error to show up, but no one reason can be blamed for it.
Therefore it is important for us to carefully examine the problem and choose from the solutions given below to fix Unfortunately, Youtube has stopped; unfortunately, Netalpha has stopped; unfortunately, the internet has stopped and many other similar unfortunately App has stopped working errors.
Part 2: A One-Click Fix to ‘Unfortunately App has Stopped’
Fortunately, while this is an annoying problem that stops you from doing what you’re doing, the best way to eliminate this error is simply to repair the data glitch, thus preventing it from happening.
The easiest solution is to use a software application known as Dr.Fone - System Repair , a specialist piece of programming designed to help you fix your devices as quickly as possible.
If this sounds like the option you need to alleviate your, unfortunately, YouTube has stopped errors; this is how to use it.
How to Use Dr.Fone -Repair to Fix Unfortunately App has Stopped Error
Note: Please note that using this solution may rewrite and repair all data on your phone, meaning there is the potential to lose data during the process. Make sure you back up your device before continuing.
Step #1 - Acquire the Software
Head over to the Dr.Fone - System Repair website and download the software to your Mac or Windows computer.
Step #2 - Connect Your Android Device
Launch Dr.Fone and click the System Repair option from the main menu. Now connect your Asus ROG Phone 8 using the official cable.

From the next menu, select the ‘Android Repair’ option and press ‘Start’.

Step #3 - Input Information & Repair
Tap in your phone information. This is to make sure your device is repaired correctly while minimizing the risk of bricking your device.
Follow the on-screen instructions on how to then boot your Asus ROG Phone 8 in Download mode.

Once booted, the software will verify your firmware and start repairing your device. Make sure your phone stays connected throughout the process, and you’ll be ready to go and your ‘unfortunately the internet [or another app] has stopped’ error should be erased!
This could take some time, depending on your internet connection and speeds, so be mindful that everything stays connected.
Part 3: Fix your App has unfortunately stopped by clearing App Cache
Herein we bring to you 3 of the most effective remedies to combat the; unfortunately, App has stopped error, which has helped many users facing similar problems.
First among these is to clear the App’s cache. Clearing App Cache to fix Unfortunately Youtube has stopped, and such errors are very popular as it cleans your App/Apps by wiping off data that has been stored due to constant App usage, and it makes the App/Apps as good as new. It is advised to all users to clear the App cache regularly for Apps to function better.
Follow the steps given below to learn how to clear App cache:
• Visit “Settings” to find an option named “Apps”.

• Tap on “Apps” and look for the App which has suddenly stopped.
• Click the App name, say, for example, “Youtube” by scrolling down in “All” Apps.
 TubeDigger - online video downloader from mostly any site
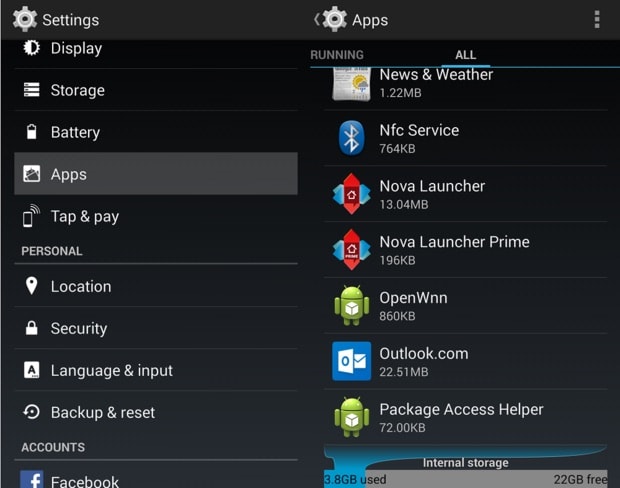
• From the options that appear, tap on “Storage” and then on “Clear cache” as shown below.

Clearing App cache is always a good idea as it prevents any errors which may be caused due to the cache being corrupt or too full. This method is likely to help you, but if the problem persists, read on to find out about 2 more solutions.

Part 4: Fix your App has unfortunately stopped by the fresh installation
Sometimes, unfortunately, Youtube has stopped; unfortunately, the internet has stopped, and such errors are caused due to improper or inappropriate App installation. It is mandatory to completely download the App from the Google Play Store and use it after it is successfully installed on your device.
Firstly, to uninstall all an existing App from your device, follow the instructions given hereunder:
• Visit “Settings” and search for “Application Manager” or “Apps”.

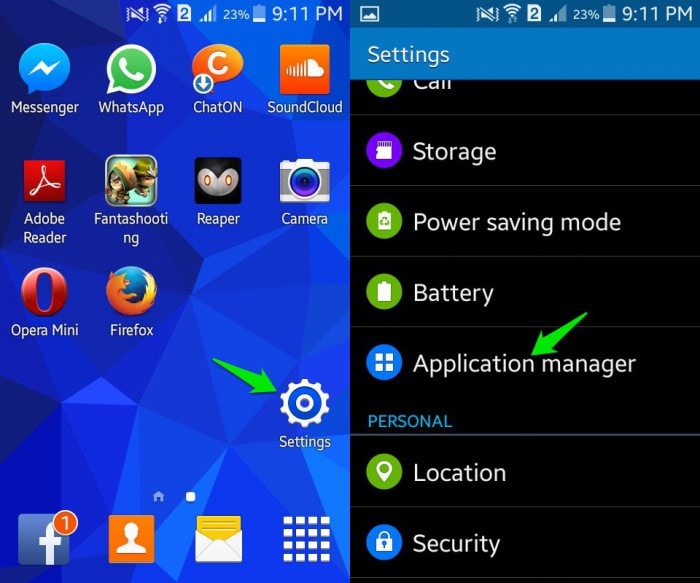
• Select the App you wish to uninstall, say, for example, “Messenger”.
• From the options that appear before you, click on “Uninstall” to delete the App from your device.

You may also uninstall an app directly from the Home Screen (only possible in certain devices) or the Play Store.
To re-install the App, visit Google Play Store, search for the App name and click on “Install”. You will also find the deleted App in “My Apps and games” on your Play store.
This method has helped many and will be useful to you too. So don’t hesitate to try it. It may sound tedious and time-consuming, but it hardly takes 5 minutes of your time.
Part 5: Fix your App has unfortunately stopped by factory reset
Factory Reset must be used only when nothing else works. Please remember to take a back-up of all your data and contents on the cloud or an external memory device, such as a pen drive before adopting this method because the one you perform a factory reset on your device, all media, contents, data and other files are wiped out, including device settings. Do remember to back up the data on an Android device before performing a factory reset.
Follow the step-by-step explanation given below to factory reset your device to fix Unfortunately Youtube has stopped; unfortunately, the internet has stopped working and similar errors:
• Visit “Settings” by clicking the settings icon, as shown below.
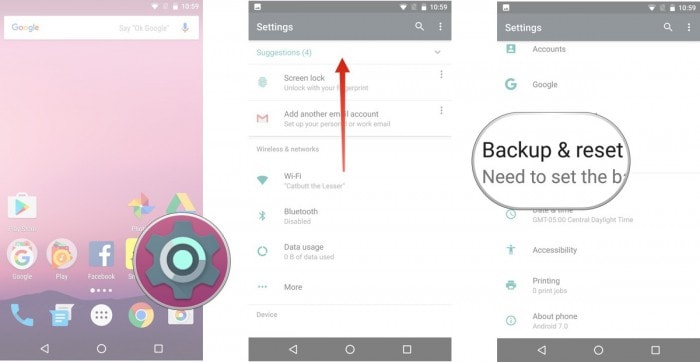
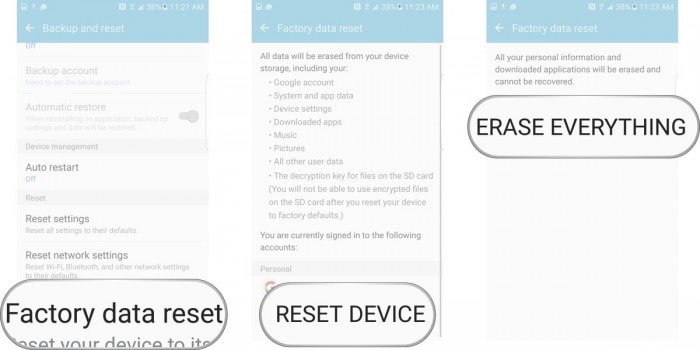
• Now select “Backup and Reset” and move on.
• In this step, select “Factory data reset” and then “Reset Device”.
• Finally, tap on “ERASE EVERYTHING” as shown below to Factory Reset your device.
Note: Once the factory reset process is complete, your device will automatically restart and you will have to set it up once again.
Errors such as unfortunately, Youtube has stopped, unfortunately, Netalpha has stopped, unfortunately, the internet has stopped working and so on are very common these days. They disrupt the normal functioning of an App/Apps and prevent you from using the App/Apps smoothly. Unfortunately, App has stopped error is not a serious problem and does not mean there is a problem with the App, your Android OS version, or your handset. It is a random error which occurs due to various reasons in a given situation. If you experience such an error while sign in your favorite App/Apps, DO NOT panic as unfortunately, App has stopped error can be fixed easily. All you need to do is be patient with the App’s software and not try to launch it again and again once it crashes, and an error message pops-up. Just follow the methods listed and explained in detail in the previous segments to solve the problem of unfortunately App has stopped.
- Title: Asus ROG Phone 8 Camera Not Working Unexpected Error? Fix It Now | Dr.fone
- Author: Ariadne
- Created at : 2024-07-30 09:28:08
- Updated at : 2024-07-31 09:28:08
- Link: https://howto.techidaily.com/asus-rog-phone-8-camera-not-working-unexpected-error-fix-it-now-drfone-by-drfone-fix-android-problems-fix-android-problems/
- License: This work is licensed under CC BY-NC-SA 4.0.