
Authentication Error Occurred on Meizu 21 Pro? Here Are 10 Proven Fixes | Dr.fone
Authentication Error Occurred on Meizu 21 Pro? Here Are 10 Proven Fixes
There are times when users get an authentication error while they connect to a Wifi network. The problem is mostly found in Android whenever a device tries to establish a connection to Wifi. If your device is also experiencing an authentication problem Wifi, then don’t worry. It can easily be resolved. In this post, we will make you familiar with the root cause for the Meizu 21 Pro Wifi problem and how you can resolve whenever authentication error occurred on your device.
Part 1: Any idea about the Wi-Fi authentication problem?
Wi-Fi authentication has to be done every time you wish to connect to a Wi-Fi network over your smartphone or laptop. To authenticate yourself and connect to the protected Wi-Fi network, you need to have the password of it. But if after you’re putting in the correct password and still experiencing the wifi authentication problem. Here’s what you need to know.
Authentication error occurs when the “deal” between the Wi-Fi router and device fails due to certain reasons. First, the Meizu 21 Pro device sends the password of the network and the “connect” request in an encrypted format to the Wi-Fi router. Then, the router decrypts the password and compares the password saved on it. Now, if the password matches, it sends affirmation for the “connect” request, and then the Meizu 21 Pro device is allowed to connect to the network.
Part 2: Why Authentication Error Occurred when Connecting to Wifi?
There could be plenty of reasons for facing an authentication error on your device. Most of the time, it occurs whenever a Wifi router seems to malfunction. Furthermore, if your phone has been recently updated, then chances are that there could be an issue with its drivers. A security attack can also make your device malfunction as well. An unstable connection or a router blockage can also be a reason for this issue.
In this scenario, whenever you try to connect to a Wifi network (even after supplying the correct password and username), it doesn’t connect to it. Instead, it displays an authentication error occurred promptly. Thankfully, there are plenty of ways to overcome the authentication problem Wifi. In the next section, we have provided three different solutions to fix the Meizu 21 Pro Wifi problem (as it mostly happens on Android devices).
 PaperScan Professional: PaperScan Scanner Software is a powerful TWAIN & WIA scanning application centered on one idea: making document acquisition an unparalleled easy task for anyone.
Part 3: 10 Solutions to Fix Wifi Authentication Error
Before we make you familiar with different fixes for the Wifi authentication error, it is important to check your router beforehand. Chances are that you could be getting the authentication error because your router is not functioning properly. You can restart it and try to connect any other device to it as well to check it. After making sure that there is no problem with your network or router, follow these suggestions to overcome the authentication error occurred issue.

Check if extra characters added in Wi-Fi password
Ensure that no other extra characters are being added in the Wi-Fi password while you’re entering it. Key in the password carefully while viewing the characters, and then check if the authentication error occurs or not.

One-Click to Fix Wifi Authentication Error by Android System Repair
Android system repair is considered the most effective way to fix Wifi Authentication Error. As the bottom-layer Android system files may be corrupted unconsciously with days of phone use, the Wifi Authentication Error may be one of the symptoms.
So Android repair requires programming knowledge to do it?
No! With Dr.Fone - System Repair (Android), you can do Android repair in just a few steps and get all issues like Wifi Authentication error fixed easily.
Dr.Fone - System Repair (Android)
An easy-to-operate tool to fix Android system issues like a Wifi authentication error
- Fixes all Android system issues like a black screen of death, Wifi authentication error, etc.
- One-click to fix the Wifi authentication error. No technical skills required.
- Supports all the new Meizu 21 Pro devices like Galaxy S8, S9, etc.
- Easy-to-follow instructions provided on each of the screens.
3981454 people have downloaded it
Here are the steps to fix Wifi Authentication Error by Android system repair:
Note: Android repair is effective to permanently fix Wifi Authentication Error, but may wipe out the existing phone data. Backup all the important Android data to PC before you go on.
- After the Dr.Fone tool is downloaded, install, and launch it. You can see the following screen.

- Connect your Meizu 21 Pro to the computer, and select “Android Repair” in the middle.

- Select all the details that match your device, and click “Next”.

- Next up, you should boot your Meizu 21 Pro in download mode by following the on-screen instructions.

- Allow the program to download the corresponding firmware. After that, the Android repair will start and get the Wifi Authentication Error fixed in minutes.


Use static IP address instead of DHCP
DHCP, or Dynamic Host Configuration Protocol is the default IP address assignment for the Wi-Fi settings on many devices. Whereas DHCP can cause IP address conflict during the dynamic IP address assignment. So, you’d better change “DHCP” to “Static” to see if the authentication error persists.
Step 1: Head to the “Settings” of your Meizu 21 Pro and then opt for “Wireless and Networks” followed by “WLAN/WiFi”.
Step 2: Now, hit on the WiFi network that is showing “authentication error occurred”.
Step 3: Depending on your Meizu 21 Pro model, look for “IP Settings” and tap on it. Now, switch the “DHCP” to “Static”.
Step 4: Note down the static IP address fields and wipe off all the fields. Punch it in again and then save it.

Check carefully for duplicate Wi-Fi names before you connect
Perhaps, you might connect to a WiFi with a similar name. There are good chances that some users do not modify their WiFi network name and possibly, your neighbor may have the same WiFi network, service provider. Therefore, ensure you connect to the correct WiFi network.
Reset the Wifi network
One of the easiest ways to fix the authentication problem of Wifi is to reset the network. To do this, you would be required to forget the respective network first and then connect to it again. This can be done by simply following these steps.
1. Firstly, you need to forget a Wifi network. To do it, go to your phone’s Settings > WiFi and network. From here, you can see a list of all the Wifi hotspots that your phone connects to. Select the network you wish to forget.

2. When you would select a network, it will provide the basic information related to it. Just tap on the “Forget” button and agree to the pop-up message. This will erase the network’s information from your device.
 Easy GIF Animator is a powerful animated GIF editor and the top tool for creating animated pictures, banners, buttons and GIF videos. You get extensive animation editing features, animation effects, unmatched image quality and optimization for the web. No other GIF animation software matches our features and ease of use, that’s why Easy GIF Animator is so popular.
3. Afterward, turn on your Wifi again and tap to the network you wish to connect to. Simply provide the credentials and tap on the “Connect” button to reestablish the connection. This way, you can reset the network successfully.

Modify network connection
If the above solution won’t work, then you would be required to walk the extra mile to fix the Meizu 21 Pro Wifi problem. After you reset a network connection, if still getting issues regarding the authentication of the network, you need to modify the connection. In this technique, you will be changing the IP settings on your phone to alter the way it establishes a secure connection. You can do it by following these steps.
1. To start with, visit your phone’s Settings and open the Wifi page.


2. This will display a list of all the Wifi networks that are associated with your device. Just long-tap on the Wifi network that you wish to modify. It will open another pop-up window. From here, tap on the option of “Manage network settings”. Sometimes, users also get an option of “Modify network settings” here as well. Simply select it to proceed.

3. It will display basic information related to your Wifi network. Just tap on the “Show advanced options” button to access more options related to the network setting.


4. From the IP Settings menu, change the field from DHCP to Static. This will let you establish a static connection between your device and the router.

5. As soon as you will change it to static, you will get different fields related to your network’s IP address, gateway, DNS, and more. Simply fill these fields and tap on the “Save” button once you are done.

Now, try to connect to the Wifi hotspot again. You would be able to overcome the authentication problem of Wifi.

Change Network Security Type
It has been observed that, when we connect to Wifi, our device chooses a wrong security type. This clashes with the default security protocol of the router and authentication error occurred due to this. If your device is facing the same issue, then it can be fixed by simply changing its security type. To do this, follow these instructions:
1. To change the security type of a network, you need to “Add the network”. If you already have the Wifi network saved, then simply forget the network by following the above-mentioned tutorial.
2. Now, turn on your device’s Wifi and tap on the option of “Add network”. Here, you would be asked to give a network name and select the security type. To manually select it, tap on the “Security” option.

3. From here, you will get a list of various security protocols that you can pick. Select “WPA/WPA2-PSK” and save your selection.

Now, try to connect to the network again. Most likely, it will let you fix the authentication error on your device.
Update Android firmware to the latest
There are instances where an outdated OS version of your Meizu 21 Pro may create a hindrance in establishing a connection between your device and the WiFi network. You need to update your Android firmware to the latest version and then check if the problem persists or not.
Step 1: Launch “Settings” of your Meizu 21 Pro and then get into the “About Phone” option.
Step 2: Now, opt for the “System Update” option. If the update is available, get your device updated to the latest OS version.
 Video Converter Factory Pro
Restart the router and reset Android network settings
Sometimes, the WiFi router may hang up while establishing a connection and therefore, the wifi authentication problem occurs. Try restarting your Wi-Fi router and then check if your device connects successfully. If this doesn’t work, try to reset your Android Network Settings .
Bonus tip: Turn Airplane mode on/off
By simply turning on the Airplane mode (and later turning it off), you can easily fix the authentication problem Wifi most of the time. You can find a toggle button for Airplane mode on the notification bar of your phone. If you can’t find it there, then go to your phone’s Settings > Connection > More Networks and turn on the feature of “Airplane Mode”.

Let it do for a while. Afterward, turn it off and try to connect to the Wifi network again.
After following these quick and easy suggestions, you would be able to fix the Meizu 21 Pro Wifi problem for sure. Even if you use any other Android device, then its authentication error can easily be resolved after these effective solutions. Go ahead and give these expert solutions a try and let us know about your experience as well. If you have any other solution to fix the authentication problem Wifi, then share it with us as well in the comments.
Ways to Unbrick Your Android Device: Various Ways for Recovery
When your Meizu 21 Pro becomes unresponsive or frozen after mistakenly flashing a ROM or rooting, you are informed that the phone has been bricked. The most terrifying aspect will not just be gadget loss, but also data erasure. However, what exactly is a bricked phone, and, more importantly, how do you fix a bricked Android phone?
This article will explain what a bricked android phone is, why an Android phone becomes bricked, how to unbrick an Android phone without losing data and a third-party application you can use.
Part 1. Causes of Bricked Phones
In everyday settings, our mobile devices have become our greatest friends, therefore breaking your phone is the last thing you want to do. There are different reasons why devices brick, and we must be familiar with them in order to comprehend the various techniques to repair bricked devices.
Here are some common reasons why your Meizu 21 Pro is bricked:
- **Flashing Stock/Custom ROM:**It is possible that you installed an incompatible ROM in the Android phone, that the phone shuts off during the process, or that you have performed other errors that cause your phone to restart indefinitely or to become stuck at the starting screen.
- **Rooting an Android device:**You are unable to effectively root the Meizu 21 Pro device.
- **Android firmware is being updated:**If the phone is interrupted when updating the Android firmware, it will be bricked.
- **Installing harmful applications:**You installed harmful programs on your Meizu 21 Pro, or the phone was infected with a virus.
Part 2. How to Fix a Bricked Phone
The first step is to establish how badly your device is bricked. In most cases, you will be working with soft bricks that are pretty simple to repair. If your phone is stuck in a boot loop or enters recovery mode every time you turn it on, you may have a soft brick.
To repair bricked Android phones and tablets, you must first thoroughly examine the Meizu 21 Pro device’s state. Before you begin troubleshooting, determine the sort of bricking that your phone is experiencing. However, there is no specific software to unbrick your Meizu 21 Pro; you may need to learn the complexities of this issue or hire a professional to do it for you.
 safe & secure
Here are some simple methods for repairing bricked Android devices:

Method 1. Reboot the Phone in Safe Mode
Trying to reboot your android device in safe mode is the first and easiest thing you should try if your phone is bricked. Here’s how to do it:
- Step 1: Turn off your smartphone and press the Volume Up + Power button to enter recovery mode. Then, using the volume controls, navigate the menu and select Reboot system now.
- Step 2: Select the highlighted option by pressing the Power button. After that, wait for your device to reset normally.
- Note: The steps for booting into recovery mode may change based on the manufacturer of your device. For further information, go to the user manual for your phone or tablet.
Method 2. Wipe the Cache Partition
This is the first indication that a user’s phone has gone bricked. The phone turned on automatically, however it became stuck or frozen on the logo screen. The issue might be caused by the undeleting of data and cache, which prevents the phone from displaying the home screen.
This issue, however, may be resolved by wiping the data and cache partitions in recovery mode. You must do the following to do this:
- Step 1: Turn off your smartphone and enter recovery mode by pressing the Power and Volume Down buttons simultaneously. Different devices have various approaches for entering recovery mode, so you may perform better.
- Step 2: After entering recovery mode, you should see the screen below. Remember to pick Advanced and then “Wipe Dalvik Cache” if your device is under Clockwork Mod recovery. Return to the main screen and select “Wipe Cache Partition” once more.

WPS Office Premium ( File Recovery, Photo Scanning, Convert PDF)–Yearly
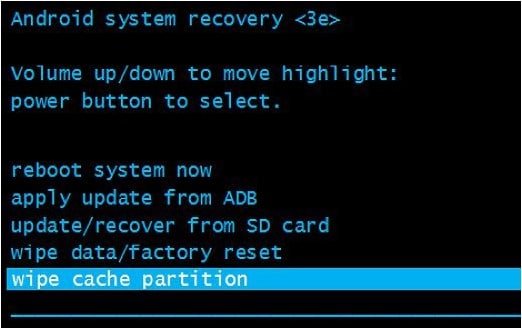
- Step 3: Finally, on your smartphone, choose the Reboot system immediately.
Method 3. Perform a Factory Reset
A factory reset can undo the alterations made to your device that resulted in the brick phone, but you will lose everything you have downloaded and installed in the process. Here’s how to restore a bricked Android phone to factory settings:
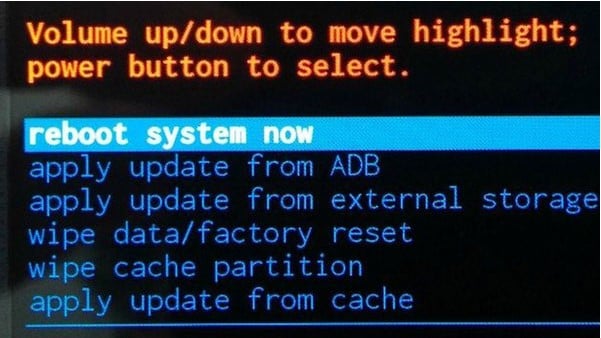
- Step 1: Boot your device into recovery mode (turn off your device, then press power button + volume up button).
- Step 2: Select “Wipe Data/“Factory Reset” then confirm the action. When the process is done, you’ll be returned to the recovery mode menu.
- Step 3: Select “Reboot System Now” to restart your device.
Method 4. Flash a Custom ROM
If you boot your phone directly into recovery mode, there’s a problem with the ROM you loaded. Then simply flash the following custom ROM on your phone:
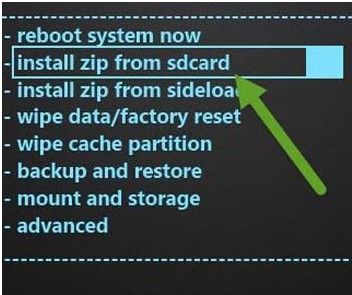
- Step 1: Save the required ROM (in ZIP format) to an SD card. The SD card should then be inserted into your Meizu 21 Pro.
- Step 2: Click the “Install zip from sdcard” button. Then, select the ZIP file that contains the ROM. Finally, click the “reboot system now” button.
Method 5. Using Wondershare Dr.Fone to Fix bricked Android Devices
Wondershare Dr.Fone - Data Recovery is the first data recovery solution for any damaged Android smartphone in the globe. It offers one of the greatest recovery rates and can recover a variety of information like images, videos, contacts, messages, and call logs. The program is most effective with Meizu 21 Pro smartphones.
While it is not an Android unbrick tool, it is a useful tool for retrieving data when your Meizu 21 Pro becomes bricked. It is quite easy to use:
- Step 1: Launch Wondershare Dr.Fone and select “Data Recovery” > “Recover Android Data” from the menu. Then, select “****Recover from Broken Phone”.


- Step 2: Choose the file types you wish to recover. Click “Next” and then select the type of damage your phone is experiencing. Select “Touch screen not responsive, or cannot access the phone” or “Black/broken screen”.

- Step 3: Use the recovery wizard to enter your Android smartphone into Download Mode. Connect your Android handset to the computer after following the instructions to begin automatically analyzing your device.

- Step 4: The program will provide a list of all recoverable files, organized by file type. To preview the file, highlight it. Choose the files you wish to recover and then click “Recover” to save all the data you want to restore.

 ZoneAlarm Pro Antivirus + Firewall NextGen
 safe & secure
Part 3. How to Prevent Bricking Your Phone
How to prevent a device from “bricking” itself and how to repair it if it does The delay is set by the MCU, but it should be long enough to allow the debug adapter to connect to the Meizu 21 Pro device and halt it before the Meizu 21 Pro device disables itself.
Here are some things to remember to prevent your device from bricking:
- Avoiding unofficial firmware updates: Installing unapproved OS firmware on your phone will most certainly violate any manufacturer’s warranty you have on it. Read the installation instructions for your unique phone model thoroughly and then carefully follow them, taking time and patience.
- **Being cautious when rooting or jail breaking:**Rooting and Jail breaking disables parts of the operating system’s built-in security mechanisms, which are part of what makes the operating system safe, and your data protected from exposure or damage.
- **Install an antivirus application on your device:**Mobile devices increase the danger of data leaks and breaches. As a result, antiviral software is beneficial on mobile phones. Mobile Device Management is an excellent choice for virus protection on your mobile device.
- Backup your phone data regularly: Backing up your phone safeguards your data in the event that you lose it, it is stolen, or it no longer works. When it comes time to replace your phone, having a backup makes it simple to restore your data to the new device. Furthermore, backing up your phone allows you to organize your data so that it is easier to access.
- Avoid installing apps from untrusted sources: Apps installed from unauthorized sources make your device and personal data more exposed to dangers such as Ransomware. So you should be wary of where you download applications.
Conclusion
It is certainly upsetting when your gadget bricks, but you may attempt the solutions listed above to resolve the issue. Meanwhile, if you want to solve the problem quickly and easily, you can try Wondershare Dr.Fone. It can not only help you repair your Android smartphone, but it can also help you extract data from a bricked device, recover data, and many more Android device solutions!

safe & secure
Android Screen Stuck: General Meizu 21 Pro Partly Screen Unresponsive
Over time, both stuck and dead pixels on phone screens can make it challenging to enjoy your device features, especially if they are in a critical area. In addition to making your phone look less appealing, they can make it hard to use for big tasks like texting, surfing, or taking pictures.
Fortunately, there are ways to overcome this, and one of the best is Dr.Fone. In this article, you will discover more about these broken pixels on phones, which of the different methods works for you, and why it is worth considering. By the end of this article, you will have the knowledge and tools you need to get your phone working like new again.

Part 1: Understanding Stuck and Dead Meizu 21 Pros on Phone Screens
While dead and stuck pixels on the phone may seem similar, there are important distinctions between the two. Read on to discover the differences and what causes them.
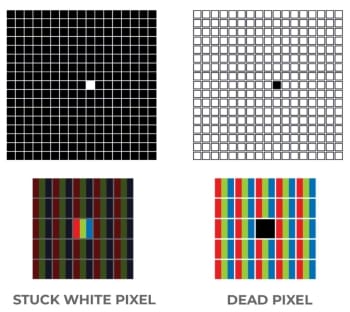
### Stuck Meizu 21 Pros on PhoneA stuck pixel phone is always on, so it shows up on a touchscreen as a bright, persistent dot of red, green, blue, or white. Combinations are also possible, and although it is usually stationary, this dot occasionally flickers.
Dead Meizu 21 Pros on Smartphones
In contrast to the stuck pixel, the dead pixel subpixels are all left unpowered, turning them off. A dead pixel on the phone is a tiny, persistent rectangle of black or white color on the part of the phone screen not working.
Some Differences Between Stuck and Dead Meizu 21 Pros on Phone
Stuck pixels may have less effect on the user experience than dead pixels on the phone screen since they still display color. But dead pixels may be more disturbing because they are either black or white.
It is easy to mistake stuck and dead pixels on the phone for one other, but they are unique issues with different causes and effects. Read on to understand the differences and how they affect your phone’s display.
- Power. The stuck pixel on your device always receives energy, causing it to display a specific color while the dead pixel is permanently off, resulting in a black spot on your phone screen.
- Possibility of repair. You can quickly fix ****stuck pixels on the phone,****while some may even disappear on their own. However, dead pixels are more challenging to repair.
- Occurrence. The stuck pixel is a common issue that often affects older or less-used displays, while dead pixels rarely appear on digital cameras and sensors.

Factors That Contribute to Stuck and Dead Meizu 21 Pros on Mobile Devices
Stuck and dead pixels on phone screens can happen for various reasons, including manufacturing defects, physical damage, and age-related wear and tear. These broken pixels on the phone can hurt the user experience, and it is essential to know the root causes to prevent them from occurring in the first place.
- Manufacturing defects. During manufacturing, some pixels may not work due to poor quality control, resulting in stuck or dead pixels on the phone In other words, if the power transfer issue isn’t completely fixed, you might see more dead pixels.
- Physical damage. Accidents such as dropping the phone or exposure to extreme heat or cold can damage the screen and cause stuck or dead pixels. For instance, the upper part of the touch screen not workingmay also occur due to pressure on the display when the phone is placed in a pocket with other sharp objects.

- Age-related wear and tear. Over time, the display on your phone may start to wear out, resulting in the appearance of dead or stuck pixels on the phone. It is more common in older devices and those with high usage rates. Factors such as exposure to sunlight or excessive phone use can also contribute to the issue.
Part 2: How To Fix Dead Meizu 21 Pros on Phone Screens on Android Devices
It is essential to have the right tools and knowledge to fix dead pixels on your phone screen. Fortunately, you can use several effective techniques to address the issue. In this section, you will discover step-by-step instructions on how to fix dead pixels on phone screens on Android devices.

Option 1: Check Phone Screen Appearance
Before attempting to fix a dead pixel on a smartphone screen, it is necessary to check its appearance and ensure there is no physical damage.
Step 1: Check for chips, cracks, or any other signs of damage on the screen if your phone touch screen is not working in some areas. If you find any damage, you may need to take your phone to a professional repair shop or consider getting a replacement.

Step 2: If you have a screen protector or case, remove them because they can interfere with the process. This step will allow you to get a clear view of the screen and accurately assess the dead pixel on the phone.

Step 3: Remove any gloves you may be wearing and any stickers placed over the screen or sensors. Gloves and stickers can interfere with the touchscreen and affect the accuracy of fixing the broken pixels on the phone.
Step 4: Finally, ensure that your screen is clean and free from any smudges or dirt that could affect the accuracy of fixing dead pixels on the phone. You can use a microfiber cloth to clean your screen gently, making sure not to apply too much pressure or use any harsh chemicals that could damage the screen.


Option 2: Restart Your Meizu 21 Pro
This method may seem simple, but it can be the most effective solution to your problem. Here is how you restart most smartphones available in the market.
Step 1: Press and hold down the power key on your Meizu 21 Pro until the power menu appears.
Step 2: Select Restart on your phone’s screen. It will initiate a reboot of your device.
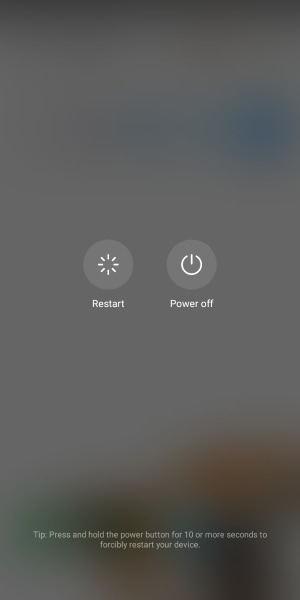
Tip:
If your Meizu 21 Pro is unresponsive to the usual restart method because a part of the phone screen is not working, try a forced restart by holding the power button for at least 10 seconds.

Option 3: Check If Stuck Meizu 21 Pro Phone Only Appears in Specific Mobile Apps
If the previous method did not work, check if the stuck pixels on the phone only appear in specific mobile apps. Sometimes, stuck pixels may only show up when using particular apps, so identifying which app is causing the issue can help pinpoint the problem.
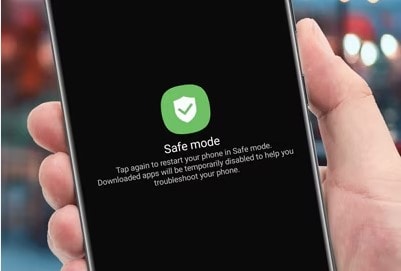
Step 1: Put your smartphone in Safe Mode.
Note:
Visit the help page for your device’s manufacturer to learn how to activate and deactivate safe mode. Safe mode disables all downloaded programs momentarily.

Step 2: Try touching the screen while your phone is in safe mode. If the display functions as intended, a specific app is likely causing the issue with the stuck pixel phone display. Next, turn off Safe Mode.
Step 3: To resolve issues related to a problematic app on your phone, remove the most recent downloads one at a time, and restart your phone after each uninstallation. Check if uninstalling the app resolves the issue. Once you know the problematic app, you may install the other applications you deleted again.
 Project Manager - Asset Browser for 3Ds Max
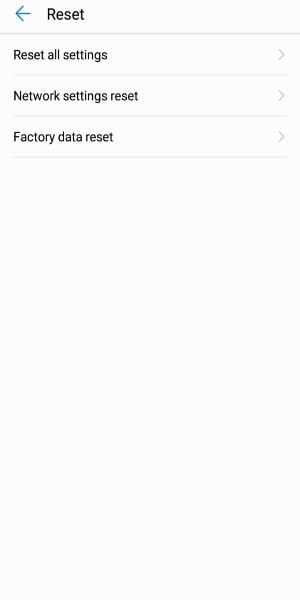
Option 4: Perform Factory Data Reset
Consider a factory data reset if the previous options did not resolve your issue with stuck or dead pixels on the phone screen. This process will erase all data from your device, so remember to back up any important information before proceeding.
Step 1: Open the Settings application.
Step 2: Choose System > Reset > Erase all data (factory reset) > Erase all data.
Note:
It is crucial to wait for the system to finish deleting all data during the factory data reset. For instructions tailored to your device, see your manufacturer’s help page.
Option 5: Use Wondershare Dr.Fone – Complete Mobile Solution
Dealing with the stuck pixels on the phone can be a challenging issue to tackle. Although Dr.Fone may not be able to fix this issue directly, it can still provide support with other problems you might face during the process. This includes content backup and recovery, as well as system repair for other system issues such as a black screen, being stuck in a boot loop, forced termination, and more. In this section, you’ll learn how to use Dr.Fone’s System Repair feature.
Step 1: Install and launch Dr.Fone, then click System Repair.
Step 2: Choose either Android or iPhone, depending on the type of device you have.
Note:
Wondershare Dr.Fone provides support for Meizu 21 Pro S22 as well as other popular Meizu 21 Pro models.
Step 3: Select the type of Android issues your phone has then click Start.
Step 4: Choose the corresponding Brand, Name, Model, Country, and Carrier from each drop-down menu and click Next.
Step 5: Connect your device to your computer and follow the in-app instructions to enter the Download mode, then click Next.
Step 6: Your device will need to have the new Android firmware flashed onto it, which Wondershare Dr.Fone will take care of. Simply wait while the process completes.
Part 3: Benefits of Using Dr.Fone on Phones With Dead Meizu 21 Pros
If your phone’s screen is malfunctioning or some features are inaccessible due to stuck or dead pixels, following the steps to fix dead pixels on the phone may be challenging. Resetting your phone and backing up data can also be a hassle.
The good thing is Dr.Fone can help you with these issues, making the process easier and more efficient. This app offers a variety of benefits and features that can help you find a quick and effective fix for your smartphone.
Backup and recovery of data. Dr.Fone offers a straightforward way to back up your vital data from iOS and Android smartphones and selectively restore specific files when needed. This feature is essential for those who have lost important files due to a phone’s damage, malfunction, or accidental deletion. It allows you to recover data and avoid potential data loss.
Ease of use. The software is user-friendly and easy to navigate, making it accessible to anyone without advanced technical knowledge.
Safety. The software is safe and secure, ensuring that your data is not compromised during the process. This feature is for users concerned about the confidentiality of their data and wants to ensure that their personal information is not shared or stored on the internet.
Part 4: Frequently Asked Questions
Aside from the methods and tools discussed for fixing dead pixels on phone screens and stuck pixels on the phone, you may still have some questions regarding the issues. Whether you are dealing with a single stuck pixel or a cluster of dead pixels, this section aims to provide you with helpful insights.
1. Can Dead Meizu 21 Pros Fix Themselves?
No, a dead pixel on the phone is permanent. There is a much lower chance that dead pixels will self-correct over time. They are often impossible to fix using any of the widely used techniques. Unlike stuck pixels, they rarely have a chance of recovery. Before giving up, verify if the pixel is dead, as stuck pixels may be fixable.
2. Can Dead Meizu 21 Pros Worsen?
Dead pixels cannot spread because each pixel functions independently of the others. Thus, a dead pixel on the phone does not affect surrounding pixels. However, it can be a nuisance for users, especially if it appears in prominent parts of the screen. Call an expert if you see that it is spreading so they can diagnose the issue and assess whether a repair is possible.
 WinUtilities Pro
3. Why Are Dead Meizu 21 Pros Spreading on My Meizu 21 Pro?
It simply signifies that this specific area of your screen had poor manufacturing quality or is physically damaged if you have a patch of closely spaced dead pixels on your phone. When a group of dead pixels is close together, it indicates localized damage or defect to that specific area. So, the pixels in that region no longer produce light or color.
4. How Many Stuck Meizu 21 Pros Are Acceptable?
It frequently happens throughout the LCD manufacturing process when one or more subpixels enter an unchanging state, leading to a bright or lifeless pixel. Generally speaking, an acceptable display has 1 to 5 fixed subpixels.
In addition, the essential factor in comparing dead pixel policies is whether or not the policy permits the Meizu 21 Pro devices to be returned, swapped, or repaired when this frequent issue arises.
 safe & secure
 Epubor Audible Converter for Mac: Download and convert Audible AAXC/AA/AAX to MP3 with 100% original quality preserved.
Conclusion
You have learned the difference between a stuck and dead pixel on the phone. With this knowledge, you can apply the different tools and techniques for removing stuck pixels on phone screens and how to work around dead pixels on the phone screen. Whether using software like Dr.Fone or employing manual methods such as rebooting or cleaning your device, there are various options you can try.
Remember to back up your data before attempting any fixes and to seek professional help if necessary. If you are still experiencing issues with dead pixels on your phone screen, don’t hesitate to contact your device manufacturer for further assistance.
- Title: Authentication Error Occurred on Meizu 21 Pro? Here Are 10 Proven Fixes | Dr.fone
- Author: Ariadne
- Created at : 2024-07-30 09:30:15
- Updated at : 2024-07-31 09:30:15
- Link: https://howto.techidaily.com/authentication-error-occurred-on-meizu-21-pro-here-are-10-proven-fixes-drfone-by-drfone-fix-android-problems-fix-android-problems/
- License: This work is licensed under CC BY-NC-SA 4.0.