
Authentication Error Occurred on Realme C53? Here Are 10 Proven Fixes | Dr.fone
Authentication Error Occurred on Realme C53? Here Are 10 Proven Fixes
There are times when users get an authentication error while they connect to a Wifi network. The problem is mostly found in Android whenever a device tries to establish a connection to Wifi. If your device is also experiencing an authentication problem Wifi, then don’t worry. It can easily be resolved. In this post, we will make you familiar with the root cause for the Realme C53 Wifi problem and how you can resolve whenever authentication error occurred on your device.
 Power Tools add-on for Google Sheets, Lifetime subscription
Part 1: Any idea about the Wi-Fi authentication problem?
Wi-Fi authentication has to be done every time you wish to connect to a Wi-Fi network over your smartphone or laptop. To authenticate yourself and connect to the protected Wi-Fi network, you need to have the password of it. But if after you’re putting in the correct password and still experiencing the wifi authentication problem. Here’s what you need to know.
Authentication error occurs when the “deal” between the Wi-Fi router and device fails due to certain reasons. First, the Realme C53 device sends the password of the network and the “connect” request in an encrypted format to the Wi-Fi router. Then, the router decrypts the password and compares the password saved on it. Now, if the password matches, it sends affirmation for the “connect” request, and then the Realme C53 device is allowed to connect to the network.

Part 2: Why Authentication Error Occurred when Connecting to Wifi?
There could be plenty of reasons for facing an authentication error on your device. Most of the time, it occurs whenever a Wifi router seems to malfunction. Furthermore, if your phone has been recently updated, then chances are that there could be an issue with its drivers. A security attack can also make your device malfunction as well. An unstable connection or a router blockage can also be a reason for this issue.
In this scenario, whenever you try to connect to a Wifi network (even after supplying the correct password and username), it doesn’t connect to it. Instead, it displays an authentication error occurred promptly. Thankfully, there are plenty of ways to overcome the authentication problem Wifi. In the next section, we have provided three different solutions to fix the Realme C53 Wifi problem (as it mostly happens on Android devices).
Part 3: 10 Solutions to Fix Wifi Authentication Error
Before we make you familiar with different fixes for the Wifi authentication error, it is important to check your router beforehand. Chances are that you could be getting the authentication error because your router is not functioning properly. You can restart it and try to connect any other device to it as well to check it. After making sure that there is no problem with your network or router, follow these suggestions to overcome the authentication error occurred issue.

Check if extra characters added in Wi-Fi password
Ensure that no other extra characters are being added in the Wi-Fi password while you’re entering it. Key in the password carefully while viewing the characters, and then check if the authentication error occurs or not.
One-Click to Fix Wifi Authentication Error by Android System Repair
Android system repair is considered the most effective way to fix Wifi Authentication Error. As the bottom-layer Android system files may be corrupted unconsciously with days of phone use, the Wifi Authentication Error may be one of the symptoms.
So Android repair requires programming knowledge to do it?
No! With Dr.Fone - System Repair (Android), you can do Android repair in just a few steps and get all issues like Wifi Authentication error fixed easily.

Dr.Fone - System Repair (Android)
An easy-to-operate tool to fix Android system issues like a Wifi authentication error
- Fixes all Android system issues like a black screen of death, Wifi authentication error, etc.
- One-click to fix the Wifi authentication error. No technical skills required.
- Supports all the new Realme C53 devices like Galaxy S8, S9, etc.
- Easy-to-follow instructions provided on each of the screens.
3981454 people have downloaded it
Here are the steps to fix Wifi Authentication Error by Android system repair:
Note: Android repair is effective to permanently fix Wifi Authentication Error, but may wipe out the existing phone data. Backup all the important Android data to PC before you go on.
- After the Dr.Fone tool is downloaded, install, and launch it. You can see the following screen.

- Connect your Realme C53 to the computer, and select “Android Repair” in the middle.
 PCDJ DEX 3 for Windows & MAC is the total entertainment DJ software solution, offering audio, video, and karaoke mixing ability. Automatic beat-sync, smart looping, 4 decks, DJ MIDI controller support, Karaoke Streaming and much more.
- Select all the details that match your device, and click “Next”.


- Next up, you should boot your Realme C53 in download mode by following the on-screen instructions.

- Allow the program to download the corresponding firmware. After that, the Android repair will start and get the Wifi Authentication Error fixed in minutes.

 HD Video Converter Factory Pro
Use static IP address instead of DHCP
DHCP, or Dynamic Host Configuration Protocol is the default IP address assignment for the Wi-Fi settings on many devices. Whereas DHCP can cause IP address conflict during the dynamic IP address assignment. So, you’d better change “DHCP” to “Static” to see if the authentication error persists.
Step 1: Head to the “Settings” of your Realme C53 and then opt for “Wireless and Networks” followed by “WLAN/WiFi”.
Step 2: Now, hit on the WiFi network that is showing “authentication error occurred”.
Step 3: Depending on your Realme C53 model, look for “IP Settings” and tap on it. Now, switch the “DHCP” to “Static”.
Step 4: Note down the static IP address fields and wipe off all the fields. Punch it in again and then save it.

Check carefully for duplicate Wi-Fi names before you connect
Perhaps, you might connect to a WiFi with a similar name. There are good chances that some users do not modify their WiFi network name and possibly, your neighbor may have the same WiFi network, service provider. Therefore, ensure you connect to the correct WiFi network.
Reset the Wifi network
One of the easiest ways to fix the authentication problem of Wifi is to reset the network. To do this, you would be required to forget the respective network first and then connect to it again. This can be done by simply following these steps.
1. Firstly, you need to forget a Wifi network. To do it, go to your phone’s Settings > WiFi and network. From here, you can see a list of all the Wifi hotspots that your phone connects to. Select the network you wish to forget.

2. When you would select a network, it will provide the basic information related to it. Just tap on the “Forget” button and agree to the pop-up message. This will erase the network’s information from your device.

3. Afterward, turn on your Wifi again and tap to the network you wish to connect to. Simply provide the credentials and tap on the “Connect” button to reestablish the connection. This way, you can reset the network successfully.

 /a>
/a>Modify network connection
If the above solution won’t work, then you would be required to walk the extra mile to fix the Realme C53 Wifi problem. After you reset a network connection, if still getting issues regarding the authentication of the network, you need to modify the connection. In this technique, you will be changing the IP settings on your phone to alter the way it establishes a secure connection. You can do it by following these steps.
1. To start with, visit your phone’s Settings and open the Wifi page.

2. This will display a list of all the Wifi networks that are associated with your device. Just long-tap on the Wifi network that you wish to modify. It will open another pop-up window. From here, tap on the option of “Manage network settings”. Sometimes, users also get an option of “Modify network settings” here as well. Simply select it to proceed.

3. It will display basic information related to your Wifi network. Just tap on the “Show advanced options” button to access more options related to the network setting.

4. From the IP Settings menu, change the field from DHCP to Static. This will let you establish a static connection between your device and the router.

5. As soon as you will change it to static, you will get different fields related to your network’s IP address, gateway, DNS, and more. Simply fill these fields and tap on the “Save” button once you are done.


Now, try to connect to the Wifi hotspot again. You would be able to overcome the authentication problem of Wifi.

Change Network Security Type
It has been observed that, when we connect to Wifi, our device chooses a wrong security type. This clashes with the default security protocol of the router and authentication error occurred due to this. If your device is facing the same issue, then it can be fixed by simply changing its security type. To do this, follow these instructions:
1. To change the security type of a network, you need to “Add the network”. If you already have the Wifi network saved, then simply forget the network by following the above-mentioned tutorial.
2. Now, turn on your device’s Wifi and tap on the option of “Add network”. Here, you would be asked to give a network name and select the security type. To manually select it, tap on the “Security” option.

3. From here, you will get a list of various security protocols that you can pick. Select “WPA/WPA2-PSK” and save your selection.

Now, try to connect to the network again. Most likely, it will let you fix the authentication error on your device.
Update Android firmware to the latest
There are instances where an outdated OS version of your Realme C53 may create a hindrance in establishing a connection between your device and the WiFi network. You need to update your Android firmware to the latest version and then check if the problem persists or not.
Step 1: Launch “Settings” of your Realme C53 and then get into the “About Phone” option.
Step 2: Now, opt for the “System Update” option. If the update is available, get your device updated to the latest OS version.
Restart the router and reset Android network settings
Sometimes, the WiFi router may hang up while establishing a connection and therefore, the wifi authentication problem occurs. Try restarting your Wi-Fi router and then check if your device connects successfully. If this doesn’t work, try to reset your Android Network Settings .

Bonus tip: Turn Airplane mode on/off
By simply turning on the Airplane mode (and later turning it off), you can easily fix the authentication problem Wifi most of the time. You can find a toggle button for Airplane mode on the notification bar of your phone. If you can’t find it there, then go to your phone’s Settings > Connection > More Networks and turn on the feature of “Airplane Mode”.

Let it do for a while. Afterward, turn it off and try to connect to the Wifi network again.
After following these quick and easy suggestions, you would be able to fix the Realme C53 Wifi problem for sure. Even if you use any other Android device, then its authentication error can easily be resolved after these effective solutions. Go ahead and give these expert solutions a try and let us know about your experience as well. If you have any other solution to fix the authentication problem Wifi, then share it with us as well in the comments.
Realme C53 Stuck on Screen – Finding Solutions For Stuck on Boot
The market has embraced Realme C53 for being the pioneers in the industry. Although the company lacked in providing explicit smartphones, they were still able to catch up with the race. Realme C53 C31, known to provide durability of the next level, is taking up the latest shelves of Realme C53 smartphones. Although the company promises reliability, there are several problems involving such smartphones.
One prominent solution stated by Realme C53 users involves the screen stuck in the boot. If your Realme C53 is stuck on the “Realme C53” screen for no particular reason, you will have to read this article. As this article tackles all reasons involving the problem, it comes up with the necessary solutions. These solutions will help Realme C53 users find solutions for their stuck screens on the boot.
Part 1: What Causes Realme C53 Screen Stuck on Boot?
Has your Realme C53 recently been stuck on the boot loop screen? If it is happening or has happened to you, there are some reasons that you need to be aware of. Having an overview of the causes of Realme C53 being stuck on the Android One screen can help you redirect yourself toward to right solution. Go through the list of all causes and find more about the issue involving screens stuck on boot in Realme C53 smartphones:
- The Device is Damped in Liquid
It is entirely possible that your Realme C53 smartphone is immersed in water. With a smartphone dipped in liquid, the Realme C53 device can turn useless. If you have tried starting it again, it won’t run and might get stuck on the boot.
- Soft-Bricked Device
There are multiple conditions where your Realme C53 smartphone can get soft-bricked. It majorly happens when a particular function in the Realme C53 device stops working. To counter the problem, it is essential that you can get your device stuck on the boot screen.
- Outdated Device
If the equipment wears out after a certain time, there is a need to have it changed. With such obsolete models of Realme C53, you will surely face issues like a screen stuck on the boot. Smartphone equipment cannot be revamped, and you will have to go for newer options.
- Software Update Required
A software update on your Realme C53 smartphone might be causing issues with the screen stuck on the boot. The best way to get rid of this problem is to update your system software to the latest version.
Part 2: 5 Solutions To Solve Realme C53 Screen Stuck on Boot
Do you seek to resolve the problem of the Realme C53 Plus stuck on the Android One screen? There are specific techniques that can be tried as a remedy. These solutions are tried and recommended by experts. Go through the details provided below to solve the issues with your stuck Realme C53 screen.
Solution 1: Force Restart Realme C53
The first and most proclaimed technique to refresh Realme C53 devices under such a problem is to force restart them. If the Realme C53 device is stuck, you will have to perform this process by pressing the “Power” and “Volume Up” keys for 15 seconds. Continue holding the buttons until the Realme C53 device vibrates or restarts by showing the screen again.
 Forex Robotron Basic Package
Solution 2: Leave the Phone For a While To Drain Its Battery
A conventional way to solve the issue of a stuck screen in Realme C53 is to leave the phone in its position. As you let its battery drain out, the phone will turn off, and you can activate the Realme C53 device again by charging it.
Once you restart it this way, all the procedures will initiate again, and the Realme C53 device will be as good as new. Draining the battery has given you the leverage to regain control over the Realme C53 device again.
Solution 3: Check For Updates on Realme C53 Smartphones
Another quick remedy to try on your Realme C53 smartphones involves updating their software. If there is any prevailing software update to install on the smartphone, you will have to check and update it by following the steps guided below:
Step 1: Open the “Settings” of your Realme C53 smartphone and continue to the “System” section in the list of options. You will have to access the “Advanced” options in the “System” menu.

Step 2: As you lead to the advanced options, look for “System update” in the provided options. Look for the “Check for update” button. This will check if your Realme C53 needs any software updates or not.
.png) Kanto Player Professional
Kanto Player Professional
Solution 4: Using Wondershare Dr.Fone
One of the finest options available to perform is using a third-party platform that promises smooth operability. Wondershare Dr.Fone is a platform designed to provide such smartphones another life to survive. Its unique functionality repairs all the issues with a smartphone and makes it as good as a new one.
If your Realme C53 Plus is stuck on the Android One screen, this platform is the ultimate solution for you. With the support of the latest devices and software versions, Dr.Fone – System Repair (Android) offers the best results. To know how to repair your Realme C53 smartphone with the help of this tool, look through the steps featured next:
Step 1: Open Dr.Fone and Select System Repair
As you launch Dr.Fone after downloading it on your computer, continue to the “System Repair” option. You will have to start by connecting the Android device to the computer through a USB cable. Select “Android Repair” from the options available and continue to the following options.
Step 2: Define Device Information and Confirm
You will be directed to the Realme C53 device information screen, where you must define the identification parameters of the Realme C53 device. Select the brand, name, model, country, and carrier details for proper system recovery. On clicking “Next,” you will receive a warning where you will have to type the number “000000” to proceed with the method.
Step 3: Put Your Realme C53 in Download Mode
Following this, you will have to put your Realme C53 in Download Mode. For that, you need to follow the steps according to the condition of the Realme C53 device:
- For Devices with Home Button:
Power off your Android and continue to press and hold the “Volume Down,” “Home,” and “Power” buttons for a few seconds. After holding them for almost 10 seconds, release and press the “Volume Up” button to enter the mode.
- For Devices without Home Button:
Turn off the Android device and hold the “Volume Down,” “Bixby,” and “Power” buttons simultaneously for a few seconds. On releasing the buttons, press the “Volume Up” button to enter Download Mode.
Step 4: Start Downloading and Verify Firmware
To proceed, tap the “Next” button to download the firmware. As you verify the firmware, the repairing process starts on your Realme C53 device.
Solution 5: Contact the Customer Service Center of Realme C53
If the issue of the Realme C53 stuck on the “Realme C53” screen continues, you will have to contact the Realme C53 device’s customer support. With no proper method left for the Realme C53 device, the only effective technique is to visit the authorized store for Realme C53 smartphones and claim the issue with the Realme C53 device. In this way, you might receive or get a fully repaired device with no additional charges if the Realme C53 smartphone is under warranty.
 dotConnect for Oracle is an ADO.NET data provider for Oracle with Entity Framework Support.
Part 3: How to Avoid Realme C53 Screen Stuck on Boot?
What if you come to know that you can avoid the Realme C53 screen stuck-on boot problem? There are a set of tips and tricks that you can follow to explain how to prevent such an issue in the first place. Follow these tips to learn more about saving your Realme C53 from such miserable conditions:
1. Protect from Malware
The first thing to protect your Realme C53 smartphone from getting stuck on the boot is to keep it safe from unauthorized and malicious data. The best thing to keep a device secure is to follow all security protocols and avoid bypassing them. If you try downloading something not authorized by the Play Store itself, for instance, an APK, it can make your device vulnerable to malware.
2. Keep Your Device Updated
If you feel frustrated by issues like Realme C53 being stuck on the Android One screen, the best thing to avoid such a problem is to keep your device updated at all costs. Whenever there is an update on your Realme C53 smartphone, make sure to install it on time and properly. Do not leave updates uninstalled for no reason, as they can hinder the Realme C53 device’s speed and performance.

3. Do Not Fool Around with System Files
Changing or modifying system files can be fatal for smartphones. Thus, to keep your Realme C53 safe, you need to keep your hands away from such important files. Modifying a single file can make your device useless or put you in situations like a Realme C53 smartphone stuck on the boot. For that, the best tip is to keep yourself out of engagement.
4. Use Wondershare Dr.Fone To Manage All Data With Ease
As you have observed, the power of Dr.Fone can be a perfect phone manager for you at all times. While providing system repair services, it can also help you manage your device’s data and other statuses. Thus, consider keeping Dr.Fone close to your device and its operations. In this way, you will be able to have complete control over all types of data present in the Realme C53 smartphone.
 safe & secure
4,675,795 people have downloaded it
Conclusion
With that, this brings the article on Realme C53 smartphones to a conclusion. If you are still facing issues with your Realme C53 stuck on the “Realme C53” screen, this article is the perfect solution for your problem.
With all the provided methods, we do hope that you will be able to restore the status of your Realme C53 smartphone and make it functional. For the finest results, you have also discovered Dr.Fone – System Repair (Android) as the best solution for repairing such devices.
How To Fix Unresponsive Touch Screen on Realme C53
With the increase in our reliance on smartphones, having touchscreen problems on your device can be annoying. Sometimes, it’s even more frustrating than a physically broken screen because you don’t know where the issue is coming from.
If your touchscreen is malfunctioning or doesn’t work correctly, you cannot interact with your device. On this page, you’ll learn general phone touch problems on Android and how to get rid of them. Now explore the article to learn more.

Part 1: Why Is My Android Experiencing Touch Screen Problems
Below are some of the most common reasons you’re experiencing touch problems on your Android smartphone.
- The touchscreen problemfreezes your phone, lags, or hangs.
- Some parts of the screen work fine, but some don’t.
- Your screen responds inaccurately (typing “a” gets you “q” or “z”).
- The touchscreen is automatically operating itself, resulting in ghost touch.
- It doesn’t respond to any taps, and the phone’s screen has stopped working.
- The device is physically damaged, or the screen is cracked or broken.
- Outdated devices are prone to the black/white/blue screen of death.
 Lyric Video Creator Professional Version
Part 2: Tips, Fixes, and Workarounds To Fix Your Realme C53 Touch Problems
If any of the outlined reasons above are the cause of your touch screen malfunctioning, here are some solutions to fix it.
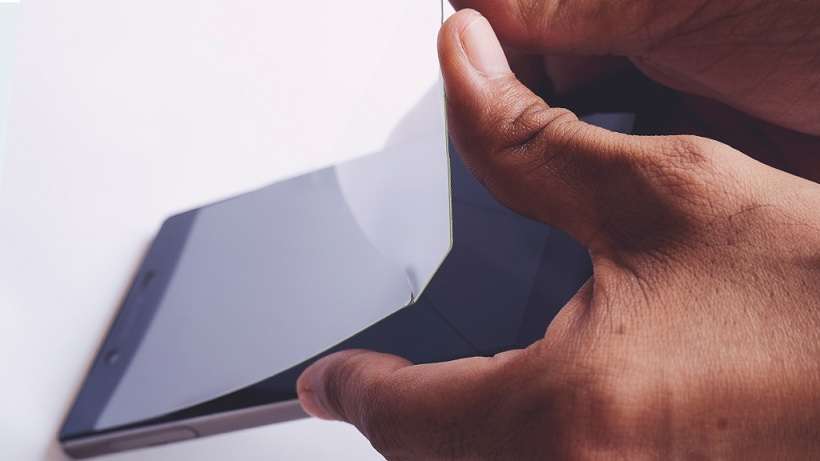
Method 1: Remove the Screen Protector and Phone Case
Some phone cases and screen protectors cause touch problems on your Android screen. This issue is prevalent if you recently changed your phone case or screen protector. It may be due to incompatibility, but you should remove them to see if your phone starts responding again.
Method 2: Clean Your Android Smartphone
A touchscreen malfunctioning can also be a sign of a dirty display. Since the screen relies on contact between your fingers and the touchpad to perform actions, this also applies to foreign particles such as dirt, debris, smudges, oil, and more. Clean your touchscreen with wipes or a soft cloth by gently wiping over the screen.
 TubeDigger - online video downloader from mostly any site
Method 3: Stop Using Your Android Device for a While
Touch problems also arise due to abnormal temperature changes. Your phone might experience ghost touch if it’s too cold or hot. For your screen to function correctly, it needs to be in a temperate environment. Remember to take breaks between phone usage, especially when the phone gets too hot. Avoid using your device under hot conditions, direct sunlight, or anything affecting your phone’s normal temperature.
Method 4: Restart Your Android
Performing a reboot sounds trivial with such a complicated issue. But sometimes, it’s often the most successful way to fix a touchscreen problem on an Android device. Restarting your Android shuts down and resets all background services, which may have led to your issue.

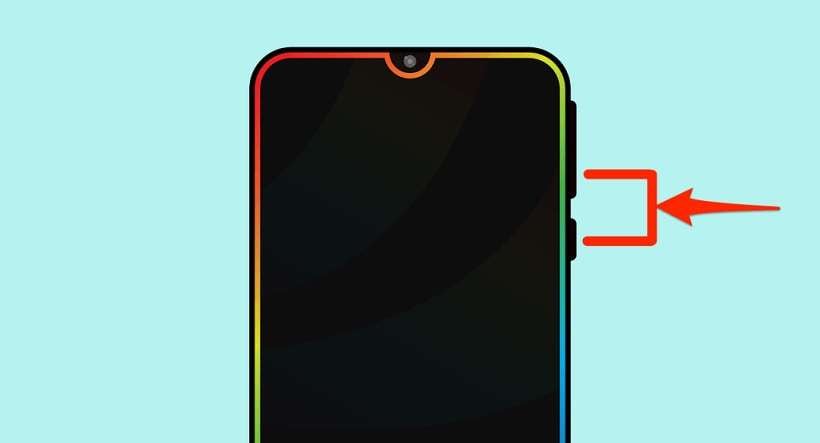
To restart your Android, press and hold the Power button for several seconds to switch off your phone. In other smartphones, you may need to hold down the Power button as well as the Volume Down button at the same time.

Method 5: Factory Data Reset Your Android
Before attempting to have your device checked for any hardware defects, you should try completing a Factory Reset. To do this, go to Settings > Backup and Reset. Next, tap on Factory data reset > Delete all.
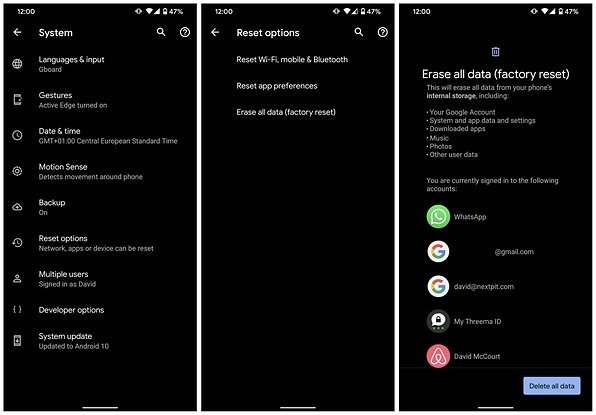
Performing a Factory Data Reset will erase all your data and restore your device to its factory default settings. Creating a backup before doing this step is recommended, as you will lose all your personal data once the process starts.
Method 6: Put Your Android into Recovery Mode
If all else fails, placing your Android into Recovery Mode should be a last resort. Doing this method works similarly to the method above. You should perform this method if the screen is unresponsive and only the buttons on your Android are functional. Here’s how.
Note
Placing your Android into Recovery Mode is different depending on your Android smartphone. Refer to your owner’s manual to see which method is right for your Realme C53.
Step 1A: Press and hold the Power button and Volume Down buttons at the same time. Continue holding both buttons until the screen starts.
Step 1B: If your Realme C53 still has a Home button, press and hold the Home button and the Power button at the same time. Continue holding them until the screen starts.
Step 1C: If step 1A did not put your Android into Recovery Mode, press and hold the Power and Volume Up and Down buttons simultaneously. Continue pressing all three until the screen starts.

Step 2: Use the Volume buttons to navigate the choices, select Wipe data/factory reset, and confirm your choice with the Power button.
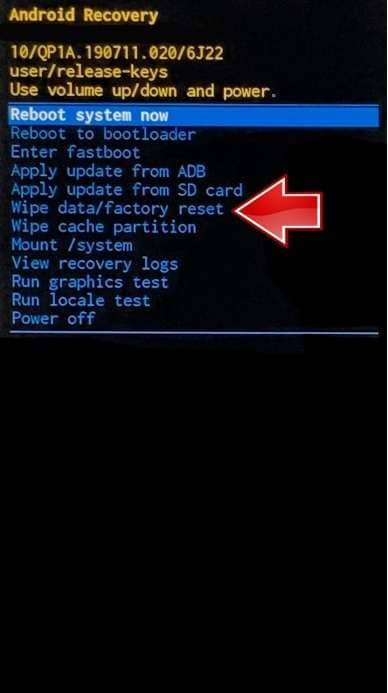
Step 3: Wait for the process to complete and for your Realme C53 to restart automatically.
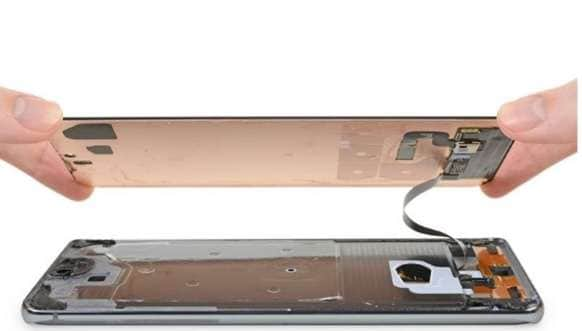
Method 7: Replace Your Android Touchscreen
If doing all the earlier workarounds and fixes couldn’t resolve the touchscreen problem, it could be the screen itself. While replacing the touchscreen yourself is possible if you have the technical know-how, it’s still best to bring it to a professional to prevent further damage. You should have your Realme C53 checked by a technician if the screen is getting weak, has water damage, or has failing screen components.
 “
“
Method 8: Bring it to an Authorized Service Center
Your phone touch problem might not be caused by the screen, even when you had it replaced. If your Android is still unresponsive, it’s best to bring your smartphone to an authorized service center or directly to the phone manufacturer, especially when all efforts are exhausted.
Part 3: How To Fix Android Touch Problem With an Alternative
If all the general phone touch problems on your Realme C53 persist, you should strongly consider Wondershare Dr.Fone to do the job. The program can fix all Android system issues without any required skills. Problems caused by the operating system or software, such as the black screen of death, boot loop, ghost touch, and more, are done within less than 10 minutes with the program.
Key Features
Dr.Fone – System Repair (Android) has many features you can immediately take advantage of. Here are some of them below.
- Fix All Android Problems In Minutes
Wondershare Dr.Fone allows you to fix all touchscreen problems on your smartphone within less than 10 minutes. Moreover, it has a high success rate making it one of the most reliable tools available today.
- Supports up to 1000+ Android Models
The program supports almost all Realme C53 models and other Android devices, whether unlocked or from a carrier. Dr.Fone is equipped with all the proper firmware to flash your Realme C53 with just a few clicks. In addition, it has handy on-screen instructions to help you complete the whole process with ease.
 ZoneAlarm Extreme Security NextGen
Pros and Cons
Here are the pros and cons of using Dr.Fone – System Repair (Android) to know if you’re still undecided.
Pros
- The user interface is clutter-free, making it highly beginner-friendly.
- The fast processing time to fix your Realme C53 means you can do more in less time.
Cons
- The free version only works until you see if your Realme C53 is compatible with the app. You will be required to enter a valid license once you initiate the repair process.
- If you own an iOS device, you’ll have to get the iOS version.
How To Fix Black Phone Screen With Wondershare Dr.Fone
Follow the step-by-step guide below to start fixing general phone screen problems on Android using Wondershare Dr.Fone.
Step 1: Download and install Wondershare Dr.Fone on your computer. Next, launch the program and connect your Realme C53 to your computer.
Step 2: Click Start to initiate the setup on a new window. From there, select the Brand, Name, Model, Country, and Carrier of your Realme C53 and click Next.

Step 3: Follow the on-screen instructions on the main program window to initiate the repair process. After that, wait for your Android smartphone to return to its original state.

Part 4: FAQs
Here are some FAQs you should remember when experiencing phone touch problems.
 With Screensaver Wonder you can easily make a screensaver from your own pictures and video files. Create screensavers for your own computer or create standalone, self-installing screensavers for easy sharing with your friends. Together with its sister product Screensaver Factory, Screensaver Wonder is one of the most popular screensaver software products in the world, helping thousands of users decorate their computer screens quickly and easily.
1. Does a Cracked Screen Affect Touch on an Android?
If you continue using a smartphone with a cracked screen, there are several implications. Your device will be vulnerable to further damage and might develop touchscreen problems,and your sensors will gradually begin to malfunction. The capabilities of your device are also compromised the longer you delay repairing it. Moreover, a cracked screen can put your fingers at risk of injury due to potential glass splinters.
2. How Do I Temporarily Fix a Cracked Screen?
If you can’t take your cracked screen to a repair shop, apply a small amount of vegetable oil or petroleum jelly to the screen. Doing this will not fix the issue but will make the cracks less noticeable. On the other hand, you can also apply a screen protector to safeguard your phone against further damage. The screen protector slows down or prevents the cracks from getting worse.
3. Can I Use Dr.Fone for Free?
You can download and install Dr.Fone – System Repair (iOS) or (Android) for free to evaluate the program’s offerings. You can do the first few steps to see if the app supports your device. However, you need to get the full version and enter a valid license code to repair your smartphone.
safe & secure
4,471,551 people have downloaded it
Conclusion
If the touchscreen is malfunctioning on your smartphone, one of the fixes above should help solve the problem. If it did not solve the issue, consider using Dr. Fone – System Repair for iOS or Android when you need an all-in-one solution to all your phone screen problems.
However, if your screen is broken or cracked, going to an authorized service center is still your best bet, especially when your screen urgently needs a replacement. Delaying it further may hurt your wallet in the long run, so it’s best to fix it as soon as possible.
- Title: Authentication Error Occurred on Realme C53? Here Are 10 Proven Fixes | Dr.fone
- Author: Ariadne
- Created at : 2024-07-30 09:32:33
- Updated at : 2024-07-31 09:32:33
- Link: https://howto.techidaily.com/authentication-error-occurred-on-realme-c53-here-are-10-proven-fixes-drfone-by-drfone-fix-android-problems-fix-android-problems/
- License: This work is licensed under CC BY-NC-SA 4.0.