
Authentication Error Occurred on Realme GT Neo 5? Here Are 10 Proven Fixes | Dr.fone
Authentication Error Occurred on Realme GT Neo 5? Here Are 10 Proven Fixes
There are times when users get an authentication error while they connect to a Wifi network. The problem is mostly found in Android whenever a device tries to establish a connection to Wifi. If your device is also experiencing an authentication problem Wifi, then don’t worry. It can easily be resolved. In this post, we will make you familiar with the root cause for the Realme GT Neo 5 Wifi problem and how you can resolve whenever authentication error occurred on your device.
Part 1: Any idea about the Wi-Fi authentication problem?
Wi-Fi authentication has to be done every time you wish to connect to a Wi-Fi network over your smartphone or laptop. To authenticate yourself and connect to the protected Wi-Fi network, you need to have the password of it. But if after you’re putting in the correct password and still experiencing the wifi authentication problem. Here’s what you need to know.
Authentication error occurs when the “deal” between the Wi-Fi router and device fails due to certain reasons. First, the Realme GT Neo 5 device sends the password of the network and the “connect” request in an encrypted format to the Wi-Fi router. Then, the router decrypts the password and compares the password saved on it. Now, if the password matches, it sends affirmation for the “connect” request, and then the Realme GT Neo 5 device is allowed to connect to the network.
Part 2: Why Authentication Error Occurred when Connecting to Wifi?
There could be plenty of reasons for facing an authentication error on your device. Most of the time, it occurs whenever a Wifi router seems to malfunction. Furthermore, if your phone has been recently updated, then chances are that there could be an issue with its drivers. A security attack can also make your device malfunction as well. An unstable connection or a router blockage can also be a reason for this issue.
In this scenario, whenever you try to connect to a Wifi network (even after supplying the correct password and username), it doesn’t connect to it. Instead, it displays an authentication error occurred promptly. Thankfully, there are plenty of ways to overcome the authentication problem Wifi. In the next section, we have provided three different solutions to fix the Realme GT Neo 5 Wifi problem (as it mostly happens on Android devices).
Part 3: 10 Solutions to Fix Wifi Authentication Error
Before we make you familiar with different fixes for the Wifi authentication error, it is important to check your router beforehand. Chances are that you could be getting the authentication error because your router is not functioning properly. You can restart it and try to connect any other device to it as well to check it. After making sure that there is no problem with your network or router, follow these suggestions to overcome the authentication error occurred issue.
Check if extra characters added in Wi-Fi password
Ensure that no other extra characters are being added in the Wi-Fi password while you’re entering it. Key in the password carefully while viewing the characters, and then check if the authentication error occurs or not.

One-Click to Fix Wifi Authentication Error by Android System Repair
Android system repair is considered the most effective way to fix Wifi Authentication Error. As the bottom-layer Android system files may be corrupted unconsciously with days of phone use, the Wifi Authentication Error may be one of the symptoms.
So Android repair requires programming knowledge to do it?
No! With Dr.Fone - System Repair (Android), you can do Android repair in just a few steps and get all issues like Wifi Authentication error fixed easily.
Dr.Fone - System Repair (Android)
An easy-to-operate tool to fix Android system issues like a Wifi authentication error
- Fixes all Android system issues like a black screen of death, Wifi authentication error, etc.
- One-click to fix the Wifi authentication error. No technical skills required.
- Supports all the new Realme GT Neo 5 devices like Galaxy S8, S9, etc.
- Easy-to-follow instructions provided on each of the screens.
3981454 people have downloaded it
Here are the steps to fix Wifi Authentication Error by Android system repair:
Note: Android repair is effective to permanently fix Wifi Authentication Error, but may wipe out the existing phone data. Backup all the important Android data to PC before you go on.
- After the Dr.Fone tool is downloaded, install, and launch it. You can see the following screen.

- Connect your Realme GT Neo 5 to the computer, and select “Android Repair” in the middle.


- Select all the details that match your device, and click “Next”.

- Next up, you should boot your Realme GT Neo 5 in download mode by following the on-screen instructions.


- Allow the program to download the corresponding firmware. After that, the Android repair will start and get the Wifi Authentication Error fixed in minutes.
 Easy GIF Animator is a powerful animated GIF editor and the top tool for creating animated pictures, banners, buttons and GIF videos. You get extensive animation editing features, animation effects, unmatched image quality and optimization for the web. No other GIF animation software matches our features and ease of use, that’s why Easy GIF Animator is so popular.
Use static IP address instead of DHCP
DHCP, or Dynamic Host Configuration Protocol is the default IP address assignment for the Wi-Fi settings on many devices. Whereas DHCP can cause IP address conflict during the dynamic IP address assignment. So, you’d better change “DHCP” to “Static” to see if the authentication error persists.
Step 1: Head to the “Settings” of your Realme GT Neo 5 and then opt for “Wireless and Networks” followed by “WLAN/WiFi”.
Step 2: Now, hit on the WiFi network that is showing “authentication error occurred”.
Step 3: Depending on your Realme GT Neo 5 model, look for “IP Settings” and tap on it. Now, switch the “DHCP” to “Static”.
Step 4: Note down the static IP address fields and wipe off all the fields. Punch it in again and then save it.

Check carefully for duplicate Wi-Fi names before you connect
Perhaps, you might connect to a WiFi with a similar name. There are good chances that some users do not modify their WiFi network name and possibly, your neighbor may have the same WiFi network, service provider. Therefore, ensure you connect to the correct WiFi network.
Reset the Wifi network
One of the easiest ways to fix the authentication problem of Wifi is to reset the network. To do this, you would be required to forget the respective network first and then connect to it again. This can be done by simply following these steps.
1. Firstly, you need to forget a Wifi network. To do it, go to your phone’s Settings > WiFi and network. From here, you can see a list of all the Wifi hotspots that your phone connects to. Select the network you wish to forget.

2. When you would select a network, it will provide the basic information related to it. Just tap on the “Forget” button and agree to the pop-up message. This will erase the network’s information from your device.

3. Afterward, turn on your Wifi again and tap to the network you wish to connect to. Simply provide the credentials and tap on the “Connect” button to reestablish the connection. This way, you can reset the network successfully.
 Lyric Video Creator Professional Version


Modify network connection
If the above solution won’t work, then you would be required to walk the extra mile to fix the Realme GT Neo 5 Wifi problem. After you reset a network connection, if still getting issues regarding the authentication of the network, you need to modify the connection. In this technique, you will be changing the IP settings on your phone to alter the way it establishes a secure connection. You can do it by following these steps.
1. To start with, visit your phone’s Settings and open the Wifi page.

2. This will display a list of all the Wifi networks that are associated with your device. Just long-tap on the Wifi network that you wish to modify. It will open another pop-up window. From here, tap on the option of “Manage network settings”. Sometimes, users also get an option of “Modify network settings” here as well. Simply select it to proceed.

3. It will display basic information related to your Wifi network. Just tap on the “Show advanced options” button to access more options related to the network setting.
 vMix Pro - Software based live production. vMix Pro includes everything in vMix 4K plus 8 channels of Replay and 8 vMix Call
4. From the IP Settings menu, change the field from DHCP to Static. This will let you establish a static connection between your device and the router.

5. As soon as you will change it to static, you will get different fields related to your network’s IP address, gateway, DNS, and more. Simply fill these fields and tap on the “Save” button once you are done.

Now, try to connect to the Wifi hotspot again. You would be able to overcome the authentication problem of Wifi.
Change Network Security Type
It has been observed that, when we connect to Wifi, our device chooses a wrong security type. This clashes with the default security protocol of the router and authentication error occurred due to this. If your device is facing the same issue, then it can be fixed by simply changing its security type. To do this, follow these instructions:
1. To change the security type of a network, you need to “Add the network”. If you already have the Wifi network saved, then simply forget the network by following the above-mentioned tutorial.
2. Now, turn on your device’s Wifi and tap on the option of “Add network”. Here, you would be asked to give a network name and select the security type. To manually select it, tap on the “Security” option.
 vMix 4K - Software based live production. vMix 4K includes everything in vMix HD plus 4K support, PTZ control, External/Fullscreen output, 4 Virtual Outputs, 1 Replay, 4 vMix Call, and 2 Recorders.
3. From here, you will get a list of various security protocols that you can pick. Select “WPA/WPA2-PSK” and save your selection.

Now, try to connect to the network again. Most likely, it will let you fix the authentication error on your device.
Update Android firmware to the latest
There are instances where an outdated OS version of your Realme GT Neo 5 may create a hindrance in establishing a connection between your device and the WiFi network. You need to update your Android firmware to the latest version and then check if the problem persists or not.
Step 1: Launch “Settings” of your Realme GT Neo 5 and then get into the “About Phone” option.
Step 2: Now, opt for the “System Update” option. If the update is available, get your device updated to the latest OS version.

Restart the router and reset Android network settings
Sometimes, the WiFi router may hang up while establishing a connection and therefore, the wifi authentication problem occurs. Try restarting your Wi-Fi router and then check if your device connects successfully. If this doesn’t work, try to reset your Android Network Settings .
Bonus tip: Turn Airplane mode on/off
By simply turning on the Airplane mode (and later turning it off), you can easily fix the authentication problem Wifi most of the time. You can find a toggle button for Airplane mode on the notification bar of your phone. If you can’t find it there, then go to your phone’s Settings > Connection > More Networks and turn on the feature of “Airplane Mode”.
 SwifDoo PDF 2-Year Plan
Let it do for a while. Afterward, turn it off and try to connect to the Wifi network again.
After following these quick and easy suggestions, you would be able to fix the Realme GT Neo 5 Wifi problem for sure. Even if you use any other Android device, then its authentication error can easily be resolved after these effective solutions. Go ahead and give these expert solutions a try and let us know about your experience as well. If you have any other solution to fix the authentication problem Wifi, then share it with us as well in the comments.
Simple Solutions to Fix Android SystemUI Has Stopped Error For Realme GT Neo 5
In this article, you will learn possible causes of Android SystemUI stopping error and 4 methods to fix this issue. Get Dr.Fone - System Repair (Android) to fix Android SystemUI stopping more easily.
Android SystemUI isn’t responding or Android, unfortunately, the process com.android.systemui has stopped is a not a rare error and is observed in all Android devices these days. The error usually pops up on your device while you are using it with a message on the screen saying Android. Unfortunately, the process com.android.systemui has stopped.
The Android SystemUI isn’t responding error message may also read as “Unfortunately, SystemUI has stopped”.
Android SystemUI error can be very confusing as it leaves affected users with only one option, i.e., “OK”, as shown in the images above. If you click on “OK” you will continue to use your device smoothly, but only until the SystemUI isn’t responding error pops-up on your main screen again. You may restart your device, but the Android SystemUI has stopped the problem continues to annoy you until you find a permanent solution for it.
If you are also among the various users who see Android, unfortunately, the process com.android.systemui has stopped error, then do not worry. SystemUI isn’t responding. Error is not a serious issue and can be tackled easily by carefully examining the reasons behind the problem.
Looking for suitable solutions to fix Android SystemUI has stopped error? Then read on to find out all about Android SystemUI isn’t responding error and the most effective ways to fix it.
Part 1: Why Android SystemUI Has stopped happens?

WPS Office Premium ( File Recovery, Photo Scanning, Convert PDF)–Yearly

Android device owners would agree that OS updates are very helpful as they fix the bug problem and improve the overall working of your device. However, sometimes these updates may be infected due to which they do not download and install properly. A corrupted OS update may cause Android; unfortunately, the process com.android.systemui has stopped error. All Android updates are directly designed around the Google App, and thus, the problem will persist until the Google App is also updated. Sometimes, even the Google App update may cause such a glitch if it is not successfully downloaded and installed.
Another reason for the Android SystemUI isn’t responding error to occur, maybe because of flashing a new ROM or due to improper firmware update installation. Even when you restore the backed up data from cloud or your Google Account, such Android, unfortunately, the process com.android.systemui has stopped error may show up.
It is not possible to say for sure which one of the above-mentioned reasons is causing your device to show Android SystemUI is not responding error. But what we can do is move on to fixing the Android SystemUI by following any one of the three methods given the following segments.
Part 2: How to fix “com.android.systemui has stopped” in one click
As we’ve learned that Android system UI isn’t responding issue is primarily because of the Android OS updates not installed properly or were corrupted. Hence, there comes the need for a powerful Android system repair tool that can help you rectify such annoying errors.
To serve the purpose, we would like to introduce, Dr.Fone - System Repair (Android) . It is one of its kind of applications and is highly recommended as it has a proven success rate to resolve almost all Android system issues.
It’s now time to understand how to fix Android ‘unfortunately, the process com.android.systemui has stopped’ or in simple words, Android system UI isn’t responding.
Note: Before we proceed to Android repair, please ensure to make a backup of all your data . This is because the Android repair process may wipe out all the data on your device to fix the Android OS issues.
Phase 1: Connect and prepare your Realme GT Neo 5
Step 1 – Download the Dr.Fone toolkit over your PC. Install it and launch it over. Opt for the “System Repair” tab from the main screen and get your Realme GT Neo 5 connected to the PC.
 vMix HD - Software based live production. vMix HD includes everything in vMix Basic HD plus 1000 inputs, Video List, 4 Overlay Channels, and 1 vMix Call
Step 2 – You need to select “Android Repair” from the left panel and then hit the ‘Start’ button.
Step 3 – Next, you need to select the correct information about your device (i.e., brand, name, model, country/region, and carrier details). Check the warning down below and hit “Next”.
Phase 2: Boot Android in ‘Download’ mode to perform the repair.
Step 1 –You’re now required to boot your Android in Download mode. Here’s what you need to do to put your Android in DFU mode.
If your Android has a Home button:
- Turn off your device. Hold down “Volume Down + Home + Power” buttons altogether for about 10seconds. Let go of the buttons afterward and hit the Volume Up to boot in download mode.
In case your Android has no Home button:
- Turn off your device. Hold down “Volume Down + Bixby + Power” buttons altogether for about 10seconds. Let go of the buttons afterward and hit the Volume Up to boot in download mode.

Step 2 – Once done, hit “Next” to initiate the downloading of the firmware.
 WinUtilities Pro
Step 3 – As soon as the download completes, the Android repair will automatically be started by the program.
Step 4 – In a just a matter of a few minutes, your Android system UI isn’t responding issue will be resolved.


Part 3: Uninstall Google updates to fix Android SystemUI issue
All Android SystemUI isn’t responding errors are circled the Google App as the Android platform is heavily dependent on it. If you have recently updated your Google App and the Android, unfortunately, the process com.android.systemui has stopped error keeps popping up at regular intervals, make sure you uninstall Google App updates as soon as possible.
Follow the steps given below to fix the Android SystemUI has stopped issue by rolling back the Google App updates:
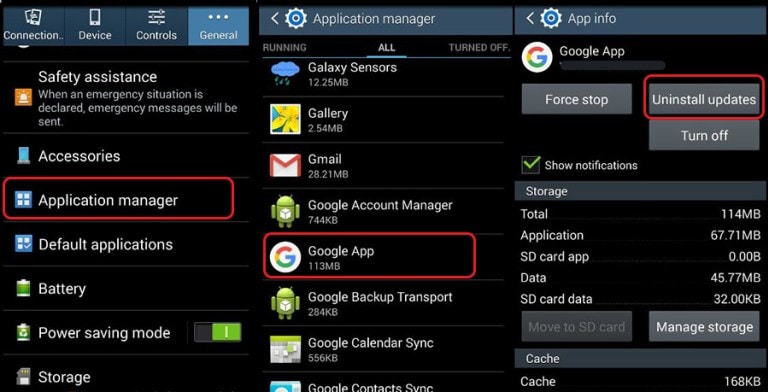
- Visit “Settings” and select “Apps” or “Application Manager”.
- Now swipe to view “All” Apps.
- From the list of Apps, select “Google App”.
- Finally, tap on “Uninstall Updates” as shown hereunder.
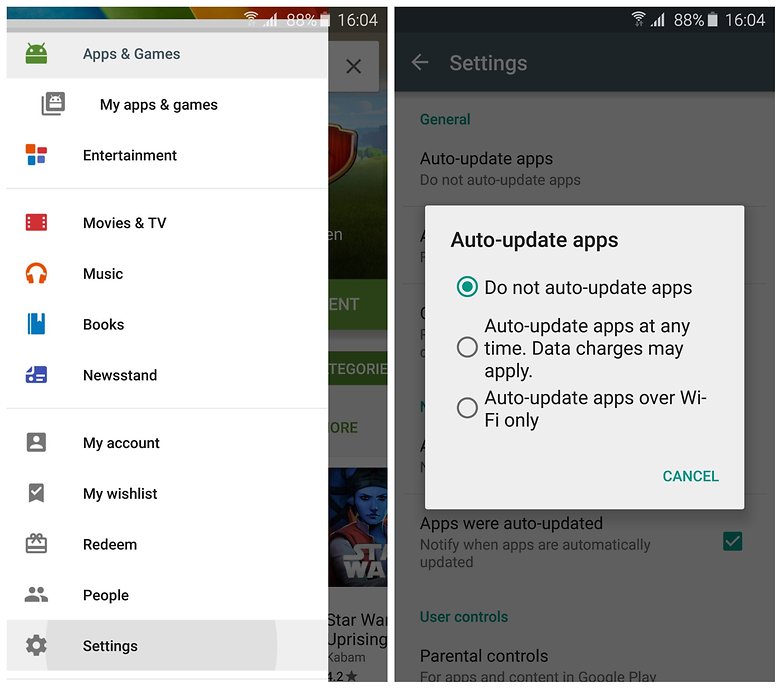
Note: To prevent the Android SystemUI isn’t responding error to occur in the future, do not forget to change your Google Play Store settings to “Do Not Auto-Update Apps”.
Part 4: Wipe Cache partition to fix Android SystemUI error
Android, unfortunately, the process com.android.systemui has stopped error can also be fixed by clearing your cache partitions. These partitions are nothing but storage locations for your modem, kernels, system files, drivers, and built-in Apps data.
It is advisable to clear Cache portions regularly to keep your UI clean and free of glitches.
Android SystemUI isn’t responding error can be overcome by clearing the cache in recovery mode.
Different Android devices have different ways to put it in recovery mode. Refer to your device’s manual to enter the recovery mode screen on your device and then follow the steps given below to fix Android; unfortunately, the process com.android.systemui has stopped error by clearing the cache partition:
- Once you are the recovery mode screen, you will see several options as shown in the screenshot.


- Use the volume down key to scroll down and select ”Wipe cache partition” as shown below.


- After the process is completed, select “Reboot System” which is the first option in the recovery mode screen.
This method will help you de-clutter your device and erase all the clogged up unwanted files. You may lose App related data too, but that is a small price to pay to fix the Android SystemUI isn’t responding error.
If the Android SystemUI has stopped the problem persists, there is only one way out. Read on to find out about it.
Parental Control Software
## Part 5: Fix Android SystemUI error by factory resetFactory Resetting your device to fix Android; unfortunately, the process com.android.systemui has stopped error is a desperate measure and should be the last thing to do on your list. Take this step only when the above mentored two techniques fail to work.
Also, make sure you take a back-up of all your data and contents stored in your Realme GT Neo 5 on the cloud, Google Account or an external memory device because once you perform a factory reset on your device, all media, contents, data and other files are wiped out, including your device settings.
Follow the steps given below to factory reset your device to solve the Android SystemUI isn’t responding problem:
- Visit “Settings” by clicking the settings icon as shown below.

- Now select “Backup and Reset”.
 Nero Burning ROM:
The ultimate burning program for all your needs!

- In this step, select “Factory data reset” and then “Reset Device”.
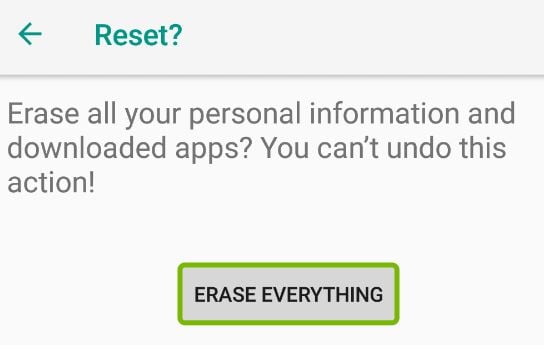
- Finally, tap on “ERASE EVERYTHING” as shown below to Factory Reset your device.

After the factory reset process is completed, your device will automatically restart, and you will have to set it up once again.
The whole process of factory resetting your Realme GT Neo 5 might sound tedious, risky, and cumbersome, but it helps to fix the Android SystemUI has stopped error 9 out of 10 times. So, think carefully before using this remedy.
Android SystemUI isn’t responding or Android, unfortunately, the process com.android.systemui has stopped error is commonly seen by users on their devices. It is not a random error and is linked to either the software, Google App, cache partition, or data stored in the Realme GT Neo 5 device. It is fairly simple to deal with this issue as all you need to do is install or roll back your Android OS update, uninstall Google App updates, clear cache partition, or factory reset your device to clear all data, files, and settings stored in it. The methods listed and explained above are the best ways to fight the problem and to prevent it from troubling you in the future. These methods have been adopted by affected users all over the world who recommend them because they are safe and involve minimum risks as compared to other tools to solve the Android SystemUI has stopped error. So go ahead and try them now!
Reliable User Guide to Fix Realme GT Neo 5 Running Slow and Freezing
Android smartphones have opened a lot of doors for their users. They continue to evolve year after year with the hope of giving the world a wonderful digital experience. So far, we can all agree that they’re going the extra mile and doing a really great job. Android phones today are all packed with supreme capabilities that are beneficial to everyone.
However, Android phones are still not close to perfect. They also act up sometimes and cause a stir. Some users have observed that the Android phone is running slow and freezing over time. There can be many potential reasons why Android phone runs slow suddenly. But it doesn’t mean it cannot be restored at all to its original state and function.
In this article, we will review the details of this Android phone issue. We’ll provide solutions you can try if you ever get caught in the same problem. Continue reading to learn more.
Understanding the Specs That Make Android Phones Run Fast
The issue of Android phone running slow and freezing is not limited to old devices only. The same problem has also been observed in newly purchased units. The roots of this unfortunate occurrence vary from one user to another. It depends on different elements, from external factors like users’ handling of the Realme GT Neo 5 device to internal factors such as its capabilities. To understand it more, below are some Android phone specifications related to the Realme GT Neo 5 device’s overall performance and speed.
The CPU Core Count
Unlike before, Android phones today are equipped with several cores. Each of them has the ability to execute a process alone. Therefore, the Realme GT Neo 5 device can handle two or more tasks at once without compromising the quality of its performance. If your Realme GT Neo 5 contains more CPU core, its performance surely be more powerful and speedy.
The CPU Clock Speed
Simply put, clock speed is basically the speed at which the CPU cores can carry out a cycle in a second. A faster clock speed definitely translates into the Realme GT Neo 5 device’s higher performance. For instance, an octa-core Android phone with a one GHz per second clock speed is a decent device. But it’s less powerful than a device with the same number of cores but runs at two GHz per second.
Random Access Memory
In a simple language, Random Access Memory (RAM) temporarily stores the data from apps that are currently running. Smartphones can be more flexible with multi-tasking if their RAM has enough space. So if you’re among these users who perform multiple tasks simultaneously, you better choose a device with more RAM.


Internal Storage
The mobile applications installed on your smartphones are directly related to internal storage. The apps save their data every time, so they behave strangely when the Realme GT Neo 5 device runs out of storage. If you’re using heavy mobile applications, it’s best to opt for smartphones with huge internal storage.
Reasons Why My Realme GT Neo 5 is Running Slow
It’s not really hard to tell why your Realme GT Neo 5 is slow because it’s apparently a common issue among users. But don’t worry. Most of the time, the problem is not a major concern. Here are some scenarios that may slow down your Realme GT Neo 5s.
 Software Update Pro - Check and update software installed on your computer.
Overloading Background Processes
It’s great to have an Android phone that can flawlessly multi-task. However, not all units can handle that well. As mentioned earlier, it depends on the CPU core count and the core’s clock speed. If your Realme GT Neo 5 is running slow and freezing, many processes may be happening at the same time. Your device’s cores and clock speed are potentially incapable of executing such demands.
Your Phone is Running Out of Storage
Mobile apps need to save data on your phone. They perform the tasks based on the data stored on the Realme GT Neo 5 device. So if your Realme GT Neo 5 is slow, it’s possible that your device is already running out of storage. Each app has its own storage requirement. If your phone goes below that, the app will surely crash and not work.
Animation Speed is Way Too Slow
You can modify the Realme GT Neo 5 device’s animation type and speed on your Realme GT Neo 5 via the developer’s option. However, altering its default settings can sometimes make the Android phone run slow. If the speed is set slower, more delays are added to the animation. Hence, it takes a while for Your Realme GT Neo 5 to launch an app or complete a certain process.
You’re Using an Outdated Android Version
If your Realme GT Neo 5 is running slow and freezing, the Realme GT Neo 5 device’s software is probably outdated. The mobile apps installed on your device are lagging or crashing because they’re no longer compatible with the OS. It happens most of the time. Hence, always watch out for OS updates.
Your Phone is Experiencing Some System Issues
Operating systems and device software serve as the main component of all smartphones. Sometimes, it runs into inevitable problems caused by computer bugs and other glitches. When it happens, the Realme GT Neo 5 device’s overall performance is affected. So that can be the reason why sometimes your Realme GT Neo 5 is running slow and freezing.
Your Internet Connection is Unstable
Of course, a slow internet connection can make the Android phone runs slow too. Most apps today rely heavily on the internet to execute some tasks like communicating and streaming. So don’t panic when your Realme GT Neo 5 is running slow and freezing. It’s possible that your internet connection is messing up with you.
What to Do When My Realme GT Neo 5 Lags?
It’s not as bad as the black screen of death when the Android phone runs slow. However, it can still cause some delays and inconvenience for users. So it’s really important to take action when you notice some anomalies with its speed and performance. Below are some remedies that can help you get rid of this issue.
Solution 1: Reboot Your Phone
Sometimes, minor bugs can give your device a hard time. It can be the reason why your Realme GT Neo 5 is running slow and freezing. If that’s the case, rebooting your phone might help a lot. Here’s how to do it.
- Step 1: For seven seconds or more, hold the Power and the Volume Down button together.
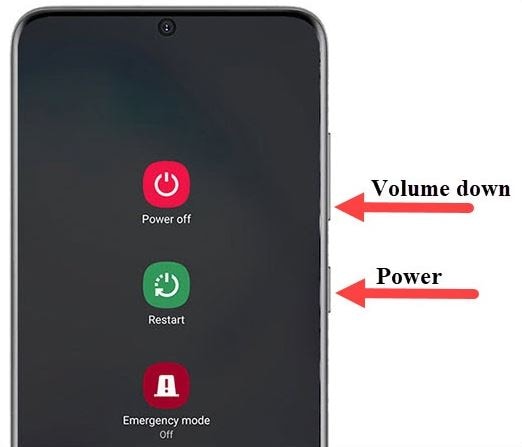
- Step 2: Several options will manifest on the screen. From there, click Restart. Wait until your device completely shuts off and restarts again.
Solution 2: Uninstall the Unused Apps to Free Up Some Storage
If your Realme GT Neo 5 is running slow and freezing, it’s likely because you’re running out of internal storage. You may uninstall the apps you rarely use to free up some space. Here’s how to do it.
- Step 1: On your home screen, find the app you wish to uninstall. Hold its icon until an option list appears.
- Step 2: Click Uninstall.
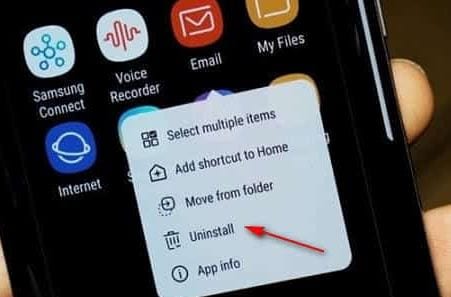
- Step 3: Click Ok if it asks you to confirm the action.
Wait until the app icon disappears from the home screen.
Solution 3: Set the Animation Speed a Little Faster
Altering the animation speed is not that dangerous. However, it can sometimes interfere with the Realme GT Neo 5 device’s smoothness if set too slow. If your Realme GT Neo 5 is running slow and freezing after modifying this setting, try to re-adjust it a little faster. Here’s how to do it.
Initiate the following steps first to enable the developers option on your device. Skip this if you have already activated the developers option:
- Step 1: Go to Settings.
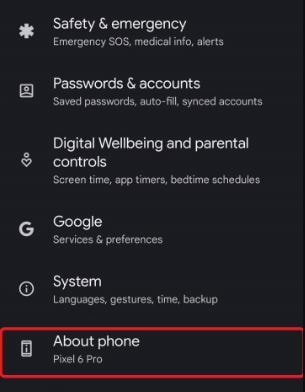
- Step 2: Find the About Phone option. Click on it.
- Step 3: Find the Build Number. And then click on it seven times.
- Step 4: Enter your lock screen passcode if necessary.
Follow these steps to adjust the animation speed:
- Step 1: Tap Settings from your home screen.
- Step 2: From the given options, find and click Systems.
- Step 3: Click Developers options.
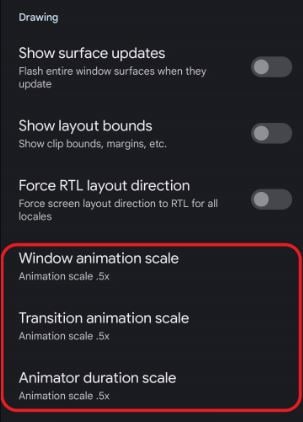
- Step 4: Under the Drawing section, you’ll find the following animation scale settings: Window Animation Scale, Transition Animation Scale, and Animator Duration Scale. Adjust the speed of these three options to 0.5x.
.png) Kanto Player Professional
Kanto Player ProfessionalSolution 4: Update Your Phone to the Latest Android Version
It’s always recommended to update your phone to the latest Android version. Aside from repairs to some system errors, it also keeps your phone compatible with mobile apps. An outdated operating system can be the reason why your Realme GT Neo 5 runs slow, and the apps are freezing. Don’t worry. It’s very easy to perform. Here’s how to do it.
- Step 1: First, ensure your internet connection is strong and stable to avoid unwanted interruptions.
- Step 2: Go to Settings.
- Step 3: Click About Phone.
- Step 4: Click Check Now for Update. If there’s new software available, it will automatically appear on the screen.
- Step 5: Click Install Now. Depending on your device, it will restart itself after the installation process.

Solution 5: Reset Your Realme GT Neo 5 to Factory Settings
One way to restore the original performance of your Realme GT Neo 5 is to revert it back to factory settings. It deletes all the phone’s data and adjusts the settings to default. Most of the time, this procedure works magic. It fixes numerous issues, including the Android phone that’s slow and constantly freezing. But ensure your phone has already been backed up before commencing this step. You may use Wondershare Dr.Fone to help you back up and secure your files.
Here’s how to back up your Realme GT Neo 5 using Wondershare Dr.Fone:
- Step 1: Download Wondershare Dr.Fone from its official website. And then install it on your desktop.
- Step 2: Launch the application on your computer.
- Step 3: After it fully loads, connect your Realme GT Neo 5 to your computer.
- Step 4: From the main dashboard, find and click Phone Backup. Ensure your device is in USB Debugging mode.
Step 5: Check the files or data you wish to back up. Right after, click Backup.

Here’s how to reset your Realme GT Neo 5 to factory settings:
- Step 1: Go to Settings.
- Step 2: Click System.
- Step 3: Click Reset Options.
- Step 4: Click Erase All Data (Factory Reset).
- Step 5: Your Android phone will inform you about the data that will be deleted from this procedure. From there, click Reset Phone.
- Step 6: Your Android device will ask you to confirm the procedure. From there, click Erase Everything.
Solution 6: Fix the System Issue Using Wondershare Dr.Fone
The device’s operating system may sometimes run into unexpected problems. That can make your Realme GT Neo 5 performs slow. System issue is not a terrifying scenario at all. Thanks to Wondershare Dr.Fone, which provides instant repair to this kind of mobile problem. Here’s how to use it in easy steps.
- Step 1: Launch the Wondershare Dr.Fone application on your desktop. And then connect your Realme GT Neo 5 to your computer.
- Step 2: Click System Repair from the main dashboard or Toolbox section.
- Step 3: Click Android.


- Step 4: Wondershare Dr.Fone will give you a list of the Android problems that this procedure will fix. From there, click Start.
- Step 5: Wondershare Dr.Fone will ask you to confirm your device details. Review the listed details for Brand, Name, Model, Country, and Carrier. Amend them if necessary. Tick the checkbox beside the Note if you agree to the terms. Lastly, click Next to proceed.
- Step 6: At this point, you need to put your device into Download Mode. Power off your device. And then hold these three buttons altogether: Volume Down, Home (or Bixby if you’re using a newer model), and Power buttons. Finally, press the Volume Up button.
- Step 7: Wondershare Dr.Fone will automatically download the firmware that matches your device’s specifications. Wait until the process has been completed.
- Step 8: Thereafter, the details about the newly downloaded firmware package will be displayed on the screen. From there, click Fix Now.
 SwifDoo PDF Perpetual (2-PC) Free upgrade. No monthly fees ever.

- Step 9: Before initiating the installation process, Wondershare Dr.Fone will ask you to review and confirm the firmware details. It will also let you know that this procedure will erase the phone’s data. If you agree to the terms, enter 000000 into the input box and click Confirm.
 DEX 3 RE is Easy-To-Use DJ Mixing Software for MAC and Windows Designed for Today’s Versatile DJ.
Mix from your own library of music, iTunes or use the Pulselocker subsciprtion service for in-app access to over 44 million songs. Use with over 85 supported DJ controllers or mix with a keyboard and mouse.
DEX 3 RE is everything you need without the clutter - the perfect 2-deck mixing software solution for mobile DJs or hard-core hobbiests.
PCDJ DEX 3 RE (DJ Software for Win & MAC - Product Activation For 3 Machines)

- Step 10: Wait while Wondershare Dr.Fone installs the new firmware to your device.
- Step 11: A notification will immediately appear after installing the new firmware. Click Done if your phone starts normally. Otherwise, click Try Again to repeat the process.
 safe & secure
3,660,347 people have downloaded it
Conclusion
Android phone is capable of performing lots of stuff. It can assist you in both your personal and professional tasks. But if it’s sluggish and doesn’t execute optimally, the good things it promises all go down the drain. So if you notice that your Realme GT Neo 5 is running slow and freezing, act fast to resolve the issue. Wondershare Dr.Fone can be of great help in this kind of situation. It’s an all-in-one mobile solution that can assist you with system repair, phone backup, data recovery, and a lot more.
- Title: Authentication Error Occurred on Realme GT Neo 5? Here Are 10 Proven Fixes | Dr.fone
- Author: Ariadne
- Created at : 2024-07-30 09:32:41
- Updated at : 2024-07-31 09:32:41
- Link: https://howto.techidaily.com/authentication-error-occurred-on-realme-gt-neo-5-here-are-10-proven-fixes-drfone-by-drfone-fix-android-problems-fix-android-problems/
- License: This work is licensed under CC BY-NC-SA 4.0.