
Authentication Error Occurred on Samsung Galaxy F14 5G? Here Are 10 Proven Fixes | Dr.fone
Authentication Error Occurred on Samsung Galaxy F14 5G? Here Are 10 Proven Fixes
There are times when users get an authentication error while they connect to a Wifi network. The problem is mostly found in Android whenever a device tries to establish a connection to Wifi. If your device is also experiencing an authentication problem Wifi, then don’t worry. It can easily be resolved. In this post, we will make you familiar with the root cause for the Samsung Galaxy F14 5G Wifi problem and how you can resolve whenever authentication error occurred on your device.
Part 1: Any idea about the Wi-Fi authentication problem?
Wi-Fi authentication has to be done every time you wish to connect to a Wi-Fi network over your smartphone or laptop. To authenticate yourself and connect to the protected Wi-Fi network, you need to have the password of it. But if after you’re putting in the correct password and still experiencing the wifi authentication problem. Here’s what you need to know.
Authentication error occurs when the “deal” between the Wi-Fi router and device fails due to certain reasons. First, the Samsung Galaxy F14 5G device sends the password of the network and the “connect” request in an encrypted format to the Wi-Fi router. Then, the router decrypts the password and compares the password saved on it. Now, if the password matches, it sends affirmation for the “connect” request, and then the Samsung Galaxy F14 5G device is allowed to connect to the network.
Part 2: Why Authentication Error Occurred when Connecting to Wifi?
There could be plenty of reasons for facing an authentication error on your device. Most of the time, it occurs whenever a Wifi router seems to malfunction. Furthermore, if your phone has been recently updated, then chances are that there could be an issue with its drivers. A security attack can also make your device malfunction as well. An unstable connection or a router blockage can also be a reason for this issue.
In this scenario, whenever you try to connect to a Wifi network (even after supplying the correct password and username), it doesn’t connect to it. Instead, it displays an authentication error occurred promptly. Thankfully, there are plenty of ways to overcome the authentication problem Wifi. In the next section, we have provided three different solutions to fix the Samsung Galaxy F14 5G Wifi problem (as it mostly happens on Android devices).

Part 3: 10 Solutions to Fix Wifi Authentication Error
Before we make you familiar with different fixes for the Wifi authentication error, it is important to check your router beforehand. Chances are that you could be getting the authentication error because your router is not functioning properly. You can restart it and try to connect any other device to it as well to check it. After making sure that there is no problem with your network or router, follow these suggestions to overcome the authentication error occurred issue.

Check if extra characters added in Wi-Fi password
Ensure that no other extra characters are being added in the Wi-Fi password while you’re entering it. Key in the password carefully while viewing the characters, and then check if the authentication error occurs or not.

One-Click to Fix Wifi Authentication Error by Android System Repair
Android system repair is considered the most effective way to fix Wifi Authentication Error. As the bottom-layer Android system files may be corrupted unconsciously with days of phone use, the Wifi Authentication Error may be one of the symptoms.
So Android repair requires programming knowledge to do it?
No! With Dr.Fone - System Repair (Android), you can do Android repair in just a few steps and get all issues like Wifi Authentication error fixed easily.
Dr.Fone - System Repair (Android)
An easy-to-operate tool to fix Android system issues like a Wifi authentication error
- Fixes all Android system issues like a black screen of death, Wifi authentication error, etc.
- One-click to fix the Wifi authentication error. No technical skills required.
- Supports all the new Samsung Galaxy F14 5G devices like Galaxy S8, S9, etc.
- Easy-to-follow instructions provided on each of the screens.
3981454 people have downloaded it
Here are the steps to fix Wifi Authentication Error by Android system repair:
Note: Android repair is effective to permanently fix Wifi Authentication Error, but may wipe out the existing phone data. Backup all the important Android data to PC before you go on.
- After the Dr.Fone tool is downloaded, install, and launch it. You can see the following screen.

- Connect your Samsung Galaxy F14 5G to the computer, and select “Android Repair” in the middle.

- Select all the details that match your device, and click “Next”.

- Next up, you should boot your Samsung Galaxy F14 5G in download mode by following the on-screen instructions.

- Allow the program to download the corresponding firmware. After that, the Android repair will start and get the Wifi Authentication Error fixed in minutes.

 Project Manager - Asset Browser for 3Ds Max
Use static IP address instead of DHCP
DHCP, or Dynamic Host Configuration Protocol is the default IP address assignment for the Wi-Fi settings on many devices. Whereas DHCP can cause IP address conflict during the dynamic IP address assignment. So, you’d better change “DHCP” to “Static” to see if the authentication error persists.
Step 1: Head to the “Settings” of your Samsung Galaxy F14 5G and then opt for “Wireless and Networks” followed by “WLAN/WiFi”.
Step 2: Now, hit on the WiFi network that is showing “authentication error occurred”.
Step 3: Depending on your Samsung Galaxy F14 5G model, look for “IP Settings” and tap on it. Now, switch the “DHCP” to “Static”.
Step 4: Note down the static IP address fields and wipe off all the fields. Punch it in again and then save it.

Check carefully for duplicate Wi-Fi names before you connect
Perhaps, you might connect to a WiFi with a similar name. There are good chances that some users do not modify their WiFi network name and possibly, your neighbor may have the same WiFi network, service provider. Therefore, ensure you connect to the correct WiFi network.
 PDF application, powered by AI-based OCR, for unified workflows with both digital and scanned documents.
 Reset the Wifi network
One of the easiest ways to fix the authentication problem of Wifi is to reset the network. To do this, you would be required to forget the respective network first and then connect to it again. This can be done by simply following these steps.
1. Firstly, you need to forget a Wifi network. To do it, go to your phone’s Settings > WiFi and network. From here, you can see a list of all the Wifi hotspots that your phone connects to. Select the network you wish to forget.

2. When you would select a network, it will provide the basic information related to it. Just tap on the “Forget” button and agree to the pop-up message. This will erase the network’s information from your device.

3. Afterward, turn on your Wifi again and tap to the network you wish to connect to. Simply provide the credentials and tap on the “Connect” button to reestablish the connection. This way, you can reset the network successfully.


Modify network connection
If the above solution won’t work, then you would be required to walk the extra mile to fix the Samsung Galaxy F14 5G Wifi problem. After you reset a network connection, if still getting issues regarding the authentication of the network, you need to modify the connection. In this technique, you will be changing the IP settings on your phone to alter the way it establishes a secure connection. You can do it by following these steps.
1. To start with, visit your phone’s Settings and open the Wifi page.

2. This will display a list of all the Wifi networks that are associated with your device. Just long-tap on the Wifi network that you wish to modify. It will open another pop-up window. From here, tap on the option of “Manage network settings”. Sometimes, users also get an option of “Modify network settings” here as well. Simply select it to proceed.

3. It will display basic information related to your Wifi network. Just tap on the “Show advanced options” button to access more options related to the network setting.

4. From the IP Settings menu, change the field from DHCP to Static. This will let you establish a static connection between your device and the router.

5. As soon as you will change it to static, you will get different fields related to your network’s IP address, gateway, DNS, and more. Simply fill these fields and tap on the “Save” button once you are done.
Parental Control Software
Now, try to connect to the Wifi hotspot again. You would be able to overcome the authentication problem of Wifi.
Change Network Security Type
It has been observed that, when we connect to Wifi, our device chooses a wrong security type. This clashes with the default security protocol of the router and authentication error occurred due to this. If your device is facing the same issue, then it can be fixed by simply changing its security type. To do this, follow these instructions:
1. To change the security type of a network, you need to “Add the network”. If you already have the Wifi network saved, then simply forget the network by following the above-mentioned tutorial.
2. Now, turn on your device’s Wifi and tap on the option of “Add network”. Here, you would be asked to give a network name and select the security type. To manually select it, tap on the “Security” option.

3. From here, you will get a list of various security protocols that you can pick. Select “WPA/WPA2-PSK” and save your selection.

Now, try to connect to the network again. Most likely, it will let you fix the authentication error on your device.
Update Android firmware to the latest
There are instances where an outdated OS version of your Samsung Galaxy F14 5G may create a hindrance in establishing a connection between your device and the WiFi network. You need to update your Android firmware to the latest version and then check if the problem persists or not.
Step 1: Launch “Settings” of your Samsung Galaxy F14 5G and then get into the “About Phone” option.
Step 2: Now, opt for the “System Update” option. If the update is available, get your device updated to the latest OS version.
Restart the router and reset Android network settings
Sometimes, the WiFi router may hang up while establishing a connection and therefore, the wifi authentication problem occurs. Try restarting your Wi-Fi router and then check if your device connects successfully. If this doesn’t work, try to reset your Android Network Settings .
Bonus tip: Turn Airplane mode on/off
By simply turning on the Airplane mode (and later turning it off), you can easily fix the authentication problem Wifi most of the time. You can find a toggle button for Airplane mode on the notification bar of your phone. If you can’t find it there, then go to your phone’s Settings > Connection > More Networks and turn on the feature of “Airplane Mode”.

Let it do for a while. Afterward, turn it off and try to connect to the Wifi network again.
After following these quick and easy suggestions, you would be able to fix the Samsung Galaxy F14 5G Wifi problem for sure. Even if you use any other Android device, then its authentication error can easily be resolved after these effective solutions. Go ahead and give these expert solutions a try and let us know about your experience as well. If you have any other solution to fix the authentication problem Wifi, then share it with us as well in the comments.
 CalendarBudget - Monthly subscription membership to CalendarBudget via web browser or mobile app. Support included.
 Why Is My Samsung Galaxy F14 5G Offline? Troubleshooting Guide
Ever had your Samsung Galaxy F14 5G claim it’s offline, leaving you scratching your head about where it went wrong? We get it; it’s confusing. That’s why this article is here to untangle the mystery.
In the following sections, we’re diving into the “why is My Samsung Galaxy F14 5G offline” dilemma that many Android users face. We’ll break down the possible reasons behind this common issue and guide you through simple steps on how to fix it. By the end of the article, you’ll be able to get back to smooth internet surfing on your Samsung Galaxy F14 5G. Let’s get started.
Part 1: Why Does My Samsung Galaxy F14 5G Say Offline?
When you encounter the “offline” error message, it can disrupt your usual smartphone activities. Suddenly, you find yourself unable to browse the internet, send or receive emails, or stay connected through instant messages.
It’s a frustrating scenario, but let’s break down the potential reasons why your phone might be displaying this offline status:
- Enabling Airplane mode
Why is My Samsung Galaxy F14 5G showing offline? Well, one common culprit behind the “offline” message is the accidental activation of Airplane Mode on your Samsung Galaxy F14 5G. When Airplane Mode is enabled, it disconnects your phone from all wireless networks, rendering it unable to connect to the internet or cellular networks.
- Internet connection issues
Fluctuations in your signal strength or unexpected data loss can also be the culprit behind the “Why is My Samsung Galaxy F14 5G offline?” problem. Android devices rely on stable internet connections, and disruptions, whether temporary or prolonged, can lead to this error.
- Glitches or bugs
Sometimes, glitches or bugs in Google apps installed on your Samsung Galaxy F14 5G can mislead it into thinking it’s offline. Google Play Services or other related applications may encounter issues, causing the phone to display an “offline” message.
- Firewall restrictions
In some cases, a firewall on your Samsung Galaxy F14 5G might be overly restrictive, preventing the Samsung Galaxy F14 5G device from establishing a connection to the internet. This security measure, intended to protect your device, can sometimes go overboard and disrupt normal online functionality.
Now, you have understood the potential causes as the first step toward resolving the issue. Next, we’ll guide you through the process of troubleshooting and getting your Samsung Galaxy F14 5G back online.


Part 2: How To Fix “Phone Offline” With Internet Connection Problem
Now that we’ve figured out why your phone says it’s offline, let’s tackle the issue head-on. If you’re facing problems like downloads that won’t start, Google Play stuck on “Loading…,” or web pages refusing to load, chances are it’s an internet connection issue causing the problem.
Here are some easy solutions to get your connection back.
Solution 1: Change connection to mobile data
Switching to mobile data can be a quick fix if your Wi-Fi is acting up. It ensures a change in your connection source and might resolve the “Phone offline” issue. Follow these easy steps to change your connection to mobile data:
- Step 1: Swipe down from the top of your screen to access the Quick Settings menu.
- Step 2: Tap the Wi-Fi icon to turn off the Wi-Fi connection.
- Step 3: Tap Mobile Data to turn it on.

Solution 2: On and off Airplane mode
Airplane Mode can sometimes cause connectivity confusion. Turning it off and on essentially resets your phone’s wireless connections, which might resolve the offline issue.
How to on and off Airplane mode on Android:
- Step 1: Swipe down from the top of your screen to access the Quick Settings menu.
- Step 2: Look for the Airplane Mode icon and tap the icon to turn on Airplane Mode.
- Step 3: Wait a few seconds, then tap it again to turn off the Airplane Mode. Now, check if your phone is now online.

Solution 3: Reset network settings
Resetting network settings can help eliminate any configuration glitches that might be causing the phone offline problem. It’s like giving your phone’s connection settings a fresh start.
To reset your network settings, the steps may differ depending on the phone model you are using. However, you can generally do so by looking for the “Network” settings.
- Step 1: Open your phone’s Settings > Connection & sharing.
- Step 2: Find and select “Reset Wi-Fi, mobile networks, and Bluetooth.”
- Step 3: Tap “Reset Settings” and confirm the action and allow your phone to reset.
- Step 4: Reconnect to your Wi-Fi and check if the issue persists.


Solution 4: Restart your Wi-Fi router
Sometimes, the problem might not be with your phone but rather with the Wi-Fi router. Restarting it can refresh the connection and potentially resolve the connectivity problem.
How to restart your Wi-Fi router:
- Step 1: Locate your Wi-Fi router.
- Step 2: Turn off the router using the power button or unplug it.
- Step 3: Wait for about 10–15 seconds before plugging the router back in or turning it on.
- Step 4: Allow the router to restart and establish a connection. Then, check if your phone still shows the “Phone Offline” message.
These solutions should cover the most common connectivity issues. If the problem persists, we’ll explore further steps in the following sections.

Part 3: How To Fix “Phone Offline” Despite Having an Internet Connection
Ever found it odd to receive the frustrating offline error message when you’re sure your internet connection is up and running? If you’ve double-checked your internet connection and your phone still says it’s offline, the issue may lie within your browser, apps, or device settings.
In this part, we’ll answer the question “**Why does My Samsung Galaxy F14 5G say offline android?**” despite a seemingly functional internet connection. Then, let’s see other solutions on how to get your device back to its online, fully functional self.
Solution 1: Clear Google Chrome’s cache and data
Sometimes, the answer to “Why is my Android phone offline” can be attributed to a buildup of corrupted or outdated data in your browser’s cache. Clearing the cache and data for Google Chrome can resolve this issue, allowing for a fresh start and potentially eliminating the offline status.
How to clear your browser’s cache and data on Android:
- Step 1: Open the Settings > Apps > Manage Apps.
- Step 2: Locate and tap “Google Chrome” or your preferred browser in the list of installed apps.
- Step 3: Tap “Storage” and select “Clear Cache” to remove temporary files.
- Step 4: Choose “Clear Data” to delete app data. Confirm the action if prompted.
Now, restart Google Chrome and check if the offline error persists.


Solution 2: Re-install Google Chrome
If clearing the cache and data didn’t solve the offline issue, reinstalling Google Chrome can be the next step. A fresh installation can eliminate any underlying glitches or corrupted files that might be causing the persistent offline status.
How to re-install Google Chrome:
- Step 1: Visit the Google Play Store and search for Google Chrome.
- Step 2: Tap “Uninstall” to remove the app from your device.
- Step 3: Wait until it has finished uninstalling your app. Then, tap “Install” to start reinstalling the app.
- Step 4: Once the installation is complete, open Google Chrome and check if the offline error persists while browsing.

Solution 3: Repair the system to fix the phone showing offline
When persistent offline issues seem deeply rooted in your device’s system, a comprehensive system repair may be the solution. Wondershare Dr. Fone’s system repair tool is designed to address a range of system problems, providing a reliable way to fix any problem you have with your phone.
With Dr. Fone’s system repair tool, you can diagnose and resolve “Why is My Samsung Galaxy F14 5G offline on Android,” ensuring a smooth and functional Android experience.
Key Features:
- Comprehensive system repair for any devices
- User-friendly interface
- Efficient problem diagnosis
How to use Dr. Fone’s system repair tool:
- Step 1: Open Dr.Fone’s system repair tool
Start by launching Wondershare Dr.Fone on your computer. Go to the Toolbox section and connect your Samsung Galaxy F14 5G. Choose System Repair and pick Android as your device type.
 safe & secure
3,189,324 people have downloaded it
- Step 2: Start the repair
Click Start on the new screen to kick off the repair. Since you’re dealing with an offline connection issue on Android, select System Damage.
 NeoDownloader - Fast and fully automatic image/video/music downloader.
- Step 3: Confirm your device details
The platform will detect your Samsung Galaxy F14 5G’s brand. Confirm the Name, Model, Country, and Carrier. If your device is unlocked, choose OPEN in the Carrier section. Agree to the warning, click Next, and proceed with the repair.
- Step 4: Download firmware.
Follow the instructions to put your Samsung Galaxy F14 5G into Download Mode. Once in Download Mode, you will start downloading the firmware.

- Step 5: Confirm Installation
Remember, the repair may erase data. It’s advisable to back up your data first before starting the repair. Enter “000000” to confirm the repair process, shown by a progress bar. Click Done once it is completed and see if your Android is back online.

Conclusion
Dealing with the “Phone Offline” hiccup on your Samsung Galaxy F14 5G can be a real headache. But fear not – we’ve covered a range of solutions to get you back online smoothly. From troubleshooting internet connection problems to addressing browser and app-related glitches, the solutions provided in this guide are designed to cater to a variety of scenarios. If you find it troublesome to try solutions one by one, then we recommend using Dr.Fone directly which is a full toolkit for your phone and can help resolve most device glitches one-off.
Remember, technology can sometimes be tricky. But with patience and the right guidance, you can overcome these challenges.
How to Fix Unfortunately, Contacts Has Stopped Error on Samsung Galaxy F14 5G
Have you recently noticed a message stating “Contacts has stopped”? This is enough to take away all your peace. As, our native contacts app stashes all our useful contacts which are time and again needed by a user. It’s malfunctioning is enough to give us chills. But, why the Samsung Galaxy F14 5G or any other Android device incurs such problems?
It can occur while you launch the app or while you’re in the app already finding the required contact or when any other application is trying to gain access to it. So, to rage a battle with this issue, you need to seek help of some powerful methods in killing down the issue of contacts app crashes. And, the best part is that you’ve secured yourself by reaching the right place. We will be taking an in-depth discussion on several methods that may prove to be helpful. Let’s read them up here now.
Part 1: Get Android system fixed in one click
We’re always in search of a method that provides handy solution in a quite speedy and hassle-free manner. There are hundreds of tips and tricks for the same. You never know the possibility of firmware being the major drawback. No amount of manual methods can beat the performance of Dr.Fone - System Repair (Android).It is capable of providing 100% solution to any kind of issues, your phone gets troubled with. It is designed with the technology of combating the problem of black screen of death, app crashes and several other issues. In just a single-click, ward off the issue and free your device with errors

Dr.Fone - System Repair (Android)
Fix Contacts app crashing on Android in one click
- Incorporates with 1-click technology to resolve any issues occurring in your Samsung Galaxy F14 5G. Black screen of death, app crash, system crash, faulty issues etc.
- fone – Repair (Android) interface is extremely simple for users and lays functionalities aptly.
- One of its kind software with highest success rate in the market.
- Fully compatible with all kinds of Android phones, models, as well as the popular carrier.
- It provides users with 24 hours customer care service to resolve queries.
3,016,434 people have downloaded it
In this tutorial, we will learn the methodology of addressing the contacts keep stopping problem and gain triumph over it.
Step 1: Load program and draw connection of device
Download Dr.Fone - System Repair (Android) on PC. While program installs, use USB cable to connect device with system. From interface, tap on “System Repair” main window.
Step 2: Opt for Android Repair option
You’ll be directed to the “System Repair” screen where you have to opt for “Android Repair” options appearing over the left panel of the program. After that, do not forget to press “Start”.
Step 3: Key in device information
From following screen, fill the fields of “Brand”, “Name”, “Model”, “Country” and several other parameters. Then, tap on “Next” option to proceed further.

Step 4: Download Firmware package
Just follow the on-screen steps for booting your Samsung Galaxy F14 5G into download mode. Then, hit the “Next” button to proceed with downloading the most suitable firmware package for your Samsung Galaxy F14 5G.
Step 5: Repair Android phone
Once the software downloads, the program will automatically repair any issues irking over your phone. Now, your phone is all free from contacts error.
 The BootIt Collection covers multi-booting, partitioning, and disk imaging on traditional PC’s using the standard BIOS and newer PC’s using UEFI. The collection includes BootIt Bare Metal (BIBM) for standard BIOS systems and BootIt UEFI (BIU) for UEFI system.
Part 2: 9 Common ways to fix “Unfortunately, Contacts Has Stopped”
2.1 Restart Android system
Our response to any minuscule issue is straightaway restarting phone. This helps in clearing out any problem that might have disrupt the functioning of phone. So, to fix the problem of “Contacts app won’t open”, you too can try out your hand in this method.
- Get hold of your Android system and long press the power button.
- This will fadeout the main screen and showcase several options from where you’ve to tap on “Reboot/Restart” mode.
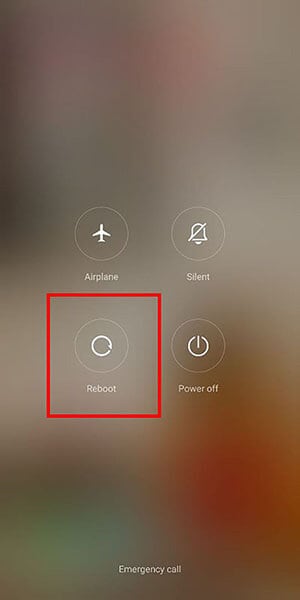
Now, your device will quickly reboot the Samsung Galaxy F14 5G device. Once, the Samsung Galaxy F14 5G device regains its normal state, check whether the issue is coming again or not.
2.2 Clear cache and data of Contacts app
The cache memory basically stashes the copies of the concerned application. It is indeed a streak of copies of the desired app storing information and incurring additional space on the storage. This might be the reason why the contact app crashes rapidly on your Samsung Galaxy F14 5G. Hence, it can prove to be a good remedy for this problem. Just follow down the steps mentioned below-
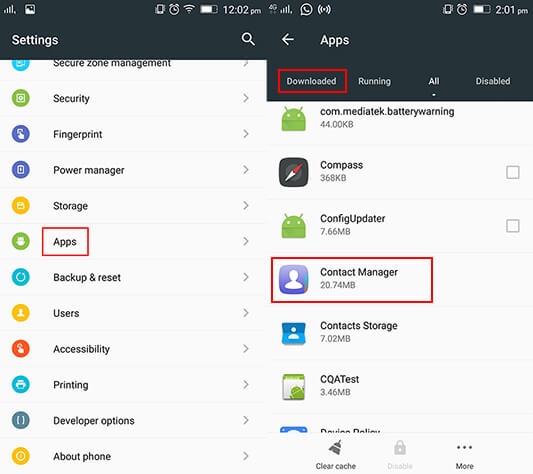
- First of all, go to “Settings” application from the app drawer or from the notification panel.
- Now, surf and select for “Applications” or “Apps & notifications”.
- Here, you need to browse for “Contacts” app and open it.
- On “Contacts” app, just tap on “CLEAR CACHE” and “CLEAR DATA” button. This will prompt the cache memory to be cleared.
 vMix Basic HD - Software based live production. vMix Basic HD includes 4 inputs, 3 cameras, streaming, recording, playlist.
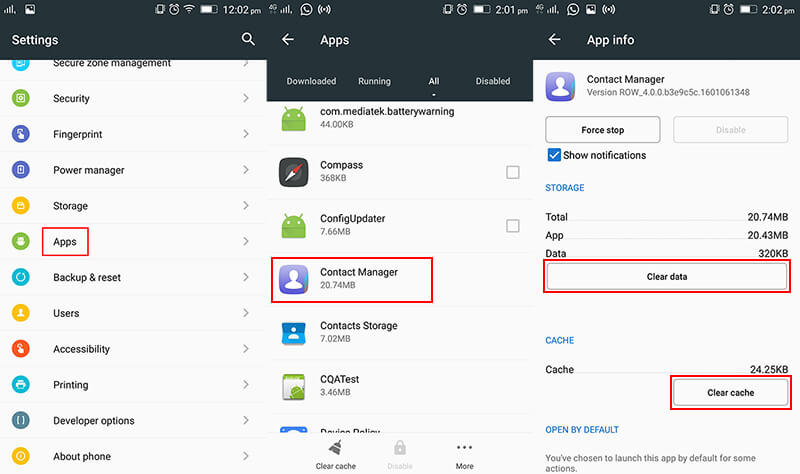
2.3 Wipe cache partition
As we know the cache memories are the temporary files build by the firmware. These are of little importance as they are bound to become a bit more corrupted in nature. And sometimes, may indirectly become a hurdle for the working of contacts app. It is good if the Samsung Galaxy F14 5G device is cleared off from the caches. Instead of manually wiping down the cache memory, we will understand how to clear off the cache partition in the following steps.
- From device, just power off your device. Then, press the “Volume Down + Power” button with “Home” combinations together.
- In a moment’s time, lose fingers from the “Power” button but do not release fingers from “Volume Down” and “Home” buttons.
- Once you view the “Android System Recovery” screen, just lose the “Volume Down” and “Home” buttons.
- Over the options available, just opt for “wipe cache partition” by tapping the “Volume down” button until the desired option is highlighted.
- Finally, push the “Power” key to give consent to the selection.

- After, the process is through there will be an option for “Reboot System Now”. Tap on it and restart the Samsung Galaxy F14 5G device.

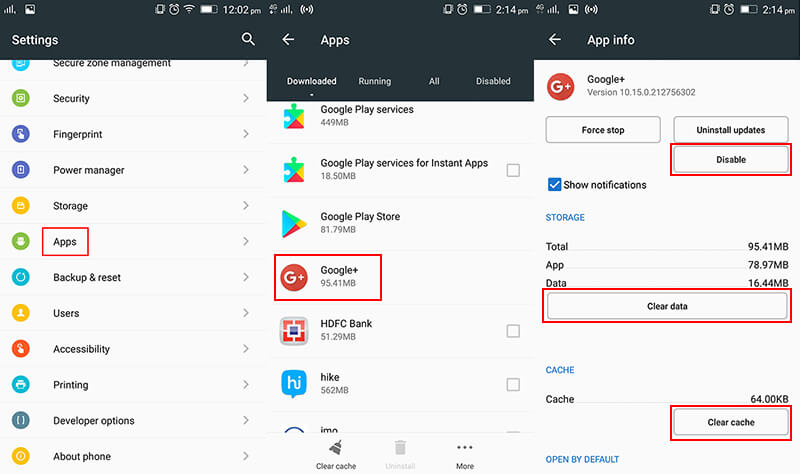
2.4 Disable Google+ app
The root cause for detecting any problem is not very easy. You never know the overloading of Google + application might have directly impacted contacts app crashes. To resolve it, disabling it may prove to be a helpful solution. Here is the quick reference for disabling Google+ application.
- First of all, visit “Settings” from your Samsung Galaxy F14 5G.
- In “Settings”, visit the “Application Manager” or “Applications” menu and browse for “Google +” app.
- From the application main page, you can choose to do either of the methods:
- Either, completely disable the application to work by pressing on “Force stop” or “Disable” feature.
- Or, brush away the unnecessary cache piled up on your storage by using “Clear Cache” functionality.
There will be a prompt stating that the application may misbehave. However, you must disable the feature and check whether it worked out for you or not.
2.5 Update your device software
Many a times, we skip updating our device software thinking it is of less importance. In fact, one must not miss out the updates that occurs in phone. As, without the updates, the scope of some applications are affected to some extent. For its better functioning and avoiding issues like “contacts keep stopping”, here is how you should update device software.
- First and foremost, head on to “Settings” menu. Over there, click on “About Device”.
- There, you need to tap over “Software Update”.
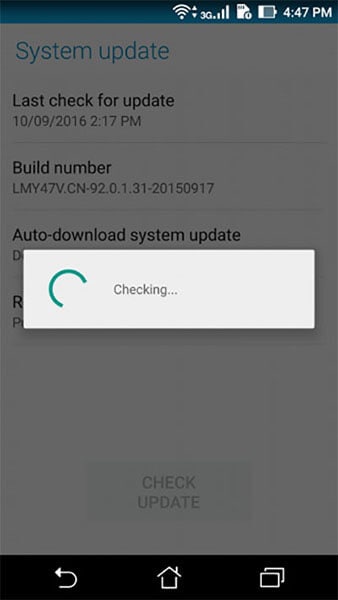
The device will now check whether there are any updates available for your device. If yes, then update application right away.
2.6 Reset App Preferences
As stated, the malfunctioning of contacts can be due to be any unexpected reason. Hence, users can opt for resetting app preferences. This may prove to be helpful in brushing away the issue of “Contacts app won’t open”.
- Launch “Settings” app and surf for “Apps” or “Applications” option on your Samsung Galaxy F14 5G.
- Just, tap over the three dots appearing at the upper right section and then tap on “Reset app preferences”.
- At last, just select “Reset default apps”.
 KoolReport Pro is an advanced solution for creating data reports and dashboards in PHP. Equipped with all extended packages , KoolReport Pro is able to connect to various datasources, perform advanced data analysis, construct stunning charts and graphs and export your beautiful work to PDF, Excel, JPG or other formats. Plus, it includes powerful built-in reports such as pivot report and drill-down report which will save your time in building ones.
 It will help you to write dynamic data reports easily, to construct intuitive dashboards or to build a whole business intelligence cockpit.
KoolReport Pro package goes with Full Source Code, Royal Free, ONE (1) Year Priority Support, ONE (1) Year Free Upgrade and 30-Days Money Back Guarantee.
Developer License allows Single Developer to create Unlimited Reports, deploy on Unlimited Servers and able deliver the work to Unlimited Clients.

Do you happen to exchange voicemails quite often? It can trigger to be the reason for contact app crashes. If your device happens to have a bulk of voicemails, you must get rid of them sooner or later. As, these might standout to be the prime reason for contacts stopping on Samsung Galaxy F14 5G. If you’re unaware about the procedure of removing all kinds of voicemails, you can proceed to make use of the following steps.
- Start with, launching the “Google Voice” app.
- From there, duly opt for “Voicemail”.
- Just click on the press menu option and at last select “Delete” option.
2.8 Uninstall the downloaded apps
Some applications contain some unwanted advertisements and some elements of malware. This can be enough for disrupting the functionality of the built-in contact app won’t open. It is crucial for your phone to be detoxed from such elements. You need to manually scrap off such applications. Do, ensure to download the application from the genuine source for future use.
- On your Samsung Galaxy F14 5G, just go to “Home” screen and tap on “Apps” icon.
- Then, tap on “Settings” icon followed by going to “Applications” or “Apps & Preferences” menu.
- After that, tap on “Menu icon” which will showcase the apps installed on device.
- Simply, open the app and hit the “Uninstall” button to brush away that app. Repeat the same with other application(s).
Now, check whether you’ve fought the battle with the problem or not.
2.9 Reset to Factory Settings
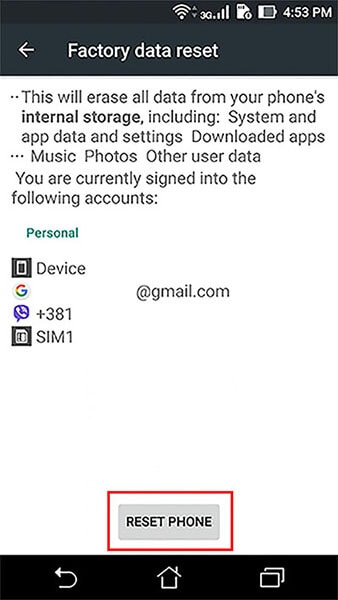
Last but not least, if all the methods falls flat to resolve the issue of contacts app won’t open. Then, it might be your device has some internal problem. This can be any software crash which might not be fixing with the aforementioned steps. That is where reset to factory settings may prove to be a good option. With this method, your phone will be cleared of all the components, settings and everything present in it. Here are is the comprehensive tutorial for biding bye to the problem of contacts app won’t open.
Note: Do ensure to take a backup of all the data available in your device. As, we don’t want you to regret afterwards.
- Just go to “Settings” and surf and select “Backup & Reset” option.
- You need to toggle on the option for performing the backup on your Google account.
- Then, tap on “Reset” button and then tick mark the option for resetting your phone.
- Title: Authentication Error Occurred on Samsung Galaxy F14 5G? Here Are 10 Proven Fixes | Dr.fone
- Author: Ariadne
- Created at : 2024-07-30 09:33:11
- Updated at : 2024-07-31 09:33:11
- Link: https://howto.techidaily.com/authentication-error-occurred-on-samsung-galaxy-f14-5g-here-are-10-proven-fixes-drfone-by-drfone-fix-android-problems-fix-android-problems/
- License: This work is licensed under CC BY-NC-SA 4.0.