
Best Methods for Lenovo ThinkPhone Wont Turn On | Dr.fone
Best Methods for Lenovo ThinkPhone Won’t Turn On
The Lenovo ThinkPhone 3 boasts numerous impressive features, making it a desirable phone. However, occasional malfunctions can result in the Lenovo ThinkPhone 3 won’t turn on issue. This issue can be incredibly frustrating. Don’t panic if you encounter this issue! There exist solutions to rectify it. This comprehensive guide aims to assist you in diagnosing and resolving the problem.
It will offer both basic steps and advanced techniques. With clear instructions and insightful tips, we’ll help troubleshoot your Lenovo ThinkPhone 3. Should you encounter this setback, follow this guide diligently to revive your Lenovo ThinkPhone 3 and have it up and running again.
Scenario 1. Phone Not Charged
A Lenovo ThinkPhone 4 not turning on might simply be a victim of a drained battery due to lack of charging. Several factors could lead to this, including a damaged charging cable or adapter. Moreover, issues with the power source or a malfunctioning charging port can be the issue.
Reason 1. Damaged Charging Cable or Adapter
Solution: Replace the charging cable or adapter with a known working one. Try using a different USB-C cable and adapter to ensure it’s not a faulty connection.
![]()

Reason 2. Faulty Power Source
Solution: Verify the power source by trying different outlets or USB ports. Ensure the power source is functional by testing it with another device.

![]()
Reason 3. Charging Port Issues
Solution: Check the charging port thoroughly to identify any dirt, debris, or signs of damage. Gently clean the port using compressed air or a small brush. If there’s visible damage, consider professional repair services.
![]()
Scenario 2. Check for Damages
Sometimes, a Lenovo ThinkPhone 3 might not turn on due to physical damage incurred by the Lenovo ThinkPhone device. Instances such as accidental drops, exposure to water or moisture, or even hardware malfunctions can be the reason. These can cause visible or invisible damage, leading to Lenovo ThinkPhone 4 won’t turn on.
Reason 1. Physical Impact or Dropping
Solution: If the Lenovo ThinkPhone 3 has experienced a significant impact or drop, inspect the exterior for any visible damage. A cracked screen or internal hardware issue might prevent the Lenovo ThinkPhone device from turning on. Consider professional repair services if necessary.
![]()
 Epubor Audible Converter for Mac: Download and convert Audible AAXC/AA/AAX to MP3 with 100% original quality preserved.
Reason 2. Water or Moisture Exposure
Solution: If the Lenovo ThinkPhone 3 has been exposed to water or moisture, immediately turn it off. Moreover, do not attempt to power it on. Place the Lenovo ThinkPhone device in a bowl of uncooked rice or silica gel packets to help absorb moisture. Alternatively, use a vacuum or hairdryer in a cool setting to draw out moisture. It’s crucial to let the Lenovo ThinkPhone device dry completely before attempting to power it on.
![]()
Reason 3. Hardware Malfunction
Solution: Check for any hardware malfunction symptoms such as overheating , unusual sounds, or a burnt smell. If any such signs are evident, refrain from attempting to turn on the Lenovo ThinkPhone device. You should seek professional assistance from authorized service centers.
 Simple and intuitive video editing
![]()
Scenario 3. Buggy Android Smartphone
An Android smartphone, including the Lenovo ThinkPhone 3 XL, can encounter situations where the OS becomes extremely buggy. It leads to various issues, such as the Lenovo ThinkPhone 3 XL won’t turn on or getting stuck in a boot loop . Software glitches, corrupted system files, or incompatible apps can contribute to such problems.
Reason 1. Device Stuck in the Boot Loop
Solution: Try initiating a force restart to help fix this issue. You can do that by pressing and holding the “Power” and “Volume Up” keys at the same time for 10 seconds.
![]()
Reason 2. Software Glitches or System Crash
Solution: If encountering issues with the Lenovo ThinkPhone device not powering on because of software glitches or a system crash, try initiating Safe Mode by simultaneously pressing and holding the ‘Power’ button along with a Volume key. This action will cause the Power menu to be displayed. Here, tap and hold the “Power off” for a while and tap “OK” once the Safe Mode prompt appears.
![]()
Scenario 4. System Glitches? Try Wondershare Dr.Fone as a Prioritized Solution
If you have attempted the solutions mentioned above without success, it is essential to explore a more robust option. This is important if the issue seems to be a major software problem that cannot be resolved using basic troubleshooting methods. In such cases, Wondershare Dr.Fone – System Repair emerges as a viable solution. Besides, It is a perfect fit to address the “Lenovo ThinkPhone 4 Not Turning On“ issue effectively.
Dr.Fone is designed to tackle various repairing problems that occur in Android devices. With its comprehensive setup, it can effectively address errors related to the Lenovo ThinkPhone. These measures are aligned to meet the specific requirements of your device. This is helpful in minimizing the time needed for troubleshooting.
 Easy GIF Animator is a powerful animated GIF editor and the top tool for creating animated pictures, banners, buttons and GIF videos. You get extensive animation editing features, animation effects, unmatched image quality and optimization for the web. No other GIF animation software matches our features and ease of use, that’s why Easy GIF Animator is so popular.
Key Features of Wondershare Dr.Fone
- Fone allows you to repair the Android device with just a few clicks. By following the on-screen instructions, you can complete the whole process conveniently.
- It fixes all Android-related problems, including the Black screen of death , the Play Store not working, and more.
- This tool is compatible with all the mainstream Lenovo ThinkPhone models, including the latest ones.
 CollageIt Pro
Steps Required To Resolve System Glitches via Wondershare Dr.Fone – System Repair
Now, we’ll provide you with a guide to resolve the Not Turning On issue of your Lenovo ThinkPhone. Go through the steps mentioned below to use Dr.Fone for the repair process.
- Step 1: Open Dr.Fone and Access System Repair Tool
Starting with, you will have to activate Dr.Fone on your computer and head to the “Toolbar” panel on the left of the window. From there, navigate to the “System Repair” tool and continue with the “Android” device to proceed with the repair process.

Parental Control Software
safe & secure4,082,195 people have downloaded it
- Step 2: Start Android System Repair
In the next step, choose the “Start” button that appears, by which your device will be recognized. You have to put in the “Name, Model, Country, and Carrier” details of the Lenovo ThinkPhone device and hit the “Next” option. Then, you need to put your Lenovo ThinkPhone on Download Mode following the on-screen instructions.

- Step 3: Utilize the Firmware
Afterward, the firmware will start to download automatically once the Lenovo ThinkPhone device enters a Download Mode. You need to select the “Fix Now” button and continue typing in a “000000” code. Then, proceed with the “Confirm” option to install the firmware on your device.

- Step 4: End the System Repair of Android
Lastly, the repair process will get started and can be viewed in a progress bar. Once it ends, hit the “Done” button to conclude the activity, and check your device to see if it starts properly.


Scenario 5. Need for a Power Cycle
At times, an Android device, including the Lenovo ThinkPhone 3/4, might benefit from a power cycle procedure. This process involves completely refreshing the Lenovo ThinkPhone device’s system. It potentially my Lenovo ThinkPhone 3 won’t turn on issues, temporary bugs, or system hang-ups. These issues prevent the Lenovo ThinkPhone device from turning on or functioning properly.
Reason 1. System Freeze or Unresponsive Device
Solution: If the Lenovo ThinkPhone 3/4 is unresponsive or frozen, perform a forced restart by holding down the “Power” and “Volume Up” for about 10 seconds. This action should force the Lenovo ThinkPhone device to shut down and reboot, potentially resolving the issue.

![]()

Reason 2. Battery Optimization and Refreshment
Solution: Sometimes, a power cycle helps optimize the Lenovo ThinkPhone device’s battery performance and refreshes the system. Allow the Lenovo ThinkPhone 3/4 to completely power down, charge it for at least 30 minutes, then attempt to turn it on.

Reason 3. Software Hang-Up or Temporary Glitch
Solution. To shut down your Lenovo ThinkPhone 3/4, press and hold the power button, then choose ‘Power Off’ from the menu that appears. After the Lenovo ThinkPhone device powers down, wait for about 30 seconds to 1 minute to ensure it has fully shut down before moving forward. Subsequently, press and hold the power button until the Google logo displays to restart your device.
Scenario 6. Software Damaged? Restore Immediately
When an Android device experiences severe software damage, it can lead to major issues like the Lenovo ThinkPhone 3 won’t turn on. This can hinder the functionality of the Lenovo ThinkPhone device. It also includes the inability to turn on or persistent system malfunctions. In such cases, performing a complete phone restore becomes a necessary solution:
 Nero Burning ROM:
The ultimate burning program for all your needs!
Reason 1. Corrupted System Files or Firmware Issues
Solution. In cases of severe software damage or corruption of system files, performing a settings reset becomes imperative. It is to restore the Lenovo ThinkPhone device to its default settings and resolve underlying issues.
![]()
Reason 2. Factory Reset as a Solution
Performing a factory reset serves as the ultimate solution. This is true when facing critical software damage that leads to a non-responsive Lenovo ThinkPhone 3/4. This process erases all user data, apps, settings, and files stored on the Lenovo ThinkPhone device, reverting it to its original factory state.
Steps To Perform a Factory Reset on Lenovo ThinkPhone 3/4
- Step 1. Access the “Settings” application on your Lenovo ThinkPhone 3/4. Then, navigate through the menu until you locate the “System” category located further down the list. Within the “System” settings, tap the last option named “Reset Options.”
![]()
- Step 2. On the following screen, press the “Erase All Data (Factory Reset)” option. Afterward, follow the on-screen instructions to complete the process.
![]()

Scenario 7. Phone Hangs on Installed App
There are scenarios where a phone, like the Lenovo ThinkPhone 3, hangs or gets stuck on a specific installed app. It happens during the startup process, and it can prevent the Lenovo ThinkPhone device from turning on properly. This issue often arises due to a malfunctioning or poorly coded app. This app disrupts the Lenovo ThinkPhone device’s startup routine, causing Lenovo ThinkPhone 4 won’t turn on.
Reason 1. Third-Party Apps Interference
Solution: Start by booting the Lenovo ThinkPhone 3 into Safe Mode. This mode disables third-party apps, allowing you to access the Lenovo ThinkPhone device without interference from downloaded applications.

![]()
Reason 2. Problematic App
Solution: While in Safe Mode, observe if the Lenovo ThinkPhone device boots up properly. If it successfully boots, it suggests that a third-party application is causing the problem. To pinpoint the problematic app, uninstall recently added apps individually and restart the Lenovo ThinkPhone device after each removal. This process helps pinpoint the problematic app causing the hang during startup.
![]()
Reason 3. Stacked Up App Cache and Data
Solution: If the problematic app is identified, try clearing its cache and data. Go to Settings and then access “Apps.” Within “Apps,” find the Problematic App and tap “Storage & cache.” On the subsequent display, select “Clear cache “ and “Clear storage” to restore the application to its original settings. After restarting the Lenovo ThinkPhone device, verify whether the problem persists.
![]()
Reason 4. Outdated Application
Solution: If the application is essential, ensure to seek updates within the Google Play Store. Updating the app to its latest version could potentially resolve any compatibility issues. Alternatively, if updates are not available or don’t resolve the problem, consider uninstalling and reinstalling the app.
![]()
Conclusion
In conclusion, this article has aimed to address the perplexing issue of a Lenovo ThinkPhone 3 won’t turn on. It offered a range of solutions depending on different underlying reasons. The guide included basic methods like checking for charging issues and examining hardware damage. Moreover, it included advanced techniques like software repair tools such as Wondershare Dr.Fone.
Users are encouraged to follow the step-by-step instructions outlined here. These solutions can serve as effective remedies for resolving the problem. For more in-depth and advanced solutions, considering Dr.Fone stands as a significant option. It offers a robust system repair feature for resolving intricate software-related issues.
 safe & secure
3,673,294 people have downloaded it
Fix App Not Available in Your Country Play Store Problem on Lenovo ThinkPhone
Mobile applications are important for smooth operations when it comes to smartphones. They offer convenience, entertainment, and functionality at your fingertips. However, encountering the “App Not Available in Your Country Play Store“ issue can be frustrating. It can quickly dampen the excitement of discovering a new app.
This is mainly due to geographical restrictions that are often imposed by developers. It poses a hurdle for users eager to access a particular application. However, there is no need to worry, as this article will help you in resolving this issue. It will delve into effective strategies and solutions to ensure the unavailability of an app is no longer an obstacle.
 Forex Robotron Basic Package
Part 1: Reasons Behind the App Not Available in Your Country Play Store Issue
Encountering the “Google Play App Not Available in Your Country“ issue can feel like hitting a roadblock. This restriction hampers your ability to explore and use valuable apps. It can also disrupt the smooth functioning of your daily digital activities. Before going for solutions, it is crucial to understand the reasons causing this restriction in installing apps on smartphones:

1. Regional Restrictions
One of the primary culprits behind this issue is the regional restrictions imposed by developers. Developers often roll out their apps gradually across different regions. It is done to adhere to legal and licensing requirements. This staggered release strategy ensures compliance with local laws. Moreover, it guarantees a smooth user experience tailored to specific geographical locations.
2. Licensing and Legal Constraints
Licensing agreements and legal constraints play an important role when it comes to the accessibility of apps. Developers may encounter licensing issues. This can prevent them from offering their apps in certain regions. It is due to copyright, trademark, or other legal considerations. Navigating the complex web of international laws and agreements is a big hassle. It becomes a determining factor in the availability of apps on the Play Store.
3. Localization Challenges
Apps are often designed with specific markets in mind. These incorporate language, cultural, and regulatory considerations to enhance user experience. The absence of proper localization can render an app incompatible with specific regions. It includes factors such as adapting the app for different languages, currencies, and cultural nuances. This can result in the app being excluded from the Play Store app not available in your country.
4. Device and OS Compatibility
The compatibility between the app, the user’s device, and its OS is another factor that contributes to this issue. Developers might restrict their app availability to certain devices or OS versions. It can restrict access for users whose devices or OS do not meet the app’s requirements. This technical limitation adds another layer to the complexity of app availability.
5. Political and Economic Factors
In some instances, political tensions or economic considerations can also be a factor. It may influence the accessibility of apps in certain countries. Geo-political factors, trade sanctions, or economic conditions can impact the distribution of apps. This leads developers to exclude specific regions from their app’s availability.
 Power Tools add-on for Google Sheets, Lifetime subscription
Part 2: 4 Tested Methods To Fix Google Play App Not Available in Your Country
The right app can make a major difference in work efficiency or personal enjoyment. That’s why facing the “Play Store app not available in your country“ issue can be frustrating. The positive aspect is that many solutions exist for addressing this issue. Presented below are the top 4 approaches to resolving this matter:
Method 1: Change Your Google Play Store Country
One of the most direct ways to address this issue is by manually adjusting your Google Play Store country settings. Google allows users to change their country or region. Remember that you can only do it once a year. To utilize this approach, it’s essential to reside in the specified country. The other option is to provide a payment method originating from that particular region. Below is a detailed walkthrough for this procedure:
- Step 1. Launch the Google Play Store on your Lenovo ThinkPhone and tap the “Profile” icon from the top right corner. Here, choose “Settings” and follow on to tap “General.”
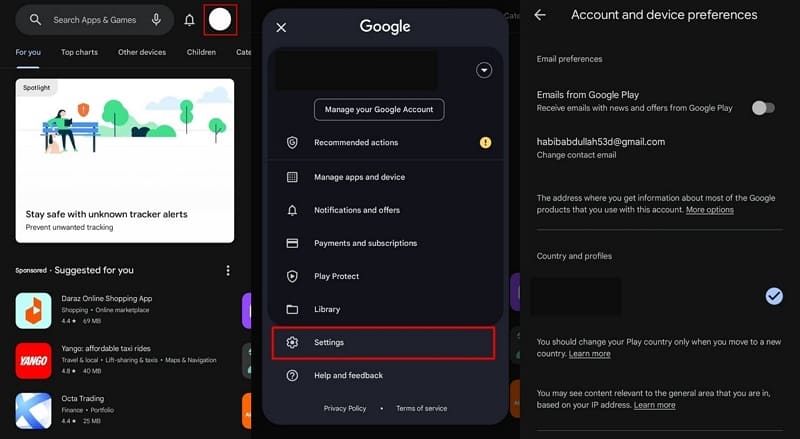
- Step 2. Within the “General” tab, move towards “Account and device preferences” and tap it. There, select “Country and profiles” and tap the country to change it. Now, follow the on-screen prompts to complete the procedure.
 Any DRM Removal for Win:Remove DRM from Adobe, Kindle, Sony eReader, Kobo, etc, read your ebooks anywhere.
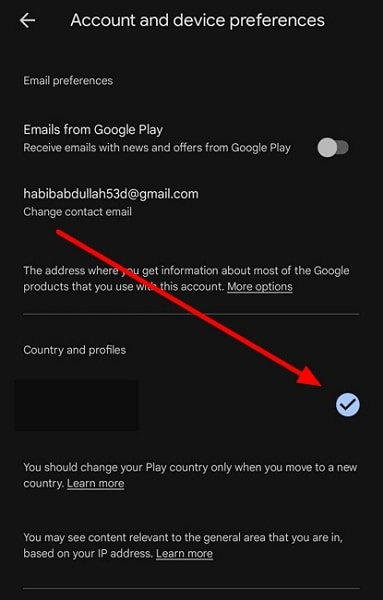

Method 2: Use a Reliable VPN
Confronting the message “This app is not accessible in your country” on the Play Store? Employing a Virtual Private Network (VPN) can be an effective strategy. It allows you to virtually transcend geographical restrictions. A VPN masks your actual location by routing your internet connection through servers in different regions.
You can utilize a reliable VPN to access the Play Store as though you were in a region where the desired app is accessible. Follow this step-by-step guide to address this concern:
- Step 1. Access the Google Play Store and download a reliable VPN for the procedure. Open the VPN you download and connect to the country of your choice. Once you have connected your device’s IP to another country using the VPN, continue to your home screen.

- Step 2. Look for Google Play Store on the home screen and long-press to open a menu. From the pop-up menu, choose “App Info,” and on the following screen, tap “Clear data.” Now, press “Clear cache” to wipe the cache.


- Step 3: Go back to the “App info” screen and press “Force Stop” to force close the app. Afterward, relaunch the Play Store and access your targeted apps.

Method 3: Download an APK File
One way to resolve the issue at hand is to sideload the app by downloading its APK file. It can be a viable and direct solution where other methods fail. This method involves installing the application manually, bypassing the Google Play Store. Follow these sequential instructions to download and install an APK file:
- Step 1. Before starting, ensure that you have enabled the installation from unknown sources. Afterward, find a reliable website and search for your targeted apps.
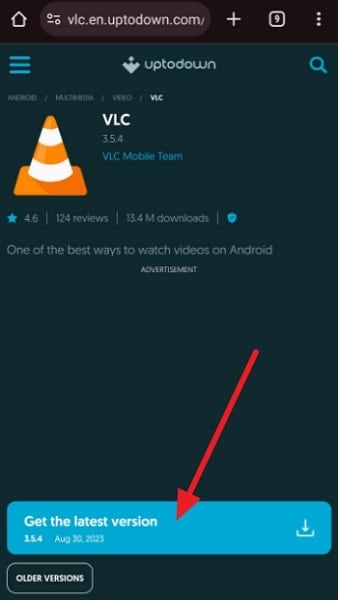
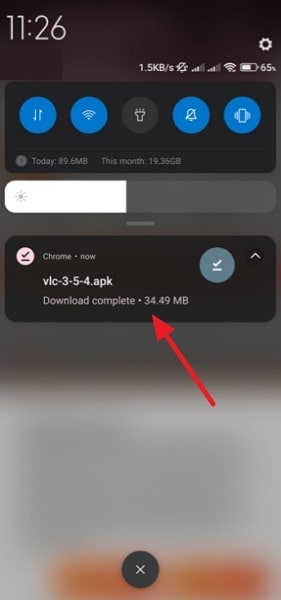
- Step 2. Once you have found the targeted app, download it on your Lenovo ThinkPhone. When the download process is complete, tap the file to start the installation process.
Method 4: Try a Third-Party App Store
Google Play Store isn’t the only apps and games store. There exist many options, and exploring them can help you find the apps you are looking for. Typically, third-party app marketplaces are not bound by geographical limitations. Here’s a guide on acquiring an app from a third-party store:
- Step 1. Use a web browser on your Lenovo ThinkPhone to look for a reliable third-party app store like Aptoide. Once it is downloaded, install it on your smartphone.

- Step 2. Open the third-party app store and look for your targeted apps. Now, you should be able to download them without any restrictions.
Pro Tip: Fix Play Store Available in Your Country but Not Working on All Android Smartphones
If the Play Store is not working on your Lenovo ThinkPhones or an application is not downloading from it, we have a tip for you. Wondershare Dr.Fone – System Repair (Android) is a perfect solution for all the issues for your Lenovo ThinkPhones. Whether it is the Play Store functionality issue or the downloading of applications problem, System Repair (Android) is there to resolve them.
It fixes various Android issues in a matter of a few seconds. This toolkit has a high success rate of fixing Android issues, including the Play Store Not Working issue. It can also resolve the issue of Apps Keep Crashing, Phone Stuck in a Boot Loop, and much more.
Key Features of Wondershare Dr.Fone
There are some prevalent pointers you should know about Wondershare Dr.Fone. Before you continue using the tool for resolving Android problems, look into these prominent features:
- System Repair (Android) tool is used to fix other issues, too, like the black screen of death in Android.
- This software is compatible with all the Lenovo ThinkPhone models, including the latest one, Lenovo ThinkPhone S23.
- With no technical expertise required, you can execute all tasks to repair your Android issues with a few clicks.
![]()
Dr.Fone - System Repair (Android)
Repair Android System Errors without Any Trouble.
- Fix your Android to normal, no skills required.
- Fix various Android system issues, stuck in boot loop , black screen , or won’t turn on , looping on start, etc.
- The high success rate in resolving Android system issues.
- Compatible with a wide range of Android devices and OS versions
- User-friendly interface with easy-to-follow steps.
3981454 people have downloaded it
Steps Included To Fix Play Store Not Working on All Android Smartphones
While you have learned much about Wondershare Dr.Fone, in situations where an app is available but the Play Store is not working properly, it comes pretty handy. Here is how you can fix the Play Store not working problem on Android devices with Dr.Fone:
- Step 1: Activate Dr.Fone – System Repair Tool
At first, you will have to run Wondershare Dr.Fone - System Repair (Android) on your system and head towards the “System Repair” section from the “Toolbox.” Next, click on the “Android” device to continue, and hit the “Start” button to start the repair process.
![]() FX PRO (Gold Robot + Silver Robot(Basic Package))
FX PRO (Gold Robot + Silver Robot(Basic Package))

- Step 2: Put Android Phone on Download Mode
On the next window, you need to enter the Lenovo ThinkPhone device details, including the “Name, Model, Country, and Carrier,” and hit the “Next” button. Then, proceed to put your Lenovo ThinkPhone on the “Download Mode” by following the on-screen instructions.

- Step 3: Confirm the Installation and Conclude the Process
Once the phone has been put in the Download Mode, the firmware will download automatically. Install it on your device by selecting the “Fix Now” icon. Now, enter the “Code” and confirm installation, after which hit the “Done” button once the process concludes.

safe & secure
3,289,252 people have downloaded it
Frequently Asked Questions
- How do we resolve the inability to change the Play Store country problem?
If you are unable to change your Play Store country, ensure that your Google Play Store account has no pending transactions. Verify that the payment methods associated with your Google account are valid. Clear the cache and data of the Google Play Store app in your device settings to reset any potential issues.
- Can you use the Google Play Store balance after changing the country?
Your Google Play Balance is linked to the country setting on your Google Play account. If you possess a Google Play balance and decide to switch countries, the balance becomes unusable in the new location. Changing countries on your account results in the inability to access or utilize the existing balance.
- Is it safe to download Android applications from a third-party store?
It is risky to download Android applications from a third-party store because of the viral content. There could be issues like App Authenticity, Outdated Apps, Policy Violations, etc. It is better to download these apps from official platforms like Google Play Store since they are more secure.
Conclusion
To summarize, the pursuit of the perfect app sometimes encounters hurdles. One frustrating issue often reported by users is the “App Not Available in Your Country Play Store“ issue. However, armed with the knowledge, you can now navigate through these challenges. From changing your Play Store country to using VPNs, this guide has covered a range of methods. Each method provides a unique approach, catering to different preferences and circumstances.
As a parting recommendation, we introduce Wondershare Dr.Fone. It is a powerful tool designed to tackle Play Store malfunctions head-on. With support for even Android 13, this software offers a complete solution for Android. Its comprehensive approach and easy-to-use interface make it a valuable addition to your toolkit.
How to Fix the Soft Bricked Lenovo ThinkPhone?
Bricked phone is a serious problem, as your brick smartphone could be suffering from a soft brick or hard brick problem, and must be dealt with carefully. It is very common to see a brick smartphone these days. If you are wondering what exactly is a bricked phone, here is your answer.
A bricked phone, hard brick or soft brick, is a smartphone which refuses to start or boot all the way up the home/main screen of the Lenovo ThinkPhone device. This issue is observed within most Android phones because users have a tendency to tamper with the Lenovo ThinkPhone device settings, flashing new and customized ROMs and tweaking with the essential files. Playing around with the phone’s internal set-up leads to such errors, worst of them being a brick smartphone. Usually, a bricked phone does not switch on and stays frozen at the Lenovo ThinkPhone device logo, a blank screen or even worse, doesn’t respond to any command, even the power on command.
If you are confused about the soft brick and hard brick problems and looking for solutions to fix your priced phone, then here is all you need to know.
Read on to find out more.
Part 1: What is the difference between soft brick and hard brick?
To begin with, let us understand the basic difference between a soft brick and hard brick issue. Both versions of a bricked phone prevent it from booting but differ in their causes and gravity of the problem.
A soft-brick problem is caused merely by a software error/crash and makes your device switch on automatically every time you manually turn it off. This phenomenon is referred to as Boot Loop. Soft bricked Android phones are not as difficult to fix as the hard bricked Android phones. It is convenient to say that a soft bricked phone only boots up half-way and not fully, whereas a hard bricked device does not switch on at all. A hard brick error is thus caused when the kernel, which is nothing but an interface for the software to communicate with the hardware, is tampered with. A hard bricked phone is not recognized by your PC when plugged in and is a serious problem. It requires troubleshooting techniques and cannot be easily fixed as the soft brick problem.

Hard bricked phones are a rare sight, but the soft brick is very common. Given below are ways to fix a soft brick Android phone. The techniques listed here are the best and the most efficient ways to get your phone back to its normal working conditions without losing your important data or damaging your device or its software.
Part 2: Stuck at the Boot Loop
This is the first sign of a soft bricked Android phone. Boot Loop is nothing but when your phone does not remain switched off and turns itself on automatically, and freezes at the logo screen or blank screen, every time you manually try to power it off.
Stuck at boot loop problem can be fixed by clearing your Cache partitions. These partitions are nothing but storage locations for your modem, kernels, system files, drivers and built-in Apps data.
It is advisable to clear Cache partitions regularly to keep your phone free from such glitches.
Since the phone refuses to boot, Cache can be cleared from entering into the Recovery Mode. Different Android devices have different ways to put it in recovery mode. Normally pressing the power key and volume down key helps, but you may refer to your phone’s guide for better understanding and then follow the steps given below to clear the cache partition:
Once you are the recovery mode screen, you will see a number of options as shown in the screenshot.

Use the volume down key to scroll down and select ”Wipe cache partition” as shown below.
 >
>
After the process is completed, select “Reboot System” which is the first option in the recovery mode screen.
This method will help you erase all the clogged up and unwanted files. You may loose some App related data, but that is a small price to pay to fix your bricked phone.
If this method does not boot up your brick smartphone and the problem still persists, there are two more things you can try. Read ahead to find out about them.
 PaperScan Professional: PaperScan Scanner Software is a powerful TWAIN & WIA scanning application centered on one idea: making document acquisition an unparalleled easy task for anyone.
Part 3: Booting straight into recovery mode
If your bricked phone does not boot up to your Home Screen or Lock screen and instead boots directly into Recovery Mode, there is not much left to do. Booting straight into recovery mode is undoubtedly a soft brick error but it also indicates a possible problem with your current ROM. The only option you have to flash a new ROM to reboot your bricked phone back to its normal functioning.
To flash a new ROM:
Firstly, you must root your phone and unlock the Bootloader. Every phone’s mechanism to unlock the bootloader is different, thus, we suggest to refer to your user manual.
Once the Bootloader is unlocked, take a backup of all your data by selecting “Backup” or “Android” back in recovery mode. The process should not take long and all you need to do is tap “OK” to config backup.

In this step, download a ROM of your choice and store it in your SD Card. Insert the SD Card in your phone to begin the flashing process.
Once at the recovery mode, select “Install Zip from SD Card” from the options.

Scroll down using the volume key and use the power key to select the downloaded ROM.


This might take a few minutes of your time, but once the process is complete, reboot your phone.
Hopefully, your bricked phone will not boot normally and work smoothly.
Part 4: Booting straight into Bootloader
If your bricked phone boots straight into Bootloader, then this a serious issue and must not be taken lightly. Flashing a new ROM or clearing cache partitions are of little help in such a brick smartphone situation. Booting straight into Bootloader is a peculiar soft bricked Android phone feature and can be tackled only by downloading and flashing your original ROM from the manufacturer. In order to do so, a detailed study about your manufacturer’s ROM, ways to download and flash must be carried out. Since different Android phones come with different types of ROMs, it difficult to cover all the aspects about the different types of ROMs.
Brick smartphone problem has become more prominent than phone freezing or hanging issue. Android users are often seen looking for solutions to fix their soft brick and hard brick phones. Android phones are prone to get bricked and thus, it is important for us to know about the three techniques given above. These methods have been tried, tested and recommended by ay affected bricked phone users. Therefore, these tips are reliable and worth a try. So if your phone acts stubborn and refuses to boot normally, examine the problem carefully and adopt one of the solutions given above which best suits your situation.
- Title: Best Methods for Lenovo ThinkPhone Wont Turn On | Dr.fone
- Author: Ariadne
- Created at : 2024-07-30 09:37:42
- Updated at : 2024-07-31 09:37:42
- Link: https://howto.techidaily.com/best-methods-for-lenovo-thinkphone-wont-turn-on-drfone-by-drfone-fix-android-problems-fix-android-problems/
- License: This work is licensed under CC BY-NC-SA 4.0.