
Best Methods for Vivo X100 Wont Turn On | Dr.fone
Best Methods for Vivo X100 Won’t Turn On
The Vivo X100 3 boasts numerous impressive features, making it a desirable phone. However, occasional malfunctions can result in the Vivo X100 3 won’t turn on issue. This issue can be incredibly frustrating. Don’t panic if you encounter this issue! There exist solutions to rectify it. This comprehensive guide aims to assist you in diagnosing and resolving the problem.
It will offer both basic steps and advanced techniques. With clear instructions and insightful tips, we’ll help troubleshoot your Vivo X100 3. Should you encounter this setback, follow this guide diligently to revive your Vivo X100 3 and have it up and running again.
Scenario 1. Phone Not Charged
A Vivo X100 4 not turning on might simply be a victim of a drained battery due to lack of charging. Several factors could lead to this, including a damaged charging cable or adapter. Moreover, issues with the power source or a malfunctioning charging port can be the issue.

Reason 1. Damaged Charging Cable or Adapter
Solution: Replace the charging cable or adapter with a known working one. Try using a different USB-C cable and adapter to ensure it’s not a faulty connection.
![]()
Reason 2. Faulty Power Source
Solution: Verify the power source by trying different outlets or USB ports. Ensure the power source is functional by testing it with another device.
![]()
Reason 3. Charging Port Issues
Solution: Check the charging port thoroughly to identify any dirt, debris, or signs of damage. Gently clean the port using compressed air or a small brush. If there’s visible damage, consider professional repair services.
![]()
Scenario 2. Check for Damages
Sometimes, a Vivo X100 3 might not turn on due to physical damage incurred by the Vivo X100 device. Instances such as accidental drops, exposure to water or moisture, or even hardware malfunctions can be the reason. These can cause visible or invisible damage, leading to Vivo X100 4 won’t turn on.

Reason 1. Physical Impact or Dropping
Solution: If the Vivo X100 3 has experienced a significant impact or drop, inspect the exterior for any visible damage. A cracked screen or internal hardware issue might prevent the Vivo X100 device from turning on. Consider professional repair services if necessary.
![]()
Reason 2. Water or Moisture Exposure
Solution: If the Vivo X100 3 has been exposed to water or moisture, immediately turn it off. Moreover, do not attempt to power it on. Place the Vivo X100 device in a bowl of uncooked rice or silica gel packets to help absorb moisture. Alternatively, use a vacuum or hairdryer in a cool setting to draw out moisture. It’s crucial to let the Vivo X100 device dry completely before attempting to power it on.
![]()
Reason 3. Hardware Malfunction
Solution: Check for any hardware malfunction symptoms such as overheating , unusual sounds, or a burnt smell. If any such signs are evident, refrain from attempting to turn on the Vivo X100 device. You should seek professional assistance from authorized service centers.
![]()
Scenario 3. Buggy Android Smartphone
An Android smartphone, including the Vivo X100 3 XL, can encounter situations where the OS becomes extremely buggy. It leads to various issues, such as the Vivo X100 3 XL won’t turn on or getting stuck in a boot loop . Software glitches, corrupted system files, or incompatible apps can contribute to such problems.
Reason 1. Device Stuck in the Boot Loop
Solution: Try initiating a force restart to help fix this issue. You can do that by pressing and holding the “Power” and “Volume Up” keys at the same time for 10 seconds.

![]()
Reason 2. Software Glitches or System Crash
Solution: If encountering issues with the Vivo X100 device not powering on because of software glitches or a system crash, try initiating Safe Mode by simultaneously pressing and holding the ‘Power’ button along with a Volume key. This action will cause the Power menu to be displayed. Here, tap and hold the “Power off” for a while and tap “OK” once the Safe Mode prompt appears.
 OtsAV TV Webcaster
![]()

Scenario 4. System Glitches? Try Wondershare Dr.Fone as a Prioritized Solution
If you have attempted the solutions mentioned above without success, it is essential to explore a more robust option. This is important if the issue seems to be a major software problem that cannot be resolved using basic troubleshooting methods. In such cases, Wondershare Dr.Fone – System Repair emerges as a viable solution. Besides, It is a perfect fit to address the “Vivo X100 4 Not Turning On“ issue effectively.
Dr.Fone is designed to tackle various repairing problems that occur in Android devices. With its comprehensive setup, it can effectively address errors related to the Vivo X100. These measures are aligned to meet the specific requirements of your device. This is helpful in minimizing the time needed for troubleshooting.
Key Features of Wondershare Dr.Fone
- Fone allows you to repair the Android device with just a few clicks. By following the on-screen instructions, you can complete the whole process conveniently.
- It fixes all Android-related problems, including the Black screen of death , the Play Store not working, and more.
- This tool is compatible with all the mainstream Vivo X100 models, including the latest ones.
Steps Required To Resolve System Glitches via Wondershare Dr.Fone – System Repair
Now, we’ll provide you with a guide to resolve the Not Turning On issue of your Vivo X100. Go through the steps mentioned below to use Dr.Fone for the repair process.
- Step 1: Open Dr.Fone and Access System Repair Tool
Starting with, you will have to activate Dr.Fone on your computer and head to the “Toolbar” panel on the left of the window. From there, navigate to the “System Repair” tool and continue with the “Android” device to proceed with the repair process.


 NeoDownloader - Fast and fully automatic image/video/music downloader.
 safe & secure
4,082,195 people have downloaded it
- Step 2: Start Android System Repair
In the next step, choose the “Start” button that appears, by which your device will be recognized. You have to put in the “Name, Model, Country, and Carrier” details of the Vivo X100 device and hit the “Next” option. Then, you need to put your Vivo X100 on Download Mode following the on-screen instructions.

- Step 3: Utilize the Firmware
Afterward, the firmware will start to download automatically once the Vivo X100 device enters a Download Mode. You need to select the “Fix Now” button and continue typing in a “000000” code. Then, proceed with the “Confirm” option to install the firmware on your device.

- Step 4: End the System Repair of Android
Lastly, the repair process will get started and can be viewed in a progress bar. Once it ends, hit the “Done” button to conclude the activity, and check your device to see if it starts properly.

Scenario 5. Need for a Power Cycle
At times, an Android device, including the Vivo X100 3/4, might benefit from a power cycle procedure. This process involves completely refreshing the Vivo X100 device’s system. It potentially my Vivo X100 3 won’t turn on issues, temporary bugs, or system hang-ups. These issues prevent the Vivo X100 device from turning on or functioning properly.
 Any DRM Removal for Win:Remove DRM from Adobe, Kindle, Sony eReader, Kobo, etc, read your ebooks anywhere.
Reason 1. System Freeze or Unresponsive Device
Solution: If the Vivo X100 3/4 is unresponsive or frozen, perform a forced restart by holding down the “Power” and “Volume Up” for about 10 seconds. This action should force the Vivo X100 device to shut down and reboot, potentially resolving the issue.
![]()
 Power Tools add-on for Google Sheets, Lifetime subscription
Reason 2. Battery Optimization and Refreshment
Solution: Sometimes, a power cycle helps optimize the Vivo X100 device’s battery performance and refreshes the system. Allow the Vivo X100 3/4 to completely power down, charge it for at least 30 minutes, then attempt to turn it on.
Reason 3. Software Hang-Up or Temporary Glitch
Solution. To shut down your Vivo X100 3/4, press and hold the power button, then choose ‘Power Off’ from the menu that appears. After the Vivo X100 device powers down, wait for about 30 seconds to 1 minute to ensure it has fully shut down before moving forward. Subsequently, press and hold the power button until the Google logo displays to restart your device.
Scenario 6. Software Damaged? Restore Immediately
When an Android device experiences severe software damage, it can lead to major issues like the Vivo X100 3 won’t turn on. This can hinder the functionality of the Vivo X100 device. It also includes the inability to turn on or persistent system malfunctions. In such cases, performing a complete phone restore becomes a necessary solution:
Reason 1. Corrupted System Files or Firmware Issues
Solution. In cases of severe software damage or corruption of system files, performing a settings reset becomes imperative. It is to restore the Vivo X100 device to its default settings and resolve underlying issues.
![]()
Reason 2. Factory Reset as a Solution
Performing a factory reset serves as the ultimate solution. This is true when facing critical software damage that leads to a non-responsive Vivo X100 3/4. This process erases all user data, apps, settings, and files stored on the Vivo X100 device, reverting it to its original factory state.
Steps To Perform a Factory Reset on Vivo X100 3/4
- Step 1. Access the “Settings” application on your Vivo X100 3/4. Then, navigate through the menu until you locate the “System” category located further down the list. Within the “System” settings, tap the last option named “Reset Options.”
![]()
- Step 2. On the following screen, press the “Erase All Data (Factory Reset)” option. Afterward, follow the on-screen instructions to complete the process.
![]()

Scenario 7. Phone Hangs on Installed App
There are scenarios where a phone, like the Vivo X100 3, hangs or gets stuck on a specific installed app. It happens during the startup process, and it can prevent the Vivo X100 device from turning on properly. This issue often arises due to a malfunctioning or poorly coded app. This app disrupts the Vivo X100 device’s startup routine, causing Vivo X100 4 won’t turn on.

Reason 1. Third-Party Apps Interference
Solution: Start by booting the Vivo X100 3 into Safe Mode. This mode disables third-party apps, allowing you to access the Vivo X100 device without interference from downloaded applications.
![]()
Reason 2. Problematic App
Solution: While in Safe Mode, observe if the Vivo X100 device boots up properly. If it successfully boots, it suggests that a third-party application is causing the problem. To pinpoint the problematic app, uninstall recently added apps individually and restart the Vivo X100 device after each removal. This process helps pinpoint the problematic app causing the hang during startup.
![]()
Reason 3. Stacked Up App Cache and Data
Solution: If the problematic app is identified, try clearing its cache and data. Go to Settings and then access “Apps.” Within “Apps,” find the Problematic App and tap “Storage & cache.” On the subsequent display, select “Clear cache “ and “Clear storage” to restore the application to its original settings. After restarting the Vivo X100 device, verify whether the problem persists.
![]()
Reason 4. Outdated Application
Solution: If the application is essential, ensure to seek updates within the Google Play Store. Updating the app to its latest version could potentially resolve any compatibility issues. Alternatively, if updates are not available or don’t resolve the problem, consider uninstalling and reinstalling the app.
![]()
Conclusion
In conclusion, this article has aimed to address the perplexing issue of a Vivo X100 3 won’t turn on. It offered a range of solutions depending on different underlying reasons. The guide included basic methods like checking for charging issues and examining hardware damage. Moreover, it included advanced techniques like software repair tools such as Wondershare Dr.Fone.
Users are encouraged to follow the step-by-step instructions outlined here. These solutions can serve as effective remedies for resolving the problem. For more in-depth and advanced solutions, considering Dr.Fone stands as a significant option. It offers a robust system repair feature for resolving intricate software-related issues.
safe & secure
3,673,294 people have downloaded it

Want to Uninstall Google Play Service from Vivo X100? Here is How
In this article, you will learn the pros and cons of uninstalling Google Play services, as well as a free root tool to help you do this.
Acts as a one-stop destination to download various kinds of apps from the Play Store. The Play service also provides a way to manage these apps without much hassle. From uninstalling to updating an app, all of this can be done with Google Play service. Nevertheless, there are times when users wish to uninstall Google Play services. To start with, it takes a lot of storage and makes it pretty tough for users to manage their devices. To help you, we will let you know how to uninstall Google Play Store in this informative post.
 Epubor Audible Converter for Mac: Download and convert Audible AAXC/AA/AAX to MP3 with 100% original quality preserved.
Part 1: Reason you might want to get rid of Google Play Service
Before we proceed and discuss different ways on how to update Play Store after uninstalling updates, it is important to cover the basics. We have heard plenty of users who wish to uninstall Google Play services, but are not sure of the repercussions. One of the main reasons is that it consumes a lot of space on phone’s storage. Not just that, it only consumes plenty of battery as well.
If your device is giving the insufficient storage warning, then you need to start by clearing your phone’s data. It is observed that the Google Play Service accumulates most of the data in a device. This leads to users looking for different ways to how to uninstall Google Play Store.
Part 2: What will it affect to uninstall Google Play Service?
If you think that Google Play Service only provides a platform to download new apps, then you are wrong. It provides several other functions that might alter the way you use your smartphone. It is linked with other essential Google services as well, like Google Maps, Gmail, Google Music, etc. After uninstalling the Google Play Service, you might face trouble using various essential apps.
Furthermore, it might tamper with the overall functionality of your device as well. For instance, you could encounter network issues, messaging problems, app crashing, and more. Since the Play Service is closely associated with Android system, it might have a prominent effect on your phone. If you have a rooted device, then you can easily install custom ROM and resolve these issues. Though, for a non-rooted device, overcoming these problems could be a big hurdle.
Part 3: How to disable Google Play Service?
By now, you already know all the repercussions of getting rid of Google Play Services permanently. Before you learn how to update Play Store after uninstalling updates, be sure whether you wish to uninstall Google Play Services or not. You can also choose to simply disable the services as well. If you face any severe issue afterward, then you can always enable the services manually.
To disable the Google Play Services, just go to your phone’s Settings > Applications > All and open Google Play Services. You will get to know about the app’s detail and a few other options here. Just tap on the “Disable” button. It will generate another pop-up message. Confirm it by tapping on the “Ok” button. This will disable Google Play Services on your device. Later, you can follow the same drill to enable it as well.
 WinUtilities Pro
Now when you know how to uninstall Google Play Store on your device, you can easily customize it. Get rid of any kind of problem you are facing due to lack of storage or battery issues related to Google Play services after following these instructions. Feel free to drop a comment below if you face any setback while following this tutorial.

How To Revive Your Bricked Vivo X100 in Minutes
Vivo X100 has established a notable presence within the custom development arena. This trait holds for Vivo X100. Today, it’s still one of the most popular budget smartphones available. The popular smartphone offers the freedom to flash custom ROMs, attain administrative privileges, access countless customization options, and much more.
Yet, delving into these capabilities comes with its share of risks. The potential for your Vivo X100 to brick is high if you don’t know what you’re doing. This page teaches you how to unbrick your Vivo X100 if it happens.
Part 1. Potential Causes of a Vivo X100 Becoming Bricked
The factors that lead to your Vivo X100 to brick vary. The possible solutions also depend upon the underlying causes. At times, the manufacturer’s intervention remains the only viable remedy. Below are the most frequent causes of bricking.
- The presence of malicious malware can harm your Vivo X100. This can result in a ‘bricked’ state devoid of functionality.
- Altering the bootloader, system partition, or other critical software components risks triggering a bricking event.
- Bricking can also occur due to errors during the update process. Whether through automatic or manual downloads, any interruption during software updates can cause your Vivo X100 to brick.
- Using inappropriate methods when performing root access can also result in bricking. Performing root access is dangerous as it grants entry to the Vivo X100 device’s root directory housing the operating system.
Every Android device is susceptible to experiencing a system failure that leads to a bricked state. The risk remains consistent whether your device is from Vivo X100, Vivo X100, Vivo X100, or any other brand. That’s why it’s strongly advised against modifying their smartphones, especially when you don’t know what you’re doing.
Part 2. Techniques To Unbrick a Vivo X100
When faced with a bricked Vivo X100, below are various techniques to revive it. Whether through software resets or hardware interventions, these methods can help breathe life back into your device.
Discharge the Battery
A particular suggestion involves allowing the Vivo X100 device’s battery to discharge fully, enabling proper functionality of the Flash Tool software. This process typically spans a few days and is recommended by some specialists.
Perform a Factory Reset
Accessing the Vivo X100 device settings is impossible if your Vivo X100 bricks. For this reason, it is recommended to enter Recovery Mode. Here’s how.
- Step 1: Press and hold the Power button and select the Restart option. During the reboot, press the Volume Up and Power keys simultaneously.
 SwifDoo PDF 2-Year Plan
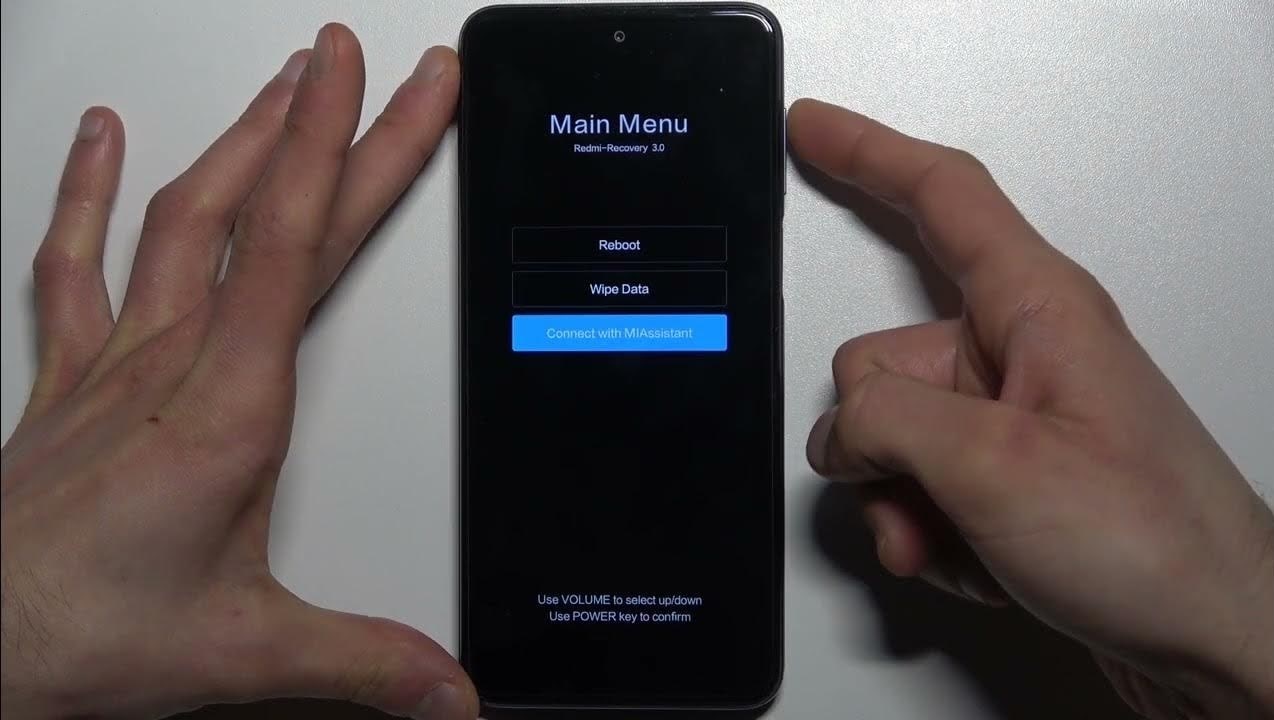
- Step 2: The main menu will show three options: Reboot, Wipe Data, and Connect with MIAssistant. Choose Reboot.
Explore Dedicated Software Tools To Fix Bricked Phones
Vivo X100 offers its official software tools, such as the Vivo X100Flash Tool. It’s designed for advanced users familiar with flashing firmware onto their devices. Here’s how.
- Step 1: Download and install the Vivo X100Flash Tool .
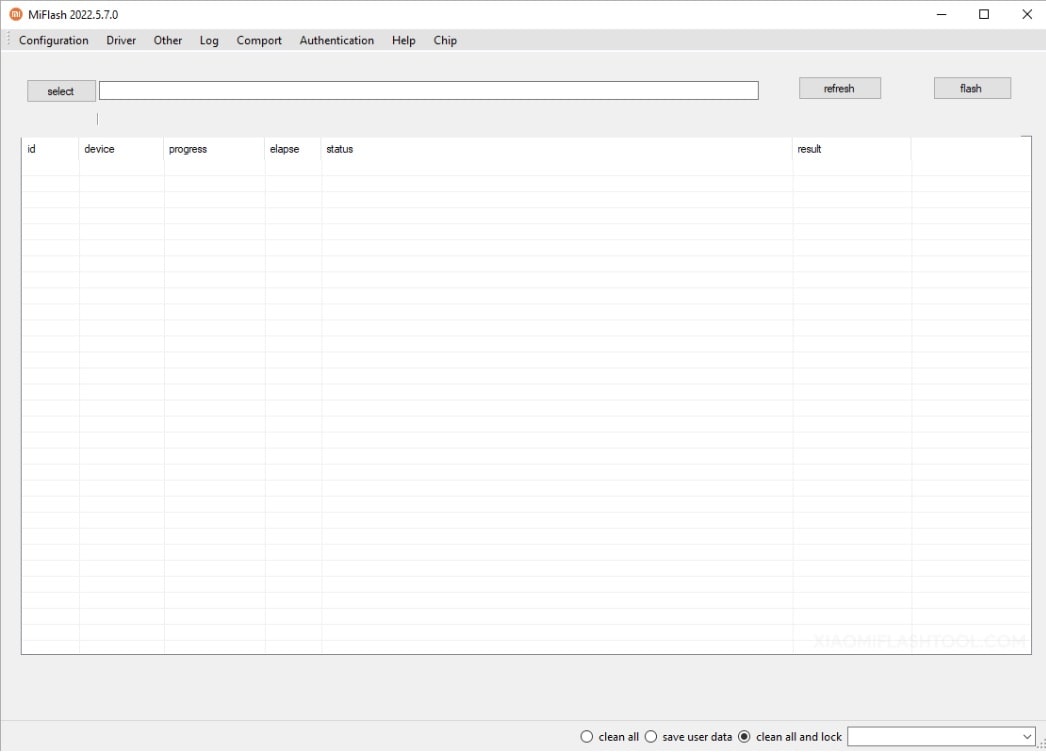
- Step 2: Download the Stock Firmware of Vivo X100 and extract it on your computer. Press and Hold the Power and Volume Down buttons for at least 5-10 seconds to enter Fastboot Mode.

- Step 3: Connect your Vivo X100 to the computer using a USB cable. Launch Vivo X100Flash Tool and locate the Firmware you have downloaded on the computer. Click the refresh > flash to begin the flashing process.
 Lyric Video Creator Professional Version
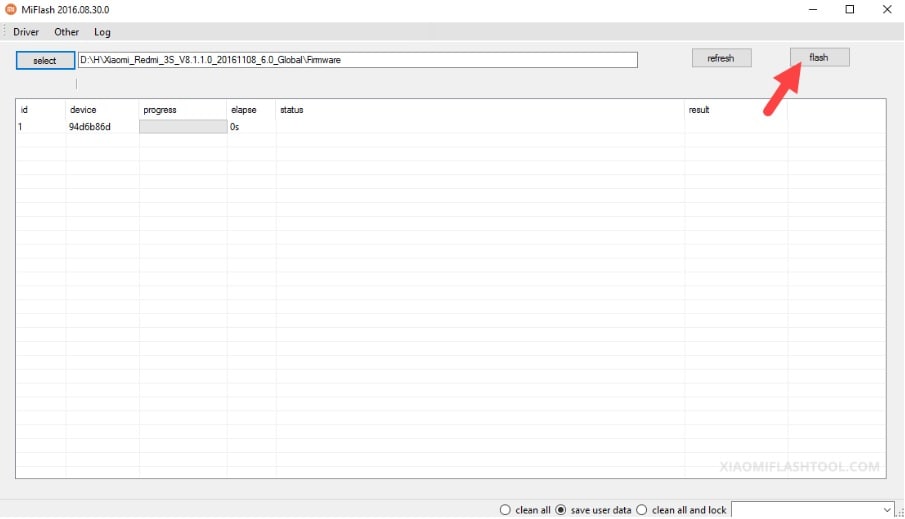
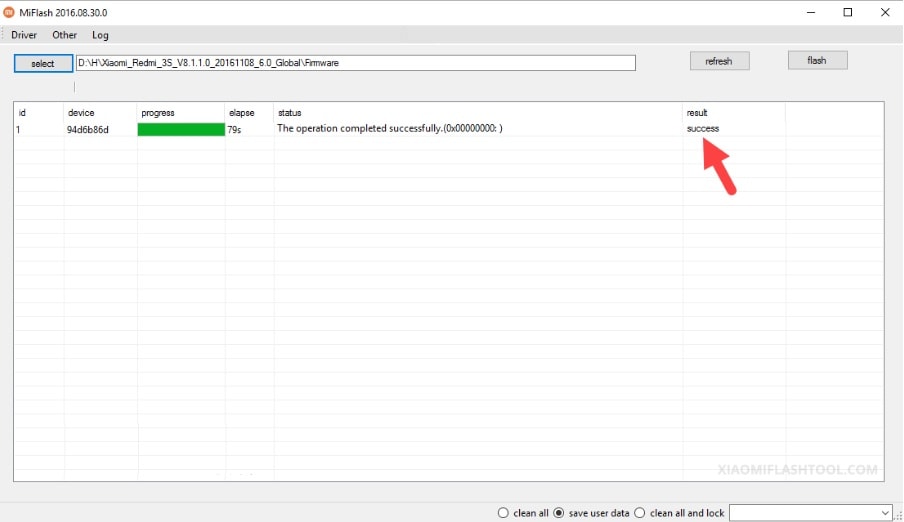
- Step 4: The SUCCESS result should appear in the Vivo X100Flash Tool once the flashing process is done.
However, if the Vivo X100Flash Tool did not unbrick your Vivo X100, consider using Wondershare Dr.Fone - System Repair (Android). The platform allows you to unbrick your Vivo X100 with a few clicks.

Part 3. Reviving Your Vivo X100 Using Wondershare Dr.Fone - System Repair (Android)
Dr.Fone - System Repair (Android) equips Vivo X100 users with the ability to tackle soft brick and hard brick issues. This specialized Android repair tool enables you to restore your Vivo X100 through a streamlined process, requiring just a few simple clicks.
safe & secure
3,227,773 people have downloaded it

Key Features
Dr.Fone - System Repair (Android) offers several benefits to unbrick your Vivo X100 easily. Below are its key features.
- Fix Common Vivo X100 Problems in Minutes. This tool provides comprehensive solutions for common issues like black screen, Play Store not working, boot loops, or even bricked Android devices .
- Compatibility with Over 1000 Android Models. This app fixes glitches across modern Android devices. The software is compatible with an extensive range of models. Whether your Vivo X100 is unlocked or carrier-bound, restoration is not a problem.
- Unparalleled Software Flexibility. Dr.Fone - System Repair (Android) also boasts an added capacity to mend iOS devices. This versatile tool is your all-inclusive solution for mobile devices, ensuring convenience whether you own an iOS or Android device.
Advantage of Dr.Fone - System Repair (Android) for Unbricking Vivo X100
Here are three benefits to choosing Dr.Fone - System Repair (Android) for unbricking a Vivo X100. You’ll further believe Dr.Fone is a reliable assistant when reviving your bricked Vivo X100.
Simplified Firmware Management
Dr.Fone eliminates the tedious search for appropriate firmware when unbricking your Vivo X100. The platform automatically downloads the correct firmware for your device. The hassle of identifying and manually procuring firmware is removed, saving time and ensuring a smoother unbricking process.
User-Friendly Approach
One of Dr.Fone’s key strengths is its user-friendly design. It caters to users with varying levels of technical expertise by employing a step-by-step process. This approach guides users through the repair process with clarity. It reduces the requirement for advanced technical knowledge.
Free Version for Evaluation
Dr.Fone - System Repair (Android) offers a free version for everyone. It allows users to test its capabilities before committing to a purchase. This trial version grants users the opportunity to assess the tool’s effectiveness and suitability for unbricking their Vivo X100. This instills confidence before investing in a full license.
How To Unbrick Vivo X100 Using Dr.Fone - System Repair (Android)
Dr. Fone’s features are perfect for unbricking Vivo X100 devices. Below are the procedures to restore your Vivo X100 from its bricked state.
![]()
Dr.Fone - System Repair (Android)
Repair Android System Errors without Any Trouble.
- Fix your Android to normal, no skills required.
- Fix various Android system issues, stuck in boot loop , black screen , or won’t turn on , looping on start, etc.
- The high success rate in resolving Android system issues.
- Compatible with a wide range of Android devices and OS versions
- User-friendly interface with easy-to-follow steps.
3981454 people have downloaded it
- Step 1: Download and install Dr.Fone - System Repair (Android) on your computer. After launching the application, click System Repair. Then, click Android as the Vivo X100 device type. Connect your Vivo X100. Indicate Phone Brick as the Android issue and initiate the process by clicking Start.

- Step 2: Select the appropriate device information corresponding to your Vivo X100. Choose Brand, Name, Model, Country, and Carrier. Confirm by checking the I agree button, then proceed to the next step by clicking Next.
- Step 3: Given that the Vivo X100 lacks a Home button, click the Phone without Home button option. Follow the prompts displayed on-screen and proceed by clicking Next to initiate the process of restoring your bricked phone.

- Step 4: As your Vivo X100 enters Download Mode, the firmware download will start automatically. Follow the on-screen instructions. Wait for the system to initiate the repair procedure automatically. Upon completion, a message will pop up on the main window. Click Done to exit the tool. You can click Try again to repeat the process if needed.

You May Also like:
How To Fix iPhone Bricked After iOS 17/iOS 16/iOS 15 Update
How to Fix It If Your Vivo X100 Phone Got Bricked?

Conclusion
Don’t let a bricked Vivo X100 stand in your way. Use the array of techniques from basic troubleshooting to advanced software tools to breathe life back into your device. Unbrick your Vivo X100 to its full functionality using the methods provided or Dr.Fone’s adept assistance.
Lastly, you can still refer to Vivo X100 for repairs. It remains the primary solution in numerous cases. Utilizing your warranty can alleviate the associated costs. Seeking assistance from a specialized technician is also a viable route to consider for a thorough device assessment.
- Title: Best Methods for Vivo X100 Wont Turn On | Dr.fone
- Author: Ariadne
- Created at : 2024-07-30 09:42:10
- Updated at : 2024-07-31 09:42:10
- Link: https://howto.techidaily.com/best-methods-for-vivo-x100-wont-turn-on-drfone-by-drfone-fix-android-problems-fix-android-problems/
- License: This work is licensed under CC BY-NC-SA 4.0.