
Bricked Your Nokia C110? Heres A Full Solution | Dr.fone
Bricked Your Nokia C110? Here’s A Full Solution
A bricked phone is a device that won’t turn on no matter what you do and everything you try to do to fix it doesn’t work. Most people will tell you that there is really nothing you can do to fix a bricked device. But with the right information, the right buttons to push and useful additional software you can actually try to fix a bricked device.
In this article we are going to look at how you can fix your device if you are sure it is bricked, how to rescue the data on your bricked device and even how you can avoid this situation in the future.
Part 1: Rescue the data on your Bricked Android Phone
Before we can learn how to fix a bricked device, it is important that you are able to save the data that is on the Nokia C110 device. Having the data saved somewhere else will be the added insurance you need in case anything goes wrong during the process. There are very few software solutions in the market to help you get back data from a bricked device. One of these and the most reliable is Wondershare Dr.Fone - Data Recovery (Android) .
Dr.Fone - Data Recovery (Android)
World’s 1st Android smartphone and tablet recovery software.
- Recover data from broken Android in different situations.
- Scan and preview files before starting the retrieval process.
- SD card recovery on any Android devices.
- Recover contacts, messages, photos, call logs, etc.
- It works great with any Android devices.
- 100% safe to use.
4,771,974 people have downloaded it
How to Use Dr.Fone - Data Recovery (Android) to Rescue Data from a Bricked Android
If your device is completely unresponsive, don’t worry Dr.Fone can help you get all the data back. Simply follow these steps to gain access to the Nokia C110 device and recover all your data.
Step 1: Download and install Wondershare Dr.Fone to your PC. Launch the program and then click on Data Recovery. Select the data types you would like to recover and then click on Next.


Step 2. Select the issue type for your phone. Choose from “Touch screen not responsive or cannot access the phone” or “Black/broken screen”.

Step 3: In the next step, you need to select your device model. If you don’t know the model of your device click on “How to check the Nokia C110 device model” to get help.

Step 4: The next screen will provide instructions on how to enter “Download mode.” Connect the Nokia C110 device to your PC once it is in “Download Mode”

Step 5: The program will begin an analysis of your device and then download the recovery package.

Step 6: Then Dr.Fone will display all the recoverable file types. You can click on the files to preview them. Select the ones you need and click on “Recover to Computer” to save them to your computer.
Part 2: How to Fix Your Bricked Android Phone
Android devices are usually very flexible in allowing users to flash ROM but sometimes an incorrect process can result in a bricked device. While there are few solutions to this problem, here are a few things you can do;
When the Nokia C110 device Boots Straight into Recovery
If the Nokia C110 device can boot to the recovery screen, you can find an alternative ROM to install and copy it your device. Installation can then be done in the recovery menu. If the Nokia C110 device is booting to recovery mode there is a chance that it can be fixed.
Step 1: Load up Clockworkmod or any other recovery tool that you have been using.
Step 2: Once you are in, navigate to the “Reboot system now.” If you are using Clockworkmod, this should be your first option. Hopefully everything will work just right if you do this, If it doesn’t you may need to download and re-flash the ROM again.

When the Nokia C110 device won’t stop rebooting
Here’s what to do if the Nokia C110 device wont stop rebooting.
Step 1: Turn off the Nokia C110 device and then reboot in recovery mode.
Step 2: Go to “Advanced” which will bring up a number of options to choose from.
Step 3: One of the options should be “Wipe Dalvik cache” select this option and then follow the instructions. When finished select “Go Back” to return to the main menu.


Step 4: Go to the “Wipe Cache Partition” and select it.
Step 5: Go to “Wipe data/ factory reset.”

Step 6: Finally reboot the Nokia C110 device by selecting “Reboot system now.” This should fix the problem. You may also want to flash the same ROM or try a new one.
If the above methods don’t work, try one of the following options.
You can return to resource where you found the flash tools and search or ask for advice
Sometimes these errors can be caused if the ROM installation was performed via SD card. In this case reformatting the SD card might help.
If all else fails, it is time to returning the Nokia C110 device to the vendor if your warranty is still applicable.
Part 3: Useful Tips to avoid Bricking your Android Phone
If you are planning on installing custom ROM you need to install Custom Recovery. This will enable you restore the Nokia C110 device to its original settings should anything go wrong and hopefully help you avoid bricking your device.
- Ensure that you are familiar with the Fastboot or ADB commands before doing anything. You should know how to recover your device by flashing a command line and also manually transfer important files to your device.
- Make a backup of your device. This is obvious but most people fail to adhere to it. At the very least you can get back all your files and settings to transfer to a new phone.
- Keep a full Nandroid backup on your phone
- Keep another backup on your PC which you can access should anything go wrong with the Custom ROM installation
- Know how to hard reset your device. It may come in handy when your device freezes on you.
- You should also consider enabling USB debugging. This is because many solutions for a Bricked device rely on USB debugging.
- Ensure the Custom ROM you choose can actually be used on your device model.
While installing Custom ROM can actually be a great way to customize your device, it is also the leading reason for bricked devices. Therefore ensure that you understand what you are doing when you decide to customize your device. Learn as much as you can about the process before attempting everything.
 CollageIt Pro
Nokia C110 Bootloop Problem, How to Fix it Without Data Loss
Have you, like many other users, faced the bootloop Android problem and wondered what exactly is Android boot loop. Well, Android boot loop is nothing but an error that makes your phone switch on itself every time you manually turn it off. To be precise, when your Nokia C110 does not remain switched off or powered off and starts to boot up automatically after a few seconds, it might be stuck in the boot loop Android.
An Android boot loop is a very common problem and is one of the first symptoms of a soft-bricked device. Also, when your device is experiencing Android boot loop issue, it does not start normally to reach the Home or Locked Screen and remains frozen at the Nokia C110 device’s logo, Recovery Mode or a lit-up screen. Many people fear losing their data and other files due to this error and thus, it is a very confusing situation to be in.
We understand the inconvenience caused, therefore, here are ways to tell you how to fix the bootloop problem in Android devices without losing any important data.
However, before moving on, let us learn a little about the causes for the Android boot loop error.
Part 1: What might cause the bootloop issue on Android?
Android boot loop error might seem weird and unexplainable but it occurs because of some specific reasons.
Firstly, please understand that it is a misnomer that boot loop error occurs only in a rooted device. Boot loop Android error can also occur in a stock device with the original software, ROM, and firmware.
In a rooted device, changes made, such as flashing a new ROM or customized firmware which are not compatible with the Nokia C110 device’s hardware or existing software, can be blamed for the boot loop problem.
Moving on, when your device’s software is unable to communicate with the system files during the start-up process, Android boot loop problem may arise. Such a glitch is caused if you have recently updated the Android version.
Also, corrupt App update files may also cause the bootloop Android issue. Apps and programs downloaded from unknown sources bring in a particular type of virus that prevents you from using your device smoothly.
All-in-all, Android boot loop error is a direct outcome of when you try to tamper with your device’s internal settings.
Hence, if you are looking for ways to guide you about how to fix boot loop issue, you will have to revamp the Nokia C110 device internally by either resetting it or adopting a recovery method.
Read on to know more about how to fix the bootloop error without any data loss when your device suffers from the bootloop Android problem.
 PearlMountain Image Converter
Part 2: One click to Fix Android Bootloop without factory reset
If you are trying to figure out how to fix boot loop, the first option you have is the one-click fix to Android Bootloop which involves using the Dr.Fone - System Repair software.
This is designed to repair any data corruption on your device and restores your firmware to its usual working condition.
 PaperScan Professional: PaperScan Scanner Software is a powerful TWAIN & WIA scanning application centered on one idea: making document acquisition an unparalleled easy task for anyone.
Dr.Fone - System Repair (Android)
One click to fix boot loop of Android
- #1 Android repair solution from your PC, can fix a wide range of Android system issues, such as boot loop, black screen, etc.
- The software requires no technical expertise, and anybody can use it
- A one-click solution when learning how to fix Android boot loop
- Not require root Android phones.
- Works with most Nokia C110 devices, including the latest Nokia C110 phones like S22
- Simple and easy-to-use user interface
4,689,059 people have downloaded it
To help you get started, here’s a step-by-step guide on how to use Dr.Fone - System Repair.
Note: This method can erase data on your device, including your personal files, so make sure you’ve backed up your device before proceeding.
Step #1 Download the Dr.Fone - System Repair software from the website and install it onto your computer.
Open the software and select the System Repair option from the main menu to fix the Android bootloop error.

Step #2 Connect your Nokia C110 to your computer using the official cable and select the “Android” option from the three menu items. Click “Start” to confirm.

You’ll then need to input the Nokia C110 device information, such as your carrier info, device name, model, and country/region in order to ensure you’re downloading and repairing the correct firmware to your phone.

Step #3 Now you’ll need to put your phone into Download Mode to remove the Android bootloop.
For this, you can simply follow the onscreen instructions for both phones with and without home buttons.

Click “Next”, and the software will begin downloading the firmware repair files.

Step #4 Now you can sit back and watch the magic happen!
Make sure your computer stays connected to the internet, and your device stays connected to your computer throughout the entire process. Once the firmware has been downloaded, it will be automatically installed onto your mobile device, removing the boot loop Android error.


You’ll be notified when the process is done and when you can remove your device and start using free from the boot loop Android error!

 safe & secure
Part 3: Soft reset to fix Android bootloop issue
When your device is stuck in Android boot loop, it does not necessarily mean that it is bricked. Boot loop might be occurring due to a simpler problem which can be fixed by turning off your device. This sounds like a home remedy for a serious problem but it works and resolves the problem most of the time.
Follow the steps given below to soft reset your device:
Turn the Nokia C110 device off and take out its battery.

If you cannot take the battery out, let the phone be off for about 3 to 5 minutes, and then turn it back on.
Simply performing a soft reset on your device can help you if you are looking for solutions for how to fix the bootloop issue. This a very useful method as it does not result in any kind of loss in data and protects all your media files, documents, settings, etc.
In case the Nokia C110 device does not turn on normally and is still stuck in the bootloop Android problem, be prepared to use the troubleshooting techniques given and explained below.
Part 4: Boot into Safe Mode to fix Android boot loop

Booting your Nokia C110 into Safe Mode is a useful troubleshooting step to fix boot loop issues caused by third-party apps. When in Safe Mode, the Nokia C110 device will start up with only essential system apps, and any downloaded apps that might be causing conflicts won’t run. Here’s how you can boot your Nokia C110 into Safe Mode to address the boot loop problem:
Step 1: Power Off Your Device
Hold down the power button until it turns off completely.
Step 2: Access Safe Mode
To enter Safe Mode, follow these steps based on your device model:
- For most Android devices: Press and hold the power button to turn on your device. As soon as the manufacturer’s logo appears, press and hold the Volume Down button until the Nokia C110 device finishes booting. You should see “Safe Mode” displayed in the bottom left or right corner of the screen.
- Some devices might require slightly different key combinations. Refer to your device’s user manual or perform an online search for the specific method to enter Safe Mode for your model.
Step 3: Observe the Nokia C110 device
Once your device has booted into Safe Mode, use it for a while to see if the boot loop issue persists. If the boot loop doesn’t occur in Safe Mode, it indicates that the problem is likely caused by a third-party app.
Step 4: Identify and Uninstall Problematic Apps
Now that you’re in Safe Mode, it’s time to identify the troublesome app. Start by uninstalling recently installed apps one by one until the boot loop problem is resolved. After each uninstallation, restart your device normally to check if the boot loop still occurs. Continue this process until you find the problematic app.
Step 5: Restart Normally
Once you’ve identified and uninstalled the problematic app, restart your device normally to exit Safe Mode. Your Android device should now start up without getting stuck in a boot loop.
By following these steps and using Safe Mode to isolate problematic apps, you can effectively troubleshoot and resolve boot loop issues on your Nokia C110.
Part 4: Factory reset to fix Android bootloop issue
Factory reset, also known as Hard Reset, is a one-stop solution for all your software resulting in issues. Android boot loop being such problem, can be easily overcome by performing a factory reset.
Please note that all your device’s data and settings will be deleted by adopting this method. However, if you have a Google account signed in on your Nokia C110, you will be able to retrieve most of your data once the Nokia C110 device turns on.
To factory reset your Android boot loop device, you must first boot into the Recovery Mode screen.
To do this:
Press the volume down button and power button together until you see a screen with multiple options before you.

When you are at the Recovery Mode screen, scroll down using the volume down key, and from the options given, select “Factory Reset” using the power key.

Wait for your device to perform the task and then:
Reboot the phone in Recovery Mode by selecting the first option.

This solution is known to fix the boot loop error 9 out of 10 times, but if you still can’t start your Nokia C110 normally, consider using a CWM Recovery to resolve the Android boot loop issue.
Part 5: Use CWM Recovery to fix bootloop on rooted Android
CWM stands for ClockworkMod and it is a very popular custom recovery system. To use this system to solve the boot loop Android error, your Nokia C110 must be rooted with CWM Recovery System which basically means CWM must be downloaded and installed on your device.
Furthermore, to use CWM Recovery to fix boot loop on rooted Android devices, follow the steps given below:
Press the home, power, and volume up buttons to launch the CWM Recovery screen.
Note: you might have to use a different combination of keys to enter into Recovery Mode, depending on your device’s model.

Scroll down using” the volume key to select “Advanced”.

WPS Office Premium ( File Recovery, Photo Scanning, Convert PDF)–Yearly

Now select “Wipe” and choose to wipe “Dalvik Cache”.

In this step, select “Mounts and Storage” to click on “Wipe” or “Cache”.
Once this is done, make sure to reboot your Nokia C110.
This process with successfully fix the Android boot loop error and not cause any loss of data stored on your device stuck in boot loop.
So the bottom line is that boot loop Android issue may seem like an irreparable error but it can be resolved by carefully following the techniques explained above. These methods not only tell you how to fix the bootloop problem but also prevent it from occurring in the future.
An Android boot loop is a common phenomenon with all Android devices because we tend to tamper with our device’s internal settings. Once the ROM, firmware, kernel, etc are damaged or rendered incompatible with the Nokia C110 device’s software, you cannot expect it to function smoothly, hence, the boot loop error occurs. Since you are not the only one suffering from the Android boot loop problem, be rest assured that the ways, given above, to combat it are recommended by users facing similar troubles. So, don’t hesitate and go ahead to try them on.

safe & secure
 DLNow Video Downloader
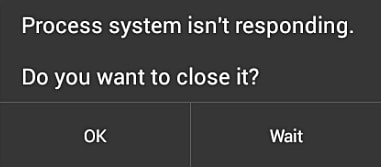
9 Solutions to Fix Process System Isn’t Responding Error on Nokia C110
The “Process system isn’t responding” is a common error that occurs in almost every kind of Android device. Even though most Android smartphone manufacturers have taken a huge leap in the last few years, the operating system still suffers from a few pitfalls. The process system isn’t responding Android is one of those errors that have been reported plenty of times. I definitely understand encountering the ‘Process System Isn’t Responding’ error on your Nokia C110 can be frustrating.
However, there are several straightforward methods to resolve this issue. This article will provide a step-by-step guide on how to fix the problem and restore your device to normal functionality.
Before solving any Android system issues, try this Android backup software to take a full backup, in case any data loss happens.
Part 1: Reasons for process system isn’t responding error
There could be plenty of reasons for getting the process system is not responding in Android.
- Software Glitch: Android systems may experience temporary glitches due to factors like memory management issues, conflicts between apps or services, or system updates.
- Insufficient System Resources: Low system storage is another reason for getting the error. If you have too many apps on your phone, then it might take a toll on its memory and generate the “process system isn’t responding” prompt.
- Third-Party Apps: Users have also complained that they receive the “Android process system is not responding” error after installing a new app. If you have installed an app from a source other than Google Play Store, then the chances are that you can get this error. Though, even after installing an app from Play Store, there is a bleak probability of facing this issue as well.
- Outdated Software: Using outdated apps, particularly system apps or critical components, may lead to compatibility issues with the latest Android version.
- System Updates: Most of the time, it happens whenever a device is restarted after updating its Android version. Your device could have undergone a bad update or might have had an unsupported driver. This can result in the occurrence of process system not responding issue.
- Corrupt Cache Files: Corrupted cache files can lead to conflicts and result in error.
- Overclocking or Modifications: Rooting or modifying the Android device, or applying overclocking settings, can lead to instability and the process system not responding error.
- Hardware Issues: Rarely, hardware problems like failing components can interfere with the proper functioning of the system.
No matter what the cause is, there are plenty of ways to overcome this issue. We have listed a handful of them in this post.
Part 2: How to Fix Android Process Not Responding? 8 Fixes
When this error occurs, it can disrupt the normal operation of the Nokia C110 device, causing apps to freeze or crash. Fortunately, there are several effective methods to address this problem.
Fix 1: Restart your device
This is one of the easiest ways to resolve the process system not responding error. If you are getting this error on your phone, then try to manually restart your device. The way to restart your phone might differ from one device to another. Mostly, it can be done by long-pressing the power button. This will provide different power options. Tap on the “Reboot” one to restart your phone.
 OtsAV Radio Webcaster
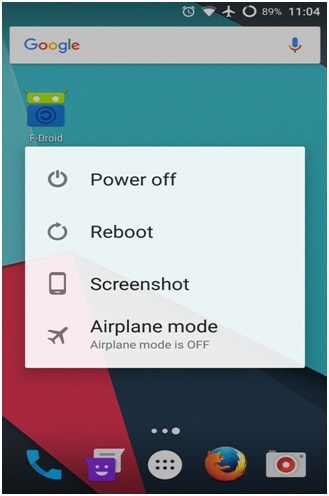
If it won’t work, then long press the Power and Volume up buttons at the same time until the screen goes off. Afterward, use the power button again to turn it on.
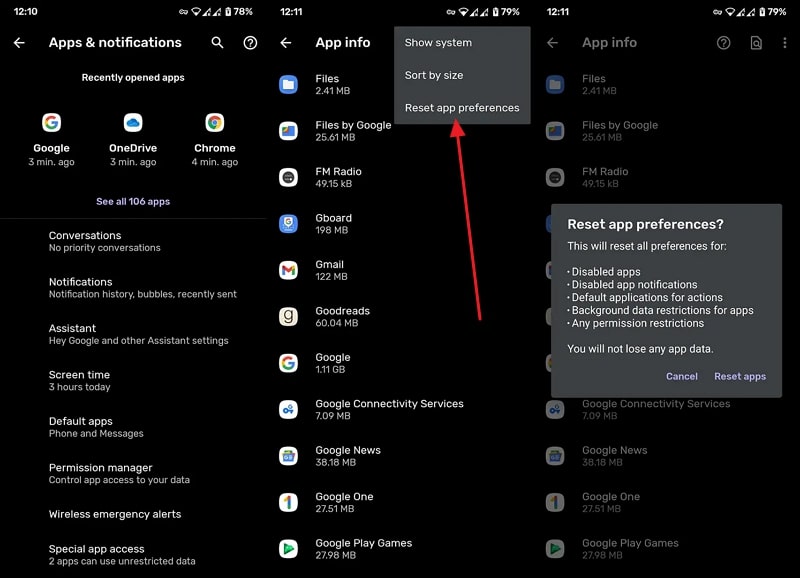
Fix 2: Reset App Preferences
Sometimes the apps interfere with the Nokia C110 device’s settings because they were given permission to access specific functions. It is recommended to allow the asked permission precisely because some suspicious apps can also steal your sensitive data. Here are the straightforward instructions you need to follow to reset the app preferences:
Proceed to the “Apps and Notifications” settings from the Settings app. Next, tap the “See All Apps” option and access the “Three Dots” menu. Here select the “Reset App Preferences” option and confirm the process from the confirmation pop-up.
 Screensaver Factory, Create stunning professional screensavers within minutes. Create screensavers for yourself, for marketing or unlimited royalty-free commercial distribution. Make screensavers from images, video and swf flash, add background music and smooth sprite and transition effects. Screensaver Factory is very easy to use, and it enables you to make self-installing screensaver files and CDs for easy setup and distribution. Screensaver Factory is the most advanced software of its kind.
Fix 3: Free Up Space to Make Sure Android Have Enough Internal Memory
In case the Android internal memory is completely filled, it will slow down the processing speed of the Nokia C110 device. Internal memory is vital for the Nokia C110 device to run all the background apps or the process required by the OS to run the Nokia C110 device efficiently. You can follow these steps to free up some space on your Nokia C110:
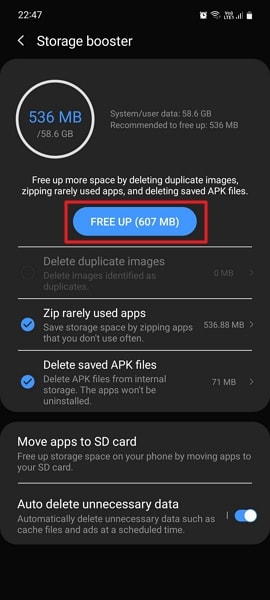
Step 1: Open the Settings app on your Nokia C110 and access the “Battery and Device Care” option by scrolling down. Next, tap on the “Three Dots” from the top right corner and choose the “Storage Booster” feature.

Step 2: Following this, you can select the data you want to remove from the internal memory. Your device will show the space it will free up for you, and you can press the “Free Up” button to free up the storage.
Fix 4: Enter Safe Mode to Uninstall Suspicious Apps
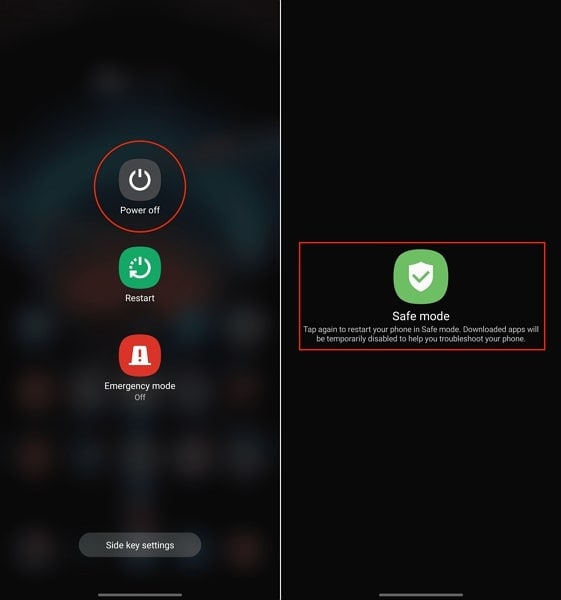
This issue can also occur if you have installed an app from the Google Play Store with a very low rating or an APK. Unlike Apple App Store, anyone can easily upload their mobile apps on Play Store, so it is important to check the app’s credibility before installing it. Following are the simplified instructions to enter the safe mode and delete all suspicious applications:
Press and hold the “Power” button of your Android and press and hold the “Power Off” option to access the “Safe Mode” feature. Afterward, confirm to enter the safe mode and remove all the suspicious apps from the Nokia C110 device. You can do this by holding on to the app and selecting the “Uninstall” option from the pop-up options.

Fix 5: Update All Apps on your Device
Updating the apps is crucial for any Android device to work with high efficiency and performance. Apps are developed to make the users’ daily tasks easy to execute. However, there might be some negligence in the development, which can leave some bugs in the app. These bugs are fixed with time by releasing the new version of the app. To update your Android app, proceed with the following step-by-step instructions:
Step 1: Locate the Play Store from the Android home screen and access it. Then, tap the “Profile” icon from the top right corner and proceed to the “Manage apps and devices” option. Afterward, you can check how many app updates are available from the “Updates available” option. To update the apps, you will have to go inside this option.
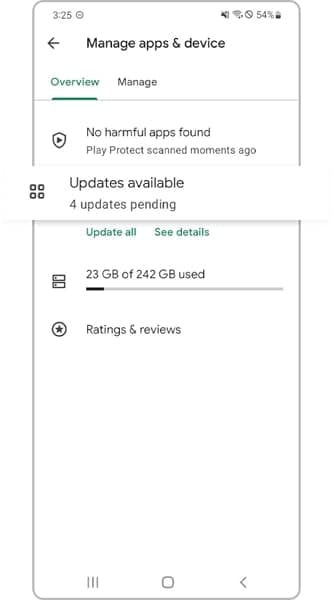
Step 2: You can tap on the “Update All” button if you want to update all the apps one by one. Otherwise, you can press the “Update” option adjacent to each app name to update the frequently used ones.

Fix 6: Check the SD card
If you are still getting the process system isn’t responding to Android error, then chances are that there could be an issue with your SD card. Firstly, check if your SD card is working fine or not. If it is corrupted, then get another memory card for your phone. Also, it should have a prominent amount of free storage. You might be facing this issue if the SD card has limited free space.
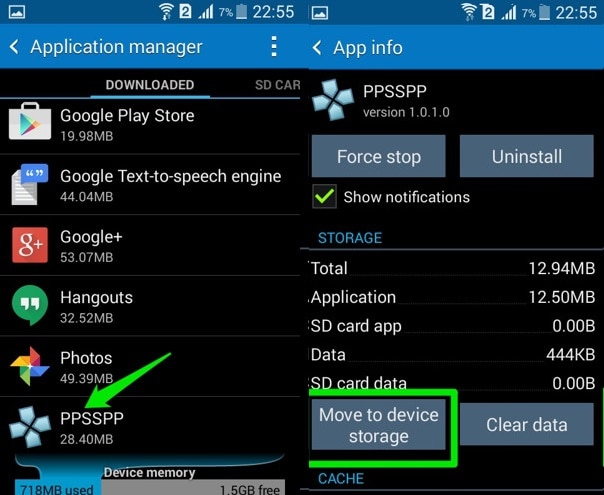
Also, if you are storing apps on the SD card, then your phone might encounter the process isn’t responding issue whenever you run a respective app. Therefore, you should move apps from your SD card to the phone’s internal memory. To do this, go to your phone’s Settings > Application Manager and select any app. If the app is stored on the SD card, then you will get an option of “Move to devise storage”. Just tap on it and manually move every app to your device storage.
Fix 7: One click to fix the process system isn’t responding error
If all the above tricks don’t get your device out of the process system not responding state, then there may be some system issues on your Android. In this case, an Android repair can successfully fix issues like process system isn’t responding.
Note: Android repair may wipe out existing Android data. Back up your Android data before going on.
Dr.Fone - System Repair (Android)
Android repair tool to fix all Android system issues in one click
- Fix all Android system issues like the black screen of death, system UI not working, etc.
- One-click for Android repair. No technical skills are required.
- Supports all the new Nokia C110 devices like Galaxy S8, S9, S22, etc.
- Step-by-step instructions are provided. Friendly UI.
3981454 people have downloaded it
Follow the easy steps below to fix process system isn’t responding error:
- 1. Download and install the Dr.Fone tool. Then select “System Repair” from the main window.
- 2. Connect your Nokia C110 to the PC. After the Nokia C110 device is detected, select the “Android” tab.
- 3. Select and confirm the correct device details of your Android. Then boot your Nokia C110 in download mode and proceed.
 /a>
/a>
- 4. Download the firmware and click “Fix Now”.

- 5. After a while, your Android will be repaired with the “process system isn’t responding” error fixed.


safe & secure
It is always considered the most used way to factory reset your phone in order to resolve the process system not responding error. Though, this should be your last resort, as it will wipe off your device’s data entirely. Even if you are performing a factory reset, make sure that you back up your data by using a reliable tool like Wondershare Dr.Fone .
Wondershare Dr.Fone
Flexibly Back up and Restore Android Data
- Back up Android data to the computer with one click.
- Preview and restore selectively the backup to any Android device.
- Supports 8000+ Android devices.
- There is no data lost during backup, export, or restoration.
3,981,454 people have downloaded it
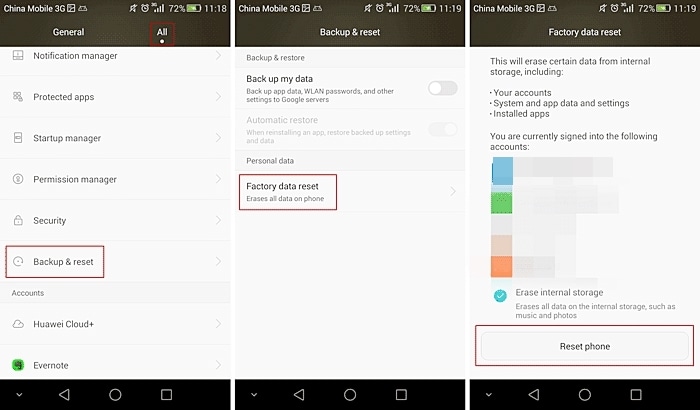
If your phone is functioning, then you can easily factory reset it by visiting Settings > General > Backup & Restore and selecting the option of “Factory Data Reset”. Your device will display a warning regarding all the data files that would be lost or un-synced. Just tap on the “Reset” button to factory reset your device.
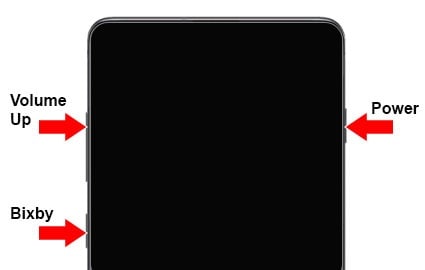
If your device is not functioning or locked, then you can perform the factory reset operation by putting your phone into Recovery mode. Most of the time, it can be done by pressing the Power and Volume up button simultaneously for at least 10 seconds. Though, the key combinations might change from one device to another.
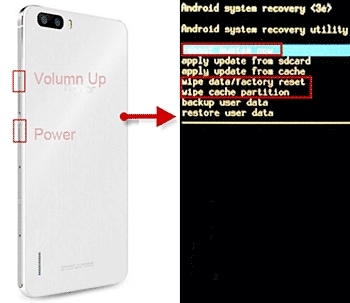
After entering the Recovery mode, go to the “wipe data/factory reset” option using the Volume up and down button. Use the Power button to make a selection. If you get an additional message, then select the “yes – delete all data” option. When it is done, you can simply reboot your device.
 SwifDoo PDF Perpetual (2-PC) Free upgrade. No monthly fees ever.
Fix 9: Unroot the Nokia C110 device
It has been further discovered that the process system isn’t responding error is more common in rooted devices. Therefore, if you also have a rooted Android device, then you can choose to unroot it in order to fix this issue. There are different ways to unroot an Android device. One of the easiest ways to do it is by using the SuperSU app.
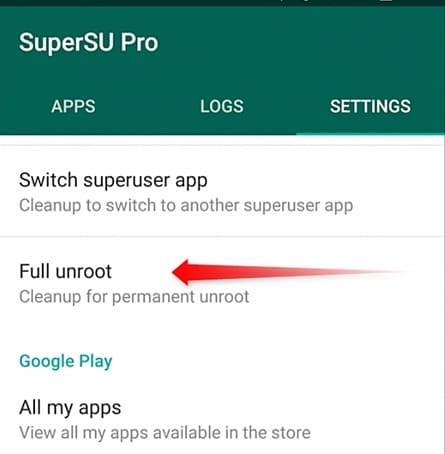
You can always download either SuperSU or SuperSU Pro app from its website here . Simply install it on our device and launch it whenever you wish to unroot it. Visit its “Settings” tab and select the option of “Full unroot”.
 NeoDownloader - Fast and fully automatic image/video/music downloader.
This will generate a warning message regarding all the repercussions of the unrooting process. Just tap on “Continue” to initiate the process.

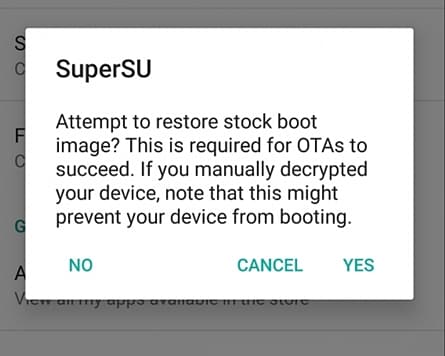
If you are using an older version of Android, then you might get another pop-up to restore boot images. Simply make the desired selection and start the process. After a while, your device would be restarted the usual way, and it would be unrooted. Most probably, this will resolve the process system isn’t responding error as well.
Now that you know different ways to fix the process system not responding error, you can easily overcome this issue and make the most out of your device. Simply start with the easy fixes, and if they don’t work, then take extreme measures like unrooting your device or restoring it to factory setting. Also, make sure to back up your data before taking any extreme measures.
- Title: Bricked Your Nokia C110? Heres A Full Solution | Dr.fone
- Author: Ariadne
- Created at : 2024-07-30 09:45:48
- Updated at : 2024-07-31 09:45:48
- Link: https://howto.techidaily.com/bricked-your-nokia-c110-heres-a-full-solution-drfone-by-drfone-fix-android-problems-fix-android-problems/
- License: This work is licensed under CC BY-NC-SA 4.0.